1
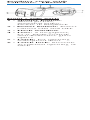
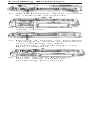
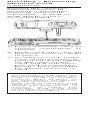
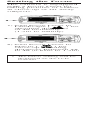
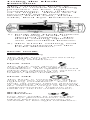
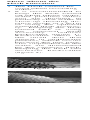
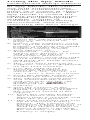
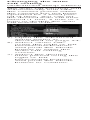
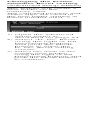
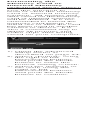
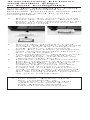
Mini II (SL330)
Waterproof
Shockproof
Digital Dive
& Sports Camera
Instruction Manual
Smart Phone Format
For Español, Deutsch,
Français, Italiano and
Nederlands, please visit:
www.sealife-cameras.com/service/manuals.html
Contents
Safety Warnings ................................3
Check What You Got..........................4
Optional Accessories ........................5
Product view with
call-outs: FRONT..............................6
Product view with
call-outs: BACK ................................7
Product view:
Bottom / Waterproof Door ................8
Opening Waterproof Door ................9
Closing Waterproof Door ................10
Loading Batteries ............................11
Inserting /Removing Memory Card ..12
Taking a Picture (Camera Mode) ......13
Recording a Video (Video Mode) ....14
Viewing Pictures and Video Clips
(Playback Mode) ..............................15
Deleting Pictures and Video Clips
(Playback Mode) ..............................16
Easy Set-up Mode ............................17
Using the Zoom Function ................19
Setting the Focus..............................20
Using the Flash Function ................21
More About the Flash Function........22
Using an External Flash
or Photo-Video Light........................23
Advanced Setup Menu ....................24
Changing the Language ..................25
Changing the Date/Time ..................26
Using the Spy Mode ........................27
Changing the Auto Off setting..........28
Changing the Beep setting ..............29
Changing the Display setting ..........30
Changing the Frame Number
Reset setting ....................................31
Changing the Light
Frequency setting ............................32
Changing the LCD Monitor
Brightness setting ............................33
Formatting the Memory Card or
Internal Memory ..............................34
Media and System Information ...... 35
Using the System Reset Function ....36
Using the Copy to Card Function .. 37
Transferring Pictures and Video Clips
to Your Computer ............................38
Editing Your Pictures
and Video Clips ..............................39
Maintaining a Waterproof Seal ........40
How to Clean the O-ring ................41
Replacing the O-ring ......................42
Maintenance and Care Instructions..43
Great Underwater pictures
made easy ..................................44-46
Troubleshooting Guide ....................47
Specifications ..................................48
Parts and Service ............................ 49
Safety Warnings
Always inspect and clean
the O-ring before underwater use. Follow the
important waterproofing
instructions on page 42 of
this manual.
If water has entered the
camera, immediately turn
off power and discontinue
use. Remove batteries and
memory card, and allow
the inside to dry. Contact
the SeaLife service center
for repairs.
Do not attempt to repair
the camera. Doing so may
result in electric shock, fire
and will void the warranty.
Use new or freshly
charged AAA-sized
batteries (Alkaline, NiMH
rechargeable or Lithium).
Remove batteries from
camera before transporting,
traveling or long periods of
storage.
Avoid exposing camera to
high temperatures or
direct sunlight for prolonged periods of time.
Safety first - Observe all
applicable safety rules
when using the camera for
SCUBA, snorkeling or
other sports.
Visit
www.sealife-cameras.com
for updates to this manual
and underwater
photography tips.
Check What You Got
SeaLife Camera SL330
(w/SL32070 strap)
Soft Camera
Case SL33090
SD/SDHC Card
Reader SL33010
Spare O-ring
SL33008
Cleaning Brush / Tool SL256
Two AAA Batteries
Warranty Statement
Flash Link Adapter SL33052
Optional Accessories
Available at your local
authorized SeaLife dealer. Visit
www.SeaLife.cameras.com to
find a dealer near you.
SDHC Memory Card
(Recommend 4GB card)
AAA batteries
(Recommend
Energizer Lithium)
SeaLife Mini Wide
Angle Lens SL973
For wide angle/ close-up
pictures from 1ft to 3ft
SeaLife Digital
Pro Flash SL961
underwater pictures
SeaLife Photo-Video Light
SL980
For brighter, more colorful
underwater pictures and videos
Moisture Muncher SL911
Insert two capsules inside
battery compartment during
storage to remove moist air
trapped inside camera
Float Strap SL920
Product view with
call-outs: FRONT
Front / Side parts
1 - Shutter button:
Shoot picture,
Start/Stop Video,
Delete in Playback
2 - Power button: Power
camera ON and OFF
3 - Flash window
4 - Lens: 9 megapixel,
F3.0, Multi-coated/
Anti-Reflective glass
optics
5 - Latch: For opening
waterproof door
6 - Latch lock: Prevents
accidental opening of
latch
Product view with
call-outs: BACK
Back parts
1 - Status LED: Camera
ready when solid; Not
ready when blinking
2 - Zoom/Directional
button: Adjust zoom
setting or scroll left/up
3 - Flash/Directional
button: Adjust flash
setting or scroll
right/down
4 - Strap connection
5 - Mode button: Push to
cycle through Camera,
Video, Playback and
Easy Setup modes. Push
and hold for 3 seconds
to access setup menu
6 - Waterproof Door:
Serial # located
inside door
7 - Tripod mount
(Standard 1/4-20
thread)
8 - Focus Lever:
Macro (close-up) or
Landscape
9 - LCD monitor
Product view:
BOTTOM /
Waterproof Door
Bottom / Waterproof
Door Parts
1 - Battery door: 2 x
AAA Batteries
2 - O-ring
3 - SD/SDHC memory
card slot
4 - Waterproof Door:
Serial # located inside
door
Opening Waterproof
Door
1) Push and hold red
latch lock tab away
from latch
2) Lift latch (Do not
force beyond
stopping point)
3) Push end of latch
away from door to
release door
4) Open waterproof
door
Closing
Waterproof Door
1) Push down on waterproof door and hold.
2) Push end of latch
over waterproof door
(Make sure latch is
unlocked as shown in
the illustration)
3) Close latch (Latch
lock will engage
automatically)
Important:
Before closing waterproof
door, make sure O-ring
and opposing contact surfaces are perfectly clean
(Refer to How to Maintain
a Waterproof Seal on Page
42). Make sure nothing is
trapped under the door to
prevent it from closing and
sealing properly.
Loading Batteries
1) Slide battery door cover
to unlock position.
2) Spring-loaded door
will open.
3) Insert 2 new or freshly
charged AAA batteries
according to the
polarity markings on
the camera.
4) Push down battery
door and slide to
locking position.
Inserting / Removing
Memory Card
(Optional)
Expand the camera’s
internal memory by
inserting a SD/SDHC
memory card (sold
separately). A 4GB or
8GB SDHC card is
recommended.
1) Insert memory card in
correct orientation as
shown.
2) Push card into slot all
the way until it clicks
in place.
3) To remove card, make
sure camera power is
turned off. Push lightly
on the edge of the
card and it will eject.
Use end of Cleaning
Brush / Tool provided
for easier removal of
card.
Notes: You should format
the memory card when it’s
first installed or when the
card is used in another
camera. Refer to page 35
for instructions on formatting the memory card.
Each 1GB of memory card
storage size is equal to
about 900 pictures or 30
minutes of video. For
example, 4GB card will
store about 3600 pictures
or 2 hours of video.
Taking a Picture
(Camera Mode)
1) Power ON camera.
2) One of the Camera
mode icons
[
]
is displayed
on the upper left
corner of the LCD
monitor.
3) Compose the image
on the LCD monitor,
hold the camera
steady and push the
Shutter button to take
a picture.
Notes:
• Refer to page 18 for more
information about the
four different camera
modes.
• The camera will automatically go into power
save mode when no
buttons are pushed for a
period of one minute.
The LCD will turn off but
the Status LED light
remains on. Push any
button to “wake-up” the
camera
• The power is turned OFF
automatically when the
camera has not been
operated for a fixed
period of time. Turn the
power ON again to
resume operation. Refer
to Setting Auto-Off on
page 29.
• The LCD monitor will
display the last picture for
1-second immediately
after taking the picture.
• Changing the Focus, Flash
and Zoom setting is
described later in the
manual.
Recording a Video
(Video Mode)
1) Power ON camera.
2) Push the Mode button
once to select Video
mode.
3) The Video mode
icon [
] is
displayed on the
upper left corner of
the LCD monitor.
4) Compose the opening
scene on the LCD
monitor and push the
Shutter button to start
recording video.
5) The “REC” icon
and elapse time is
displayed on the
bottom of the LCD
monitor indicating
the camera is now
recording video.
6) Hold camera steady
and pan slowly when
recording video.
7) Push the Shutter
button again to stop
recording video.
Notes:
• There must be sufficient
lighting for good quality
video. Use the SeaLife
Photo-Video Light SL980
(Optional accessory) for
recording video in low
light conditions.
• Changing the Focus and
Zoom setting is described
on pages 19-20.
• The Zoom cannot be
adjusted during video
recording.
• The Flash cannot be used
when recording video.
Viewing Pictures
and Video Clips
(Playback Mode)
1) Power ON camera.
2) Push the Mode button
twice to set camera to
Playback mode.
3) The Playback icon
[
] is displayed
on the upper left
corner of the LCD
monitor and the last
recorded picture
or video clip will be
displayed on the
LCD monitor.
4) Push the left or right
Directional button to
scroll through the
pictures and video
clips stored in
memory.
Note:
• Video clips will start
playing automatically.
Push and hold the left
Directional button to
reverse the video clip.
Deleting Pictures
and Video Clips
(Playback Mode)
1) To delete a picture or
video clip, use the left
or right Directional
button to scroll
through the pictures
until the picture or
video clip you want to
delete is displayed.
2) Push the shutter
button.
3) The LCD monitor will
display “Delete This
Image?” - “Yes”
or “No”.
a. Push the left or
right Directional
button to select
“Yes” and push
the Shutter button
to delete the picture or video.
b. Push the left or
right Directional
button to select
“No” and push the
Shutter button to
exit. Picture will
NOT be deleted.
Note:
• You can also delete all
images and videos
stored in memory by
formatting the memory
card. Refer to page 35
for information on formatting the memory
card.
Easy Set-up Mode
The Easy Set-up mode is
a fast and easy way to
set the camera for
underwater or land use.
1) Power ON camera.
2) Push the Mode button
three times to set
camera to
Easy Set-up mode.
3) “Easy Set-up” is
displayed on the
upper left corner of
the LCD monitor.
4) Follow the on-screen
guide using the left or
right Directional
button to make your
selections.
5) Push the Shutter
button to confirm
selection.
6) Once you have
completed the Easy
Set-up, the camera
will automatically exit
the Easy Set-up mode
and return to the
Camera mode.
Easy Set-up Mode
(Continued)
When finishing the Easy
Setup, the camera will be
set to one of the following four shooting modes:
Land Auto – Ideal for
taking pictures or
video clips on Land.
Underwater ➡
Camera+Flash – Ideal
for taking underwater
pictures or videos when
using the optional external flash and/or photovideo light accessory.
Underwater ➡ Camera
Only ➡ Snorkeling Ideal for taking underwater pictures or videos
without external flash or
light accessory at depths
less than 20ft/6m
Underwater ➡ Camera
Only ➡ Diving - Ideal
for taking underwater
pictures or videos without external flash or
light accessory at depths
greater than 20ft/6m
Using the Zoom
Function
The camera is equipped
with 3X digital zoom,
which is useful to
magnify far away
subjects. Use a tripod or
place the camera on a
stable surface when
using 3X zoom to avoid
blurry pictures.
1) To activate the zoom
push and release the
Zoom button.
2) Each push and release
will increase the
zoom by one step up
to 3X. The magnification is displayed on
the LCD monitor.
3) Compose your scene
and push the shutter
button to take a
picture or start
recording video
Note:
• The Zoom cannot be
adjusted during video
recording.
Setting the Focus
The camera is equipped
with a Focus Lever for
taking pictures or videos
at close-up or far away
subjects.
1) Turn Focus Lever to
Landscape [
] for
shooting distances
of 4ft to infinity
(1.3m to infinity)
2) Turn Focus Lever to
Macro [
] for
close-up shooting
distances between 2ft
to 4ft (0.65m to 1.3m)
Notes:
• The Focus setting will be
displayed on the LCD
monitor
Using the Flash
Function
The camera’s built-in
flash is useful for taking
pictures in low light
conditions, like indoors
or at night. There are 4
possible flash modes:
Auto, Flash ON, Flash
OFF, Red Eye Reduction.
1) Push the Flash button
to change flash to
desired setting. The
flash setting options
are described below.
2) The Flash setting will
be displayed on the
LCD Monitor.
Flash mode
Description
Auto [no icon]
The flash fires automatically
according to the
lighting conditions.
Flash ON
The flash will always fire
regardless of the lighting
conditions. This option is useful
when the subject is set against a
bright background or to
reduce dark shadows.
Flash OFF
The flash is turned off and
will not fire regardless of the
lighting conditions. Turn the
flash off when taking pictures
at shooting distances beyond
the effective range of the flash
(approximately 10ft/3m on
land or 3ft/1m underwater).
Red-eye
Reduction
Use this mode to reduce the
red-eye phenomenon when
taking pictures of humans or
animals in low-light conditions.
More About the
Flash Function
• The Flash cannot be
used when recording
video.
• It is recommended to
keep the flash turned
off when taking underwater pictures, unless
you are shooting in
perfectly clear water at
close-up shooting distance inside of 3 ft/1m
or using the optional
external flash accessory. Keeping the flash
turned OFF or using
the optional flash
accessory
reduces
backscatter (figure 1).
Backscatter refers to
the small dots that
appear in underwater
pictures, which occurs
because the tiny particles suspended on the
water are illuminated
by the camera’s flash.
Keeping the flash ON
increases backscatter
(figure 2).
Figure 1
Figure 2
Using an External
Flash or Photo-Video
Light (Optional
Accessories)
SL961 Digital Pro Flash
SL980 Photo-Video Light
• Use the SeaLife SL961
Digital Pro Flash
and/or SL980 PhotoVideo Light (optional
accessories) for
brighter, more colorful
underwater pictures
or videos with
reduced backscatter.
Visit www.sealifecameras.com for more
information.
• When using the
optional SL961
external flash or
SL980 photo-video
light accessories,
follow the Easy Setup
mode to set the camera
to UNDERWATER ➡
CAMERA + FLASH.
This optimizes the
camera’s exposure
program to compensate for the more
powerful light emitted
from the external flash
or light. The camera’s
flash is locked to
FLASH ON. Pushing
the Flash button will
adjust the exposure
setting of the camera.
The default setting is
Normal.
Advanced Setup Menu
The camera has a hidden
advanced Setup menu
used for changing the
Date/Time, Language
and other one-time or
advanced settings.
1) Power ON camera.
2) Push and hold the
mode button for 3
seconds until the
Setup menu is displayed on the LCD
monitor.
3) Use the right or left
Directional buttons to
scroll up and down
the setup menu.
4) Use the Mode button
to confirm the desired
setting.
5) To exit the menu,
push and hold the
Menu button for 3
seconds or select
“Exit” from the menu
and push the Mode
button.
Changing the Language
(Advanced Setup Menu)
1) Open the advanced
Setup menu as
described on page 24.
2) Select “Language”
from the setup menu
using the right or left
Directional buttons
and push the Mode
button to enter the
Language setting
screen.
3) Select the desired
language using the
right or left
Directional buttons
and push the Mode
button to confirm.
Changing the
Date/Time (Advanced
Setup Menu)
1) Open the advanced
Setup menu as
described on page 24.
2) Select “Date/Time”
using the right or left
Directional buttons and
push the Mode button
to enter the Date/Time
setting screen.
3) The time is displayed
in 24-hour HH:MM
format and the date
is displayed in
MM/DD/YYYY format.
4) Adjust the number
values using the left
[or right] to increase
[or decrease] the
value and push the
Mode button to
confirm each setting.
Note:
• The Date/Time setting
will not be saved if the
battery is removed for
more than 3 minutes.
Using the Spy Mode
(Advanced Setup Menu)
In Spy Mode, the camera will automatically
capture continuous pictures of a scene at specified time intervals. The
Spy mode is useful for
taking multiple pictures
of hard-to-photograph
wildlife, sealife or
scenery without being
discovered, and later
selecting the best image.
1) Open the advanced Setup
menu as described on
page 24.
2) Select “Spy Capture” using
the right or left Directional
buttons and push the Mode
button to enter the Spy
Capture setting screen.
3) Two options are
displayed: “Single” for
taking one picture at a time
and “Spy” for taking
continuous pictures.
4) Select “Spy” using the right
or left Directional buttons
and push the Mode button
to confirm.
5) The “Set Time Interval of
Capture” screen is displayed
on the LCD monitor.
6) Use the right or left
Directional buttons to
select the desired time
interval: 5 sec, 10 sec, 30
sec, 1 min, 5 min or 30 min.
7) Push the Mode button to
confirm the time interval.
8) The advanced setup menu
will automatically close
and you will see the spy
mode icon [
]
displayed on the LCD
monitor.
9) Aim the camera at the
desired scene. A compact
tripod is helpful to keep
the camera aimed at the
subject.
10) Push the shutter button.
The camera will count
down from 2 seconds and
take the first picture.
11) The LCD monitor will turn
off to conserve battery
power. The camera will
continue taking pictures at
the pre-set time interval
until the shutter button or
power button is pushed,
the memory is full, or the
battery is empty.
Changing the Auto
Off setting
(Advanced Setup Menu)
The Auto Off function will
automatically turn OFF
the camera power when
the camera has not been
operated for a fixed period of time. You can set
the desired Auto Off time
period (1 min, 2 min or 3
min) or disable the Auto
Off feature (Off).
1) Open the advanced
Setup menu as
described on page 24.
2) Select “Auto Off”
using the right or left
Directional buttons
and push the Mode
button to enter the
Auto Off setting
screen.
3) Select the desired
time period using the
right or left
Directional buttons
and push the Mode
button to confirm.
Changing the Beep
setting
(Advanced Setup Menu)
The camera will make a
beeping sound when a
button is pushed buttons.
You can set the Beep to
On or Off.
1) Open the advanced
Setup menu as
described on page 24.
2) Select “Beep” using the
right or left Directional
buttons and push the
Mode button to enter
the Beep setting
screen.
3) Select On or Off
using the right or left
Directional buttons and
push the Mode button
to confirm.
Changing the
Display setting
(Advanced Setup Menu)
The LCD monitor will
display the camera setting
icons, date/time and other
status information. You
can set the camera to
display all icons (ALL) or
no icons (OFF).
1) Open the advanced
Setup menu as
described on page 24.
2) Select “Display” using
the right or left
Directional buttons and
push the Mode button
to enter the Display
setting screen.
3) Select ALL (display
icons) or OFF (do not
display icons) using
the right or left
Directional buttons and
push the Mode button
to confirm.
Changing the Frame
Number Reset setting
(Advanced Setup Menu)
This feature will create a
new folder on the
memory card.
The captured pictures and
video clips are saved in
the new folder starting at
frame number 0001.
1) Open the advanced
Setup menu as
described on page 24.
2) Select “Fr. No. Reset”
using the right or left
Directional buttons
and push the Mode
button to enter the
Fr. No. Reset setting
screen.
3) Select No (exit) or Yes
(create new folder)
using the right or left
Directional buttons and
push the Mode button
to confirm.
Changing the Light
Frequency setting
(Advanced Setup Menu)
Change the camera’s light
frequency setting to
match the electrical system used in your country.
This will prevent the LCD
monitor from flickering
under fluorescent lighting
conditions. Select 60 Hz
(default) for North and
Central America and 50
Hz for Europe and most
other parts of the world.
1) Open the advanced
Setup menu as
described on page 24.
2) Select “Light Freq.”
using the right or left
Directional buttons and
push the Mode button
to enter the Light Freq.
setting screen.
3) Select 60Hz or 50Hz
using the right or left
Directional buttons and
push the Mode button
to confirm.
Changing the LCD
Monitor Brightness
setting
(Advanced Setup Menu)
Use this setting to
increase the brightness of
the LCD monitor. You
can select between
Standard (default) or
Bright. The Bright setting
makes it easier to see the
LCD monitor in bright
light conditions, but will
also use up the battery
power more quickly.
1) Open the advanced
Setup menu as
described on page 24.
2) Select “LCD Bright.”
using the right or left
Directional buttons
and push the Mode
button to enter the
LCD Bright. setting
screen.
3) Select Standard or
Bright using the right or
left Directional buttons
and push the Mode
button to confirm.
Formatting the
Memory Card or
Internal Memory
(Advanced Setup Menu)
Use this function to
reset or clear the memory
card or internal memory.
Caution: All images and
data saved on the memory
card or internal memory
will be deleted. It is recommended to format the
memory card before its
initial use or after the card
has been used in another
camera or device. It is
also a convenient way to
delete all pictures and
video clips after being
saved on your computer.
1) Open the advanced
Setup menu as
described on page 24.
2) Select “Format” using
the right or left
Directional buttons
and push the Mode
button to enter the
Format setting screen.
3) Select Yes (format) or
No (exit) using the
right or left
Directional buttons
and push the Mode
button to confirm.
Media and System
Information
(Advanced Setup
Menu)
Media Information
(Media Info.) will display
the memory card size
and amount of memory
storage remaining in
megabytes (MB).
System Information (Sys.
Info.) will display the
firmware version
installed on the camera.
New firmware may be
released to repair bugs
in the operating system
or improve the camera
performance. Any new
firmware versions would
be posted on the
www.sealife-cameras.com
and available for free
download.
1) Open the advanced
Setup menu as
described on page 24.
2) Select “Media Info” or
“Sys. Info.” using the
right or left
Directional buttons
and push the Mode
button to enter the
information screen.
3) Push the Mode button
to exit the information
screens.
Using the System
Reset Function
(Advanced Setup Menu)
Use this function to restore
the camera’s original
default settings. The time
setting will not be reset.
1) Open the advanced
Setup menu as
described on page 24.
2) Select “Sys. Reset”
using the right or left
Directional buttons
and push the Mode
button to enter the
Sys. Reset setting
screen.
3) Select Yes (reset)
or No (exit) using
the right or left
Directional buttons
and push the Mode
button to confirm.
Using the Copy to
Card Function
(Advanced Setup Menu)
Use this function to copy
the pictures and video
clips saved in the camera’s internal memory to
the SD/SDHC memory
card. You can only use
this when the memory
card is installed and you
have pictures or video
clips saved in the camera’s internal memory.
1) Open the advanced
Setup menu as
described on page 24.
2) Select “Copy to Card”
using the right or left
Directional buttons
and push the Mode
button to enter the
Copy-to-Card setting
screen.
3) Select Yes (copy to
card) or No (exit)
using the right or left
Directional buttons
and push the Mode
button to confirm.
Transferring Pictures
and Video Clips
to Your Computer
Use the SD/SDHC Card
Reader provided to
transfer pictures from the
memory card to your
computer.
• Remove the memory card
from the camera. Refer to
page 12 for information on
how to install/remove the
memory card.
• Insert the Memory Card
into Card Reader and Card
reader into the computer
USB port as illustrated.
• Your PC or MAC computer
will automatically detect
the card reader.
• For Windows, double click
“Computer” located on
the desktop, and look for
“Removable Disk”.
• Double-click “Removable
Disk” and you will see the
DCIM folder, which contains the pictures and
video clips saved on the
inserted memory card.
• Copy or Cut the pictures
and video clips contained
in the folder and Paste to
the desired folder location
on your computer.
Notes:
• For Mac, double-click
the “Untitled” or
“Volume 1” folder that
appears on your desktop. iPhoto should
launch automatically.
Editing Your Pictures
and Video Clips
Almost every computer
includes picture and
video editing software,
like Windows Photo
Gallery, Movie Maker or
Mac iPhoto. Editing software allows you to open,
view, organize and make
edits adjustments to your
pictures and video clips.
If your computer does
not include editing software, you may want to
purchase one. Here are
some links to popular
photo editing software:
Google Picasa:
www.picasa.google.com
Adobe Photoshop
Elements:
www.adobe.com
Arcsoft Photo Studio:
www.arcsoft.com
Ulead PaintShop:
www.ulead.com
Maintaining a
Waterproof Seal IMPORTANT
The camera uses one
O-ring to maintain a
waterproof seal. The
O-ring is located under
the waterproof door.
Follow these important
O-ring care instructions
or the camera may flood
• Do not lubricate O-ring.
• Inspect O-ring and O-ring
contact surfaces for damage (cuts, scratches, tears,
cracks, dents and any other
imperfections.) before each
use. Replace O-ring if
damaged or have camera
serviced if the O-ring
contact surfaces become
damaged.
• Clean O-ring and O-ring
contact surfaces, removing
all sand, hair and other
debris before every use.
Use the cleaning brush
provided or wipe the
O-ring and O-ring contact
surfaces with clean
moistened cloth.
• Make sure O-ring is
completely seated into
O-ring groove before sealing the waterproof door.
• Make sure there are no
obstructions preventing the
waterproof door from closing or sealing properly.
• Do not exceed the depth
rating of 40m (130ft) or
the camera may leak or
become damaged.
• Replace O-ring every year
to ensure proper seal.
Refer to page 44
for information on
replacing the O-ring.
How to Clean
the O-ring
1) Remove the O-ring
using the end of the
cleaning brush
provided.
2) Inspect O-ring(A),
contact surface(B) and
O-ring groove(C) for
cuts, scratches, tears,
cracks, dents or other
damages before each
use. Replace O-ring if
damaged or have
camera serviced if the
O-ring contact surfaces
become damaged.
3) Use a damp, lint-free
cloth to clean O-ring
and O-ring contact
surfaces, removing
all sand, hair and
other debris.
4) Use the cleaning
brush provided to
remove any sand
or debris from the
O-ring groove,
waterproof door
and sealing area.
5) Install O-ring
(see next page).
Replacing the
O-ring
Replace the O-ring if
damaged or at least
once per year. Only use
approved SeaLife O-ring
- Item # SL33008. One
spare O-ring is included.
Additional O-rings may
be purchased at your
local authorized SeaLife
dealer, or online at
www.sealifepartsdirect.c
om (USA Only).
To Remove O-ring:
1) Open the waterproof
door. Refer to page 9
for instructions on
opening and closing
the waterproof door.
2) Use the end of the
Cleaning Brush / Tool
or the side of a credit
card to lift the O-ring
out of its groove.
To Install O-ring:
1) Make sure O-ring,
O-ring groove and
O-ring contact surfaces
are perfectly clean
and undamaged for
installing the O-ring.
2) Lay O-ring flat along
the O-ring groove.
Be careful not to
roll or twist O-ring.
3) Gently push O-ring
down into the groove
until the O-ring is
completely seated
into the groove.
Do not lube O-ring.
Maintenance and Care
Instructions IMPORTANT
Follow these important
camera care instructions
or the camera may
become damaged or
flood.
• Soak and rinse sealed camera under running water or
in fresh water tub for about
2 minutes after underwater
use or when dirty. Press
each button several times
to clean out any saltwater,
sand or dirt that may be
trapped under the buttons.
Towel dry and place camera button-side down to
allow excess water to drain
from the buttons.
• Do not let any water or dirt
enter the camera's battery
compartment or memory
card slot when waterproof
door is opened. This may
result in damage to the
camera electronics.
• Make sure that you and the
camera are completely dry
before opening the waterproof door or changing the
batteries or the memory
card.
• Avoid opening waterproof
door in wet, sandy or
humid environments. It is
recommended to load batteries and prepare the camera in dry cool air, such as
inside an air conditioned
room. This will prevent
water or humidity from
being trapped inside the
camera, which may cause
fogging to occur.
• Avoid exposing camera to
direct sunlight or extreme
high temperatures, such as
the trunk of your car, for
prolonged periods of time.
• The camera is negatively
buoyant and will sink in
water. Recommend purchasing optional float strap
(SL920).
• Attach the strap to your
wrist or buoyancy control
device (BCD) when using
the camera in or near
water.
• Make sure camera is
cleaned and completely
dry before storing.
• Store camera at room temperature in a clean and dry
place. Remove batteries.
Leave waterproof door
unlatched when storing
camera for 3 months or
longer.
Great Underwater
pictures made easy
Most people are familiar
with taking pictures and
videos on land, but
there are plenty of
challenges that
photographers face in
the underwater world.
The following information summarizes the
basic principles of
underwater photography.
Crystal clear water is
essential for good underwater pictures. Low visibility, caused by fine
particles suspended in
the water, will diminish
the picture and video
quality.
Limit your shooting distance to 1/10 of the
water visibility. For
example, if the visibility
is 30ft/10m, limit your
shooting distance to
3ft/1M. Closer shooting
distances result in better
pictures. Consider buying the Mini Wide Angle
Lens accessory (SL973),
which allows you to
keep a closer shooting
distance and fit everything into the picture.
Control your buoyancy
and set yourself up in
the ideal position before
taking a picture or shooting video. This allows
you to hold the camera
steady and control your
shooting distance. Good
buoyancy control will
help you avoid stirring
up the sandy bottom
which will cloud-up the
water and cause
backscatter. Controlling
your buoyancy is very
important for your diving
safety so don’t start
shooting until your buoyancy is under control.
Compose a good picture. Avoid shooting
down on the subject
from above. Shooting
down usually results in a
poor contrast because
the subject blends into
the background. Try and
shoot upwards from
below the subject so
you get a blue water
background and better
contrast. Get the entire
subject into your picture
frame. Don’t cutoff the
hands, fins or head of
your subject. You can
always crop you image
later on your computer
if you want.
Video tips
Hold the camera as
steady as possible and
move (pan) very slowly.
A jumpy, fast-moving
video is hard for anyone
to watch.
Avoid shooting video
clips more than 1
minute. It is difficult to
edit a lengthy video
clips because the large
file size. You can always
patch together short
video scene into a
longer movie using
video editing software,
like Microsoft Movie
Maker.
Practice makes perfect
There is no better way to
learn than from your
mistakes. Become
familiar with your
camera controls so you
can make quick adjustments depending on the
conditions. Take the time
to practice and experiment with different
settings. Review your
pictures and learn from
your mistakes
Always observe dive
safety rules and Never
Touch Marine Life
Do not let photography
distract you from diving
safely. Observe marine
life - Never touch
marine life. Be aware of
your surroundings to
avoid contacting anything. Keep your dive
gear close to your body.
Troubleshooting
Guide
Camera does not
power ON
Check the battery polarity
and if batteries are new or
fully charged.
Blue or dark underwater
pictures/videos
Use Easy Set-up mode to
set camera for underwater.
Keep flash turned off
unless shooting close-up
distances in clear water, or
unless using the optional
external flash accessory.
Turning the flash ON while
underwater disables the
underwater color correction feature.
Consider purchasing the
SeaLife Digital Pro Flash
(SL961) for brighter, more
colorful pictures.
Pictures or Video clips
are not sharp
The focus switch is not set
correctly. Refer to page 20
for more information on
setting the focus and
correct shooting distances.
Light conditions are too
dark resulting in grainy
pictures or motion blur.
Hold camera steady or
use optional external flash
or light accessory.
The lens is dirty - Clean the
lens using a damp cotton
cloth and dry.
For more troubleshooting
information and technical
updates, please refer to the
SeaLife website at
www.sealife-cameras.com
or contact your local
SeaLife dealer or service
center for help.
Specifications
Image Sensor:
9.0 mega pixel CMOS image sensor
Color: 24-bit color (RGB)
Image Resolution: 9mp (3472x2604)
Picture file format: JPEG
Movie Resolution: VGA (640x480)
at 30 frames per second
Video file format: MJPEG (.AVI)
Lens: F3.0 / 7.9mm
(film equivalent = 45mm)
Focus type: Instant fixed-focus
lens (2ft /0.65m to infinity)
Zoom: 3x Digital zoom
Shutter speed: Mechanical shutter
(1 to 1/2000 second)
Flash: Auto, Fill, Off, Red-Eye
Reduction
Picture modes: Auto, Snorkel
(underwater), Sea, Ext Flash
Shooting modes: Single, SPY Mode
LCD: 2.4” color TFT LCD
Memory: Internal: 28 MB
(10 hi-res pictures) External: SD
and SDHC card (Recommend
4GB or 8GB SDHC card)
EXIF Format: EXIF 2.2
Operating Environment:
PC: Windows XP/Vista/7 or
MAC: OS 9.0 and up
On-Screen language: English,
German, French, Spanish,
Italian, Russian, Dutch, Turkish,
Portuguese (Brazil), Chinese
(T-C and S-C)
Instruction manual: English
(printed), German, French,
Spanish, Italian, Dutch
Power: AAA Battery x 2
Battery life: 100 pictures
w/Alkaline (500+ pics w/Energizer
Ultimate)
Certifications: CE, ROHS, FCC
Weight: 10 oz. (286g) w/strap
Dimensions: 4.5" x 1.8" x 3.0"
(11.4cm x 4.6cm x 7.6cm)
Depth: Individually depth
tested to 130ft (40 m)
Buoyancy: Slightly negative
Operating temp: 33 degrees F
to 110 degrees F
Storage temp: -20 degrees F
to +140 degrees F
Tripod mount: Standard 1/4 -20
tripod threads
Warranty: 1 year limited warranty.
Parts and Service
SeaLife guarantees the
original purchaser of this
product, for a period of
one (1) year from the date
of purchase, that the product is free from defects in
workmanship and materials. For detailed warranty
information, please refer to
the warranty statement
included with the product.
In the event the original
purchaser believes there is
a defect in a product, it is
recommended that the
purchaser first visit
www.sealife-cameras.com
for product updates and
technical advice. The
SeaLife website also
includes detailed information on how to get repair
service.
Pioneer Research
www.sealife-cameras.com