1
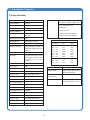
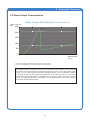
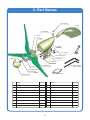
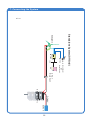
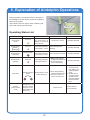
Airdolphin Pro Z-1000 - 48
Instruction Manual
Zephyr Corporation
For your internal use only.
Contents
1. Getting Started.....................................................................................................................................3
2. For Your Safety (Read before using.)...................................................................................................4
3. Airdolphin Features..............................................................................................................................6
3-1 10 State-of-the-Art Technologies...............................................................................................6
3-2 Specification..............................................................................................................................8
3-3 Power Output Characteristics....................................................................................................9
4. Installation Environment..................................................................................................................... 10
5. Part Names........................................................................................................................................ 11
6. Assembling the Airdolphin (Z-1000)................................................................................................... 12
6-1 Verify the following upon purchase.......................................................................................... 12
6-2 Assembly procedure................................................................................................................ 13
7. Connecting the System...................................................................................................................... 19
7-1 Before connecting.................................................................................................................... 19
7-2 Length of the extension cable that leads from the Airdolphin to the battery............................ 19
7-3 D.P.D.T Blade Switch............................................................................................................... 19
7-4 Connecting the Airdolphin output cable extension...................................................................20
7-5 Connection example................................................................................................................ 21
8. Explanation of Airdolphin Operations.................................................................................................23
9. Considerations When Choosing Peripheral Materials/Devices.........................................................24
10. Maintaining the Airdolphin System.....................................................................................................25
10-1 Daily Inspection........................................................................................................................25
1. Getting Started
Thank you for purchasing the Airdolphin (Z-1000).
The Airdolphin's creation is the culmination of Zephyr Corporation’s years of experience and technical
expertise with small wind turbines.
This turbine is powered by wind, which it harnesses to generate electricity. Since wind is a natural
energy source, its output varies in accordance with time, date, and the seasons. Wind conditions
may not always be optimal, and can range from no breeze to raging gusts. Although people cannot
influence wind force directly, it is possible to adapt to changes in the wind itself. Zephyr Corporation
Airdolphin engineering focused on building a system that can adjust to subtle wind conditions in real
time, generating the maximum amount of electricity.
We at Zephyr Corporation hope that our products are both fun and useful, contributing to the
development of an ecological minded culture by reducing carbon dioxide emissions through the use of
natural energy, thus leaving a better Earth for future generations.
This manual provides specific information on the Airdolphin, including its features, instructions for use,
safety precautions, maintenance procedures, and peripheral equipment.
It is intended to be read by those who own or work on this product. Read this manual thoroughly and
familiarize yourself with this product before attempting to use it.
In the unlikely event that this product does not function properly, prohibit all persons except for trained
technicians from handling its internal systems and contact either the dealer from whom you purchased
it or Zephyr Corporation customer service department.
• The specifications of this product may change due to improvements without prior notice.
•For purposes of explanation, the illustrations and photographs throughout this manual may differ
from the actual product.
• "AIRDOLPHIN" and "Airdolphin" are trademarks of Zephyr Corporation.
•The serial number of the wind turbine is written at the last page of this manual. You will need this
information in the event a warranty claim.
Read the following!
u Certain Airdolphin installation procedures are dangerous. Always have a trained professional
perform installation work.
u Be aware that Zephyr Corporation assumes no responsibility for accidents or damages sustained as a result of not following the procedures and warnings specified in this manual.
u Be aware that Zephyr Corporation assumes no responsibility for accidents or damage
caused by improper installation, use, or attempts to modify this product.
u This product may suffer salt erosion or other forms of corrosion if installed in a location that
places it in direct contact with salt water.
*
Failure to operate this product in accordance with the content of sections labeled “Danger”,
“Warning”, and “Caution” may result in accidental death, injury, fire, or damage to the product
itself.
2. For Your Safety (Read before using.)
SAFETY WARNINGS AND SYMBOLS
To ensure proper use of this product, read this section (“Safety warnings and symbols”) before attempting to
install, operate, or inspect the Airdolphin (Z-1000). Throughout this manual, safety information is divided into three
categories: “Danger”, “Warning”, and “Caution”.
DANGER:
This symbol indicates information that could result in death or severe injury if ignored. It is
used to indicate information of a particularly dangerous and/or urgent nature.
WARNING:
This symbol indicates information that could result in death or severe injury if ignored.
CAUTION:
This symbol is used to indicate information that could result in death, severe injury, or damage
limited to property if ignored.
Be aware that failure to use the product in the
manner indicated by Caution may, depending on
circumstances, also have severe consequences. All
of the symbols described above indicate important
safety information. Obey all safety information when
using this product.
SAFETY INFORMATION IS INDICATED AS
SHOWN BELOW
The
symbol is intended to draw readers’ attention to
Danger/Warning/Caution information. Specific details on
the nature of the threat to safety are indicated inside or
beside the symbol.
The
symbol indicates prohibited actions. Specific
details on the prohibited action are indicated inside or
beside the symbol.
This manual contains caution information related
to the rotors.
“Rotor” is the term used to describe the three
blades when they are attached to the hub.
Caution information that describes the rotor gives
warnings about the rotating blades.
(See to page 13.)
The symbol indic ates instr uctions that must be
followed. Specific details on the mandatory instructions
are indicated inside or beside the symbol.
DANGER
Do not install the Airdolphin (Z-1000) before inspecting the durability/quality of the pole to which it will be attached
and the area in which it will be installed for safety.
If the pole and the location are not suitable for the installation of this product, the pole may break or fall over,
resulting in injury or death.
Install this product so that the tips of the rotor are at least 3.5m away from locations that may be approached by
people. After installation is complete, clear away all scaffoldings, making sure that nobody goes near the rotor.
Never touch a moving rotor with your hand or any other part of the body. The rotor is as dangerous as a sword and
accidental contact can result in death or severe injury.
The body of the Airdolphin (Z-1000) will also move in accordance with wind direction once it begins to make contact
with the wind. Exercise caution if it is necessary to approach the Airdolphin (Z-1000) to perform installation or
maintenance work.
2. For Your Safety
WARNING
Do not install the Airdolphin (Z-1000) in close proximity to electric or telephone lines. A fallen pole or contact
between the rotor and electric/telephone lines could result in electrocution, disconnection, or damage to/
malfunction of the Airdolphin (Z-1000).
Do not install the Airdolphin (Z-1000) in close proximity to structures such as smokestacks that attain extremely
high temperatures. The heat could melt the insulation on electrical cables, resulting in electrocution, fire, or other
damage.
Do not install the Airdolphin (Z-1000) if the pole to which it will be attached is not standing straight up. The
Airdolphin (Z-1000) could fall, causing an accident or mechanical damage/malfunction.
Do not use the Airdolphin (Z-1000) for any purpose other than generating electricity from natural wind. Do not
attempt to generate electricity by mounting the Airdolphin (Z-1000) on a moving vehicle. Do not use the Airdolphin
(Z-1000) in close proximity to an exhaust duct or in any other extremely high-temperature environment. Doing so
could result in fire, injury, or damage to the Airdolphin (Z-1000).
Contact either the dealer where you purchased the Airdolphin (Z-1000) or Zephyr Corporation for repairs if the lines
or cables are damaged (i.e. exposed wires, cut cables, plug damage). Continued use could result in electrocution,
fire, or short circuits.
Do not pull on, excessively bend, or attempt to modify the wires/cables of the Airdolphin (Z-1000).
Doing so could result in cord damage, electrocution, or fire.
Never attempt to disassemble or modify the Airdolphin (Z-1000). Doing so could result in electrocution, fire, or
Airdolphin (Z-1000) malfunction.
Due to conditions of use, this system may not continuously supply stable electrical power. Do not attempt to use
the electricity generated by the Airdolphin (Z-1000) to power medical devices or other equipment related to human
life systems support . Do not attempt to use the electricity generated by the Airdolphin (Z-1000) to power personal
computers not equipped with batteries or other auxiliary power sources.
CAUTION
Observe all safety precautions when working on the Airdolphin (Z-1000) in high locations. Take care to ensure
that hardware and other parts do not fall from the Airdolphin (Z-1000). Falling parts can cause injuries or other
accidents.
Before assembling the Airdolphin (Z-1000), secure adequate space to ensure that work can be completed safely.
Inadequate space can result in injuries or other accidents.
3. Airdolphin Features
3-1 10 State-of-the-Art Technologies
u Extremely
Low Mass
The total weight of the Airdolphin is only 17.5kg. This means it weighs just 17.5g.per generated
watt (when the continuous rated output is 1kW). Thus, the Airdolphin tracks wind better in turbulent
flows, resulting in more efficient power generation. The light weight also allows the unit to be installed in a
wide variety of places.
u Newly-Designed
Rudder
u Newly-Designed
Rotor
The rudder of the Airdolphin uses the newly-developed Swing Rudder System. This system ensures the turbine’s superior response to sudden changes in the direction of wind, improving the efficiency of power generation.
The Airdolphin comes with a new rotor system consisting of:
(1) Three ultra low-mass blades, reinforced by a carbon-fiber skin for superior rigidity. (2) A hub mechanism
that uses the newly-developed Multi-Stagger System (incorporating multiple airfoils and lift angles). This
technology allows the turbine to capture the wind effectively and respond flexibly to changing conditions, from
slight to stormy winds, eliminating the need for pitch controls.
u An
Innovation for Low Noise Newly-Designed Rotor
The Airdolphin comes with the “Noise Disrupter Coating”. This new blades have a number of thin ridges
applied on its surface, which significantly reduces air flow noise. Our designers were inspired by the wings of
owls that enables it to fly almost silently and unnoticed while approaching its prey.
u Robust
Body Structure
Bolt-less self-fitting body inspired by Japanese traditional block puzzle craftsmanship. This technique ensures
an exact fit and provides superb resistance to adverse weather conditions, greatly minimizing maintenance
requirements.
u Power-Assist
Function
For 10 seconds every minute when there is no wind, the Airdolphin uses previously- generated power to spin
the rotor. This allows the rotor to reach the cut-in point more quickly--even when there is near zero wind,
allowing the unit to capture the wind effectively. The Power Assist Function also prevents freezing of the rotor
due to low temperatures.
3. Airdolphin Features
u New
Power Management System
The newly-developed Power Management System is aimed at optimizing the safety and efficiency of power
generation.
Non-Stop Operation with Continuous Output
At its upper potential, the Airdolphin can deliver a 2.3kW output (at 20m/s). During strong winds (at 20m/s or
more), the Airdolphin automatically moderates its spinning speed and continues working at a reduced output.
Safety Control
Several technologies are applied to keep the turbine from disintegrating and allow it to control its output, even
during overheating of the power generator, excessive spinning speed, and other unfavorable situations.
High-Efficiency Operation
To maintain optimum efficiency at a variety of wind speeds, the turbine is controlled by a special computer
program coordinated with the Multi-Stagger System of the rotor. An ultra-lightweight rotor, a special propeller
design optimized for varying wind speeds, and a power generator with superior efficiency was also developed.
Battery Charge Management
Management of the rechargeable battery, optimized for using the wind turbine as an independent power supply, is controlled by a system based on a 3-step battery recharge. Charge can be managed under a variety
of conditions, from arctic to tropical weather. Management includes compensations for wire cable length and
even current (more than 50 amps of continuous power).
u New
Generator
u Data
Communication System
For the Airdolphin, a newly-developed heavy-duty generator is used with a max. 4.5kW power output. The
magnet used for the turbine is a neodymium iron boron magnet which boasts of an extremely high magnetic
flux.
The Zephyr Communication System was recently developed, which will soon allow you to connect the
Airdolphin to the internet. This way, you can check the wind strength, amount of generated power, and other
information on your PC remote from the turbine’s location. You can also install a GPS receiver to the turbine
for confirming the location of each unit.
u Fresh
Design - Winner of the Good Design Award 2005
The attractive body was designed, using nature’s animals as our inspiration. The sleek lines, high power, cleverness and playful responsiveness of this design inspired the name Airdolphin. Our turbine looks alive, eager
and ready to catch the wind.
3. Airdolphin Features
3-2 Specification
Wind Turbine Type
Horizontal axis, up-wind
Rotor Diameter
1800mm
Mass
17.5kg
Mount Diameter
48.6mm
Number of Blades
3
Blade Material
Carbon-fiber laminate over foam core
Control System Built-in Zephyr-Original Power Management System* (ZPMS) with:
1. Power-Assist Function
2. Stall Mode
3. Safety Control
4. Battery Charge Management
5. Data Communication System
Blade Mass (per piece) 380g
Power Generation Features
Wind Speed Power
Rotor Speed
(m/s) (mph)
(W)
(rpm)
Blade Retention
Interlock hub mounting
Body Material
Aluminum diecast
Body Construction
Protection Circuit
3.5
Screw-free joints (based on 6.5
traditional Japanese handi- 10.0
crafts)
12.5
Teflon-based paint
15.0
17.5
Synchronous-type, three- 20.0
phase power generator with
30.0
neodymium iron boron 40.0
magnets
50.0
Built-in
Data Logger
Built-in
Yaw control
Free yaw (360 degrees)
Direction Control
Original Swing-Rudder System
Output Control
Non-stop output control Start-up Wind Speed
0m/s (Power-Assist Function)
Product Finish
Generator
-
Survival Wind Speed
65m/s
Rated Power
1kW (12.5m/s)
Rated Rotor Speed
1000rpm
Output Voltage DC50V
Braking System
Regenerative electro-magnetic braking system
Recommended System Off-grid : Deep cycle lead
acid battery,500Ah or more
Maximum Power2.3kW (20m/s)
Maximum Rotor Speed 1000rpm (20m/s)
Mass per Watt
350
650
1000
1000
1000
1000
1000
600
600
600
Communication System RS-485
(Signal Output)
Cut-in Wind Speed2.5m/s
Cut-out Wind Speed
7.827
14.5
170
22.4
620
27.9
1000
33.5
1500
39.12000
44.72300
67.1
500
89.4
700
111.8
900
17.5g/W (at rated power)
Power per Square Meter 393W/m2 (at rated power)
3. Airdolphin Features
3-3 Power Output Characteristics
Power output Characteristics
Power out put
(W)
2500
of the Airdolphin Pro
2.3kW
2000
1500
1000
500
0
0
5
10
15
20
25
30
35
40
45
50
55
Wind Speed
(m/s)
Intelligent Power Management System
* Cut-in; wind speed at which the turbine begins to produce power.
Thewind
intelligent
power
management
system
* Cut-out;
speed at which
the turbine
stops to produce
power. has
succeeded in truly seamless
power generating performance for a broad spectrum of wind energy
ranging from 2.5 m/s (5.6 mph) upwards, never cutting out. The system
The instantly
intelligent power
management
system
has succeeded
in trulyspeed
seamless
generating
responds
to sudden
changes
in the wind
andpower
adapts
by
performance
for
a
broad
spectrum
of
wind
energy
ranging
from
2.5
m/s
(5.6
mph)
upwards,
neverby
creating the most suitable power point production. At its upper potential,
cutting
out.
The
system
instantly
responds
to
sudden
changes
in
the
wind
speed
and
adapts
incorporating sophisticated software algorithms, the Airdolphin Pro can
by creating
production.
At its(44.7
uppermph)
potential,
by incorporating
deliverthe
2.3most
kW suitable
output power
when point
capturing
20 m/s
gusts
and winds. It
sophisticated software algorithms, the Airdolphin Pro can deliver 2.3 kW output when capturing
then shifts to a more gradual power curve slowly increasing output as the
20 m/s (44.7 mph) gusts and winds. It then shifts to a more gradual power curve slowly increasing
wind strength increases.
output as the wind strength increases.
4. Installation Environment
1. Safety
Although the Airdolphin (Z-1000) has been engineered to withstand wind speeds of 65m/s, the rotating blades
may be damaged by tree branches or other flying objects during strong winds. In addition, unforeseen circumstance may cause the pole supporting the wind turbine to topple or the wind turbine itself to fall. Keep these possibilities in mind when selecting a location for the installation of the Airdolphin (Z-1000).
Although the blades of the Airdolphin (Z-1000) are constructed from laminated carbon fiber and are extremely
durable, they can cause severe injury in the unlikely event that they make contact with a human being. For this
reason, we recommend that you install the wind turbine in a location away from people. Install the wind turbine in
a high location that people cannot reach up and touch it.
2-1.Environmental deterioration (public nuisance)
The wind turbine is a mechanical equipment that rotates at a high rate of speed during periods of strong wind. It
is intended for installation outdoors in locations high above the ground. During periods of strong wind, the rotor
rotates at a high rate of speed. Although the blades on the rotor are engineered to minimize the noise they produce, certain individuals may still be disturbed by the noise. The shadows of wind turbines mounted in high locations may also fall on neighboring houses. Be aware of the flickering shadows that the rotating blades may cast
when considering the location in which the wind turbine will be mounted.
3. Generation environment
Since the wind turbine’s output is proportional to the cube of the wind speed, it is advantageous to optimise the
location where wind speed is highest within the possible choices. The wind turbine must be installed in a location
that is high above ground level and free from obstructions has unobstructive wind passage.
10
5. Part Names
c. Screw Plug
a. Tail
d. Tail Shaft
m. Hub i. C Ring
b. Body
e. Long Nut
p. Wrench
f. Yaw Shaft Cover
r. E-ring
g. Insulator
h. Cap Bolt
l. Hub 1
q. Hexagonal Wrench
(8mm / 6mm)
n. Blades (3)
j. Hexagonal Nut
(for Hub use)
o. Instruction Manual
k. Nose Cone
Name
1
j
Hexagonal Nut (for Hub use)
1
Body
1
k
Nose Cone
1
c
Screw Plug 1
l
Hub 1
1
d
Tail Shaft
1
m
Hub 2
1
e
Long Nut (for Yaw Shaft use)
4
n
Blades
3
f
Yaw Shaft Cover
1
o
Instruction Manual (this document)
1
g
Insulator
1
p
Wrench (13mm / 17mm)
1
h
Cap Bolt (for Yaw Shaft use)
4
q
Hexagonal Wrench (8mm / 6mm) 1
i
C Ring
1
r
E-ring (1pc. for spare) 2
Name
a
Tail
b
Quantity
11
Quantity
6. Assembling the Airdolphin
(Z-1000)
6-1 Verify the following upon purchase
n The Airdolphin consists of the items listed below. Upon opening the package, check the parts
against the list shown above in “5. Part Names” to ensure that nothing is missing.
* Although Zephyr Corporation verifies the quality of all our products before shipping them, damage may
occur during shipping. Check the surfaces of the blades, the tail, and all other components to ensure that
they are free from any damage or warping that may affect performance.
n I f any parts are missing or damaged, please contact the dealer at which you purchased the
Airdolphin for assistance.
Tail Unit
The body Unit and the tail is packed in
the same box.
Body Unit
Blades, Hub, and Nuts
Optional parts :
Remote Monitor RM-1000
Anemometer : AM-10
DPDT Switch
12
6. Assembling the Airdolphin (Z-1000)
6-2 Assembly procedure
Follow steps j–m below to assemble the Airdolphin (Z-1000). The assembly procedure for each part is
shown on the following and subsequent pages.
(outer diameter is 4 8 . 6 m m )
OBSERVE THE FOLLOWING SAFETY INSTRUCTIONS DURING ASSEMBLY AND INSTALLATION
ailure to observe these safety instructions may result in a severe accident or damage to the Airdolphin (Z-1000) or
F
other parts of the system.
l Do not place the Airdolphin body upside down or inclined during installation or maintenance. Water (rain,
snow) can leak inside a body joint gap and cause damage to the turbine. When the body is upside down or
inclined and has the possibility of getting wet, put a cover over the body well.
l
Warning
l
Always assemble/install the Airdolphin in accordance with the procedure outlined in this manual.
l
U
se a tower in which the upper portion has an outer diameter of at least 48.6mm and at least 100mm in length.
l
D
o not install the Airdolphin if the pole is not standing straight. If the Airdolphin is not mounted in an upright position, it could topple or fall, causing injury or damage to the system.
l Moving roter blades are as dangerous as a sharp object. During installation and maintenance attaching the rotor to
the tower body is extremely dangerous because the wind could blow while the work is being performed, rotating the
rotor and causing a serious accident such as death or injury. After attaching the rotor to the body, fix the rotor in place
to prevent it from rotating until the wind turbine has been completely installed
l
If the wind turbine has not been completely assembled, a strong gust of wind or similar phenomenon may cause it to
fall, causing an injury or other misharps.
13
6. Assembling the Airdolphin (Z-1000)
CAUTION: DO NOT CONNECT TO BATTERIES WHEN INSTALLING.
Airdolphin is in brake mode when disconnected from the batteries.
Fastening the pole to the body (yaw shaft)
j
1.The wind turbine has six cables. Connect these cables
to the extension cable that passes through the pole.
(See page 20.)
2.Connect the pole to the body (yaw shaft).
Lower the yaw shaft until the end of the pole fastens
inside the yaw shaft.
l l M atch the seam of the insulator up with the
connection section of the yaw shaft. Affix the
insulator in place.
Body
(Yaw Shaft)
Insulator
Yaw Shaft
Attachment Section
Cables
Pole
Insulator Seam
3.With the body pressed down firmly on
the pole attach the yaw shaf t cover
as shown in the figure on the right.
(Tightening torque 22Nm)
l
l
Yaw Shaft
Cover
Cap Bolt
All electric al power
cables should run
inside the tower for
protection.
Cap bolts shoud be
tightened with the
included hexagonal
wrench with a force of
14 -16Nm
Long Nut
Hexagonal Wrench
(included)
CAUTION: OBSERVE THE FOLLOWING WHEN ATTACHING THE YAW SHAFT
Tighten the cap bolts (j–m) in order incrementally so
that all four bolts hold the yaw shaft cover in place with
an uniform degree of tightness.
Tighten the cap bolts leaving no space between the
yaw shaft and the yaw shaft cover
Yaw Shaft
Yaw Shaft Cover
1
l
3
The yaw shaft and the yaw shaft cover
are designed to be fastened together
tightly around the insulator.
Match the edge line of the insulator with
Yaw Shaft Cover
Pole
(outer diamer
is 4 8 . 6 mm )
2
the connection section of the yaw shaft.
Affix the insulator in place.
4
Almost nil
Almost nil
Yaw Shaft
Insulator
14
6. Assembling the Airdolphin (Z-1000)
k Attaching the tail to the body
1.Line up the attachment holes on the body
and the tail.
2.Make sure you have the tail shaft right side
up and then insert it into the attachment hole
on the body until it makes contact with the
bottom as shown in the figure below.
3.Install the screw plug on top of the tail
shaft and then tight it snugly into place.
Hexagonal Wrench (8mm)
Tail Shaft
Screw Plug
Tail Attachment Hole
Tail Attachment Hole
D-shaped
pedestal
* When the tail shaft is inserted
correctly, the top of the tail
shaft should be approximately
5mm below the uppermost
body surface.
Approx.5mm
Correct
Incorrect
* Tighten the screw plug so that it is completely below the
body surface.
4. In order to prevent crrosion, apply silicone sealant to the screw plug from above and ensure that the
screw plug is completely covered.
* Be careful not to apply the silicone sealant to other parts of the body.
Silicone sealant
Cover the screw plug
by applying the silicone
sealant provided with
this product.
15
6. Assembling the Airdolphin (Z-1000)
l Assembling the rotor
1.Attach the three blades to the blade attachment
sections on hub 1. There are numbers on hub
1 and the attachment sections of the blades.
Make sure that these numbers match when
attaching the blades.
Blade Attachment Section
000001
There is a protrusion on this part
of the blade attachment face.
00000
01
* The rotor is tuned so that it is dynamically balanced. The
groove on the blade guard contains a clay-like tungsten
substance used for balancing weights. Do not remove
the tungsten material under any circumstances.
00000
00
03
00
00
00
* A ttach the blades to hub 1
so that the c or resp onding
numbers match. Using the
wind turbine with the blades
attached in the wrong
locations will result in degraded performance and may
cause damage to the turbine itself.
If the numbers on the supplied hub 1 and the three
blades do not match, contact the dealer where
you purchased the Airdolphin (Z-1000) and have it
exchanged so that the numbers properly.
Hub 1 Attachment Face
000003
Hub 1 Attachment Face
Blade Guard Groove
2.After attaching the blades, tap them with a rubber mallet or other tool that will not damage them until
they are fixed securely in place. The wind turbine could break if the blades are not securely attached
to hub 1
Rubber Mallet
(or similar tool)
000
003
Hub 1 Attachment Face
01
00
00
00
00
01
3.T h e r e a r e f o u r n o t c h e s ,
ranging from large to small,
in the assembly holes on hub
1. On hub 2, there are four
protrusions, ranging from large
to small. These protrusions
f i t i nto t h e c o r r e s p o n di n g
notches, fixing parts securely
into place.
00
01
00000
0
000003
00
00
00
Protrusion
(Large)
Hub Protrusion
(Small)
Hub 1
Notch
(Small)
Notch
(Large)
16
0
6. Assembling the Airdolphin (Z-1000)
4.Rotate hub 2 while holding hub 1 (to
which the blades have been attached).
Hub 2 will come free. If it rotates, rotor
assembly is complete.
In the event that Hub
2 does not rotate
smoothly, return to
step 2 above, make certain that the blades are
securely fastened, and repeat the assembly procedures.
Verify
thathub
hub
II
Verify that
2
rotate
s smoo
thly.
rotates
smoothly.
The blades
are
The
blades are
1.I
attached
hub 1.
atta
ched to hub
m Attaching the rotor to the body
1.Fit the C ring onto the shaft of the body facing downwards as shown as in the illustration below.
2.Referring to the figure shown below, attach the rotor to the shaft.
C Ring
Hub 2 Indentation (for C-Ring)
Shaft
C Ring
Shaft
Body
C Ring
Shaft
Rotor
C Ring
Hexagonal Nut
Hub 2
C Ring
* When attaching the rotor to the shaft, make
sure that the C-ring, which is installed first,
securely fits into the appropriate indentation.
Slide hub 2 onto the shaft so that hub 2’s key
fits snugly onto the C ring slot.
Key
17
6. Assembling the Airdolphin (Z-1000)
7.Check the Rotor that will rotate smothly after
attaching the E-ring to the shaft.
3.Once the rotor is in place, use the hexagonal
nut to fasten it to the shaft.
4.The rotor will be f ixed into place once
the gap between the body and the rotor
reaches 3mm.Verify that the rotor can rotate
smoothly.
E- ri ng
Rotor
8.Slide the nose cone onto the end of the rotor.
Lining the protrusions on the nose cone up
with the blades, press the nose cone onto the
rotor until in locks into place with a snapping
sound.
App rox. 3mm
5.Holding the rotor in place, use the wrench
included with this product to grip the nub
on the end of the shaft and turn it counter
clockwise. Continue to tighten until the three
plates are quite snug. (Tightening torque
30Nm)
Nose Cone
Rotate counterclockwise.
9. If the nose cone is not securely attached to the hub
2, then the cone will become detached, resulting in
severe rotor damage while turning at high speeds!
Ensure that the three protrusions on the nose cone are
evenly fastened to the hub 2 as shown in the image
below.
Wrench
(supplied with
this product)
6.Fix the E-ring to the shaft. Use the pliers etc
to fix the E-ring as the below figure.
Over 5mm gap
Visible gap
E-ring
Less than 5mm gap
No gap
Completely Assembled Unit
# To remove the E- r ing,
u s e two s e t s o f f l a t
blade screw driver.
Fix the E-ring as the figure.
18
7. Connecting the System
7-1 Before connecting
The Airdolphin 48V model is used as a standalone system(Off-grid system). A 48V battery is required
for the system. The following explains how to connect the Airdolphin power cable (approx. 500mm
long) and provides a typical example of a wind turbine system connection.
*P
ay attention to the + and – terminals when connecting the
power cable to the battery. Reverse connection will cause
serious damage.
(Be aware that any damage to this product caused by improper connection is NOT
covered by the warranty. Connect the cables to the correct terminals.)
7-2 Length of the extension cable that leads from the Airdolphin to the battery
The Airdolphin is designed based on use of 15meter / 8sq cable between Airdolphin and batteries.
If longer distance is required, please contact the dealer where you purchased the Airdolphin or
Zephyr Corporation.
The Airdolphin (Z-1000) has an output voltage of 50V.
Connect either a single 48V battery or four 12V batteries in a serial
connection.
7-3 D.P.D.T.(Double pole double throw) blade switch
To ensure safety, the Airdolphin (Z-1000) is equipped with an emergency stop feature (See page
23). In the event of an emergency stop, the Airdolphin (Z-1000)’s power supply must be shut off
for approximately 10 seconds before being restarted. In order to facilitate turning the power on/
off, Zephyr Corporation recommends the installation of a D.P.D.T. BLADE SWITCH between the
Airdolphin (Z-1000) and the battery. (See next page.)
19
7. Connecting the System
7-4 Connecting the Airdolphin output cable extension
A total of six cables
extend from the Airdolphin
(Z-1000): four power
cables and two data
communication cables.
Circuit Diagram of D.P.D.T.Blade Switch
Operate
Stop
Short cable
* Each cable is 500mm long.
To the Battery
Use a compression sleeve
to connect the extension
cable (15m) that leads
to the blade switch. Use
electrical tape or a shrink
tube to insulate the
connections.
Power cables from Turbine
Connect both sides
of the cables to the
terminal of the
D.P.D.T.Blade
Switch.
Extended
communication
cables from the
Turbine
Compression
Sleeves
Fuse
Short cable
Extended power cables
from the Turbine
Pay attention and abide by all safety and electrical codes before installation.
Pay attention to the + and – terminals when connecting the power cable to the battery.
Reverse connection will cause serious damage.
l
Pay attention to the + and – terminals when connecting the data transmission cable to the Remote
Monitor "RM-1000". Reverse connection will cause serious damage.
l
20
7. Connecting the System
7-5 Connection example
The Airdolphin can be used in a multitude of configurations. This section shows a typical connection
example recommended by Zephyr Corporation.
Caution
This manual is intended for individuals who have the knowledge and technical skill
needed to work with batteries and electrical wiring. If the Airdolphin is used in an
inappropriate configuration or wired incorrectly, its use could cause a severe accident
and damage the system, including this product.
If you have any questions regarding Airdolphin system configuration, contact either
the dealer where you purchased this product or Zephyr Corporation for more
information.
21
7. Connecting the System
AT-10
RM-1000
TH-5
LAN
PC
AM-10 (Anemometer
and
thermometer)
Standalone System (Off Grid)
Airdolphin
D.P.D.T
Blade Swich
DC48V
Deep Cycle Battery
DC/AC Inverter
22
8. Explanation of Airdolphin Operations
During operation, the indicator LED on the body of
the Airdolphin can be used to check the operating
status of the system.
The indicator LED can light in solid or flashing red,
green and orange (red and green).
Indicator LED
Operating Status List
Mode
Power Assist
Mode
Normal Mode 1
250rpm–
1000rpm
Normal Mode 2
(1000rpm)
Normal Mode 3
(600rpm)
Stop Mode
Restart
(Same as start
mode)
Indicator Status
Solid Orange
Solid Green
Flashing Green
Status
Cause
Operation
Power Assist rotates
the Airdolphin at
80rpm in 10-second
every minute
No wind for 1 minute
Operating Normally
Generating electricity
Wind speed - 10m/s
Generating electricity
Wind speed 10 - 20m/s
Solid Red
Flashing Red and
Green
Generating electricity
Wind speed 20m/s -
Rtating slowly or stop
Power assist stop
Solid green for 10
seconds, flashing
orange for 5 seconds, solid red for
90 seconds
Rotor rotating at 250–
1000rpm
Operating Normally
Rotor rotating at 1000 rpm
Operating Normally
a. Battery fully charged
(voltage exceeds 59.2V)
b. At around 20m/s or
more of wind speed
Operating Normally
a. Over voltage (battery
voltage exceeded 72V)
b. G
enerator ambient temperature exceeded 90°C
Power On/Off
23
23
a. System returns
to normal mode
if the battery voltage drops below
53.2V.
b. System returns
to normal mode if
generator motor
ambi-ent temperature drops below
60°C
System started
in normal mode
9. Considerations When Choosing
Peripheral Materials/Devices
Choosing peripheral materials/devices
Batteries
Zephyr Corporation recommends the use of a deep cycle battery (AGM) for all off-grid applications to
handle the deep charge/discharge cycles in the wind turbine system. (A car battery cannot be used
for repeated deep charge/discharge.)
Connect four 12VDC batteries in a series circuit to attain 48VDC performance.
Recommended battery specifications:
Off-grid : Deep cycle lead acid battery, 500Ah or more
Mounting Tower
The mounting Tower that supports the Airdolphin is an extremely important part with respect to safety.
We recommend that all locations to which equipment will be attached as well as the foundation mast
are strong enough to provide adequate safety.
• Location and height of the mounting tower : Select free and safe location where the ample amount of wind
flow is obtained. The height of the pole must be 3.5m or more to ensure safety from hazard to people.
• The tower must have an upper portion of at least 100mm in length and an outer diameter of 48.6mm. The
total tower height must be of sufficient height to prevent accidental with body or structures.
• The tower must withstand horizontal wind pressure of 105kgf /231lbf(at a wind speed of 65m/s,145.3mph)
• You should consult with your local dealer or Zephyr Corporation for details.
Cables
A considerable amount of current flows through the cables and devices (batteries, use inverter etc)
connected to the Airdolphin (Z-1000). Use cables specified by Zephyr Corporation or manufactured
them to recommended specifications.
• Wire Diameter Sizes
To select the appropriate size wires, measure the distance between the turbine and the batteries. Make sure
you include the height of the tower and refer to the following wire size chart.
Distance between Airdolphin and Batteries Cable diameter
5.5 mm2
7m (22.96 ft)
15m (49.21 ft)
8.0 mm2
* Cable quality and electricity transfer rate vary in accordance with turbine quantity.
* A multitude of cables with different specifications is also available. For details, contact the dealer where you
purchased the Airdolphin (Z-1000) or Zephyr Corporation.
24
9. Considerations When Choosing
Peripheral Materials/Devices
Inverters
Since batteries are a direct current power source, a DC-AC inverter is needed to convert direct
current (DC) to alternating current (AC) when an alternating current device is used to manage the
electrical load. Verify the capacity and type of your inverter to ensure that it is appropriate for the load
you are using.
* Always use 48VDC inverters.
* Always use inverters equipped with an overvoltage protection circuit.
10. Maintaining the Airdolphin System
Perform the maintenance tasks listed below to ensure the safe operation of this system.
10-1 Daily Inspection
Although the Airdolphin is basically a maintenance-free system, Zephyr Corporation recommends
visual inspections.(See page 23 for details on the indicator lamp.)
a)Is the power assist rotating the turbine at the standard speed (80rpm) for 10 seconds every minute?
*T
he power assist will rotate the turbine at a speed slower than the aforementioned standard approximately 10% of the time. This is not a malfunction.
b)Is the system exhibiting operations listed on the “Explanation of Airdolphin Operations” chart above?
(Example: Indicator lamp is green when the rotor is rotating at a high rate of speed (250-1000rpm), etc.)
c)Are the blades free from damage?
d)Is there an approximate 3mm gap between the hub and the main unit face?
e)Is any debris such as ice, snow, or tree branches jamming the turbine?
f )Is the joint on the tail moving smoothly?
g)Is the tail free from any minor damage?
WARNING
CAUTION
If replacement is necessary, only use parts specified by Zephyr International. Use of other parts could
cause accidents or malfunction.
l
When
strong winds blow, tree branches and other objects may make contact with and damage the wind
turbine, its support pole, or its wiring. Continued use of the wind turbine when it is damaged may cause
electric shock, fire, a serious accident, or cause the turbine to cease functioning. Inspect all parts of the
Airdolphin (Z-1000) after periods of strong wind.
l Do not place the Airdolphin body upside down or inclined during installation or maintenance. Water (rain,
snow) can leak inside from the joint gap of the body and may cause damage to the turbine. When the
body is upside down or inclined and have a possibility of getting wet, put a cover over the body to avoid
water.
25
26
.
27
* This document may not be reprinted or copied without express permission from Zephyr Corporation.
Zephyr Corporation
American Zephyr Corporation
Hatsudai Center Bldg. 1-51-1, Hatsudai
Shibuya-ku, Tokyo, Japan
Fax +81-3-3299-1977
Tel +81-3-3299-1910
URL http://www.zephyreco.co.jp/en
331 West 57th Street, Suite 555
New York, NY 10019 U.S.A.
Tel: 646-378-7911 Fax: 212-489-8011
www.americanzephyr.com
Document No.
Z3302-02-01