1
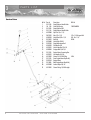
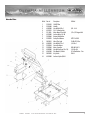
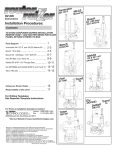
OLYMPIA™
Battery
Edger
W arra n ty
Welcome to the OLYMPIA™ Advantage
The entire OLYMPIA™ Product line is designed and built to exacting standard to provide trouble free performance. Like
all mechanical equipment however, trouble free performance requires a complete maintenance and proper operating
procedures to be followed. Failure to follow a complete and on-going maintenance program will invalidate the Resurfice
Corp. warranty on the OLYMPIA™ Battery Edger.
Purchaser:
........................................................................................................................................................................
Address:
........................................................................................................................................................................
........................................................................................................................................................................
........................................................................................................................................................................
........................................................................................................................................................................
Model:
........................................................................................................................................................................
Serial Number: ........................................................................................................................................................................
Date Delivered: ........................................................................................................................................................................
The illustrations and product information contained in this manual were current at the time of publication. In order to
continue Resurfice Corp.'s development of its technology, Resurfice Corp. reserves the right to change designs, models and
specifications without notice and without liability for such changes.
Resurfice Corp. warrants the components of your OLYMPIA™ Battery Edger against defects in material and workmanship,
for two full years from the date of delivery.
The motor for your OLYMPIA™ Battery Edger is a Briggs & Stratton Etek™. To validate it's warranty it must be placed on an
ongoing maintenance program as outlined in the motor manual included with the OLYMPIA™ Battery Edger. The charger is a
Guest® Smart Charger 2621. For the continued safe, economic operation and to validate the Resurfice Corp. warranty, the over
all maintenance and operation of your OLYMPIA™ Battery Edger must strictly follow the guideline outlined in this manual.
Resurfice Corp. or an authorized dealer must first authorize all warranty repairs.
No warranty on this machine will be honored by Resurfice Corp. other than that stated above.
WHAT EVERY ICE RESURFACER SHOULD BE
i
T able of C o n te n ts
For Safe
Operation
The OLYMPIA™ Battery Edger is intended for use, only by people who have a basic knowledge of motorized
equipment operation and maintenance. Resurfice Corp. cannot accept responsibility for any accidents that occur as a
result of operation or maintenance of the machine .
Operating conditions vary widely and Resurfice Corp. cannot predict these varying conditions, and it is therefore
the user's responsibility to determine the appropriate settings in the operation of the OLYMPIA™ Battery Edger.
Each OLYMPIA™ Battery Edger is shipped with a variety of built-in safety devices. To prevent the occurrence of such
accidents, all operators and maintenance personnel that deal with the machine must carefully read the manuals supplied
by Resurfice Corp., Guest® and Briggs & Stratton Etek™, before attempting to operate and maintain the OLYMPIA
Battery Edger.
Because there are many "things that cannot be done" and "things that must not be done" when using the
OLYMPIA™ Battery Edger, it is impossible to cover it all in the OLYMPIA™ Battery Edger manual. Assume that
something is impossible or unsuitable unless the manual specifically states that it can be done.
The following manual is customized for the OLYMPIA™ Battery Edger. It provides detailed information
regarding the following:
1 - DELIVERY PROCEDURE
GUEST Charger Installation Procedure................................................................................................... 1
2 - OPERATING PROCEDURE
Battery Charging Procedure..................................................................................................................... 3
Blade Inspection and Replacement Procedures....................................................................................... 4
Edger Operational Procedure.................................................................................................................. 6
Maintenance Program............................................................................................................................. 6
Charger Safety Procedure........................................................................................................................ 7
3 - PARTS LIST..................................................................................................................................................... 8
Please make use of this material when operating and maintaining the OLYMPIA™ Battery Edger.
Fundamental safety information is high lighted throughout the manual.
All cautions on operation must be strictly observed when operating the machine, carrying out maintenance work,
and storing the equipment. Failure to observe the fundamental safety information can cause accidents in which the
operator or other personnel that deal with the OLYMPIA™ Battery Edger are seriously injured, or the machine is
damaged. All personnel that deal with the machine must carefully read and thoroughly understand the information
in the following pages before attempting to operate or maintain the OLYMPIA™ Battery Edger.
Delivery
Procedure
ii
The OLYMPIA™ Battery Edger arrives fully assemblied except for the blade tips. They are attached
to ther handle in a plastic bag. Using the Blade replacement procedure on page 4 install the blade
tips onto blade plate.
O L Y M P I A M I L L E NN I U M – T H E N E W S T A N D A R D
1
Delivery
Parts Check
D elivery P rocedure
The OLYMPIA™ Battery Edger is delivered fully assembled along with the Guest® Model 2621 3 Output, 3 Stage
battery charger.
Upon receipt of the OLYMPIA™ Battery Edger, install the charger in an open area, adjacent to a direct electric power
source outlet, according to the Guest installation instructions for battery chargers.
Safety Note: Make sure the charger is mounted in an open area, with the fins vertical to maximize
venting of the internal heat.
WHAT EVERY ICE RESURFACER SHOULD BE
1
GUEST® 2621
Installation
In order to optomize the performance and useful life of your charger, the following guideline for installation should be followed.
1. Chargers are electronic products designed for efficient energy conversion, specifically taking unregulated AC line power
and converting it to an isolated low voltage DC power source. The nature of the process dictates that some heat is
generated in the process, and consideration should be given to the proper dissipation of this heat. Electronic assemblies
are sensitive to excessive heat and extreme temperatures could shorten the life cycle of the charger.
2. The measure of the output of a charger is called "watts", which are calculated by multiplying voltage X current. For
example, a 12 volt, 10 amp charger will generate approximately 120 watts (12 X 10). If the "waste heat" generated by
the charger was 10% of the rated wattage, it would be the equilavent of a 12 watt light bulb. In open air spaces, this
heat is not an issue- but in a small box, it could get very hot.
3. Guest® chargers are cooled by convection. This means that as the charger generates warm air, it rises and cooling air
takes its place. The efficiency of Guest® chargers allows them to build a product that does not require a fan running
constantly over the electronic components. It is important that the charger is mounted in an area that will allow
sufficient airflow. Keep in mind that the Guest® chargers will self-protect in extreme temperature by cutting back on the
amperage output. Correct installation will ensure maximum efficiency.
There are a varity of configurations and cases available from Guest®. The following holds true for all models.
a) Always mount the charger with the fins vertical, so they can form a little chimney or air column to take away the internal heat. Remember, heat will affect the efficiency and longevity of your charger.
b) Guest® recommends that you do not mount the charger with the cooling fins horizontal.
c) Keep the top charger surface at least 4" below the ceiling of any compartment and the bottom of the charger surface at least 6" above the floor so the air can find its way around the body to provide cooling.
A backing or mounting panel of wood, metal, or heavy plastic should be used if the chargers are mounted against an
insulated bulkhead.
4. Mounting Space: The larger the space, the greater the cooling. Use larger areas when available.
2
O L Y M P I A M I L L E NN I U M – T H E N E W S T A N D A R D
2
Battery
Charging
Proceedure
operati n g P rocedure
The OLYMPIA™ Battery Edger is re-charged by a Guest® Model 2621 "smart" charger. It first evaluates the amount of
charge in each of the three batteries on the OLYMPIA™ Battery Edger. One of the batteries is charged at a rate of 10 amps
and the other two are charged at a rate of 5 amps. Consequently one battery will charge faster then the other two. When
the proper charge levels are obtained the battery charge cycle switches automatically into the trickle charge mode which
maintains the battery at the peak charge.
The OLYMPIA™ Battery Edger three stage battery array is designed for safety and all operators must comply with the
following safe battery charging instructions:
Step 1: Make sure the GUEST charger is unplugged from the main electric power source or the power control switch is turned off.
Step 2: Remove the ignition key from the OLYMPIA™ Battery Edger.
Step 3: Plug the charger into the OLYMPIA™ Battery Edger and then plug the charger into the direct electric power source.
SAFETY NOTE: Always plug the charger into the OLYMPIA™ Battery Edger before plugging the charger
into the direct electric power source.
Preparing
to Charge
Precautions
Over Load Protection:
If an electrical short or overload (excessive demand) occurs in the DC wiring connected to this charger, the charger will reduce its
output voltage to avoid damage. The GUEST Model 2621 has internal electronic current limiting. When an electrical short occurs, the
red LED on the front panel will be on. The overload or short must be removed in order for the charger to start charging again. The
chart below describes how the two sets of LED lights on the charger indicate the state of charge on your batteries.
DISPLAY
OPERATING CONDITION
Red lit
Green unlit
When the red light is on, it indicates that the batteries are discharged and the charger is operating in
the BULK mode (Stage 1) This charging rate is 10 amps and two 5 amps for each Engine start output.
Red lit
Green lit
When both the green and the red lights are on, the charger is in ABSORPTION mode at between
9 and 3 amps (stage 2). This mode of charging gradually tops off the batteries, and reduces
harmful sulfating. While both lights are on, the voltage measured (with the charger on) should be
apprximately 14 volts. If both lights stay on longer than 48 hours, refer to the trounble shooting
page at the back of the GUEST manual.
Red lit
Green unlit
When the green light is on, the charge is in its FLOAT mode at a current of less than 2 amps, (stage 3).
Your battery is now 90% charged and ready for use. This float charging current will gradually decrease
to as low as 0.1 amp over the next day as the battery reached 100% charge. The batteries will now be
kept at full charge without over-charging. The battery voltage is maintained at 13.3 VDC. If the green
light stays on when you battery is known to be low, refer to the trouble shooting in the Guest manual.
Maintaining the OLYMPIA™ Battery Edger: Periodically clean all the battery terminals with baking soda
and tighten all connections. No other maintence is required.
WHAT EVERY ICE RESURFACER SHOULD BE
3
2
Battery Cycles
operati n g P rocedure
The sealed lead acid gel batteris on the OLYMPIA™ Battery Edger are rated for 1,600 cycles. Every time the OLYMPIA™
Battery Edger is plugged into the GUEST charger constitutes a single cycle. A full charge on the batteries provides for
approximately 40 to 60 minutes of operating time, depending on how deep a cut you are making. If you edge the ice
surface once a day, it should only take 15 minutes to complete the edging procedure. Consequently, to get maximum life out
of the batteries your should recharge the batteries every third or fourth day.
SAFETY NOTE: When your are ready to edge the ice, make sure you disconnect the direct electric power
source to the charger and then disconnect the charger from the OLYMPIA™ Battery Edger.
Blade
Installation
Before using the OLYMPIA™ Battery Edger you first must inspect the blades to ensure they are undamaged and secured
tightly to the blade plate.
SAFETY NOTE: Prior to inspecting the blade tips make sure you are wearing protective gloves.
1. To check the blades: first remove the ignition key.
2. Now tilt the OLYMPIA™ Battery Edger backward onto the sloped back. Unlike other edgers on the market the OLYMPIA™
Battery Edger's batteries are gel filled and sealed, allowing you to lay it over at any angle. However, the OLYMPIA™ Battery Edger is
designed to safely support the unit when the control handle is pushed downward, tilting the unit onto its sloped back.
3. Rotate the blade plate and visually inspect each of the blade tips to ensure they are undamaged, sharp and securely tighten to
the blade plate. If the blade tip is damaged, the OLYMPIA™ Battery Edger will vibrate and you will get an uneven finish on the ice. Even
more important, a loose or damaged blade tip could seperate from the blade plate and cause serious injury or damage.
Safety Note: Most blade damage is caused by hitting screws in the dasher boards or ice surface entrance threshholds.
4. When a blade needs replacement, first undo the four bolts holding the blade plate in place.
5. On a work surface loosen the two bolts holding the blade tip to
Straight Edge
the blade plate. Remove the damaged tip and replace it with a new blade
tip, making sure to position it correctly on the plate before tightening the
holding bolts to a maximum 11 ft. lbs of torque.
6. Using a straight edge along the opening in the cutting side of the edger,
adjust the blade tips in or out along the slotted guides until they are 1/16 to 1/8 of an
inch (1.6 mm to 3.2 mm) from the straight edge. Hand tighten and check clearance.
Positioning the blade tip beyond the blade guard casing will cause damage
to both the blade tip and the boards.
To maintain the consistent edging, make sure the blade tips are the
same distance from the outer edge of the blade guard casing.
Approx. 1/16" - 1/8"
To double check, measure an existing undamaged blade for the proper
(1.6mm - 3.2mm)
measurement and adjust the new blade accordingly.
4
O L Y M P I A M I L L E NN I U M – T H E N E W S T A N D A R D
7. On the eight blade plate, we recommend every second blade be inset by moving it to the back of the slide groove. The
alternate blade tips are positioned correctly by measuring from the outer edge of the blade guard casing to the tip of the blade.
It should be 1/16" to 1/8" inside the edge.
When the blades are inspected and replaced if necessary, re-attach the blade plate with the four bolts making sure to
tighten to a maximum 11 ft. lbs. of torque on the grade 8 bolts.
Safety Note: Make sure you do not over torque the blade attachment bolts. It can cause the blade to
break and fly out from under the edger. Because of the high velocity of the spinning blade plate this can be
extremely dangerous.
Edging
Procedure
Once the OLYMPIA™ Battery Edger is charged, the blades inspected and replaced if necessary, you are ready to edge
the ice surface.
Safety first: Before entering the ice surface make sure you are wearing steel toed boots, safety googles
or glasses, and studded slip on boot covers to provide proper traction on the ice.
The OLYMPIA™ Battery Edger is designed to remove ice build up along the boards and level the ice surface. Ice buildup
extends from the board into the ice surface. To properly level the ice we recommend the following proceedure:
1. Push the OLYMPIA™ Battery Edger onto the ice surface. Securely close the entrance door and ensure that all the
other entrance doors are closed and secured.
2. Walk the entire circumference of the ice surface examining the board surfaces for protruding screws and materials
embedded into the ice and/or boards. Remove any such debris. This will prevent damage to the edger, the boards and most
importantly to the operator.
3. After completing the board inspection walk around the circumference of the rink a second time, examining the ice
surface for high spots. Using a felt tip pen, mark the beginning of a high spot with a line and an arrow pointing forward
along the high spot. At the end of the high spot mark another line and an arrow pointing backwards. This will clearly
indicate where you have to spot edge the ice.
4. With the blades in the fully up positon turn on the OLYMPIA™ Battery Edger compress the start bar on the handle
and push the edger forward to the first marked high spot.
It is very important to keep the edger moving thoughout the edging process.
5. When the edger is against the board and you reach the first arrow, lower the cutting blades by pushing the lock button on
the blade height control lever to release it and lower the cutter asembly by pushing the lever downward. The blades will begin to cut
into the high spot, removing the ice. As you reach the end of the high spot, push in the control button on top of the blade height lever
and pull up to bring the blades off the ice surface. Repeat this until each high spot has been removed.
6. Once the high spots are removed do a second lap around the ice circumference. Move the edger against the boards
with the blades spinning in the raised position. Now moving forward push the blade height control lever until the cutter
assembly starts cutting a thin cut of the ice. Maintaining that cut level, edge the entire circumference of the ice surface.
WHAT EVERY ICE RESURFACER SHOULD BE
5
2
operati n g P rocedure
SAFETY NOTE: NEVER move the OLYMPIA™ Battery Edger backward when the blades are moving or try to
cut backwards.
7. When you have completed a full circuit around the ice, raise the cutter assembly to the full up position, release the
start bar and turn off the key. Exit the ice surface and store the OLYMPIA™ Battery Edger in the proper storage area next to
the charger.
SAFETY NOTE: Always release the safety bar before turning the ignition key off. Turning key off while the
safety bar is engaged can cause severe damage to the OLYMPIA™ Battery Edger .
A fully charged OLYMPIA™ Battery Edger is able to complete three to four full edging proceedures under normal ice
build up scenarios following a daily edging regime.
The Briggs & Stratton Etek™ motor on the OLYMPIA™ Battery Edger, has a safety preset which turns off the motor if it
is over worked or over heats. If this occurrs, simply turn the igniition key to the off position and wait until the motor has had
time to cool down. Once cooled the Briggs & Stratton Etek™ can be started following the normal starting proceedure.
SAFETY NOTE: When doing any inspection or maintenance work on the OLYMPIA™ Battery Edger always
Electric Motor
Safety Feature remove the ignition key first. This is the best safety measure you can use in preventing accidents.
To open the OLYMPIA™ Battery Edger turn the opening knob on the top of the edger casing counter-clockwise. You will
note the three batteries which are pre-wired together and enclosed in a safety harness.
Each battery has it's own fuse leading from the charging circuit through the conduit wire harness.
DANGER: The 100 amp fuse located at the front of the OLYMPIA™ Battery Edger, is hot. Do not touch.
Maintenance
Proceedure
Whenever working on the OLYMPIA™ Battery Edger, make sure you are not wearing any rings, bracelets or
watches which can cause an electric arc and severe injury.
If you have to remove the 100 amp fuse make sure the battery array is disconnected by disengaging the positive terminal
(red wire) from the front battery before touching the 100 amp fuse. Do not re-engage the positive terminal until after you
have replaced the 100 amp fuse.
Risk of explosive gases! Working in the vicinity of sealed lead acid gel batteries is dangerous. Batteries
generate explosive gases during normal operation. Therefore it is of utmost importance you follow these
instructions exactly.
6
O L Y M P I A M I L L E NN I U M – T H E N E W S T A N D A R D
IMPORTANT
Adhere to the following personal safety precautions when installing or working with the chargers.
CHARGER
SAFETY
1. Someone should be within voice range or close enough to come to your aid when you work near a seal leadINSTRUCTIONS
acid Gel battery.
2. Have plenty of fresh water and soap nearby in case battery acid contacts your skin, clothing or eyes.
3. Wear complete eye protection and clothing protection. Avoid touching your eyes while working near a battery.
4. If battery acid contacts your skin or clothing, wash them immediately with soap and water. If acid enters your
eye, flood the eye with cold, running water for at least ten minutes and get medical attention.
5. Never smoke or allow open flame in the vicinity of the battery.
6. Do not drop a metal tool onto the battery. It may spark, short circuit the battery and may cause an explosion.
7. Remove all personal metal items such as rings, bracelets, necklaces and watches when working near a leadacid battery. A battery can produce short circuit currents high enough to weld a ring or the like, causing a
severe burn.
SAFETY NOTE: If after charging you find the performance power is low have the batteries checked
by a qualified battery technician.
Always make sure the ice is clear of both members of the public and arena staff prior to
operating the edger.
Safety Glasses, (steel toed) safety boots with proper grips must be worn by all staff during edging
operation.
WHAT EVERY ICE RESURFACER SHOULD BE
7
3
PARTS LIST
Control Arm
Ref.#
1
2
3
4
5
6
7
8
9
10
11
12
13
14
15
16
17
18
19
20
21
8
Part #
55- 5120
10- 120
55- 5100
55- 5110
49-37800
50-51925
49-30550
25-51855
49-33600
55-25330
49-36250
49-33235
49-30050
55- 3210
49-33555
49-19025
55- 3150
55-25310
55- 3200
49-33500
49-19035
Description
Depth Selector Handle Knob
Gear Shift Spring
Depth Selector Rod
Depth Selector Handle Knob
Split Pin 1/4 x 1 1/2
Axle 1/2 x 1 1/4 Hex Hd bolt 3/8 x 1 1/4
Rod End
Hex Hd Nut 3/8-24
Depth Adjustment Rod
Flat Washer 3/8
Hex Hd Jam Nut 5/16-18
Stripper Bolt 3/8 x 3/8 Engine Mount Connecting Bar
Hex Jam Nut 3/8-16
Grease Fit 1/4-28 45 Deg.
Front Engine Mount Depth Adj.
Engine Mount
Back Engine Mount Depth Adj.
Locknut-Nylon 3/8-16
Grease Fitting 1/4-28 Straight
O L Y M P I A M I L L E NN I U M – T H E N E W S T A N D A R D
OEM #
C18291600318
1/2 x 1 1/4 Stripper Bolt
3/8 - 16 x 1 1/4
VCW6
1636
Handel Bar
Ref.#
1
2
3
4
5
6
7
8
9
10
11
12
13
14
15
16
Part #
55-25450
55-25400
49-30500
49-33555
55- 1050
49-33200
35-23860
55-25070
50-53015
49-30230
55-25042
55-25040
49-30200
49-36100
50-53250
49-33500
Description
ON/OFF Bar
Handle
Hex Hd Bolt 3/8 x 1
3/8 - 16 Hexjam Nut
Motor Mount Pivot Bolt
Locknut Nylon 1/4-20
Bottom Hub Washer
Safety Push Buttom
Valve Pilot Light Hex Hd Bolt 1/4 x 1
Controller Mount
Motor Controller
Hex Hd Cap Screw 1/4 x 3/4
Flat Washer 1/4 Hole
Key Switch
Locknut -Nylon 3/8-16
OEM #
3/8 - 16 x 1
1/2 x 1/2 Stripper Bolt
OTT P1-62122
PL-20-GC 2 Wire
1/4-20 x 1
SRE-MC 248-11
1/4-20 x 3/4
3/16 Flat Washer - Zinc
95614
16
WHAT EVERY ICE RESURFACER SHOULD BE
9
3
PARTS LIST
Panels & Sled
Ref.#
1
2
3
4
5
6
7
8
9
10
11
12
13
14
15
10
Part #
49-33130
46- 9600
49-30134
49-36045
55-25010
49-36140
49-30233
49-30550
55-25015
49-33213
49-33500
49-33075
55-25085
49-30135
55-25020
Description
OEM #
Locknut-Nylon 10-32 S/S
NS11S1
Panel Turn Latch
MO99957-10-201-10 Spring Latch
Button Hd Soc10-32x1/2 S/S
Nylon Flat Washer # 10
WF194375032NY.194x.375x.032
Edger Battery Cover Front
Nylon Flat Washer 1/4
WF257500032NY.257X.500X.032
Button Hd Soc 1/4-20x1 S/S CSB 1416S1
Hex Hd Bolt 3/8x1 1/4
3/8-16x1 1/4
Edger Battery Front Hood Hinge
Well Nut 1/4-20 NWEL1418
Locknut-Nylon 3/8-16
Well Nut 10-32 NWEL111910-32x.015-.192
Battery Connector Rec.70084 CPR70084
Button Hd Soc 10-32x3/4 S/S CSB1112S1
Edger Battery Cover Back
O L Y M P I A M I L L E NN I U M – T H E N E W S T A N D A R D
Under Carriage
Ref.# Part #
1
55-25005
2
55-25310
3
55-25300
4
55-25350
5
55-25355
6
50-51760
7
49-36250
8
49-30560
9
49-30205
10 49-36170
11 49-36100
12 49-30152
13 50-51930
14 55- 1010
15 55- 1000
16 49-33555
17 49-30530
Description
Motor Electric
Engine Mount
Base
Bottom Hub
Bottom Plate Edger Blade
Flat Washer 3/8
Hex Hd bolt 3/8 x 1 1/4
Hex Hd Bolt 1/4 x 3/4
Lockwasher 1/4
Flat Washer 1/4 Hole
Hex Head Bolt 1/4 X 1/2 GR8
Back Axle
Wheel Washer
Rubber Wheel 4”
3/8 - 16 Hexjam Nut
Flat Socket Screw 3/8 x 1
OEM #
696951
3/8-24 x 1 1/4
1/4-28 x 3/4 HCS
3/16 Flatwasher - Zinc
CH81408
1/2 x 1 3/4 Stripper Bolt
18.8 S/S-Thin Series 1/2 BS
RED 100PU14
3/8-16x1
WHAT EVERY ICE RESURFACER SHOULD BE
11
3
PARTS LIST
Battery Tray
Ref.# Part #
1
49-33500
2
49-36250
3
55-25095
4
55-25000
5
55-25045
6
49-30110
7
55-25055
8
55-25050
9
49-33115
10 55-25100
11 49-30550
12 49-38290
13 37- 198
14 49-30150
15 49-33200
12
Description
Locknut - Nylon 3/8 - 16
Flat Washer 3/8
Battery Hold Down Channel 22”
Edger Battery
Edger Battery Relay-Contactor
RD Soc. M/S 10/24 x 1/2
Edger Battery 100 Amp Fuse
Edger Battery Fuse Block 100A
Locknut-Nylon 10-24
Edger Battery Tray
Hex Hd Bolt 3/8 x 1 1/4
M4 x 8 Hex Cap Screw
Insulated 3/8 “ Clamp
Hex Hd Bolt 1/4 x 1/2
Locknut - Nylon 1/4 - 20
O L Y M P I A M I L L E NN I U M – T H E N E W S T A N D A R D
OEM #
R-13858
SLA12-55
SRE-CT-SW80B-60
LJP-100SP
LJ60100-1C
10-24 Nylon Insert Locknut
3/8-16x 1 1/4
9338MO408
35030
1/4-20 x 1/2
Electrical System
WHAT EVERY ICE RESURFACER SHOULD BE
13
4
MAINTENANCE LOG
Maintenance Log
To assist you in maintaining a permanent record of your maintenance program for your new Olympia, keep track of all
maintenance performed in the following log.
Copy this form for additional pages as needed.
Date
Hours of Operation
Maintenance Performed
..............................................................................................................................................................................
..............................................................................................................................................................................
..............................................................................................................................................................................
..............................................................................................................................................................................
..............................................................................................................................................................................
..............................................................................................................................................................................
..............................................................................................................................................................................
..............................................................................................................................................................................
..............................................................................................................................................................................
..............................................................................................................................................................................
..............................................................................................................................................................................
..............................................................................................................................................................................
..............................................................................................................................................................................
..............................................................................................................................................................................
..............................................................................................................................................................................
..............................................................................................................................................................................
..............................................................................................................................................................................
..............................................................................................................................................................................
..............................................................................................................................................................................
..............................................................................................................................................................................
..............................................................................................................................................................................
..............................................................................................................................................................................
..............................................................................................................................................................................
..............................................................................................................................................................................
..............................................................................................................................................................................
..............................................................................................................................................................................
..............................................................................................................................................................................
..............................................................................................................................................................................
..............................................................................................................................................................................
..............................................................................................................................................................................
14
O L Y M P I A M I L L E NN I U M – T H E N E W S T A N D A R D