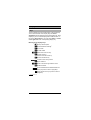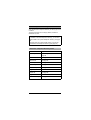
1
û
+LFRP#FRUGOHVV#(0
*LJDVHW#6333#0LFUR
2SHUDWLQJ#LQVWUXFWLRQV
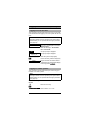
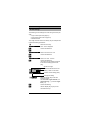
Warning!
Please read the
safety notes on
page 2 before
putting the equipment into service.
General
Safety notes
Notes on handset use
Do not use the handset in environments where there is
danger of explosion (for example, a paint shop).
Research has shown that electronic devices,
such as medical equipment, can be affected by the handset. Local safety regulations must therefore be
observed!
The handset is not suitable for people with hearing
aids since the radio signals interfere with hearing aids,
producing a very unpleasant humming sound if the volume is turned up too high.
Do not use handsets in damp environments (bathroom).
The units are not splashproof.
If you lend your handset to someone else, please make
sure that you include the operating instructions with it.
Notes on battery use
Only use the approved battery V30145-K1310-X143
(NiMH battery), see page 12.
Never use other batteries or normal (non-rechargeable) batteries. These batteries can cause short-circuits
and may be subject to damage (dangerous).
Avoid contact with water and fire.
Do not use non-Siemens charging devices. These
could damage the batteries.
Only use the supplied plug-in power supply unit as
designated on the underside of the charging shell.
Please dispose of defective batteries, the mobile handset
and the charging shell in accordance with the environmental specifications.
Note:
The display is covered by a protective
film. Remove the film before putting
the handset into service.
2
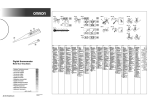
General
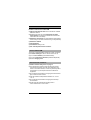
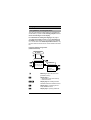
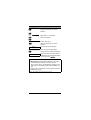
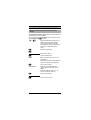
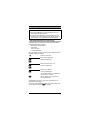
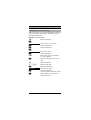
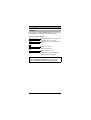
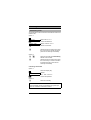
Operating elements, unit parts
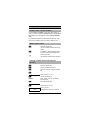
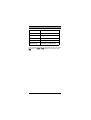
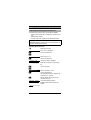
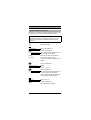
13
1
2
3
4
5
6
7
8
9
10
11
12
1
Receiver inset
8
Keypad lock
2
Display (illuminated)
9
Ringer-off key
3
Display keys
10
Microphone
4
On-hook key
11
Recall key
5
Menu key
12
6
Telephone directory
key (local)
Battery compartment/lid
13
Headset port
7
Talk key
Fig. 1 Operating elements, unit parts
3
Contents
General . . . . . . . . . . . . . . . . . . . . . . . . . . . . . . . . . . . . . . 2
Safety notes . . . . . . . . . . . . . . . . . . . . . . . . . . . . . . . . . . . 2
Operating elements, unit parts . . . . . . . . . . . . . . . . . . . . . 3
Contents . . . . . . . . . . . . . . . . . . . . . . . . . . . . . . . . . . . . . 4
Introduction . . . . . . . . . . . . . . . . . . . . . . . . . . . . . . . . . . 7
Notes on these operating instructions. . . . . . . . . . . . . . . . 7
Features . . . . . . . . . . . . . . . . . . . . . . . . . . . . . . . . . . . . . . 7
Hicom cordless EM . . . . . . . . . . . . . . . . . . . . . . . . . . . . . . 8
Environmental conditions . . . . . . . . . . . . . . . . . . . . . . . . . 8
General operating instructions . . . . . . . . . . . . . . . . . . . . . 9
Radio range. . . . . . . . . . . . . . . . . . . . . . . . . . . . . . . . . . . . 9
Leaving the radio network . . . . . . . . . . . . . . . . . . . . . . . . 10
Cleaning the handset . . . . . . . . . . . . . . . . . . . . . . . . . . . 10
Preparing the handset. . . . . . . . . . . . . . . . . . . . . . . . .
Inserting the battery into the handset . . . . . . . . . . . . . . .
Charging and using the battery. . . . . . . . . . . . . . . . . . . .
Fitting the attachment clip . . . . . . . . . . . . . . . . . . . . . . . .
Activating/deactivating handsets . . . . . . . . . . . . . . . . . . .
Activating/deactivating the keypad lock. . . . . . . . . . . . . .
11
11
12
13
14
15
Display . . . . . . . . . . . . . . . . . . . . . . . . . . . . . . . . . . . . .
Explanation . . . . . . . . . . . . . . . . . . . . . . . . . . . . . . . . . . .
Keys . . . . . . . . . . . . . . . . . . . . . . . . . . . . . . . . . . . . . . . .
User guidance, selecting functions . . . . . . . . . . . . . . . . .
16
16
17
18
Logging handsets onto a telephone system. . . . . . . 20
Logging on for the first time. . . . . . . . . . . . . . . . . . . . . . . 21
Logging on at other systems . . . . . . . . . . . . . . . . . . . . . . 21
Conducting calls . . . . . . . . . . . . . . . . . . . . . . . . . . . . .
Internal dialling . . . . . . . . . . . . . . . . . . . . . . . . . . . . . . . .
External dialling. . . . . . . . . . . . . . . . . . . . . . . . . . . . . . . .
Block dialling for internal/external dialling . . . . . . . . . . . .
Answering calls . . . . . . . . . . . . . . . . . . . . . . . . . . . . . . . .
23
23
24
24
25
Number redial. . . . . . . . . . . . . . . . . . . . . . . . . . . . . . . .
Number redial – last five numbers . . . . . . . . . . . . . . . . .
Manual number redial . . . . . . . . . . . . . . . . . . . . . . . . . . .
Copying a number to the local telephone
directory . . . . . . . . . . . . . . . . . . . . . . . . . . . . . . . . . . . . .
Editing an entry . . . . . . . . . . . . . . . . . . . . . . . . . . . . . . . .
Deleting an entry. . . . . . . . . . . . . . . . . . . . . . . . . . . . . . .
Displaying an entry . . . . . . . . . . . . . . . . . . . . . . . . . . . . .
26
26
26
26
27
27
28
Entering text. . . . . . . . . . . . . . . . . . . . . . . . . . . . . . . . . 29
Overview – key layout . . . . . . . . . . . . . . . . . . . . . . . . . . . 29
Entering letters/characters and digits . . . . . . . . . . . . . . . 29
4
Contents
Local telephone directory . . . . . . . . . . . . . . . . . . . . . . 31
Overview – telephone directory menu. . . . . . . . . . . . . . . 31
Storing numbers (directory/network prefix menu) . . . . . . 32
Dialling a number from the directory/network prefix menu34
Other telephone directory functions . . . . . . . . . . . . . . . . 34
Network prefix support . . . . . . . . . . . . . . . . . . . . . . . . 37
Linking the prefix and call number . . . . . . . . . . . . . . . . . 37
Speed dialling other locations . . . . . . . . . . . . . . . . . . . . . 37
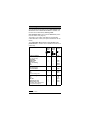
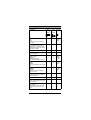
Main menu–overview. . . . . . . . . . . . . . . . . . . . . . . . . . 38
Settings – overview . . . . . . . . . . . . . . . . . . . . . . . . . . . 39
Sound settings. . . . . . . . . . . . . . . . . . . . . . . . . . . . . . .
Sound settings . . . . . . . . . . . . . . . . . . . . . . . . . . . . . . . .
Activating/deactivating sound settings . . . . . . . . . . . . . .
Activating/deactivating the ringer . . . . . . . . . . . . . . . . . .
40
40
41
42
Security. . . . . . . . . . . . . . . . . . . . . . . . . . . . . . . . . . . . . 43
Changing the handset PIN . . . . . . . . . . . . . . . . . . . . . . . 43
Activating/deactivating the handset lock . . . . . . . . . . . . . 44
Auto talk . . . . . . . . . . . . . . . . . . . . . . . . . . . . . . . . . . . . 46
Language . . . . . . . . . . . . . . . . . . . . . . . . . . . . . . . . . . . 47
Resetting the handset to the default state . . . . . . . . 48
Base settings . . . . . . . . . . . . . . . . . . . . . . . . . . . . . . . . 49
Selecting the base. . . . . . . . . . . . . . . . . . . . . . . . . . . . . . 49
Changing the base name . . . . . . . . . . . . . . . . . . . . . . . . 50
Short Cuts . . . . . . . . . . . . . . . . . . . . . . . . . . . . . . . . . . 51
Saving a short cut – new entry . . . . . . . . . . . . . . . . . . . . 52
Start Short Cut . . . . . . . . . . . . . . . . . . . . . . . . . . . . . . . . 53
Switching functions as of Version 3.0 . . . . . . . . . . . .
User interface . . . . . . . . . . . . . . . . . . . . . . . . . . . . . . . . .
Callback . . . . . . . . . . . . . . . . . . . . . . . . . . . . . . . . . . . . .
Missed calls list . . . . . . . . . . . . . . . . . . . . . . . . . . . . . . . .
System telephone directory . . . . . . . . . . . . . . . . . . . . . .
Call forwarding . . . . . . . . . . . . . . . . . . . . . . . . . . . . . . . .
Consultation during a call . . . . . . . . . . . . . . . . . . . . . . . .
Transferring a call . . . . . . . . . . . . . . . . . . . . . . . . . . . . . .
Toggle – Switching between two users . . . . . . . . . . . . . .
Conference . . . . . . . . . . . . . . . . . . . . . . . . . . . . . . . . . . .
54
54
56
58
60
61
63
64
65
66
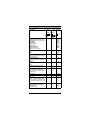
Switching functions – overview . . . . . . . . . . . . . . . . . 68
5
Contents
Message . . . . . . . . . . . . . . . . . . . . . . . . . . . . . . . . . . . .
Sending a message . . . . . . . . . . . . . . . . . . . . . . . . . . . .
Calling up a message received . . . . . . . . . . . . . . . . . . . .
Advisory message. . . . . . . . . . . . . . . . . . . . . . . . . . . . . .
74
74
76
77
Appendix . . . . . . . . . . . . . . . . . . . . . . . . . . . . . . . . . . .
Troubleshooting . . . . . . . . . . . . . . . . . . . . . . . . . . . . . . . .
Approval . . . . . . . . . . . . . . . . . . . . . . . . . . . . . . . . . . . . .
Technical data . . . . . . . . . . . . . . . . . . . . . . . . . . . . . . . . .
Headset (accessories) . . . . . . . . . . . . . . . . . . . . . . . . . .
78
78
79
79
80
Index . . . . . . . . . . . . . . . . . . . . . . . . . . . . . . . . . . . . . . . 81
6
Introduction
Notes on these operating instructions
These operating instructions describe the Gigaset 3000
Micro handset in connection with Hicom® cordless EM at
Hicom 150 E / Hicom 150 H.
All functions that can be performed via your handset are
described. You may discover that certain handset functions
are not available as required. The reasons for this may be as
follows:
●
●
The function is not configured for you and your handset. In
this case, please consult your system administrator.
Your Hicom 150 E / Hicom 150 H does not support this
function. Please contact your Siemens sales partner for a
system upgrade.
Features
Features of the DECT1 handset
●
●
●
●
●
●
●
●
●
●
●
●
Illuminated graphical display with battery charge display
Status-dependent functions
User interface with dialog menu2
Number redial for the last five numbers/names dialled
Telephone directory in the handset for approx. 100
entries
Enhanced user guidance with displays in different languages.
For information on setting the language see page 47
Block dialling with correction option
Auto talk3 on removal from the charging unit
Protection against inadvertent key activation
Enhanced convenience through short cuts
Long usage times without recharging using an NiMH
battery:
– up to 15 hours talk time.
– up to 200 hours in standby mode.
Each handset can log onto and be used by up to 4 DECT
systems
1 DECT = Digital Enhanced Cordless Telecommunications
2 As of Version 3.0
3 Activated by default
7
Introduction
Features of the Hicom cordless EM
●
●
●
●
●
●
●
Internal and external calls in the entire Hicom cordless
EM radio network
Roaming (the user can roam throughout the entire
radio network and still receive all internal and external
calls under one call number)
Automatic call transfer from base station to base station
when moving in the radio network during a call (handover)
Automatic callback
Call forwarding
Consultation during a call
Use of all important Hicom functions
Hicom cordless EM
The Hicom cordless EM DECT telephone system comprises
●
●
●
●
the radio exchange for Hicom 150 E / Hicom 150 H,
up to 16 base stations (transmitter/receiver),
up to 64 convenience handsets (cordless telephones)
and the charging shell.
Environmental conditions
●
●
●
●
●
●
Please read the safety notes on page 2!
The handset and charging shell should not be placed
near electronic devices, such as other telephones, hi-fi,
office or microwave devices, as this may adversely affect
the operation of your telephone and/or the electronic
equipment.
Do not expose the handset or charging shell to direct sunlight or other sources of heat.
Use the handset at temperatures between +5 °C and
+45 °C.
Do not expose the handset or charging shell to damp
environments.
Avoid using the handset and charging shell in
rooms where there is a lot of dust.
8
Introduction
General operating instructions
●
●
●
●
●
●
●
●
The devices offer a high level of privacy. No protection
can be guaranteed against illegal bugging using other
radio receivers.
When operating the handset, a basic distinction is made
between
– telephone/switching functions, e.g. when a call is in
progress, and
– local functions, display when handset is on.
Local functions can also be performed in the charging
shell.
Local functions can be cancelled with the on-hook key
€ýbefore they are stored or saved.
Your telephone directory entries, all settings and your PIN
are not lost, even if you remove the battery.
Call charge display at the handset is similar to that of
optiset E telephones.
The emergency number function is not supported by
cordless EM.
Operation at a Gigaset base station is possible in accordance with the Gigaset operating instructions.
Radio range
●
●
●
●
●
●
Depending on the environment, the range in the open is
up to 300 m per base station.
In buildings, the range extends up to 50 m per base station (depending on the room and building layout and construction).
If you leave the radio range of the system’s base stations during a call, the quality of the voice connection
drops, particularly if you move. For a better voice connection, move back into the base station range.
The radio connection is lost if you exceed the range. This
is identified by the flashing of ìã-!ýü, for example.
The field strength in the first display line is displayed by
the ´ symbol when the phone is idle.
Please consult your system administrator in the case of
range problems!
9
Introduction
Leaving the radio network
●
●
Integrated power saving function: if you leave the base
station radio range when the handset is switched on,
the interval between synchronisation attempts gradually
increases – this increases the battery life in standby
mode.
To ensure that the handset can be used as soon as you
return to the radio network, you should immediately register it again:
Press the on-hook key until the display is blank, press
the on-hook key again until the handset is on.
If you intend to leave the radio network and take your
handset with you, we recommend that you turn the handset off in order to save the battery.
Cleaning the handset
To clean the handset and the charging shell, simply wipe
them with a damp or antistatic cloth. Never use a dry cloth
(since this can generate electrostatic charges and discharges) and never use abrasive cleaning agents.
10
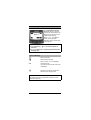
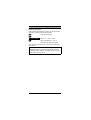
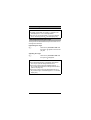
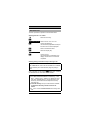
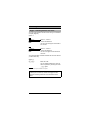
Preparing the handset
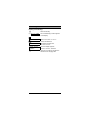
Inserting the battery into the handset
Note:
●
●
Please read the safety notes on page 2 first!
Only use the permitted battery, do not use any other
batteries or normal batteries (non-rechargeable) – see
page 12.
Proceed as follows to insert the battery:
Fig. 2 Inserting the battery
●
●
●
●
●
Hold the handset with the dialling keypad facing downwards. A battery compartment for the battery is located
in the lower part of the handset.
To open the battery compartment, press the grooves and
slide the lid downwards in the direction of the arrow. Lift
off the lid.
Insert the battery connector into the jack with the small
tabs facing upwards and left as shown.
Insert the battery into the battery compartment with the
label facing upward. Ensure that the cable is not trapped
under the battery.
Position the lid at a distance of a few millimetres from
the battery compartment. Slide the lid of the battery compartment upwards until it slots into place.
11
Preparing the handset
Charging and using the battery
The battery supplied (NiMH) is not fully charged.
To charge the battery, insert the handset with the display facing upwards into the Gigaset 3000L Micro charging shell.
The battery symbol on the handset display indicates the
charging status:
á Battery empty.
E Battery 33% charged.
8 Battery 66% charged.
7 Battery 100% charged.
Note:
●
●
●
●
New batteries should be initially charged for a minimum period of 16 hours without interruption –
irrespective of the battery symbol displayed!
You can subsequently place your handset in the charging shell each time it is used. Charging is electronically controlled which ensures that the battery is
charged optimally.
The battery warms up during charging.
Old, defective batteries must be disposed of in accordance with legal requirements, not in the normal waste
disposal system.
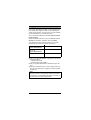
Permitted battery:
Toshiba Power Pack (NiMH 600mAh),
Order No.: V30145-K1310-X143
Operating times/charging time:
These times are only achieved after several charging and
discharging cycles!
Battery
capacity
Standby
time
Talk time
Charging
time
600 mAh
up to 200
hours
approx. 15
hours
approx. 5
hours
12
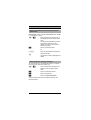
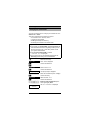
Preparing the handset
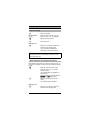
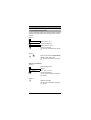
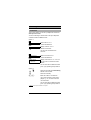
Fitting the attachment clip
You can fit the supplied attachment clip to your handset if
required.
Fig. 3 Fitting the attachment clip
Place the attachment clip on the back of the handset. There
are holes on the sides of the handset approximately level
with the displays. Press the clip towards the handset until
the clip’s side tabs click into place in the handset’s holes.
13
Preparing the handset
Activating/deactivating handsets
Note:
The language set at the factory is English! For information on changing the language to another language, refer
to page 47.
●
●
Off status: display clear – calls are not received!
On status: Base 1, for example, is displayed – prerequisite for all telephone functions, normal operating status!
Activating the handset:
€
Press the on-hook key and hold it
down until the display changes to on
or message status (see page 16).
You will hear the confirmation beep *.
* Activated by default
Deactivating the handset:
€
Press the on-hook key and hold it
down until the display clears.
You will hear the confirmation beep.
Note:
The handset can only be fully switched off when it is
removed from the charging shell!
The handset is automatically set to "on" or message status if it is placed in the charging shell (see page 16).
14
Preparing the handset
Activating/deactivating the keypad lock
This allows you to protect your handset against inadvertent
key activation, e.g. when carrying it in your bag. Calls are
signalled even if the keypad is locked and can be answered
in the same way as when the telephone is on.
Prerequisite: Handset is activated.
Activating the keypad lock:
z
Press the keypad lock key and hold it
down until Keypad locked appears.
9!2æã
'*á&!
Display in keypad lock status.
Deactivating the keypad lock:
z
Press the keypad lock key and hold
it down until the display changes to on
or message status (see page 16) .
15
Display
Explanation
The handset features a 4-line display with 16 characters per
line. Depending on the situation, the display shows:
●
●
●
●
digits, e.g. dialled numbers,
text, e.g. the current base (system),
symbols, e.g. ringing or battery symbol
and the current functions of the two display keys in the
last line.
Display when the handset is on or in message status
(example)
Receive intensity
›
ìã-!ýü
M ,
8
+ [
Charge status (66 %)
Display of handset name
Current functions of the
display keys:
Network prefix, message1, INT
key, number redial
Display keys:
– varying functions specific
to the display
– press left or right side of
the key, depending on the
function
Display when a call is in progress (example1)
Name in the system
4**,!
ûGHú
<
>
Call number
S
=
Display key functions:
scroll back & forth,
open service menu,
confirm selected functions
1 As of Version 3.0
16
Display
Keys
The two display keys are located directly under the display.
The current functions of the display keys are statusdependent and are displayed in the lower display line. Each
display key can be used to display one or two functions. In
the case of two functions, you must press either on the left
or the right side of the corresponding display key.
Meaning of the displays keys:
M Call up network prefix
, Receive/retrieve message*
+ No function
[ Number redial
;ý< Select menu item or entry
\ Cancel process /
back to next menu level up
= Confirm function/entry
GO BACK Cancel function and go back
N Open submenu
âý
Move to the left or right with the cursor
: Delete character
<
> Scroll backward and forward/activate functions (only when a call is in progress)*
S
Open service menu (only when a call is in
progress)*
* As of Version 3.0
17
Display
User guidance, selecting functions
The use of all telephone system features is simplified and
accelerated by a system of user-friendly prompts based on
menus and messages on the display.
For information on setting the language, see page 47.
The range of functions available changes depending on
the status of the handset, e.g. if the telephone is switched
on or in call status. With status-dependent functions, only
functions that are relevant to the current situation are available.
Function selection using menus
(handset functions)
On status
ð
\
Main menu
;
<
8HWWLQJV
'DVH#8HWWLQJV
-VHW#:VHU#4SWLRQ
ç9
7RRP#2RQLWRU#8HW
8HUYLFH#8HW#:S
2#2#2#2#2#2#2#2
\
Submenu
- 8RXQG#8HWWLQJV
------8HFXULW\
&XWR#9DON
1DQJXDJH
)HIDXOW#7HVHW
2#2#2#2#2#2#2#2
;
<
ð
Menu key to open the main menu
(handset function)
\
Display key to:
– jump back to next menu level up
– cancel a function
;ý<
Display keys for scrolling forward/
backward within the individual menus.
=
Display key for confirming the currently selected function.
N
Display key for opening submenus.
18
Display
€
On-hook key for ending calls or for
cancelling functions and returning
immediately to "on" status.
The currently selected (highlighted) function is displayed
on a dark background.
A dotted line indicates the end of the menu. If you scroll
further, the first function in the menu is selected again.
When the "line" is selected, press the GO BACK display
key to return to the higher-level menu or to the "on" status.
Selecting functions using codes
(switching functions)
Most switching functions, e.g. Callback or Toggle, can be
implemented using codes.
An overview of all available functions is given on page 68.
19
Logging handsets onto a telephone system
Your system administrator supplies you with handsets that
have already been logged on when you are installing the
system for the first time. You must log on any new handsets
as described below if you extend the system.
This is only required when the handset is put into service
for the first time.
Please call Siemens Service if you purchased the handset
directly from Siemens. Otherwise, call your retailer.
You can enter the name and call number of your system
administrator as well as the handset number here:
Your
system administrator
Tel. no. of
system administrator
Handset call number
●
●
●
Ask your system administrator to provide you with the following information:
– handset call number
– handset system PIN (8 digits)
Ask your system administrator to activate the logon window.
Take your handset and log it on to the system (see "Logging on for the first time" or "Logging on at other systems"
on page 21).
Note:
The logon window is automatically closed if the handset
is not logged on as described above within 10 minutes. In
this case, you must repeat the procedure.
20
Logging handsets onto a telephone system
Logging on for the first time
This procedure must be performed if you have not yet used
your handset and are logging it on to the system for the first
time.
Note:
The logon window must be opened by the system administrator before you can proceed with the logon procedure
(see page 20).
>!#ä-å!,ï
Eë?
>!#ä-å!,ï is displayed on the activated handset.
Enter the following in the handset
within one minute:
An input prompt is displayed.
ë)å!,ý
âã-!ý<7;ô
An input prompt is displayed.
e.g. qsu.. Enter the system PIN (8 digits).
=
Confirm the entry with the display key.
ìã-!ýü
If logon has been successful, ìã-!ýü
is displayed, with intermediate display
of the ring symbol
.
Logging on at other systems
This procedure must be performed if you want to log your
handset on to other systems.
Note:
The logon window must be opened by the system administrator before you can proceed with the logon procedure
(see page 20).
Enter the following in the activated handset within one
minute:
ð
Press the menu key.
<
ìã-!ý-!ååä)#-
Scroll to ìã-!ý-!ååä)#-.
21
Logging handsets onto a telephone system
=
Press the display key to confirm
selection.
<
e.g. ìã-!ýH
Select ìã-!ýHýfor example.
N
Open the submenu.
<
>!#ä-å!,
ý=
Scroll to >!#ä-å!,.
Press the display key to confirm
selection.
ë)å!,ý
âã-!ý<7;ô
This input prompt is displayed.
e.g. qsu.. Enter the system PIN (8 digits).
=
Confirm the entry with the display key.
ìã-!ýH
If logon has been successful, ìã-!ýH
is displayed, with intermediate display
of the ring symbol
.
Note:
●
●
Base/system: cordless EM handsets are not logged
onto bases (base stations), but rather onto the
Hicom 150 E / Hicom 150 H telephone system. In this
case, ìã-! on the display always refers to DECT* system.
If logon was not successful, the ring symbol is not displayed during logon.
* DECT = Digital Enhanced Cordless Telecommunications
22
Conducting calls
›
8
ýýìã-!ýü
M
+ [
This display when the telephone is "on" is a prerequisite and the initial status for all
telephone functions (see also
"Radio range" page 9).
ìã-! H, û, úý or a different
name can be displayed,
depending on the current base
(see page 50).
Note:
●
●
The on-hook key € can be used to cancel all
functions.
You can end the call by replacing the handset in the
charging shell.
Internal dialling
Dý
Press the talk key.
Pý
Dial the internal number
when <'!ã-!ý äã'ýis displayed.
Call
Conduct the call.
The name and the number of the user
is displayed.
€
Press the on-hook key or place the
handset in the charging shell.
Note:
The dialled number is automatically stored for number
redial (see page 26).
23
Conducting calls
External dialling
C
Press the talk key.
External code
e.g. "
Enter the "external code", e.g. "0",
when <'!ã-!ý äã' is displayed.
P
Dial the external number.
Call
Conduct the call.
Ending a call
€
Press the on-hook key or place the
handset in the charging shell.
The call charges are displayed,
depending on the system setting.
Note:
The dialled number is automatically stored for number
redial (see page 26).
Block dialling for internal/external dialling
Block dialling means that you enter the number first (up to
32 digits), if necessary correct it and then press the talk key
to dial.
P
Enter the internal number or the
"external code", e.g. "0" and the
external number.
The entered digits are displayed "in
large format".
Correct entries as necessary with the
âý
and : display keys.
C
Press the talk key (within 60 seconds).
The entered number is dialled.
Ending a call
€
Press the on-hook key or place the
handset in the charging shell.
24
Conducting calls
Note:
●
●
The size of the digits is reduced for longer numbers.
The dialled number is automatically stored for number
redial (see page 26).
Answering calls
The handset’s ringer tone is audible. The number and the
name of the caller appear on your display, depending on the
user (internal/external).
●
The handset is in the charging shell:
L
Simply remove the handset from the
charging shell.
(Only if Auto Talk is activated, see
page 46)
or
●
The handset is not in the charging shell:
Dý
Press the talk key.
Ending a call
€
Press the on-hook key or place the
handset in the charging shell.
25
Number redial
Number redial – last five numbers
You have dialled a number, but the other party is busy or
does not answer: press the on-hook key. The last five numbers dialled (up to 32 digits) are always stored automatically.
If you dialled a number from the telephone directory, then
the name is displayed when you use the redial function.
Manual number redial
[
Press the display key.
The first 3 redial numbers/names are
shown.
<
If necessary, press the display keys to
scroll to the required number/name.
C
Press the talk key.
The selected number/name is dialled.
Copying a number to the local telephone
directory
[
Press the display key.
<
Scroll to the desired number.
N
Open the submenu using the display
key.
<
}
é*æ2ýå*ýèä,Ný
Scroll to é*æ2ýå*ýèä,N
=
Confirm the selection.
Names
Enter names (max. 16 characters).
(see page 29)
N
Press the display key.
?ã/!ýë)å,2
Confirmý?ã/!ýë)å,2.
=
ë)å,2
-ã/!
ë)å,2ý-ã/!
is displayed for approx. 2 seconds.
26
Number redial
Editing an entry
[
Press the display key.
<
Scroll to the desired number/name.
N
Open the submenu using the display
key.
<
ë äåýë)å,2
=
âý
Scroll to ë äåýë)å,2.
Confirm the selection.
ý:
N
Edit the entry.
Press the display key.
?ã/!ýë)å,2
Confirmý?ã/!ýë)å,2.
=
ë)å,2
-ã/!
ë)å,2ý-ã/!
is displayed for approx. 2 seconds.
Deleting an entry
[
Press the display key.
<
Scroll to the desired number/name.
N
Press the display key.
<
è!'!å!ýë)å,2
=
Scroll to è!'!å!ýë)å,2
Confirm the selection.
ë)å,2
$ã-ýâ!!)ý !'!å!
ë)å,2ý$ã-ýâ!!)ý !'!å!
is displayed for approx. 2 seconds.
27
Number redial
Displaying an entry
All the digits of a number (to a max. of 32) are displayed.
[
Press the display key.
<
Scroll to the desired number/
name.
N
Press the display key.
<
èä-æ'ã2ýë)å,2
=
GO BACK
Scroll to èä-æ'ã2ýë)å,2.
Confirm the selection.
Press the display key to return to the
redial function.
28
Entering text
You can enter names or text for specific functions (local telephone directory, short cuts, messages) via the digit keys.
Overview – key layout
Press x 9
Press x 8
Press x 7
Press x 6
Press x 5
Press x 4
Press x 3
Press x 2
Key
Press x 1
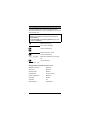
The following table shows the assignment of all letters, digits
and characters to the keys:
®ý 1
qý a
b
c
2
ä
à
â
ã
¬ý d
e
f
3
ë
é
è
ê
sý g
h
I
4
ï
î
øý j
k
l
5
uý m
n
o
6
ö
ñ
ó
ô
vý p
Q
r
s
7
ß
wý t
u
v
8
ü
ú
ù
û
|ý w
x
y
z
9
ý
æ
ø
å
.
–
0
,
+
:
?
!
äý a]A *
/
(
)
=
&
@
zý #
$
"ý
S
*
)
£
ç
õ
* Blank is inserted
Entering letters/characters and digits
●
Entering letters
Press the key the appropriate number of times in quick
succession depending on the position of the letter on the
key – 1st, 2nd, 3rd or 4th position – or hold the key
down.
The first letter of a name is automatically written in
upper case letters. This is followed by lower case letters.
Press the ä key to switch from lower case to upper
case for a particular character.
29
Entering text
●
Entering digits
Press the appropriate digit key 4 or 5 times in quick succession depending on the number of letters on the digit
key.
●
Entering special characters
In accordance with the "Overview – key layout" (see page
29), press the key the appropriate number of times (up to
9 times) to enter the special characters.
●
Entering text with character preview
As soon as you press a key, all letters, digits and special
characters assigned to this key are displayed in the lower
display line.
Press the key or hold it down until the cursor reaches the
required character (letter, digit, special character) in the
display line. This character is transferred to the 1st line.
●
Correcting/deleting entries
The cursor is moved from character to character with the
or â display keys and from line to line with the ;ý
or < display keys.
A character is always inserted to the left of the cursor.
The character to the left of the cursor is deleted. The
delete function is executed with the : display key.
30
Local telephone directory
Your handset has a telephone directory for storing up to 100
numbers.
The stored numbers can be simply dialled, modified or
deleted at any time.
Note:
In addition to the local telephone directory, you can also
save entries in the system telephone directory, see page
60.
Numbers from the number redial memory can also be
transferred to the telephone directory (see page 26).
Overview – telephone directory menu
Menu
Explanation/notes
New Entry
see "Storing numbers",
page 32
Use Number
see page 35
Dial Number
see page 35
Edit Entry
see page 35
Delete Entry
see page 35
Display Entry
see page 36
Copy Entry
not relevant for cordless EM
Delete List
see page 36
Copy List
not relevant for cordless EM
Available Memory
see page 36
31
Local telephone directory
Storing numbers (directory/network prefix
menu)
The telephone directory - enables convenient dialling of
approximately 100 call numbers.
You can store the prefix numbers of other locations using
the network prefix M function.
- or M
Press the telephone directory key or
display key for the network prefix
menu. (The operation of the telephone directory and the network prefix function is identical up to this
point.)
N
Press the display key.
<
;!0ýë)å,2
Scroll to ;!0ýë)å,2.
=
Confirm the selection.
Name
Enter name (only 1st line, max. 16
characters).
Enter letters/characters and digits and
correct if necessary (see page 29).
<
Jump to the next line.
Tel. number
Enter the associated telephone
number (2nd and 3rd line, max. 32
digits).
Enter the "external code", e.g. "0"
in front of external numbers.
N
Press the display key.
?ã/!ýë)å,2ý
=
Confirmý?ã/!ýë)å,2.
32
Local telephone directory
Entering a dial pause:
When entering the telephone number you can also insert a
dial pause, e.g. after the international prefix.
N
Press the display key.
<
<ý7)-!,åý<ã.-!
=
Scroll toý<ý7)-!,åý<ã.-!.
Confirm the selection - a "<" is
inserted in the telephone number.
Enter the rest of the telephone number and save the entry
(see above).
Note:
Telephone directory entries are automatically sorted in
alphabetical order. "Names" that begin with "✱" or "#" precede entries starting with "A".
33
Local telephone directory
Dialling a number from the directory/network
prefix menu
Prerequisite: number is stored and handset is "on" or idle
– no connection is set up.
- or M
Press the telephone directory key or
the display key for the network prefix
menu.
The first names (alphabetical order) in
the telephone directory are displayed. The name in the first line is
selected (dimmed).
<
Scroll to the desired name.
or
e.g. u
Enter the initial letters (see page 29).
C
Press the talk key.
The relevant number is displayed and
dialled.
Other telephone directory functions
All menus/functions of the telephone directory or network
prefix menu are called in the same way:
- or M
Press the telephone directory key or
display key for the network prefix
menu.
<
Scroll to the desired number.
N
Press the display key.
<
Scroll to the desired function.
The remaining functions of the telephone directory are
described below.
34
Local telephone directory
Use Number:
A-!ý;.(â!,
=
Confirm the selection.
e.g. üHûúùø÷ö
selected number, e.g. üHûúùø÷ö, is
displayed.
e.g. |®"
N
Extend number, for example with
õüGN
Press the display key.
èäã'ý;.(â!,
=
èäã'ý;.(â!, is displayed.
Confirm the selection.
The extended number is dialled.
Dial Number:
èäã'ý;.(â!,
=
Confirm the selection.
The number is dialled.
New Entry:
Enter the new name and new telephone number, see "Storing numbers" page 32.
Edit Entry:
ë äåýë)å,2
=
Confirm the selection.
e.g. 4çç>ë
Name flashes.
âý
Change the name, for example.
ý:
<
Switch to number and edit.
N
Press the display key.
?ã/!ýë)å,2ý
=
Confirmý?ã/!ýë)å,2.
Delete Entry:
è!'!å!ýë)å,2
=
Confirm the selection.
35
Local telephone directory
Display Entry:
èä-æ'ã2ýë)å,2
=
Confirm the selection.
GO BACK
To jump to the higher-level menu.
Delete List:
You can also delete all of the entries in the entire telephone
directory in one go, e.g. if you are lending the handset to
another user. This function is also protected by the handset
PIN (max. 8 digits).
è!'!å!ý:ä-å
=
Confirm the selection.
e.g. ®q¬.. Enter the handset PIN*.
=
Confirm the entry.
è!'!å!ýã''
!)å,ä!-ï
Eë?
To cancel:
press the ;ç
display key.
Press the display key.
í''ý!)å,ä!-ý
!'!å! N
í''ý!)å,ä!-ý !'!å! is displayed
for approx. 2 seconds.
*The default PIN is "0000"
Available Memory:
The amount of available memory space can be displayed as
a percentage.
í/ãä'ãâ'!ý4!(*,2
=
Confirm the selection.
e.g.
4!(*,2ô
öùwýã/ãä'ãâ'!
e.g. 4!(*,2ôýöùwýã/ãä'ãâ'!
is displayed for approx. 2 seconds.
36
Network prefix support
Linking the prefix and call number
M
Call up the network prefix menu
<
Scroll to the desired prefix.
9
Open the submenu.
=
Confirm A-!ý;.(â!,.
The prefix number is displayed.
e.g. P
Enter the telephone number of the
user or open the telephone directory
and select the number.
D
Start the dialling procedure.
The prefix number and telephone
number are dialled.
Speed dialling other locations
Speed dialling other locations allows you to rapidly access
their prefix numbers:
– You can store 10 speed dialling prefix numbers (0-9) in
the case of the network prefix list. Enter a speed dialling number (0-9) in front of the network prefix name,
e.g. "1 network prefix name".
– The stored prefix number is displayed by holding down
the relevant digit key (0-9).
Prerequisite: the speed dialling number is stored.
e.g. ®
Hold down the relevant digit key.
The prefix number stored under
"1 network prefix name", for
example, is displayed.
e.g. P
Enter the telephone number of the
user or open the telephone directory
and select the number.
D
Start the dialling procedure.
The prefix number and telephone
number are dialled.
37
Main menu–overview
Main menu
Explanation/notes
Settings
see page 39
Base settings
see page 49
Hset User Option
see page 51
Room Monitor Set
not relevant for cordless EM
Service Set Up
not relevant for cordless EM
Open the main menu with the ð menu key. You can scroll
this menu using < or ; and select a menu entry with
=.
38
Settings – overview
Setting
Explanation/notes
Sound
Settings
Ringer volume
5
5
Ringer melody
10
1
Beep
-
Off
Handset volume
3
1
Key beeps, audible each
time a key is pressed.
-
On
Battery low beep, audible
approx. 5 minutes before the
battery runs out
-
On
Confirmation beeps indicate
whether functions have been
successful (confirmation
beep) or unsuccessful (error
tone)
-
On
Security
Level Factory
setting
Change the handset PIN
-
-
Disable some handset functions
-
-
Enter DSS number
-
-
Activate DSS
-
-
You can define whether the
talk key must be pressed
when the handset is removed
from the charging shell to
accept a call
-
On
Language Different languages can be
selected for the display.
7
English
Default
Reset
-
-
Auto Talk
The resetting of the handset
to the initialization state
(defaults) is protected by the
handset PIN.
Resetting the handset deletes
the redial numbers. The registration (logon) and the
mobile PIN are retained.
39
Sound settings
Sound settings
The following sound settings are all set using the same principle:
– ringer volume (see note page 41)
– ringer melody (see note on page 41)
– handset volume
The "ringer volume" function is used by way of example here
to describe setting procedures:
ð
Press the menu key.
?!ååä)#- is displayed.
?!ååä)#=
Confirm the selection.
<
?*.) ý?!ååä)#=
Scroll to ?*.) ý?!ååä)#-.
Confirm the selection.
<
>ä)#!,ýB*'.(!ý
=
Scroll to >ä)#!,ýB*'.(!.
Confirm the selection.
The ringer volume audible is specific
to the current setting (see the display).
Symbol for ringer
Ringer Volume: 3
âý
ð âý
\ý=
Dark bars indicate the current
setting – level 3 in this case
Confirm current setting (save)
Change the setting
Press the display keys to set the
required volume.
You select five ringer volumes, the
crescendo ring (= c) and no ringer
tone (= 0).
=
Confirm the setting.
\
Use the display key to jump to the
next menu level up.
40
Sound settings
Note:
●
●
The symbol & appears in the first display line if you
deactivated the ringer (level 0).
A call pickup is signalled by a short ringer tone if the
handset is part of a call pickup group. Ringer tones 1-5
are, therefore, recommended in a call pickup group.
Activating/deactivating sound settings
The following sound settings are all activated and deactivated using the same principle:
– Beep (see note on page 42)
– key beeps
– batt. low beep
– confirmation beep
The "key beeps" function is used by way of example here to
describe setting procedures:
ð
?!ååä)#=
Press the menu key.
?!ååä)#- is displayed.
Confirm the selection.
<
?*.) ý?!ååä)#=
Scroll to ?*.) ý?!ååä)#-.
Confirm the selection.
<
9!2ýì!!æ-
Scroll to 9!2ýì!!æ-.
=
Confirm the selection.
The activated function is indicated by
a check mark ✓ symbol.
\
Use the display key to jump to the
next menu level up.
To deactivate the function, proceed in the same way as
described for activating it.
The check mark disappears again once the key beeps function is confirmed with the = display key.
41
Sound settings
Note:
●
●
If "Beep" is activated, the symbol &'ýappears in the
first display line in "on" or message status.
As soon as you activate "Beep", ringer tone deactivation is removed (symbol & ýin the first display line).
Activating/deactivating the ringer
The ringer can be deactivated at the push of a button in "on",
message and call status.
Deactivating the ringer:
{
Press the key and hold it down until
the symbol & appears in the first display line.
Activating the ringer:
{ý
Press the key and hold it down until
the symbol & disappears.
Note:
●
●
●
The deactivated ringer is automatically activated as
soon as you open the "Ringer Volume" menu.
The ringer volume cannot be activated with the {
key if it was deactivated via the "Ringer Volume" menu
(level 0, see page 40).
The ringer volume cannot be deactivated with the {
key if "Short ringer” is activated (symbol &'ýin the first
display line).
42
Security
Changing the handset PIN
You can use this function to change your handset PIN. The
default PIN is "0000".
This PIN is required for the following functions:
– All functions in the "Security” menu
– Logging on the handset
– Deleting the telephone directory
– Resetting the handset to the default state
Important:
●
●
●
If you forget your handset PIN, a service engineer will
have to access the device. Forgetting a PIN is just as
serious as losing a key. In this case, please consult
your system administrator!
If an incorrect handset PIN is entered,
7)á*,,!áåý<7; is displayed.
The functions can be cancelled/terminated with the
menu key before settings are saved/deleted.
ð
?!ååä)#=
Press the menu key.
?!ååä)#- is displayed.
Confirm the selection.
<
?!á.,äå2
=
ë)å!,ý<7;ô
Scroll to ?!á.,äå2.
Confirm the selection.
An input prompt is displayed.
e.g. ®q¬.. Enter the handset PIN (max. 8 digits).
=
Confirm the entry.
é$ã)#! <7;
Select é$ã)#!ý<7;.
=
Confirm the selection.
e.g. vw|.. Enter the new handset PIN (maxie.g. vw|.. mum eight digits) twice.
;!0ý<7;
ý-å*,! uý
;!0ý<7;ý-å*,! uýis displayed.
43
Security
Activating/deactivating the handset lock
The following are blocked when the handset is locked:
– Dialling internal and external telephone numbers manually
– Manual block dialling
– Function menu call up (without "Cancel handset lock").
Important:
Incoming calls are signalled and can be answered or, for
example, forwarded as required.
Activating the handset lock
ð
?!ååä)#=
Press the menu key.
?!ååä)#- is displayed.
Confirm the selection.
<
?!á.,äå2
=
ë)å!,ý<7;ô
Scroll to ?!á.,äå2.
Confirm the selection.
An input prompt is displayed.
e.g. ®q¬.. Enter the handset PIN* (max. 8 digits).
=
Confirm the entry.
<
6ã) -!åý:*á&
Scroll to 6ã) -!åý:*á&N
=
Confirm the selection.
The activated function is indicated by
a check mark ✓ symbol.
\
Use the display key to jump to the
next menu level up.
6ã) -!åý'*á&!
The locked display appears.
Multiple functions (see above) are
locked.
* The default PIN is "0000"
44
Security
Deactivating the handset lock
ð
ë)å!,ý<7;ô
Press the menu key.
An input prompt is displayed.
e.g. ®q¬.. Handset PIN* (max. 8 digits).
=
6ã) -!åý:*á&
Confirm the entry.
6ã) -!åý:*á& is displayed without a
check mark.
The handset lock is cancelled.
\
Use the display key to jump to the
next menu level up.
* The default PIN is "0000"
45
Auto talk
You only have to remove the handset from the charging shell
to accept a call if this function is activated.
ð
?!ååä)#=
Press the menu key.
?!ååä)#- is displayed.
Confirm the selection.
<
í.å*ý@ã'&
Scroll to í.å*ý@ã'&.
=
Confirm the selection.
The activated function is indicated by
a check mark ✓ symbol.
\
Use the display key to jump to the
next menu level up.
Proceed in the same way as described above to deactivate
the function.
The check mark disappears again once the í.å*ý@ã'&ý
function is confirmed with =ý.
46
Language
Factory setting: the default language is English.
ð
?!ååä)#=
Press the menu key.
?!ååä)#- is displayed.
Confirm the selection.
<
:ã)#.ã#!
=
Scroll to :ã)#.ã#!.
Confirm the selection.
<
e.g. è!.å-á$
Scroll to the required language,
for example, è!.å-á$.
=
Confirm the selection.
The selected language is indicated by
a check mark ✓ symbol.
\
Use the display key to jump to the
next menu level up.
The following overview will help you to set the desired language as described above when the unit is delivered or after
the language is changed inadvertently:
Possible language settings
IM 1
IM 2
German
English
English
Czech
French
Finnish
Italian
Norwegian
Spanish
Swedish
Portuguese
Danish
Dutch
Turkish
Note:
The language you set only applies to the handset display
texts stored in the handset. The language used in the
system texts, for example, when a call is in progress,
depends on the telephone system settings.
47
Resetting the handset to the default state
You can use this function to reset your handset to the
defined default state, e.g. if you are handing over your handset to another user.
Note:
Resetting the handset to the default state deletes the
redial numbers.
The handset PIN and system registration (logon) are,
however, not deleted.
ð
?!ååä)#=
Press the menu key.
?!ååä)#- is displayed.
Confirm the selection.
<
è!"ã.'åý>!-!å
=
Scroll to è!"ã.'åý>!-!å.
Confirm the selection.
e.g.®q¬.. Enter the handset PIN* (max. 8 digits).
=
Confirm the entry.
*The default PIN is "0000"
Settings after the handset has been reset:
Telephone directory:
Retained
Short cuts:
Retained
Number redial:
Deleted
Handset PIN:
As per last save
System registration:
Retained
Language
English
Auto Talk:
On
Audio settings:
see page 39
48
Base settings
Selecting the base
If your handset is logged onto more than one base (systems1), you can set it to a particular base or "best base"
for automatic base changeover.
ð
Press the menu key.
<
ìã-!ý-!ååä)#=
Scroll to ìã-!ý-!ååä)#-.
Confirm the selection.
<
ìã-!ýû
N
Scroll to the required base,
for example, ìã-!ýû.
Press the display key.
<
?!'!áåý
Scroll to ?!'!áå.
=
Confirm the selection.
The activated base is indicated by a
check mark ✓ symbol.
\
Use the display key to jump to the
next menu level up.
Note:
●
●
●
If you set ì!-åýìã-!, the handset is always automatically connected to the base with the best reception.
If you are located between two systems, for example,
and the handset switches continuously, you should set
it to a particular system.
The "ISDN Config" function should always be activated
as a basic setting.
1See also note on page 22
49
Base settings
Changing the base name
You can change the name of the handset, e.g. ìã-!ýü1 to
an individual name, e.g. 7)å!,)ã'ýû. "3" is the internal
number of the handset.
ð
Press the menu key.
<
ìã-!ý-!ååä)#=
Scroll to ìã-!ý-!ååä)#-.
Confirm the selection.
<
ìã-!ýû
Scroll to the required base,
for example, ìã-!ýû.
N
Press the display key.
<
é$ã)#!ýìã-!ý;ã(! Scroll to é$ã)#!ýìã-!ý;ã(!.
=
Confirm the selection.
Name
Enter the required base names
(see "Entering text" page 29).
N
Press the display key.
<
?ã/!ýë)å,2ý
Scroll to ?ã/!ýë)å,2.
=
Confirm the selection.
1Name set by factory
50
Short Cuts
Short cuts make it easier to perform "longer" operating
sequences, e.g. "automatic callback" or other code functions.
Store a function (operating sequence) under a name of your
choice. The name of the function is included in the list of
short cuts. You can execute the function quickly by confirming the name - see "Starting a shortcut", page 53.
Short cut submenu
The following functions are available:
?åã,åý?$*,åýé.å
;!0ýë)å,2
ë äåýë)å,2
è!'!å!ýë)å,2
èä-æ'ã2ýë)å,2
é*æ2ýë)å,2 (not a function)
è!'!å!ý:ä-å
é*æ2ý:ä-å (not a function)
í/ãä'ãâ'!ý4!(*,2
51
Short Cuts
Saving a short cut – new entry
When saving a short cut, an area is available for "name" and
"short cut contents". First assign a name to this short cut.
Enter text (see page 29).
Example: Automatic callback
ð
Press the menu key.
<
6-!åýA-!,ýçæåä*)
Scroll to 6-!åýA-!,ýçæåä*).
=
Confirm the selection.
N
Press the display key.
<
;!0ýë)å,2
Scroll to ;!0ýë)å,2 .
=
Confirm the selection.
Name
Enter names (max. 16 characters),
e.g. "Do not disturb".
<
Switch to entering the short cut contents.
4
Press the recall key.
ä|v
Enter the code "✱97".
N
Press the display key.
?ã/!ýë)å,2
Scroll to ?ã/!ýë)å,2.
=
Confirm the selection.
The entry is stored in the short cut list.
\
Use the display key to jump to the
next menu level up.
52
Short Cuts
Start Short Cut
The start procedure is specific to the handset status:
Starting from the "on" status
ð
Press the menu key.
<
6-!åýA-!,ýçæåä*) Scroll to 6-!åýA-!,ýçæåä*).
=
Confirm the selection.
The first names (alphabetical order) in
the list of short cuts are displayed.
<
Scroll to the desired name.
N
Press the display key.
?åã,å
=
Confirm ?åã,å.
The active status is indicated in the
display until the short cut has been
completed.
Starting during connection set-up or during a call
Important:
As of Version 3.0, short cuts are activated via a modified
user interface (see "User interface" page 54) during a
call.
Call up the short cut list with the N display key. Continue
as described for the "on" status of the handset.
Note:
●
●
●
The other short cut functions "Delete Entry", "Edit
Entry", "Display Entry", "Delete List" (deletes all short
cuts) and "Available Memory" are all executed in the
same way as described for the telephone directory
(see page 34).
A shared memory with up to 100 entries is available
for telephone directory entries and short cut
entries.
<ý7)-!,åý<ã.-! cannot be used when saving short
cuts.
53
Switching functions as of Version 3.0
Switching functions are special features that are mainly used
in connection or call status. The range of functions that you
can use depends on the your telephone’s individual COS
and the configuration of your system.
User interface
The user interface (UI) of the convenience handset provides
access to the required switching functions by means of selfexplanatory displays. The user guidance consist of an1 interactive menu with text and symbols on the display . This
menu activates as soon as you press the talk key
(e.g. display: "Please dial:").
The displays are context-specific. The menu only includes
features/functions that are relevant to the current situation.
The text is entered in the 2nd line and flows over into the
3rd line (automatic word wrap). Functions and text messages are displayed here. Special characters in the text
lines support user guidance:
Example:
ë)+.ä,2ïð
●
●
If the character "ð" appears to the right of
the text, then other functions/options are
available. You can scroll further with the
display keys < and > .
If a function is followed by a question
mark, then this function can be confirmed
or activated by pressing the display key
=.
As in this example, both characters
mostly appear next to the text. The
interactive menu allows you to decide
whether to scroll further or execute the
function.
Example:
4!--ã#!ýå*ô
●
●
A colon following the text indicates that
input is mandatory.
Inputs (e.g. message text, call number)
are then to be confirmed by pressing the
display key =.
1 As of Version 3.0
54
Switching functions as of Version 3.0
The 4th line contains the display key symbols (see also
"Display when the handset is on or in message status
(example)" page 16). These symbols are used to call up and
activate functions. The symbols have the following meaning:
<
=
S
>
Scroll (back and forth) to the desired and currently available function. The existing situation
(e.g. call status, conference) is not modified.
Confirm, execute or initiate the function displayed. The function can only be activated by
pressing this key.
Opens the service menu with additional functions. Navigation in the service menu corresponds to user prompts in the dialog menu. In
addition, the functions can be called up by entering codes (see page 68).
The next few pages contain examples of how to execute cer1
tain functions via the dialog menu. All switching functions
are then listed in a table.
1 If activated (consult your system administrator if necessary)
55
Switching functions as of Version 3.0
Callback
Dial a number. If a dialled internal user is busy or if your call
is not answered, you can program a callback request.
Storing a callback request:
â.-2ýä)å!,)ã'
ûGHú
The following appears on the busy user’s display: â.-2ýä)å!,)ã',
followed by the user’s call number, e.g.
ûGHú.
>
éã''âãá&ïð
Scroll to éã''âãá&ïð.
=
Confirm the selection.
éã''âãá&ý-!å
Display: éã''âãá&ý-!å.
€
Press the on-hook key or place the
handset in the charging shell.
Note:
●
●
The system calls you back when the user is free.
Up to 5 callback requests can be programmed.
56
Switching functions as of Version 3.0
Deleting callback:
Dý
Press the talk key.
>
Bä!0ýáã''âãá&-ïð
Scroll to Bä!0ýáã''âãá&-ïð.
=
Confirm the selection.
éã''âãá&ô;ã(!
Display: éã''âãá&ô;ã(!.
=
è!'!å!ïð
Confirm the selection.
Display: è!'!å!ïð.
=
Confirm the selection.
either
:ä-åýä-ý!(æå2
Display: :ä-åýä-ý!(æå2
(if no callback requests were programmed).
€
Press the on-hook key or place the
handset in the charging shell.
or
éã''âãá&ý !'!å!
Display:
éã''âãá&ý !'!å!
(if another callback request is programmed).
>
èä-æ'ã2ý)!1åïð
Scroll to èä-æ'ã2ý)!1åïðýif you
want.
=
Confirm the selection.
éã''âãá&ô;ã(!
Display: éã''âãá&ô;ã(!.
=
Confirm the selection.
è!'!å!ïð
Display: è!'!å!ïð.
=
Confirm the selection.
:ä-åýä-ý!(æå2
Display: :ä-åýä-ý!(æå2.
€
Press the on-hook key or place the
handset in the charging shell.
57
Switching functions as of Version 3.0
Missed calls list
You can display calls that you were unable to answer in the
missed calls list. If you want, you can call back the users.
Checking the missed calls list:
D
Press the talk key.
>
4ä--! ýéã''ý
:ä-åïð
Scroll to 4ä--! ýéã''ý:ä-åïð.
=
Confirm the selection.
e.g.
4**,!
or üHûúù
>
;!1åïð
=
>
The name or the call number appears
on the display.
Press the display key.
Only if there are multiple entries in the
missed calls list:
display: ;!1åïð.
Confirm the setting.
Press the display key.
@ä(!S ãå!ý-!)åïð Display: @ä(!S ãå!ý-!)åïð.
Check when the call was received.
=
Confirm the setting.
e.g.
ãåôýüùôü÷ýå* ã2
Display, e.g.:
ãåôýüùôü÷ýå* ã2
(the date of another day can be specified instead of å* ã2ý, e.g.: ãåôý
ü÷ôHùýGøNGH.)
=
Confirm the setting.
",*(ïð
Display: ",*(ïð.
=
Confirm the setting.
e.g. 4**,!
The name of the caller appears on the
display.
Check who called.
>
èä-æ'ã2 ).(â!,ïð
Scroll to èä-æ'ã2ý).(â!,ïð.
58
Switching functions as of Version 3.0
=
Confirm the selection.
e.g. üHûúù
The call number appears on the display.
>
éã''ïð
=
Scroll to éã''ïð.
Confirm the selection.
The call number is dialled.
Deleting the missed calls list:
D
Press the talk key.
>
4ä--! ýéã''ý
:ä-åïð
Scroll to 4ä--! ýéã''ý:ä-åïð.
=
Confirm the selection.
e.g.
4**,!
or üHûúù
The name or the call number appears
on the display.
>
è!'!å!ïð
Scroll to è!'!å!ïð.
=
Confirm the selection.
either
:ä-åýä-ý!(æå2
Display: :ä-åýä-ý!(æå2ý(if no other
call is stored).
or
e.g.
4ä''!, or ø÷öõG
Additional names or call numbers appear on the display.
You can delete these if you want.
59
Switching functions as of Version 3.0
System telephone directory
Entries that you saved in the system telephone directory can
be called up by any person connected to the system.
Note:
In addition to the system telephone directory, you can
also save entries in the local telephone directory (see
page 31).
D
Press the talk key.
>
<$*)!â**&ïð
=
Scroll to <$*)!â**&ïð.
Confirm the selection.
e.g. ùúûHüýí)å$*)2 The call number and name of the first
entry appear on the display.
either
e.g. ¬
or
=
Enter the first letter of the desired
name via the keypad, e.g. è.
The first entry under è appears on the
display.
Confirm the selection.
?á,*''ý)!1åïð
Display:
?á,*''ý )!1åïð.
=
Confirm the setting.
e.g. Gõö÷øýì,!) ã
The call number and name of the second entry appear on the display.
To scroll further, repeat the procedure
until the required entry appears.
>
éã''ïð
=
Scroll to éã''ïð.
Confirm the selection.
The call number is dialled.
60
Switching functions as of Version 3.0
Call forwarding
You can use the "Call forwarding" function to forward incoming calls to another telephone.
Saving call forwarding:
D
Press the talk key.
>
èä/!,åý-!åïð
Scroll to èä/!,åý-!åïð.
=
Confirm the selection.
éã''ý"*,0ã, ä)#ô
Display: éã''ý"*,0ã, ä)#ô
>
either
üñã''ýáã''-ïð
Scroll to üñã''ýáã''-ïð.
®
Enter ü via the keypad.
or
Hñ!1å!,)ã'
áã''-ý*)'2ïð
Scroll to Hñ!1å!,)ã'
áã''-ý*)'2ïðN
q
Enter H via the keypad.
or
ûñä)å!,)ã'
áã''-ý*)'2ïð
Scroll to ûñä)å!,)ã'ý
áã''-ý*)'2ïðN
¬
Enter û via the keypad.
ã''ýå*ô
Display: ã''ýå*ô
e.g. ¬sø.. Enter the number.
=
Confirm the entry.
?ã/!ý!)å,2ïð
Display: ?ã/!ý!)å,2ïð.
=
Confirm the setting.
?ã/! N
Display: ?ã/! .
€
Press the on-hook key or place the
handset in the charging shell.
61
Switching functions as of Version 3.0
Deleting call forwarding:
Dý
Press the talk key.
e.g. ã''ýå*ôýûúùø÷ The call forwarding number appears
on the display.
>
ê*,0ã, ä)#ý*""ïð Scroll to ê*,0ã, ä)#ý*""ïð.
=
Confirm the selection.
ê*,0ã, ä)#ý*""
This display appears first:
ê*,0ã, ä)#ý*"".
<'!ã-!ý,!æ'ãá!
$ã) -!åN
Then this display appears:
<'!ã-!ý,!æ'ãá!ý$ã) -!å.
€
Press the on-hook key or place the
handset in the charging shell.
62
Switching functions as of Version 3.0
Consultation during a call
You are conducting an internal or external call and would like
to obtain some information from a second internal or external user:
Option 1:
>
ë)+.ä,2ïð
=
<'!ã-!ý äã'ô
P
Scroll to ë)+.ä,2ïð.
Confirm the selection.
Display: <'!ã-!ý äã'ô
Dial the call number.
You are now connected to the 2nd user.
Option 2:
4 P
Press the recall key and immediately
dial the number of the user.
You are now connected to the 2nd user.
Ending a consultation:
Option 1:
>
Press the display key.
=.äå
ã) ý,!å.,)ïð
Display:
=.äåýã) ý,!å.,)ïð.
=
Confirm the question.
You are now connected once again to
the 1st user.
Option 2:
4
Press the recall key.
You are now connected once again to
the 1st user.
63
Switching functions as of Version 3.0
.
Transferring a call
You answered an external call and would like to forward it to
another user:
Option 1:
>
ë)+.ä,2ïð
=
<'!ã-!ý äã'ô
Scroll to ë)+.ä,2ïð.
Confirm the selection.
Display: <'!ã-!ý äã'ô
P
Dial the call number.
€
Wait for the user to answer, then press
the on-hook key to transfer the call or
press the on-hook key immediately.
Option 2:
4 P
Press the recall key and immediately
dial the user’s number.
€
Wait for the user to answer, then press
the on-hook key or scroll to "Transfer"
to transfer the call or press the onhook key immediately.
Cancelling call transfer
Option 1:
>
Press the display key.
=.äå
ã) ý,!å.,)ïð
Display:
=.äåýã) ý,!å.,)ïð.
=
Confirm the question.
Option 2:
4
Press the recall key.
Note:
If the forwarded call was not answered, the system performs an automatic recall after a timeout.
64
Switching functions as of Version 3.0
Toggle – Switching between two users
You can toggle between the two users during a consultation
call (see page 63).
Option 1:
>
@*##'!ïð
Scroll to @*##'!ïð.
=
Confirm the selection.
You are now once again connected to
the 1st user.
>
@*##'!ïð
Scroll to @*##'!ïð.
=
Confirm the selection.
You are once again connected to the
2nd user.
You can toggle back and forth between the users as often as
you like in this way.
Option 2:
äq*
Enter the code.
You can toggle between the users as
often as you like by entering the code
äq again.
* Default code, may be modified in the system.
Note:
Pressing the on-hook key cancels the toggle function.
The two remaining users are now connected to each
other.
65
Switching functions as of Version 3.0
Conference
This function allows you to set up a telephone conference
with up to five users.
You are conducting a call and wish to set up a telephone
conference with an additional user:
Option 1:
..
>
ë)+.ä,2ïð
Scroll to ë)+.ä,2ïð.
=
Confirm the selection.
<'!ã-!ý äã'ô
Display: <'!ã-!ý äã'ô
P
Dial the call number.
You are now connected to the
2nd user.
>
é*)"!,!)á!ïð
Scroll to é*)"!,!)á!ïð.
=
Confirm the selection.
é*)"!,!)á!ô
ûýæã,åä!-N
Display: é*)"!,!)á!ôýûýæã,åä!-.
You are now in a conference with 3
parties.
You can now add on additional users
(max. 5) by repeating the procedure.
Option 2:
4 P
Press the recall key and immediately
dial the user’s number.
4
Press the recall key.
z¬*
Enter the code for "Conference".
The current number of users is displayed, e.g. "û"; all three users are
now connected.
You can now add on additional users
(max. 5) by repeating the procedure.
* Default code, may be modified in the system.
66
Switching functions as of Version 3.0
End conference:
Option 1:
>
Press the display key.
=.äå
ã) ý,!å.,)ïð
Display:
=.äåýã) ý,!å.,)ïð.
=
Confirm the selection.
The conference is ended.
Option 2:
z¬*
Enter the code.
The conference is ended.
* Default code, may be modified in the system.
67
Switching functions – overview
You can execute the following functions interactively as of
Version 3.0 and/or via the service menu. In addition, the
functions can be activated by entering codes.
Only standard codes can be used for Version 2.2 (execution, see "Short Cuts" page 51).
The codes in your system may differ from the standard
codes listed here: consult your system administrator as necessary.
The confirmation beep indicates a successfully completed function.1 The error tone is audible in the event of a
malfunction.
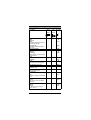
Functions
*
Ininteractive**
mode
In the Standard
service
code
menu**
<
S
>
=
S **
<
>
=
Accept call waiting
Answer call from a (second) waiting
party (second call).
Call waiting
without tone
with tone
Auto. call waiting
on
off
✓
✓
✱55
✓
✓
✓
✓
✱87
#87
✓
✓
✱490
#490
Missed calls list
(see also page 58)
Save call number
✓
✓
#82
✓
✓
✱82
✓
✓
✓
✓
✱97
#97
✓
✓
✓
✓
✓
✓
✓
✓
✓
✓
✱1
#1
✱11
✱12
✱13
Do not disturb
on
off
Prevent incoming calls.
Call forwarding
on
off
all calls
external calls only
internal calls only
Forwarding calls to another telephone (see also page 61).
1Activated by default
68
Switching functions – overview
*
Functions
Ininteractive**
mode
In the Standard
service
code
menu**
<
S
>
=
S **
<
>
=
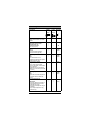
Call distribution (ACD)
register (start of work period)
de-register(end of work period)
available
unavailable
wrap-up on
wrap-up off
night service on
night service off
Distribute calls in a team.
✓
✓
✓
✓
✓
✓
✓
✓
✱401
#401
✱402
#402
✱403
#403
✱404
#404
✓
✓
✱69
#69
Associated service
Activate or deactivate functions for
other telephones.
✓
✱83
Associated dialling
Set up connections for other telephones.
✓
✱67
✓
✱62
Reset services for own base
Reset activated functions.
✓
#0
Voice calling
Communication with telephone
partner via partner’s loudspeaker in
the telephone.
✓
✱80
Phone test
✓
✱940
Flex call
✓
✱508
Trace call
Identify an external caller via the
network provider. The feature must
be requested separately from Telecom.
✓
✱84
✓
✓
✓
✱68
#68
#68
Advisory message
on
off
✓
✓
✓
Override
Override a busy connection and
speak.
✓
✓
✓
Send/delete message text
Display/delete message text
Messages sent
(see also page 74).
69
Switching functions – overview
*
Functions
Ininteractive**
mode
In the Standard
service
code
menu**
<
S
>
=
S **
<
>
=
Conference (up to 5 users)
start
extend**
end
Add additional telephone partner to
call (see also page 66).
Show user list
Clear down conference user**
(USA only)
✓
✓
✓
✓
✱3
✓
#3
✓
✓
✓
✱491
✓
✱65
✓
✓
✱7
✱92
Call charge display
Speed dialling numbers
dialling
changing
Dialling centrally stored speed dialling destinations.
Trunk
transferring**
enabling
✓
✓
✱43
✓
✱2
Open listening (USA only)
✓
✱944
Logging on the handset (not
available in USA)
✓
✱942
DTMF dialling (tone dialling)
Transmit DTMF signals.
✓
✱53
✓
✓
✱44
#44
✓
✓
✱56
#56
✓
✓
✱45
#45
✓
Toggle
Switch between two
connections (see also page 65).
Night Service
on
off
Diversion of all calls to a fixed destination.
Park
Unpark
Hold call and resume at different
telephones.
Page
search
answer
Locate person using assigned
pocket receivers.
70
✓
✓
Switching functions – overview
*
Functions
Ininteractive**
mode
In the Standard
service
code
menu**
<
S
>
=
S **
<
>
=
✓
✱60
✓
✓
✓
✓
✓
✱0
✓
✓
✓
✓
✱58
#58
✓
✓
✓
✓
✱86
#86
✓
✱41
✓
✓
✓
✓
✱81
#81
✓
✓
✓
✓
✱85
#85
Project code
Assign toll connections to certain
projects.
Consultation**
terminate and go back**
transfer/pick up**
return to held call
(see also page 63)
Callback
store
delete
Store an automatic callback
request (see also page 56).
Suppress phone number
on
off
Your number/name is not
displayed for external users (basic
comfort telephone only).
Assign phone number
Assign other numbers to your own
phone. These numbers then
appear in the display of the called
party’s telephone.
Prerequisite: trunk connection is
multi-device connection (not available in USA).
Answer group
on
off
Signal calls from other telephones
and answer calls on these telephones.
Hunt group/group call
activate
deactivate
Hunt group calls/group call are no
longer signalled to the user who
has left the hunt group.
Hunt group (the telephones ring in
succession).
Group call (the telephones ring
simultaneously).
71
Switching functions – overview
*
Functions
Ininteractive**
mode
In the Standard
service
code
menu**
<
S
>
=
S **
<
>
=
Actuate switch
on
off
To switch on/off certain devices
(e.g. relay).
Recall to network (Flash)
To allow features to be used via
analogue lines, a signal must be
transmitted through the line before
the number is dialled.
Language selection
✓
✓
✱90
#90
✓
✱51
✓
✱48
✓
✓
✓
✱66
#66
✱93
✓
✓
✱46
#46
✓
✓
✱89
#89
✓
✱61
✓
✱59
✓
✱57
✓
System telephone directory**
(see also page 60)
Telephone
lock (system)
unlock
change lock code
Protect against unauthorised use.
✓
✓
Timed reminder
enter
delete
Enter a unique date for the next 24
hours.
Door opener via DTMF
Enable
disable
Activate door opener feature by
means of a code.
Door opener via adapter box
Activate the door opener feature
from the telephone.
✓
Initiate transfer**
Call pickup, directed
Answer calls for another phone on
your own phone.
Call pickup, group
Call pickup**
Answer calls for telephones within
a call pickup group on your own
phone.
72
✓
✓
Switching functions – overview
*
Functions
Ininteractive**
mode
In the Standard
service
code
menu**
<
S
>
=
S **
<
>
=
External call forwarding (not
available in USA)
on
off
✓
✓
✱64
#64
Retrieve an external
call from common hold
Transfer a call on hold to the
assigned line.
✓
✱63
Central code lock
✓
✱943
✓
✓
*If activated (consult your system administrator if necessary)
**As of Version 3.0
73
Message
You can send and receive messages with your handset. The
messages are short messages that can be read on the display. You can
– send messages,
– display messages you received,
– delete sent messages,
– call up received messages and
– leave advisory messages
Note:
Messages can only be sent internally and only to other
handsets or optiset E telephones with display.
The individual message functions are executed in the
same way as switching functions via an interactive
menu (see page 54). Examples of the "Send Message" and
"Call up received messages" functions are provided on the
following pages.
When transmitting messages, you can select predefined
messages or enter your own1 texts.
You telephone system offers the following predefined message texts2 with the associated message numbers:
0 = Please callback
5 = FAX waiting
1 = Visitor waiting
6 = Dictation pls
2 = Appointment
7 = Please join me
3 = Urgent call
8 = Coffee please
4 = Do not disturb
9 = vacate office
Sending a message
D
Press the talk key.
>
?!) ý4!--ã#!ïð
Scroll to ?!) ý4!--ã#!ïð.
=
Confirm the selection.
4!--ã#!ýå*ô
Display: 4!--ã#!ýå*ô
1 As of Version 3.0
2 Default texts may be modified in the system
74
Message
Pý
Dial the call number.
(The call number can also be entered
via the telephone directory.)
e.g.
4-#Ný"*,ýûGHúô
Display, e.g.:
4-#Ný"*,ýûGHúô
(The associated name is displayed if
the call number is entered in the system telephone directory, e.g.: 4-#Ný
"*,ýé*'ä)ô)
either:
=ýand >
Confirm the display and scroll to the
required default message.
or:
Message number
or:
=ýand >
ë)å!,ý(!--ã#!
å!1åïð
=
own message
Enter the message number (0 - 9) of
the required default message.
Confirm the display and scroll to
ë)å!,ý(!--ã#!ýå!1åïð.
Confirm the selection.
*
enter own message.
(see "Entering text" page 29.)
=
Confirm the entry.
?!) ï
Display: ?!) ï
=
e.g.:
Confirm the entry.
?!)åýå*ýûGHú
<'!ã-!ý,!æ'ãá!
$ã) -!åN
First display:
?!)åýå*ýûGHú
then:
<'!ã-!ý,!æ'ãá!ý$ã) -!åN
€ý
Press the on-hook key or place the
handset in the charging shell.
* As of Version 3.0
75
Message
x
Calling up a message received*
* As of Version 3.0
Your handset receives a message –
a notification tone sounds.
The letter icon appears on the display
after approx. 1 second.
,
Press the display key.
e.g.
4-#Ný",*(ôýûGHú
Display, e.g.:
4-#Ný",*(ôýûGHú
(A name can also be displayed
instead of the call number, e.g. : 4-#Ný
",*(ôýé*'ä).)
=
Confirm the selection.
@!1åïð
Display: @!1åïð.
=
e.g.
Confirm the selection.
Bä-äå*,ý0ãäåä)#
=
Display, e.g.:
Bä-äå*,ý0ãäåä)#
Confirm the setting.
@ä(!S ãå!ý-!)åïð Display: @ä(!S ãå!ý-!)åïð – check
when the message was sent.
=
e.g.
ãåôýüHôúûýå* ã2
=
>
Confirm the setting.
Display, e.g.: ãåôýüHôúûýå* ã2
(the date of another day can be specified instead of å* ã2ý, e.g.: ãåôý
ü÷ôHùýGøNGH.)
Confirm the setting.
Scroll to one of the following 4
options.
éã''ý?!) !,ïð
è!'!å!ïð
<,!/ä*.-ý(!).ïð
ë) ïð
=
Confirm the selection.
76
Message
Advisory message
If you are unable to answer any calls, you can send callers
an automatic advisory message.
As in the case of message texts, you can also select predefined texts or enter customised1 texts for advisory messages.
You telephone system offers the following predefined message texts 2 with the associated message numbers:
0 = Back on:
5 = Not available
1 = Holiday until:
6 = Avail/home:
2 = Away until:
7 = Contact:
3 = Out all day
8 = Avail at:
4 = Out till noon
9 = In room:
1 As of Version 3.0
2 Default texts may be modified in the system
77
Appendix
Troubleshooting
Before contacting the Service department, you should
attempt to correct any errors yourself:
Error
Possible cause
No display.
Handset not switched Press the on/off
on.
key.
Battery empty.
Charge the battery.
Remedy
é*))!áåNýý
>!'!ã-! is dis-
Cordless EM is being Try again later.
used by other users.
played as soon as you
press the talk key.
No dial tone; no calls
can be made.
No radio connection
possible to base station,
ìã-!ýüýflashes.
The handset is outside the radio range of
the base stations;
radio signal too weak.
The handset is not
registered.
Excessive delay
between synchronisation attempts.
ìã-!ýü is displayed, The handset is
blocked.
for example, but no
incoming or outgoing
calls can be received
or made. Activation/
deactivation not possible.
78
Move into radio
range, change
location.
Log on the handset.
Switch off handset
and switch it back on
again.
Open the battery
compartment lid
(arrow) and close it
again.
Appendix
Approval
Hicom cordless products satisfy the EU approval specifications in accordance with the EU directive 98/13/EEC.
Technical data
Standards
DECT in accordance with ETSI,
CTR 6, CTR 10, GAP
Number of channels 120 duplex channels
Frequencies
1.88 GHz to 1.90 GHz
Duplex operation
Time duplex with a 10 ms frame
length each
Channel configuration
1728 kHz
Bit rate
1152 kbit / s
Modulation
GFSK
Voice encoding
32 kbit/s (ADPCM)
Transmit power
10 mW medium power;
250 mW peak power
Range
outdoors approx. 300 m
indoors approx. 50 m
Convenience handset
Operating times
with fully charged
battery
see "Charging and using the
battery” (page 12f)
Permitted environmental conditions
for operation
+5 °C to +45 °C
20% to 75% relative humidity
Weight incl. battery
approx. 98 g
Dimensions
(L X W X H)
approx. 122 x 43 x 18 mm
79
Appendix
Headset (accessories)
Fig. 4 Headset
The reference number for ordering the headset is
C39453-Z5-C135.
Connecting the headset
The headset port is located above the receiver inset in
Gigaset 3000 Micro (See Fig 1 on page 3).
Use a pointed object to carefully remove the rubber plug
from the handset housing. Insert the headset connector in
the connection socket.
80
Index
A
Call pickup
directed............................. 72
group ................................ 72
Call trace............................... 69
Call waiting ........................... 68
Call, transferring ................... 64
Callback ................................ 71
deleting ....................... 57, 68
Callback request
storing............................... 56
Cancelling functions.............. 17
Character function
digits ................................. 30
letters................................ 29
Charging the battery ............. 12
Cleaning
charging shell ................... 10
handset............................. 10
Code functions ...................... 68
Conducting calls ................... 23
Conference ..................... 66, 70
Confirmation beep
activating/deactivating ...... 41
function ............................. 39
Connection quality .................. 9
Consultation
during a call ...................... 63
Correcting entries ................. 24
Correction key................. 24, 30
Accessories........................... 80
Activating/deactivating
the handset ....................... 14
Actuate switch ....................... 72
Advisory message................. 77
Answer group ........................ 71
Answering calls .....................25
Approval ................................ 79
Assign phone number ........... 71
Associated dialling ................69
Associated service ................69
Attachment clip...................... 13
Auto talk ................................ 46
Automatic
base changeover .............. 49
Available Memory..................36
B
Base
changeover ....................... 49
changing the name ........... 50
Display .............................. 23
select ................................ 49
Battery
charging ............................ 12
charging time .................... 12
inserting into handset........11
operating times ................. 12
permitted type ................... 12
use ................................ 2, 12
warning tone .....................39
Battery life .............................79
Battery low beep
activating/deactivating ...... 41
function .............................39
Beeps
setting ............................... 40
Block dialling ......................... 24
D
Deactivating/activating
the handset....................... 14
Default state.......................... 48
Deleting
entry ................................. 35
list ..................................... 36
Dial pause ............................. 33
Dialling
block dialling ..................... 24
external............................. 24
internal.............................. 23
number from
telephone directory ...... 34
redialling ........................... 26
Dialling in block ..................... 24
Display .................................. 16
available memory ............. 36
keys .................................. 17
Displaying
entry ................................. 36
Disposal .................................. 2
Do not disturb ....................... 68
C
Call
forwarding ......................... 64
Call acceptance, automatic ...46
Call charge display..................9
Call charges ............................9
Call distribution...................... 69
Call forwarding ...................... 68
deleting .............................62
saving ............................... 61
81
Index
Door opener ..........................72
Interactive menu ................... 54
E
K
Entering digits ....................... 30
Entering names .....................32
Entering text ..........................29
Entry
deleting .............................35
deleting/displaying ............ 27
displaying..........................36
editing ......................... 27, 35
Environmental conditions ........ 8
Error correction .....................78
External code ........................ 24
Key beeps
activating/deactivating ...... 41
function ............................. 39
Keypad
locking .............................. 15
Keypad lock .......................... 15
Keys...................................... 16
L
Lending the mobile phone ...... 2
Letters/characters
entering ............................ 29
Lock code ............................. 72
Logging
handset onto
telephone system ......... 20
F
Factory setting....................... 39
Features
handset ...............................7
Hicom cordless EM............. 8
Fitting the attachment clip .....13
Function selection
via codes........................... 68
via menus ......................... 18
M
Main menu
overview ........................... 38
Message
calling up received messages
76
displaying/deleting ............ 74
sending ............................. 74
Missed calls list
checking ........................... 58
deleting ....................... 59, 68
G
General operating instructions 9
Group call.............................. 71
H
Handset
activating/deactivating ...... 14
cleaning ............................ 10
logging onto telephone
system ..........................20
preparing........................... 11
Handset Lock ........................ 44
Handset PIN
changing ........................... 43
Handset volume .................... 40
Headset................................. 80
Hearing aids ............................2
Hunt group ............................ 71
N
Night service ......................... 70
Number
copying
number redial ............... 34
deleting ............................. 35
dial .................................... 35
dialling from directory ....... 34
editing ............................... 35
storing............................... 32
Number redial ....................... 26
I
O
Input function
digits ................................. 30
letters/characters .............. 29
text .................................... 29
Inserting a pause................... 33
Inserting the battery .............. 11
On status ........................ 16, 23
Operating elements ................ 3
Operating status ................... 14
Override ................................ 69
82
Index
Overview
display keys ...................... 17
main menu ........................ 38
settings .............................39
switching functions............ 68
Short message service ......... 74
Short ringer
activating/deactivating ...... 41
Special characters
entering ............................ 30
Speed dialling ....................... 70
Storing numbers ................... 31
Structure of the menu ........... 18
Suppress phone number ...... 71
Switching between users ...... 65
Switching functions
interactive menu ............... 54
overview ........................... 68
service menu .................... 55
user interface.................... 54
System
administrator..................... 20
code.................................. 21
PIN ................................... 21
P
Page
answer .............................. 70
search ............................... 70
Park.......................................70
PIN
handset .............................43
system .............................. 21
Power saving function ........... 10
Privacy ....................................9
Project code ..........................71
Putting the handset into service
11
Putting the handset into service
for the first time ................. 20
T
Technical data ...................... 79
Telephone
lock ................................... 72
unlock ............................... 72
Telephone conference .......... 66
Telephone directory
local .................................. 31
system .............................. 60
Telephone functions
Prerequisite ...................... 23
Telephone number
entering ............................ 32
Timed reminder..................... 72
Toggle............................. 65, 70
Tone dialling ......................... 70
Transmit power ..................... 79
Troubleshooting .................... 78
R
Radio network
leaving .............................. 10
power saving function ....... 10
Range................................ 9, 79
Recall to network................... 72
Reset services....................... 69
Retrieve
external call....................... 73
Ringer
activating/deactivating ...... 42
tone................................... 40
volume .............................. 40
S
Security ................................. 43
Service menu ........................ 55
Setting the language .............47
Settings
audio ................................. 40
base ..................................49
language ........................... 47
overview............................ 39
Short cut
calling up........................... 53
saving ............................... 52
starting .............................. 53
Short Cuts .............................51
Short cuts
menu................................. 51
U
Unit parts ................................ 3
User interface ....................... 54
V
Voice calling.......................... 69
Volume
handset............................. 40
ringer ................................ 40
83
-43$643360048630%;830870:94<1P A31003-M1530-B850-54-7619
When passing on the device
enter the following telephone numbers!
In the event of an error:
For sales queries:
Printed on recycled paper –
doing more for the environment!
This device complies with the requirements of the EU guidelines
89/336/EEC
"Electromagnetic Compatibility",
73/23/EEC
"Electric Operating Resources for Use within
Specific Voltage Parameters".
and therefore displays the CE symbol.
Published by the
Information and Communication Networks
Hofmannstraße 51, D-81359 Munich
Siemens Aktiengesellschaft
© Siemens AG 2001
All rights reserved.
Subject to availability.
Right of modification reserved.
Order No.:
A31003-M1530-B850-54-7619
Printed in Germany.
BA 0401