1
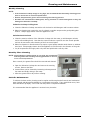
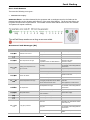
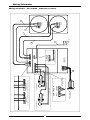
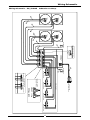
Installation and Operation Manual Induction Cooktop IN8200E IN8400E INL8200E INL8400E INB8200E INB8400E INLB8200E INLB8400E Date Purchased Serial Number Dealer Service Provider 1 For use in GB & IE 235034-3 MANUFACTURED BY Moffat Limited Rolleston 7675 New Zealand INTERNATIONAL CONTACTS AUSTRALIA Moffat Pty Limited E.Mail: Main Office: Service: Spares: Customer Service: [email protected] (tel): +61 (03) 9518 3888 (fax): +61 (03 9518 3838 (tel): 1800 622 216 (tel): 1800 337 963 (tel): 1800 335 315 (fax): 1800 350 281 CANADA Serve Canada Web: E.Mail: Sales: Service: www.servecanada.com [email protected] (tel): 800 551 8795 (Toll Free) (tel): 800 263 1455 (Toll Free) NEW ZEALAND Moffat Limited Web: E.Mail: Main Office: www.moffat.co.nz [email protected] (tel): 0800 663328 UNITED KINGDOM Blue Seal Web: E.Mail: Sales: Spares: Service: www.blue-seal.co.uk [email protected] (tel): +44 121 327 5575 (fax): +44 121 327 9711 (tel): +44 121 322 6640 (fax): +44 121 327 9201 (tel): +44 121 322 6644 (fax): +44 121 327 6257 UNITED STATES Moffat Web: Sales: Service: www.moffat.com (tel): 800 551 8795 (Toll Free) (tel): +1 336 661 1556 (fax): +1 336 661 9546 (tel): 800 858 4477 (Toll Free) (tel): +1 366 661 1556 (fax): +1 336 661 1660 REST OF WORLD Moffat Limited Web: E.Mail: www.moffat.co.nz [email protected] The reproduction or copying of any part of this manual by any means whatsoever is strictly forbidden unless authorized previously in writing by the manufacturer. In line with policy to continually develop and improve its products, Moffat Ltd. reserves the right to change the specifications and design without prior notice. © Copyright Moffat Ltd. November 2014. Contents Waldorf Electric Cooktops IN(L)(B)8200E IN(L)(B)8400E Induction Cooktop. Induction Cooktop. Introduction .............................................................................................. 2 Specification .............................................................................................. 4 Model Numbers Covered in this Specification General Technical Data Electrical Supply Requirements Electrical Connection Dimensions ................................................................................................ 6 Installation ................................................................................................ 7 Installation Requirements Unpacking Location Clearances Assembly Electrical Connection Commissioning Operation ................................................................................................. 10 Operation Guide Description of Controls Operating the Cooktops Cleaning and Maintenance ...................................................................... 12 General After Each Use Daily Cleaning Weekly Cleaning Monthly Filter Cleaning Periodic Maintenance Fault Finding ............................................................................................ 14 Error Codes General Fault Messages (E1) Wiring Schematics ................................................................................... 16 Replacement Parts List............................................................................ 18 Introduction We are confident that you will be delighted with your WALDORF INDUCTION COOKTOP, and it will become a most valued appliance in your commercial kitchen. To ensure you receive the utmost benefit from your new WALDORF Appliance, there are two important things you can do. Firstly: Please read the instruction book carefully and follow the directions given. The time taken will be well spent. Secondly: If you are unsure of any aspect of the installation, instructions or performance of your appliance, contact your WALDORF dealer promptly. In many cases a phone call could answer your question. CE Only: These instructions are only valid if the country code appears on the appliance. If the code does not appear on the appliance, refer to the supplier of this appliance to obtain the technical instructions for adapting the appliance to the conditions for use in that country. WARNING: INDUCTION HEAT SOURCE - CARE MUST BE TAKEN TO ENSURE THAT THE SPLASHBACK AND SURROUNDING AREAS ARE KEPT FREE OF METALLIC OBJECTS. WARNING: IMPROPER INSTALLATION, ADJUSTMENT, ALTERATION, SERVICE OR MAINTENANCE CAN CAUSE PROPERTY DAMAGE, INJURY OR DEATH. READ THE INSTALLATION, OPERATING AND MAINTENANCE INSTRUCTIONS THOROUGHLY BEFORE INSTALLING OR SERVICING THIS APPLIANCE. WARNING: GREAT CARE MUST BE TAKEN BY THE OPERATOR TO USE THE EQUIPMENT SAFELY TO GUARD IT AGAINST RISK OF FIRE. THE APPLIANCE MUST NOT BE LEFT ON UNATTENDED. IT IS RECOMMENDED THAT A REGULAR INSPECTION IS MADE BY A COMPETENT SERVICEMAN TO ENSURE CORRECT AND SAFE OPERATION OF YOUR APPLIANCE IS MAINTAINED. DO NOT STORE OR USE GASOLINE OR OTHER FLAMMABLE VAPOURS OR LIQUIDS IN THE VICINITY OF THIS OR ANY OTHER APPLIANCE. DO NOT SPRAY AEROSOLS IN THE VICINITY OF THIS APPLIANCE WHILE IT IS IN OPERATION. CAUTION: This appliance is; For professional use and is only to be used by suitably qualified / trained persons. Only service persons trained or recommended by the manufacturer are to carry out installation, servicing and repair operations. Components having adjustments protected (e.g. paint sealed) by the manufacturer should not be adjusted by the user / operator. 2 Introduction Safety Information: For your safety, please pay attention to the following symbols marked on the appliance. - RISK OF ELECTRIC SHOCK. NO USER SERVICEABLE PARTS INSIDE. NON-IONISING ELECTROMAGNETIC RADIATION QUALIFIED SERVICE PERSON ACCESS ONLY. QUALIFIED SERVICE PERSON ACCESS ONLY. DISCONNECT FROM POWER BEFORE SERVICING. DISCONNECT FROM POWER BEFORE SERVICING. Please Note the Following Points: Do Not placed metallic objects such as kitchen utensils, cutlery etc, on the Cooktop surface within the cooking zones as they could become hot. Take care when operating the appliance, as rings, watches and similar objects worn by the user could get hot when in close proximity to the Cooktop surface. Only use pans of the type and size suitable for induction cooking. NOTE: Users with Heart Pacemakers fitted should consult with their doctor or the manufacturer before using this appliance. Operation: Never insert objects into the Induction Unit. Inside are highly dangerous voltages. Do Not damage the Generator Inductors, e.g. with pointed / sharp objects as this may lead to electric shock. This Induction Unit is only for commercial cooking and for indoor use. It is only to be used with induction capable cookware. Any other use may result in unexpected hazards. Only use Induction Capable Cookware with a base of at least 120 mm diameter. Do not place metal objects, e.g. kitchen utensils, cutlery, tools, jewelry etc, on the cooking surface as they will quickly heat up if the appliance is turned ‘On’. Beware that when using the induction unit, personal items such as rings, watches and similar objects could get hot when in close proximity to the cooking zone. Do Not place Aluminium Foil on the cooking zone. Do Not use the ceramic glass surface as a work top. Do not damage the cooking surface. If the cooking surface shows visible signs of cracking, the appliance must be immediately disconnected from the mains supply. Switch ‘Off’ the cooking zone after use. Do not rely on the Pan Detection Mode. Personnel: Employees, visitors and contract personnel must be informed of the potential hazards for persons with pacemakers or metal implants. These persons must consult their doctor or the appliance manufacturer. Maintenance and Repair: Maintenance and repair work is only to be undertaken by service persons trained or recommended by the manufacturer. Disconnect the electrical supply before removing the Induction Unit. Defective or damaged Induction Units are not to be installed, these should be returned to the manufacturer for repair. For safety reasons, only used recommended original spare parts and accessories. Dispose of appliance in accordance with national and regional regulations. Emergency: Immediately switch ‘Off’ appliance and disconnect from the mains supply. Fire: Burning appliances should only be extinguished with a Carbon Dioxide (CO2) extinguisher. Never use water or powder type extinguishers. 3 Specifications Model Numbers Covered in this Specification IN[1]8200E IN[1]8400E Induction Cooktop (450 wide) - 2 Induction Heat Zones. Induction Cooktop (900 wide) - 4 Induction Heat Zones. NOTE: [1]: - Model Options; L B LB - Standard Models. - Low Back Models. - Bold Front. - Low Back and Bold Front. General A commercial heavy duty, high efficiency Induction Cooktop for modular kitchens, constructed in easy clean stainless steel external finish. It has a high option Cooktop arrangement with either 2 or 4 Induction Heat Zone option. Can be supplied with either Standard or Low Back Option and is available on industrial adjustable feet or with rear roller assembly. Induction generators are the result of intensive research and development work. In addition to their high safety standard, they offer easy operation, the latest technology and maximum convenience for: Boiling. Roasting. Keeping Food Warm. Flambéing. Grilling. The pan bottom is heated directly with a minimum of energy loss, without having to heat a hotplate needlessly. The food is heated more rapidly, allowing set meals to be prepared in a shorter time, with greater convenience and efficiency. A pan detection feature ensures that no energy is flowing when there is no pan (eliminating any fire hazard). A temperature sensor monitors the pan to prevent the pan boiling dry (no liquid in the pan), and switches ‘Off’ the cooking zone immediately in the event of over heating. Maximum efficiency is only obtained when induction- capable pans and pots are used. Technical Data Minimal Pan Diameter 120 mm. Relative Humidity 10% to 90% Non-condensing. Ambient Temperature: Operation Storage 0˚C to +40˚C. -20˚C to +70˚C. Supply Voltage: Voltage Tolerance: Supply Frequency: Operating Frequency: According to the Technical Data Plate. -10% to +6%. 50 or 60 Hz. 18 to 22 kHz. 4 Specifications Electrical Supply Requirements Power Supply Model Voltage Type Frequency IN8200E 400-415 Vac 3P+E 50 / 60 Hz IN8400E 400-415 Vac 3P+E 50 / 60 Hz Total Power Input Amps L1 L2 L3 10 kW 16 16 16 20 kW 32 32 32 Electrical Connection WARNING: THIS APPLIANCE MUST BE EARTHED. IF THE SUPPLY CORD IS DAMAGED, IT MUST BE REPLACED BY A SUITABLY QUALIFIED PERSON IN ORDER TO AVOID A HAZARD. The electrical supply connection point is located at the rear of the appliance, approximately 130 mm from the right hand side and 48 mm from the rear of the appliance and 614 mm from the floor. When connecting a this electric appliance to the mains supply, ensure that the following is carried out: An isolating switch is fitted within 2 m of the appliance, but not on the appliance and in such a position that the user does not have to reach across the cooking surface. Supply cord shall be oil-resistant, sheathed flexible cable and not lighter than ordinary polychloroprene or other equivalent synthetic elastomer sheathed cord (as per AS/NZS 3191 part 2.10.11. or IEC 60245-IEC-57) e.g. HO5 RN-F Type. The branch supply line shall be individually overload protected to the correct current rating and the supply cord shall be protected against any mechanical or thermal damage. A grommet is fitted around the wiring entry hole into the appliance. All wiring connections must be tight. Refer to the appropriate wiring standards for the size of cable that is to be supplied to an appliance for the current drawn on that line. 5 Dimensions Dimensions IN(L)8200E IN(L)8400E 6 Installation Installation Requirements NOTE: It is most important that this Induction Cooktop is installed correctly and that operation is correct before use. Installation shall comply with local electrical and health and safety requirements. Waldorf Induction Cooktops are designed to provide years of satisfactory service, and correct installation is essential to achieve the best performance, efficiency and trouble-free operation. This appliance must be installed in accordance with National installation codes and in addition, in accordance with relevant National / Local codes covering gas and fire safety. Australia / New Zealand United Kingdom: AS/NZS 3000 BS 7671 - Wiring Rules. - Requirements for Electrical Installations. Installations must be carried out by qualified persons only. Failure to install equipment to the relevant codes and manufacturer’s specifications shown in this section will void the warranty. Components having adjustments protected (e.g. paint sealed) by manufacturer, are only to be adjusted by an authorised service agent. They are not to be adjusted by the installation person. Unpacking Remove all packaging and transit protection from the appliance including all protective plastic coating from the exterior stainless steel panels. Check equipment and parts for damage. Report any damage immediately to the carrier and distributor. Report any deficiencies to the distributor who supplied the appliance. Check that the available electrical supply is correct to that shown on the Rating Plate attached to the underside of the R/H side, front Induction Cooktop lower trim. Location 1. 2. 3. Installation must include adequate clearance and ventilation. Position the appliance in its approximate working position. The legs must always be fitted. Ensure that the legs are securely attached. Clearances Combustible Surface Non Combustible Surface Left / Right Hand Side 50mm 0mm Rear 50mm 0mm NOTE: Only non-combustible materials can be used in close proximity to this appliance. 7 Installation Assembly This model is delivered completely assembled. Ensure that the adjustable feet are securely attached. C AUTIO N : This appliance is for professional use and is only to be used by qualified persons. Only qualified service persons are to carry out installation and servicing of this appliance. NOTE: This appliance is fitted with adjustable feet to enable the appliance to be positioned securely and level. This should be carried out on completion of the electrical connection. Rear Roller Kit - For installation details, refer to the instructions supplied with the kit. Electrical Connection WARNING: THIS APPLIANCE MUST BE EARTHED. IF THE SUPPLY CORD IS DAMAGED, IT MUST BE REPLACED BY A SUITABLY QUALIFIED PERSON IN ORDER TO AVOID A HAZARD. NOTE: ALL ELECTRICAL CONNECTIONS MUST ONLY BE CARRIED OUT BY A QUALIFIED SERVICE PERSON. Each appliance should be connected to an adequately protected power supply and isolation switch mounted adjacent to, but not behind the appliance. This switch must be clearly marked and readily accessible in case of fire. 1. Check that the electricity supply is correct as shown on the Rating Plate. Refer to the 'Dimensions Section’ for rating plate locations for the different model types. 2. The supply terminal connections are located at the rear of the the appliance. Refer to ‘Electrical Connections’ in the ‘Specifications’ section of the manual. 3. Bring the supply cable up through the compression type gland provided on the rear of the main electrical switchgear panel. 4. Connect the mains supply to L1, L2 and L3 connections as required. Refer to the 'Electrical Supply Requirements' section. 5. Connect earth conductors to earth stud. 6. For all connections ensure that conductors are secure and appropriately terminated. 7. Tighten the cable gland to secure against tension on the cable. NOTE: This appliance must be earthed. Fixed wiring installations must incorporate an all-pole disconnection switch. 8. Correctly locate the appliance into its final operating position and using a spirit level, adjust the legs so that the appliance is level and at the correct height. 9. Connect the power supply to the appliance. 10. Check that the electrical supply is as shown in ‘Specifications’ section. 8 Installation Commissioning The following commissioning checks must be carried out before the Induction Cooktop is handed over for use, to ensure that the unit operates correctly and the operator(s) understand the correct operating procedure. 1. Before leaving the new installation, check the following functions in accordance with the operating instructions specified in the ‘Operation’ section of this manual. Check the current draw and loading for the equipment. Refer specification section for correct electrical requirements. Check that all the connections are correct and that all cover panels have been re-fitted. After everything is connected, perform the following function check:a. Ensure that any cooking pots are removed from the cooking zone. b. Adjust the cooking level to ‘Zero’. c. Switch ‘On’ the mains supply. d. The Green and Red Indicator lamps must not illuminate or flash. e. Increase the cooking level to any number. f. The Green Indicator lamp must blink regularly every second (Pan Detecting Mode). On the display, Pan Detection Symbol U must blink (Pan Detecting Mode). g. No Fault must occur. Red Indicator lamp must not illuminate. h. Place a water filled induction pan (minimum of 120 mm diameter) on the cooking zone. i. The Green Indicator lamp must be ‘On’ continuously. j. Adjust power to Maximum. k. After a few seconds, the fan must turn ‘On’. WARNING: DO NOT HEAT EMPTY PANS WITHOUT SUPERVISION. ALWAYS PLACE PANS IN THE CENTRE INDUCTOR ZONE. PANS SHOULD NOT BE HEATED UP TO MORE THAN 300˚C (570˚F). OF AN If an error occurs, refer to the ‘Fault Finding’ section of this manual. Ensure that this instruction manual is left with the appliance. Ensure that all the relevant details and contacts have been added to the front of this manual. 2. Ensure that the operator has been instructed in the areas of correct operation and shutdown procedure for the appliance. 3. This manual must be kept by the owner for future reference and as a record of Date of Purchase, Date of Installation and Serial Number of Unit recorded and kept with this manual. (These details can be found on the Rating Plate attached to the inner R/H side panel. Refer to the ‘Dimensions’ section for rating plate location). NOTE: If for some reason it is not possible to get the unit to operate correctly, turn off the electrical power supply and contact a qualified service person. The supplier of this unit will be able to recommend a suitable person. Make sure that the electrical supply is turned off before any service or maintenance work is carried out. 9 Operation Operation Guide C AUTIO N : This appliance is for professional use and is only to be used by qualified persons. Only qualified service persons are to carry out installation and servicing operations. Components having adjustments protected (e.g. paint sealed) manufacturer should not be adjusted by the user / operator. 1. 2. by the Waldorf appliances have been designed to provide simplicity of operation. Improper operation is therefore almost impossible, however bad operation practices can reduce the life of the appliance and produce a poor quality product. To use this appliance correctly please read the following sections carefully. Description of Controls (Model IN8200E Shown) Fault Lamp (Red) Pan Detection / Power ‘On’ Lamp (Green) HI-LO Temperature Control Knob (Rear Hob) HI / LO Temperature Control Knob Used to select hob required and to adjust the temperature setting for individual Hobs. Pan Detection / Power ‘On’ Lamp (Green) Illuminates and remains ‘On’ when a selected hob is turned ‘On’ and has a pan on the hob. If the hob is turned ‘On’ without a pan on the hob, the lamp will commence flashing until a pan is placed on the selected hob. Also used with the ‘Fault Lamp’ to display Generator Faults, refer to ‘Error Code Pattern’ in the ‘Fault Finding’ section. Fault Lamp (Red) Illuminates and remains ‘On’ when a fault is detected. The red fault lamp will remain ‘On’ until the fault is rectified. Refer to ‘Error Code Pattern’ in the ‘Fault Finding’ section. 10 Operation Operating the Cooktop WARNING: INDUCTION HEAT SOURCE - CARE MUST BE TAKEN TO ENSURE THAT THE SPLASHBACK AND SURROUNDING AREAS ARE KEPT FREE OF METALLIC OBJECTS. Before Operating this Appliance Please Note the Following Points: Metallic objects such as kitchen utensils, cutlery etc. shall not be placed on the Cooktop surface within the cooking zones as they could become hot. Take care when operating the appliance, as rings, watches and similar objects worn by the user could get hot when in close proximity to the Cooktop surface. Only use pans of the type and size recommended by the manufacturer. NOTE: Users with Heart Pacemakers fitted should consult with their doctor or the manufacturer before using this appliance. The controls for the hobs may be set at any position between high and low to provide the desire level of heating. An individual green neon for each hob, will glow when the hob is ‘On’ with a pan present and extinguish when the hob is turned ‘Off’. Start cooking at the highest setting, and change to a lower setting when the desired temperature is reached. 1. 2. 3. Turn power ‘On’ at the mains power supply. Place cooking pan onto the hob to be used, ensuring that there is liquid in the pan. Turn the control knob to the desired temperature. The ‘Green’ indicator lamp will illuminate and stay ‘On’. NOTE: If the control knob is turned ‘On’ without a pan being on the hob, the green indicator lamp will commence flashing until a pan is placed on the hob. 4. On completion of cooking, turn ‘Off’ the control knob and remove the pan, the green indicator light will extinguish. NOTE: If the Red ‘Fault Lamp’ Illuminates and remains ‘On’, a fault has been detected. The red fault lamp will remain ‘On’ until the fault is rectified. The Green indicator light will commence flashing. Refer to ‘Error Code Pattern’ in the ‘Fault Finding’ section. DO NOT use the appliance until the fault is rectified. 11 Cleaning and Maintenance C AUTIO N : Always turn off the electrical power supply at the mains supply before cleaning. This appliance is not water proof. Do not use water jet spray to clean interior or exterior of this appliance. General Clean the Induction Cooktop regularly. A clean appliance looks better, will last longer and will perform better. Carbonised grease on the surface will hinder the transfer of heat from the cooking surface to the food. This will result in loss of cooking efficiency. DO NOT use water on the induction hob while this item is still hot as warping and cracking may occur. Allow the hob to cool down before cleaning. NOTE: DO NOT use abrasive detergents, strong solvents or caustic detergents as they could corrode or damage the induction hob. To keep your Induction Cooktop clean and operating at peak efficiency, follow the procedures shown below:After Each Use 1. Clean the Induction Cooktop hob area with a plastic or wooden scraper tool to remove any food debris. 2. Wipe down with a damp cloth lightly moistened with a solution of mild detergent and water. Dry the Cooktop hob area thoroughly with a dry cloth and polish with a soft dry cloth. Daily Cleaning 1. Thoroughly clean the splash back, the interior and exterior surfaces of the Induction Cooktop with hot water, a detergent solution and a soft scrubbing brush. 2. Clean the Control Panel with a damp cloth lightly moistened with a solution of mild detergent and water. Dry the control panel thoroughly with a dry cloth and polish with a soft dry cloth. 3. Any carbon deposits should be removed using a plastic or wooden scraper tool followed by wiping with a cloth moistened in a solution of hot water and detergent to prevent accumulation of food deposits. 4. Dry the Induction Cooktop thoroughly with a dry cloth and polish with a soft dry cloth. 12 Cleaning and Maintenance Weekly Cleaning NOTE: If the Induction Cooktop usage is very high, we recommend that the weekly cleaning procedure is carried out on a more frequent basis. Ensure that protective gloves are worn during the cleaning process. DO NOT use harsh abrasive detergents, strong solvents or caustic detergents as they will damage the Induction Cooktop. Induction Cooktop Cooking Area a. Clean the Induction Cooktop area with a soft cloth and a mild detergent and hot water solution. b. Baked on deposits may require the use of a plastic or wooden scraper and a good quality glass cleaner. Always apply cleaner when the appliance is cold. Stainless Steel Surfaces a. Clean the exterior surfaces of the Induction Cooktop with hot water, a mild detergent solution and a soft scrubbing brush. Note that the control knobs are a push fit onto the control spindles and can be removed to allow cleaning of the front control panel. b. Baked on deposits or discolouration may require a good quality stainless steel cleaner or stainless steel wool. Always apply cleaner when the appliance is cold and rub in the direction of the grain. c. Dry all components thoroughly with a dry cloth and polish with a soft dry cloth. Monthly Filter Cleaning NOTE: If the Induction Cooktop usage is very high, we recommend that the grease filter monthly cleaning procedure is carried out on a more frequent basis. Once a month, the grease filter should be removed and cleaned. a. Open the Induction Cooktop door and remove the securing screws. Remove the filter. b. Grease Filters can be cleaned by immersing in detergent and hot water and finally rinsing in hot water. c. Allow the grease filter to dry before re-fitting. Grease Filter Periodic Maintenance To achieve the best results, cleaning must be regular and thorough and all controls and mechanical parts checked and adjusted periodically by a competent serviceman. If any small faults occur, have them attended to promptly. Don't wait until they cause a complete breakdown. It is recommended that the appliance is serviced every 6 months. 13 Fault Finding Fault Finding This section provides an easy reference guide to the more common problems that may occur during the operation of your appliance. The fault finding guide in this section is intended to help you correct, or at least accurately diagnose problems with your equipment. Although this section covers the most common problems reported, you may encounter a problem not covered in this section. In such instances, please contact your local authorised service agent who will make every effort to help you identify and resolve the problem. Please note that the service agent will require the following information: The Model Trade Name and the Serial Number of the Appliance. (both can be found on the Technical Data Plate located on the appliance. Fault Possible Cause Remedy Insufficient heating of the cooking zone. Unsuitable pan material. Use only approved pans. Continuous heating of the cooking zone at maximum power. Knob switch faulty. Check / Replace the knob switch. Empty cooking zone starts operating. Pan detection sensor faulty. Call the service provider. Replace / repair generator. Call the service provider. Small metal objects are heated. Pan detection sensor faulty. Replace / repair generator. Call the service provider. No heating of cooking zone. Pan bottom diameter is less than 120 mm. Use suitable pan size. Generator defective. Replace / repair generator. Call the service provider. Appliance not working. Mains fuse or supply interrupted. Check fuses / mains connection. Fuses blow when switching ‘on’ appliance. Short circuit in generator. Replace / repair generator. Call the service provider. 14 Fault Finding Error Code Pattern There are the following error types: Generator Errors (E1). Generator Errors - are faults detected by the generator and on analogue controls, the faults can be detected according to the duration and frequency of the green light blinking. The green lamp lights, one long flash and then short regular flashes. The number of these short flashes refers to the error number. This pattern will repeat constantly. Generator Fault Messages (E1) Error No. Type of Error Use suitable pan material Wrong or defective coil Check Coil No inductor current Inductor connection failure Connect the Inductor correctly IGBT Temperature too high Air routes blocked Fan clogged Temperature sensor of IGBT defective Clear air routes Check fan and clean Check fan rotation Pan empty Remove pan, switch ‘Off’ and wait a few minutes until cooking field has cooled down Temperature Sensor faulty Replace Temperature Sensor Power Board faulty Replace Generator Defective wiring or Control Unit Check wiring harness to unit, or replace Control Unit Control Unit faulty Replace the Control Unit Air routes blocked Fan clogged, temperature sensor defect Exterior heat sources too close Clear air routes Clean fan Move appliance or heat sources Coil temperature too high Remove pan, switch ‘Off’ and wait a few minutes until cooking field has cooled down Temperature Sensor faulty Replace Temperature Sensor 01 Hardware over-current E1 02 E1 03 E1 E1 E1 04 05 06 07 Corrective Action Unsuitable pan material E1 E1 Cause Cooking zone temperature too high or too low Control Unit failure Internal temperature too high Coil temperature E1 08 Mains phase failure Breakdown of mains phase or mains power fluctuation Check mains supply E1 13 Mains connection error Mains voltage is too high or too low Check mains connection E1 14 Mains adaptor error Mains voltage is too high or too low Check mains connection Mains error Switch ‘Off’ the main power switch and wait a few seconds and switch power back ‘On’ Empty pan Remove pan, switch ‘Off’ and wait a few minutes until cooking field has cooled down E1 15 Empty pan protection Defective Coil Temperature Sensor 15 Replace Coil Temperature Sensor C ?W + ?F + PU + ?W + ?F + PU + POTENTIOMETER + - 16 4 ln + L1 L2 L3 PE L3 L2 L1 + INDUCTION GENERATOR MICROSWITCH CONNECTION out1 TYPICAL CONTROL CONNECTION DETAIL ?W + ?F + PU + Digital I/O + rt rt ln out2 + + + gn gn + + NEONS + + Lamps + rt Digital I/O out1 Poti - + + C ?W + ?F + PU + out2 CONTROL A CONTROL PANEL NEONS - gn Lamps Poti + Lamps Poti B CONTROL C CONTROL B N/C COM 1 MICROSWITCH 3 2 3 COIL COIL Wiring Schematic - IN(L)8200E MAINS CONNECTION 400-415v 3P+E + - POTENTIOMETER COIL AND COIL TEMPERATURE SENSOR CONNECTION DETAIL B 2 Wiring Schematic Induction Cooktop. + + - - NEONS 17 - - + + POTENTIOMETER gn ?W + ?F + PU + - - L1 L2 L3 N/C 4 NEONS COM 1 + + MICROSWITCH - - POTENTIOMETER + rt PE L3 L2 L1 gn + gn + rt Lamps Poti + Lamps Poti B CONTROL B A ?W + ?F + PU + CONTROL A ?W + ?F + PU + gn + rt Lamps + Poti gn + ?W + ?F + PU + Digital I/O + + ln + out2 + out1 + ln + N/C COM 1 MICROSWITCH 3 MICROSWITCH CONNECTION rt Lamps + D out1 Digital I/O ?W + ?F + PU + CONTROL D C INDUCTION GENERATOR Poti CONTROL C out2 MAINS CONNECTION 400-415v 3P+E + + NEONS TYPICAL CONTROL CONNECTION DETAIL rt POTENTIOMETER + CONTROL PANEL NEONS + Lamps CONTROL A Poti B 2 3 COIL COIL 2 3 2 3 COIL COIL 2 Wiring Schematic - IN(L)8400E POTENTIOMETER A ?W + ?F + PU + TYPICAL COIL AND COIL TEMPERATURE SENSOR CONNECTION DETAIL Wiring Schematic Induction Cooktop. Replacement Parts List Replacement Parts List IMPORTANT: Only genuine authorized replacement parts should be used for the servicing and repair of this appliance. The instructions supplied with the parts should be followed when replacing components. For further information and servicing instructions, contact your nearest authorized service branch (contact details are as shown on the reverse of the front cover of this manual). When ordering replacement parts, please quote the part number and the description as listed below. If the part required is not listed below, request the part by description and quote model number and serial number which is shown on the rating plate. 233706 233705 234480 234481 234482 234693 235309 227398 020774 227850 229674 235137 235351 227856 235308 235307 Induction Glass 450. Induction Glass 900. Induction Generator Vario Quad - 2 Tray. Induction Generator Vario Quad - 4 Tray. Induction Coil Tray 2 Zone. Induction Control Rotary Switch Assembly (Includes LED’s). Potentiometer with Switch. Knob Waldorf 6 mm, HI-4-3-2-1-LO. Microswitch. Leg 150 mm (Flush Stud). Rear Roller Assy. Induction Air Filter. Thumb Screw (for Filter). Magnetic Door Catch. LED Red. LED Green. 18