1
ProMini Keyboard
User Manual
(V1.0)
1
Contents
1.
SAFETY MATTERS .................................................................................................................................. 3
2.
OVERVIEW ................................................................................................................................................ 4
3.
INTRODUCTION....................................................................................................................................... 5
3.1. PRODUCT OVERVIEW ............................................................................................................................... 5
3.2. ABOUT KEYBOARD ................................................................................................................................. 5
3.3. INTRODUCTION TOUCHPAD TOUCH PAD ICON ....................................................................................... 6
3.4.
LASER HEAD DESCRIPTION ................................................................................................................. 6
3.5.
WIRELESS 2.4G RECEIVER 2.4G ADAPTER ICON ..................................................................................... 6
4.
STARTED ...................................................................................................................................................... 7
4.1.
4.2.
4.3.
4.4.
4.5.
4.6.
5.
BASIC FUNCTIONS .................................................................................................................................. 8
5.1.
5.2.
5.3.
5.4.
5.5.
5.6.
5.7.
6.
CONNECT RECEIVER ................................................................................................................................ 7
PROCESS OF USE ...................................................................................................................................... 7
HOW TO CONTROL THE BACKLIT ............................................................................................................. 7
EQUIPMENT SLEEP AND WAKE-UP OPERATION .......................................................................................... 7
SWITCH OFF THE DEVICE AFTER USE........................................................................................................ 7
BATTERY CHARGING ............................................................................................................................... 7
PRIMARY KEY BITS ................................................................................................................................. 8
SUB-KEYS ................................................................................................................................................ 8
DEPLICATE KEYS...................................................................................................................................... 8
BACKLIT CONTROL KEY ........................................................................................................................... 8
TOUCH PAD ............................................................................................................................................. 8
LASER POINTER ...................................................................................................................................... 8
RF MATCHING ......................................................................................................................................... 9
APPENDIX .................................................................................................................................................. 9
6.1.
6.2.
6.3.
6.4.
TECHNICAL PARAMETERS ........................................................................................................................ 9
MAINTENANCE........................................................................................................................................ 9
TROUBLESHOOTING .............................................................................................................................. 10
PACKING LIST .........................................................................................................................................11
(V1.0)
2
1. Safety Matters
Safety Matters
To avoid injury, death of personnel or damage to the equipment the operator must refer to an
explanation in the User’s Manual.
Battery: There is a piece of lithium-ion rechargeable battery in this device. Don’t water this
device, or take it in the humid environment for long time, or the device will be damaged.
Attention to traffic safety
(CAR PC): Do not use the device while driving. If you want to use, please park the car.
Turn off this device on the plane
This Electronic wireless product can disturb the communication for the plane. Please turn off
before boarding.
Turn off this device near the site of the explosion
In order to avoid interfering with blasting operations, please turn off this device in the
"blasting site" or in the area with "turn off two-way radio" icon.
In the vicinity of dangerous goods to be shut down
In the gas station and close to the fuel and chemical agents and other hazardous materials
areas, please shut down.
Turn off this device in the hospital
Please power off where there is a notice that “no wireless device” in the hostipal.
Wireless devices may interfere with implanted cardiac pacemakers, hearing aids and other
medical implant devices.
Interference
All wireless devices may be subject to interference, thus affecting the performance of this
product.
Accessorie
Only use factory specified parts. The machine specified by the manufacturer of travel charging
cable, the use of other charging devices may be dangerous.
Do not laser irradiation on human or animal eye directly to avoid damage the eye.
(V1.0)
3
2. Overview
This is wonderful combo, 2.4G Wireless Mini QWERTY Keyboard & Touch Pad & Presenter
Combo, with USB interface receiver.
Operating frequency: 2.4GHz ISM band, Dimension: 151.4mmX59mmX12.5mm
This product is not only with the normal wireless keyboard input, but also with multimedia control
keys, wireless PC gaming control keys. It has built-in programmable smart touch pad - the world's first
Touchpad which can be used from horizontal and vertical. With power indicator, RF signal indicator,
CAPSLOCK light, low-voltage reminder indicator, keypad backlight to facilitate night operations, in
addition, it also has a built-in laser pointer, to facilitate lectures, teaching, distance instruction.
This is a handheld keyboard with back lit
With 26 PCS dazzling bright LED lights to help when using in poor lighting environments.
Wireless 2.4G radio frequency with USB receiver
Ergonomically design makes this product can be used conveniently and easy to carry..
the world's first Touchpad can be used from horizontal and vertical
Use from horizontal or vertical at your pleasure!
innovative design of the Navigation keys
Smart located the direction control keys in order to be used as joystick control, make you feel the
thrill of playing game by wireless device.
Windows Media Control
Whether you are sitting on the sofa, or a comfortable bed, multimedia, wireless control, allows you
to enjoy the pleasure of enjoying multimedia.
Built-in rechargeable more staying power lithium-ion battery
Advanced lithium-ion battery shorts time for charging but with longer usage time, endurable for up
to 1 month.
Iphone style, classic style
Lines of beautiful, stylish, elegance, simplicity is not simple
One Wireless Laser Pointer, e-Pointer
Keyboard, mouse, presenter trinity, three-dimensional presentation, more vivid!
have a real notebook Touchpad
Use of advanced capacitive sensing technology, comparable to a real notebook touchpad.
real QWERTY full-function mini keyboard
(V1.0)
4
Delicate appearance, clever keyboard layout, a real mini-QWERT full-function keyboard.
3. Introduction
3.1. Product overview
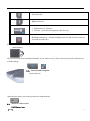
3.2. About Keyboard
Keyboard
Description
Numeric keys / letter key / function key
F1-F8 / duplicate multimedia keys
F1-F8 advanced computer function key, simultaneously press the "Fn"
key to work as multimedia keys
1. navigation keys: PgUp,PgDn,Home,End
2. joystick control key - press the "Fn" key together with the keys:
PgUp(up) or PgDn(down) or Home(left) or End(Right) to control the
direction when playing PC games
(V1.0)
5
left mouse key
Right mouse key
1. Backspace key / Del key
2. Del key – press this key together with "Fn" key
Backlight control key - default backlight turn off, and if want to turn on,
you need press this key
3.3. Introduction touchpad
Touch Pad icon
The use of touch pad is normally horizontal. If you want to use by from vertical, press below shown keys
to make change.
3.4. Laser Head Description
Laser head icon
Open the laser head, you need press the laser button shown
3.5.
Wireless 2.4G receiver
2.4G Adapter icon
(V1.0)
6
Started
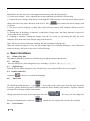
3.6. Connect receiver
Plug out the receiver from the side of this product, and insert to the devices with a standard USB
interface, and then switch machine keys
to the "ON" position, to complete the connection.
3.7. Process of use
Type the left Qwerty keyboards you can use it as input device, moving on the touch pad can control the
cursor, do the same function as mouse. If you want to use the built-in laser pointer to highlight the
words/drawing, just switch on the micro-switch control at the side of product.
3.8. How to control the backlit
There’re two ways to control the backlit – by software and by manual control mode.
When the connection is successful, backlit auto turn on, and will auto turn off after 3 seconds to save
power and increase battery life. If you want to turn on the backlit, just need to press the key
3.9.
.
Equipment sleep and wake-up operation
The device built into the auto-sleep function under certain circumstances, in order to save power and
increase battery life. Specifically for, when a user no longer operate buttons and touch pad for more than
three minutes, the device will automatically get into sleep mode - backlit turn off, leaving only the RF
indicator flashes.
In the sleep state, only need to click any button you can wake-up the device, the equipment will return to
the state before sleep.
3.10. Switch off the device after use
When finished, push the switch
to the OFF position, cut off the power, turn off equipment.
The 2.4G USB receiver should be plug out from USB interface, and then insert back in the equipment,
keep safety.
3.11. Battery Charging
The device with built-in lithium-ion battery, please use only approved data lines and chargers.
(V1.0)
7
Note: Before the first time use of the equipment, the battery must be fully charged.
* Use the travel charger – this is optional part of this equipment, provided by required only.
1. Connect the travel charger with the device through the USB connector at left, the arrow shown on the
charger need be in the same direction of the device. like:
, then connect the travel charger with
AC power.
2. The device can be recharge via data lines which directly connect with standard USB port on the
computer.
3.1 Second later (if the battery is depleted, it would take a longer time), the charge indicator at upper left
corner of the device will light.
4. Charging is complete, unplug the charger from the AC power (or disconnect the data line from
computer) first, then remove the charger plug from the device.
Note: This device can be used when charging, but will extend the charging time;
When the electrical capacity is low, the low-voltage light will constantly flashing to warn. When the
electrical capacity will run out, the device will self closing.
4.
Basic functions
4.1. Primary Key bits
The function printed at each key is defaulted by pressing the button with one time.
4.2. sub-keys
Press the SHIFT key while using these keys, including :!,@,#,$,%,^,&,*,(,),~,|,",{,},?,_,+
4.3. deplicate keys
Press the FN key while using these keys. all these keys were printed in Blue for easy recognize.
4.4. backlit control key
As Shown:
4.5.
is the key for control the backlight.
Touch Pad
The default operation direction is as
, move finger at the touch zone can do the same operation
as mouse, quickly double-tap can be achieved with the mouse double-click function. Together with the
left mouse key can drag window functionality.
Change operation direction of the touch pad: Press the
direction of touch panel to vertical as
4.6.
Two keys, you can change the
, suitable for user operate the computer by one hand.
Laser Pointer
(V1.0)
8
Make the device at the ON position (no need to connect 2.4G receiver to USB interface)
Press the key
when using, release the hand, the laser will automatically shut down. So, if you
want to continue to open the laser, you need to always press the laser button.
4.7.
RF matching
The device was set well by factory , you can ensure that different users on the same occasion using both
2.4G devices won’t interfering with each other. However, if in special circumstances, the interference
situation happened, you can change channels to avoid interference according to the following operation:
under the connection state, pressing the two keys
about 10 seconds after the lights began
to flash slowly, let slip the key, the flash will get quick, when the flash slow again, the channel was
changed.
6. Appendix
6.1. Technical parameters
Main Specification
Dimension: 151mmX59mmX12.5mm / 6'X2 .4 'X0.5'
Weight: 100g/0.22poud
Suitable temperature: -10 ℃ to +55 ℃
Battery Type: Built-in lithium-ion battery
Standby time: 500 ~ 700 hours
Operation range: up to 30 meters
Modulation: RF using DSSS mode, a stronger anti-jamming capability
Transmit Power: Max +4 dBm
Operating Voltage: 3.3V
Operating Current: <80mA
Charge voltage: 4.2V - 5.05V
Charge current: <300mA
Sleep Current: <1mA
Computer system requirements
Windows 2000
Windows XP
Windows Vista ,Windows CE, Windows 7
Linux(Debian-3.1,Redhat-9.0 Ubuntu-8.10 Fedora-7.0 tested)
6.2.
Maintenance
Battery Caution
Do not try to disassemble the machine or replace rechargeable batteries without permission,
otherwise the resulting loss has nothing to do with the manufacturer.
Battery charging time depends on the remaining battery capacity and battery / charger type.
(V1.0)
9
The battery can be charged and discharged hundreds of times, but eventually wear out. When the
battery operating time was significantly shorter than usual, it’s time to replace the battery, please
contact your local dealer.
A charged battery without use within a certain period will be self-discharge.
Use the specified charger. When the charger not in use, please cut off the power, do not let the
battery connected to a charger more than a week, over-charging will shorten battery life.
Do not place the machine at the places too hot or too cold, such as: In the summer or winter, a
closed car. This will reduce the capacity of the battery life. Try to keep the machine at room
temperature. Use too hot or too cold battery, even if the battery is fully charged, it may be
temporarily not working. Lithium-ion batteries are particularly subject to the impact of sub-zero
temperatures.
Careful maintenance
This equipment is designed by excellent designers, please carefully care.The following recommendations
can help you to comply with warranty, so the machine can be used for many years. When using this
equipment:
Put this device and all its parts and accessories at the place where children can’t reach.
Do not place this equipment at dusty place, or it's moving parts will be damaged.
The touch pad is the most vulnerable part, should avoid strong impact by other objects or
scratching.
Do not put it at hot place, high temperatures will shorten the life of electronic devices
Do not put it at too cold place, when the device temperature rise (to its normal operating
temperature) there will be water vapor generated inside the device, which could damage the
device's electronic circuit boards.
Do not drop, knock or shake the device, violent action would undermine the internal circuit
boards.
Do not use rough chemicals, cleaning solvents or strong cleaning agents to clean it, gently scrub
with a soft cloth soaked in soapy water to clean it.
Do not paint the device, paint will stick to the activities parts of the device and to impede the
normal operation.
If this device, battery, charger or any accessories not working properly, take it to the nearest
qualified service center, If necessary, the staff will help you arrange for its repair.
6.3.
Troubleshooting
In the operation of this equipment, if feeling it wasn’t work well, please refer to the following questions
and solutions. If this can’t solve the issue, please contact with vendors or service providers.
Issue
reason of the malfunction
Solution
1 、 The
electricity;
1.recharge the machine, over
around 15 minutes and then
switch on.
2. Check if the switch was put at
“ON” place.
battery
no
Can not boot
2. the on/off switch is not
placed well;
(V1.0)
10
RF
can’t
be
connected after a
long
time
light
blinking
1. Receiver Inserted
correctly or not, the
inserted device is in boot
state or not.
2. The signal is too weak
at your physical location,
or there is a wireless
interference.
1. Check if the receiver inserted
correctly and the inserted device
in the boot state.
2. Move your location, make sure
there’s no interference between
you and the inserted device.
Operation of the
mouse
pointer
jumping,
or
unresponsive
1.the equipment you
connected itself is not
working properly
2. your physical location
is too far away from the
equipment, or there are
too many block between
you and the equipment.
1.Check if the operation of the
equipment has been confirmed
that its working correctly.
2. Move your location or try from
another direction.
Device
charging
1.Chargers
and
equipment not being
connected well;
2.Battery
performance
degradation.
1. Correctly connect the charger
to this device;
2. Replace the same model
batteries; please contact your
local dealer.
can’t
be
6.4. Packing list
This equipment package contains the following items, depending on the local dealers:
Configuration
Units
Amount
Wireless combiner
PCS
1
Wireless receiver
PCS
1
Charging Data Cable
PCS
1
User Manual
PCS
1
(V1.0)
11


![Rii Mini [Bluetooth]](http://vs1.manualzilla.com/store/data/005936615_1-8449f5b84072d5316a2f330723fd6ad7-150x150.png)
![Rii Mini [Bluetooth]](http://vs1.manualzilla.com/store/data/005730343_1-53cd9486bcc3b780c33a2a4f5175af21-150x150.png)