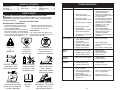
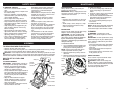
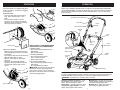
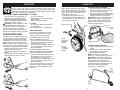
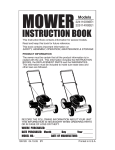
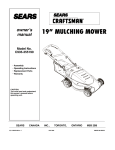
1
LIMITED WARRANTY
The Manufacturer warrants to the original consumer purchaser that this product as
manufactured is free from defects in materials and workmanship. For a period of
two (2) years from date of purchase by the original consumer purchaser, we will repair or replace, at our option, without charge for parts or labor incurred in replacing
parts, any part which we find to be defective due to materials or workmanship. This
Warranty is subject to the following limitations and exclusions.
1. This warranty does not apply to the engine, transaxle/transmission components,
battery (except as noted below) or components parts thereof. Please refer to the
applicable manufacturer's warranty on these items.
2. Transportation charges for the movement of any power equipment unit or attachment are the responsibility of the purchaser. Transportation charges for any
parts submitted for replacement under this warranty must be paid by the purchaser unless such return is requested by the manufacturer.
3. Battery Warranty: On products equipped with a Battery, we will replace, without
charge to you, any battery which we find to be defective in manufacture, during
the first ninety (90) days of ownership. After ninety (90) days, we will exchange
the Battery, charging you 1/12 of the price of a new Battery for each full month
from the date of the original sale. Battery must be maintained in accordance with
the instructions furnished.
4. The Warranty period for any products used for rental or commercial purposes is
limited to 45 days from the date of original purchase.
5. This Warranty applies only to products which have been properly assembled,
adjusted, operated, and maintained in accordance with the instructions furnished.
This Warranty does not apply to any product which has been subjected to alteration, misuse, abuse, improper assembly or installation, delivery damage, or to
normal wear of the product.
6. Exclusions: Excluded from this Warranty are belts, blades, blade adapters, normal wear, normal adjustments, standard hardware and normal maintenance.
7. In the event you have a claim under this Warranty, you must return the product to
an authorized service dealer.
Should you have any unanswered questions concerning this Warranty, contact:
Weed Eater
Customer Service Department
9335 Harris Corners Parkway
Charlotte, NC 28269 USA
In Canada contact:
Weed Eater
Customer Service Department
5855 Terry Fox Way
Mississauga, Ontario L5V 3E4
giving the model number, serial number and date of purchase of your product and
the name and address of the authorized dealer from whom it was purchased.
THIS WARRANTY DOES NOT APPLY TO INCIDENTAL OR CONSEQUENTIAL
DAMAGES AND ANY IMPLIED WARRANTIES ARE LIMITED TO THE SAME
TIME PERIODS STATED HEREIN FOR OUR EXPRESSED WARRANTIES.
Some areas do not allow the limitation of consequential damages or limitations
of how long an implied Warranty may last, so the above limitations or exclusions
may not apply to you. This Warranty gives you specific legal rights, and you may
have other rights which vary from locale to locale.
This is a limited Warranty within the meaning of that term as defined in the Magnuson-Moss Act of 1975.
OPERATOR’S MANUAL
MODEL NUMBER WE20C
ELECTRIC-POWERED, 3-IN-1,
20" ROTARY LAWN MOWER
438184
TROUBLESHOOTING
TABLE OF CONTENTS
Safety Rules ................. 2-4
Assembly ......................... 4
Pre-Operation ............... 5-6
Operation.................... 7-11
Maintenance ............. 12-13
Storage .......................... 14
Troubleshooting ............. 15
Warranty ........................ 16
PROBLEM
Does not start
SAFETY RULES
3. Extension cord not
connected to power source.
READ ALL INSTRUCTIONS
MOWER SAFETY GUIDELINES
4. Circuit breaker has tripped.
• Familiarize yourself with your lawn
mower, know all the lawn mower controls and how to operate them.
5. Loose blade or broken
blade adapter.
6. Operator presence control
bar in released position.
USER SAFETY
The symbols below may appear in this
manual and on your mower. Learn and
understand their meaning.
7. Operator presence control
bar defective.
Loss of power
CAUTION
or
WARNING
DANGER: Beware of
sharp blade - keep
hands and feet away.
Turn off mower and
remove plug from mains
before service, inspection,
or if cord is damaged.
DANGER:
Cut hazard keep hands
and feet away.
Do not mow when
children or others
are present - keep
bystanders away.
Read the
operator's
manual.
2
CORRECTION
2. Extension cord not
connected to power cord.
WARNING: IMPORTANT SAFETY WARNINGS AND INSTRUCTIONS.
WARNING: When using electric gardening appliances, basic safety precautions
should always be followed to reduce risk of fire, electric shock, and personal injury,
including the following.
• The information this manual contains
will alert you to potential hazards and
prevent possible problems.
• It may not be practical or possible to warn
about all the hazards associated with operating or maintaining your lawn mower
in this manual and we would advise you
to use your own good judgment.
CAUSE
1. Start button not depressed.
To reduce risk of
electric shock, do not
expose to water or
operate on wet ground.
Beware of thrown
objects from mower
deck. Remove
objects that could be
thrown by the blade.
Mow across slopes, not
up and down. Do not mow
any slope that has an
angle of greater than 15°
Poor cut –
uneven
1. Lawn mower housing or
cutting blade dragging
in heavy grass.
2. Cutting too much grass.
3. Buildup of grass, leaves,
and trash under mower.
4. Walking speed too fast.
1. Worn, bent or loose blade.
2. Buildup of grass, leaves
and trash under mower.
1. Press start button and hold
down operator presence
control bar to handle.
2. Reconnect extension cord
and use cord retainer to keep
the cord in place.
3. Connect extension cord to a
live and properly grounded
120V AC, 60 Hz receptacle.
4. Wait 5 minutes for motor to
cool down. Push circuit
breaker to reset.
5. Tighten blade nut or
replace blade adapter.
6. Press start button and hold
down operator presence
control bar to handle.
7. Replace operator presence
control bar.
1. Raise cutting height.
2. Raise cutting height.
3. Clean underside of mower
housing.
4. Cut at slower walking speed.
1. Replace blade.
Tighten blade nut.
2. Clean underside of
mower housing.
Excessive
vibration
1. Worn, bent or loose blade.
1. Replace blade.
Tighten blade nut.
Grass catcher
not filling
1. Cutting height too low.
2. Lift on blade worn off.
3. Catcher not venting air.
1. Raise cutting height.
2. Replace blade.
3. Clean grass catcher.
Hard to push
1. Grass is too high or wheel
height is too low.
2. Lawn mower housing or
or cutting blade dragging
in heavy grass.
3. Grass catcher too full.
4. Handle height position not
right for you.
1. Raise cutting height.
15
2. Raise lawn mower housing
one (1) setting higher.
3. Empty grass catcher.
4. Adjust handle height to suit.
STORAGE
SAFETY RULES
Immediately prepare your lawn mower for storage at the end of the season or if the unit
will not be used for 30 days or more.
LAWN MOWER
Operator
presence
control bar
When lawn mower is to be stored for a period of time, clean it thoroughly, remove all
dirt, grease, leaves, etc. Store in a clean,
dry area.
• Clean entire lawn mower (See “CLEANING” in the Maintenance section of this
manual).
• Lubricate as shown in the Maintenance
section of this manual.
• Be sure that all nuts, bolts, screws, and
pins are securely fastened. Inspect
moving parts for damage, breakage and
wear. Replace if necessary.
• Touch up all rusted or chipped paint
surfaces; sand lightly before painting.
FOLD
FORWARD
FOR
STORAGE
MOWING
POSITION
Upper
handle
Cam lock
Lower handle
Handle knob
HANDLE
You can fold your lawn mower handle for
storage.
1. Loosen the two cam locks on sides of
the upper handle and allow handle to
fold down to the rear.
2. Loosen the two handle knobs on sides
of the lower handle, lift the sides of
the lower handle past the edges of the
handle brackets and pivot entire handle
assembly forward and allow it to rest on
mower.
• When setting up your handle from the
storage position, the lower handle will
require manually locking into the mowing
position.
IMPORTANT: When folding the handle for
storage or transportation, be sure to fold
the handle as shown or you may damage
the control cables.
EXTENSION CORD
• Wipe extension cord to remove any
foreign substances such as oil or stains.
IMPORTANT: Replace extension cord if
cut or damaged in any way.
• Wind cord in a series of equal loops to
prevent it from tangling.
OTHER
• If possible, store your unit indoors and
cover it to protect it from dust and dirt.
• Cover your unit with a suitable protective
cover that does not retain moisture. Do
not use plastic. Plastic cannot breathe,
which allows condensation to form and
will cause your unit to rust.
14
I. GENERAL OPERATION
• Read, understand, and follow all
instructions on the machine and in the
manual(s) before starting. Be thoroughly
familiar with the controls and the proper
use of the machine before starting.
• Do not put hands or feet near or under
rotating parts. Keep clear of the discharge opening at all times.
• Only allow responsible adults, who are
familiar with the instructions, to operate
the machine.
• Clear the area of objects such as rocks,
toys, wire, sticks, etc., which could be
picked up and thrown by the blade.
Stay behind the handle when the motor
is running.
• Be sure the area is clear of other people
before mowing. Stop machine if anyone
enters the area.
• Do not operate the mower when barefoot or wearing open sandals. Always
wear substantial foot wear.
• Do not pull mower backwards unless
absolutely necessary. Always look down
and behind before and while moving
backwards.
• Never direct discharged material toward
anyone. Avoid discharging material
against a wall or obstruction. Material
may ricochet back toward the operator.
Stop the blade when crossing gravel
surfaces.
• Do not operate the mower without the
entire grasscatcher, discharge guard,
rear guard or other safety protective
devices in place and working.
• Never leave a running machine unattended.
• See manufacturer’s instructions for
proper operation and installation of
accessories. Only use accessories approved by the manufacturer.
• Stop the motor when crossing gravel
drives, walks, or roads.
• Stop the motor whenever you leave the
equipment, before cleaning the mower
or unclogging the chute.
• Shut the motor off and wait until the
blade comes to complete stop before
removing grass catcher.
• Mow only in daylight or good artificial
light.
• Do not operate the machine while under
the influence of alcohol or drugs.
• Never operate machine in rain or on wet
grass. Always be sure of your footing:
3
keep a firm hold on the handle and
walk; never run.
• Disengage the self-propelled mechanism on mowers so equipped before
starting the motor.
• If the equipment should start to vibrate
abnormally, stop the motor and check
immediately for the cause.
• Vibration is generally a warning of
trouble.
• Always wear safety goggles or safety
glasses with side shields when operating mower.
II. SLOPE OPERATION
Slopes are a major factor related to slip
and fall accidents which can result in
severe injury. All slopes require extra caution. If you feel uneasy on a slope, do not
mow it.
DO:
• Mow across the face of slopes: never
up and down. Exercise extreme caution
when changing direction on slopes.
• Remove obstacles such as rocks, tree
limbs, etc.
• Watch for holes, ruts, or bumps. Tall
grass can hide obstacles.
DO NOT:
• Do not trim near drop-offs, ditches or
embankments. The operator could lose
footing or balance.
• Do not cut excessively steep slopes.
• Do not mow on wet grass. Reduced
footing could cause slipping.
III. CHILDREN
Tragic accidents can occur if the operator is
not alert to the presence of children. Children
are often attracted to the machine and the
mowing activity. Never assume that children
will remain where you last saw them.
• Keep children out of the mowing area
and under the watchful care of another
responsible adult.
• Be alert and turn machine off if children
enter the area.
• Before and while walking backwards,
look behind and down for small children.
Use extra care when approaching blind
corners, shrubs, trees, or other objects
that may obscure vision.
• The mower is not a toy. It can be very
dangerous; children should not use this
mower. Only responsible adults who
have read the manual and understood
all instructions should operate this
mower.
SAFETY RULES
IV. GENERAL SERVICE
• Never run a machine inside a closed
area.
• Never make adjustments or repairs with
the motor running.
• Keep nuts and bolts, especially blade
attachment bolts, tight and keep equipment in good condition.
• Never tamper with safety devices.
Check their proper operation regularly.
• Keep machine free of grass, leaves, or
other debris build-up. Allow machine to
cool before storing.
• Stop and inspect the equipment if you
strike an object. Repair, if necessary,
before restarting.
• Never attempt to make wheel height
adjustments while the motor is running.
• Always unplug electric mowers before
adjusting, cleaning or repairing.
• Grass catcher components are subject
to wear, damage, and deterioration,
which could expose moving parts or
•
•
•
•
•
MAINTENANCE
allow objects to be thrown. Frequently
check components and replace with
manufacturer’s recommended parts
when necessary.
Mower blade is sharp and can cut. Wrap
the blade or wear gloves, and use extra
caution when servicing it.
Do not attempt to change the motor’s
electronic settings or over speed the
motor.
Maintain or replace safety and instruction labels, as necessary.
Only use accessories or parts approved
by the manufacturer. Non-approved
parts or accessories can cause serious
injury or damage and will void the warranty.
This lawnmower is not to be used for
commercial use; Use only on personal
property. It should only be used on
private lawns and should not be used to
cut public parks, playing fields, farms,
forests or a large number of lawns.
ASSEMBLY
TO REMOVE MOWER FROM CARTON
• Remove all loose parts from carton.
• Remove lawn mower housing with care. Avoid touching blade under housing. Always
wear gloves or other protection when working under or lifting mower.
CAUTION: Do not operate this lawn mower without the discharge guard or an entire
approved grass catcher in place. These guards are for your protection and are required by
the American National Standards Institute and Consumer Products Safety Commission.
HOW TO SET UP YOUR LAWN
MOWER
Always observe safety rules when performing any maintenance.
IMPORTANT: Always unplug electric mowers before servicing, cleaning or removing
material from lawn mower.
TIRES
• Keep tires free of gasoline, oil, or insect
control chemicals which can harm rubber.
• Avoid stumps, stones, deep ruts, sharp
objects and other hazards that may
cause tire damage.
BLADE CARE
For best results, blade must be kept sharp.
Replace a bent or damaged blade.
CAUTION: Use only a replacement
blade approved by the manufacturer of
your mower. Using a blade not approved
by the manufacturer of your mower is
hazardous, could damage your mower and
void your warranty.
TO REMOVE BLADE
1. Use a wood block between blade and
mower housing to prevent blade from
turning when removing blade nut.
NOTE: Protect your hands with gloves
and/or wrap blade with heavy cloth.
2. Remove blade nut by turning counterclockwise.
3. Remove blade and attaching hardware
(nut, square washer, insulator washer).
Trailing
edge
Wing nut
TO UNFOLD HANDLE
IMPORTANT: Unfold handle carefully so
as not to pinch or damage control cables.
• Remove any packing material which
may be between the upper and lower
handles for shipping purposes.
• Pull up and back on the upper handle to
raise the handle into the operating position. Make certain the lower handle is
seated securely into the handle mounting bracket.
• Align the holes between the upper
handle and lower handles. Insert the
cam locks and tighten them with the
wing nuts provided.
• Secure the lower handle to the bracket
with the knob on each side.
LAWN MOWER
Operator
presence
control bar
MOWING
POSITION
LIFT
UP
Insulator
washer
TO REPLACE BLADE
1. Be sure the trailing edge of blade (opposite sharp edge) is up toward the
motor.
2. Install the square washer and insulated
washer; secure with blade nut.
3. Use block of wood between blade and
lawn mower housing and tighten the
blade nut, turning clockwise.
• The recommended tightening torque is
35-40 ft. lbs.
TO SHARPEN BLADE
NOTE: We do not recommend sharpening
blade. An unbalanced blade will cause
eventual damage to lawn mower or motor.
CLEANING
WARNING: To reduce the risk of
electric shock, do not expose the mower
to water.
IMPORTANT: For best performance, keep
mower housing free of grass build-up and
trash. Clean the underside of your mower
after each use.
• Clean the underside of your lawn mower
by scraping to remove buildup of grass
and trash.
• Clean motor cover often to keep trash
from accumulating.
• Keep finished surfaces and wheels free
of all gasoline, oil, etc.
GRASS CATCHER
Grass catcher may be hosed with water
but must be dry when used.
CAUTION: Under normal usage, the
catcher material is subject to deterioration
and wear and should therefore be checked
to ensure compliance with original
manufacturer specifications.
Blade
nut
LIFT
UP
Blade
Upper
handle
Square washer
Cam lock
Lower handle
Handle knob
4
13
PRE-OPERATION
MAINTENANCE
BEFORE
EACH
USE
AFTER
EACH
USE
EVERY
10
HOURS
EVERY
BEFORE
25 HOURS
OR SEASON STORAGE
Check for Loose Fasteners
Clean / Inspect Grass Catcher
Check Tires
Clean Lawn Mower *
Check / Sharpen / Replace Blade **
Lubrication
* Use a scraper to clean under deck
** Replace blades more often when mowing in sandy soil
GENERAL RECOMMENDATIONS
The warranty on this lawn mower does not
cover items that have been subjected to
operator abuse or negligence. To receive
full value from the warranty, operator
must maintain mower as instructed in this
manual.
Some adjustments will need to be made
periodically to properly maintain your unit.
All adjustments in the Service and Adjustments section of this manual should be
checked at least once each season.
• Once a year, check blade for wear.
• Follow the Maintenance Schedule in this
manual.
Mulcher door
hinge rod
Rear door
hinge rod
2-prong
plug
WARNING: This mower is for outdoor
use only. Do not expose to rain or use in
damp locations.
• Avoid Dangerous Environment – Don’t
use lawn mowers in damp or wet locations.
• Don’t Use In Rain.
• Keep Children Away – All visitors should
be kept a safe distance from work area.
• Dress Properly – Do not wear loose
clothing or jewelry. They can be caught
in moving parts. Use of rubber gloves
and footwear is recommended when
working outdoors.
• Use Safety Glasses – Always use face
or dust mask if operation is dusty.
• Use Right Appliance – Do not use lawn
mower for any job except that for which
it is intended.
• Ground Fault Circuit Interrupter (GFCI)
protection should be provided on the
circuit(s) or outlet(s) to be used for the
lawn mower. Receptacles are available
having built-in GFCI protection and may
be used for this measure of safety.
WARNING: To prevent electric shock
use only with an extension cord suitable
for outdoor use, such as SW, SOW, STW,
STOW, SJW, SJOW, SJTW or SJTOW.
• Extension Cord – Make sure your extension cord set is in good condition. When
using an extension cord, be sure to use
one heavy enough to carry the current
you’re product will draw. An undersize
cord will cause a drop in line voltage, resulting in loss of power and overheating.
The table shows the correct size to use
depending on cord length and nameplate ampere rating. If in doubt, use the
next heavier gauge. The smaller the
gauge number the heavier the cord.
Properly grounded
extension cord
Spray
lubricant
BEFORE EACH USE
• Check for loose fasteners.
LUBRICATION
Keep unit well lubricated
POLARIZED APPLIANCE
CONNECTIONS
To reduce the risk of electric shock, this
appliance has a polarized plug (one blade
is wider than the other) and will require the
use of a polarized extension cord.
• The appliance plug will fit into a polarized extension cord only one way. If the
plug does not fit fully into the extension
cord, reverse the plug. If the plug still
does not fit, obtain a correct polarized
extension cord.
• A polarized extension cord will require
the use of a polarized wall outlet. This
plug will fit into the polarized wall outlet
only one way. If the plug does not fit fully
into the wall outlet, reverse the plug. If
the plug still does not fit, contact a qualified electrician to install the proper wall
outlet.
IMPORTANT: Do not change the
equipment plug, extension cord receptacle,
or extension cord plug in any way.
Handle bracket mounting pins
IMPORTANT: Do not oil or grease plastic
wheel bearings. Viscous lubricants will
attract dust and dirt that will shorten the life
of the self-lubricating bearings. If you feel
they must be lubricated, use only a dry,
powdered graphite type lubricant sparingly.
CAUTION: In all cases, make certain
the receptacle in question is properly
grounded. If you are not sure, have a
certified electrician check the receptacle.
This mower is “Double Insulated”.
MINIMUM GAUGE FOR EXTENSION CORDS (AWG)
(WHEN USING 120 V ONLY)
Amp Rating
12
Total Length of Cord in Feet (meters)
More Than
Not More Than
25' (7.6 m)
50' (15 m)
0
6
10
12
6
10
12
16
18
18
16
14
16
16
16
12
5
100' (30.4 m)
150' (45.7 m)
16
14
14
12
14
12
Not Recommended
PRE-OPERATION
To reduce the likelihood of disconnection of lawn mower cord from the cord set
during operation, use the extension cord
retainer supplied with the mower.
• Don’t Abuse Cord – Never pull lawn
mower by cord or yank it to disconnect
from receptacle. Keep cord from heat,
oil and sharp edges.
• Don’t Force Lawn Mower – It will do the
job better and safer at the rate for which
it was designed.
• Don’t Overreach – Keep proper footing
and balance at all times.
• Stay Alert – Watch what you are doing.
Use common sense. Do not operate
lawn mower when you are tired.
• Disconnect Lawn Mower – Disconnect
the lawn mower from the power supply
when not in use, before servicing, when
changing accessories such as blades,
and the like.
• Store Idle Lawn Mower Indoors – When
not in use, lawn mower should be stored
in an indoor dry and locked-up place
– out of reach of children.
• Maintain Lawn Mower With Care – Keep
cutting edges sharp and clean for best
and safest performance.
• Follow instructions for lubricating and
changing accessories.
• Inspect lawn mower cord periodically
and if damaged, have it repaired by an
authorized service facility.
• Inspect extension cords periodically and
replace if damaged.
• Keep handles dry, clean, and free from
oil and grease.
• Keep guards in place and in working
order.
• Keep blades sharp.
• Keep hands and feet away from cutting
area.
• Objects struck by the lawn mower blade
can cause severe injuries to persons.
The lawn should always be carefully
examined and cleared of all objects prior
to each mowing.
• If lawn mower strikes a foreign object,
follow these steps:
- Stop lawn mower. Release the switch.
- Unplug power cord.
- Inspect for damage.
- Repair any damage before restarting
and operating the lawn mower.
• Use identical replacement blades only.
OPERATION
MOWING TIPS
MULCHING MOWING TIPS
CAUTION: Do not use de-thatcher
blade attachments on your mower. Such
attachments are hazardous, will damage
your mower and could void your warranty.
• Under certain conditions, such as when
mowing very tall grass, raise the mower
height on the first cut to reduce pushing
effort, to avoid overheating the motor,
and to avoid leaving clumps of grass
clippings. Make the second cut to the
desired height.
• For extremely heavy cutting, reduce the
width of cut.
• For side discharge operation, cut in a
counterclockwise direction, starting at
the outside of the area to be cut, in order
to spread grass clippings more evenly
and to put less load on the motor. To
keep clippings off of walkways, flower
beds, etc., make the first cuts in a clockwise direction.
IMPORTANT: For best performance, keep
mower housing free of built-up grass and
trash. See "CLEANING" in the Maintenance section of this manual.
• The special mulching blade will recut the
grass clippings many times and reduce
them in size so that as they fall onto the
lawn they will disperse into the grass
and not be noticed. Also, the mulched
grass will biodegrade quickly to provide
nutrients for the lawn. Always mulch with
your highest motor (blade) speed as this
will provide the best recutting action of
the blades.
• Avoid cutting your lawn when it is wet.
Wet grass tends to form clumps and
interferes with the mulching action.
• For best results, adjust the lawn mower
cutting height so that the lawn mower
cuts off only the top one-third of the
grass blades. If the lawn is overgrown it
will be necessary to raise the height of
cut to reduce pushing effort and to keep
from overloading the motor and leaving
clumps of mulched grass. For extremely
heavy grass, reduce your width of cut
by overlapping previously cut path and
mow slowly.
SAVE THESE INSTRUCTIONS
MAX 1/3
• When using a lawn mower in moist,
heavy grass, clumps of cut grass may
not enter the grass catcher. Reduce
ground speed (pushing speed) and/or
run the lawn mower over the area a
second time.
• If a trail of grass clipping is left on the
right side of the lawn mower during rear
discharge operation, mow in a clockwise
direction with a small overlap to collect
the clippings on the next pass.
• Pores in cloth grass catchers can
become filled with dirt and dust with use
and the catcher will collect less grass.
To prevent this, regularly hose catcher
off with water and let dry before use.
6
• Certain types of grass and grass
conditions may require that an area be
mulched a second time to completely
hide the clippings. When doing a second
cut, mow across (perpendicular) to the
first cut path.
• Change your cutting pattern from week
to week. Mow north to south one week
then change to east to west the next
week. This will help prevent matting and
graining of the lawn.
11
OPERATION
TO CONVERT MOWER
Your lawn mower was shipped ready to be
used as a mulcher. To convert to bagging
or discharging:
Discharge deflector
OPERATION
KNOW YOUR LAWN MOWER
READ THIS OWNER'S MANUAL AND ALL SAFETY RULES BEFORE OPERATING
YOUR LAWN MOWER. Compare the illustrations with your lawn mower to familiarize
yourself with the location of various controls and adjustments. Save this manual for
future reference.
REAR BAGGING
• Open rear door and remove mulcher
plug. Store mulcher plug in a safe
place.
• You can now install grass catcher.
• To convert to mulching or discharging
operation, install mulcher plug into rear
discharge opening of mower.
Operator presence control bar
Start button
Power
cord
Circuit breaker
Mulcher
plug
Wing
nut
Mulcher plug
SIDE DISCHARGING
• Mulcher plug must be installed into rear
discharge opening of mower (see above
instructions).
• Open mulcher door and install discharge
deflector under door as shown.
• Mower is now ready for discharging
operation.
• To convert to mulching or bagging
operation, discharge deflector must be
removed and mulcher door must be
closed.
SIMPLE STEPS TO REMEMBER WHEN
CONVERTING YOUR LAWN MOWER:
FOR MULCHING • Rear mulcher plug installed and rear
door closed.
• Mulcher door closed.
FOR REAR BAGGING • Rear mulcher plug removed.
• Grass catcher installed.
• Mulcher door closed.
FOR SIDE DISCHARGING • Rear mulcher plug installed and rear
door closed.
• Discharge deflector installed.
CAUTION: Do not run your lawn mower
without rear mulcher plug or approved
grass catcher in place. Never attempt to
operate the lawn mower with the rear door
removed or propped open.
Extension
cord
retainer
10
Grass
catcher
Single point height
adjuster handle
Mulcher door
Handle
knob
Discharge
guard
Motor housing
MEETS CPSC SAFETY REQUIREMENTS
Our rotary walk-behind lawn mowers conform to the safety standards of the American
National Standards Institute and the U.S. Consumer Product Safety Commission.
WARNING: The blade turns when the motor is running.
Operator presence control bar – must
be held down to the handle to start the
motor. Release to stop the motor.
Start button – used for starting the motor.
Single point height adjuster – used to
adjust cutting height of lawn mower.
Open mulcher door
Cam
lock
Mulcher plug – located at the rear discharge opening. Must be removed when
converting to bagging operation.
Mulcher door – allows conversion to
discharging or bagging operation.
7
OPERATION
The operation of any lawn mower can result in foreign objects thrown into
the eyes, which can result in severe eye damage. Always wear safety
glasses or eye shields while operating your lawn mower or performing any
adjustments or repairs. We recommend standard safety glasses or a wide
vision safety mask worn over spectacles.
HOW TO USE YOUR LAWN MOWER
TO START
• Your lawn mower is equipped with an
operator presence control bar which
requires the operator to be positioned
behind the lawn mower handle to start
and operate the lawn mower.
CAUTION: Federal regulations require
a motor control to be installed on this
lawn mower in order to minimize the risk
of blade contact injury. Do not under
any circumstances attempt to defeat the
function of the operator control. The blade
turns when the motor is running.
EXTENSION CORD RETAINER
This lawn mower is equipped with a cord
retainer in order to prevent the extension
cord from disconnecting from the power
cord while the mower is in use. The cord
retainer hangs from the cord guide bar.
NOTE: Do not plug the extension cord into
the outlet until it has been connected to the
cord retainer and plugged into the mower.
• Fold the extension cord in order to form
a tight loop near the retainer.
• Push the loop through the hole in the
retainer.
• Slide the loop over the retaining clip, and
pull down until the cord is secured.
• Press the start button.
• Hold down operator presence control
bar to handle.
• Mower will begin to operate.
TO STOP
• To stop motor, release operator presence control bar.
Let the blade come to a complete stop.
OPERATION
TO ADJUST CUTTING HEIGHT
Adjust cutting height to suit your requirements. Medium position is best for most
lawns. Raise wheels for low cut and lower
wheels for high cut. All four wheels are
adjusted by a single lever.
• Pull adjuster lever toward wheel. To
lower mower, move lever forward to
desired position. To raise mower, move
the lever toward the rear.
TO ATTACH GRASS CATCHER
1. Lift the rear door of the lawn mower
and place the grass catcher frame side
hooks onto the door pivot pins.
2. The grass catcher is secured to the lawn
mower housing when the rear door is lowered onto the grass catcher frame.
CAUTION: Do not run your lawn mower
without mulcher plug or approved grass
catcher in place. Never attempt to operate the lawn mower with the rear door
removed or propped open.
Height adjuster lever
Pivot pins
Rear door
Grass catcher
handle
CIRCUIT BREAKER
This mower is equipped with a circuit
breaker in order to protect the supply
circuit from short-circuit overloads.
FOLLOW THESE STEPS IF THE
CIRCUIT BREAKER POPS OUT:
• Release the operator presence control
bar and allow the mower to stop and
cool down for 5 minutes.
• After the mower has cooled down, press
the circuit breaker in order to reset it.
Resume operation.
FOLLOW THESE STEPS IF THE
CIRCUIT BREAKER POPS OUT AGAIN
SHORTLY AFTER THE FIRST TIME:
• Release the operator presence control
bar and allow the mower to stop and
cool down for 15 to 30 minutes.
• After the mower has cooled down, press
the circuit breaker in order to reset it.
Resume operation.
If the circuit breaker does not stay in, or if
it continues to pop out during operation,
contact the Toll-Free Helpline at 1-800849-1297.
LEVER
BACKWARD
TO RAISE
MOWER
Catcher frame hook
TO EMPTY GRASS CATCHER
1. Lift up on grass catcher using the frame
handle.
2. Remove grass catcher with clippings
from under lawn mower handle.
3. Empty clippings from bag.
NOTE: Do not drag the bag when
emptying. It will cause unnecessary wear.
CAUTION: Under normal usage, the
catcher material is subject to deterioration
and wear and should, therefore, be
checked frequently for replacement. Any
replacement catcher should be checked
to ensure compliance with original
manufacturer's specifications.
LEVER
FORWARD
TO LOWER
MOWER
Grass
catcher
frame
handle
Bag
handle
8
9