1
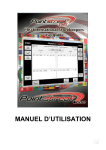
PAR+ES Controller
Installation Manual
P/N: 635778
635778 Rev B (PAR+ES installation manual (1of2 ENG)) source.indd 1
9/2/2008 4:09:27 PM
PAR+ES Controller
Installation Manual
Contents
Introduction������������������������������������������ 1
CAM Link Installation Flow Chart������ 10
System Configuration������������������������������������������������������1
Basic PAR+ES Field Wiring����������������� 11
Parts List and Tools Required����������������������������������������1
Installation Checklist��������������������������������������������������������1
Mount Controller Pedestal on PouredIn-Place Concrete Pad �������������������������� 2
Install L-Bolts in Mounting Template(s)���������������������2
Concrete Pad Requirements�����������������������������������������2
Before Pouring Concrete Pad����������������������������������������3
Pour the Concrete Pad and Mount the Pedestal����3
Install Power Wiring (120, 220 or 240
VAC)������������������������������������������������������� 4
Install Junction Box�����������������������������������������������������������4
Surge Arrestor Installation���������������������������������������������4
Connect AC Power Supply�������������������� 5
Connect AC Power������������������������������������������������������������5
Decoder Controller����������������������������� 12
Decoder Design�������������������������������������������������������������� 12
General Installation Instructions������������������������������� 13
Decoder Controller Installation��������������������������������� 13
Field Surge Protection for Decoders������������������������ 14
Install an Additional Output Station
Module (OSM)������������������������������������� 15
Upgrade Kit Installation��������������������� 16
Sensor Installation����������������������������� 17
Appendix
Controller Grounding System
Installation������������������������������������������ 18
Connect Power Wires and Surge Arrestor Wires�����5
Ground Resistance��������������������������������������������������������� 18
Controller to Controller Connections
Overview����������������������������������������������� 6
Installation Requirements������������������������������������������� 18
Grounding System Designs���������������������������������������� 19
Enhanced Ground System������������������������������������������� 20
Install MAXI 2-Wire Interface Board���� 7
Cable Connections������������������������������������������������������������7
2-Wire Path Connections������������������������������������������������7
Install The +LINK Radio/Modem Kit���� 8
+LINK Power Transformer Installation &
Connection��������������������������������������������������������������������������8
+LINK Interface Board Installation������������������������������8
Radio Modem Kit and Antenna Panel Installation9
635778 Rev B (PAR+ES installation manual (1of2 ENG)) source.indd 2
9/2/2008 4:09:27 PM
Introduction
This manual shows how to install your new PAR+ES
irrigation controller. Refer to the controller’s
Operation Manual for instructions on programming
and operating your controller.
zz Conduit cutting tool.
System Configuration
zz Small flat blade screwdriver.
PAR+ES controllers may be installed in three different
configurations:
zz Stand-Alone Models - Controller operates
independently and is not connected to a central
control system.
zz Two-Wire Models - Controller is hard-wired
to a central control system through a 2-wire
connection.
zz Wireless (LINK) Models - Controller is
connected to a central control system via a
wireless radio/modem unit.
Every Model is available with Output Station Modules
(Standard Controllers) or with Decoder Interconnect
Board (Decoder Controllers). Standard controllers
output directly to the solenoid or remote control
valves. Decoder controllers output to decoders which
in turn activate solenoids or remote control valves.
Parts List and Tools Required
Before beginning installation, make sure you have the
following parts and required tools and materials:
Parts
zz PAR+ES controller Installation Manual.
zz PAR+ES controller.
zz Plastic controller mounting template.
zz Four L-bolts.
zz Eight stainless steel nuts.
zz Four large washers.
zz Four small split-ring washers.
Tools and Materials
zz Hammer, nails, framing lumber, concrete, trowel,
etc. (for concrete pad).
zz Adjustable wrench or pliers.
zz Phillips screwdriver.
zz Level.
zz Tape measure.
zz Electrical wire.
zz Wire cutters/strippers.
zz Wire nuts (or other code-approved wire
connectors).
zz Intermatic AG-2401 Surge Arrestor; one for each
controller being installed (recommended) if
single, or one per cluster.
zz Metal junction box (4” x 4” x 1½”); one for each
controller being installed (except last controller
in a cluster).
zz Grounding grid installation materials (recom-
mended; see Appendix 1).
Installation Checklist
To install your PAR+ES controller, we recommend that
you complete the following steps in order:
Choose location and prepare to
to concrete pad.................................. Page 2
Mount controller pedestal on
concrete pad....................................... Page 3
Install junction box........................... Page 4
Install surge arrestor......................... Page 4
Connect AC power supply.............. Page 5
Connect power wiring..................... Page 5
Connect decoders (only required
on Decoder Controllers)................. Page 12
zz 1”, 1 ½” and 4” non-metallic conduit, sweep ells,
and appropriate fittings for routing power wires,
communication wires, valve wires and ground
wires.
PAR+ES Installation Manual
635778 Rev B (PAR+ES installation manual (1of2 ENG)) source.indd 1
1
9/2/2008 4:09:27 PM
Mount Controller Pedestal on Poured-In-Place Concrete Pad
Mount the controller on a poured-in-place concrete
pad. Orient the pad to provide easy access of electrical
conduit into the front of the controller. Make sure the
pad is flat and level to allow the controller’s doors and
lid to open and close properly. Avoid installing the
controller in the direct path of a sprinkler head. If the
controller is in the direct path of a sprinkler, place the
pedestal with hinge (back) side facing the sprinkler.
Install L-Bolts in Mounting
Template(s)
1. Screw four of the 5/16” stainless steel nuts onto
the L-bolts (see Figure 1).
Concrete Pad Requirements
zz Location - Any convenient outdoor location
with access to AC power.
!!
NOTE: Do not locate the concrete pad in
low-lying areas that may flood during heavy
rains. Install pad 1” above grade.
zz Size - 20” x 20” minimum. If mounting multiple
controllers on the same pad, size the pad to
allow at least 6” clearance between controllers
(see Figure 2).
zz Thickness - 6” minimum.
2. Insert the L-bolts into the threaded holes in the
plastic mounting template.
3. Screw another stainless steel nut onto each L-bolt
to hold it in place.
4. Repeat steps 1-3 with templates for other
controllers (if installing multiple controllers).
2
635778 Rev B (PAR+ES installation manual (1of2 ENG)) source.indd 2
PAR+ES Installation Manual
9/2/2008 4:09:30 PM
Before Pouring Concrete Pad
1. Position a 1” sweep “ell” for the 120, 220, or 240
volt power wires. If installing multiple controllers
on the same pad, position another 1” sweep ell
to carry power wires to the other controllers (see
Figures X and Y for proper sweep details).
2. Position a 1” sweep ell for the 2-wire
communication wires (for 2-wire systems only).
If installing multiple controllers on the same pad,
place another 1” sweep ell to carry communication
wires to the other controllers.
Pour the Concrete Pad and Mount
the Pedestal
1. Pour the concrete pad around the properly
positioned sweep ells.
2. Lower the mounting template onto the pad,
setting the L-bolts into concrete as shown in
Figure 2. Make sure the template is level and
properly oriented before setting it into concrete
at concrete’s grade. Make sure the L-bolts extend
true vertical from the pad.
3. Position one 4” ell for the valve output wiring, valve
common wires, Maxi Wire (decoder controller
installation), master valve wiring, etc.
3. If installing multiple controllers, position the
mounting templates for the other controllers.
Make sure to maintain a minimum 6” clearance
distance between controllers.
NOTE: Decoder Controllers only require a 1
1/2” sweep ell for valve wire path(s), master
valve wiring, ground wire, etc.
4. After the concrete hardens, remove the four
exposed nuts from the L-bolts.
!!
4. Run all power wires, communication wires, and
field wiring through their appropriate conduits.
PAR+ES Installation Manual
635778 Rev B (PAR+ES installation manual (1of2 ENG)) source.indd 3
5. Lower the controller pedestal onto the L-bolts in
the template. Place a split-ring washer on each
bolt and use the stainless-steel nuts to bolt the
controller pedestal securely to the concrete pad.
3
9/2/2008 4:09:32 PM
Install Power Wiring (120, 220 or 240 VAC)
Install Junction Box
PAR+ES controllers must have a metal junction
box installed on the bottom of the controller’s
wiring compartment. The first controller in a
cluster and any other controller(s) feeding power
to another controller must be equipped with a
junction box.
FF
CAUTION: To avoid a serious shock hazard,
make sure the primary AC power source to
the controller is OFF before installing power
wiring.
First Controller(s) in the Cluster
1. Punch out a junction box knockout and attach
the box to the 1” power wire conduit. Route the
hot (black), neutral (white), and green (ground)
power wires into the junction box.
2. Secure the junction box to the conduit using a
short nipple and the required fittings as shown in
Figure 3.
3. Punch out one of the knockouts in the side of
the junction box and use the hole to install the
recommended Intermatic model AG-2401 surge
arrestor (see Surge Arrestor Installation).
Last Controller in the Cluster
1. No electrical junction box is required for the last
controller in the cluster or for a stand-alone model
that does not feed power to another controller.
2. Run the 1” conduit directly to the controller wiring
compartment and use an appropriate fitting to
connect the conduit to the wiring compartment.
Surge Arrestor Installation
Rain Bird recommends installing a surge arrestor
to protect the controller’s power wiring circuits
from voltage fluctuations. Recommended surge
arrestor models include the Intermatic AG‑2401 (or
1G2401LA1).
Install Surge Arrestor
1. Knockout a hole in the right side of the metal
junction box and mount the surge arrestor in the
knockout hole.
2. Extend the surge arrestor wires (two black, one
white) into the junction box with the AC power
wires.
Install Surge Arrestor (Alternate Location)
For stand-alone and 2-wire installations, you may
choose to install the surge arrestor in the vacant
compartment designed for the wireless transformer.
FF
CAUTION: To avoid a serious shock hazard,
make sure the primary AC power source to
the controller is OFF.
1. Remove the power supply access panel.
2. Punch out the bottom left knockout hole in the
power supply compartment. Mount the surge
arrestor into the knockout hole.
3. Connect the surge arrestor wires to the controller’s
power wires (see Connect Power Wires and Surge
Arrestor Wires).
4. Replace the controller’s power supply access
panel.
To order a surge arrestor, contact Intermatic,
hh
Inc. at (815) 675-2321.
4
635778 Rev B (PAR+ES installation manual (1of2 ENG)) source.indd 4
PAR+ES Installation Manual
9/2/2008 4:09:34 PM
Connect AC Power Supply
Connect AC Power
FF
CAUTION: To avoid a serious shock hazard,
make sure the primary AC power source to
the controller is OFF.
1. Punch out a knockout hole in the top of the
junction box and run a length of conduit from
the junction box to the controller’s power supply
compartment.
2. Use appropriate fittings to connect the conduit
to the junction box and the power supply
compartment.
3. Run three power wires from the power supply
compartment down into the junction box (green,
black and white for 120 VAC installations; green
black and red or other appropriately identified
hot-wire for 220-240 VAC installation).
4. Attach the power wires to the modular snap-in
connector in the power supply compartment, as
shown in the diagram on the power supply access
cover (see Figure 4).
Connect Power Wires and Surge
Arrestor Wires
1. In the junction box, connect the AC power wires
(black, white, and green) as shown in Figure 3.
2. Wire the two black surge arrestor lead wires into
the controller’s 120, 220, or 240 VAC power wiring.
Connect one of the two black surge arrestor lead
wires to the HOT (black) power wire.
!!
NOTE: Use only double-crimp style wire nuts
approved by local regulations for all PAR+ES
wiring connections.
3. Connect the other black surge arrestor lead wire
to the NEUTRAL (white) power wire.
!!
NOTE: If using a 220/240 volt system, the
other black surge arrestor lead should go to
the other HOT (red or blue) power wire.
4. Connect the white surge arrestor ground wire to
one of the controller’s copper grounding lugs.
5. Connect the utility ground to the ground lug
on the left side of the wiring compartment (see
Figure 5).
6. Use the 3-position selector switch to choose
correct voltage option for your installation (default
voltage setting is 220 VAC).
!!
!!
NOTE: Select the correct voltage before
turning on AC power. If the switch position is
changed after applying power, the controller
will be damaged.
NOTE: In 240 VAC the power wire are colored
red/black or red/blue.
!!
NOTE: Each controller location or cluster of
controllers requires a Controller Grounding
System to protect your controller(s) from
lightning damage. Refer to the manual
Appendix for details on installing an
appropriate grounding system for your
location.
PAR+ES Installation Manual
635778 Rev B (PAR+ES installation manual (1of2 ENG)) source.indd 5
5
9/2/2008 4:09:36 PM
Controller to Controller Connections Overview
Figure 6 shows overview of how power and communication wiring connects from controller to controller in a cluster.
hh
6
635778 Rev B (PAR+ES installation manual (1of2 ENG)) source.indd 6
PAR+ES Installation Manual
9/2/2008 4:09:37 PM
Install MAXI 2-Wire Interface Board
!!
NOTE: Follow this procedure only for 2-wire
installations.
The Maxi 2-wire board mounts under the control
module (face panel) of the basic PAR+ES controller.
1. Remove the four screws from the face panel bezel
(not the interior face panel screws) and lift out the
control module.
2. Use four #4-40 machine screws to attach the
MAXI 2-Wire module to the bottom of the control
module, as shown in Figure 7.
Cable Connections
Connect the 10-pin ribbon cable from the connector
on the left end of the MAXI 2-Wire board to the 10-pin
connector on the left end of the Power Interconnect
Module.
PAR+ES Installation Manual
635778 Rev B (PAR+ES installation manual (1of2 ENG)) source.indd 7
2-Wire Path Connections
On the lower front of the controller is a 4-terminal
connection block (see Figure 8).
1. Connect the HOT (red) wire of the 2-wire
communication path to terminal #4 (lower right
terminal).
2. Connect the COM (black) wire of the 2-Wire
communication path to terminal #2.
3. Connect the HOT (red) wire of the 2-Wire
communication path going to the next controller
to terminal #3.
4. Connect the COM (black) wire of the 2-Wire
communication path going to the next controller
to terminal #1 (bottom left terminal).
!!
NOTE: If sharing only one MSP-1 among a
cluster of controllers, then splice the black
and red wires on the EQUIP side of the
MSP-1. Connect one set of wires to the green
plug that connects to the 2-wire interface
board. Connect the other set of wires to the
4-terminal connecting block of the second
controller.
7
9/2/2008 4:09:40 PM
Install The +LINK Radio/Modem Kit
+LINK Power Transformer
Installation & Connection
!!
FF
NOTE: Follow this procedure only for wireless
systems without a Radio/Modem Kit (RMK)
pre-installed.
CAUTION: To avoid a serious shock hazard,
make sure the primary AC power source to
the controller is OFF.
Install the +LINK Power Transformer (P/N 633254) in the
transformer wiring compartment in the space to the left of
the main PAR+ES Power Transformer. (See Figure 9).
1. Remove the two screws securing the Power Supply
Access Cover.
2. Remove the two screws from the reverse side of the
power supply and the one screw from the bottom of
the power supply.
3. Remove the secondary power connector from the
power interface board.
4. Remove the main AC power connector from the
snap-in terminal block.
5. Insert the +LINK transformer into the power supply
and run the orange wires through the hole in the top
of the compartment.
6. Feed the wires through the power supply hole and
secure the transformer using the nuts provided.
9. Replace the power supply in the controller and secure
it with its screws.
10.Reattach all power connections.
+LINK Interface Board Installation
The +LINK Interface Board mounts under the control
module (face panel) of the basic PAR+ES controller
1. Remove the four screws from the face panel bezel (not
the interior face panel screws) and lift out the control
module.
2. Use four #4-40 machine screws to attach the +LINK
Interface Board module to the bottom of the control
module (see Figure 10).
3. Attach the 10-pin ribbon cable from the connector on
the left end of the +LINK Board to the 10-pin connector
on the left end of the Power Interconnect Board.
4. Attach the nine-pin Radio/Modem data cable into the
connector on the bottom of the +LINK Board. Pass the
cable through the opening between the bezel tray
and the plastic pedestal itself.
5. Plug the other end of the nine-pin cable into the
Radio/Modem link module.
6. Plug the link transformer power Wire Connector in the
two-pin connector.
7. Replace the Control Panel Assembly and continue
with the installation.
7. Attach the green ground wire to the grounding post.
8. Plug the +LINK transformer’s white male connector
into the free white female power supply connector.
8
635778 Rev B (PAR+ES installation manual (1of2 ENG)) source.indd 8
PAR+ES Installation Manual
9/2/2008 4:09:43 PM
Radio Modem Kit and
Antenna Panel Installation
1. Slide the radio unit into its mounting location on
the radio cover, making sure that it snaps into
place (see Figure 11A).
2. Attach the modem board to the radio cover using
the four screws provided.
3. Plug the connector cable from the modem board
into the radio.
4. Insert the connector from the antenna through
the opening in the radio cover and plug into the
radio.
5. Mount the radio cover assembly to the antenna
plate using six nuts provided (not shown).
6. Insert the metal tabs on the base of the antenna
panel into the slots in the controller lid and use
the two screws to secure the antenna panel inside
the lid (see Figure 11B).
PAR+ES Installation Manual
635778 Rev B (PAR+ES installation manual (1of2 ENG)) source.indd 9
9
9/2/2008 4:09:45 PM
CAM Link Installation Flow Chart
Up to four controllers can share one Radio/Modem kit. Figure 12 shows how to connect the different CAM Link
modules.
!!
NOTE: Cables provided with CAM Link are not suitable for direct burial and need to be in either a
waterproof conduit underground from controller 1 to 2 and so on, or in a waterproof conduit above
ground, at pad level, between controllers.
10
635778 Rev B (PAR+ES installation manual (1of2 ENG)) source.indd 10
PAR+ES Installation Manual
9/2/2008 4:09:47 PM
Basic PAR+ES Field Wiring
1. Connect each station valve wire to its appropriate
terminal on the controller’s terminal strips (i.e.,
station 1 to terminal #1, station 2 to terminal #2,
etc.) Each station can control up to four valves.
!!
NOTE: It may be necessary to splice station
valve wires together to make them fit into
the terminal strip connectors.
2. Connect a “common” wire to one of the leads on
each valve. Connect the other end of the common
wire to the “VLV COM” terminal on the controller’s
terminal strip.
!!
NOTE: Wire used to connect the valves
must be code-approved for underground
installation.
3. A harness cable connects the OSMs to the
corresponding stations on the terminal strip.
PAR+ES Installation Manual
635778 Rev B (PAR+ES installation manual (1of2 ENG)) source.indd 11
11
9/2/2008 4:09:49 PM
Decoder Controller
!!
NOTE: For additional information about
decoders, please refer to Rain Bird Decoder
System Manual.
Decoder Design
There are design specifications limiting the length of
the wire path between the controller and decoders
and the decoders and solenoids/valves. The distance
between the decoder and the controller is the Primary
Path and the maximum length depends on the layout.
The distance between the decoder and the solenoid/
valve is the Secondary Path and the maximum length
depends on the wire size. Following are two options
for the wire path layout as well as a breakdown of the
wire path lengths for various wire sizes.
Primary Path
There are two types of layouts for the wire path
between the controller and the decoders, the Star
configuration and the Loop configuration. The Star
configuration is a design where the wire path is
branched throughout the course but where it is not
looped back to the controller.
The Loop configuration is a design where the wire
path is looped back to the controller at the farthest
reach of the layout. The Star configuration is the
recommended layout for the wire path for its ease of
troubleshooting. Only use the Loop configurations
when the wire path length of the Star configuration is
not sufficient to meet your needs.
!!
NOTE: If a Loop configuration is necessary,
install a valve box near the center of the Loop
configuration for ease of troubleshooting.
In a Star configuration, the primary path is the distance
between the controller and the farthest decoder.
In a Loop configuration, the length is measured by
following the wire path around the loop out to the
farthest decoder and back to the controller. The
maximum allowable primary path lengths depend on
the layout as well as the size of wires. Table 1 lists the
maximum allowable primary path lengths for several
wire sizes.
12
635778 Rev B (PAR+ES installation manual (1of2 ENG)) source.indd 12
Wire Size
14 AWG
12 AWG
10 AWG
2.5 mm2
Maximum Primary Path
Star · Miles/km Loop · Miles/km
2.4 / 3.8
9.6 / 15.2
3.8 / 6.1
15.2 / 24.4
6.1 / 9.8
24.4 / 39.2
1.8 / 3.0
7.5 / 12.0
Table 1
Secondary Path
The secondary path is the distance between the
decoder output and the solenoid on the valve-inhead sprinkler(s) or the remote control valve. The
maximum lengths for the secondary path for several
wire sizes are shown in Table 2.
Maximum Secondary Path
Wire Size
Feet
Meters
16 AWG
289
88
14 AWG
456
139
12 AWG
720
220
328
100
1.5 mm2
2
436
133
2.0 mm
2
545
166
2.5 mm
!!
Table 2
NOTE: If two solenoids are connected to
one decoder, the total length is the distance
from the decoder to the first solenoid plus
the distance again from the decoder to the
second solenoid.
Decoder Address
All the decoders connected to one controller must
have a unique four or five digit address code. The
controller uses the address codes to activate each
decoder individually. Setup instructions for the
decoder addresses are included in the PAR+ES
Operation Manual.
PAR+ES Installation Manual
9/2/2008 4:09:49 PM
General Installation Instructions
It is very important that the decoders be installed
properly since most of the system will be underground
and therefore not easy to access should any alterations
or repairs be required. Refer to instructions below for
proper installation techniques.
Stripping The Maxi Wire
!!
NOTE: Use only a U.F. safety stripper tool as
manufactured by King Safety Products to
remove the outer PE jacket on the Maxi wire.
It is the only tool that will remove the outer
jacket of the Maxi wire while minimizing
potential damage to the insulation on the
inner conductors.
1. Slide 4” to 6” of the Maxi wire out through the hole
in the back of the safety stripper.
2. Make sure the cable is on it’s edge and gently
apply even pressure with your thumb on top of
the tool.
3. Firmly draw the tool back along the cable in one
motion while maintaining light pressure with
your thumb.
4. Turn the cable on it’s opposite edge and repeat
the process.
5. Clip off the loose outer pieces of PE jacket with
linesman’s pliers.
6. Remove the inner insulation with a properly sized
wire stripper for the gauge cable you are working
with to make the Maxi wire splice, Red to Red and
Black to Black.
!!
NOTE: It is advisable to test the above
method on a small piece of scrap Maxi wire
to familiarize yourself with the amount of
pressure to apply consistently remove a very
thin strip of the jacket in one motion without
damaging the inner insulation.
Wire Splices
1. Gently twist two wires together using linesman’s
pliers. No more than four twists are required.
!!
NOTE: Twisting the wires in excess can
fracture the conductors.
2. Firmly hand-tighten the appropriate size wire nut
onto the twisted wire and push it into the DBY or
DBR connector as far as possible.
3. Snap the cap securely.
Valve Boxes at Splices
1. Place splices in a 12” x 18” rectangular valve box.
2. Provide three to four feet of excess wire in the
valve box so that splices may easily be brought
above ground for troubleshooting.
3. Clearly mark all wire splices with their routing
direction or the holes they feed.
Decoder Controller Installation
Decoder Wiring Procedure - Primary Path
1. Connect red wire of Equip side of MSP-1 to
terminal 1A of DIB.
2. Connect black wire of Equip side of MSP-1 to
terminal 1B of DIB.
3. Connect red wire of Line side of MSP-1 to red wire
of Primary path.
4. Connect black wire of Line side of MSP-1 to black
wire of Primary path.
!!
NOTE: Color coding of the wires can be
an invaluable troubleshooting tool in the
future.
5. Connect the other end of the red wire of the
Primary path to one (1) of the blue decoder
wires.
6. Connect the other end of the black wire of the
Primary path wire to the other blue decoder wire.
!!
NOTE: If you are continuing the wire path to
another decoder, then connect a new wire to
the decoder in steps 5-6 and run the other
end of the new wire to the next decoder.
PAR+ES Installation Manual
635778 Rev B (PAR+ES installation manual (1of2 ENG)) source.indd 13
13
9/2/2008 4:09:49 PM
Decoder Wiring Procedure - Secondary Path
1. Connect the two (2) white decoder wires to the
two (2) solenoid coils of the valve-in-head rotor or
remote control valve.
2. Record the decoder address and following the
instructions in the PAR+ES Operation Manual, add
the decoder address to the appropriate station at
the controller.
3. Connect the two blue decoder wires to the wire
path from the controller, one to the red wire and
the other to the black wire.
Field Surge Protection for Decoders
LSP-1 surge arrestors are required for surge protection
of decoders and solenoids. The LSP-1 surge arrestors
consist of several surge arrestor devices potted in a
cylindrical yellow plastic case. The LSP-1 has two blue
wires and two green wires.
Install LSP-1s in the following locations:
zz Install LSP-1s so that there is no more than eight
decoders between two LSP-1s or so that there is
no more than 500 feet between LSPs, which ever
is less.
zz Install LSP-1s at the last decoder in a dead end of
a wire path.
1. Connect the two blue wires to the primary path
wire, one to the black and one to the red wire.
2. Connect the green wire that has the closed eye
spade securely to the core tube of the solenoid
on the valve-in-head rotor or to a remote control
valve by using a stainless steel nut threaded onto
the core tube.
3. Connect the green wire to a ground rod on a
grounding grid using a brass clamp.
!!
NOTE: A resistance of 50 ohms or less is
required for the LSP-1 surge arrestor to be
effective.
4. If the decoder is not located next to the solenoid,
install the LSP-1 near the decoder and connect
both green wires to the grounding grid using
separate brass clamps.
14
635778 Rev B (PAR+ES installation manual (1of2 ENG)) source.indd 14
PAR+ES Installation Manual
9/2/2008 4:09:49 PM
Install an Additional Output Station Module (OSM)
The basic PAR+ES controller comes with a minimum of
two OSMs (Output Station Modules) already installed.
The OSMs are mounted at the top of the power-board
mounting plate, just below the Power Interconnect
Module.
2. Repeat Step 1 to connect the field wires for any
other OSM(s) being installed.
OSMs are held in place by two tabs on the left side of
the mounting plate, and by two screws on the right
side of the OSM board.
Make sure to connect the correct labeled field wire
bundle to the correct OSM.
Remember, each OSM controls eight station. (OSM
1 controls stations 1-8, OSM 2 controls stations 9-16,
OSM 3 controls stations 17-24, and so on).
Each OSM can control up to eight stations, so the basic
2-OSM configuration can control a total of 16 stations
(each station can control up to four remote- control
valves).
You can install a maximum of seven additional OSM
boards, expanding the controller’s capacity to a
maximum of 72 stations.
Installing Additional Output Station Modules
1. To install the new OSM(s), slide the left end of the
OSM under the mounting tabs on the left side of
the power-board mounting plate.
2. Secure the right side of the OSM to the mounting
plate with two #6-32 machine screws. OSMs for
stations 49-72 should be installed on swing out
of bracket. Refer to “Upgrade Kit Installation” for
instructions.
3. Repeat Steps 1 and 2 for each additional OSM.
Ribbon Cable Connections
1. Insert the 16-wire ribbon cable coming from the
top left of the new OSM into the 16-pin connector
on the bottom left of the OSM above it.
2. Repeat Step 1 to connect the ribbon cable for any
other OSM(s) being installed.
Field Wire Connections
On the right end of each OSM board is an eight-pin
terminal station output connector.
Each station wire bundle is labeled with the numbers
of the stations it controls. Connect the bundled station
wires to the OSMs as follows:
1. Insert the appropriate eight-wire terminal block
into the eight-pin connector on the right side of
the new OSM. For example, for OSM 3, insert the
field wire bundle labeled “Stations 17-24”.
PAR+ES Installation Manual
635778 Rev B (PAR+ES installation manual (1of2 ENG)) source.indd 15
15
9/2/2008 4:09:49 PM
Upgrade Kit Installation
For controllers ordered with more than 48 stations,
a swing out bracket (where three 3” additional
OSMs can be installed), terminal strip, power and
communication cables and the appropriate OSMs are
pre-installed. If ordered with fewer than 48 stations, an
Upgrade Kit will be required for the expansion of the
PAR+ES controller to 72 stations (see Figure 15). The
Upgrade Kit includes a swing-out bracket, terminal
strip, power and communication cables.
Installation of Swing-out Bracket
1. To install the swing-out bracket, using two #10-32
screws, attach to the left rail, just above the first
terminal strip.
2. Once in place, attach the OSM(s) as described
below.
Terminal Strip Installation
1. Install the third terminal strip just below the
second terminal strip by using four #10-32 screws
(two at each end) and attaching to the rails.
2. Connect one end of harness cable (green plugs)
to the corresponding OSMs for stations 49-72.
3. Connect the other end of harness cable to third
terminal strip in the following order from left to
right (P7, P8, P9).
4. Connect each stations valve wire to its appropriate
terminal on the controller’s third terminal strips
(i.e., station 49 to terminal #1, station 50 to
terminal #2, etc.) Each station can control up to
four valves.
Installation of Power and Ribbon Cables (for
OSM for stations 49-56)
1. Disconnect power cable between PIB (Power
Interconnect Board) and first OSM.
2. Connect “Y” cable to power cable of first OSM.
3. Connect short end of “Y” cable to the PIB, at the
bottom end.
4. Connect the long end of the “Y” cable to the first
OSM installed on the swing-out bracket.
5. Connect the ribbon cable to the top left opening
in the PIB board. Connect the other end of the
ribbon cable to the first OSM on the swing-out
bracket by attaching to ribbon cable located at
the top left.
For second and third OSMs installed on swing-out
bracket (for stations 57-72):
6. Insert the 16-wire ribbon cable coming from the
top of the OSM into the 16-pin connector on the
bottom left of the OSM above it.
7. Repeat Step 6 to connect the ribbon cable for the
last OSM being installed.
8. Insert the power cable coming from the top right
of the bottom OSM to the bottom right of the
OSM above it.
9. Repeat Step 8 to connect power cable for last
OSM being installed.
16
635778 Rev B (PAR+ES installation manual (1of2 ENG)) source.indd 16
PAR+ES Installation Manual
9/2/2008 4:09:50 PM
Sensor Installation
Connect a rain or moisture sensor to your PAR+ES
controller and automatically shut off irrigation when
the sensor activates. You can connect a local sensor
normally open (NO) or normally closed (NC). You
cannot connect a sensor decoder for Central Control.
In a Decoder Controller
(see Figure 16)
1. Connect one sensor wire to sensor terminal #1 of
the DIB (Decoder Interconnect Board).
2. Connect the other wire to the second sensor
terminal #1 of the DIB.
3. Setup the sensor (setup instructions in PAR+ES
Operation Manual).
In a Standard Controller
(see Figure 17)
4. Connect one sensor wire to terminal #3 of the first
terminal board.
5. Connect the other sensor wire to a common
terminal.
6. Setup the sensor (setup instructions in PAR+ES
Operation Manual).
PAR+ES Installation Manual
635778 Rev B (PAR+ES installation manual (1of2 ENG)) source.indd 17
17
9/2/2008 4:09:52 PM
Appendix - Controller Grounding System Installation
To prevent lightning damage to your equipment,
Rain Bird recommends installing a grounding system
for the equipment (including controllers, weather
stations, and central control systems).
A good grounding system should maintain a ground
with a resistance of 10 ohms or less. Anything 15 ohms
or greater offers little protection to the controller’s
electronic circuits.
The grounding system discharges lightning-induced
electrical current into the earth rather than allow the
surge to pass through power wires or field wires to
your equipment’s electronic components.
If you are unable to reach a resistance of 10 ohms
or less, you can enhance the ground network with
additional ground electrodes or plates.
Ground Resistance
Ground resistance occurs when grounding system
components, or the soil itself, oppose the flow
of electricity into the earth. Ground resistance is
measured in units called “ohms” (Ω).
The higher the ground resistance (higher ohm
readings), the less chance the surge will be shunted
to ground rather than to the equipment’s electronic
components.
Figure 18 shows points where grounding systems can
develop resistance.
Installation Requirements
The following requirements apply to all grounding
system designs (design “Y” and the “Grounding Plate”
design).
All grounding rods or plates must be connected
together below grade with #6 AWG or larger solid
bare copper wire.
Install the connecting wire in as straight a line as
possible. If you must make a turn or bend in the wire,
make the turn in a sweeping curve with a minimum
radius of 8” and a minimum included angle of 90°.
To minimize resistance, the copper wire must be
pre-welded to the grounding rods/plates, or welded
to the rods/plates using an exothermic welding
process at the site.
Make sure all welds are secure before burying the
grounding rods. Rods and plates with welded joints
do not need periodic visual inspection and can be
fully buried (no valve box required).
Measure the ground resistance around the grounding
system after installation, and once every year after
that.
!!
NOTE: The ground wire from the equipment
to the grounding system should be as short
as possible and have no bends, kinks, or coils
in the wire.
To decrease ground resistance, Rain Bird recommends
irrigating the soil around the grounding system.
Each grounding system may require a dedicated
irrigation zone with sprinkler heads and its own
watering program to maintain soil moisture around
the grounding system.
18
635778 Rev B (PAR+ES installation manual (1of2 ENG)) source.indd 18
Inspect the grounding system’s clamped connections
to the equipment (not the welded grounding system
connections) once a year to make sure they are secure
and corrosion-free.
PAR+ES Installation Manual
9/2/2008 4:09:54 PM
Grounding System Designs
Basic Ground System - 1 rod
The single ground rod design consists of a 10’ ground
rod with a Caldwell Connection located at least 10’
from the equipment (see Figure 19).
PAR+ES Installation Manual
635778 Rev B (PAR+ES installation manual (1of2 ENG)) source.indd 19
19
9/2/2008 4:09:55 PM
Enhanced Ground System
Option A:
Option C:
Add a second 10’ ground rod, positioned 10’ from the
controller and 20’ from the first rod.
Enhanced ground in poor soils (in lieu of rods);
Position 2 ground plates 8’ from the controller and 20’
from one another. Encase each ground plate in 100
lbs. of ground enhancement material.
Option B:
The “Grounding Plate” design (see Figure 20) consists
of one vertical 8-foot copper-clad grounding rod at
least eight feet from the equipment, and a copper
grounding plate (minimum dimensions 4” x 96” x
.0625”). Install the grounding plate horizontally, three
feet deep and 15 feet from the grounding rod. Encase
ground plate in 100 lbs. of ground enhancement
material.
20
635778 Rev B (PAR+ES installation manual (1of2 ENG)) source.indd 20
PAR+ES Installation Manual
9/2/2008 4:09:56 PM
635778 Rev B (PAR+ES installation manual (1of2 ENG)) source.indd 21
9/2/2008 4:09:56 PM
Warning: This equipment has been tested
and found to comply with the limits for a
Class A digital device, pursuant to Part 15
of the FCC Rules. These limits are designed
to provide reasonable protection against
harmful interference when the equipment
is operated in a commercial environment.
This equipment generates, uses and can
radiate radio frequency energy and if not
installed and used in accordance with the
instructions, may cause interference to
radio communications. Operation of this
equipment in a residential area is likely to
cause harmful interference in which case
the user will be required to correct the
interference at their own expense.
Changes or modifications not expressly
approved by Rain Bird Corporation could
void the user’s authority to operate the
equipment.
Rain Bird Irrigation Corporation
Golf Division
6991 Southpoint Road
Tuscon, AZ 85706
www.rainbird.com
© 2008 Rain Bird Corporation
Registered trademark of Rain Bird Corporation
®
635778 Rev B (PAR+ES installation manual (1of2 ENG)) source.indd 22
P/N: 635778
9/2/2008 4:09:56 PM