1
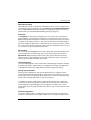
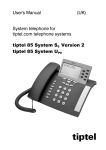
OpenCom 100 / Aastra 800
Operation on Standard Terminals
Quick Reference Guide
Aastra 800 and OpenCom 100
This user guide applies to the Aastra 800 and OpenCom 100 communications
systems.
The OpenCom 100 product family comprises the OpenCom 130, OpenCom 131,
OpenCom 150, OpenCom 510 and OpenCom X320 communications systems.
If individual features differ on the systems, a reference is made in this user guide.
Contents
1.
1.1
1.2
1.3
Systematic Telephony . . . . . . . . . . . . . . . . . . . . . . . . . . . . . . . . . . . . . . . . . . . . 3
You Need Authorisation . . . . . . . . . . . . . . . . . . . . . . . . . . . . . . . . . . . . . . . . . . 4
Glossary. . . . . . . . . . . . . . . . . . . . . . . . . . . . . . . . . . . . . . . . . . . . . . . . . . . . . . . . . . 4
Signals & Symbols . . . . . . . . . . . . . . . . . . . . . . . . . . . . . . . . . . . . . . . . . . . . . . . . 4
2.
2.1
2.2
2.3
2.4
2.5
2.6
2.7
2.8
Making Calls. . . . . . . . . . . . . . . . . . . . . . . . . . . . . . . . . . . . . . . . . . . . . . . . . . . . . . 5
Seizing an External Line. . . . . . . . . . . . . . . . . . . . . . . . . . . . . . . . . . . . . . . . . . . 5
Making Internal Calls . . . . . . . . . . . . . . . . . . . . . . . . . . . . . . . . . . . . . . . . . . . . . 5
Making External Calls . . . . . . . . . . . . . . . . . . . . . . . . . . . . . . . . . . . . . . . . . . . . . 5
Speed Dialling. . . . . . . . . . . . . . . . . . . . . . . . . . . . . . . . . . . . . . . . . . . . . . . . . . . . 6
Accepting a Call . . . . . . . . . . . . . . . . . . . . . . . . . . . . . . . . . . . . . . . . . . . . . . . . . . 6
Calls in the Queue . . . . . . . . . . . . . . . . . . . . . . . . . . . . . . . . . . . . . . . . . . . . . . . . 6
Parking a Call . . . . . . . . . . . . . . . . . . . . . . . . . . . . . . . . . . . . . . . . . . . . . . . . . . . . . 7
Accessing Your Voicebox. . . . . . . . . . . . . . . . . . . . . . . . . . . . . . . . . . . . . . . . . . 8
3.
3.1
3.2
3.3
3.4
3.5
3.6
3.7
3.8
3.9
Several Parties . . . . . . . . . . . . . . . . . . . . . . . . . . . . . . . . . . . . . . . . . . . . . . . . . . . . 9
Enquiry . . . . . . . . . . . . . . . . . . . . . . . . . . . . . . . . . . . . . . . . . . . . . . . . . . . . . . . . . . 9
Toggling . . . . . . . . . . . . . . . . . . . . . . . . . . . . . . . . . . . . . . . . . . . . . . . . . . . . . . . .10
Disconnecting a Call . . . . . . . . . . . . . . . . . . . . . . . . . . . . . . . . . . . . . . . . . . . . .10
Transferring a Call and Notifying the Destination Party . . . . . . . . . . . .10
Transferring a Call without Notifying the Destination Party . . . . . . . .11
Starting a Three-Party Conference. . . . . . . . . . . . . . . . . . . . . . . . . . . . . . . .11
Ending a Three-Party Conference . . . . . . . . . . . . . . . . . . . . . . . . . . . . . . . .12
Connecting Two External Parties with Each Other. . . . . . . . . . . . . . . . .12
Connecting Two Parties (Internal/External) with Each Other . . . . . . .12
4.
4.1
4.2
4.3
4.4
4.5
4.6
Call Protection. . . . . . . . . . . . . . . . . . . . . . . . . . . . . . . . . . . . . . . . . . . . . . . . . . .13
Call Waiting On/Off . . . . . . . . . . . . . . . . . . . . . . . . . . . . . . . . . . . . . . . . . . . . . .13
Accepting a Waiting Call . . . . . . . . . . . . . . . . . . . . . . . . . . . . . . . . . . . . . . . . .13
Rejecting a Waiting Call . . . . . . . . . . . . . . . . . . . . . . . . . . . . . . . . . . . . . . . . . .14
Call Protection On/Off . . . . . . . . . . . . . . . . . . . . . . . . . . . . . . . . . . . . . . . . . . .14
Announcement Protection On/Off . . . . . . . . . . . . . . . . . . . . . . . . . . . . . . .15
Intercom Protection On/Off . . . . . . . . . . . . . . . . . . . . . . . . . . . . . . . . . . . . . .15
5.
5.1
5.2
5.3
5.4
User Groups . . . . . . . . . . . . . . . . . . . . . . . . . . . . . . . . . . . . . . . . . . . . . . . . . . . . .15
Pick-up. . . . . . . . . . . . . . . . . . . . . . . . . . . . . . . . . . . . . . . . . . . . . . . . . . . . . . . . . .15
Pick-up Selective . . . . . . . . . . . . . . . . . . . . . . . . . . . . . . . . . . . . . . . . . . . . . . . .16
Logging out of/into All Hunt Groups . . . . . . . . . . . . . . . . . . . . . . . . . . . . .16
Logging out of/into Individual Hunt Groups . . . . . . . . . . . . . . . . . . . . . .16
6.
6.1
Forwarding Calls. . . . . . . . . . . . . . . . . . . . . . . . . . . . . . . . . . . . . . . . . . . . . . . . .17
Call Forwarding “Immediately” . . . . . . . . . . . . . . . . . . . . . . . . . . . . . . . . . . .19
1
6.2
6.3
6.4
6.5
6.6
6.7
6.8
Call Forwarding “On Busy” . . . . . . . . . . . . . . . . . . . . . . . . . . . . . . . . . . . . . . . 20
Call Forwarding “After Delay” . . . . . . . . . . . . . . . . . . . . . . . . . . . . . . . . . . . . 20
Call Forwarding for Other Users . . . . . . . . . . . . . . . . . . . . . . . . . . . . . . . . . . 21
MSN Call Forwarding . . . . . . . . . . . . . . . . . . . . . . . . . . . . . . . . . . . . . . . . . . . . 22
All Call Forwarding Off. . . . . . . . . . . . . . . . . . . . . . . . . . . . . . . . . . . . . . . . . . . 23
Follow Me. . . . . . . . . . . . . . . . . . . . . . . . . . . . . . . . . . . . . . . . . . . . . . . . . . . . . . . 23
Call Forwarding for Specific Call Numbers . . . . . . . . . . . . . . . . . . . . . . . . 24
7.
7.1
7.2
7.3
7.4
7.5
7.6
7.7
7.8
7.9
7.10
7.11
7.12
Special Calls. . . . . . . . . . . . . . . . . . . . . . . . . . . . . . . . . . . . . . . . . . . . . . . . . . . . . 24
VIP Call. . . . . . . . . . . . . . . . . . . . . . . . . . . . . . . . . . . . . . . . . . . . . . . . . . . . . . . . . . 24
Baby Call . . . . . . . . . . . . . . . . . . . . . . . . . . . . . . . . . . . . . . . . . . . . . . . . . . . . . . . . 25
Announcement . . . . . . . . . . . . . . . . . . . . . . . . . . . . . . . . . . . . . . . . . . . . . . . . . 25
Intercom . . . . . . . . . . . . . . . . . . . . . . . . . . . . . . . . . . . . . . . . . . . . . . . . . . . . . . . . 26
Dialout for Another Terminal. . . . . . . . . . . . . . . . . . . . . . . . . . . . . . . . . . . . . 26
Callback on Busy . . . . . . . . . . . . . . . . . . . . . . . . . . . . . . . . . . . . . . . . . . . . . . . . 26
PIN Dialling . . . . . . . . . . . . . . . . . . . . . . . . . . . . . . . . . . . . . . . . . . . . . . . . . . . . . 27
Take . . . . . . . . . . . . . . . . . . . . . . . . . . . . . . . . . . . . . . . . . . . . . . . . . . . . . . . . . . . . 27
Door Opener . . . . . . . . . . . . . . . . . . . . . . . . . . . . . . . . . . . . . . . . . . . . . . . . . . . . 28
Entrance Intercom Calls . . . . . . . . . . . . . . . . . . . . . . . . . . . . . . . . . . . . . . . . . 28
Keypad Dialling . . . . . . . . . . . . . . . . . . . . . . . . . . . . . . . . . . . . . . . . . . . . . . . . . 29
CSTA Application Operation . . . . . . . . . . . . . . . . . . . . . . . . . . . . . . . . . . . . . 30
8.
8.1
8.2
8.3
8.4
Even More Protection . . . . . . . . . . . . . . . . . . . . . . . . . . . . . . . . . . . . . . . . . . . 30
Telephone Lock . . . . . . . . . . . . . . . . . . . . . . . . . . . . . . . . . . . . . . . . . . . . . . . . . 30
Calling Line Identification Restriction (CLIR) on a
Call-by-Call Basis . . . . . . . . . . . . . . . . . . . . . . . . . . . . . . . . . . . . . . . . . . . . . . . . 31
Changing the User PIN . . . . . . . . . . . . . . . . . . . . . . . . . . . . . . . . . . . . . . . . . . 31
Intercept . . . . . . . . . . . . . . . . . . . . . . . . . . . . . . . . . . . . . . . . . . . . . . . . . . . . . . . . 32
9.
9.1
9.2
9.3
9.4
Special Modes. . . . . . . . . . . . . . . . . . . . . . . . . . . . . . . . . . . . . . . . . . . . . . . . . . . 32
Deactivating Least Cost Routing (LCR). . . . . . . . . . . . . . . . . . . . . . . . . . . . 32
Calling Selectively via Routes . . . . . . . . . . . . . . . . . . . . . . . . . . . . . . . . . . . . 32
Time Control . . . . . . . . . . . . . . . . . . . . . . . . . . . . . . . . . . . . . . . . . . . . . . . . . . . . 33
Deleting All Call Forwarding in the Exchange . . . . . . . . . . . . . . . . . . . . . 33
10.
10.1
10.2
10.3
10.4
Remote-Controlled Functions. . . . . . . . . . . . . . . . . . . . . . . . . . . . . . . . . . . . 34
Remote-Controlled Dialling (Call Through) . . . . . . . . . . . . . . . . . . . . . . . 34
Remote-Programmable Call Forwarding . . . . . . . . . . . . . . . . . . . . . . . . . 35
Calling a Voicebox from a Remote Terminal . . . . . . . . . . . . . . . . . . . . . . 36
Setting up an Internet Connection from Remote
(ISP Trigger Call) . . . . . . . . . . . . . . . . . . . . . . . . . . . . . . . . . . . . . . . . . . . . . . . . . 37
Index . . . . . . . . . . . . . . . . . . . . . . . . . . . . . . . . . . . . . . . . . . . . . . . . . . . . . . . . . . . 38
2
Systematic Telephony
1.
Systematic Telephony
The OpenCom 100 / Aastra 800 communications system, referred to hereafter as
“the OpenCom 100 / Aastra 800”, enables the connection of standard terminals
(standard analogue telephones, ISDN telephones and cordless GAP telephones).
SMS-enabled terminals and SIP terminals can also be used. It is possible to operate
the so-called standard terminals on an Aastra 800 communications system if the
system is equipped with the corresponding telephony interface cards.
With this configuration you can telephone conveniently and use the features of
the OpenCom 100 / Aastra 800 via code-number procedures. This guide describes
how you operate your telephone in order to use the desired functions. In most
cases, you can do this by pressing the key combination * and # , R , together
with a specific sequence of digits.
Please note the specific operating characteristics of your telephone:
On standard analogue telephones featuring pulse dialling, it is not possible to
enter data with the star key * or hash key # .
As a result, the functionality of the OpenCom 100 / Aastra 800 features is only
available to you on a limited basis. It is thus better to use telephones equipped
with dual-tone multi-frequency (DTMF) dialling. Modern telephones often allow
you to switch between the two dialling modes.
When telephoning via SIP (i. e. telephoning via the Internet Protocol “Session Initiation Protocol”) entry of the hash key # is only permitted at the end of a codenumber procedure or of a call number. You can thus only use a part of the codenumber procedures on a SIP terminal. Furthermore, some SIP terminals offer
operation of features at the mere press of a button. Please review the user guide of
the manufacturer.
In the case of ISDN telephones, certain features can be operated via menus or
function keys. Refer to the operating instructions of these telephones for details.
On telephones with a display, you can read the caller’s call number if the telephone supports this feature and the caller has activated it. What other information
is displayed depends on the telephone. Charge display (ISDN telephones only)
requires prior configuration by your network operator.
3
Systematic Telephony
1.1
You Need Authorisation
Most of the features mentioned in this Quick Reference Guide are only available to
you if you have appropriate authorisation. This will be set up by your system
administrator when configuring the OpenCom 100 / Aastra 800. If you are unable
to use a particular feature or have any questions, consult your system
administrator. Please refer to the chapter entitled “Frequently Asked Questions” in
the “Mounting and Commissioning” user guide for tips on how to deal with any
faults you may experience while using your telephone.
1.2
Glossary
If you would like more details about any of the system features described in this
Quick Reference Guide, please refer to the “Glossary” supplied with your
OpenCom 100 / Aastra 800 (see PDF file on the enclosed CD-ROM and on the
Aastra 800 USB flash drive).
1.3
Signals & Symbols
Audio and ringer signals
You will find a table showing the audio and ringer signals on the inside back cover
of this user guide (the page before last of the PDF file).
Symbols
H lift the handset
GR press the R key during the current call (“enquiry call” mode)
Instead of the R key, some SIP terminals have a key for putting a subscriber “on
hold” and thus put them “in the enquiry mode”.
* press the star key
7 press digit key “x” (7 here)
# press the hash key
Z (xxx) dial the digits of the call number (call no.) “xxx”
G … speak
h hang up the handset
4
Making Calls
2.
Making Calls
2.1
Seizing an External Line
If your telephone is set to manual line seizure, all call keys on your telephone first
seize an internal line, and you can dial an internal number straight away. When
making external calls, you must first press the line seizure code digit
(presetting: 0 ).
Note: This also applies to all enquiry calls and call forwarding to external destinations, but not to call forwarding
“MSN”.
Your system administrator configures this code digit for all subscribers on the
OpenCom 100 / Aastra 800 system and will tell you what value is currently valid.
If your telephone is set to automatic line seizure, all call keys on your telephone
seize an external line, and you can dial external numbers straight away. In order to
reach internal subscribers, press the star key twice * * before dialling the
internal number.
Note: This also applies to the destination numbers you specify when configuring call forwarding or a baby call.
2.2
Making Internal Calls
On automatic seizure of external line
H** Z (internal call no.)
On manual seizure of external line
H Z (internal call no.)
2.3
Making External Calls
On automatic seizure of external line
H Z (external call no.)
On manual seizure of external line
H Z (external access code, e.g. 0 )(external call no.)
5
Making Calls
2.4
Speed Dialling
H*7Z (speed-dialling no.)
For enquiry calls:
GR*7Z (speed-dialling no.)
Alternatively:
H*7* Z (speed-dialling no.) #
For enquiry calls:
GR*7* Z (speed-dialling no.) #
You can use this procedure to retrieve a number from the central telephone book
by entering its two-digit or three-digit speed-dialling number (speed-dialling no.).
The two-digit speed-dialling numbers are in the range 00…99, the three-digit are
in the range 000…999. Ask your system administrator how many digits are valid.
The central telephone book is managed by users who have appropriate authorisation. The OpenCom 100 / Aastra 800 can store up to 2,000 call numbers, for each
call number up to three speed-dialling numbers can be configured.
2.5
Accepting a Call
HG …
When your telephone rings, lift the handset or press the hands-free key.
The type of ringing signal indicates (on a standard analogue telephone) whether it
is an internal or external call.
2.6
Calls in the Queue
G…
Your system administrator can configure and activate a queue feature for your telephone in the OpenCom 100 / Aastra 800. New calls can enter this queue while
you are making a call. The callers in the queue hear a ringing signal. The number of
calls allowed in the queue is set by the system administrator during system configuration, e.g. 5 calls. When this number is reached, additional callers hear a busy
6
Making Calls
signal. The calls in the queue are put through according to their priority (baby
calls, doorway calls, VIP calls, other internal and external calls); calls in the same
category are lined up according to the time of their arrival.
Calls which have been queued for too long a time are removed; these callers subsequently also hear the busy signal. The time until an external call is cleared from a
queue is defined by the network operator. In Germany this is usually two minutes
and in other European countries usually three minutes.
A queue for your telephone can also be administered when it is part of a user
group, and at the same time it has an effect on the forwarding of calls. For details,
please refer to User Groups starting on page 15 and Forwarding Calls starting on
page 17.
Note: If a queue for your telephone is active, it may be wise
to activate call protection.
2.7
Parking a Call
You can park one or more calls to make other calls or put down the receiver and
engage in other activities. Parked calls are recorded system internal in a list. You
can park up to 10 calls. This feature cannot be used with a SIP terminal.
Parking a call
GR*16 (Park-Codes 0-9) h
Unparking a call
H*16 (Park-Codes 0-9)
Parking and unparking a call can be made on different terminals. On ISDN telephones you can park/unpark calls using a menu.
Authorisation for parking connections and the period of time after which a recall
will be executed are defined by the administrator during the configuration of the
system.
7
Making Calls
2.8
Accessing Your Voicebox
If your system administrator has configured a voicebox for the call number of your
terminal, calls which you do not (or cannot) accept are diverted to this box. A
number of analogue telephones and ISDN telephones support the “Message
Waiting Indication” feature, that is the notification of messages on the telephone.
In this way you are notified, for example, of not listened to messages. Please review
the user guide of the manufacturer.
Note: In order to be able to call and query your voicebox
from a SIP terminal, the “Keypad as SIP-INFO message” function must be activated on the SIP terminal. Please review the
user guide of the manufacturer on how to set this function.
You can access and edit voicebox messages from your telephone:
Calling your voicebox directly …
(from a telephone whose number is assigned to your voicebox)
1. Enter the call number your system administrator has configured for the OpenVoice application.
2. If the PIN query for the voicebox is activated, enter your PIN after the prompt.
This query always appears for a new voicebox. The default PIN setting is “0000”.
You will now be directly connected with your voicebox. The OpenVoice application will inform you if there are any new messages in this voicebox.
3. You can now access and edit messages and make settings for the voicebox.
4. Please follow the instructions in the voice menu for all further operating steps.
Via the OpenVoice application …
(from a telephone whose number is not assigned to your voicebox)
1. Enter the internal call number which your system administrator has configured
for the OpenVoice application.
You hear a text prompting you to enter a voice-box number.
2. Now enter the call number of the terminal whose voice-box messages you
wish to access. Confirm the input by pressing * .
8
Several Parties
It is not possible to access your voicebox unless the authorisation for “remote
access” has been activated.
3. If the PIN query has been activated for the voicebox, enter your PIN after the
prompt.
The OpenVoice application will inform you if there are any new messages in
this voicebox.
4. You can now access and edit messages and make settings for the voicebox.
5. Please follow the instructions in the voice menu for all further operating steps.
Note: For detailed information on the use and operation of
the OpenVoice application, please refer to the user guide for
the optional component “OpenVoice 200 – The Voice-Mail
System in the OpenCom 100 and Aastra 800 Communications Systems”.
3.
Several Parties
3.1
Enquiry
Internal:GR Z (internal call no. or speed-dialling no.) G …
External:GR Z (external call no. or speed-dialling no.) G …
You can speak with a second internal or external party during a call by putting the
first party on hold.
After ending (disconnecting) the enquiry call, you can return to the party on hold
(see Disconnecting a Call on page 10).
Instead of the R key, some SIP terminals have a key for putting a subscriber “on
hold” and thus put them “in the enquiry mode”.
9
Several Parties
3.2
Toggling
GR2G …
You can toggle (i.e. switch back and forth) between two calls.
On ISDN telephones and on SIP terminals you toggle between two connections by
means of the corresponding function key or a menu.
If you want to talk to both parties at the same time, you can set up a three-party
conference (see Starting a Three-Party Conference on page 11).
3.3
Disconnecting a Call
GR1G …
When you have several calls, you can disconnect one (e.g. a enquiry call) without
hanging up the handset.
On ISDN telephones you disconnect calls by means of the corresponding function
key or a menu. On a SIP terminal, please review the user guide of the manufacturer
on how to disconnect a call.
3.4
Transferring a Call and Notifying the
Destination Party
GR (external access code, e.g. 0 ) Z (destination no.) G … h
You can transfer an incoming call to another internal or external number. After
notifying the other party of the transfer, hang up the handset.
If the party to whom you want to transfer the call is unavailable or busy, disconnect this call by pressing the R key. You will again hear a dialling tone and can
set up a new enquiry, or press the R key once more to speak to the party on hold
again.
On a SIP terminal, please review the user guide of the manufacturer on how to
transfer a call with notifying the destination party.
10
Several Parties
To connect an external party with an external party use the procedure described
in the section Connecting Two External Parties with Each Other on page 12.
3.5
Transferring a Call without Notifying the
Destination Party
GR (external access code, e.g. 0 ) Z (destination no.) h
You can transfer an incoming call to another internal or external destination. When
you hear the ringing signal, hang up the handset.
If the call you wish to transfer is not accepted within a certain length of time, you
will receive an automatic recall. You are reconnected with the original caller after
lifting the handset. The length of time for the automatic recall is set by your system
administrator in the Configurator for all OpenCom 100 / Aastra 800 users.
If the party to whom you want to transfer the call is busy, disconnect this call by
pressing the R key. You will again hear a dialling tone and can set up a new
enquiry, or press the R key once more to speak to the party on hold again.
On a SIP terminal, please review the user guide of the manufacturer on how to
transfer a call with notifying the destination party.
To connect an external party with an external party use the procedure described
in the section Connecting Two External Parties with Each Other on page 12.
3.6
Starting a Three-Party Conference
GR3G …
You are speaking with someone on the telephone. You set up a further connection
(e.g. by enquiry or by accepting a call). You can toggle between these parties (see
Toggling on page 10) or press the keys R3 to start a three-party conference
and speak to both parties at the same time.
On ISDN telephones and on SIP terminals you start a three-party conference by
means of the corresponding function key or a menu.
11
Several Parties
3.7
Ending a Three-Party Conference
Toggle: GR2
End: h
To end a three-party conference and continue telephoning with only one of the
other two parties, press the keys R2 to switch to the toggle mode. Then you
can disconnect one of the parties (see Disconnecting a Call on page 10). You end a
three-party conference by replacing the handset.
On ISDN telephones and on SIP terminals you end a three-party conference by
means of the corresponding function key or a menu.
3.8
Connecting Two External Parties with Each
Other
R#h
You are speaking with an external party and have another (external) call on hold.
With this procedure you can connect the two parties with each other.
On ISDN telephones and on SIP terminals you use the corresponding function key
or a menu.
Please note:
3.9
If you connect two external parties whom you called, you will
be charged for the cost of the resultant call. Two SIP lines
cannot be connected!
Connecting Two Parties (Internal/External) with
Each Other
h
You are speaking with an external party and have another (internal) call on hold.
You can connect the two parties with each other by simply hanging up the
handset.
12
Call Protection
4.
Call Protection
4.1
Call Waiting On/Off
On: H*43#
Off: H#43#
If you are called while you yourself are telephoning, you will hear the call-waiting
signal which tells you that there is a second party wishing to speak to you. You can
deactivate the call-waiting signal (call waiting off, call-waiting protection on) and
reactivate it (call waiting on, call-waiting protection off ). When call-waiting protection is active, the caller hears a busy signal.
On ISDN telephones and on SIP terminals you activate/deactivate the call waiting
tone by means of the corresponding function key or a menu. Not all SIP terminals
support the “activate/deactivate call waiting” feature. Please review the user guide
of the manufacturer.
4.2
Accepting a Waiting Call
End: GhHG …
Toggle: GR2G …
While you are telephoning, the call-waiting signal tells you that there is a second
party wishing to speak to you. You can end the first call and accept the new call; or
you can hold the first call, accept the second call and toggle between the two.
If you toggle between the parties, you can also start a three-party conference (see
Starting a Three-Party Conference on page 11).
On ISDN telephones and on SIP terminals you accept the call request indicated by
the call-waiting signal by means of the corresponding function key or a menu.
13
Call Protection
4.3
Rejecting a Waiting Call
GR0G …
While you are telephoning, the call-waiting signal tells you that there is a second
party wishing to speak to you. You can reject the waiting call, in which case the
caller will then hear a busy signal.
On ISDN telephones and on SIP terminals you reject a waiting call by means of the
corresponding function key or a menu.
4.4
Call Protection On/Off
For all (internal and external) calls
On: H*42#
Off: H#42#
Only for internal calls
On: H*421#
Off: H#421#
Only for external calls
On: H*422#
Off: H#422#
You can protect your telephone against receiving internal and external calls
(except VIP and hunt group calls).
When configuring your user group, your system administrator sets whether a
caller hears a dial tone or an engaged tone when call protection is activated; ask
him for the setting which applies to you.
When call protection is activated, you hear the special dialling tone after lifting the
handset.
On a SIP terminal, you cannot activate/deactivate call protection with the codenumber procedure described here. You can, however, operate the feature with the
OpenCTI 50 additional programme. To do so, the system administrator has to
authorise you to use this programme. For more information, please refer to the
online help of the OpenCom 100 / Aastra 800.
14
User Groups
4.5
Announcement Protection On/Off
On: H*441#
Off: H#441#
When announcement protection is activated no announcements can be made to
your telephone (please refer to page 25 also).
4.6
Intercom Protection On/Off
On: H*442#
Off: H#442#
When intercom protection is activated no intercom announcements can be made
to your telephone (please refer to page 26 also).
5.
User Groups
5.1
Pick-up
H*0#G …
For enquiry calls:
GR*0#G …
If another telephone in your pick-up group rings, you can pick up the call on your
telephone. If a queue is active for the other telephone, you will pick up the next
call lined up in this queue. Pick-up groups are configured by your system administrator.
Note: If pick-up protection is activated in the called party’s
user group, you cannot pick up calls to his call number.
15
User Groups
5.2
Pick-up Selective
H*0* Z (internal call no.) #G …
For enquiry calls:
GR*0* Z (internal call no.) #G …
If a telephone outside your hunt group rings, you can pick up this call (with the call
number of the party who is being called). If a queue is active for the telephone of
this other party, you will pick up the next call lined up in this queue.
Note: If pick-up protection is activated in the called party’s
user group, you cannot pick up calls to his call number selectively.
5.3
Logging out of/into All Hunt Groups
You can log out of or into all hunt groups configured for you.
Logout: H*31#
Login: H#31#
On a SIP terminal you cannot use the code-number procedure described here for
logging into or out of hunt groups. You can, however, operate this feature with the
OpenCTI 50 additional programme. To do so, the system administrator has to
authorise you to use this programme. For more information, please refer to the
online help of the OpenCom 100 / Aastra 800.
5.4
Logging out of/into Individual Hunt Groups
Logout: H*31* Z (internal call no.) #
Login: H#31* Z (internal call no.) #
Using your own call number, you can log out of or into individual hunt groups configured for you.
All hunt group calls are configured by your system administrator.
16
Forwarding Calls
Note: If you are the last reachable member of the hunt
group and you log out then any further callers will hear a
busy signal.
On a SIP terminal you cannot use the code-number procedure described here for
logging into or out of hunt groups. You can, however, operate this feature with the
OpenCTI 50 additional programme. To do so, the system administrator has to
authorise you to use this programme. For more information, please refer to the
online help of the OpenCom 100 / Aastra 800.
6.
Forwarding Calls
Types of forwarding
You can forward internal or external calls intended for yourself to another
(internal or external) call number. Call forwardings can also be made to speed
dialling numbers which have been stored in the central telephone book (please
refer to the section Speed Dialling on page 6). You can decide whether only
internal, only external or both types of calls are forwarded.
Calls can be forwarded either immediately, after a specified period of time (delay)
or if the line is busy. You can configure more than one call forwarding mode
(“Immediately”, “After Delay” or “On Busy”). However, only one forwarding
function can be activated for each mode.
Example:
You can configure “Immediate forwarding of external calls” to the number 333,
and “After Delay forwarding of internal calls” to the number 444.
On ISDN telephones, “Immediately”, “After Delay” and “On Busy” call forwarding
can also be set by means of a menu for all calls, i.e. internal and external.
Call forwarding is executed in the OpenCom 100 / Aastra 800, or in the case of
external calls, in the network operator’s exchange.
If your system administrator has given you the authorisation, then you can also
program call forwarding for call numbers of other users.
Call forwarding to a voicebox
If OpenVoice, the integrated voice-mail system of OpenCom 100 / Aastra 800, has
been installed, calls can also be forwarded to a voicebox which has been configured for you.
17
Forwarding Calls
MSN call forwarding
“MSN call forwarding” is available for ISDN multi-terminal accesses. Using this forwarding mode, you can forward incoming external calls to external destinations
for each MSN (multiple-subscriber number) – providing you have the necessary
authorisation (see also MSN Call Forwarding starting on page 22).
Call queue
If a call queue is active for your telephone, this is not taken into consideration
when configuring “Immediately” or “On Busy” call forwarding, and its content is
not transferred to the destination terminal. Calls already in the queue can only be
accepted on the original terminal – after you have deactivated call forwarding. If
you have configured “After Delay” call forwarding, an incoming call enters a queue
if it is active and is forwarded after the delay. As with all other forwarded calls, you
can accept the call on the destination terminal.
SIP terminals
On a SIP terminal you cannot use the code-number procedure described here to
activate/deactivate call forwarding. You can also operate the feature with the
OpenCTI 50 additional programme. To do so, the system administrator has to
authorise you to use this programme. For more information, please refer to the
online help of the OpenCom 100 / Aastra 800.
Least Cost Routing
Least Cost Routing (LCR) can be evaluated for call forwarding to external numbers,
providing your system administrator has configured LCR and the LCR application
in the OpenCom 100 / Aastra 800. Ask him about the applicable setting.
Hunt group call numbers
During system configuration, the system administrator can configure call forwarding destinations for hunt group call numbers. These destinations are called
when all users of a hunt group are busy and/or when a call is not accepted by any
member of the hunt group within a certain time interval.
In addition, the system administrator can determine whether you can forward
incoming calls to the hunt group call number or not. If the system administrator
does not permit call forwarding for your hunt group call number, any call forwarding that you have programmed on your device is not carried out upon a hunt
group call.
Call forwarding chains
The system administrator can configure the system so multiple call forwarding
instances can be linked one to another to form a chain. A simple example: user A
18
Forwarding Calls
forwards to user B, who then forwards to user C. A call for user A is then directly
signalled to user C.
The system prevents call forwarding chains from forming a loop, e. g. when the call
forwarding destination refers back to the call forwarding source. When the system
detects a call forwarding loop, no further call forwarding is carried out. This can
mean that – despite call forwarding being programmed – calls are nonetheless
signalled on your device.
Contact your system administrator if call forwarding is not functioning as
expected on your device. The system administrator is able to analyse call forwarding chains and eliminate any possible conflicts.
6.1
Call Forwarding “Immediately”
For internal and external calls
On: H*21* (external access code, e.g. 0 ) Z (destination no.) #
Off: H#21#
Only for internal calls
On: H*211* (external access code, e.g. 0 ) Z (destination no.) #
Off: H#211#
Only for external calls
On: H*212* (external access code, e.g. 0 ) Z (destination no.) #
Off: H#212#
Calls (only internal, only external or all of them) are immediately forwarded to
another telephone and not signalled at all on the telephone originally dialled. If
you have activated call forwarding “immediately”, you will hear a special dialling
tone when you lift the handset.
19
Forwarding Calls
6.2
Call Forwarding “On Busy”
For internal and external calls
On: H*67* (external access code, e.g. 0 ) Z (destination no.) #
Off: H#67#
Only for internal calls
On: H*671* (external access code, e.g. 0 ) Z (destination no.) #
Off: H#671#
Only for external calls
On: H*672* (external access code, e.g. 0 ) Z (destination no.) #
Off: H#672#
When a terminal is busy, calls (only internal, only external or all calls) are immediately forwarded to another specified terminal.
6.3
Call Forwarding “After Delay”
For internal and external calls
On: H*61* (external access code, e.g. 0 ) Z (destination no.) *
Z (period of time in seconds, e. g. 20 ) #
Off: H#61#
Only for internal calls
On: H*611* (external access code, e.g. 0 ) Z (destination no.) *
Z (period of time in seconds, e. g. 20 ) #
Off: H#611#
Only for external calls
On: H*612* (external access code, e.g. 0 ) Z (destination no.) *
Z (period of time in seconds, e. g. 20 ) #
Off: H#612#
Calls (only internal, only external or both types) are signalled at the selected terminal and after the specified period of time, these calls are forwarded to another
specified terminal.
20
Forwarding Calls
6.4
Call Forwarding for Other Users
In order to program call forwarding for call numbers of other users, you must have
the “Call forwarding for other user” authorisation. Also, you can only configure call
forwarding only for those users whose terminal have not been blocked for this
type of access (these users will themselves have the authorisation “Prevent call forwarding by other user”). Please consult your system administrator if you have
questions regarding these authorisations.
Call forwarding for call numbers of other users always apply for internal and
external calls.
Immediately
On: H*214* Z (user’s internal call no.) * Z ( destination no.) #
Off: H#214* Z (user’s internal call no.) #
Calls for the user will immediately be forwarded to the other terminal. When the
user pick ups their headset they hear the special dialling tone.
On busy
On: H*674* Z (user’s internal call no.) * Z (destination no.) #
Off: H#674* Z (user’s internal call no.) #
If the terminal of the user is busy, then calls will immediately be forwarded to the
other terminal.
After delay
On: H*614* Z (user’s internal call no.) * Z (destination no.)
* Z (period of time in seconds, e. g. 20 ) #
Off: H#614* Z (user’s internal call no.) #
Calls are signalled on the users terminal and after the specified period of time are
forwarded to the other terminal.
21
Forwarding Calls
6.5
MSN Call Forwarding
Using “MSN Call Forwarding”, you can forward both a single MSN and several MSNs
together to an external number. The individual MSNs are separated using * .
You do not need to enter the full MSNs – the last unique digits are all you need, as
this is sufficient to distinguish them from one another.
Example:
“Immediately MSN” for several MSNs
Let’s say you want to forward the MSNs 86013, 86014 and 86554 to the destination
number 861234. To do this, enter the following:
H*213*
3 (for the MSN 86013) *
14 (for the MSN 86014) *
54 (for the MSN 86554) *
861234 (the destination no.) #
Immediately (for one MSN)
On: H*213* Z (MSN) * Z (destination no.) #
Off: H#213* Z (MSN) #
Immediately (for several MSNs)
On: H*213* Z (MSN 1) * Z (MSN 2) * Z (destination no.) #
Off:H#213* Z (MSN 1) * Z (MSN 2) #
An external call for an MSN configured in the OpenCom 100 / Aastra 800 is forwarded immediately to the specified external destination and not signalled on the
original terminal. If “Immediately MSN Call Forwarding” is activated on your telephone, you will hear a special dial tone when you pick up the handset.
On busy (for one MSN)
On: H*673* Z (MSN)* Z (destination no.) #
Off: H#673* Z (MSN) #
On busy (for several MSNs)
On: H*673* Z (MSN 1) * Z (MSN 2) * Z (destination no.) #
Off:H#673* Z (MSN 1) * Z (MSN 2) #
22
Forwarding Calls
When a terminal is busy, an external call for an MSN configured in the
OpenCom 100 / Aastra 800 is forwarded immediately to the specified external
destination.
After delay (for one MSN)
On: H*613* Z (MSN) * Z (destination no.) *
Z (period of time in seconds, e. g. 20 ) #
Off: H#613* Z (MSN) #
After delay (for several MSNs)
On: H*613* Z (MSN 1) * Z (MSN 2) * Z (destination no.) *
Z (period of time in seconds, e. g. 20 ) #
Off:H#613* Z (MSN 1) * Z (MSN 2) #
An external call for an MSN configured in the OpenCom 100 / Aastra 800 is signalled on the destination terminal and forwarded to the specified external destination after the specified period of time.
6.6
All Call Forwarding Off
H#2#
If you have programmed several instances of call forwarding, you can deactivate
them all simultaneously with the above procedure.
6.7
Follow Me
You can activate and deactivate immediate internal call forwarding for your own
telephone from any other telephone, providing you have the user PIN for your
own telephone (see page 31). Calls are forwarded to the telephone (destination)
on which you carry out the procedure.
Initiating the function on the destination telephone
H*22* Z (source PIN) * Z (source call no.) #
Calls are immediately forwarded to the other destination, and are not signalled on
your own telephone. On the originally dialled telephone (the source) you will hear
a special dialling tone on lifting the handset.
23
Special Calls
Switching the function off on your own telephone
H#21#
(= call forwarding off )
Use this procedure to deactivate the function on your own telephone.
Switching the function off on another telephone
H#22* Z (source PIN) * Z (source call no.) #
(= call forwarding off ).
You can use this procedure to switch off the call forwarding for your telephone
from any other telephone.
6.8
Call Forwarding for Specific Call Numbers
Besides the call forwarding that you can program at your telephone, the system
administrator can program call forwarding where the call number of the caller is
analysed (“SCF: Selective Call Forwarding”). Potentially this could be the reason
why specific calls do not reach you. If you have any questions concerning this functionality, please consult your system administrator.
7.
Special Calls
7.1
VIP Call
H*# Z (internal call no.)
For enquiry calls:
GR*# Z (internal call no.)
If you have VIP access rights and start an internal call with *# , your calls will be
signalled acoustically to internal parties even if they have activated their call protection (call-waiting protection or call protection). This function is also possible in
a enquiry call.
This also applies if the called party has activated immediate call forwarding.
This feature cannot be used with a SIP terminal.
24
Special Calls
7.2
Baby Call
On: H*53* (external access code, e.g. 0 ) Z (destination no.)#
Off: H#53#
You can configure your telephone to dial a preprogrammed (internal or external)
call number after a certain length of time after the handset has been lifted (default
setting is 5 seconds).
To prevent the baby call from being made, you can dial another number within the
defined length of time after lifting the handset. The time span is set to a value
between 0 and 20 seconds in the OpenCom 100 / Aastra 800. It is set by your
system administrator for all OpenCom 100 / Aastra 800 users. Please ask him for
the current value.
On a SIP terminal you cannot activate/deactivate the baby call with the codenumber procedure described here. You can, however, operate this feature using
the OpenCTI 50 additional programme. To do so, the system administrator has to
authorise you to use this programme. For more information, please refer to the
online help of the OpenCom 100 / Aastra 800.
7.3
Announcement
H*13* Z (internal call no.) #
For enquiry calls:
GR*13* Z (internal call no.) #
Using this procedure you can make announcements to system terminals. The
loudspeaker of the destination telephone is activated without a ring, and your
announcement is heard by those present in the room.
If you want to start an announcement on several system terminals to a hunt group
phone number at which the call is signalled simultaneously for example, all called
subscribers hear the announcement at that same time. If one of these subscribers
responds to the announcement (by answering the call), the announcement connection to the other system terminals is terminated.
Note: If a called party has activated the announcement protection, the feature will not be executed.
25
Special Calls
7.4
Intercom
H*131* Z (device ID) #
For enquiry calls:
GR*131* Z (device ID) #
After entering the device ID, you can initiate an announcement to a single system
terminal. The microphone is activated on the terminal called and the person you
are calling can immediately answer your announcement. The “intercom” function
cannot be used for announcements to a group of terminals.
Note: If a called party has activated the intercom protection, the feature will not be executed.
7.5
Dialout for Another Terminal
H*51* Z (device ID) * Z (destination call number) #
You can also conduct automatic dialling for another terminal. Enter the device ID
of the terminal from which the dialling is to be conducted. Then enter the call
number to be called. The next time the subscriber whose device ID you entered
picks up the handset, (or when using a headset, presses the headset Talk key), the
saved destination call number will be dialled automatically. This programmed
number remains saved for 30 seconds. After 30 seconds, the automatic dialling will
be deactivated automatically.
7.6
Callback on Busy
If the internal or external number you have dialled is busy, you can leave a callback
request. (This is not possible if the destination number is a hunt group call
number.) Your telephone will ring as soon as the other party has ended his call.
When you lift the handset, the number of the other party will be dialled.
This feature cannot be used with a SIP terminal.
Leaving a callback request
G*37#
26
Special Calls
Alternatively:
G6h
On ISDN telephones you can activate “callback on busy” by means of the corresponding function key or a menu.
Cancelling a callback request
G#37#
You cancel your callback request with this procedure.
7.7
PIN Dialling
This feature cannot be used with a SIP terminal.
H#46 Z (internal call no. of the telephone used, e. g. “102”) *
Z (your user PIN) # Z (destination no.)
You switch the telephone to a user group determined by the system administrator
for the next call. Switching the user group involves different authorisations (e. g.
international dialling authorisation) and possibly other features (e. g. for billing
and recording connection data of private calls). Please contact your system administrator for information on the system configuration and the designated application for PIN dialling.
First you enter the internal call number of the telephone you wish to make a call
from and then your user PIN. Then you can dial the desired call number.
Note: PIN dialling is available on any terminal in a user
group with this authorisation activated. The call number dialled using PIN dialling is not saved in any redial list, neither
on the terminal used, nor on one’s own terminal.
7.8
Take
H*88#
You accept a current call from a different terminal at your telephone and continue
your call on your telephone. The prerequisite is that your telephone and the other
terminal have the same internal call number.
27
Special Calls
7.9
Door Opener
H*11
For enquiry calls:
GR*11
If an automatic door opener is connected, you can use this procedure to activate it
from your telephone.
7.10
Entrance Intercom Calls
Calling the entrance intercom
H*101
For enquiry calls:
GR*101
If an entrance intercom is connected to your system, you can use this procedure to
speak with a visitor.
If you use a “DoorLine” entrance intercom, you use the following Code-number
procedure to speak with a visitor:
H*102
For enquiry calls:
GR*102
Forwarding entrance intercom calls
On: H*151* (external access code, e.g. 0 ) Z (destination no.) #
Off: H#151#
You can forward a call signalled from the doorbell to another (internal or external)
call number, a so-called “pharmacy line”.
Several doorbells can be configured in the OpenCom 100 / Aastra 800. You can
forward these doorbells using the corresponding code-number procedure. How
28
Special Calls
many doorbells are available and with which code-number procedure these can
be forwarded depends on the entrance intercom that is connected.
Standard Entrance Intercom
Doorbell
151
1 (only for OpenCom 130, 131, 150)
152
2 (only for OpenCom 130, 131, 150)
153
3 (only for OpenCom 130, 131, 150)
154
4 (only for OpenCom 150)
“DoorLine” Entrance Intercom
Doorbell
155
1
156
2
157
3
158
4
All entrance intercom calls are terminated automatically after a certain length of
time has elapsed. This ensures that the forwarding of entrance intercom calls does
not unintentionally result in a permanent connection (e.g. to a mailbox).
The length of time can be set by your system administrator to a value between 30
and 300 seconds in the OpenCom 100 / Aastra 800. Please ask him for the current
value.
No call forwarding can be set up for doorbells on a SIP terminal.
7.11
Keypad Dialling
H*12 Z (keypad code digits)
For enquiry calls:
GR*12 Z (keypad code digits)
Certain European network operators require the keypad protocol to be used in
order for you to be able to set certain features (this is not the case in Germany).
You use the sequence *12 to switch to the keypad protocol, and subsequently enter the code digits required by your network operator. These are transmitted directly to the exchange and evaluated there.
You will then generally hear an announcement as confirmation.
29
Even More Protection
7.12
CSTA Application Operation
H*17* Z (code) #
The communications system can be extended via third-party programmes. If the
programme offers information entry (e. g. setting room temperature) you can use
special code-number procedures to conduct these settings. Your system administrator will inform you regarding code numbers.
8.
Even More Protection
8.1
Telephone Lock
Activating:
H*33* Z (user PIN) #
Deactivating:
H#33* Z (user PIN) #
You can lock your telephone as a safeguard against unauthorised use. Then only
those features and functions of your telephone can be accessed that are preset in
the OpenCom 100 / Aastra 800 Configurator for the “Guests” user group. You
must enter your user PIN to activate the telephone lock (see Changing the User PIN
on page 31).
Note: National emergency numbers can still be dialled although the telephone lock is activated, providing they have
been defined in your user group’s special list in the
OpenCom 100 / Aastra 800. Ask your system administrator
for these numbers.
You cannot activate/deactivate the telephone lock on a SIP terminal using the
code-number procedure described here. You can, however, operate the feature
with the OpenCTI 50 additional programme. To do so, the system administrator
has to authorise you to use this programme. For more information, please refer to
the online help of the OpenCom 100 / Aastra 800.
30
Even More Protection
8.2
Calling Line Identification Restriction (CLIR) on a
Call-by-Call Basis
H*14 Z (call no.)
For enquiry calls:
GR*14 Z (call no.)
Activating this function prevents your call number from being displayed on the
terminal of the internal or external party for a single call. This procedure is not necessary:
■
if the “Suppress phone number display permanently” function is set for your
user group or
■
if CLIR is activated for your number in the OpenCom 100 / Aastra 800
telephone book.
On ISDN telephones you can also activate the calling line identification restriction
function on a call-by-call basis by means of a menu.
8.3
Changing the User PIN
H*99*
Z (old user PIN) *
Z (new user PIN) *
Z (new user PIN) #
When your system is first commissioned, the user PIN is “0000”. Code-number procedures requiring a PIN should be unavailable to other users. For this reason, you
should change the PIN when you start operating your telephone, and put the new
number in a safe place. The user PIN can be up to six characters long.
Please note:
Make sure you do not lose your new PIN. Contact your system administrator if you experience any problems.
You cannot change your user PIN on a SIP terminal with the code-number procedure described here. You can do so, however, in the Configurator of the
OpenCom 100 / Aastra 800. To do so, the system administrator has to authorise
you to change your personal information. For more information, please refer to the
online help of the OpenCom 100 / Aastra 800.
31
Special Modes
8.4
Intercept
The call numbers of malicious callers can be stored in your network operator’s
exchange (if this service has been implemented). This function works even if the
caller has already hung up!
Note: The feature can only be activated on ISDN telephones.
9.
Special Modes
9.1
Deactivating Least Cost Routing (LCR)
H## Z (dialling code, call no.)
For enquiry calls:
GR## Z (dialling code, call no.)
If you wish, you can deactivate Least Cost Routing, which always uses the cheapest
route for a call, and select a network operator yourself (this is known as “call by
call”). This feature cannot be used with a SIP terminal.
This procedure is only necessary if LCR is activated in the OpenCom 100 /
Aastra 800 for your user group.
9.2
Calling Selectively via Routes
H Z (routing code, call no.)
For enquiry calls:
GRZ (routing code, call no.)
A call to a desired party is set up automatically or selectively via routes in the
OpenCom 100 / Aastra 800. Your system administrator configures these routes in
the OpenCom 100 / Aastra 800 and defines the assignment of each route. By
selectively dialling the routing code prior to the (internal or external) call
number, you manually select a route for a particular call.
Selectively calling via routes allows you to reach parties in the branch offices of a
large corporate network, for example. By manually entering a routing code, you
32
Special Modes
can also administer the tariff charge data for private and professional calls separately.
Your system administrator will inform you of the current routes and their
routing codes.
9.3
Time Control
Several time groups can be configured in the OpenCom 100 / Aastra 800.
Depending on the activated time group, incoming calls are signalled on different
terminals. It is possible to automatically change between these time groups,
according to a timetable set up by the system administrator, or to change them
manually.
You can only program this function if the system administrator has activated the
“Time control” authorisation for your user group.
This feature cannot be used with a SIP terminal.
Activating automatic time control
H*8#
This key combination activates automatic time control. The setting remains
unchanged until one of the available time groups is set manually.
Manually setting a time group
H*8* Z (number of the time group, e.g. 1 ) #
You activate the required time group using this procedure; automatic time control
is then deactivated. Ask your system administrator about the number of configured time groups.
9.4
Deleting All Call Forwarding in the Exchange
H*184 Z (system PIN) #
Call forwarding can be set up in the network operator’s exchange. For setting up
new call forwarding or finding faults, it can be useful to delete all active call forwarding in the exchange. Using the above code-number procedure, you can do
this from any telephone.
33
Remote-Controlled Functions
Deleting the call forwarding in the exchange is a background function. After you
entered the procedure this process will take time (up to 15 seconds for each line).
Please have patience with this.
The system PIN is issued by the system administrator. It must have been changed
from the factory setting “0000” valid on delivery to another value.
This feature cannot be used with a SIP terminal.
10.
Remote-Controlled Functions
The OpenCom 100 / Aastra 800 enables remote-controlled calls and remotely programmable call forwarding. These features are set up by the system administrator
when he configures the system. To carry out these features the system PIN is
required.
The system PIN is issued by the system administrator, who has to change the
default value “0000” to another value before it is issued.
In addition, all the owners of voiceboxes can, with the corresponding authorisation, call their voiceboxes from external telephones. They can remotely access
and edit their messages as well as modify the central settings of their voiceboxes.
10.1
Remote-Controlled Dialling (Call Through)
Without internal number assignment
Z (reserved call no.)
Wait until the connection to the communications system has been established.
You hear a positive acknowledgement tone.
Z (system PIN) * (external access code, e.g. 0 )
Z (external call no.) #
With internal number assignment
Z (reserved call no.)
Wait until the connection to the communications system has been established.
You hear a positive acknowledgement tone.
Z (system PIN) * (external access code, e.g. 0 )
Z (external call no.) * Z (internal call no.) #
34
Remote-Controlled Functions
You can call the OpenCom 100 / Aastra 800 from outside (from home, for
example), then dial an external number and continue telephoning with the cost
being charged to the OpenCom 100 / Aastra 800 connection. This way you take
advantage of different tariff zones, for example.
The system administrator must have set up a number (for remote control) in the
OpenCom 100 / Aastra 800 for this feature. In addition, the number reserved in the
OpenCom 100 / Aastra 800 can also be assigned an internal call number, via which
the dialling is to be performed. In the case of remote-controlled dialling, there is
no check on authorisation.
Least Cost Routing (LCR) is used for remote-controlled dialling, provided your
system administrator has correspondingly configured LCR and the LCR application
in the OpenCom 100 / Aastra 800. Ask him for the setting which applies to you.
10.2
Remote-Programmable Call Forwarding
Configuring the function
Z (reserved call no.)
Wait until the connection to the communications system has been established.
You hear a positive acknowledgement tone.
Z (system PIN) *
Z (your internal call no.) * (external access code, e.g. 0 )
Z (destination no.) #
Deleting the function
Z (reserved tel. no.)
Wait until the connection to the communications system has been established.
You hear a positive acknowledgement tone.
Z (system PIN) *
Z (your internal tel. no.) #
Using the call number reserved in the OpenCom 100 / Aastra 800 for remote
control, you can configure or delete immediate call forwarding for your own call
number from a remote location. This remotely-programmed forwarding overwrites any other internally active forwarding. Forwarding “On Busy” and “After
Delay” are not affected. Incorrect or non-existent call numbers are rejected. Your
authorisation is checked in the same way as for forwarding within the
OpenCom 100 / Aastra 800. A correct entry is confirmed with a positive acknowledgement signal, and the external call subsequently ended.
35
Remote-Controlled Functions
Note: The procedure will be aborted if there is a pause of
longer than 60 seconds between the entry of two digits.
Thanks to this time span, it is also possible to implement remote-controlled functions from GSM cellphones.
10.3
Calling a Voicebox from a Remote Terminal
If your system administrator has configured a voicebox with the authorisation for
remote access, you can also access and configure the box from a remote terminal.
Note: In order to be able to call and query your voicebox
from a SIP terminal, the “Keypad as SIP-INFO message” function must be activated on the SIP terminal. Please review the
user guide of the manufacturer on how to set this function.
Using the call number of the OpenVoice application …
(this call number is included in the incoming call distribution)
1. Select the MSN or the system call number to which your system administrator
has assigned the internal call number of OpenVoice application.
Wait until the connection to the communications system has been established.
You hear a message from your voicebox.
2. Then enter the internal call number of your voicebox – i.e. the call number of
the terminal which has been assigned to the voicebox. Confirm your input by
pressing * .
3. Enter the PIN of your voicebox.
4. Follow the instructions in the voice menu for all further operating steps.
Using the number of your telephone…
(the number of your telephone is included in the incoming call distribution; you
have diverted the telephone to your voicebox)
1. Dial the MSN or the system extension number at which you can reached externally.
2. You hear the welcome text for callers to your voicebox.
36
Remote-Controlled Functions
3. Enter the PIN of your voicebox.
4. Follow the instructions in the voice menu for all further operating steps.
Note: For detailed information on the use and operation of
the OpenVoice application, please refer to the user guide for
the optional component “OpenVoice 200 – The Voice-Mail
System in the OpenCom 100 and Aastra 800 Communications Systems”.
10.4
Setting up an Internet Connection from Remote
(ISP Trigger Call)
Z (reserved call no.)
Wait until the connection to the communications system has been established.
You hear a positive acknowledgement tone.
Z (system PIN) * #
If the communications system is connected to the Internet via a dialup connection, a user can initiate from external that the system establishes an Internet
connection (ISP Trigger call). The system is then reachable via the Internet and
enables to set up a connection for a VPN connection via RAS.
Note: This feature is only available on an OpenCom X320
communications system.
37
Index
Index
A
E
Announcement protection 15
Announcements
to system telephones 25
Authorisation 4
Emergency numbers 30
Enquiry 9
enquiry call mode 4
Entrance intercom 28
B
F
Baby call 25
Features 4, 30
Follow Me 23
C
Call forwarding 17
deleting active call forwarding 33
deleting all active instances of 23
remote programming of 35
to voicebox 17
Call protection 7, 14
Call queue 18
Callback request 26
Calling Line Identification Restriction
(CLIR) 31
Call-waiting protection 13
Call-waiting signal
deactivation of 13
Code-number procedures 3
CSTA application 30
D
Dialout for another terminal 26
Disconnecting a call 10
Door opener 28
Doorbell 28
38
H
Hunt groups 16
I
Intercom
to a system terminal 26
Intercom protection 15
ISP Trigger call 37
L
Least Cost Routing (LCR) 32
Line seizure
automatic 5
manual 5
M
Malicious Call Identification (MCID) 32
Index
P
Transferring a call
with notification 10
without notification 11
Parking a Call 7
Pharmacy line 28
Pick-up group 15
PIN dialling 27
U
Q
Unparking a call 7
User PIN 23, 30
Queue 6
for user group 7
priority 7
R
Recall 11
Routes 32
Routing code 32
V
VIP call 24
Voicebox 8
accessing via OpenVoice 8
direct access 8
PIN 8, 36
remote access 9, 36
Voice-mail system 17
S
Seizing an external line 5
Speed dialling 6
Speed-dialling code 6
System PIN 34
T
Take 27
Telephone
SIP terminal 3
Telephone book 6
Telephone lock 30
Telephone number
of OpenVoice 36
Three-party conference 11
Time control 33
Time groups 33
Toggling 10
39
Index
Notes
40
Time axis in seconds
0
1
2
3
4
5
Audio Signals
Ringing signal
Internal busy tone
Internal dialling tone
External dialling tone/continuous tone
Positive acknowledgement tone
Negative acknowledgement tone
Special internal dialling tone
Special external dialling tone
Call-waiting signal
Special sensor signal
Ringer signals (analogue terminals)
External ringer signal*
Internal ringer signal
* The first ring is a single ring, and all subsequent rings are periodic double rings.
The tones and ringer signals mentioned above are valid for Germany; in other countries they may differ.
6
www.aastra.com
As of 14.06.2009
Subject to changes