1
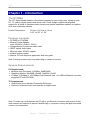
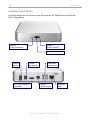
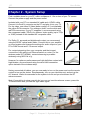
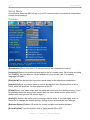
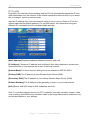
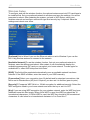
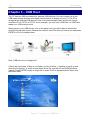
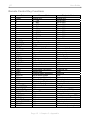
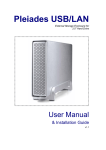
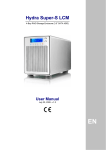
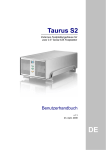
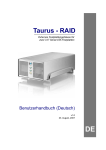
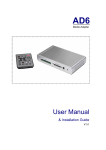
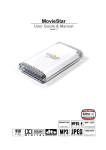
D7-DMA
Digital Media Adapter
User Manual
& Installation Guide
October 15, 2007
v1.3
D7
User Guide
Table of Contents
CHAPTER 1 - INTRODUCTION
1
[SECONDARY DNS]
7
[DEFAULT GATEWAY]
7
[AOL]
7
WIFI SETUP
8
[PREFERRED]
8
THE D7-DMA
1
[AVAILABLE NETWORK]
8
PACKAGE CONTENTS
1
[SSID]
8
SYSTEM REQUIREMENTS
1
[CONNECTION]
8
PC REQUIREMENTS
1
[SECURITY]
8
TV REQUIREMENTS
1
[KEY]
8
INTERFACE INFORMATION
2
TIME SETUP
9
REMOTE CONTROL
3
UPDATE ROM
9
[TV MODE]
3
[SETUP]
3
[VOLUME]
3
[RETURN]
3
[INFO]
4
[SUBTITLE]
CHAPTER 3 – USB HOST
10
CHAPTER 4 – NETWORK MODE
11
4
UPNP DEVICES
11
[AUDIO]
4
MEDIA SERVER
11
[ZOOM]
4
ONLINE PREMIUM CONTENT
12
[VTUNER]
12
[AOL]
12
[INTERNET TV]
12
CHAPTER 2 - SYSTEM SETUP
5
SETUP MENU
6
[MUSIC]
12
OPTIONS
6
[PHOTO]
12
[SCREENSAVER]
6
[NEWS]
12
[LANGUAGE]
6
[ENTERTAINMENT]
12
[SLIDESHOW]
6
[TECHNOLOGY]
12
[INTERNET]
6
[SEARCH]
12
[VIDEO]
6
[EDIT]
12
[AUDIO]
6
[BROWSER OPTION]
6
CHAPTER 5 - APPENDIX
13
[SOUND OPTION]
6
IP CONFIG
7
SPECIFICATIONS
13
[MAC ADDRESS]
7
FAQ
14
[IP ADDRESS]
7
REMOTE CONTROL KEY FUNCTIONS
15
[SUBNET MASK]
7
ABOUT THIS MANUAL
16
[PRIMARY DNS]
7
D7
User Guide
Chapter 1 - Introduction
The D7-DMA
The 'D7' Digital Media Adapter is the perfect gateway for your living room, linking up your
PC, TV, stereo, digital camera and much more. Great design coupled with playback
support for all kinds of standard media formats and simple installation makes it the perfect
all-in-one multimedia solution.
Product Dimensions:
16.5cm x 16.5 cm x 3.2 cm
6.50” x 6.50” x 1.26”
Package Contents
• D7-DMA or D7-WDMA
• External Power Adapter;
Input 100-240V, Output +12V/1A
• Composite and Component video cable
• SPDIF optical audio cable
• Ethernet cable, SCART adapter
• Infrared remote control
• Manual, CD with MyHome application and user guide
Note: Package content may vary, depending on vendor & version.
System Requirements
PC Requirements
• Minimum Intel Processor II 350MHz, 64MB RAM
• Operating System; Win98SE, WinME, Win2000, WinXP
• 10 Mbps, 100 Mbps or 10/100Mbps Fast Ethernet card, or a USB-to-Ethernet converter
equipped PC with CD-ROM
TV Requirements
• Video/Audio input, standard Composite RCA input
• Optional Component input and amplifier for digital audio
Note: To make use of all features the D7 offers, an Ethernet connection with access to the
local network and internet is required. Additionally, a computer running the MyHome media
server is recommended.
Page 1 / Chapter 1 - Introduction
D7
User Guide
Interface Information
Following images are for reference only and show the D7-DMA without the optional
802.11 b/g antenna.
Yellow:
LAN connection
Green:
Power ON/OFF
Infrared Receiver
Power
switch
A/V multi interface
connector
Power
receptacle
USB host
connectors
SPDIF
audio output
Ethernet
port
Page 2 / Chapter 1 - Introduction
D7
User Guide
Remote Control
Power ON/OFF
No Function
Input for time, search, login, URL and other text.
Input Selector
Clear (Backspace)
[CLEAR] Delete a letter or number when entering text.
[SELECT] Toggle text input between upper case, lower case and numbers.
No Function
TV Mode
Setup
Volume Adjustment
Mute Sound
Navigation Keys
Menu
Return
[TV MODE] Each time this button is pressed, the video output will change. Use this when
you only see a blank screen but go to setup and save your settings once you have a signal.
[SETUP] Press this key to enter the setup menu and change the settings and other
configuration options for your D7.
[VOLUME] When browsing web pages, these keys can be used to scroll up and down,
otherwise they are used to adjust the volume for music and video files.
[MENU] Tab between the different menu options.
[RETURN] Go one step back and return to the previous menu.
Page 3 / Chapter 1 - Introduction
D7
User Guide
A: N/A
B: Return to Menu
Playback Functions
A: N/A
B: Return to Home
A: File Info
B: Go to Setup
A: Time Search
B: URL input
Audio output
Subtitle encoding/OFF
A: Repeat
B: Refresh
Zoom Function
No function
No function
Rotate Images
[A-B] Return to the menu or the main screen depending on the present mode.
[REPEAT] Return to the main screen.
[INFO] Go to the setup menu or show file info during playback.
[EDIT/PROGRAMM] Go to URL or time search during playback.
[SHUFFLE] Refresh screen or change repeat mode during playback.
[SUBTITLE] Toggle between different encodings for the subtitles or turn them OFF.
[AUDIO] Change between stereo and mono output.
[ZOOM] Zoom mode for photos (press Enter in zoom mode to pan) and toggle between
full screen, actual size and original size for movies.
Note: See Appendix for detailed functions of each key.
Page 4 / Chapter 1 - Introduction
D7
User Guide
Chapter 2 - System Setup
Find a suitable place for your D7, within a distance of 1.2m or less of your TV screen.
Connect the power supply and the power outlet.
Included with your D7 is a standard AV cable and a YPbPr cable.
Connect it to the A/V connector on the D7 and plug it into your TV.
For the video, use either S-Video (better quality) or if not available,
the yellow RCA connector. For analogue audio, use the white and
red RCA connectors. If your TV supports it, we recommend using
the component cable (YPbPr) for optimum video quality (up to 720p
or 1080i) instead of the standard AV composite cable.
For Dolby 5.1 surround and digital audio output, we recommend
using the SPDIF optical audio cable. Connect this to your amplifier
or sound system and change the settings for audio output on your
D7 to RAW format and 5.1 surround output.
For content streaming from your computer and the internet,
connect the LAN cable to an Ethernet switch or router. For the
wireless model (D7-WDMA), content streaming is possible
wirelessly using 802.11b or g.
However, for optimum performance and high definition content with
high bitrates, we recommend using the wired LAN connection
option instead of the wireless setup.
Having connected all cables, you are now ready to turn on the power and use the remote
control to turn on the device. Simultaneously, turn on your television set, and set up the
A/V channel. Wait a few seconds for the system to boot and you should see the D7
welcome screen.
Note: If everything is setup correctly but you can not see the welcome screen, press the
TV Mode button until you find the right video signal.
Page 5 / Chapter 2 - System Setup
D7
User Guide
Setup Menu
Once booted, press the SETUP key on your D7 remote control to access the configuration
screen and its settings.
Options
[Screensaver] Set a time from 1-60 minutes before the screensaver turns on.
[Language] Select your preferred language for the on-screen menu, file browser encoding
and subtitles. You can also turn off the subtitles for your movies here. The default
language is English.
[Slideshow] Set the transition time and repeat mode for the slideshow presentation.
[Internet] Options for internet security used to browse the web. By default this is set to
SSL2, which will work fine for most purposes of the D7.
[Video] Select your video output and the preferred zoom level for watching movies. If you
accidentally saved the wrong video output and only see a blank screen, press the TV
Mode button until you see the screen again.
[Audio] By default, the audio is set to analogue stereo audio. If you use digital audio or
would like to change the default settings, change it here and save the new settings.
[Browser Option] Enables HD mode for a more compact and smaller browser.
[Sound Option] Turns the system alert or typing sound ON or OFF.
Page 6 / Chapter 2 - System Setup
D7
User Guide
IP Config
By default, you can leave these settings and the D7 will automatically request the IP and
other information over the network. If the internet connection does not work or you would
like to change it, switch to manual mode.
Input an IP address from your local network which is not in use yet. Enter an IP for the
subnet mask and the default gateway. For the DNS server, we recommend using two
different IP’s, preferable from a local and reliable provider.
[MAC Address] Displays hardware address to identify each unit
[IP Address] Choose an IP address that is different from other computers, printers and
various devices on your network but is part of the local network.
[Subnet Mask] The most common setting for home networks is 255.255.255.0.
[Primary DNS] The IP address of your Domain Name Server (DNS).
[Secondary DNS] The IP address of your backup Domain Name Server (DNS).
[Default Gateway] The IP address of the gateway or router on your local network.
[AOL] Server and URL setup for AOL subscriber services.
Note: To use direct internet access for IPTV, webradio, podcasts and other content, make
sure to enter a valid DNS server. Numbers seen in the image above are for reference only
and will be different to your settings.
Page 7 / Chapter 2 - System Setup
D7
User Guide
Wireless Setup
To configure and use the wireless function, the optional antenna and mini PCI card have to
be installed first. Set your preferred network to wireless and save the settings. You will be
prompted to reboot. After restarting the system, go back to WIFI Setup, select your
wireless network and configure connection type and security key if required. Save the
settings and reboot once more.
[Preferred] Set to Wired if you use the Ethernet cable or set to Wireless if you use the
802.11b/g wireless antenna to connect to the network.
[Available Network] To use the wireless function, first set your preferred network to
wireless, save the settings and reboot. After restart, it will automatically display the
available access points (AP) and you can select your home network. To scan again for
available AP’s, select WIFI setup and click Enter.
[SSID] This field will be populated automatically once an available network has been
selected. If the SSID is hidden, enter the name of your SSID manually.
[Connection] Select your connection type. By default and for standard connections, this
will be set to Infrastructure (AP) but if required, you also set it to Ad-Hoc (peer-to-peer).
[Security] D7 supports WEP 64-bit or 128-bit encryption for additional security. Select the
WEP encryption used in your home network and enter the key or set it to OFF.
[Key] If you are using WEP encryption for your wireless network, enter the WEP key here,
otherwise leave this field empty. When 64-bit WEP is used, the WEP key should be 10
hexadecimal characters. If 128-bit WEP is used, the WEP key should be 26 hexadecimal
characters. A valid value for a hexadecimal character is 0 to 9 and A to F.
Page 8 / Chapter 2 - System Setup
D7
User Guide
Time Setup
Setup for clock time with time zone and NTP server. If the NTP server is set and an
internet connection exists, the D7 can synchronise the time automatically.
The default value for the NTP server should work fine, so you only have to choose your
time zone, turn on daylight saving if required and save the settings.
Update ROM
Displays current firmware version and can be used to check for new releases and
upgrades for the D7.
If your D7 is not connected to the internet, you can download the latest firmware and save
it on a USB disk. Connect it to the USB port on your D7 and browse for the update file,
then manually update the firmware.
Page 9 / Chapter 2 - System Setup
D7
User Guide
Chapter 3 – USB Host
The D7 has two USB connectors for external USB devices. You can connect up to two
USB mass storage devices with digital media content to display on your TV. For D7 to
recognise the external USB device it has to be mass storage class, and the file format
must be FAT12, FAT16 or FAT32. As an example, you may use a USB disk, an USB card
reader or a USB memory stick.
Simply plug in your USB device, turn on the power and you will be able to access the
device from the main screen. Browse the content, select the files you like to see and press
ENTER or PLAY to display them.
Note: USB hubs are not supported.
If there are more than 10 files in one folder, use the Volume +/- buttons to scroll up and
down the list quickly. To scroll up and down file by file, use the UP and DOWN buttons
instead. Press ENTER to play a single file or press PLAY to playback all the files in that
particular folder.
Page 10 / Chapter 3 - USB Host
D7
User Guide
Chapter 4 – Network Mode
There are 3 different kinds of network modes:
• UPnP devices on local network
• Media server on PC
• Online premium content with direct internet access
UPnP devices
To access a Universal Plug and Play (UPnP) device, all you need to do is connect it to the
same local network as your D7. Turn on the UPnP enabled NAS or Windows Media
Connect as an example, then turn on the D7. On boot up, it will automatically connect to
the network and list any compatible devices. Once mounted, you can access it from the
main screen.
For UPnP servers such as Windows Media Connect or other applications, make sure your
firewall is setup properly; otherwise D7 will not recognise the device.
Media Server
To use this mode, you need to install the included “MyHome” application or Windows
Media Connect on your computer. Connect the computer to the same network as your D7,
start the application and you will be able to access your shared files from the computer
directly on your D7.
To connect the D7 to your computer without a local network, use a cross over Ethernet
cable.
To setup a new media server, go to the main screen. It should automatically detect new
servers but if not, click on the add button. You will have to enter the name of your MyHome
server and the IP address of that computer. Once it is setup, you can access the server
from the main screen.
For more details regarding the “MyHome” application and Windows Media Connect,
please refer to the PDF manual on the included CD.
Page 11 / Chapter 4 - Network Mode
D7
User Guide
Online Premium Content
In this mode, you can access content on the internet directly from your D7, without the
need to turn on any computer. To use this function, make sure your gateway and DNS
server are setup properly and that you have access to the internet.
[VTuner] Access to online radio broadcast and web radio with advanced search features.
Bookmark your favourite channels and listen to music from all over the world right from
your living room.
[AOL] Access to AOL subscriber services.
[Internet TV] View internet TV from all over the world. Sorted by countries, you can
browse the available TV channels and select the one you like for broadcast. For optimum
quality, high-speed internet access with good connection between TV server and your
home is required.
[Music] Listen to music news, web radio and podcast shows online.
[Photo] Access web based photo services like Flickr and view your photos.
[News] Read or listen to world news from ABC, BBC, CNN, Yahoo, MSNBC and others.
[Entertainment] Watch video clips and podcast shows related to entertainment.
[Technology] Watch podcast shows featuring the latest technology, gadgets, reviews and
other news.
[Search] Search the web by movies, podcasts, photos and other content using the Yahoo
search engine.
[Edit] Add your own bookmarks to your personal service portal or any other website.
Page 12 / Chapter 4 - Network Mode
D7
User Guide
Chapter 5 - Appendix
For RMA and other questions, please contact your vendor or check out their online support
area!
Specifications
Internal Memory
Playback Formats
N/A (data is accessed via USB or Ethernet)
Video:
• MPEG-1 up to 1.15Mbps CBR (MPG, MPE, MPEG, DAT,
M1V)
• MPEG-2 up to 15Mbps and 1080i (MPG, MPE, MPEG,
M2V, VOB)
• MPEG-4 up to 720p XviD, RMP4 (AVI, MOV, MP4)
• WMV9 up to 720p (ASF, WMV) (online key authorisation
not supported)
• MOV: 3ivX + MP3, 3ivX + PCM
(3ivX converted from supported MPEG-4 video codec
using Dr. DivX 2 for Mac OS)
• MP4: MP4V + MP4A (AAC) only support non-hinted MP4
• AVI audio codec: MP3, AC3, PCM, WMA, Ogg
Subtitles:
SUB (MicroDVD format), SRT (SubRIP format), SMI (SAMI
format), SSA (Sub Station Alpha format), Embedded Multiple
Subtitle support
Audio:
• MPEG-1 Layer 1 (MP1, MPA)
• MPEG-1 Layer 2 (MP2)
• MPEG-1 Layer 3 (MP3)
• Ogg Vorbigs (OGG)
• AC3 5.1 (AC3)
• Microsoft PCM Wave (WAV)
• Advance Audio Coding AAC, ADIF, ADTS (AAC)
• Apple MPEG4 AAC Audio (M4A)
• Microsoft Windows Media Audio version 1&2 (WMA, ASF)
• Microsoft Windows Media Audio Professional WMA Pro
(ASF)
Photo:
• JPG baseline and progressive up to 8 mega pixel
• GIF
• PNG
Page 13 / Chapter 5 - Appendix
D7
Supported USB
devices
UPnP Version
Output Interfaces
User Guide
Mass Storage class devices using FAT12, FAT16 or
FAT32, including USB hard drives, card readers and
USB memory sticks.
v1.0
Video NTSC/PAL:
• Composite Video
• S-Video
• Analogue Component Video up to 720p or 1080i
• SCART RGB (optional cable)
• VGA up to 1024x768 (optional cable)
Audio:
• Dual Stereo Analogue Audio
• SPDIF optical output
Power Supply
External Power Adapter universal auto-switching (UL, cUL)
Input: AC 100-240V, 1.2A, 50-60Hz
Output: DC +12V/1A
FAQ
Q: My TV screen is blank and I can not see the D7 main screen!
A: Make sure the cables are connected firmly and the TV is set to the proper (A/V)
channel. Turn on the D7 and wait for about 10-20 seconds. If you still do not see anything,
press the TV Mode button on your remote control to change the video output until you see
the screen.
Q: I can not access the internet!
A: Make sure that the D7 is connected to your network and that your internet security is
setup properly. Press the SETUP key and confirm the IP configuration and DNS server. If
the automatic function does not work, switch to manual mode and enter the IP addresses
by yourself. To access the internet, the DNS server needs to be accurate and running.
Q: My file names and bookmarks are scrambled!
A: Go to the setup menu and change the encoding to your language.
Page 14 / Chapter 5 - Appendix
D7
User Guide
Remote Control Key Functions
Item
Button
1
Power
2
1
3
2
4
3
5
4
6
5
7
6
8
7
9
8
10
9
11
0
12
CLEAR
13
SELECT
14
TV MODE
15
SETUP
16
MUTE
17
VOLUME
18
UP
19
DOWN
20
LEFT
21
RIGHT
22
ENTER
23
RETURN
24
MENU
25
A-B
26
PREV
27
PLAY
28
NEXT
29
REPEAT
30
REV
31
STOP
32
FWD
33
INFO
34
SLOW REV
35
PAUSE/STEP
36
SLOW FWD
37
EDIT/PROGRAM
38
TITLE
39
SUBTITLE
40
AUDIO
41
SHUFFLE
42
ANGLE/ROTATE
43
SEARCH
44
ZOOM
Browser Mode
Power OFF
1 - .:/@
2 - ABC
3 - DEF
4 - GHI
5 - JKL
6 - MNO
7 - PQRS
8 - TUV
9 - WXYZ
0 - Space
Backspace
Caps/Num
Toggle video output
Go to setup page
Mute sound
Scroll up/down
Up
Down
Left
Right
Enter/Select
Return to previous screen
Tab (select next menu)
Go to home
Photo page (MyHome)
Select icon
Internet page (MyHome)
Go to main screen
Video page (MyHome)
Stop download
Music page (MyHome)
Go to setup page
N/A
N/A
N/A
Go to URL
N/A
N/A
N/A
Refresh
N/A
N/A
N/A
Playback Mode
Power OFF
Go to 10%
Go to 20%
Go to 30%
Go to 40%
Go to 50%
Go to 60%
Go to 70%
Go to 80%
Go to 90%
Go to 0%
N/A
N/A
N/A
Go to setup page
Mute sound
Volume +/Previous clip
Next clip
Rewind by %
Forward by %
N/A
N/A
N/A
Go to home
Previous clip
Play
Next clip
N/A
Rewind
Stop playback
Forward
Display file info
N/A
Play/Pause
Slow motion (MPEG)
Go to by time search
N/A
Subtitle encoding or OFF
Stereo/mono audio output
Repeat mode
Rotate photo
N/A
Zoom mode (movie/photo)
Page 15 / Chapter 5 - Appendix
D7
User Guide
About this Manual
This manual covers both D7-DMA (wired version) and D7-WDMA (wireless version).
Images and descriptions may therefore slightly vary between this manual and the actual
product you have.
© Copyright 2007 by Macpower & Tytech Technology Co., Ltd. all Rights Reserved
The information contained in this manual is believed to be accurate and reliable. Macpower & Tytech
Technology assumes no responsibility for any errors contained in this manual and reserves the right to make
changes in the specifications and/or design of this product without prior notice. The diagrams contained in
this manual may also not fully represent the product that you are using and are there for illustration purposes
only. Macpower & Tytech Technology assumes no responsibility for any differences between the product
mentioned in this manual and the product you may have.
Page 16 / Chapter 5 - Appendix