1
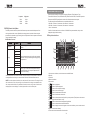
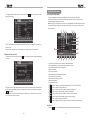
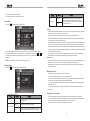
DTS-660W Contents Thank you for your choosing a Valor Multimedia product. We hope you will find the instructions in this user manual clear and easy to follow. If you take a few minutes to look through it, you’ll learn how to use all the features of your new unit for maximum enjoyment. After you have finished reading the instructions, please keep this manual in a safe place for future reference. Preparation Features Tools and Supplies Warnings Disconnecting the Battery Controls and Indicators Button Operation The Key Areas of Touch Screen Remote Control Front Zone Remote Control Rear-Zone Remote Control Smart Dial Remote Control TFT Monitor Operation Open/Close TFT Monitor TFT Monitor Auto Open Monitor Tilt Angle Adjustment Rear Camera Mode Image Setting Parking Brake Interlock Monitor Movement Mechanism Operating Instructions Power On / Off Playing Source Selection Volume Adjustment Audio Control Menu Six-Channel Audio Control Rear Zone System Reset Mute System Setup Menu MAIN Menu Screen Setting General Setup Menu ASP(Audio Signal Processing) Configuration Menu Rear-Zone Operation Standby 1 1 1 1 2 3 3 4 5 5 6 7 9 9 9 9 9 9 10 10 11 11 11 11 11 12 13 13 13 14 14 15 15 17 19 20 Tuner Operation Tuner TFT Display Switch to Radio Tuner source Select FM/AM Band Auto Tuning Manual Tuning Using Preset Stations Auto Store (AS) Program Scan (PS) Local Radio Stations Seeking (LOC) DVD Player Operation Opening/Closing the TFT Video Screen Insert/Eject Disc Reset the Loading Mechanism Accessing DVD Mode Using the Touch-Screen Controls Controlling Playback Accessing the DVD Menu Moving Through Chapters Fast Forward/Fast Reverse Selecting 2-Channel or 6-Channel Audio Playback GOTO Search Direct Chapter / Track Selection Viewing an Alternate Picture Angle (DVD Only) Zooming Multi-Language Discs (DVD Only) Playback Information General Disc Information DVD Setup Menu Accessing the DVD Setup Screen LANGUAGE Menu ASP SET Menu VIDEO Menu SPEAKER Menu RATING (Parental Lock) Menu CD/MP3/WMA/JPEG Operation CD Player User Interface MP3/WMA Discs JPEG Discs SD Card Reader Operation Accessing SD Card Mode Using the Touch-Screen Controls 21 21 21 22 22 22 22 22 23 23 24 24 24 24 24 24 25 25 26 26 26 27 27 28 28 28 28 29 31 31 31 32 32 33 34 35 35 36 37 38 38 38 Preparation iPod Operation Accessing iPod Mode iPod Instructions Playback of video on iPod Sat Radio Operation Accessing SAT Mode Auto Scan Manual Scan Storing a Channel Recalling a channel Bluetooth Operation Before using the Bluetooth The Bluetooth Indicator Accessing the Bluetooth Mode Bluetooth User Interface Phone Book Bluetooth Setup Pairing Auto Connect Making a phone call Answering an incoming call End a call Navigation Operation Access the Navigation mode Navigation Operation How to Listen to an Audio program While Using/viewing the Navigation Troubleshooting Specifications NOTE: 1. certain description in the book may differ from the actual unit. 2. Some pictures or icons in the book may differ from actual display. 3. Specifications subject to change without notice. 39 39 39 40 41 41 41 42 42 42 43 43 43 43 43 44 44 45 45 45 45 46 47 47 47 47 48 53 Please read all of the instructions below before beginning your installation. We recommend that you have your unit installed by an experienced mobile video/navigation installer. Features •Double DIN size, all-in-one integrated entertainment system •Built-in DVD Player, automotive specification slot loading mechanism •Built-in ISS FM/AM Tuner. •SD card reader with READ/PLAY functionality. •Built-in Bluetooth hands-free dial/answer for connection to Bluetooth enabled handsets. •High resolution 6.5”(16:9) TFT color monitor, contrast and brightness adjustment. •Built-in 50W X 5 output amplifier, 5.1 channel surround sound output. •Dual zone function with easy operation. •Smart Touch-screen operation. •All functions can be operated by included Remote Controls. •Rear zone remote control operation. •”Smart Dial” remote control operation. •Built-in Satellite Radio Control, Built-in iPod Control, Navigation Ready. •Powerful Graphic User Interface and software update ability. Tools and Supplies We suggest using these tools and supplies to install the unit. • Torx type, flat-head and Philips screwdrivers • Wire cutters and strippers • Tools to remove existing radio (screwdriver, socket wrench set or other tools) • Electrical tape • Crimping tool • Multimeter • Crimp connections • 18 gauge wire for power connections • 16 – 18 gauge speaker wire • Heatshrink tubing • Soldering iron and solder Warnings 1. Only connect the unit to a 12-volt negative ground system. 2. Never install this unit where operation and viewing could interfere with safe driving conditions. 3. To reduce the risk of a traffic accident (except when using for rear view video camera) never use the video display function while driving the vehicle. This may be in violation of local laws. 4. Never disassemble or adjust the unit without the assistance of a professional. For details, please consult your local car stereo specialty shop. 5. To prevent injury from shock or fire, never expose this unit to moisture or water. 6. Never use irregular discs, the only recommended disc size is a 12cm round disc. 1 Controls and Indicators 7. To prevent damage to the mechanism inside this unit, avoid impact to the TFT monitor. 8. Do not change the fuse on the power wire without professional guidance. Using an improper fuse may cause damage to the unit and result in a fire. 9. The monitor employs an automatic motorized mechanism. To prevent damage to the core Mechanism, please do not push, pull or swivel the monitor manually. Disconnecting the Battery To prevent a short circuit, turn off the ignition and remove the negative (-) battery cable prior to starting the installation. NOTE: If the unit is to be installed in a car equipped with an on-board drive or navigation computer, do not disconnect the battery cable. If the cable is disconnected, the computer memory may be lost. Under these conditions, use extra caution during installation to avoid causing a short circuit. NOTE: It is especially important that you read the WARNINGS and NOTES in this manual Button Operation 7 1 8 2 3 4 9 10 11 5 12 13 14 6 16 15 17 18 1.MENU Press to go to MAIN menu. Press to go to the previous source, if applicable, while in the MAIN menu. 2.FM/AM Press to change among the following bands: FM1,FM2,FM3,AM 3. AS/PS(AUTO STORE/PROGRAM SCAN) Press to auto store strong radio stations in the 12 preset channels in the current band. Press and hold to start to Scan the preset radio station 4.SRC Press to select a source. Press and hold to toggle rear zone mode On/Off. 5.POWER OFF/MUTE Press and hold to power off. Press Mute or restore the volume. Press to power on when the machine is in powered off. 6.SMART DIAL/VOL Press to enter SMART DIAL mode. Press and hold to enter audio adjust menu, you must wait 15 seconds after your last volume change. Otherwise, you will set the default start-up volume. Rotate clockwise/counter-clockwise to control the volume increase or decrease. Select a new volume level, and then press and hold the knob until hear a long single sound to store a new default volume. 7.REMOTE CONTROL SIGNAL RECEIVER 2 3 Remote Control 8.SHORT WAY TO SWITCH TO THE NAVIGATION SOURCE 9.PREVIOUS 10.POS Return to current position 11.NEXT 12.INFO/PIC Press to display playing information on the screen. Press and hold to access the picture settings. 13.RESET Use this button to restart the machine. 14.ANGLE ADJUST Press to adjust the tilt of the screen. Press and hold to adjust the tilt of the screen in any angle between 35 to 90,of course you should loosen the first when you find the best tilt . 15.DISC SLOT 16.DISC INDICATOR LIGHT It is blue when there is no disc in the unit, it is red when there is a disc in the unit. 17.EJECT Press once to eject the disc. Hold to reset loading mechanism. 18.SD CARD SLOT Front Zone Remote Control 3 2 4 1 6 5 7 9 8 10 11 13 14 12 16 15 19 20 23 24 27 28 17 18 21 22 25 26 The key areas of touch screen The touch key areas are outlined below, for DVD, VCD playback mode and so forth. Power Open Turn the power on/off Mute Toggle on/off audio output SRC Select playing mode Numeric button VOL up VOL down Information GOTO search Stop/Band Select A — Return to MAIN MENU B — Display playing information C — Select previous chapter D — Select next chapter E — Display the on-screen controls, and different mode displays different menu. F —On DVD/VCD mode, display the GOTO search menu on the screen directly. 4 Open/close the motorized screen Directly access certain chapter / track / preset station in current band Increase the volume Decrease the volume Display playing information Position search function on VCD/DVD mode Select FM/AM band on Tuner mode Stop playback Enter the audio settings Menu Exit the current menu Enter the main menu of system Picture Adjust the picture settings Repeat A—B OK Set start point A and end point B to repeat continually Direction buttons Up/down/left/right to select items for setting ESC Start or pause playback, confirm the settings 5 Select rear playing sources Title Also can activate and disable SCAN mode while playing CD R-SRC Root Enter the main menu of the disc Turn on PBC while playing VCD Numeric button Repeat Repeat playback for current chapter Mute Directly access certain chapter / track / preset station in current band Toggle on/off audio output Next Select the next chapter/track for playback Search an available radio station by increasing tuning frequency on tuner mode GOTO search Title Position search function on VCD/DVD mode Also can activate and disable SCAN mode while playing CD Select the previous chapter/track for playback Search an available radio station by decreasing tuning frequency on tuner mode Root Enter the main menu of the disc Turn on PBC while playing VCD Previous OK Start or pause playback, confirm settings Fast Reverse Fast reverse the disc content Fast Forward Fast forward the disc content Audio Change the audio language for disc playback Zoom Angle Zooming in/out on an image SUB Title Language selection for subtitle Play in different angle for a scene scene(if it is applicable) Rear-Zone Remote Control 1 2 3 4 Direction buttons Up/down/left/right to select items for setting Previous Select the previous chapter/track for playback Search an available radio station by decreasing tuning frequency on tuner mode Next Select the next chapter/track for playback Search an available radio station by increasing tuning frequency on tuner mode Stop Play/pause Stop playback Zoom Zooming in/out on an image Fast Reverse Fast reverse the disc content Fast Forward Fast forward the disc content Slower Play Repeat Audio SUB Title Angle Repeat A—B Start/pause playback Slow forward playback Repeat playback for current chapter Change the audio language for disc playback Language selection for subtitle Play in different angle for a scene scene(if it is applicable) Set start point A and end point B to repeat continually 6 5 7 8 Smart Dial Remote Control 10 9 12 13 11 15 16 14 17 18 21 19 20 6 7 TFT Monitor Operation Open/Close TFT Monitor 3 2 1 Press the ( ) button on the front zone remote control or press the ( front panel to open/close the monitor. ) button on the TFT Monitor Auto Open •If “TFT Auto Open” is “On”, when the unit is turned on, the monitor automatically opens to the last viewing position. •If “TFT Auto Open” is ”Off” , when the unit is turned on, press the ( ) button on the remote control or press the ( ) button on the front panel to open the monitor into the desired viewing position. w •If “TFT Auto Open” is ”Manual”, hen the unit is turned on or turned off, the monitor has no Movement. See “General setting” for more instructions. Monitor Tilt Angle Adjustment VOL down VOL up Smart Dial Decrease the volume Increase the volume Press this encoder to access system setup. Rotate up/down to select a desired item and press once to access or confirm. NOTE: The buttons of NAV MENUF1\F2\F3\F4\F5\F6 are used on the navigation mode. If your unit has the navigation function, please read the user manual of navigation to find the functions of the buttons. The monitor angle can be adjusted for optimum viewing using one of the following methods: • Press the ( ) button on the front panel to adjust the tilt angle of the screen one step at a Time. • Press and hold the ( ) button to continuously adjust the tilt angle. • Adjust the “Screen Tilt” in the “Screen setting” to adjust the tilt of the screen to the desired degree. Rear Camera Mode When the vehicle is placed in "Reverse", and an optional rear camera is connected to the unit, the TFT monitor will automatically switch to the camera input source. Image Setting Video Output Format The table below shows the video output format for each source. SAT RGB Mode Adjustable Parameters While in RGB mode, the only parameter that can be adjusted is brightness (BRIGHT). To access “SHARPNESS” “COLOR” “CONTRAST” “BRIGHTNESS” and “TINT ”you must be in CVBS Mode. 8 9 Operation Instructions Parameter Adjustment Procedure 1. Enter Picture Quality Setting mode: Press the PIC button on the remote or press and hold the PIC button on the unit. 2. Select Item to Set: Press the ( / ) buttons on the remote or press the ( / ) buttons on the front panel to select an item. 3. Set Parameters: Press the ( / ) buttons on the remote or rotate the SMART DIAL clockwise/counterclockwise to adjust the selected feature to the desired setting. 4. Exit Picture Quality Setting Mode: Press the PIC button on the remote or press and hold the PIC button on the unit. NOTE: There must be a video signal present on the AUX or CAMERA input to adjust the above settings. Parking Brake Interlock 1. When the “PARKING” lead is properly connected to the brake switch, the display on the TFT monitor will display video only when the vehicle is stopped and the parking brake is applied. 2. Parking brake function is overridden when the video source is set to CAMERA. 3. When the “parking brake interlock” is active, the front monitor displays a caution message with blue background, preventing the driver from watching video while driving to reduce the risk of a traffic accident. Rear video screens are not affected. Please see “INSTALLATION SECTION” for installation. Monitor Movement Mechanism If an obstruction occurs in the monitor path, the motion will stop automatically to prevent damage to the mechanism or monitor. Normal operation is resumed by pressing the ( ) button or disconnecting and reconnecting the power. Power On / Off Press the POWER /MUTE button to turn the unit on. You can also turn on the unit by pressing the button ( ) on the remote. Press and hold the POWER/MUTE button on the front panel or press the POWER button ( ) on the remote to power off the unit. Playing Source Selection Press the SRC button on the front panel or the (SRC) button on the remote to change among available playing sources: TUNER, Disc, iPod, SAT, AUX IN, CAMERA (rear view video camera), NAVI and SD Card. The playing mode is displayed on the TFT display. AUX IN Mode An external audio/video device can be connected to this unit via RCA cables to the “AUX-IN”. CAMERA Mode “CAMERA” mode is only available when the camera is connected and when backing up. To install a rear view video camera, connect the CAMERA video input cable to the rear view camera output cable. NOTE: If you have not connected a device to the unit, the source can not be selected. Example: If you have not connected an iPod to the unit, the iPod source will not be available. Volume Adjustment To increase or decrease the volume level, turn the SMART DIAL/VOL on the front panel or press the VOL+/ VOL- buttons on the remote control. The volume ranges from “0” to “40”. The default volume is “10” when the unit is powered on each time. Default volume memory setup: Rotate Smart Dial/VOL knob on the front panel to select volume value and then press and hold the Smart Dial/VOL button until you hear a single beep. When you hear the beep, setup is completed. Audio Control Menu The Audio Control feature allows you to easily adjust your audio system to meet the acoustical characteristics of your vehicle, which vary depending on the type of vehicle and its measurements. To get the best possible sound quality from your new system, be sure to adjust the settings for the speakers as well. Proper setting of the Fader and Balance boosts the effects of the cabin equalizer. Accessing the Audio Control Menu Press and hold the SMART DIAL/VOL button on the front panel for more than 2 seconds (you must wait 15 seconds after your last volume adjustment before attempting to enter the audio control menu via the SMART DIAL) or press the (SEL ) button on the remote control to display The “Audio” menu. Selecting an Audio Feature for Adjustment Press the ( / ) buttons on the remote or press the SMART DIAL/VOL button on the front panel once to select a audio feature to be adjusted. Adjusting an Audio Feature Press the ( / ) buttons on the remote or rotate the SMART DIAL/VOL Clockwise/counterclockwise to adjust the selected feature to the desired setting. 10 11 Audio Adjustments Rear Zone If a monitor is installed in the rear zone and connected to the rear zone AV output, passengers in the back seat can control the DVD output using the rear zone remote control. See “Rear-Zone Remote Control” for instructions. System Reset To correct a system halt or other unusual operation, use the tip of a pen to press the RESET button located on the front bottom-right corner of the unit. After a system reset, the unit restores the settings before last power off. Mute The volume will be muted when the following cases occur: • Automatic: audio output mutes when a telephone call is received by the car phone or when verbal navigation is performed. • When the “MUTE” wire is connected to a cell phone that will output a mute signal to the “MUTE” Wire. • Manual: Press the MUTE button ( ) on the front panel or the MUTE button ( ) on the remote to mute the volume from the unit. NOTE: Press the MUTE button again to restore the volume. Adjusting the volume or using any of the audio set-up features will cancel the mute function. NOTE: The Bass and Treble levels are only adjustable when EQ is on “User” mode. The Loudness function compensates for deficiencies in sound ranges at low levels. Loudness levels range from 1-4 or “off”. When the Loudness function is on, LOUD is displayed on the screen. Exiting the Audio Control Menu Press and hold the SMART DIAL/VOL button on the front panel to exit the audio control menu, or touch the return arrow on the top right of the display. Press the (ESC) or (SEL) button on the remote control to exit the audio control menu. Six-Channel Audio Control 6-Channel Audio Adjustments Item Master Volume Front Left Channel Volume Front Right Channel Volume Rear Left Channel Volume Rear Right Channel Volume Center Channel Volume Subwoofer Volume 12 00 to 40 -10 to +10 -10 to +10 -10 to +10 -10 to +10 -10 to +10 -10 to +10 13 System Setup Menu MAIN Menu Screen Setting Accessing the Screen Setup Menu •Press the MENU on the front panel or press the (MENU) button on the remote control to access MAIN menu. •Select the button on the right bottom of the screen to access the Screen setup. There are three methods to access the MAIN menu. •Press the MENU button on the front panel . •Press the MENU button on the remote control. •Touch the A area on the touch-screen. 10 11 8 13 9 17 12 15 14 16 18 1 2 3 4 5 6 7 1.Touch to access Front-Zone menu. 2.Touch to access Rear-Zone menu. 3.Touch to access DVD setup. 4.Touch to access ASP setup. 5.Touch to access General setup. 6.Touch to access Screen setup. 7.Touch to turn to the previous menu. 8.Bluetooth indicator. 9.Touch to access Tuner mode. 10.Touch to access DVD mode. 11.Touch to access iPod mode. 12.Touch to access SAT Radio mode. 13.Touch to access AUX IN mode. 14.Touch to access SD Card mode. 15.Touch to access Navigation mode. 16.Touch to access Camera mode. 17.Touch to access Bluetooth mode. 18.Touch to access the Standby mode. Note: Remote, Smart dial, touch screen operations and buttons on front panel are all useable to select menu and adjust settings. The following instructions will show the different ways to access menus and adjustments. 14 Selecting a Feature for Adjustment Press the ( / ) buttons on the remote to select a feature to be adjusted. Rotate SMART DIAL clockwise/anticlockwise to select a feature to be adjusted. Touch directly the options on the screen to select a feature to be adjusted. Adjusting a Feature General setup Menu Accessing the General Setup Menu •Select the TOOLS button on the bottom of the touch screen to access the General setup. 15 Selecting a Feature for Adjustment Press the direction buttons on the remote control or touch the option directly on the screen to select the feature to be adjusted. Adjusting a Feature 1. Enter the option field for the feature you want to adjust by pressing the (OK) button on the remote or by pressing the SMART DIAL button. A submenu appears in a second row with the selected option. 2. Select a new value by pressing the direction button. 3. Confirm your selection by pressing (OK) button or pressing the SMART DIAL button. The new value setup is complete. Adjusting the Clock 1. Access the “Clock” setting under the General Setup menu. 2. Press the direction button on the remote to move the cursor to the “Hour” or “Min” position, and press the (OK) button. you also can touch the “Hour” or “Min” position directly. 3. The numeric keypad will pop up. 4. Press the numeric button on the remote control or touch the numeric keypad on the screen to adjust the hour or minutes. 5. Press the (OK) button on the remote control or on the keypad of the screen to confirm setup. Return to normal playback The system will automatically return the previous playback mode that it was in before accessing the setup menu 20 seconds after the last operation. 16 Bluetooth Select to activate/deactivate the Bluetooth function. ASP(Audio Signal Processing) Configuration Menu The ASP Configuration menu allows you to make fine audio adjustment. Accessing the ASP Configuration Menu •Press the MENU on the front panel or press the (MENU) button on the remote control to access MAIN menu. •Select the SPEAKER TOOLS button on the bottom of the screen to access the ASP setup. •A menu appears with the option for the first item, and then you can touch the button to the option on the next page, press the button to return. 17 10KHz Treble Freq 12.5KHz 15KHz Depending on the audio source, select the Treble Center Frequency to achieve the best Treble effect. 17KHz 160Hz Selecting a crossover frequency sets a cut-off frequency of the subwoofer’s LPF(low-pass filter) and the “SMALL” speakers’ HPF (high-pass filter). The Crossover frequency setting has no effect if the subwoofer is set to “Off” and any other speaker is set to “Large”. 0° Subwoofer output IN phase 180° Subwoofer output OUT OF phase 80Hz Sub Filter Sub Phase 120Hz NOTE: Depending on your installation, reversing the subwoofer phase may increase bass output. 1.0 Bass Q-Factor 1.25 1.5 When the Bass Center Frequency is selected, adjusting the Bass Q-Factor alters the sharpness of the Bass output. 2.0 Selecting a Feature for Adjustment Press the direction buttons on the remote control or touch the option directly on the screen to select a feature to be adjusted. Adjusting a Feature 1. Enter the option field for the feature you want to adjust by pressing the (OK) button on the remote or by pressing the SMART DIAL. A submenu appears in a second row with the selected option. 2. Select a new value by pressing the direction button. 3. Confirm your selection by pressing (OK) button on the remote control or pressing the SMART DIAL on the front panel. The new setup is complete. Return to normal playback The system will automatically return the previous playback mode that it was in before accessing the setup menu 20 seconds after the last operation. FM/AM Gain -07 ~ +07 Adjust the FM/AM gain DVD Gain -07 ~ +07 Adjust the DVD gain NAVI Gain -07 ~ +07 Adjust the NAVI gain Bluetooth Gain -07 ~ +07 Adjust the Bluetooth gain SAT Gain -07 ~ +07 Adjust the SAT gain iPod Gain -07 ~ +07 Adjust the iPod gain AUX IN Gain -07 ~ +07 Adjust the AUX IN gain SD Card Gain -07 ~ +07 Adjust the SD Card gain Rear-Zone Operation Independent sources can be played simultaneously on the unit. For example, the FM/AM tuner can be listened to by the front passengers, while DVD video is available to rear passengers. Access Rear-Zone 1.Touch the REAR ZONE button on the bottom of the display to access the Rear-Zone menu and you can select a source to play. 60Hz 80Hz Bass Freq 100Hz 130Hz Depending on the audio source, select the Bass Center Frequency to achieve the best Bass effect. 150Hz 200Hz 18 19 Tuner Operation 2. Use the Multi-Zone Remote Control to access the Rear-Zone and select a source to play. 3. Press and hold the SRC button on the front panel to toggle Rear-Zone mode On. Exit Rear-Zone 1.Touch the Off button on the Rear-Zone menu. 2.Press and hold the SRC button on the front panel. NOTE: If DVD is selected as the front source and SD Card can not be selected for the rear source, if SD card is selected as the front source and DVD can not be selected for the rear source .Since the multimedia processor is shared between optical and SD Card media, one or the other can be selected but not both simultaneously. Selecting a Source for the Front Zone Access the Front-Zone menu, and this menu allows you to select a source for the front zone. You can also use the button on the front panel or on the front remote control. The AM/FM tuner/iPod/SAT Radio graphics will change to a "blue screen" background when the DVD player or SD Card media is selected from the Rear-Zone menu. Remote, Smart dial, touch screen operations and buttons on front panel are all useable to control the front source. The functions of the buttons on the touch-screen are discribed in the next chapters about AM/FM tuner/iPod/SAT Radio. NOTE: Optical media and an SD Card cannot be selected from the Rear-Zone Source Menu simultaneously. Standby 1. Touch the button on the touch-screen to access Standby mode. 2. In the standby mode, the unit stands in low-power state with audio output only. 3. In the standby mode, you can return to normal screen mode by performing any unit operation. Tuner TFT Display 6 1 13 3 12 2 4 5 11 7 8 9 10 14 15 16 17 18 19 20 1.Current Source information, touch this area to return to MAIN menu 2. Current Radio Band Indicator 3. Current Preset Station playing Indicator 4. Stereo Broadcast Indicator 5. Radio Frequency Indicator 6. Preset Radio Stations: Touch to recall preset stations or touch and hold to store a station. (total 12 stations a Band can be preset.) 7. System EQ setting 8. Loud Setting Indicator (See “Audio control menu” for instructions. ) 9. Rear Zone Playing Mode 10.Volume Indicator. 11.Strong Local Signal Broadcasting Indicator: Touch to active Local/DX function 12.Current time 13.Bluetooth Indicator 14. : Touch to change among the following bands: FM-1, FM-2, FM-3 and AM. 15. : Touch to automatically scan and store stations in current radio band. You also can press the AS/PS button on the front panel. 16. : Touch to seek down. 17. : Touch to seek up. 18. : Touch to tune down once a step. 19. : Touch to tune up once a step. 20. : Touch to activate/deactivate Scan Mode Switch to Radio Tuner source Press the SRC button on the front panel or on the remote control to switch to the Tuner source. You can also access the tuner mode from the MAIN menu directly. 20 21 Select FM/AM Band Program Scan (PS) Touch the button on the screen, or press the BAND button( change among the following bands: FM-1, FM-2, FM-3 and AM. )on the remote control to Auto Tuning Press the button ( ) on remote control or touch the button on the screen to seek the next available channel by increasing the tuning frequency. Press the button again to stop searching. Press the button ( ) on the remote control or touch the button on the screen to seek the next available channel by decreasing the tuning frequency. Press the button again to stop searching. 1. Press and hold the AS/PS button on the panel Or press the button on the screen.scan the stations in the 12 preset channels in the current band. 2. Touch the button on the screen to automatically scan all stations in current band to preview stations. 3. Press any button to stop scanning and listen to the selected station. Local Radio Stations Seeking (LOC) When the Local function is on, only radio stations with a strong signal are tuned. When the Local function is active, “LOC” appears on the screen and an indicator is illuminated. To activate the Local function in AM/FM tuner mode, touch the button on the screen . Touch the again to Activate the DX function Manual Tuning Press the button on the remote control or touch the frequency one step at a time. Press the button on the remote control or touch the frequency one step at a time. button to increase the tuning button to decrease the tuning Using Preset Stations 12 numbered preset buttons store and recall stations for each band. Front 6 stored stations (P1P6) for the current band appear on the screen, touch the channel directly for use. You can touch the arrow buttons on the screen to see the other 6 stations. Storing a Station 1. Select a band (if needed), then select a station. 2. Touch and hold an onscreen preset button (6) for three seconds. The preset number appears at the top of the screen. Recalling a Station 1. Select a band (if needed). 2. Touch an on-screen preset button (6) to select the corresponding stored station. Auto Store (AS) Press the AS/PS button on the panel or Press and hold the automatically scan and store all stations in current band. 22 button on the screen to 23 DVD Player Operation NOTE: When properly installed, DVD video cannot be displayed on the main TFT screen unless the parking brake is applied. If you attempt to play a DVD while the vehicle is moving, the TFT screen displays caution information with a blue background. Rear video screens, if applicable, will operate normally. Opening/Closing the TFT Video Screen Opening the TFT Screen To open the TFT video screen, press the ( ) button on the unit or press the ( ) button on the remote control. Closing the TFT Screen Press the ( ) button on the unit or press the ( ) button on the remote control again to Close the TFT screen. 1.Touch to Play/Pause 2.Touch to stop 3.Touch to fast reverse 4.Touch to fast forward 5.Touch to repeat playback 6.Touch to repeat from A to B. Select the repeat point A wherever you want to start and the point B wherever you want to end, then, DVD displays from A to B continually. 7.Touch to choose a language, if the disc is recorded in multiple languages. 8.Touch to display Sub-title 9.Touch to return to DVD main menu Controlling Playback Insert/Eject Disc Inserting a Disc When inserting a DVD disc, DVD mode is entered and disc play begins. NOTE: If Parental Lock (Rating) is activated and the disc inserted is not authorized, the 4-digit code must be entered and/or the disc must be authorized (see “RATING (Parental Lock) Menu”). You cannot insert a disc if there is already a disc in the unit or if the power is off. NOTE: CD-R/RW, DVD-R/RW, DVD+R/RWs will not play unless the recording session is closed. Ejecting a Disc Press the button on the unit to eject the disc. The unit automatically reverts to Tuner mode at the same time. Reset the Loading Mechanism If the disc loads abnormally or does not play properly, press and hold the button to reset the loading mechanism. The disc is ejected and normal operation resumes. on the unit Accessing DVD Mode To switch to DVD mode when a disc is already inserted, press the SRC button on the front panel or on the remote control till DVD appears at the top of the screen. Using the Touch-Screen Controls Stopping Playback Touch the stop button on the screen or press the ( ) button on the remote control to stop DVD play; touch the play/pause button on the screen or the (OK) button on the remote Control to resume disc play. Pausing Playback Touch the play/pause button on the screen to suspend or resume disc play. Repeat Playback Press the Repeat button on the screen or on the remote control to alter repeat mode according to the following: • DVD: Repeat Title, Repeat Chapter, Repeat Off • VCD (PBC Off): Repeat Single, Repeat Off • MP3: Repeat Single, Repeat Folder, Repeat Off NOTE: For VCD play, the repeat function is not available if PBC is on. PBC (Play back Control) (VCD Only) For VCD with play back functionality, play back control (PBC) provides additional controls for VCD playback. Press the (ROOT) button on the remote control to toggle the PBC function “On”/”Off”. Once PBC is on, playback starts from track one of the play list. NOTE: When PBC is activated, fast forward, slow playback, and previous/next track are available. Repeat and direct track selection are not available. When PBC is activated, selecting random, scan, or search playback automatically deactivates PBC. Sectional Repeat Function (A-B) Use the A-B function to define a specific area of a disc to repeat. • Press the Repeat A-B button ( ) on the screen or on the remote control to set the start point (A) of the repeated section. • Press the Repeat A-B button ( ) again once you reach the desired end point (B) of the repeated section. The selected portion of the DVD will now repeat continuously. • Press the Repeat A-B button ( ) again to cancel the A-B section setting and stop repeat play. Accessing the DVD Menu 1.You can touch the area F, and then touch the 24 25 button to recall the main DVD menu. 2.Use the arrow buttons on the remote to select a title from the menu. 3.Press the (TITLE) button on the remote control to select a different title for playback. 4. Press the (OK) button on the remote control or touch the item directly to confirm your selection and begin playback. Moving Through Chapters Press the ( ) button on the remote control to advance to the next chapter on the DVD. Press the ( ) button on the remote control to move to the previous chapter on the DVD. Touch the right side of the screen to advance to the next chapter, or touch the left side of the Screen to move to the previous chapter. GOTO Search During DVD or VCD playback, perform the following steps to use the GOTO feature to access a specific location on a disc: 1. Press the( -/--) button on remote control or touch Area F on the screen to enter “GOTO” mode. 2. Press the ( / ) buttons on the remote control to select a category. • For DVD mode, you can choose Time or Title/ Chapter search. • For VCD mode, press the( -/-- ) button to choose between Track Search, Disc Search and Exit. Fast Forward/Fast Reverse Press the ( ) button on the remote control or touch the of area E on the screen to fast forward. Keep pressing or touching and releasing the button to increase the rate from “2X” to “4X”, “8X”, and “20X”. Press the ( ) button on the remote control or touch the of area E on the screen to fast reverse. Keep pressing or touching and releasing the button to increase the rate from “2X” to “4X”, “8X”, and “20X”. Selecting 2-Channel and 6-Channel Audio Playback 2-Channel Audio (Down Mix) Support for CD, SD Card and DVD Linear pulse code modulation (LPCM) and pulse code modulation (PCM) support is available for CD, SD Card and DVD discs when 2-channel audio is selected. 6- Channel Audio Support for CD, SD Card and DVD Surround I is available for decoding analog or digital 2- channel down mixed sources. Surround II is available for decoding digital bit-stream sources. NOTE: Only 2-Channel audio support is available for AM / FM tuner, Auxiliary input. 3. Touch the( Screen. )/ (--- /---) area on the screen to display a numeric keypad on the touch Speaker Output Options Speaker Setup Front speaker Rear Speaker Center Speaker Sub- Woofer 2CH mode Play 2CH audio in 6CH mode with surround “off” 4. Enter a time/Track number into the field using the numeric keypad on the remote control or on the screen. 5. Press the OK button on the remote control or on the touch screen to go to the specified Location on the disc. 6. Press the ( -/-- )button on the remote control or touch the F Area on the screen again to exit. Play 2-channel (DownMix) audio in 6-channel mode with surround “on” Play 6-channel audio in 6-channel mode Direct Chapter / Track Selection During DVD, VCD and CD playback, you can use the numeric keypad on the remote control to access a track directly. 26 27 Viewing an Alternate Picture Angle (DVD Only) Some DVDs contain scenes that have been shot simultaneously from different angles. For discs recorded with multiple angles, press the (ANGLE) button on the remote control to toggle available angles of the on-screen image. VCD Playback Information The following information is displayed at the top of the screen during VCD playback: Zooming Press the ZOOM button on the remote control to enlarge and pan through the video image using the following options: “Q1”, “Q2”, “Q3”, and “Off”. Multi-Language Discs (DVD Only) Changing Audio Language If you are watching a disc recorded in multiple languages, press the (AUDIO) button on the remote control to choose a language. You also can touch area E, and then touch the button. NOTE: During VCD playback, press the (AUDIO) button on the remote control to choose between Left Channel, Right Channel, and Stereo. Changing Subtitle Language If you are watching a disc recorded in multiple languages with subtitles, press the (SUBT) button on the remote control to choose the language in which you would like the subtitles to appear. You also can touch area E, and then touch the button. 1.Indicates Current playing source. 2.Indicates the forth of 16 tracks on the DVD is currently playing. 3.Indicates the playback time of the current title. 4.Indicates EQ Setting. 5.Indicates the Loud Setting. 6.Indicates the current system time. 7.Indicates the current playback source of the rear zone. General Disc Information Playback Information During DVD and VCD playback, press the (INFO) button on the remote control or touch area B to display playback information on the screen, including the media playing and current playback time. DVD Playback Information The following information is displayed at the top of the screen during DVD playback: Disc Symbols 1.Indicates Current playing source. 2.Indicates the forth of 16 titles on the DVD is currently playing. 3.Indicates the first of 20 chapters on the DVD is currently playing. 4.Indicates the playback time of the current title. 5.Indicates EQ setting (or decoding mode when listening to a DVD with 5.1 surround 6.Indicates the Loud Setting. 7.Indicates the current system time. 8.Indicates the current playback source of the rear zone. 28 sound.) 29 DVD Setup Menu In “DVD Setup” mode, “LANGUAGE”, “ASP SET”, “VIDEO”, “SPEAKER” “SURROUND” and “RATING” (parental lock) are available for setup. This operation can be performed using rotary encoder, the remote control or touch screen. Accessing the DVD Setup Screen If DVD is selected as the current playing source, you can access the DVD setup screen through the following methods: • Press the MENU on the front panel or touch area A to access the MAIN menu, and then touch the DVD TOOLS button to access DVD Setup Screen. • Press the (MENU) button on the remote control , press the direction button to select DVD TOOLS and press the (OK)button to access. Accessing a Menu To access a menu (LANGUAGE .ASP SET, VIDEO, SPEAKER. SURROUND, RATING), press the direction buttons on the remote control to highlight the desired menu. You can also touch the on-screen menu selection to access that menu. NOTE: Once the DVD setup is complete, the settings are memorized. If you want To restore the factory default settings, please use the “Load Factory “ in the RATING Menu. (See RATING Menu.) Selecting a Feature for Adjustment Once inside a menu, press the ( / ) on the remote control or touch the item directly to select the feature to be adjusted. Adjusting a Feature 1. Enter the option field for the feature you want to adjust by pressing the (OK) button on the remote or by pressing SMART DIAL. A submenu appears in a second row with the selected option. 2. Select a new value by pressing the ( / ) buttons on the remote control or rotate clockwise or counter-clockwise the SMART DIAL. 3. Confirm your selection by pressing the (OK) buttons on the remote control, or press the SMART DAIL. The new setup is completed. LANGUAGE Menu If a DVD supports more than 1 Subtitle or Audio language, all the languages are available for selection during playback. If the selected language is not supported by the DVD, then the default language is used. During playback, press the (SUBT)or (AUDIO) button on the remote control to Change the language directly. This will not affect the DVD menu settings. LANGUAGE Menu Features 30 31 TV Shape (Aspect Ratio) 4:3 Image is presented in wide view with a 4:3 aspect ratio. 16:9 Image is presented in wide view with a 16:9 aspect ratio. ASP SET Menu The unit has a built-in Pink Noise generator to help set the relative speaker levels for multichannel audio playback. ASP SET Features Off Pink noise DRC Stop output of pink noise Left Left channel pink noise Right Off Right channel pink noise Employ the Dynamic Range Control for better playback for low volumes. On NOTE: For standard discs not formatted for “widescreen”, use of the 16:9 aspect ratio will result in image distortion. SPEAKER Menu Speaker Menu Features 5ms 4ms Center Control 3ms 2ms 1ms Adjust the time difference between the center and front speakers to create a time delay between 1 and 5 milliseconds, producing a more accurate audio effect. 0ms Rear Control 9ms 6ms 3ms Adjust the time difference between the rear and front speakers to create a time delay between 3 and 15 milliseconds, producing a more accurate audio effect. Down Sampling Off On Surround Subwoofer 0ms Normal Output Audio signal output at 48kHz Center NOTE: When Down Sampling is On, the audio output signal will be converted to 48kHz. When Down Sampling is Off, the original sampling frequency is preserved. DownMix Large Front 15ms 12ms Full 6CH Speaker Mode 6-channel mode 2-channel mode. If you select this mode, the selections below will not be available. Use when front speakers have good bass output. Small Use when front speakers do not have good bass output. Large Use when rear speakers have good bass output. Small Use when rear speakers do not have good bass output. None Use when rear speakers are not present. Present Use when subwoofer is present. None Large Use when subwoofer is not present. Use when center speaker has good bass output. Small Use when center speaker does not have good bass output. None Use when center speaker is not present. Speaker Selection Selecting LARGE for the multi-channel speaker option will give a full range output. Selecting SMALL for the multi channel speaker option will activate a high pass filter whose crossover is dependent upon the sub-woofer low pass filter frequency. For example, if the subwoofer low pass filter is set to 80Hz, then the high pass SMALL speaker crossover will be set to 90Hz. VIDEO Menu VIDEO Menu Features 32 33 CD/MP3/WMA/JPEG Operation Low pass 80Hz 120Hz 160Hz High pass 90Hz 135Hz 180Hz RATING (Parental Lock) Menu The DVD system has a built-in parental lock feature to prevent unauthorized persons from viewing restricted disc content. By default, the rating system is unlocked. Once setup, the parental lock is released only by entering the correct password. Once the password is entered, rating is available for setup. RATING Menu Features Password ---- Instructions for Insert/Eject, Play/Pause, Stopping Playback, Track Selection, Fast Forward/Fast Reverse, Scan, and Random Play are the same for DVD, CD and MP3 operation. Please see the DVD Player Operation section for information about these topics. The file naming formats listed below are compatible with this unit: • ISO 9660 – file name: 12 characters, file extension: 3 characters • ISO 9660 – file name: 31 characters, file extension: 3 characters • Joliet – 64 characters If the file or folder name does not conform to ISO 9660 file system standards, it may not be displayed or played back correctly. CD Player User Interface 1 2 3 4 5 Enter a 4-digit password to activate the “Rating” feature. 16 13 1. Kid Safe 17 14 2. G 3.PG Rating 4. PG-13 5. PG-R Select the appropriate rating level for the intended audience. You may override higher ratings by using your password. 18 15 19 6. R 7. NC-17 8. ADULT No Load Factory Yes Select “Yes” to restore the factory default settings for the DVD setup only (except the password and parental lock setting). To reset the password, access the “RATING” menu and enter the current password. Once the correct password is entered, you can access the “Password” field and enter a new one. NOTE: Record the password and keep it in a safe place for future reference. The rating for each disc is marked on the disc, disc packing, or documentation. If the rating is not available on the disc, the parental lock feature is unavailable. Some discs restrict only portions of the disc and the appropriate content will play. For details, please refer to the disc description. 34 6 7 8 9 10 11 12 1.Current source indicator, touch this area to access MAIN menu. 2.Disc title 3.Track title 4.Bluetooth indicator 5.Current time 6. : Touch to play/pause 7. : Touch to stop disc playback 8. : Touch to turn to the previous page 9. : Touch to turn to the next page 10. : Touch to fast backward current track 11. : Touch to fast forward current track 12. : Touch to activate/deactivate Scan And you can press the (Title) button on the remote control to toggle the scan function “on/off” 13. : Touch to activate/deactivate Repeat Single Mode 14. : Touch to activate/deactivate Random Mode 15. : Touch to display the numeric keypad on the screen and then you can use the numeric keypad to access a track directly. 16.Current track and total number of tracks on disc 35 17.Elapsed playing time 18.Playback information 19.Volume indicator Playing CD Files After inserting a CD disc, files will play in the sequence of the directory. In playing back, you can press the numeric button on the remote control or touch a track on the onscreen directly to play. Previous/Next Page Touch the or on the screen to navigate through the pages/files. Fast backward/fast forward Touch the or on the screen to Fast backward or fast forward play. MP3/WMA Discs This player allows you to playback MP3/WMA files recorded on CDROM, CD-R, CD-RW, DVD+R/RW and DVD-R/RW. For CD-RW discs, please make sure they are formatted using the full method and not the quick method to prevent improper disc operation. Use the following settings when compressing audio data for your MP3 disc: • Transfer Bit Rate: 320kbps • Sampling Frequency: 48kHz When recording MP3 up to the maximum disc capacity, disable additional writing. For recording on an empty disc up to maximum disc capacity, use the "Disc at once" setting. 7. : Touch to stop disc playback 8. : Touch to turn to the previous page 9. : Touch to turn to the next page 10. : Touch to display previous folder 11. : Touch to display next folder 12. : Touch to fast forward current track 13. : Touch to activate/deactivate Repeat Single Mode 14. : Touch to activate/deactivate Random Mode 15. : Touch to display the numeric keypad on the screen, and use it to access a track directly. 16.The disc format indicator, displays the current track and total number of tracks on disc 17.Elapsed playing time 18.playback information 19.Volume indicator Playing MP3/WMA Files After inserting a MP3/WMA disc, files will play in the sequence of the directories/folders. In playing back, you can press the numeric button on the remote control or touch the a track directly to play. Change Directory/Folder Touch the or on the screen to navigate through the directories/folders. Previous/Next Page Touch the or on the screen to navigate through the pages/files. The touch keys for MP3/WMA CD/DVD playback are described below. JPEG Discs 1 2 3 4 5 16 13 17 14 18 15 19 6 7 8 9 10 11 1.Current source indicator, touch this area to access MAIN menu. 2.Disc title 3.Track title 4.Bluetooth indicator 5.Current time 6. : Touch to play/pause 36 12 1 2 3 1.Stop playback and return to the picture list 2.Rotate picture clockwise 90° 3.Rotate picture counterclockwise 90° 37 SD Card Reader Operation iPod Operation Accessing SD Card Mode Accessing iPod Mode Open the main display panel, and you will find the SD Card slot. Insert the SD Card in the slot, and press the SRC button on the front panel to switch to SD Card mode. You can press the (SRC) button on the remote control to switch to the Can also touch the SD icon on the screen Form the main menu. 1.To switch to iPod mode, press the SRC button on the front panel or the (SRC) button on the remote control repeatedly until iPod appears at the top left corner of the screen. 2. Select the Main menu, then touch the iPod icon to select iPod as your source. iPod Instructions Using the Touch-Screen Controls The touch keys on the screen for iPod playback are described below. The touch keys for SD card playback are described below. The interface is similar to the MP3/WMA mode. 1 2 3 4 1 2 3 4 5 5 19 16 13 20 14 13 17 14 15 16 17 18 21 18 15 22 19 6 6 7 8 9 10 11 12 1.Current source indicator, touch this area to access MAIN menu. 2.Folder title 3. Track title 4.Bluetooth indicator 5.Current time 6. :Touch to play/pause 7. : Touch to stop disc playback 8. :Touch to turn to the previous page 9. :Touch to turn to the next page 10. : Touch to display previous folder 11. : Touch to display next folder 12. : Touch to fast forward current track 13. : Touch to activate/deactivate Repeat Single Mode 14. : Touch to activate/deactivate Random Mode 15. : Touch to display the numeric keypad on the screen to access a track directly. 16. Current track /total tracks 17. Elapsed playing time 18. Playback information 19. Volume indicator 38 7 8 9 10 11 12 1.Current source indicator, touch this area to access MAIN menu. 2.Artist name 3.Track title / root directory list 4.Bluetooth indicator 5.Current time 6. : Touch to play/pause disc playback 7. : Touch to stop disc playback 8. : Touch to turn to the previous page 9. : Touch to turn to the next page 10. : Touch to fast backward current track 11. : Touch to fast forward current track 12. : Touch to activate/deactivate Scan Mode 13. : Touch to wait for iPod video/photo 14. : Touch to activate/deactivate Repeat Single Mode 15. : Touch to activate/deactivate Random Mode 16. : Touch to access root directory list 17. : Touch to display a numeric keypad on the screen to access a track directly. 18. : Touch to display track list 19.Current track /total tracks 20.Elapsed playing time 21.Playback information 22.Volume indicator 39 Sat Radio Operation According to the above instruction 16, when you press the display The following. button, the touch screen will Accessing Sat Radio Mode To switch to Sat Radio mode, press the SRC button on the front panel or the (SRC) button on the remote control until SAT appears at the top of the screen. The touch keys for Sat Radio playback are described below. NOTE: An optional Terk XM Direct Universal Tuner box(XMD1000) and XM Antenna is required to receive XM Radio, along with a subscription to XM Radio. Check with your dealer for these Optional devices. 1 2 3 4 5 6 7 8 The TFT displays the root directory list classified by the iPod, from which you can select your favorite songs. You can choose a play list from your iPod play lists and then select a song to listen to. 9 18 10 Playback of video on iPod For playback of video on iPod, press the following. button to enter, the touch screen will display the 11 If there are videos on iPod and you select them on iPod, they will start to play, otherwise there will be nothing on the display. However, you can return to listen to your music by pressing the button again. NOTE: All video control functions are done on the iPod video, the touchscreen only controls audio portions of iPod functionality. 12 13 14 15 16 17 1.Current source indicator, touch this area to access MAIN menu. 2.The artist information of the channel the playing back currently. 3.The preset channel Currently playing back. 4.Bluetooth indicator 5.Current time indicator. 6.Current Band and channel number indicator. 7.Current channel name indicator. 8.Current channel category indicator. 9.Playback information. 10.The volume indicator. 11. : Touch to change among the following bands: SAT, SAT-1, SAT-2 and SAT-3. 12. : Touch to open the category folder list. 13. : Touch to scan the previous available channel of all categories. 14. : Touch to scan the next available channel of all categories. 15. : Touch to scan the previous available channel of current category. 16. : Touch to scan the next available channel of current category. 17. : Touch to activate/deactivate Scan Mode. 18. : Touch to display the numeric keypad on the screen to access a channel directly. Auto Scan Touch the 40 button to automatically scan the available channels of all categories. 41 Bluetooth Operation Manual Scan Touch the Touch the Before using the Bluetooth / / to scan the previous/next available channel of all categories. to scan the previous/next available channel of current category. Storing a Channe l 1. Select a band (if needed), then select a channel. 2. Touch and hold an on-screen preset channel for three seconds. The storing process is complete. Before using the Bluetooth, it’s necessary to perform the following steps. For more operating details, refer to each section below. 1. Select the “Bluetooth” option in the General setup and select the “On” option to activate the Bluetooth feature. 2. Pair your mobile phone to this unit (refer to the “Pairing” operation). It is necessary to pair your phone to the unit. Without pairing, Bluetooth is not available. The Bluetooth Indicator Recalling a channel 12 numbered preset channels store and recall channels for each band. Front 6 stored channels (1-6) for the current band appear on the screen, touch the channel directly or use the numeric buttons on the remote control. You can touch the arrow buttons ( ) on the screen to select other channels. There is a Bluetooth indicator ( ) at the top of the touch screen. When the Bluetooth function is “Off”, the indicator is grey. When the Bluetooth function is “On” and no phone is connected to the unit, the indicator will blink. If a phone has been connected to the unit, the indicator is on solid. Accessing Bluetooth Mode Access the MAIN menu first and then touch the button on the screen to access Bluetooth mode. Touch the button at the top of the touch screen to access Bluetooth mode directly. Bluetooth User Interface Dial Interface 1 8 2 3 6 4 7 5 1.Current source indicator, touch this area to access MAIN menu. 2.Touch to access the dial interface. 3.Touch to access the Phone book. 4.Touch to access Bluetooth setup. 5.Touch to switch the audio output between the unit and the mobile phone. 6.Make use of these buttons to achieve some base functions of the phone. 42 43 7.Touch to return to the previous menu. 8.Show the phone number and function status. Manual Connect Phone Book Press the Auto button to access the Phone Book. If this function is set to Auto, connection between the Last Used phone and this unit will take place automatically as soon as the devices are less than a few meters apart. Pairing You can see phone book list, SIM book list, dialed call list, received call list, missed call list. If the number has been stored in the Phonebook, it can be accessed by touching or on the screen to navigate through the Phone Book entries. Then, touch the number to initiate the phone call NOTE: Not all Bluetooth enabled phones support this feature Bluetooth setup Select the button to access the Bluetooth setup. Access the Bluetooth setup and press “Yes” option on the screen, then “Wait pairing” displays on the screen. Now you can pair a phone with the unit. This unit can pair with 4 mobile phones in all, but just one can be active at a time. The Default phone will be retained only if all other paired phones are deleted. (Default Phone: The phone that was first paired with the unit.) When maximum pairing has been completed, that is, four mobile phones have been connected with the unit, and you want to still pair a new one, then the system will retain the default phone and last used phone used. The phone least used (except the default phone) will be deleted and the new paired phone will become the last used phone. (Last Used Phone: The phone connected with the unit that was used last.) If you want pair your phone with the unit, the password 1234 is used to complete the pairing. When asked, enter this password in the phone you are pairing with this unit. Auto Connect If the unit has been set to auto connect, it will attempt to connect to the last used phone first. If Auto Connect is not activated, the unit will return to the previous operating mode. When the phone connects to the unit successfully, all of the cell phone’s Bluetooth enabled options will be active. Making a phone cal l There are four ways to make a phone call from this unit: 1. Make use of the Number dial on the screen to make a call. 2. You can enter the phone number using the numeric keypad and press the OK button on the remote control to make a call. (must be in the Bluetooth mode) 3. You can open the phone book and select one to make a call directly. (Your cell phone must support this option) 4. If your phone supports voice dial, access this mode on your phone instead of using the Phonebook Answering an incoming call LANGUAGE Menu Features Pairing Yes Press the “Yes” button to start to wait for pairing with one phone. Off Answer an incoming call manually. On The unit will automatically answer an incoming call (based on the cell phone Bluetooth functions) Auto Answer 44 You can answer an incoming call even if the source other than the telephone is selected. You can answer an incoming call automatically or manually (refer to Bluetooth setup and the Controls and Indicators title (Button Operation) for exact instructions) When a call comes in, this interface will display on the screen: 45 Navigation Operation Access the Navigation mode 1. Access the MAIN menu and select the NAVI button on the touch-screen to enter the Navigation Operation interface. 2. Press the SRC button on the front panel or on the remote control to switch the source to Navigation. 3. Press NAV button on the front panel of the unit. Navigation Operation Please read the Navigation Software User Manual End a call Press the ESC button on the remote or touch the icon to end a call. NOTE: Not all handsets are compatible with the Bluetooth hands free system. Please check the compatibility list if you are experiencing connectivity problems. If you are experiencing operation problems, please contact your installation center for assistance. You may have an Incompatible handset and your unit is functioning normally. IMPORTANT INFORMATION: Make sure that the SD Card with the map information is inserted into the NAV-1 or NAV-2 navigation unit before installing in the vehicle. It may be hard to access this card slot once the installation is completed. Follow the instructions on loading mapping information from the DVD-ROM to the SD Card in the Navigation Software User Manual. This must be done prior to loading the SD Card into the Navigation Unit. How to Listening to an Audio program while using/viewing the Navigation You can listen to an audio program while using Navigation. To do so, do the following: 1. Select the audio source. The source can be the Tuner, Satellite Radio, iPod, SD Card, or the audio from the AUX input. 2. Touch the NAV button on the front panel to select Navigation. The map will be shown on the TFT display, and audio will continue to play while you are in the Navigation mode. 3. Navigation voice prompts will mute the audio source, give the instruction, and then return to the audio source 4. To adjust a parameter of the audio source (i.e., select a different radio station), touch the NAV button. This will return you to the audio source screen. Make your adjustments, and then press the NAV button to return the Navigation function. Navigation will continue while you are in an audio source screen, and voice prompts will continue while you make adjustments. 46 47 48 49 Increase volume level Review wiring diagram and check “MUTE” connection Replace speakers Volume set too low Improper “MUTE” connection Speakers damaged Check wiring and correct Turn TFT Auto Open on Check wiring and correct Incorrect connection between yellow memory wire and positive battery wire TFT Auto Open is turned off Incorrect connection to parking brake wire Unit resets itself when engine is off Monitor does not open automatically Use disc in good condition Clean disc with soft cloth Use compatible disc Disc is dirty or wet Incorrect playback message displayed Interruption occurred during playback Recreate disc with good files File is damaged/bad recording Message is longer than LCD can display Clean disc or replace Turn PCB off Use original disc Disc is dirty or scratched PCB is on No repeat or searching while playing VCD MP3 PCB is not available on the disc PBC cannot be used during VCD playback Insert disc with label side up Disc is inserted upside down Disc is illegally copied Use disc with proper region cod Disc region code is not compatible with unit Disc rating exceeds Parental Lock rating limit Change Parental Lock settings to lower restriction Incompatible disc is used Eject current disc and insert new one Disc is warped or scratched Turn LOCAL function off Disc already inside unit Connect the auto antenna control cable properly LOCAL function is activated Connect the auto antenna control cable properly Auto antenna not properly connected Auto antenna is not fully extended Press OPEN key to restart monitor movement Use correct aspect ratio setting Improper aspect ratio setup Moving path is blocked Check wiring and correct Improper video signal connections Image blurred, distorted, or dark Disc does not play back Cannot insert disc DISC Weak station searching TUNER Monitor stops at incorrect position Prolonged image or improper height/width ratio display No image Stop vehicle in safe place and apply parking brake Check that “MUTE” connection is not grounded and that it’s properly insulated “MUTE” wire is grounded Tel-Mute malfunction PRK SW is activated and parking brake is not engaged Check speaker connections TFT MONITOR Connect proper speakers Speaker is shorted Use original copy Insulate all speaker wiring connections Check wiring and correct Improper audio output connection Adjust the channel balance to the center position Remove battery and install correctly Battery installed incorrectly Speaker wiring is in contact with metal part of car Replace battery with new one Battery depleted Heavily biased volume balance Press the RESET button located in the bottom right corner of the front panel Install new fuse with correct rating Install new fuse with correct rating Corrective Action Illegal operation Radio Fuse blown Car battery fuse blown Cause Unauthorized disc is in use Speaker power rating not compatible with unit Poor sound quality or distortion No/low audio output Remote control does not function Unit will not power on GENERAL Provlem Clean disc with soft cloth Insert disc with label side up Disc is dirty 50 Remote control does not function Pull out the insulation tape Replace battery with new one Remove battery and install correctly Battery depleted Battery installed incorrectly illegal mechanism operation Error Battery is covered with insulation tape DVD is not compatible with region code of unit Region Error Remote control Disc format is not compatible with this unit Press EJECT key for 5 seconds to reset loading mechanism Insert disc Disc not present in loading compartment Disc is upside down Clean disc with soft cloth Insert disc with label side up Corrective Action Disc is upside down Disc is dirty Cause Disc is being read Unknown disc Bad Disc No Disc Loading Error Messages Messages Displayed 1. When using the remote for the first time, you must pull out the insulation tape. 2. Remove the battery if the remote control is not used for a month or longer. Remove and dispose of the old battery immediately. Do not store the battery with metallic materials. 3. Inserting/Replacing the Battery: Remove the battery holder Remove the battery from the battery holder Install the battery 51 Specifications Power Ratings Main Amplifier Power Output: 20 watts X 4 channels into 4-ohms @ < 10% THD+N Signal to Noise Ratio: 70dBA below reference. (Reference: 1 watt, 4-ohms) MAX Power: 50 X 5 watts into 4-ohms, all channels driven Frequency Response: 20Hz to 20kHz, -3dB. Aux input used as source reference Reference Supply Voltage: 14.4VDC DVD/CD Player Compatible formats: DVD-R, DVD-RW, DVD+R, DVD+RW, CD-R, CD-RW, CD-DA, MP3, WMA, HDCD, SVCD, VCD, MPEG, JPEG, MP3/WMA files burned onto a DVD+R/W or DVD-R/W and CD-R/RW Signal to Noise Ratio: 85dBA Dynamic Range: >95dB Frequency Response: 20Hz to 20kHz, -3dB Channel Separation: > 60dB @ 1kHz D/A Converter(s): 6-channel high performance 24-bit, 192kHz, multi-bit Sigma Delta modulation. DAC supports sample rates from 8~192kHz. Mechanical anti vibration ability: 10~200Hz, X/Y/Z direction: 1.0G Insert the battery holder NOTE: Use only one CR2025(3V) lithium battery. Danger of explosion if battery is incorrectly replaced. Replace only with the same or equivalent type. Do not recharge, disassemble, heat or dispose of the battery in fire. Keep batteries away from children to avoid the risk of accident. Suggestions 1. Only use a piece of clean silicone cloth and neutral detergent to clean the front panel or monitor. A rough cloth and non neutral detergent (such as alcohol) may result in scratching or discoloration. 2. Keep off water and other liquid things. 3. If the temperature inside the player gets too high, a protective circuit automatically stops playing the disc. And then, please wait for the unit to cool down before operating the player again. 4. Never insert anything other than a 5” (12 cm) compact disc into the player as the mechanism can be damaged by foreign objects. 5. Do not attempt to use a 3” (8 cm) CD-Single disc in this unit, either with or without an adaptor, as it will damage the player and disc. Such damages are not covered by the Warranty on this product. 6.When the vehicle warms up during cold weather or under damp conditions, condensation may appear on the LCD panel. If this occurs, the screen will not operate properly until the moisture has evaporated. 7.We suggest that you should clean the discs used in this unit more frequently than used in your home, because of the environmental conditions of the vehicle. 52 Video Section Format: NTSC, PAL (auto-detection) Output: 1Vp-p (75-ohm), buffered Input: 1Vp-p (75-ohm) FM Tuner Section Tuning Range: 87.5MHz - 107.9MHz Mono Sensitivity (-30dB): 10dBu Quieting Sensitivity (-50dB): 15dBu Alternate Channel Selectivity: 70dB Signal to Noise Ratio @ 1kHz: 58dB Image Rejection: 60dB Stereo Separation @ 1kHz: 30dB Frequency Response: 30Hz - 15kHz, -3dB AM Tuner Section Tuning Range: 530kHz - 1710kHz Sensitivity (-20dB): 20dBu Signal to Noise Ratio @ 1kHz: 50dB Image Rejection: 60dB Frequency Response: 50Hz - 2kHz, -3dB Integrated SD Card Reader 53 Monitor Section Screen Size: 6.5" (Measured diagonally). Screen Type: TFT Liquid Crystal Display (LCD) active matrix Response Time: 30mSec rise time, 50mSec fall time Resolution, DVD/Composite Video in: 280,800 sub pixels, 1200 (W) X 234 (H) Viewing angle: 55-60 degrees left or right 35-40 degrees up 50-55 degrees down General Auxiliary Input impedance: 10k Power Supply: 10.5 to 16V DC, negative ground Fuse: 10-amp, mini ATM type DIN chassis dimensions: 178mm x (160+25)mm x100mm * Specifications subject to change without notice. 54