1
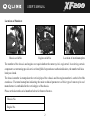
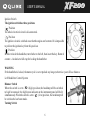
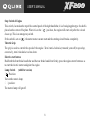
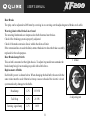
USER'S MANUAL
INTRODUCTION
Thank you for choosing a Qlink Brand X F200 motorcycle. Our company uses the latest advanced
production technology and equipment in the design and development of this type of motorcycles to offer
you a reliable performance, novel style and good appearance. Riding a motorcycle is one of the most
exciting activities, and also an ideal traffic tool that make you happy. Before operating your motorcycle,
read this manual carefully.
This manual outl ines the correct met hods of repairing and maintaining motorcycles. Compliance with the
stipulations and requirements will contribute to the long-lasting and trouble-free operation of your
motorcycle. The well-trained and skilled maintenance personnel in the sales agencies and service centers
of Qlink are ready to offer the best service.
USER'S MANUAL
Important Precautions
Information About the Running-in Operation of Motorcycles
The first 1,000 km of mileage is the most important phase in the whole lifetime of your motorcycle. During this
period, correct running-in operation may not only prolong the lifetime, but also make the best of your new
motorcycle. The surfaces of the joining components can be polished, resulting in smooth engagement.
Careful and patient running-in operation can facilitate stable riding and best performance of your motorcycle.
Special attention must be paid to operations that cause the engine to be overheated.
Refer to the section on “Running-in of New Motorcycles for details about the running-in operation.
Please carefully read this manual and strictly observe the relevant stipulations and instructions.
Terms such as Warning, Caution and Attention are used in this manual to indicate important information.
Read these parts carefully.
Warning ---- Instructions concerning the safety of a rider. Ignorance of these instructions may lead to traffic
accidents.
Caution ---- Instruction relating to the protection of the motorcycle. Ignorance of these instructions or measures
may cause damage to your motorcycle.
Attention----Instructions concerning the maintenance of the motorcycle or the explanation of other important
information.
USER'S MANUAL
Content
Precautions and General Information………………………………..………………………………………1
Location of Components……………………………………………....……………………………………… 3
Operation …………………………………………………………………………………………………………5
Hints on Use of Fuel and Engine Oil……………………… ……………………… …………………………13
Running-in Operation………………………………………………..……………………………… ………14
Inspection Prior to Riding…………………………………… ………………… ……..… …………… ……15
Main Points for Riding……………………………………………….………………..………………………17
Check and Maintenance……………………………………………..………………..………………………21
Measures of Reducing Pollution………………………………….…………………..………………………37
Troubleshoo ting……………………………………………………….………………..………………………37
Storage Method……………………………………………………….………………..………………………41
Parameter s List………………………………………………………..………………..………………………43
Wiring Diagram………………………………………………………..………………..………………………47
USER'S MANUAL
Precautions and General Information
Safety Precautions for Riders
It is a great pleasure to ride a motorcycle. For the sake of your safety, please observe the traffic rules and
regulations, and five stipulations listed below strictly.
To Wear Safety Helmet
Safely riding a motorcycle starts from the proper wearing of helmet, which is very important for a rider. A
high-quality safety helmet is the first protective tool to a rider because most serious accident is the injuring
of head. So please put on your safety helmet with appropriate protective glass on riding your motorcycle.
To Get Familiar with the Structure
Your riding skill and knowledge of the machinery structure constitute a basis of safe operation. Make adequate
practice at a traffic-free area. Keep in mind that practice makes perfect.
To Know Your Speed Limit
Riding speed varies according to the road conditions, your riding skill and the weather. Awareness of your safety
speed limit may help avoid accidents. At any time only ride within your safety speed limit.
To Wear Suitable Clothes
Loose and outlandish clothes can make you uncomfortable and unsafe. Riding on the road with suitable clothes
makes your feet and hands move freely. Gloves, boots and the necessary safety helmet show that you are a
qualified rider. For the sake of safety, high quality and fit clothes are recommended.
Doubled Attention in Rainy Days
Special caution should be exercised in the riding of your motorcycle in rainy time. Bear in mind that the braking
distance in rainy days is twice as that in sunny days. Keep away from covers, paints and greasy dirt on the road
to prevent slippi ng. Never turn sharply during speeding up. Be careful to pass through railways and bridges etc.,
and keep sufficient distance from the vehicle ahead.
1
USER'S MANUAL
Locations of Numbers
Chassis serial No.
Engine serial No.
Location of metal nameplate
The number of the chassis and engine are required when the motorcycle is registered. In order ing certain
component s or entrusting special services from Qlink Corporation or authorized dealers, the number will also
lend you a hand.
The chassis number is stamped on the vertical pipe of the chassis and the engine number is on the left of the
crankcase. The metal nameplate indicating the main technical paramete rs of this type of motorcycle and
manufacturer is embedded in the vertical pipe of the chassis.
Please write down the serial numbers below for future reference.
Chassis No.
Engine No.
2
USER'S MANUAL
Locations of Components
Instruments on handlebar
1. Clutch lever
2. Left handlebar switch
3. Tachometer
4. Ignition switch
5. Speedometer
6. Right handlebar switch
7. Throttle grip
8. Front brake lever
9. Rearview mirror
3
USER'S MANUAL
Left Side Fig.
Right Side Fig.
1£®Switch of fuel tank
2£®Carburetor
3£®Gear shift lever
4£®Side stand
1. Rear brake pedal
2. Spark plug
4
USER'S MANUAL
Operation
Ignition Key
Two uniform ignition keys are available, reserve one of them for future use.
Instrument Panel
Odometer ¢Ù
It records the total kilometer accumulated since the motorcycle is used.
Speedometer ¢Ú
It is used to indicate the current speed outer is kph and inner is mph.
Turning Lamp Indicator ¢Û
Turn to the right, the right side indicator is yellow; when to the left, the left side
indicator becomes yellow.
Tachometer ¢Ü
It indicates the running speed of the engine in rpm.
Hi Beam Indicator ¢Ý
The blue indicator will be lit when the Hi beam headlamp is switched on.
Gearshift Indicator ¢Þ
This indicator will show the current gear where the motorcycle is. There are all 5 speed shift levels. The 5
number indicators will be lit in turn on shifting. However, when the gear shifter is set in the neutral mode,
they will extinguish, but only neutral indicator N is lit.
5
USER'S MANUAL
Ignition Switch
The ignition switch has three positions
“ ” Position
The whole electrical circuit is disconnected.
“ ”Position
The ignition circuit is switched on so that the engine can be started. It is impossible
to pull out the ignition key from this position.
“ ” Position
In order to lock the handlebar, turn the bar to the left, then insert the key. Rotate it
connter - clockwise to full stop for locking the handlebar.
WARNING
If the handlebar is locked, the motorcycle is never pushed any longer; otherwise you will lose balance.
Left Handlebar Control System
Dimmer Switch ¢Ù
When the switch is set to “
” (high) position, the headlamp will be switched
to h ig h bea m mode; th e high bea m indicator on the instrument panel will be lit
simultaneously. When the switch is set to “ ” (low) position, the headlamp will
be switched to low beam mode.
Turning Switch ¢Ú
6
USER'S MANUAL
For turning signal operation, set the switch to ¡°
¡± (left) position, the left turning signal lamp will get
lighting; if set to ¡° ¡±(right) position, the right turning lamps will be switched on. After turning, move the
switch to middle position; the turning lamp will be turned off.
WARNING
If you want change another lane or to turn to another direction, switch on the turning signal lamp in time.
After turning, switch off the turning lamp in time.
Horn Button ¢Û
Press this button to make the horn sound.
Clutch Lever ¢Ü
Grip this lever to disengage the driving system at the time of starting the engine or shifting the gear. Disengage
the clutch by grasping the lever.
Control System of Right Handlebar
Front Brake Lever ¢Ù
The front brake means that the brake lever of the right handlebar is gripped sl ow ly
towards the control handle of the throttle. When gripping the brake lever, the tail
lamp of the brake will be automatically lit.
7
USER'S MANUAL
Stop Switch of Engine ¢Ú
This switch, located on the top of the control panel of the right handlebar, it is of swinging plate type. Its shaft is
placed on the center of the plate. When it is on the “
” position, the engine will start only after the circuit
closes up. This is an emergency switch.
If the switch is set on “ ”, the starter motor can not start and the starting circuit breaks completely.
Throttle Grip ¢Û
The grip is used to control the speed of the engine. Turn it anti-clockwise (towards yourself) to speed up,
conversely, turn it clockwise to slow down.
Electric start button ¢Ü
Hold both the front brake handle bar and the rear brake handle bar firmly, press the engine starter button so as
to start the electric starter and ignite the engine.
Lamp Switch ¢ Ý(with Dot version)
“
”Position:
Turn on the meters, lamp.
“¡ñ” position:
The meters, lamp will get off.
8
USER'S MANUAL
Fuel Tank Cap
To open the cap, insert the ignition key and turn it clockwise. Then the cap can be
removed together with the key. To close the cap, align with the arrow and push
down the cap and the key on the hole of the tank cap till the locking sound is heard.
Finally pull out the key.
(1) Gasoline level
(2) Gasoline inlet
WARNING
The gasoline tank should not be overfilled. Never spill gasoline on hot engine.Never
add the fuel over tank inlet as shown in the Fig. Otherwise expansion of the gasoline
owing to higher temperature will cause overflow.
The engine should be stopped during the refilling, and the ignition switch should
be turned to OFF. No smoking during the refilling.
Gear Shift Pedal
This model of motorcycle is equipped with a five-shift gear-in transmission system.
The working orde r of the gearshift is as shown in the figure.The lever is connected to
the ratchet of the gearshift. It will return automatically to its original position
after select ion of a certain gear so that it is possible to change to the next gear. With
the ratchet mechanism, only one upper or lower gear is engaged each time.
9
1-N-2-3-4-5
USER'S MANUAL
CAUTION
In the neutral gear, the indicat or on the instrument panel will be lit. Although the indicator is lit, it is still
advised to release the clutch lever slowly, and confirm the transmission system is really in neutral mode.
Before you shift to lower gear, you need to slow down the motorcycle. Before the clutch is engaged, the engine
speed should be raised at the time of shifting to lower gear. This can avoid unnecessary wearing of the driving
system and the rear tire.
Rear Brake Pedal
When stepping on this pedal, the rear brake functions and the brake indicator on the
instrument panel will be lit simultaneously.
Stands
This motorcycl e is equipped with a side stand. To locate the motorcycle on the side
stand, put your foot on the end of the stand, then step on downwards physically till
the stand moves to the full stop and rest upon the stopper.
CAUTION
When the motorcycle stops on the slope, let its front end toward the high direction
of the slope to avoid sliding from the side stand, and also engage the bottom gear
to prevent it from sliding.
WARNING
Before start, check if the side stand return its normal position, and if there is
looseness or unstability on the stands.
10
USER'S MANUAL
Fuel Cock
The motorcycle is equipped with a manual valve with three positions ---- ¡ °
¡ ±
ON, ¡ °
RESERVE
¡ ±
and¡ ° ¡ OFF.
ñ ¡ ±
¡ °
¡ON
± Position
The lock is usually set to this position. The gasoline can be supplied through this
lock to the carburetor each time the throttle grip is turned.
¡ °
¡Reserve
±
Position
If the fuel level is too low, turn the tap lever to ¡ °
RESERVE
¡ ±
to supply 1.6 L
of the fuel from the reserve tank.
¡°¡ñ¡± OFF Position
Set the tap to ¡ ° ¡ ñafter
¡ ±the engine stopped.
CAUTION
If the tap is set to ¡ °
ON
¡ ± or ¡ °
RESERVE,
¡ ±
some problems may occur, i.e. the carburetor ove rfl ows
and fuel enters into the engine. This may cause serious damage to the mechanical sy stem wh en the engine is
started.
Note: After the tap is set to ¡ °
,¡ go
± to the near gas station to get the fuel refilled. Turn the tap to ¡ °
position again after refueling.
Fuel Hose
If the fuel hose is worn out, replace it in time.
11
¡ ±
USER'S MANUAL
Carburetor Choke System
This motorcycle is equipped with the choke system, which makes the starting easier.
Push down the choke lever to the lowest position in order to start the engine under
the cold state. Once the engine is started, lift up the choke lever to half and let the
engine gradually warm up. When the engine acquires the normal working temperature
reset the choke lever to original position.
The choke system works only when the throttle is entirely closed. If the throttle grip
is turned during the warm ing-up period, the fuel will be supplied to the engine from
the throttle system, instead of the choke system.
When the engine is in the state of high temperature, there is no need to use the choke system for starting.
Tools box
The tools box is in the left side of the seat
12
USER'S MANUAL
Hints on the Use of Fuel and Engine Oil
Fuel
Please use lead-free gasoline. If slight explosion sound comes from the engine, the possible cause is to use
general fuel as a substitute, thus replace the fuel.
Note: Using lead-free gasoline can prolong the lifetime of the spark plug.
Engine Oil
Use of high quality 4-stroke engine oil would extend the lifetime of the engine. Grade SG or SH engine oil in
API method is recommended, whose viscosity is SAE10W-50. If this oil is not available, please purc hase
appropriate substitutes according to the data listed below.
20W-50
15W-40 15W-50
MUL
TIGRADE
10W-40 10W-50
10W-30
-30 -20 -10
TEMP
0
10
-22 -4 -14 32 50
13
20
68
30
40
86 104
USER'S MANUAL
Running-in Operation
That correct running-in operation is important to prolong the service life and making the best of a new
motorcycle. This chapter provides the correct methods of running-in operation.
Maximum Speed
The maximum speed limits for a new motorcycle during the running-in period are shown as below.
First 1,000km
Less than 5,000 rpm
To
2,000km
Less than 7,500 rpm
Over 3,000 km
Less than 10,000 rpm
Vary the Engine Speed
The engine speed should be changed often, instead of being kept steady, so that each component of the engine
acquires a “loaded” pressure. When the pressure is “unloaded”, the components will be cooled down. Such
process contr ibutes to the engagement of the components. In order to ensure a fine fitness, it's important to give
a load to each of the component in the trial riding. But mind that the engine must not be overloaded.
Avoid Constant Low Speed
When the engine is running at a constant low speed, the components will be polished well but will not be fitted
well. You may engage to different gears to speed up, provided that the above speed limits are not exceeded.
However, during the first 2,000 km, never turn the throttle to the maximum position.
14
USER'S MANUAL
Let the Engine Oil Circulate before Riding
After the engine has been sta rted, no matter cold or warm, let the engine run at idle speed for an adequate period
of time before adding any load, so that the engine oil can flow to each of the important components.
To Carry Out the First Maintenance
The maintenance after the first 1,000km of mileage is of uttermost importance to your motorcycle. At the time
of running-in , all the components of engine are run in, and all the other parts are also engaged. All the necessary
adjustments, tightening and replacement of contaminated gear oil should be done in time.
The timely maintenance after the first 1,000km will contribute to a long lifetime and good performances.
CAUTION
The maintenance after the first 1,000km should be carried out in accordance with MAITENANCE SCHEDULE
of this manual. Pay special attention to the WARNING and CAUTION in the section.
Inspection Prior To Operation
Before starting to ride your motorcycle each time, check the items liste d below. Never underestima te the
importance of these checks.
15
USER'S MANUAL
Items to Be Checked
Purposes for Check
Steering
1. Smoothness 2. Flexible Movement 3. No gap or looseness
Lighting
Operate all the lamps --- headlamp, tail lamp, stop lamp, illuminated panel
indicator, turning signal lamp.
Engine Oil
Brake
Indicator lamps
The oil level is high or not.
1. Correct clearances of rear braking pedal, front braking connection rod.
2. No sponge-like dull braking.
Indicators of neutral gear
Throttle
1. Correct cable clearance 2. Smooth speeding up and swift slowing down
Tires
1. Calibrate air pressure. 2. Adequate tread depth 3. No fracture or cutting
Horn
Normal performance
Clutch
Fuel
Driving chain
1. Calibrate clearance of cable 2. Smooth movement
Sufficient fuel for the planned kilometer
1. Calibrate tightness. 2. Proper lubrication.
16
USER'S MANUAL
Main Points for Riding
Start the Engine
Check if the throttle switch is set to ON position. Insert the ignition key into the switch and turn clockwise to
ON. If the transmission system is currently in neutral mode, the neutral indicator should be lit.
CAUTION
When starting the engine, the gearshift should be in neutral mode and the clutch switched on , and the rider sits
on the correct position.
Start the Engine as It is in Cold
1. The ignition switch is set to OFF position.
2. Use the choke system.
3. Step on the starting rod two or three times.
4. Quickly turn the ignition switch to ON. Step on the starting lever to start the engine.
Press the choke lever fully down. The throttle valve is closed. Press the starter button to start the engine. As soon
as the engine is started, pull the lever up by half and let the engine warm up sufficiently. Then release the lever.
The cooler the weather becomes, the longer the time requires warming up.
Start the Engine as It is Warm
1. The ignition switch is set to ON position.
2. Turn the throttle grip by 1/8 to 1/4 cycle.
3. Step on the starting lever to start the engine, or push the electric starter button down. When starting the engine
17
USER'S MANUAL
as it is warm, the choke system is unnecessary.
WARNING
Never start the engine in an enclosed area with bad ventilation conditions. The component of the tail gas is
radically toxic. Never keep the motorcycle running a short while without monitoring.
CAUTION
Never let the engine running for prolo nged time in stationary condition. Otherwise the engine may get overheated
and the engine assemblies may be damaged.
Set Out
While gripping the clutch lever and then waiting a moment, press the gear lever to engage the bottom gear. Twist
the throttle grip counterclockwise and release the clutch lever slowly and gradually. When the clutch is engaged,
the motorcycle will set out.
To shift to a higher gear, first slow down gradually, then release the throttle and grip the clutch lever. Move the
lever to the next higher gear and release the clutch lever. Then twist the throttle grip slight ly. Repeat this
procedure and you will be able to shift to the top gear.
Use of Gearshift
The gearshift is capable of making the engine smooth running within a normal range of operation. The transmission
ratio is carefully designed to be compliance with the characteristic of the engine. The rider should select the most
.
18
USER'S MANUAL
suitable gear under general condition. Never slide the clutch for the purpose of controlling the speed. Shift to
lower gears as necessary to get the engine working at normal speed.
CAUTION
The engine rotary speed at any gear should not exceed the red area of the tachometer.
Riding on a Slope
When the motorcycle runs upwards on a steep slope, it will slow down and demonstrates a lack of power. Now
shift to a lower gear so that the engine resumes normal operation. The action of gear shifting should be performed
swiftly; otherwise the motorcycle will lose the forward-rushing force.
When the motorcycle runs downwards along a slope, shift to lower gears so that the motorcycle can be braked
easily.
Bear in mind that the speed should not be too high in downward riding.
WARNING
If this is the first time for you to ride this type of motorcycle, make sufficient practice at a traffic-free area till
you fully get familiar with the operation of the motorcycle.
Before you start and stop the motorcycle, set the side stand to the normal upward position.
Never shift the gear or slow down at the time of turning. Before you start turning, decelerate to a safe speed.
Do not change to a lower gear during turning.
It is extremely dangerous to ride your motorcycle with a single hand. Hold the handlebars firmly with both hands.
19
USER'S MANUAL
.
Rest your feet on the footrests. Never let both hands leave the handlebars at the same time.
Because the tire friction becomes low on wet and smooth surface, the braking and turning abilities decrease
naturally. Slow down your motorcycle in such case.
Observe the traffic marks and regulations and control speeds.
Application of the Brake and Stop
Release the throttle grip clockwise to close the throttle completely.
Apply both the front and rear brakes evenly.
Decrease the speed by shifting the gear.
Before the motorcycle stops, grip the clutch lever and shift to the neutral gear so as to stop. Observe the neutral
indicator to confirm the neutral gear.
WARNING
As the speed is high, the braking distance will be longer accordingly. Correctly judge the distance from the
vehicles ahead. The distance should be at least enough for you to brake the motorcycle.
Less-experienced rider tends to use the rear brake only. It will speed up the wearing of the rear brake and make
the braking distance longer.
To use the front or rear brake only may cause loss of control and slippery, and therefore is dangerous. Care
should be taken when riding on a wet or slippery road and at a curving road. In such cases, use the brakes gently.
Hurried braking on a slippery or uneven road is especially dangerous.
20
USER'S MANUAL
If the motorcycle must be supported with the side stand on a gentle slope, the botto m ge ar should be engaged
in order to prevent unexpected sliding from the stand. Return to the neutral gear prior to starting the engine.
Turn the ignition switch to OFF to stop the engine.
Remove the key from the switch.
Lock the steering lock for safety.
Check and Maintenance
The following table gives the schedule of check and maintenance according to the intervals based on odometer
reading or the number of used months. At the end of each interval, the required check, inspection, lubrication
and other service should be carried out. If your motorcycle has been used under bad conditi ons, for example ,
continuously running with large throttle in a windy or dusty environment, necessary maintenance should be
done each time after operation in order to guarantee its reliability. Our authorized dealers can provide further
maintenance instructions. The steering assembly, shock absorbing system and the wheel system require the
special and careful maintenance, for they are the key components of the motorcycle. For the sake of safety, it
is advised that these components be serviced by qualified workers.
WARNING
The maintenance after the running-in period must be carried out as soon as the odometer reading reaches to
1,000 km. Timely maintenance contributes to the safety and reliabilit y. Carry out the regular maintenance
thoroughly according to the instructions of this manual.
21
USER'S MANUAL
CAUTION
It may be necessary to replace one or more parts during the regular main tenance. It is recommended that you
use genuine Qlink brand parts or their equivalents. Experienced or not, you'd better to entru st the designated
dealers or qualified technician to maintain the items marked with a “ * ”. The others may be maintained by
yourself under the instructions of this Manual.
Maintenance Schedule.
Km
1,000
5,000
10,000
Months
6
12
24
* Battery ( specific gravity of electrolyte)
I
I
I
Carburetor
I
I
I
Spark plug
I
C
I
C
C
I
R
R
R
I
R
Intervals: Based on the reading
of odometer or No. of months
Gasoline filter
Clutch
* Air filter
* Fuel hose
I
I
I
* Chassis bolts and nuts
I
I
I
Crankshaft driving chain
I
I
I
22
USER'S MANUAL
Intervals: Based on the reading
of odometer or No. of months
Km
1,000
5,000
10,000
Months
6
12
24
I
I
I
I
I
I
I
I
I
* Brakes
* Front fork
I
I
Tires
Driving chain
Clean and lubricate once every 1,000 km
* Steering assembly
I
Rear shock absorber
* Cylinder nuts and exhausting pipe bolts
T
I
I
I
I
T
T
Engine oil
500Km×2
Replace once evey 1000Km
oil filter by paper
500Km×2
Replace once evey 2000Km
C
oil filter by steel net
23
C
USER'S MANUAL
Lubrication Schedule
Intervals
Items
First 5,000 km or 6 months
Throttle cable
Machine oil
Clutch cable
Machine oil
Driving chain
Every 1,000 km or 12 months
Apply oil every 1,000 km
Grease
Grease
* Brake cam shaft
Throttle control handlebar
Brake cable
Machine oil
Grease
Speedmeter gearbox and wheel bearing
Brake pedal
* Steering bearing
Grease or machine oil
Apply grease every 2 years or 20,000 km
Special note£º
To secure your ride please conduct termly check and tightening of spoke according to the following sheet at local
distributor or professional maintenance shop.
Item
Check
tighten / change
500
1500
3000
¡Ì
¡Ì
¡Ì
¡Ì
¡Ì
¡Ì
mileage£¨Km£©
5000
8000
¡Ì
¡Ì
Every 3000 hereafter
¡Ì
¡Ì
Note: If spoke cap or spoke is worn, it must be changed immediately.
24
¡Ì
¡Ì
USER'S MANUAL
Tools
A tool kit placed in the small bag on the left lower side of the chassis is available
to your regular maintenance, which include the tools listed below.
Battery
WARNING
This vehicle used sealed rechargeable battery.
When using, you should notice to charge to prolong its service life.
Note: For the first 1,000 km and every 3,000 km, entrust the authorized dealers
to check the electrolyte gravity of the battery with a gravity gauge. The
battery operating condition can be judged according to the gravity.
25
USER'S MANUAL
Spark Plug
After the first 1,000 km or every 5,000 km, clean the carbon deposit attached to
the spark plug with a small metal brush or cleaner. Readjust the spark plug gap
with a gap gauge so as to keep it between 0.6 and 0.8 mm. Replace the plug with
a new one after every 10,000 km.
While cleaning the carbon deposit, observe the color of the porcelain tip. The
color can tell you if the standard spark plug apply to your motorcycle. In case of
being wet or black in color, it is more suitable to use high-pressure hot type of
spark plug. The normally worked spark plug usually is light gray or light brown.
If the spark plug is white or seem flashing, it shows that the spark plug works
under the overheat condition. In such case, change the spark plug with a cold
type one.
0.6 - 0.8mm
CAUTION
The standard spark plug available to this type of motorcycle is carefully chosen to suit most of the working
scope. If the color of spark plug is different from the standard one, consult with dealers before changing other
types of spark plugs of different heat-resisting range. Improper spark plug will lead to serious damage to the
engine. Choosing improper spark plugs can make operation very difficult. So contact with your dealer before
using other kinds of spark plugs.
26
USER'S MANUAL
Engine oil
Engine's durability depends on the quality of oil used and regular renewal. The two most important maintenance
tasks are the daily oil level checking and the regular oil change.
Oil level checking
Precaution:
The gauge of machine oil view the oil level. Never start the engine with a low oil level. Never ref ill oil over
the upper limit of the view glass.
Oil change and oil filter replacement.
Change transmission oil after the twice each 500km before 1,000km and every
1000 km thereafter. Carry out oil change with a warm engine, so as to empty the
old oil thoroughly, as follows:
1. Park the vehicle on its side stand.
2. Remove refilling cap.
3. Remove drain plug on engine bottom and empty the oil.
4. Retighten drain plug. Fill about 950 ml of fresh engine oil into the refilling
port under filter cap. Retighten the cap.
Note: In case of changing oil without replacing element, it needs 850 ml of fresh
engine oil.
5. Start engine and run it at idle speed for a few seconds.
6. Stop the engine and wait for one minute. Check oil level at the gauge of
machine oil
The oil level shoud be at “F” (Full) mark. If it is lower than the “F” mark, refill
it up.
27
1
1 drain plug
USER'S MANUAL
Precaution:
Please always use the engine oil recommended in “Instructions on fuel and engine
oil”.
Brake
Check brakes after the first 1000 km and every 3000 km thereafter.
The vehicle uses disc bake in front wheel and drum brake in rear wheel. Correct
brake operation is critical to safe driving. Always you must have the regular brake
check executed by qualified distributors.
Warning:
Brakes are the parts related to personal safety. Always keep it in good adjustment . Front brake Brake fluid.
WARNING
Brake fluid is harmful for drinking or contacting to eyes and skin. In case of drinking by mistake, vomit it out
by force. In case of contacting eyes and skin, wash with plenty of clean water before going to hospital.
Precaution:
The vehicle uses ethanol hydraulic fluid for brakes. No silicate or petrol products shoud be mixed with it.
Otherwise, the braking system may be damaged. Never use any fluid lef t in th e last maintenance, because it
may absorb moisture in the air. Always use SAE J1703 brake fluid. Never splash brake fluid onto painted or
plastic surfaces, or corrosion may occur.
28
USER'S MANUAL
Check frequently the level of brake fluid tank. Replenish with recommended fluid. The level may get lower
along with the wearing of brake lining. Brake fluid replenishing is an important item in regular maintenance.
Brake lining
Check the front brake lining to see if it is worn to the limit mark. If it reaches the
mark, replace brake lining.
WARNING
If brake system or brake lining need maintenance, it is advisable to have the job
done by your distributor. He has the special tools and skills to fulfill it in the safest
and most economical manner.
Precaution:
Disc braking system involves high pressure. For the sake of safety, replace the hydraulic pipes and fluid at the
interval stipulated in the maintenance schedule.
Items for daily check of braking system:
1. Check for any leakage in front braking system.
2. Check for any leakage or crack in hydraulic pipes.
3. Check brake grip and brake pedal and keep them with proper spring-up force.
4. Check the wearing conditions of front brake.
29
USER'S MANUAL
WARNING
Do not drive the vehicle immediately after brake lining replacement. Apply brake for several times to make
the brake lining extended, restore the spring force and bring the brake fluid into circulation.
Front brake lamp switch
Front brake lamp switch is under the brake grip. Loosen the screw and move the
switch unit the lamp can be.
lit just before the grip is firmly pressed.
Muffler Pipe
The muffler of the motorcycle ridden for a long time is at a high temperature, so
do not touch it in order to protect you from scald.
Fuse
The fuse box is installed in the cover of left chassis. If some troubles occur in an
electric system, the fuse must be checked. If the fuse is burned out, the standby
one ( 15 A) in the fuse box will be replaced.
CAUTION
Use the fuse with designated amperes on replacement of a new. Never substitute
for the burned fuse with aluminum foil, copper wire, etc. If the new fuses are
burned out in a short time frequently, this shows there is the poss ibili ty of more
serious electrical trouble. Contact the dealer immediately for repairing.
30
(1)
(2)
(3)
USER'S MANUAL
Rear Brake
The play can be adjusted to 2030 mm by screwing in or screwing out the adjusting nut of brake steel cable.
Wearing Limit of the Brake Liner band
The wearing limit marks are impressed on both front and rear brakes.
Check if the braking system is properly adjusted.
Check if the mark extension line is within the allowed limit.
If the extension line exceeds the limit, entrust the dealer to have the brake assembly
replaced for the safe purpose.
Rear Brake Lamp Switch
This switch is mounte d at the right chassis. To adjust it up and down can make the
brake lamp being lit on treading on pedal with a little force.
Replacement of Bulbs
Each bulb's power is shown below. When changing the bad bulb, the one with the
same value must be used. Otherwise it may cause overload of the electric circ uit
system and early damage to the bulbs.
Headlamp
12V
35/35W
Tail/ Stop
12V
21/5W
Turning signal lamp
12V
10W
1
1 stroke
2
2 adjusting nut
31
USER'S MANUAL
Headlamp
1. Loosen three screws and pull out the lamp assembly.
2. Disconnect cable connector, put off rubber and put out bulb.
3. Install a new bulb and replace the assembly.
Precaution:
The lamp assembly is of reflection type. Do not touch the reflection lens in bulb
replacement to avoid reducing its service life.
Turning signal lamp
1.Remove two screws and take off the lamp lens.
2.Press the bulb and turn it leftward to take it out.
3.To install a new bulb, press it down and turn it rightward.
Precaution:
After installing the lamp lens, be careful not to over tighten the screws to avoid
damaging the lamp lens.
Tail/Brake Lamp
1. Remove the lamp cover by loosening the two screws.
2. Screw out the bulb by pressing and turning it to the left.
3. Renew a bulb.
332
USER'S MANUAL
Air Filter
If dust clogs the air filter element, intake resistance increases as the output power
decreases. The increase of gasoline content in the mixing gas leads to the increasing
of fuel consumption. To avoid this, replace the air filter element as the
following steps after riding for every 5,000 km.
1. Remove the right chassis cover with the key.
2. Loosen the fixing screws and remove the air filter cover.
3. Withdraw the bright plastic flake and outer frame.
4. Separate the foam plastic from the outer frame.
Carburetor
The stability of carburetor contributes to the performance of the engine. The carburetor has been adjusted
to the best state before leaving the factory. Please do not attempt to make
unnecessary adjustment. The carburetor has two adjustment items that a re th rot tle
cable clearance and idle speed. The new motorcycle should be adjusted according
to the following method after running for 1,000 km or ev ery 3,000 km.
Adjustment of the Carburetor's Idle Speed (rpm)
Start the engine and warm it up.
After warming the engine up, screw in and out the adjusting screws for idle speed
and let the engine run at 1,250 -1,450 rpm.
Note: If there is a tachometer, make adjustments as the stated above.
33
USER'S MANUAL
CAUTION
The idle speed should be adjusted with the engine fully warmed up.
Adjustment of the Throttle Cable
1. Loosen the locking nut.
2. Turn the adjuster so that the cable clearance is kept within a range of 0.5 - 1.0 mm.
3. Tighten the locking nut after adjusting of the clearance.
CAUTION
After the adjustment of cable, check the grip to see if it can be turned normally.
The idle speed should not be increased due to this adjustment. The throttle grip
should be able to turn freely.
Adjustment of the Clutch
Before the clutch is released, the cable clearance measured from the lever of
clutch should be 4 mm. If the clearance fails to meet this requirement, make an
adjustment as the following method.
Loosen the locking nut of clutch's cable adjuster.
Turn the adjuster and allow it to the required clearance (4mm).
Tighten the locking nut.
During this time, lubricate the cable with machine oil.
34
4
6
5
USER'S MANUAL
Adjustment of the Driving Chain
(1)Scale (2) Lock nut
After running for every 1,000 km, adjust the tightness of driving chain so that the
movable distance between the two chain sprockets is kept within 25 - 35mm.
1. Support the motorcycle with the side stand.
2
1
2. Loosen the nut of rear wheel shaft.
3. Screw out the locking nut.
4. The chain can be adjusted by turning the adjusting bolt clockwise and counterclockwise.
Note: When a new chain is replaced, the two chain sprockets must be checked. If necessary, make replacement.
CAUTION
The opening end of chain joint should be installed in reverse to the turning
direction.
20-30mm
(1) Joint clip. (2) Rotating direction.
¢Ù
The dust and dirt on the driving chain will increase the wearing of the chain
itself and chain sprockets. Therefore, clean the driving chain with cleaning
detergent and then lubricate it using special lubricant or motor oil after riding
¢Ú
for every 1,000 km.
Tire
After the first 1,000 km and every 3,000 km, check the air pressure and tire tread. For the sake of safety and
35
USER'S MANUAL
longer service time, the air pressure of tire should be often checked.
Air Pressure of Tires
If the air pressure of tires is not sufficient, it not only speeds up the wearing of tire, but also extreme ly affect
the stability of motorcycle. Insufficient air pressure makes the motorcycle difficult to turn. But excessive air
pressure may decrease the contact area between the tire and ground and lead to the slipping of motorcycle and
even losing of control. The air pressure should be always kept with the specified limit. Adjust the air pressure
as the tire is cold.
Air pressure of tires:
Front tire: 225 kpa.
Rear tire: 225 kpa.
Outer Tire Tread
Riding on the motorcycle with its tire excessively worn will decrease the
stability of operation, and may be out of control accordingly. When the depth
of outer tire tread is reduced to 1.6 mm (0.06 inch) or less than this value,
replacement of outer tire is recommended.
WARNING
It is very important for the air pressure of tires to keep the normal performance and
safety of motorcycle. Therefore, often check the wearing state and air pressure of tires.
36
0.06
USER'S MANUAL
WARNING
Replace the air filter only, don,t went to clean or wash it .
That will have some particle and damage with your engine .
Troubleshooting
If it is not able to start the engine, check the following items to find the cause.
1. Check if the fuel in the tank is sufficient.
2. Check if the fuel flows to the carburetor through the tap.
3. Disconnect the fuel hose from the carburetor, turn the tap to ON position, and check if gasoline flows out
of the hose.
4. Make sure the fuel has flown to the carburetor, then proceed to check the ignition system.
WARNING
When checking the fuel system, do it at a spacious area with no smoking.
1. Dismount the spark plug and reconnect it to the play cap.
2. Set the ignition switch to ON position, allow the ignition close to the engine
and start the engine . If the ignition system works normally, there is blue spark
jumping through the spark plug gap. If no spark appear, contact with the dealer
to have it repaired.
37
USER'S MANUAL
.
WARNING
Keep the spark plug away from the opening plug hole on the cylinder head, because the spark may ignite the
gasoline steam in the cylinder, causing fire.
Stop of the Engine
1. Check the fuel in the tank.
2. Check the interval spark of the ignition system.
3. Check if the idle speed of the engine is normal.
Note:
It's better to contact with the dealer before you make any repairs. If the warranty peri od has not expired, you
must get the explicit permission of your dealer before you try to repair by yourself. Otherwise your operation
may void the warranty.
38
USER'S MANUAL
Troubleshooting Table of the Engine
Failures
The carburetor has oil
The engine can't start or stop suddenly
No fuel in the
carburetor
Causes
Troubleshooting
1. No fuel in the tank.
2. The tank tap is not open.
3. The tank tap is clogged.
4. The needle-valve in the float chamber
is blocked.
5. The main jet hole is clogged.
1. Fill fuel.
2. Open the tap.
3. Clean the oil tank and tap.
4. Dismantle the carburetor and clean it.
5. Dismantle the carburetor and clean it.
1. There is oil dirt in the spark plug.
High-voltage
line has normal 2. The magnetic core or electrode is
broken.
spark, but the
spark plugdoes 3. The electrode of spark plug has carbon
deposit.
not.
4. The clearance of spark plug isnot proper.
1.Dismount and dry it.
2.Replace the spark plug.
3.Clear carbon deposit.
4. Adjust the clearance.
1. The pad of cylinder cover has leakage.
2. The spark plug is loose.
The spark plug
3. The piston ring is in the improper
has a normal
position.
spark.
4. The piston and ring are excessively
But the cylinder
worn out or the ring is broken.
doesn't compress
5. The cylinder is seriously worn.
properly.
6. The intake pipe leaks.
7. The oil seal of crankshaft is damage
1. Tighten the screw or replace the pad.
2. Tighten the plug.
3. Clear the ring and the carbon deposit
around it.
4. Replace the piston and its ring.
5. Replace the cylinder body.
6. Tighten or replace the rubber ring.
7. Replace the oil seal.
39
USER'S MANUAL
Troubleshooting Table of the Engine
Causes
Troubleshooting
The engine has
abnormal sound
1. The cylinder and piston are seriously
worn out.
2. The needle bearings of the cnnecting
rod are seriously worn out.
3. Excessively early ignition.
4. The combustion chamber has too much
carbon deposit.
5. The spark plug overheats.
1. Replace the cylinder body and piston.
2. Replace the bearings and parts.
3. Regulate the ignition time.
4. Clear the carbon deposits in the
cylinder head.
5. Replace the ignition plug.
The engine doe
s not run steadily.
1. There is water or dirt in the carburetor.
2. The oil route is clogged.
3. The crankcase leaks.
4. The joint of the carburetor and engine
has leakage.
5. The mixing gas is too thick or too thin.
1. Clean the carburetor.
2. Blow or replace the oil pipe.
3. Replace the oil seal.
4. Tighten the screw.
5. Adjust the carburetor.
1. Run for too long time with a lower gear.
2. Overload or run under heavy load for
excessive long time.
3. The mixing gas is too thick or too thin.
4. The engine uses improper machine oil
or the oil in the gearbox is not sufficient.
5. The clutch is slippery.
6. The chain is too tight.
7. The brake can not be released.
1. Shift gear and control time.
2. Control the load and leave intervals to cool
3. Adjust the carburetor.
4. Replace the proper machine oil and
refill the gearbox with oil.
5. Adjust the play or replace the clutch,
friction pad and spring.
6. Adjust the tightness.
7. Adjust the clearance of the brake.
Failures
The engine does not run normally
The engine overheats
40
USER'S MANUAL
Storage Method
If the motorcycle is not used in winter or for quite a long time, the motorcycle should be specially maintained
with appropriate materials, tools and skill.
Motorcycle
If you will not ride your motorcycle for a long time, clean the whole motor cycle, suppo rt it on the side stand
and place it on a solid and flat ground to avoid weltering before storage. Then turn the motor cycle handleb ar
to the left and lock the control system, finally pull out the ignition key for the safe purpose. In addition, choose
a place suitable to keeping the motorcycle for a long period. When you want to use the motorcycle again , you
should check it thoroughly to make sure the performance of all parts is well.
Fuel
The fuel in the oil tank should be drained out before storage. The gasoline used for the motorcycle is flammable,
and may even cause explo sion in certain conditions. Therefore, never allow the motorcycle close to fire source,
and do not park it in the place where flammable materials (such as grain, coal and cotton) are kept. Once the fuel
in the motorcycle contact the open fire, it may lead to fire disaster.
Battery
If the motorcycle is not ridden for a long time, remove the battery from the motorcycle, charge the battery up
sufficiently, and then put it in a place away from children.
In summer, the battery should be charged once a month, but once two months in winter. If the battery attached
to the motorcycle is not used temporarily, it requires to be charged once a month.
.
41
USER'S MANUAL
Tires
Pump the tires up to the normal pressure value. The outer appearance of tires should be kept clean, and not be
exposed to sunlight for long time and protected from moisture. Keep the tires away from acid, alkali and oil so
as to avoid corrosion.
Procedures of Returning Service
1. Clean the whole motorcycle.
2. Remove the spark plug, push down the foot starting rod and let the engine rotate for a while, then install
the park plug.
3. Reinstall the battery.
Note: Make sure that the battery should be first connected to the positive end, then to the negative end.
4. Adjust the air pressure of tires according to the relevant instruction of this manual.
5. Lubricate the required parts as instructed in this manual.
6. Before you ride your motorcycle, first check it in accordance with this manua.l
42
USER'S MANUAL
Parameters list
Dimension parameters
Overall dimension
length x Width x Height( inch/mm) ……… ……………………… …… 86.6¡ 36.6Á 46.5¡(2200¡Á830¡Á1180)
Á
Wheel base ( inch/mm) ……………………………………… ………… ………… …… …………… 57.1 (1405)
Minimum ground clearance( inch/mm)…………………… …… ……… ……… …… …… …………10.6 (270)
Castor angle ……………………………………………………………… …………… ………………………27¡ã
Steering turning angle (left, right )……………….……………………………………… ……… ………48° / 48°
Minimum turning diameter ( inch/mm)………………………………… …… ……… …… ………21 2.6 ( 5400)
Quality Parameter
Dry weight (include oil and fuel) (lb/kg) ……………………… …………… …………… ……… … 271.2 (123)
Maximum load quality(lb/kg)……………………….………………………………………………… 330.8 (150)
Fuel tank capacity (G/L)…………………………….……………………………………………………2.8 (10.6)
Engine
Type …………………………………………………………………………Single cylinder, 4-stroke, air cooled
Bore x stroke (mm)……………………………. ………… …………… ……… … … ……… …………66¡Á58.2
Piston swept volume(ml)……………………….…………… ……… …… …… …………… ………… ……199
Compression ratio …………………………. ……… ………… ………… ………… ……………………… 9.4:1
43
USER'S MANUAL
Max. power[Kw/(rpm)]………………… …….…… …………. ………………………………… ……11.5/8000
Rated power [kw/(rpm)] ……………………..……………….………………………………………10.5/7500
Max. torque[Nm/(rpm)] …………… …………………… …….……………… ………………………14.5/8500
Min. fuel consumption (g/kw.h) ……………….……………….………………………………………………354
Min. idle stable rotary speed (rpm) …………. .…… ……… ….……… …………… ……… ………1500¡À100
Starting type…………………………………….……………….……………………………………Electric start
Lubrication type…………………………….…………………………………Pressure and spraying lubrication
Lubricant type ……………………………….………………………………………………………SAE 10W /50
Fuel type …………………………………….……………………………………………………> 90 gasoline
Air filter type ……………………………….……………………………………Polyurethane foam plastic type
Transmission System
Clutch …………………………………………… ………… .……… ………… ………… …………Wet multiple
Primary reduction ratio ……………………. ……………….………………………………………………3.158
Final reduction ratio ………………………. .……………….………………………………………………3.000
Gear ratio
1 st gear
th
4 gear
3.000
1.095
2 nd gear
th
5 gear
3 rd gear
1.933
0.913
44
1.438
USER'S MANUAL
Wheels and Brakes
Front wheel tire……………………………….………………. ……… ……… ……… ………………110 /70/17
Rear wheel tire …………………………….……… ……….… ……… ……… ……… ……… ………130/70/17
Air pressure of front wheel (psi/kpa)………………………….……………….…………………………33(225)
Air pressure of rear wheel (psi/kpa)……………..… ……… ….… ……… ……. ……… ……… ………33(225)
Front brake ……………………………………………….……………….………………………………disc type
Rear brake …………………………………. …………….……………….…………………………………Drum
Shock Absorber
Front shock absorber …………………………….……………….……………………………Spring oil damper
Rear shock absorber …………… ……… ……… .… …… …… …. …………………Spring oil and Gas damper
Electrical System
Spark plug ……………………………………………… .… …… …… …. …… ……… ……… …NG K D8RTC
Headlamp ………………………………….…………….……………….……………………… 12V 35W/35 W
Turning lamp …………………………………………….……………….…………………………… 12V 10W
Tail lamp/stop lamp ……………………….…………….……………….……………………………12V 21/5W
Instrument indicating lamp ………………. .……… …….…… ………….………… …………… ……12V 2W
Battery ……………………………………..…………….……………….……………………………12V 9Ah
Horn ………………………………………..…………….……………….………………………12V 105 dB (A)
45
USER'S MANUAL
Performance of Motorcycle
Braking distance(30 km/h)m……………….…… ……….… …………… .………… ………… ………… …¡Ü 7
Max. noise dB (A)……………………………………….……………….……………………………………¡Ü 80
Max. speed (mph/kph)………………………..……… …….…… ………….……………………………¡Ý60(96)
Climbing ability………………………………………….…………… ….……………… …………… ……¡Ý22¡ã
Economic oil consumption (G/Mile)…….…… …… …. …… …… …… .… …… …… ……… …… ………1.9
Min. stable speed (mph/kph)…………………………………. ……… ……… .……… ………………¡Ü15.6(25)
Gliding distance(m)………………………….…………….………………. …………… …………… ……¡Ý200
Starting acceleration time (s)……………….…………….……………….……… ……………………… …¡Ü15
Exceeding acceleration time (s)……………..…………….……………….…………………………………¡Ü14
46
USER'S MANUAL
Wiring Diagram
Qlink reserves the right to change, without prior written notice, of specifications, material and other it ems to
each model.Qlink continually seeks advancement in products' improvement in different countr ies or are as,
therefore wh ile this manual contains the most current product information available at the time of printing, there
may be minor discrepancies between your vehicle and this manual. If there is any question concernin g this
manual, please consult your local dealer.
All rights reserved. Any reprinting or unauthorized use without written permission of Qlink Motorcycle Co. ,
Ltd. is expressly prohibited.
47
USER'S MANUAL
MAINTENANCE RECORDS
Mileage(km)
Date
Times
This bike's traveled mileage is Kilometer
Items Maintained
1
M
D
Y
500
Oil
2
M
D
Y
1000
Oil / Filter
All nuts
3
M
D
Y
2000
Oil
4
M
D
Y
3000
Oil / Filter
5
M
D
Y
4000
Oil
6
M
D
Y
5000
Oil / Filter
Air Filter
7
M
D
Y
6000
Oil
8
M
D
Y
7000
Oil / Filter
9
M
D
Y
8000
Oil
10
M
D
Y
9000
Oil / Filter
48
Dealer
USER'S MANUAL
MAINTENCE RECORDS
Mileage(km)
Date
Times
This bike's traveled mileage is Kilometer
11
M
D
Y
12
M
D
Y
13
M
D
Y
14
M
D
Y
15
M
D
Y
16
M
D
Y
17
M
D
Y
18
M
D
Y
19
M
D
Y
20
M
D
Y
10000
Items Maintained
Oil / Air Cleaner
Spark plug / Brake fluid
49
Dealer