1
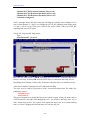
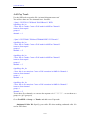
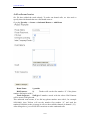
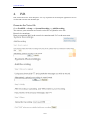
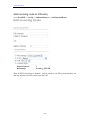
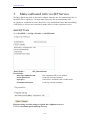
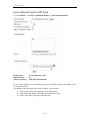
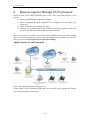
www.atcom.cn
Tour of Trixbox
Edwin
Version
Date
Author
Description
1.0
2007-June-08
Edwin
Creation
1/32
www.atcom.cn
1.
Introduce................................................................................................................4
Related Hardware and software ................................................................................................4
System set up ............................................................................................................................5
2.
Install Trixbox and make internal calls ..............................................................6
Install Trixbox ...........................................................................................................................6
Ways to Access Trixbox ............................................................................................................6
Install Trixbox modules ............................................................................................................6
Add extensions..........................................................................................................................6
Register SIP device: ..................................................................................................................8
Voice Mail Box .........................................................................................................................9
3.
Make outbound call ............................................................................................10
Install AX-100p and AX-400p to the PC (Hardware) .............................................................10
Configure AX-100p and AX-400p on Trixbox .......................................................................11
Add Zap Trunk ........................................................................................................................13
Add outbound routes...............................................................................................................15
Add zap extensions .................................................................................................................16
4.
IVR .......................................................................................................................18
Generate the Voice file ............................................................................................................18
Add IVR entry.........................................................................................................................19
Add incoming route to IVR entry ...........................................................................................20
5.
Make outbound calls via SIP Service ................................................................21
Add SIP Trunk.........................................................................................................................21
Link outbound route to SIP trunk............................................................................................22
6.
Remote register through IAX2 protocol ...........................................................23
Add IAX2 extension ...............................................................................................................24
Add Port Forwarding on router ...............................................................................................24
7.
Echo Cancellation ...............................................................................................27
Use ztmonitor to trace the echo...............................................................................................27
Use FXOTUNE tool to configure the line impedance ............................................................27
Install the MG2 echo cancellation...........................................................................................28
Octware echo cancellation ......................................................................................................28
8.
Install AX-4S in the Trixbox ..............................................................................29
Configure the jumper and switch of the card ..........................................................................29
Install the mISDN driver.........................................................................................................29
Modify misdn-init.conf and misdn.conf file ...........................................................................29
Add custom trunk:...................................................................................................................30
Add inbound route: .................................................................................................................30
Auto load the AX-4S card after system startup.......................................................................31
9.
The End................................................................................................................32
2/32
www.atcom.cn
3/32
www.atcom.cn
1.
Introduce
This article is a guide to use Trixbox and ATCOM products to build a simple
application on small office application. Through this article, we hope that reader can
build the IP PBX solution for small enterprise
Related Hardware and software
Trixbox2.0: Asterisk based Trixbox enables even the novice user to quickly set up a
voice over IP phone system. Trixbox can be configured to handle a single phone line
for a home user, several lines for a small office, or several T1s for a million minute a
month call center.
AX-100p:
Asterisk PCI card with One FXO port
AX-400p:
Asterisk PCI card with four FXO/FXS interchangeable ports, four
ports can be configured as FXO or FXS port individually.
AX-110S:
FXS module of AX-400p
AX-110X:
FXO module of AX-400p
AT-530:
Stand along IP phone, can be configured as SIP/IAX2 extensions.
X-lite:
softphone run on the PC, can be configured as SIP extensions.
Normal phone: connect to AX-400p, act as ZAP extensions.
4/32
www.atcom.cn
System set up
We use following devices in our set up:
1: Server with Trixbox installed: we also install AX-100p and AX-400p in this
server, we install two AX-110S FXS modules and two AX-110X modules, so you can
connect three PSTN lines and two normal phones. So there are five analog ports on
the Trixbox server. one FXO port from AX-100p, two FXO port from AX-400p. two
FXS ports from AX-400p.
2: Normal phone: connect to the AX-400p FXS ports.
3: Working PC, x-lite runs on this computer act as a sip extension.
4: AT-530 IP phone, register to Trixbox to act to as SIP or IAX2 extension.
We want to provide below function in our simple application.
1:
free internal call.
2:
Voice Mail.
3:
make out bound call
4:
IVR system.
We will implement these functions step by step.
5/32
www.atcom.cn
2.
Install Trixbox and make internal calls
Install Trixbox
The set up of Trixbox is simple. Just download the ISO file from www.trixbox.org
and record it in the CD to make an auto boot CD. PUT this installation CD and reboot
your computer, then it will format your system and install the CENTOS and Trixbox
server on it.
I am using Trixbox2.0 version on this article.
If you have question in install, you can refer the www.trixbox.org for the install guide.
Ways to Access Trixbox
There are two ways to access the Trixbox server.
Use Web browser to open the IP of the Trixbox server to connect to the GUI
of Trixbox. After open the Trixbox web interface, you need to switch the
access mode from user to admin. The default username and password is
maint and password. This is base configure way of Trixbox. Trixbox doesn’t
support IE well. You can use Firefox to configure it.
Use the SSH tool to access the Trixbox server. in this way the use name is
root and password is the password you input when install the Trixbox.
Most of our configure job will be done in the web interface. and we will do some
advance configure via SSH tool.
Install Trixbox modules
Trixbox doesn’t install many function default, you need to install them manually. In
the web interface, go to the Asterisk -->Free PBX page --> Tools --> Module
Admin. You can see many function modules in this page. Just select all and process
the install to install all these modules.
Notice: every change on the Trixbox will show a red section ask you to apply the
change via click the link.
Add extensions
At first, we need to add some extensions to make internal calls. Each extension acts as
an internal number. There are many types of extensions, we will use SIP, IAX2 and
ZAP extensions on this article.
6/32
www.atcom.cn
Add SIP extensions:
Sip extensions is an SIP account allows you to log on the Trixbox via an SIP terminal
such as IP phone AT-530 and softphone x-lite.
Go to -->Free PBX --> setup-->Extensions -->add generic SIP device.
Add Exenions:
User Extension:
2003
; Phone number of this extension
Display Name:
Fantasy
; Caller ID
Secret:
2003
; SIP Log on password
Enable Voicemail
Voicemail password:
2003
; password of your mailbox, you need to
input this password when you enter the mailbox
Use the same method add two other extensions
User Extension:
2004
; Phone number of this extension
Display Name:
Edwin
; Caller ID
Secret:
2004
; Log on password
Enable Voicemail
Voicemail password:
2004
; password of your mailbox
User Extension:
Display Name:
2005
Marvin
; Phone number of this extension
; Caller ID
7/32
www.atcom.cn
Secret:
Enable Voicemail
Voicemail password:
2005
; Log on password
2005
; password of your mailbox
So we have created three SIP extensions. And we can use SIP device to log on the
Trixbox use these extensions.
Register SIP device:
1.
Register SIP softphone
Download the x-lite softphone phone from couterpath website www.xten.com
After install the x-ltie, right click the panel and select the SIP Account Setting and
then configure it:
Display Name:
User Name:
Password:
Authorization User Name:
Domain:
Fantasy
2003
2003
2003
192.168.1.129 (IP address of your Trixbox server)
2. Register IP phone AT-530
a) Connect the AT-530’s WAN port to the switch. And it can get the ip from
your router.
b) Press the “sysinfo” key on AT-530 to get the IP of AT-530.
c) Put the ip on the IE of your computer and you can enter the AT-530
configure page through this ip.
d) Put the SIP extensions info on the AT-530 IP phones.
8/32
www.atcom.cn
Register Server Addr:
Register Username:
Register Password:
Phone Number:
192.168.1.129
2004
2004
2004
IP address of Trixbox server.
Use the same method register another at-530 to extension 2005, then you can free
inbound call between these three extensions 2003~2005.
Voice Mail Box
Voice mail box is enabled when we create the extensions. So if somebody calls you on
your extension and you are unavailable, he will hear the voice mail greeting message
and leave voice message.
Retrieve voice message:
Dial *97 in your sip terminal and input the voice mail password of your extension
then you will enter your voice mail box.
Dial *98 in your sip terminal and you will enter the voice mail main menu, then you
can input extension number and voice mail password to enter the corresponding
extension’s voicemail box.
9/32
www.atcom.cn
3.
Make outbound call
To make an outbound call, we need to add trunk first. There are many types of trunk,
SIP trunk, Zap Trunk and so on, We use AX-100p and A-400p to make zap trunks
here.
Install AX-100p and AX-400p to the PC (Hardware)
1.
2.
3.
Power off Trixbox and pull out the power adapter.
Insert AX-100p card to the PCI slot of your PC and firm it with screw.
Insert AX-400p card to the PCI slot, please see below picture for the configure
Module
One
Module
Two
Module
Three
Module
Four
Power
port1
port2
port3
port4
Set up:
Insert AX-110X FXO module to module 1 and
module 2, port 1 and port 2 will then be
configured as FXO port.
Insert AX-110S FXS module to module 3 and
module 4, port 3 and port 4 will then be
configured as FXS port.
If you have insert AX-110S module to the
AX-400p, because the FXS port need to provide
AU-110S(FXS)
AU-110X(FXO) signal to the normal phone, you also need to
power the AX-400p with your PC via the power port. Otherwise AX-400p won’t have
sufficient voltage to drive the normal phone connected.
What are FXO and FXS?
FXS (Foreign eXchange Station) is an interface which drives a telephone or FAX
10/32
www.atcom.cn
machine. FXS interfaces get phones plugged into them, delivery battery, and
provide ringing. FXS interfaces are signalled with FXO signalling.
FXO (Foreign eXchange Office) is an interface that connect to a phone line. They
supply your PBX with access to the public telephone network. FXO interfaces
use FXS signalling. FXS interfaces are what allow you to hook telephones to
your PBX, and FXO interfaces allow you to connect your PBX to real analog
phone lines.
Configure AX-100p and AX-400p on Trixbox
There is a command genzaptelconf can generate the configure file of AX-100p and
AX-400p automatically.
Use the SSH tool to connect Trixbox server and run:
[root@asterisk1 ~]# genzaptelconf
Trixbox will then auto detect zaptel hardware and install AX-100p and AX-400p
driver automatically.
You may see below info in this process:
Loading wcfxo: wcfxo: DAA mode is “FCC”
Found a Wildcard FXO: Wildcard X100P.
//Detect AX-100p card
Loading wctdm: Freshmaker version 7
Freshmaker pass register test
Module 0: Installed – AUTO FXS/DPO
Module 1: Installed – AUTO FXO (FCC mode)
Module 2: Installed – AUTO FXO (FCC mode)
Module 3: Installed – AUTO FXS/DPO
Found a Wildcard TDM: Wildcard TDM400P REV I (4 modules)
//Detect AX-400p card
Which indicate that Trixbox detect and install AX-100p and AX-400p successfully
And type:
[root@asterisk1 ~]# ztcfg -vvv
To see the channel state:
Zaptel Configuration
======================
Channel map:
Channel 01: FXS Kewlstart (Default) (Slaves: 01)
Channel 02: FXS Kewlstart (Default) (Slaves: 02)
11/32
www.atcom.cn
Channel 03: FXS Kewlstart (Default) (Slaves: 03)
Channel 04: FXO Kewlstart (Default) (Slaves: 04)
Channel 05: FXO Kewlstart (Default) (Slaves: 05)
5 channels configured.
Above message shows that AX-100p and AX-400p are already auto configured. You
can see that channel 1, 2 and 3 are configured as FXS_KS signaling, that means ports
1,2 and 3 will be act as FXO ports. And for the ports 4 and 5, they use FXO_KS
signaling and act as FXS ports.
Check AX-100p and AX-400p status:
Type
[root@asterisk1 ~]# zttool
Here the AX-100p’s state is RED, indicating that you haven’t connected the PSTN
lines to AX-100p. It shows OK after the PSTN lines is connected and ready for use.
Regarding the AX-400p, it shows OK all the time when the driver is install correctly.
After auto install the configure the AX-100p and AX-400p.
You also need to add two properties in the /etc/asterisk/zapata.conf file under the
[channels] section.
busydetect=yes
busycount=5
This two command is to enable the busy detect on the system. when you make calls to
a PSTN network, the other sides hangup the call , you will here the busy tone. If you
don’t enable busy detect. The system will regards the busy tone as a normal talking
tone, so it won’t hangup the line and other one can not call you.
12/32
www.atcom.cn
Add Zap Trunk
Use the SSH tool to open the file /etc/asterisk/zapata-auto.conf
You will see there are five channels here. Just like:
; Span 1: WCFXO/0 "Wildcard X100P Board 1" RED
signalling=fxs_ks
; Note: this is a trunk. Create a ZAP trunk in AMP for Channel 1
context=from-zaptel
group=0
channel => 1
; Span 2: WCTDM/0 "Wildcard TDM400P REV E/F Board 1"
signalling=fxs_ks
; Note: this is a trunk. Create a ZAP trunk in AMP for Channel 2
context=from-zaptel
group=0
channel => 2
signalling=fxs_ks
; Note: this is a trunk. Create a ZAP trunk in AMP for Channel 3
context=from-zaptel
group=0
channel => 3
signalling=fxo_ks
; Note: this is an extension. Create a ZAP extension in AMP for Channel 4
context=from-internal
group=1
channel => 4
signalling=fxo_ks
; Note: this is an extension. Create a ZAP extension in AMP for Channel 5
context=from-internal
group=1
channel => 5
To use these five channels, we can use the separate via “1” “2” “3”… or use them as a
group via “g0” (group=0)
Go to FreePBX-->Set up --> Trunks and add a new Zap trunk.
Outbound Caller ID: Specify your caller ID when making outbound calls. No
use for FXO lines.
13/32
www.atcom.cn
Maximum Channels: Maximum available simultaneous outbound calls.
Outbound Dial Prefix: 9
Trixbox will add a prefix to the number you dial
and send to the trunk
Zap Identifier: g0
; the three FXO ports are grouped as g0, so when you
make outbound call via this trunk, Trixbox will pick up the available FXO channel in
g0 automatically. The channel are grouped by Trixbox when you use “genzaptelconf ”,
you can see the group information in the file /etc/asterisk/zapata-auto.conf . you can
also put “1” “2” or “3” here to specify the separate FXO port here
14/32
www.atcom.cn
Add outbound routes
Ok. We have added the trunk already. To make out bound calls, we also need to
specify that which trunk that our calls should route to.
Go to the Freepbx --> Setup--> Outbound Routes--> Add Route
Route Name:
9_outside
Dial Patterns:
9|.
Trixbox will cut the first number “9” if the phone
number dial begins with 9.
Trunk Sequence:
ZAP/g0 all number accord with the above Dial Patterns
will be sent to ZAP/g0 trunk.
This outbound route means, if we dial any phone number start with 9, for example
983018806, then Trixbox will cut the number first number “9” and send the
number(83018806) to the g0 group (it will use the available channel of channel 1,2,3).
After doing above, you can use SIP extensions to make outbound calls.
15/32
www.atcom.cn
Add zap extensions
Remember that we have two FXS modules on the AX-400p card, we can use this two
fxs port to build two zap extension.
Go to the Free PBX --> setup-->Extensions -->add generic zap device
User Extension:
Display Name:
Channel:
Enable VoiceMail
VoiceMail Password:
2001
Annie
4
the fourth channel is the FXS port
2001
Now connect a normal phone to the 3rd port of the AX-400p card, and pick up the
phone, you will hear the dial tone and you can make calls now.
Use the same method to add another zap extension 2002
User Extension:
2002
Display Name:
Crystal
Channel:
5
the fifth channel is the FXS port
Enable VoiceMail
VoiceMail Password:
2002
System Review:
So far we have:
Five internal extensons:2001~2005, calling between these extensions are free.
16/32
www.atcom.cn
And we have assigned voice mail boxes to each extension. To expand the number of
extensions, you can just add IP phone or softphone.
Three PSTN extensions, to make outbound calls, you need to add prefix 9 to your
number when dialing.
We have finished outbound call now, the next step we will add IVR for our system.
17/32
www.atcom.cn
4.
IVR
IVR, means Interactive Voice Response. It is very important for the enterprise application. We can
use the IVR to do the auto-attendant job.
Generate the Voice file
Go to FreePBX -->Setup --> System Recording --> Add Recording
You can use your extension to record a voice file or Upload a voice file.
Record via extensions:
Enter an extension 2001 in the record via extension and “Go” to the next page.
18/32
www.atcom.cn
Specify the name of this record and dial *77 in 2001 extension and you will here
indicate sound and then record your voice. When hang up and Save, now we have
record a voice name “Greeting_ATCOM” in the Trixbox
Notice: you can also upload a fair-sounding voice to the system in the “add recording”
page
Add IVR entry
Go to FreePBX --> SetUp --> IVR--> Add IVR
Change Name:
Announcement:
Welcome
Greeting_ATCOM
19/32
www.atcom.cn
Add incoming route to IVR entry
Go to FreePBX --> SetUp --> Inbound Routes--> Add Inbound Route
Zaptel Channel :
Recordings:
1
Greeting_ATCOM
Then all PSTN incoming to channel 1 will be routed to our IVR system and they can
dial any internal extension when listen the IVR
20/32
www.atcom.cn
5.
Make outbound calls via SIP Service
We have added zap trunk in the before chapter. But the rate for international call on
the PSTN line is expensive. I want to more lower rate for our international call.
So I apply an voipbuster account ( they have a low international rate) and after adding
a SIP trunk, we can use our extension to make calls to via the voipbuster service.
Add SIP Trunk
Go to FreePBX --> SetUp-->Trunks-->Add SIP trunk
Trunk Name :
SIP_International
Peer Details:
host=sip.voipbuster.com
//the voipbuster SIP server address
secret=password
//your sip account password
type=peer
//can receive and make calls via this trunk
username=aniceman
//your sip account username
Register string: use this string to register the voipbuseter service.
Format is username:password@sip serve ip
21/32
www.atcom.cn
Link outbound route to SIP trunk
Go to FreePBX --> SetUp-->Outbound Routes-->Add ourbound routes
Route name:
Dial Patterns:
Trunk Sequence:
8_international_calls
8|.
SIP/SIP_International
Now we have added a new international route. All number begin with number 8 will
be sent to this route.
According to the zap trunk in the above chapter, in our system:
Calls begin with 8 will outgoing via our SIP service.
And calls begin with 9 will outgoing via the PSTN line
Other calls will be regards to internal calls
22/32
www.atcom.cn
6.
Remote register through IAX2 protocol
We have built a local simple IP PBX system so far. This is the total structure of my
system:
I lease an ADSL line to connect the internet.
I have a dynamic WAN IP. (dynamic IP is enough to me and static ip is
expensive)
I have a Trixbox server behind my router.
I can use my ip phone connect the Trixbox to act as an extension in my local
area network. They are at the same network as Trixbox.
And I want to use my Trixbox server when I am on business trip or at home. So how
can I do it in this case that my Trixbox server is behind a router and have a private IP?
The key point is the IAX2 protocol and port forwarding.
Above it the update structure of my system.
I have added a IAX2 extensions 2006 and I use AG-188 ata to register the Trixbox
server remotely. Below is the step:
23/32
www.atcom.cn
Add IAX2 extension
Go to -->Free PBX --> setup-->Extensions -->add generic IAX2 device. and add a
IAX2 extensions:
Add IAX2 Exenions:
User Extension:
2006
; Phone number of this extension
Display Name:
Alice
; Caller ID
Secret:
2006
; IAX2 Log on password
Enable Voicemail
Voicemail password:
2006
; password of your mailbox.
Add Port Forwarding on router
Since our Trixbox server is behind the router and don’t have public ip. We need to do
port forwarding in our router so the corresponding packets call be rend to the Trixbox
server.
Below is the port forwarding setting in my Linksys router.
The IAX2 protocol use the 4569 port as it register port and voice communicate port.
So I forward port 4569 to the public IP. Then all data incoming from the internet via
port 4569 will be sent to my Trixbox server (192.168.1.14).
Go to the Linksys status page
24/32
www.atcom.cn
I can see that my public ip is 124.35.127.209. so I can use my ATA AG-188 to register
to my Trixbox server via internet.
The configure method of AG-188 is the same as AT-530.
IAX Server Addr:
121:35.127.209
Account Name:
2006
Account Password:
2006
Phone Number:
2006
Enable Register
Enable IAX2 as default protocol
25/32
www.atcom.cn
OK, Now!, we can use the AG-188 to register our Trixbox server now, but it is very
annoy because our public IP is dynamic and will change after several hours.
Fortunately, there is a service called DDNS. Via the DDNS, you can bind your
dynamic public IP to a fix domain. For example, I am using a free DDNS service
from a Chinese company and they give me an account. I run the DDNS client on the
Trixbox server. The client will connect to the DDNS server and send my public ip to
them .and the server bind the ip with my register domain. So I can use my domain to
access the dynamic ip.
26/32
www.atcom.cn
7.
Echo Cancellation
Echo is a big problem in VoIP and the most possibility echo problem in our system is
the making outbound calls via an IP Phone. Below is several ways to improve our
voice quality.
Use ztmonitor to trace the echo
Run ztmonitor -1 v to trace the port1 and you will see:
( # = Audio Level * = Max Audio Hit )
<----------------(RX)----------------> <----------------(TX)---------------->
#####*
#######################*
You can see the RX voice level and TX voice level when you are talking and if we
mute one side for example mute the RX PSTN side and the there should be total silent
in the RX side. In this case, RX level should be 0 and if we are talking on the TX side
and see there are some audio on the RX side, it means there are echo in our talking.
The first way to reduce the echo is modify the RX and TX gain, we can go to
/etc/asterisk/zapata.conf and adjust the rxgain and txgain. Modify and modify up to
the echo is acceptable.
Remember you need to go to the asterisk CLI to reload the chan_zap.so module after
every time you modify the file.
Use FXOTUNE tool to configure the line impedance
Every country has different PSTN line impedance. If the line impedance doesn’t
match, then you will experience more or less echo. Fxotune utility is a tool to auto
configure the line impedance of your PSTN line and set the corresponding echo
coefficient for your line
This tool is installed default in Trixbox. Use the SSH tool to access the Trixbox and
run :
asterisk –vvvvvgrc
stop now
//before running the fxotune. You need to stop asterisk
fxotune -i 5
The system will test the PSTN line impedance and set the corresponding echo
coefficient in the /etc/fxotune.conf file. This will take about 20 minutes for to do it.
Notice, It will test all the FXO ports in your system , if you don’t have the PSTN line
connect to this port , it will generate wrong data in the /etc/fxotune.conf file.
fxotune –s
// to apply the setting
Run the asterisk and then you will find that the voice is better than before
More info about this utility, please refer www.voip-info.org, you can find more detail
of this tool.
27/32
www.atcom.cn
Install the MG2 echo cancellation
If the echo is still worst or you hear some noise at the beginning of your speech, then
we can try to use the MG2 echo cancellation. Trixbox doesn’t install this soft echo
cancellation in default. The soft echo cancellation may give you a good result in
Trixbox.
Download the latest 1.2 version zaptel for asterisk official website www.asterisk.org.
before install the zaptel driver , we need to install the kernel source of Trixbox. Use
SSH to connect the Trixbox server and run:
Install Kernel Source:
yum –y install kernel-devel kernel
yum –y install kernel-smp-devel
//
There is a bug in the new kernel , to fix it, you need to:
cd /usr/src/kernels/2.6.9-34.0.2.EL-smp-i686/include/linux/
vi spinlock.h
search for rw_lock_t in that file, and change it to rwlock_t, otherwise there will be error when
compile the zaptel driver
Install Zaptel:
Download the zaptel driver.
cd /usr/src
tar –zxvf zaptel-1.2.17.tar.gz
;
cd zaptel-1.2.17
vi zconfig.h and locate
/* #define ECHO_CAN_MARK2 */
/* #define ECHO_CAN_MARK3 */
#define ECHO_CAN_KB1
+/* MG2 is a version of KB1 that has some changes to it that are
+ * supposed to improve how it performs. If you have echo problems,
+ * try it out! */
+/* #define ECHO_CAN_MG2 */
Uncomment the +/* #define ECHO_CAN_MG2 */
And comment #define ECHO_CAN_KB1
make clean;make install
; finish the install of zaptel
Then MG2 echo cancellation is successful installed in your system.
Octware echo cancellation
Octasic provides a software echo cancellation for Asterisk, it can improve the voice quality much.
Trixbox 2.2 has installed this software (OCTWARE) default. You will need the license key to use
it. You can find it easily on the internet, the price is about several US dollars. This is the best
choice to improve the voice ☺
28/32
www.atcom.cn
8.
Install AX-4S in the Trixbox
AX-4S is a four ports BRI card. It doesn’t use the zaptel driver so the genzapconf
command doesn’t work on it. If you need to install this card on the Trixbox server,
you need to install the mISDN driver, it base on the mISDN driver.
Configure the jumper and switch of the card
First according to the AX-4S manual to set the card to correct jumper, I use the card to
connect the NT Plus’s S/T port, so I configure the card’s four ports as TE port.
The Jumper setting should be: jumper S401~404 set to right side. Switch 401~402 set
to ON(Left side)
And then put the AX-4S card on your PC.
Install the mISDN driver
Trixbox doesn’t have the linux kernel source in their default install. You need to
install the kernel source manually otherwise you will have trouble to install the oterh
software.
1: yum –y install kernel-devel kernel
2: yum –y install kernel-smp-devel
// install kernel source
3: cd /usr/src
4: wget beronet.com/download/install-misdn-mqueue.tar.gz
// get mISDN
and chan_misdn.
5: tar xzfv install-misdn-mqueue.tar.gz
6: cd install-misdn-mqueue
7: make
8: make install
9: reboot
After reboot, we have successfully install the misdn driver of the AX-4S and we can
use the card now.
Modify misdn-init.conf and misdn.conf file
The job of /etc/misdn-init.conf file is the same as the zaptel.conf.
I put below on this file:
card=1,0x4
; this is for the AX-4S card
te_ptmp=1,2,3,4
; configure port 1~4 to TE port.
/etc/asterisk/misdn.conf is the interface of the card and asterisk
Most important is
[intern]
29/32
www.atcom.cn
; define your ports, e.g. 1,2 (depends on mISDN-driver loading order)
ports=1,2,3,4
context = from-pstn
; context where to go to when incoming Call on one of the above ports
msns=*
In the misdn.conf file, I configure the port 1~4 as a group named “intern”. to use these
ports to make outgoing call. We need to add a custom trunk.
Add custom trunk:
Go to FreePBX-->Set up --> Trunks and add a new custom trunk.
Configure the outgoing setting as:
You can also use mISDN/1/$OUTNUM$/b to specify the outgoing call via port 1.
Then add a new route to this trunk and you can make outgoing call via the AX-4S
card.
Add inbound route:
According to the misdn.conf file, our incoming call will go to from-pstn context s
extension.
We need to add a route how it should work for this s extensions.
Go to FreePBX --> SetUp --> Inbound Routes--> Add Inbound Route
30/32
www.atcom.cn
After doing that, all calls to the BRI port will route to the IVR entry.
Auto load the AX-4S card after system startup
Open the /etc/rc.d/rc.local file and add a new line on this file to auto start the AX-4S
card after system startup
/etc/rc.d/rc.local
=============
#!/bin/sh
#
# This script will be executed *after* all the other init scripts.
# You can put your own initialization stuff in here if you don't
# want to do the full Sys V style init stuff.
touch /var/lock/subsys/local
/etc/init.d/misdn-init start
<== add this line
/etc/trixbox/runonce
/usr/local/sbin/motd.sh > /etc/motd
/usr/sbin/fxotune -s
/usr/sbin/amportal start
===============
31/32
www.atcom.cn
9.
The End
Thanks for your reading of this article. If you have question or advise of this article,
please feel free to contact me at [email protected]. Next update: Value add
service, calling group, FAX, Skype … and so on
32/32