1
HP StorageWorks Scalable File Share
Client Installation and User Guide
Version 2.2
Product Version: HP StorageWorks Scalable File Share Version 2.2
Published: November 2006
© Copyright 2005, 2006 Hewlett-Packard Development Company, L.P.
Lustre® is a registered trademark of Cluster File Systems, Inc.
Linux is a U.S. registered trademark of Linus Torvalds.
Quadrics® is a registered trademark of Quadrics, Ltd.
Myrinet® and Myricom® are registered trademarks of Myricom, Inc.
InfiniBand® is a registered trademark and service mark of the InfiniBand Trade Association
Microsoft and Windows are U.S. registered trademarks of Microsoft Corporation.
Red Hat® is a registered trademark of Red Hat, Inc.
Fedora™ is a trademark of Red Hat, Inc.
SUSE® is a registered trademark of SUSE AG, a Novell business.
Voltaire, ISR 9024, Voltaire HCA 400, and VoltaireVision are all registered trademarks of Voltaire, Inc.
Intel is a registered trademark of Intel Corporation or its subsidiaries in the United States and other countries.
AMD Opteron is a trademark of Advanced Micro Devices, Inc.
Sun and Solaris are trademarks or registered trademarks of Sun Microsystems, Inc. in the United States and other countries.
The information contained herein is subject to change without notice.
The only warranties for HP products and services are set forth in the express warranty statements accompanying such products
and services. Nothing herein should be construed as constituting an additional warranty. HP shall not be liable for technical or
editorial errors or omissions contained herein.
Contents
About this guide . . . . . . . . . . . . . . . . . . . . . . . . . . . . . . . . . . . . . . . . . . . . . . . . . . . . . . vii
1 Overview
1.1 Overview of the Lustre file system ............................................................................................... 1-2
1.2 Overview of HP SFS ................................................................................................................. 1-3
1.3 HP SFS client configurations....................................................................................................... 1-3
1.3.1
Interoperability with earlier versions of the HP SFS software ...................................................... 1-4
1.3.2
HP SFS with HP XC systems................................................................................................... 1-4
1.3.2.1
Supported upgrade paths for HP SFS and HP XC configurations ........................................... 1-5
1.3.3
HP SFS with RHEL and SLES 9 SP3 client configurations............................................................ 1-6
1.3.3.1
Tested client configurations............................................................................................... 1-6
1.3.3.2
Untested client configurations ........................................................................................... 1-7
1.3.4
Client configurations that do not work with HP SFS .................................................................. 1-9
2 Installing and configuring HP XC systems
2.1 HP SFS client software for HP XC systems .................................................................................... 2-2
2.2 Installing the HP SFS client software on HP XC systems (new installations) ........................................ 2-2
2.2.1
Step 1: Installing the HP SFS client RPM packages ................................................................... 2-2
2.2.2
Step 2: Running the sfsconfig command after installing the client software .................................. 2-3
2.2.3
Step 3: Completing other configuration tasks on the head node................................................. 2-4
2.2.3.1
Configuring interconnect interfaces.................................................................................... 2-4
2.2.3.1.1
Configuring Gigabit Ethernet interfaces ......................................................................... 2-4
2.2.3.1.2
Configuring Voltaire InifiniBand interfaces ..................................................................... 2-4
2.2.3.2
Configuring the NTP server .............................................................................................. 2-5
2.2.3.3
Configuring firewalls ....................................................................................................... 2-5
2.2.3.4
Configuring the slocate package on client nodes ................................................................ 2-5
2.2.4
Step 4: Verifying the operation of the interconnect ................................................................... 2-5
2.2.5
Step 5: Ensuring the HP XC system can monitor the HP SFS system............................................. 2-5
2.2.6
Step 6: Verifying that each file system can be mounted ............................................................ 2-6
2.2.6.1
If a file system does not mount successfully ......................................................................... 2-6
2.2.7
Step 7: Creating the /etc/sfstab.proto file .............................................................................. 2-7
2.2.8
Step 8: Preparing to image and configure the HP XC system ..................................................... 2-8
2.2.9
Step 9: Mounting the Lustre file systems .................................................................................. 2-8
2.2.10 Step 10: Enabling quotas functionality (optional) ..................................................................... 2-8
2.2.11 Step 11: Completing the installation of the HP XC system.......................................................... 2-8
2.3 Upgrading HP SFS client software on existing HP XC systems......................................................... 2-9
2.3.1
Step 1: Upgrading the HP SFS client software ......................................................................... 2-9
2.3.2
Step 2: Running the sfsconfig command after upgrading the client software .............................. 2-10
2.3.3
Step 3: Updating the golden image ..................................................................................... 2-11
2.3.4
Step 4: Disabling Portals compatibility.................................................................................. 2-11
2.4 Downgrading HP SFS client software on HP XC systems .............................................................. 2-12
3 Installing and configuring Red Hat Enterprise Linux and SUSE Linux Enterprise Server 9 SP3
client systems
3.1 HP SFS client software for RHEL and SLES 9 SP3 systems............................................................... 3-2
3.2 Building your own client kit ........................................................................................................ 3-3
3.2.1
Prerequisites for the SFS Client Enabler................................................................................... 3-4
3.2.2
Building an HP SFS client kit using the sample script................................................................. 3-5
3.2.2.1
Additional steps for systems using Voltaire InfiniBand interconnect ........................................ 3-7
3.2.3
Output from the SFS Client Enabler ........................................................................................ 3-9
3.2.4
Locating the python-ldap and hpls-diags-client packages........................................................... 3-9
3.2.5
List of patches in the client-rh-2.4.21-32 series file.................................................................. 3-10
3.2.6
Additional patches ............................................................................................................. 3-11
3.3 Installing the HP SFS client software on RHEL and SLES 9 SP3 systems (new installations) ................ 3-12
3.3.1
Step 1: Verifying that prerequisite packages are present......................................................... 3-12
iii
3.3.2
Step 2: Installing the client software ......................................................................................3-13
3.3.3
Step 3: Running the sfsconfig command after installing the software..........................................3-16
3.3.4
Step 4: Completing other configuration tasks .........................................................................3-17
3.3.4.1
Configuring interconnect interfaces ..................................................................................3-17
3.3.4.1.1
Configuring Gigabit Ethernet interfaces........................................................................3-17
3.3.4.1.2
Configuring Voltaire InfiniBand interfaces.....................................................................3-18
3.3.4.2
Checking that the python2 package is loaded ...................................................................3-18
3.3.4.3
Configuring the NTP server .............................................................................................3-19
3.3.4.4
Configuring firewalls ......................................................................................................3-19
3.3.4.5
Configuring the slocate package on client nodes ...............................................................3-19
3.3.5
Step 5: Configuring boot-time mounting of file systems ............................................................3-19
3.4 Upgrading HP SFS client software on existing RHEL and SLES 9 SP3 systems ..................................3-19
3.4.1
Step 1: Upgrading the HP SFS client software ........................................................................3-20
3.4.2
Step 2: Running the sfsconfig command after upgrading the software .......................................3-21
3.4.3
Step 3: Disabling Portals compatibility ..................................................................................3-22
3.5 Downgrading HP SFS client software on RHEL and SLES 9 SP3 systems..........................................3-22
4 Mounting and unmounting Lustre file systems on client nodes
4.1 Overview .................................................................................................................................4-2
4.2 Mounting Lustre file systems using the sfsmount command with the lnet: protocol ...............................4-3
4.3 Mounting Lustre file systems using the mount command ..................................................................4-4
4.4 The device field in the sfsmount and mount commands ...................................................................4-4
4.5 Mount options...........................................................................................................................4-5
4.6 Unmounting file systems on client nodes .......................................................................................4-7
4.7 Using the SFS service.................................................................................................................4-9
4.7.1
Mounting Lustre file systems at boot time..................................................................................4-9
4.7.2
Rebuilding the /etc/sfstab file at boot time ............................................................................4-10
4.7.2.1
Tips for editing the /etc/sfstab.proto file ...........................................................................4-12
4.7.3
The service sfs start command ..............................................................................................4-12
4.7.4
The service sfs reload command ...........................................................................................4-12
4.7.5
The service sfs stop command ..............................................................................................4-12
4.7.6
The service sfs status command.............................................................................................4-13
4.7.7
The service sfs cancel command ...........................................................................................4-13
4.7.8
The service sfs help command ..............................................................................................4-13
4.7.9
Disabling and enabling the SFS service .................................................................................4-13
4.8 Alternative sfsmount modes.......................................................................................................4-14
4.8.1
Mounting Lustre file systems using the sfsmount command with the http: protocol ........................4-14
4.8.2
Mounting Lustre file systems using the sfsmount command with the ldap: protocol .......................4-15
4.9 Restricting interconnect interfaces on the client node ....................................................................4-16
4.10 File system service information and client communications messages .............................................4-16
4.10.1 Viewing file system state information using the sfslstate command .............................................4-16
4.10.2 Examples of communications messages .................................................................................4-17
5 Configuring NFS and Samba servers to export Lustre file systems
5.1 Configuring NFS servers ............................................................................................................5-2
5.1.1
Supported configurations for NFS servers and client systems ......................................................5-2
5.1.2
Configuration factors for NFS servers ......................................................................................5-3
5.1.3
Configuration factors for multiple NFS servers ..........................................................................5-4
5.1.3.1
An example configuration with multiple NFS servers.............................................................5-4
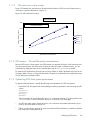
5.1.3.2
NFS performance scaling example.....................................................................................5-5
5.1.4
NFS access — file and file system considerations .....................................................................5-5
5.1.5
Optimizing NFS client system performance ..............................................................................5-5
5.1.6
Optimizing NFS server performance .......................................................................................5-6
5.2 Configuring Samba servers.........................................................................................................5-6
6 User interaction with Lustre file systems
6.1 Defining file stripe patterns .........................................................................................................6-2
6.1.1
Using the lfs executable .........................................................................................................6-2
6.1.2
Using a C program to create a file..........................................................................................6-3
6.1.3
Setting a default stripe size on a directory ...............................................................................6-4
iv
6.2 Dealing with ENOSPC or EIO errors ........................................................................................... 6-4
6.2.1
Determining the file system capacity using the lfs df command................................................... 6-5
6.2.2
Dealing with insufficient inodes on a file system....................................................................... 6-5
6.2.3
Freeing up space on OST services ......................................................................................... 6-6
6.3 Using Lustre file systems — performance hints .............................................................................. 6-7
6.3.1
Creating and deleting large numbers of files ........................................................................... 6-7
6.3.1.1
Improving the performance of the rm -rf command............................................................... 6-8
6.3.2
Large sequential I/O operations ............................................................................................ 6-8
6.3.3
Variation of file stripe count with shared file access.................................................................. 6-9
6.3.4
Timeouts and timeout tuning .................................................................................................. 6-9
6.3.4.1
Changing the Lustre timeout attribute ............................................................................... 6-11
6.3.5
Using a Lustre file system in the PATH variable ...................................................................... 6-12
6.3.6
Optimizing the use of the GNU ls command on Lustre file systems ........................................... 6-12
6.3.7
Using st_blksize to determine optimum I/O block size ............................................................ 6-12
7 Troubleshooting
7.1
7.1.1
7.1.2
7.2
7.2.1
7.2.2
7.2.3
7.2.4
7.2.5
7.3
7.3.1
7.3.2
7.3.3
7.3.4
7.3.5
7.3.6
7.4
7.4.1
Installation issues ...................................................................................................................... 7-2
The initrd file is not created ................................................................................................... 7-2
Client node still boots the old kernel after installation................................................................ 7-3
File system mounting issues ........................................................................................................ 7-3
Client node fails to mount or unmount a Lustre file system.......................................................... 7-3
The sfsmount command reports device or resource busy............................................................ 7-4
Determine whether Lustre is mounted on a client node .............................................................. 7-5
The SFS service is unable to mount a file system (SELinux is not supported).................................. 7-5
Troubleshooting stalled mount operations................................................................................ 7-6
Operational issues.................................................................................................................... 7-6
A find search executes on the global file system on all client nodes ............................................ 7-6
Investigating file system problems .......................................................................................... 7-6
Reset client nodes after an LBUG error.................................................................................... 7-7
Access to a file system hangs ................................................................................................ 7-7
Access to a file hangs (ldlm_namespace_cleanup() messages) ................................................... 7-8
Troubleshooting a dual Gigabit Ethernet interconnect ............................................................... 7-9
Miscellaneous issues ............................................................................................................... 7-10
socknal_cb.c EOF warning ................................................................................................. 7-10
A Using the sfsconfig command
B Options for Lustre kernel modules
B.1
B.2
B.2.1
B.3
B.4
Overview .................................................................................................................................B-2
Setting the options lnet settings ....................................................................................................B-3
Testing the options lnet settings ...............................................................................................B-4
Modifying the /etc/modprobe.conf file on Linux Version 2.6 client nodes manually ..........................B-6
Modifying the /etc/modules.conf file on Linux Version 2.4 client nodes manually .............................B-6
C Building an HP SFS client kit manually
C.1
C.2
C.3
C.4
Overview ................................................................................................................................ C-2
Building the HP SFS client kit manually ........................................................................................ C-2
Output from the SFS Client Enabler ............................................................................................. C-9
Locating the python-ldap and hpls-diags-client packages ............................................................... C-9
Glossary
Index
v
vi
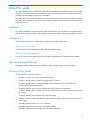
About this guide
This guide describes how to install and configure the HP StorageWorks Scalable File Share (HP SFS) client
software on client nodes that will use Lustre® file systems on HP SFS systems. It also includes instructions for
mounting and unmounting file systems on client nodes.
This guide does not document standard Linux® administrative tasks or the functions provided by standard
Linux tools and commands; it provides only administrative information and instructions for tasks specific to
the HP SFS product.
Audience
This guide is intended for experienced Linux system administrators. The information in this guide assumes
that you have experience with Linux administrative tasks and are familiar with the Linux operating system.
Assumptions
The following assumptions have been made in preparing the content of this guide:
About you, the client user
You have read the HP StorageWorks Scalable File Share Release Notes
About the state of the hardware
The HP SFS system that the client node will use has been installed and a file system has been created.
New and changed features
All chapters and appendixes have been updated to reflect changed features and functionality.
Structure of this guide
The contents of the guide are as follows:
•
Chapter 1 provides an overview of the HP SFS product.
•
Chapter 2 describes how to install and configure HP XC systems.
•
Chapter 3 describes how to install and configure Red Hat Enterprise Linux and SUSE Linux
Enterprise Server 9 SP3 client systems.
•
Chapter 4 describes how to mount and unmount Lustre file systems on client nodes.
•
Chapter 5 describes how to configure HP SFS client nodes as NFS or Samba servers to export Lustre
file systems.
•
Chapter 6 describes user interaction with Lustre file systems.
•
Chapter 7 describes solutions to problems that can arise in relation to mounting Lustre file systems on
client systems.
•
Appendix A describes the sfsconfig command.
•
Appendix B describes the options for Lustre kernel modules.
•
Appendix C describes how to build an HP SFS client kit manually.
vii
HP SFS documentation
The HP StorageWorks Scalable File Share documentation set consists of the following documents:
•
HP StorageWorks Scalable File Share Release Notes
•
HP StorageWorks Scalable File Share for EVA4000 Hardware Installation Guide
•
HP StorageWorks Scalable File Share for SFS20 Enclosure Hardware Installation Guide
•
HP StorageWorks Scalable File Share System Installation and Upgrade Guide
•
HP StorageWorks Scalable File Share System User Guide
•
HP StorageWorks Scalable File Share Client Installation and User Guide (this document)
Documentation conventions
This section lists the documentation conventions used in this guide.
viii
Italic type
Italic (slanted) type indicates variable values, placeholders, and function argument names.
Italic type is also used to emphasize important information.
Courier font
This font denotes literal items such as command names, file names, routines, directory
names, path names, signals, messages, and programming language structures.
Bold type
In command and interactive examples, bold type denotes literal items entered by the user
(typed user input). For example, % cat.
When describing a user interface, bold type denotes items such as buttons or page names
on the interface. In text, bold type indicates the first occurrence of a new term.
TIP:
A tip calls attention to useful information.
NOTE:
A note calls attention to special information and to information that must be understood
before continuing.
CAUTION:
A caution calls attention to actions or information that may affect the integrity of the system
or data.
WARNING:
A warning contains important safety information. Failure to follow directions in the warning
could result in bodily harm or loss of life.
%, $, and #
In examples, a percent sign represents the C shell system prompt. A dollar sign represents the
system prompt for the bash shell. A pound sign denotes the user is in root or superuser
mode. A dollar sign also shows that a user is in non-superuser mode.
mount(8)
A cross-reference to a manpage includes the appropriate section number in parentheses. For
example, mount(8) indicates that you can find information on the mount command in
Section 8 of the manpages. Using this example, the command to display the manpage is:
# man 8 mount or # man mount.
.
.
.
A vertical ellipsis indicates that a portion of an example is not shown.
[|]
In syntax definitions, brackets indicate items that are optional. Vertical bars indicate that you
choose one item from those listed.
Ctrl/x
This font denotes keyboard key names.
Naming conventions
This section lists the naming conventions used for an HP SFS system in this guide. You are free to choose
your own name for your HP SFS system.
System Component
Value
Name of the HP SFS system (the system alias)
south
Name of the HP SFS administration server
south1
Name of the HP SFS MDS server
south2
For more information
For more information about HP products, access the HP Web site at the following URL:
www.hp.com/go/hptc
Providing feedback
HP welcomes any comments and suggestions that you have on this guide. Please send your comments and
suggestions to your HP Customer Support representative.
ix
x
1
Overview
HP StorageWorks Scalable File Share Version 2.2 (based on Lustre® technology) is a product from HP that
uses the Lustre File System (from Cluster File Systems, Inc.).
An HP StorageWorks Scalable File Share (HP SFS) system is a set of independent servers and storage
subsystems combined through system software and networking technologies into a unified system that
provides a storage system for standalone servers and/or compute clusters.
This chapter provides an overview of HP SFS, and is organized as follows:
•
Overview of the Lustre file system (Section 1.1)
•
Overview of HP SFS (Section 1.2)
•
HP SFS client configurations (Section 1.3)
1–1
1.1
Overview of the Lustre file system
Lustre is a design for a networked file system that is coherent, scalable, parallel, and targeted towards high
performance computing (HPC) environments. Lustre separates access to file data from access to file metadata. File data is accessed through an object interface, which provides a higher level of access than a basic
block store. Each logical file store is called an Object Storage Target (OST) service. Data is stored on multiple
OST services, which may be served from one or more Object Storage Servers. Scalable access to file data
is provided by the Object Storage Servers, and scalable, independent access to file meta-data is provided
by the meta-data servers (MDS servers). Lustre configuration information is distributed to client nodes
through a configuration management server.
This modular architecture allows Lustre to overcome many of the bottlenecks and deficiencies of existing file
systems. The separation of data from meta-data allows extra capability to be added easily as data or metadata loads increase. Because Lustre is designed for HPC environments, high performance is at the centre of
the Lustre architecture.
Lustre networking protocols are implemented using the Lustre Networking Model API (LNET) message
passing interface. The LNET network layer provides a network-independent transport layer that allows Lustre
to operate in multiple networking environments. Network types are implemented by Lustre Networking
Device layers (LNDs).
Lustre file systems can be accessed in the same way as other POSIX-compliant file systems.
Lustre is being developed and maintained as Open Source software under the GNU General Public License
(GPL), enabling broad support for industry-standard platforms.
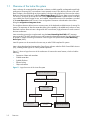
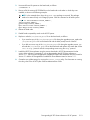
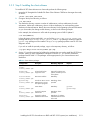
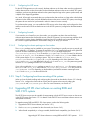
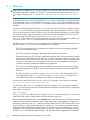
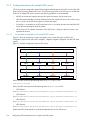
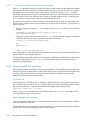
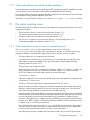
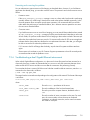
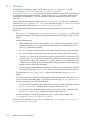
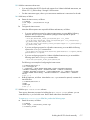
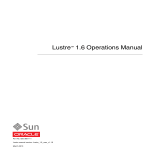
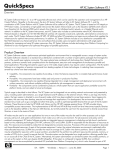
Figure 1-1 shows a logical overview of the architecture of Lustre and its main features, which include the
following:
•
Separation of data and meta-data
•
Scalable meta-data
•
Scalable file data
•
Efficient locking
•
Object architecture
Figure 1-1 Logical overview of the Lustre file system
f
Configuration Management Server
Configuration information, network connection details,
& security management
Lustre Client
Directory operations,
meta-data & concurrency
MDS Server
1–2
Overview
File I/O & file locking
Recovery, file status,
file creation
Object Storage Servers
A typical Lustre file system consists of multiple Object Storage Servers that have storage attached to them.
At present, the Object Storage Servers are Linux servers, but it is anticipated that in the future the Object
Storage Servers may be storage appliances that run Lustre protocols. The Object Storage Servers are
internetworked over potentially multiple networks to Lustre client nodes, which must run a version of the Linux
operating system. Similarly, one or more MDS servers with associated storage are also interconnected with
client nodes. HP SFS Version 2.2 supports a single MDS server only.
1.2
Overview of HP SFS
HP SFS is a turnkey Lustre system that is delivered and supported by HP and has the following features:
1.3
•
Provides Lustre services in an integrated and managed fashion.
•
Provides access to Lustre file systems by way of Lustre client-server protocols over multiple
interconnects.
•
Provides a single point of management and administration for the Lustre services.
•
Allows legacy clients that can use only the NFS protocol to access the Lustre file system by configuring
a Lustre client as an NFS server of the Lustre file system (see Chapter 5 for more information).
•
Allows Windows® and CIFS (Common Internet File System) client systems to access Lustre file systems
via Samba.
HP SFS client configurations
Client nodes that will use the Lustre file systems on an HP SFS system must have the HP SFS client software
and some additional software components installed on them. The client kernel must be at the correct level
to support the HP SFS client software; if necessary, the client kernel must be patched to the correct revision.
The client configurations that can be used with HP SFS fall into two categories:
•
HP XC systems
HP provides prebuilt packages for installing the HP SFS client software on nodes that are running HP
XC System Software on Cluster Platform 3000, 4000, or 6000.
Section 1.3.2 provides details of the recommended HP SFS and HP XC configurations. Chapter 2
provides instructions for installing the HP SFS software on HP XC nodes.
•
Certain Red Hat Enterprise Linux (RHEL) distributions and the SUSE® Linux Enterprise Server 9 SP3
(SLES 9 SP3) distribution
A number of RHEL distributions, and the SLES 9 SP3 distribution, have been tested successfully with
the HP SFS client software. In addition, HP has identified a number of other client configurations that
are likely to work with the HP SFS software, but have not been fully tested. The tested and untested
configurations are listed in Section 1.3.3.
For RHEL and SLES 9 SP3 configurations, you must use the supplied SFS Client Enabler to build the
HP SFS client software against the client kernel on the appropriate distributions, and then install the kit
that you have built. Chapter 3 provides instructions for building and installing the HP SFS client
software.
Note that the SLES 9 SP3 kernel does not need to be patched to function as an HP SFS client system;
therefore you do not need to reinstall the kernel or to reboot your system when you are installing the
HP SFS client software on a SLES 9 SP3 system.
Overview of HP SFS
1–3
HP SFS Version 2.2-0 software has been tested successfully with the following interconnect types:
•
Gigabit Ethernet interconnect
•
Quadrics interconnect (QsNetII) (from Quadrics, Ltd.)
•
Myrinet interconnect (Myrinet XP and Myrinet 2XP) (from Myricom, Inc.)
•
Voltaire InfiniBand interconnect (HCA 400) (from Voltaire, Inc.)
For details of the required firmware versions for Voltaire InfinBand interconnect adapters, refer to
Appendix A in the HP StorageWorks Scalable File Share Release Notes.
1.3.1 Interoperability with earlier versions of the HP SFS software
If you wish, you can upgrade your HP SFS server software to Version 2.2-0 while leaving some or all of your
HP SFS client systems at HP SFS Version 2.1-1. However, running different versions of the HP SFS software
on your servers and client nodes is normally considered a temporary configuration.
When an HP SFS system has been upgraded to Version 2.2-0, but one or more of the client systems served
by the HP SFS system has not yet been upgraded to HP SFS Version 2.2-0, the HP SFS servers and clients
must be configured as follows:
•
The HP SFS servers must run in Portals compatibility mode.
•
On client nodes that have been upgraded to HP SFS Version 2.2-0, the portals_compatibility
attribute must be set to weak.
When all of the client nodes and the HP SFS system have been upgraded to HP SFS Version 2.2-0, the
HP SFS system does not need to run in Portals compatibility mode and the portals_compatibility
attribute on all client nodes must be set to none.
HP does not support a scenario where the HP SFS client software is upgraded before the HP SFS server
software is upgraded.
1.3.2 HP SFS with HP XC systems
HP recommends that you upgrade both your HP SFS system and your HP XC systems to the latest versions
of the products. In the case of this release, this means that HP recommends the following:
•
Upgrade all HP SFS server and client software to HP SFS Version 2.2-0.
•
Upgrade all HP XC systems currently running the HP XC Version 2.1 stream or the HP XC Version 3.0
stream to HP XC Version 3.1 or HP XC Version 3.0 PK2.
However, to facilitate upgrade paths, HP supports interoperability between certain other HP SFS and HP XC
versions. The supported upgrade paths are shown in Section 1.3.2.1.
1–4
Overview
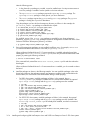
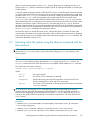
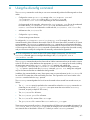
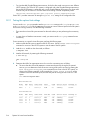
1.3.2.1
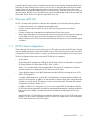
Supported upgrade paths for HP SFS and HP XC configurations
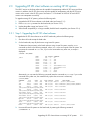
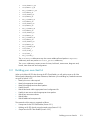
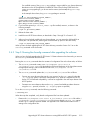
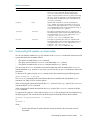
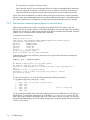
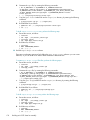
The supported upgrade paths for HP SFS and HP XC configurations are shown in Table 1-1.
Table 1-1 Supported upgrade paths for HP SFS and HP XC configurations
Existing Versions
XC Version
SFS
Client
Version
SFS Server
Version
2.1 PK02
2.1-1
2.1-1
Can be Upgraded To
XC Version
Upgrade Path
SFS Client
Version
SFS Server
Version
Recommended configurations
Upgrade all
3.1
2.2-0
2.2-0
Upgrade all
3.0 PK02
2.2-0
2.2-0
Temporary configurations
3.0 PK01
2.1-1
Upgrade HP XC system software
first.
Later, upgrade HP SFS server and
client software.
3.1
(upgraded)
2.1-1
(reinstall
RPMs1)
2.1-1
(unchanged)
Upgrade HP XC system software
first.
Later, upgrade HP SFS server and
client software.
3.0 PK02
(upgraded)
2.1-1
(reinstall
RPMs1)
2.1-1
(unchanged)
Upgrade HP SFS server software
first.
Later, upgrade HP XC system
software to Version 3.1 or Version
3.0 PK02 and HP SFS client
software to HP SFS Version 2.2.0.
2.1 PK02
(unchanged)
2.1-1
2.2-0
(unchanged) (upgraded use Portals
compatibility
mode2)
2.1-1
Recommended configurations
Upgrade all
3.1
2.2-0
2.2-0
Upgrade all
3.0 PK02
2.2-0
2.2-0
Temporary configurations
Upgrade HP XC system software
first.
Later, upgrade HP SFS server and
client software.
3.1
(upgraded)
2.1-1
(reinstall
RPMs1)
2.1-1
(unchanged)
Upgrade HP XC system software
first.
Later, upgrade HP SFS server and
client software.
3.0 PK02
(upgraded)
2.1-1
(reinstall
RPMs1)
2.1-1
(unchanged)
Upgrade HP SFS server software
first.
Later, upgrade HP XC system
software to Version 3.1 or Version
3.0 PK02 and HP SFS client
software to HP SFS Version 2.2-0.
3.0 PK01
(unchanged)
2.1-1
2.2-0
(unchanged) (upgraded use Portals
compatibility
mode2)
1. If you are upgrading the HP XC software before you upgrade the HP SFS server and client software, you must
install an updated version of the HP SFS Version 2.1-1 client software on the nodes. The appropriate prebuilt
packages are available from HP. Contact your HP Customer Support representative for more information.
2. See Section 1.3.1 for more information on the Portals compatibility mode.
HP SFS client configurations
1–5
1.3.3 HP SFS with RHEL and SLES 9 SP3 client configurations
In addition to HP XC systems (as described in Section 1.3.2), the HP SFS Version 2.2-0 client software has
been tested and shown to work successfully with a number of other client configurations. The tested
configurations are listed in Section 1.3.3.1.
HP has also identified a number of client configurations that are likely to work successfully with
HP SFS Version 2.2-0 but have not been fully tested. These configurations are listed in Section 1.3.3.2. If
you intend to use any of these untested configurations in your HP SFS client systems, please contact your
HP Customer Support representative so that HP can work with you to ensure that the configuration can be
used successfully.
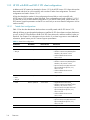
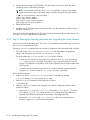
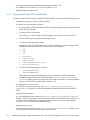
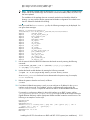
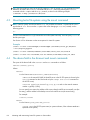
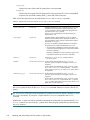
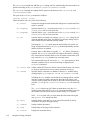
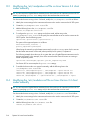
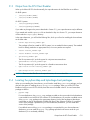
1.3.3.1
Tested client configurations
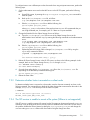
Table 1-2 lists the client distributions that have been successfully tested with HP SFS Version 2.2-0.
Although HP does not provide prebuilt packages to install the HP SFS client software on these distributions,
you can use the SFS Client Enabler to build an HP SFS client software kit, and then install the kit that you
have built. See Chapter 3 for information on how to do this. If you have any queries or need additional
information, please contact your HP Customer Support representative.
Table 1-2 Tested client configurations
Architecture
Distribution
Kernel Version
Interconnect
• i686
RHEL 4 Update 4
2.6.9-42.0.2.EL
• Gigabit Ethernet interconnect
• ia64
RHEL 4 Update 4
2.6.9-42.0.2.EL
• Gigabit Ethernet interconnect
• Quadrics interconnect (QsNetII) (from
Quadrics, Ltd.) Version 5.23.2
• x86_64
• Voltaire InfiniBand Interconnect
Version 3.5.5
• ia32e
RHEL 4 Update 4
2.6.9-42.0.2.EL
• Gigabit Ethernet interconnect
• Quadrics interconnect (QsNetII) (from
Quadrics, Ltd.) Version 5.23.2
• Myrinet interconnect (Myrinet XP and
Myrinet 2XP) (from Myricom, Inc.)
Version 2.1.26
• Voltaire InfiniBand Interconnect
Version 3.5.5
• i686
RHEL 3 Update 8
2.4.21-47.EL
• Gigabit Ethernet interconnect
RHEL 3 Update 8
2.4.21-47.EL
• Gigabit Ethernet interconnect
• ia64
• x86_64
• ia32e
• Quadrics interconnect (QsNetII) (from
Quadrics, Ltd.) Version 5.23.2
• Myrinet interconnect (Myrinet XP and
Myrinet 2XP) (from Myricom, Inc.)
Version 2.1.26
• Voltaire InfiniBand Interconnect
Version 3.4.5
• i686
RHL 9
2.4.20-31
• Gigabit Ethernet interconnect
• Myrinet interconnect (Myrinet XP and
Myrinet 2XP) (from Myricom, Inc.)
Version 2.1.26
• i686
1–6
Overview
RHEL 2.1 AS1
2.4.20-31
• Gigabit Ethernet interconnect
Table 1-2 Tested client configurations
Architecture
• i686
Distribution
SLES 9
SP32
Kernel Version
Interconnect
2.6.5-7.244
• Gigabit Ethernet interconnect
• ia64
• ia32e
• x86_64
1. In subsequent releases of the HP SFS product, HP will not test or support Red Hat Enterprise Linux 2.1 AS client
systems as Lustre clients.
2. The versions of the Lustre client software (not the kernel) shipped with SLES 9 SP3 are obsolete, and are not
compatible with HP SFS Version 2.2-0. The process of rebuilding the client software requires the kernel tree for
compilation purposes; for this reason (and only for this reason), the SFS Client Enabler may rebuild the kernel.
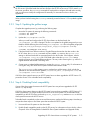
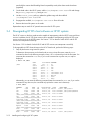
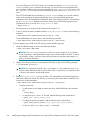
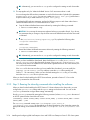
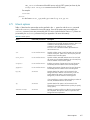
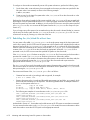
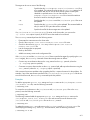
1.3.3.2
Untested client configurations
Table 1-3 lists a number of client configurations that are likely to work successfully with HP SFS
Version 2.2-0 but have not been fully tested by HP. If you intend to use any of these configurations in your
HP SFS client systems, please contact your HP Customer Support representative so that HP can work with
you to ensure that the configuration can be used successfully.
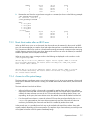
Table 1-3 Untested client configurations
Architecture
Distribution
Kernel Version
Interconnect
• i686
RHEL 4 Update 4
2.6.9-42.0.2.EL
• Myrinet interconnect (Myrinet XP
and Myrinet 2XP) (from Myricom,
Inc.) Version 2.1.26
• i686
RHEL 4 Update 3
2.6.9-34.0.2.EL
• Gigabit Ethernet interconnect
• ia64
RHEL 4 Update 3
2.6.9-34.0.2.EL
• Gigabit Ethernet interconnect
• ia64
• x86-64
• Quadrics interconnect (QsNetII)
(from Quadrics, Ltd.) Version
5.23.2
• x86_64
• Voltaire InfiniBand Interconnect
Version 3.5.5
• ia32e
RHEL 4 Update 3
2.6.9-34.0.2.EL
• Gigabit Ethernet interconnect
• Quadrics interconnect (QsNetII)
(from Quadrics, Ltd.) Version
5.23.2
• Myrinet interconnect (Myrinet XP
and Myrinet 2XP) (from Myricom,
Inc.) Version 2.1.26
• Voltaire InfiniBand Interconnect
Version 3.5.5
• i686
RHEL 4 Update 2
2.6.9-22.0.2.EL
• Gigabit Ethernet interconnect
• ia64
RHEL 4 Update 2
2.6.9-22.0.2.EL
• Gigabit Ethernet interconnect
• x86_64
• Quadrics interconnect (QsNetII)
(from Quadrics, Ltd.) Version
5.23.2
• Voltaire InfiniBand Interconnect
Version 3.5.5
HP SFS client configurations
1–7
Table 1-3 Untested client configurations
Architecture
Distribution
Kernel Version
Interconnect
• ia32e
RHEL 4 Update 2
2.6.9-22.0.2.EL
• Gigabit Ethernet interconnect
• Quadrics interconnect (QsNetII)
(from Quadrics, Ltd.) Version
5.23.2
• Myrinet interconnect (Myrinet XP
and Myrinet 2XP) (from Myricom,
Inc.) Version 2.1.26
• Voltaire InfiniBand Interconnect
Version 3.5.5
• i686
RHEL 4 Update 1
2.6.9-11.EL
• Gigabit Ethernet interconnect
• ia64
RHEL 4 Update 1
2.6.9-11.EL
• Gigabit Ethernet interconnect
• Quadrics interconnect (QsNetII)
(from Quadrics, Ltd.) Version
5.23.2
• x86_64
• Voltaire InfiniBand Interconnect
Version 3.5.5
• ia32e
RHEL 4 Update 1
2.6.9-11.EL
• Gigabit Ethernet interconnect
• Quadrics interconnect (QsNetII)
(from Quadrics, Ltd.) Version
5.23.2
• Myrinet interconnect (Myrinet XP
and Myrinet 2XP) (from Myricom,
Inc.) Version 2.1.26
• Voltaire InfiniBand Interconnect
Version 3.5.5
• i686
RHEL 3 Update 8
2.4.21-47.EL
• Myrinet interconnect (Myrinet XP
and Myrinet 2XP) (from Myricom,
Inc.) Version 2.1.26
• ia64
RHEL 3 Update 8
2.4.21-47.EL
• Quadrics interconnect (QsNetII)
(from Quadrics, Ltd.) Version
5.23.2
• x86_64
• Myrinet interconnect (Myrinet XP
and Myrinet 2XP) (from Myricom,
Inc.) Version 2.1.26
• Voltaire InfiniBand Interconnect
Version 3.4.5
• i686
RHEL 3 Update 7
2.4.21-40.EL
• Gigabit Ethernet interconnect
RHEL 3 Update 7
2.4.21-40.EL
• Gigabit Ethernet interconnect
• ia64
• x86_64
• ia32e
• Quadrics interconnect (QsNetII)
(from Quadrics, Ltd.) Version
5.23.2
• Myrinet interconnect (Myrinet XP
and Myrinet 2XP) (from Myricom,
Inc.) Version 2.1.26
• Voltaire InfiniBand Interconnect
Version 3.4.5
• i686
• ia64
• x86_64
1–8
Overview
RHEL 3 Update 6
2.4.21-37.EL
• Gigabit Ethernet interconnect
Table 1-3 Untested client configurations
Architecture
Distribution
Kernel Version
Interconnect
• ia32e
RHEL 3 Update 6
2.4.21-37.EL
• Gigabit Ethernet interconnect
• Quadrics interconnect (QsNetII)
(from Quadrics, Ltd.) Version
5.23.2
• Myrinet interconnect (Myrinet XP
and Myrinet 2XP) (from Myricom,
Inc.) Version 2.1.26
• Voltaire InfiniBand Interconnect
Version 3.4.5
• i686
RHEL 3 Update 5
2.4.21-32.0.1.EL
• Gigabit Ethernet interconnect
RHEL 3 Update 5
2.4.21-32.0.1.EL
• Gigabit Ethernet interconnect
• ia64
• x86_64
• ia32e
• Quadrics interconnect (QsNetII)
(from Quadrics, Ltd.) Version
5.23.2
• Myrinet interconnect (Myrinet XP
and Myrinet 2XP) (from Myricom,
Inc.) Version 2.1.26
• Voltaire InfiniBand Interconnect
Version 3.4.5
• i686
SLES 9 SP21
2.6.5-7.179
• Gigabit Ethernet interconnect
CentOS 4.3
2.6.9-34.0.2.EL
• Gigabit Ethernet interconnect
• ia64
• x86_64
• ia32e
• i686
• Quadrics interconnect (QsNetII)
(from Quadrics, Ltd.) Version
5.23.2
• ia64
• x86_64
• ia32e
• Myrinet interconnect (Myrinet XP
and Myrinet 2XP) (from Myricom,
Inc.) Version 2.1.26
• Voltaire InfiniBand Interconnect
Version 3.5.5
1. The versions of the Lustre client software (not the kernel) shipped with SLES 9 SP2 and SP3 are obsolete, and are not
compatible with HP SFS Version 2.2-0. The process of rebuilding the client software requires the kernel tree for
compilation purposes; for this reason (and only for this reason), the SFS Client Enabler rebuilds the kernel.
1.3.4 Client configurations that do not work with HP SFS
It is either not possible to build or not possible to run HP SFS client configurations that use
HP SFS Version 2.2-0 client software in the following combinations:
•
Any client architecture other than i686, ia32e, x86_64, or ia64.
•
Any client system with a Quadrics interconnect software version earlier than Version 5.11.
•
Any client system with Myrinet interconnect software Version 2.0.x; the HP SFS client kit may build in
this case, but the system does not run correctly.
•
Any client system with a Myrinet interconnect software version earlier than Version 2.1.23; the HP SFS
client kit does not build in this case.
•
Any client system with a Linux kernel version earlier than Version 2.4.20-31; such client nodes cannot
be patched correctly.
HP SFS client configurations
1–9
1–10
Overview
2
Installing and configuring HP XC systems
To allow client nodes to mount the Lustre file systems on an HP SFS system, the HP SFS client software and
certain other software components must be installed and configured on the client nodes. This chapter
describes how to perform these tasks on HP XC systems.
This chapter is organized as follows:
•
HP SFS client software for HP XC systems (Section 2.1)
•
Installing the HP SFS client software on HP XC systems (new installations) (Section 2.2)
•
Upgrading HP SFS client software on existing HP XC systems (Section 2.3)
•
Downgrading HP SFS client software on HP XC systems (Section 2.4)
When the client nodes have been configured as described in this chapter, file systems from the HP SFS
system can be mounted on the clients, as described in Chapter 4.
NOTE: Before you start to install or upgrade the HP SFS client software on your client systems, make sure
that you have read the HP StorageWorks Scalable File Share Release Notes, particularly Section 2.2, the
installation notes for client systems.
2–1
2.1
HP SFS client software for HP XC systems
The prebuilt packages that you will need for installing the HP SFS client software on your HP XC systems are
provided on the HP StorageWorks Scalable File Share Client Software CD-ROM.
The packages are located in the arch/distro directory.
•
The possible architectures are ia64, x86_64, and ia32e (em64t).
•
There is one directory for each supported version of the HP XC distribution.
The installation and configuration tasks described in this chapter must be performed during the installation
and configuration of the HP XC head node. If you have chosen to place the /hptc_cluster file system
on the HP SFS system, these tasks must be performed before you run the cluster_config utility on the
HP XC system.
2.2
Installing the HP SFS client software on HP XC systems (new
installations)
NOTE: The HP XC version on the client nodes must be capable of interoperating with the HP SFS server
and client versions. In addition, the HP SFS client version must be capable of interoperating with the HP
SFS server version on the servers in the HP SFS system. See Section 1.3.2 for details of which HP XC and
HP SFS versions can interoperate successfully.
To install the HP SFS software on HP XC systems, and to configure the client nodes to support HP SFS
functionality, perform the following tasks:
1.
Install the HP SFS client software on each client node (see Section 2.2.1).
2.
Run the sfsconfig command on the head node (see Section 2.2.2).
3.
Complete the remaining configuration tasks on the head node (see Section 2.2.3).
4.
Verify the operation of the interconnect (see Section 2.2.4).
5.
Add the HP SFS server alias to the /etc/hosts file (see Section 2.2.5).
6.
Verify that each file system can be mounted (see Section 2.2.6).
7.
Create the /etc/sfstab.proto file (see Section 2.2.7).
8.
Prepare to image and configure HP XC systems (see Section 2.2.8).
9.
Mount the Lustre file systems (see Section 2.2.9).
10. Enable quotas functionality (optional) (see Section 2.2.10).
11. Complete the installation of the HP XC system (Section 2.2.11).
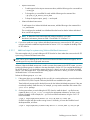
2.2.1 Step 1: Installing the HP SFS client RPM packages
To enable the nodes in an HP XC system to access the file systems served by the HP SFS system, you must
install the supplied prebuilt (RPM) packages as well as a number of supporting software modules and utilities
on the nodes. Perform the following steps:
1.
Mount the HP StorageWorks Scalable File Share Client Software CD-ROM on the head node, as
follows:
# mount /dev/cdrom /mnt/cdrom
2.
Change to the top level directory, as follows:
# cd /mnt/cdrom
2–2
Installing and configuring HP XC systems
3.
The binary distribution directory contains a number of subdirectories, with one subdirectory for each
architecture. Within each subdirectory, there is an XC directory containing binary RPM files. Identify
the correct directory for the architecture on your client node, then change to that directory, as shown
in the following example.
In this example, the architecture is ia64 and the HP XC software version is 3.0:
# cd ia64/XC_3.0/
The directories each contain a number of packages, as follows:
•
lustre-modules
•
lustre
•
hpls-lustre-client
•
python-ldap (for ia64 systems only)
•
hpls-diags-client
The first four of these packages are mandatory and must be installed. The hpls-diags-client
package provides SFS client diagnostic utilities and is optional.
4.
Install the packages, as shown in the following example. In this example, the optional
hpls-diags-client package is installed. You must install the packages in the order shown here:
# rpm -ivh lustre-modules-version_number.rpm \
lustre-version_number.rpm \
python-ldap-version_number.rpm \
hpls-lustre-client-version_number.rpm \
hpls-diags-client-version_number.rpm
When you have finished installing the HP SFS client software on the head node, proceed to Section 2.2.2
to run the sfsconfig command on the node.
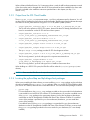
2.2.2 Step 2: Running the sfsconfig command after installing the client software
When you have finished installing the HP SFS Version 2.2 client software on the head node, you must
configure the options lnet settings and the lquota settings on the node. You can use the
sfsconfig(8) command to configure these settings automatically.
Run the sfsconfig command on the head node, by entering the command shown in the following
example. In this example, south is the name of an HP SFS system that the HP XC nodes will access:
# sfsconfig --server south all
The sfsconfig command creates a new /etc/modprobe.conf.lustre file that contains the
appropriate settings, and includes the new file in the /etc/modprobe.conf file.
When the script has completed, examine the /etc/modprobe.conf.lustre file and the
/etc/modprobe.conf file on the head node to ensure that the options lnet settings and the lquota
settings have been added (see Appendix B for more information on the settings).
If the head node has a different number of Gigabit Ethernet devices than the other nodes in the HP XC
cluster, the sfsconfig command may have added tcp entries to the options lnet settings on the head
node that are not appropriate for the other nodes. If this happens, edit the
/etc/modprobe.conf.lustre file on the head node so that the options lnet settings contain a
common set of Gigabit Etherernet devices. This may involve removing the tcp entries if a Gigabit Ethernet
interconnect is not being used.
Note that the sfsconfig command uses the http: protocol to get configuration information from the
HP SFS servers. If the head node does not have access to the HP SFS servers over a TCP/IP network, or if
the servers are offline, the sfsconfig command will not be able to configure the head node correctly, and
you will have to modify the configuration file manually. For instructions on how to do this, see Appendix B.
Installing the HP SFS client software on HP XC systems (new installations)
2–3
When you have finished configuring the options lnet and lquota settings, proceed to Section 2.2.3
to complete the remaining additional configuration tasks.
2.2.3 Step 3: Completing other configuration tasks on the head node
To complete the configuration of the head node, perform the following tasks:
1.
Configure interconnect interfaces (see Section 2.2.3.1).
2.
Configure the NTP server (see Section 2.2.3.2).
3.
Configure firewalls (see Section 2.2.3.3).
4.
Configure the slocate package (see Section 2.2.3.4).
2.2.3.1
Configuring interconnect interfaces
This section describes specific configuration steps that you may need to perform depending on the
interconnect type and configuration that is used in the HP SFS system.
The section is organized as follows:
•
Configuring Gigabit Ethernet interfaces (Section 2.2.3.1.1)
•
Configuring Voltaire InifiniBand interfaces (Section 2.2.3.1.2)
No specific configuration steps are required for Quadrics or Myrinet interconnects.
2.2.3.1.1
Configuring Gigabit Ethernet interfaces
If a client node uses more than one Gigabit Ethernet interface to connect to an HP SFS system, the
arp_ignore parameter must be set to 1 for each client node interface that is expected to be used for
interaction with Lustre file systems. This setting ensures that a client node only replies to an ARP request if
the requested address is a local address configured on the interface receiving the request.
You can set the arp_ignore value for an interface after a client node has been booted; you can also
configure a node so that the arp_ignore value is set automatically when the node is booted, by adding
the arp_ignore definition to the /etc/sysctl.conf file.
For example, if a client node uses interfaces eth1 and eth2 for interaction with an HP SFS system, both of
these interfaces must have the arp_ignore parameter set to 1. To set this value on a running client node,
enter the following commands:
# echo "1" > /proc/sys/net/ipv4/conf/eth1/arp_ignore
# echo "1" > /proc/sys/net/ipv4/conf/eth2/arp_ignore
To configure the head node so that the values are automatically set when the node is booted, add the
following lines to the /etc/sysctl.conf file:
net.ipv4.conf.eth1.arp_ignore = 1
net.ipv4.conf.eth2.arp_ignore = 1
It is possible to restrict the interfaces that the client nodes uses to communicate with the HP SFS system by
editing the options lnet settings in the /etc/modprobe.conf file; see Appendix B.
2.2.3.1.2
Configuring Voltaire InifiniBand interfaces
If the head node uses an InfiniBand interconnect to connect to an HP SFS system, you must configure the
IP address of the head node manually.
At an earlier stage in the process of installing the HP XC system, you specified a base address for the
InfiniBand network—this address is in the /opt/hptc/config/base_addr.ini file. You can use this
base address to work out the appropriate IP address for the head node.
Note that unless you configure an IP address for the InfiniBand network manually at this point, you will not
be able to mount any file systems as described later in Section 2.2.6.
2–4
Installing and configuring HP XC systems
2.2.3.2
Configuring the NTP server
For the HP SFS diagnostics to work correctly, the date and time on the client nodes must be synchronized
with the date and time on other client nodes, and with the date and time on the servers in the HP SFS system.
In addition, synchronizing the date and time on the systems keeps the logs on the systems synchronized, and
is helpful when diagnosing problems.
As a result, HP strongly recommends that you synchronize the date and time on client nodes with the date
and time on other client nodes, and with the date and time on the servers in the HP SFS system, even though
the systems do not need to be synchronized for Lustre to work correctly.
To synchronize the systems, you can enable the NTPD service on the head node, and configure the node to
use the same NTP server that the servers in the HP SFS system use (configured on the administration server).
2.2.3.3
Configuring firewalls
If you intend to run a firewall on your client nodes, you must make sure that it does not block any
communication between the client and the servers in the HP SFS system. If you encounter any problems while
your firewall is running, please disable the firewall and see if the problems can be reproduced. Your
HP Customer Support representative will be able to help you to set up your firewall.
2.2.3.4
Configuring the slocate package on client nodes
The slocate package may be installed on your system. This package is typically set up as a periodic job
to run under the cron daemon. To prevent the possibility of a find command executing on the global file
system of all clients simultaneously, the hpls-lustre-client package searches the
/etc/updatedb.conf file for references to lustre or lustre_lite. If no reference is found, lustre
and lustre_lite are added to the list of file systems that the slocate package ignores. This list is in
the /etc/updatedb.conf file. When lustre and lustre_lite are added to this list, all lustre
and lustre_lite file systems are ignored when the slocate package executes a find command.
If you wish to enable the slocate package to search lustre and lustre_lite file systems, remove
the lustre and lustre_lite entries from the /etc/updatedb.conf file and add a comment
containing the text lustre and lustre_lite at the end of the file.
When you have finished configuring the head node as described in Section 2.2.3.1 through
Section 2.2.3.4, proceed to Section 2.2.4 to verify the operation of the interconnect.
2.2.4 Step 4: Verifying the operation of the interconnect
Verify that the interconnect is operating correctly; refer to Chapter 6 of the HP StorageWorks Scalable File
Share System User Guide for details of how to test the interconnect. (Note that you will not be able to mount
a file system if the interconnect between the HP XC and HP SFS systems is not working correctly.)
When you have finished verifying the operation of the interconnect, proceed to Section 2.2.5 to add the
HP SFS server alias to the /etc/hosts file.
2.2.5 Step 5: Ensuring the HP XC system can monitor the HP SFS system
The HP XC system must be able to communicate with the HP SFS system to allow the HP XC system to monitor
the HP SFS system. Because this communication is through a single address, you must configure an alias on
one of the networks on the HP SFS system. Depending on the interconnect type, configure an alias on the
HP SFS system as follows:
•
If the interconnect is a Gigabit Ethernet network, HP recommends that you configure an alias on this
network.
•
If the interconnect is a type other than Gigabit Ethernet—for example, InfiniBand—configure an alias
on the external network.
Installing the HP SFS client software on HP XC systems (new installations)
2–5
In both cases, the name of the HP SFS system must resolve on the HP XC system. HP recommends you do
this in the /etc/hosts file.
Verify that the alias works—for example, use the ssh(1) command to log on to the HP SFS system.
When you have finished adding and verifying the HP SFS server alias, proceed to Section 2.2.6 to verify
that each file system can be mounted.
2.2.6 Step 6: Verifying that each file system can be mounted
Before proceeding with the tests described here, make sure that the file systems you intend to mount have
been created on the HP SFS system. Refer to Chapter 4 of the HP StorageWorks Scalable File Share System
User Guide for instructions on how to view file system information.
When you have confirmed that the file systems have been created, verify that you can mount each of the
file systems on the head node, as shown in the following example, where the data file system is mounted:
# sfsmount http://south/data /data
If a file system does not mount successfully, see Section 2.2.6.1 for more information.
When you have verified that the file system has been mounted, unmount the file system as shown in the
following example:
# sfsumount /data
Repeat the mount test for each file system that will be mounted on the client nodes.
When you have finished verifying that each file system can be mounted, proceed to Section 2.2.7 to create
the /etc/sfstab.proto file.
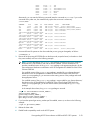
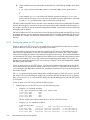
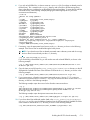
2.2.6.1
If a file system does not mount successfully
To mount successfully, a file system must be in the started or recovering state when the mount
operation is attempted. You can determine the state of the file system using the sfsmgr show
filesystem command, as shown in the following example:
# ssh south sfsmgr show filesystem
Name
------------data
hptc_cluster
State
-------------recovering
started
Services
---------------------------------mds9: recovering, ost[1-12]: running
mds10: recovering, ost[13-14]: running
In this example, the hptc_cluster file system is in the started state and the data file system is in the
recovering state.
2–6
•
If the file system you are attempting to mount is started, but the mount operation fails, see
Section 7.2.1 of this guide, and Chapter 9 of the HP StorageWorks Scalable File Share System User
Guide for information on troubleshooting mount operation failures.
•
If the file system is stopped or is in any state other than started or recovering, you must start the
file system or otherwise correct the situation before proceeding. Refer to Chapter 9 of the
HP StorageWorks Scalable File Share System User Guide for information on troubleshooting file
system problems.
•
If the file system is in the recovering state, attempt to mount the file system using the sfsmount
command as described earlier. The mount operation will behave in one of the following ways:
•
The mount operation may complete normally.
•
The mount operation may fail immediately with an Input/output error message. In this
case, wait for the file system to move to the started state before trying the mount operation
again.
Installing and configuring HP XC systems
•
The mount operation may stall for up to ten minutes. Do not interrupt the mount operation—as
soon as the file system moves to the started state, the mount operation will complete.
If the mount operation has not completed after ten minutes, you must investigate the cause of the
failure further. See Section 7.2.1 of this guide, and Chapter 9 of the HP StorageWorks Scalable File
Share System User Guide for information on troubleshooting mount operation failures.
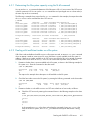
2.2.7 Step 7: Creating the /etc/sfstab.proto file
The SFS service uses the /etc/sfstab.proto file to mount Lustre file systems at boot time. Do not use the
/etc/fstab or /etc/fstab.proto files to mount Lustre file systems.
Create an /etc/sfstab.proto file as follows:
1.
If an /etc/sfstab file exists on the head node, delete it as follows:
# rm /etc/sfstab
2.
Stop the SFS service as follows:
# service sfs stop
3.
Edit /etc/sfstab.proto using any text editor.
The format and syntax of the /etc/sfstab.proto file is described in Chapter 4. In addition to the
general description provided in that chapter, there are specific rules that apply to HP XC systems. To
ensure correct and optimal operation of the HP XC system, you must observe the following rules:
•
If the /hptc_cluster file system is stored on the HP SFS system, it must be mounted in
foreground mode; that is, you must not use the bg (background) mount option. This applies to all
nodes including the head node. This means that when a node has booted, the
/hptc_cluster file system will always be mounted on the node.
CAUTION: If you plan to store the /hptc_cluster file system on the HP SFS system, you must
contact your HP Customer Support representative to discuss the operational aspects of this
configuration. Unless your systems are correctly configured, placing the /hptc_cluster file
system on the HP SFS system can make the HP XC system difficult to manage.
•
The head node must mount all other file systems (that is, with the exception of the
/hptc_cluster file system) using the bg mount option. This means that the head node will
always boot even if some file systems are not in the started state.
•
All nodes other than the head node must mount Lustre file systems in foreground mode; that is,
they must not use the bg option on any file system. This means that when the nodes have booted,
all of the file systems will be mounted on the nodes, and jobs can run on the nodes.
•
You must use the lnet: protocol in the mount directives in the /etc/sfstab file. You cannot
use the http: protocol in the /etc/sfstab file; the http: protocol (described in
Section 4.8.1) must only be used for interactive mount operations.
•
You must use the server=name mount option. This option is not needed by the SFS service;
however, it is required for the correct operation of the nconfigure stage of the
cluster_config utility.
•
HP recommends that you also use use the fs=name option.
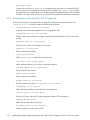
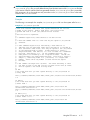
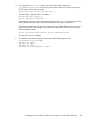
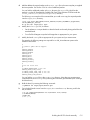
An example of /etc/sfstab.proto is shown in Example 2-1. In this example, n1044 is the head node,
and south is the HP SFS system.
Installing the HP SFS client software on HP XC systems (new installations)
2–7
Example 2-1 Sample /etc/sfstab.proto file
#% n1044
lnet://10.0.128.2@vib0,10.0.128.1@vib0:/south-mds10/client_vib /hptc_cluster
server=south,fs=hptc_cluster 0 0
lnet://10.0.128.2@vib0,10.0.128.1@vib0:/south-mds9/client_vib /data sfs
bg,server=south,fs=data 0 0
#% n[1-256]
lnet://10.0.128.2@vib0,10.0.128.1@vib0:/south-mds10/client_vib /hptc_cluster
max_cached_mb=2,max_rpcs_in_flight=2,server=south,fs=hptc_cluster 0 0
lnet://10.0.128.2@vib0,10.0.128.1@vib0:/south-mds9/client_vib /data sfs
fg,server=south,fs=data 0 0
sfs
sfs
When you have finished editing the /etc/sfstab.proto file on the head node, proceed to
Section 2.2.8 to prepare to image and configure the HP XC system.
2.2.8 Step 8: Preparing to image and configure the HP XC system
When the SFS service is started, it creates a local /etc/sfstab file from the /etc/sfstab.proto file.
To ensure correct operation of the imaging process, the /etc/sfstab file must exist before you run the
cluster_config utility.
Create an /etc/sfstab file on the head node by entering the following command:
# service sfs gensfstab
Proceed to Section 2.2.9 to mount the Lustre file systems.
2.2.9 Step 9: Mounting the Lustre file systems
To mount the Lustre file systems specified in the /etc/sfstab.proto file, enter the following command:
# service sfs start
When the command completes, all of the file systems specified in the /etc/sfstab.proto file will be
mounted. You can confirm this by entering the mount(8) command with no arguments. (Do not use the df(1)
command—it will hang if there is a connection problem with any component of a Lustre file system. If
commands such as df(1) hang, you can identify the connection that has failed using the sfslstate(8)
command. More details of using the sfslstate(8) command are provided in Section 4.10.1.)
When all of the file systems have mounted, proceed to Section 2.2.10 if quotas are to be used; otherwise,
proceed to Section 2.2.11.
2.2.10 Step 10: Enabling quotas functionality (optional)
If you plan to use quotas, follow the instructions provided in Chapter 5 of the HP StorageWorks Scalable
File Share System User Guide to configure the head node and the mount options in the
/etc/sfstab.proto file.
2.2.11 Step 11: Completing the installation of the HP XC system
When you have completed Steps 1 through 10 (in Section 2.2.1 through Section 2.2.10), return to the
HP XC System Software Installation Guide and continue with the installation of the HP XC system. As part
of the installation, the HP SFS configuration on the head node will be propagated to all other nodes in the
HP XC system.
2–8
Installing and configuring HP XC systems
2.3
Upgrading HP SFS client software on existing HP XC systems
The HP XC version on the client nodes must be capable of interoperating with the HP SFS server and client
versions. In addition, the HP SFS client version must be capable of interoperating with the HP SFS server
version on the servers in the HP SFS system. See Section 1.3.2 for details of which HP XC and HP SFS
versions can interoperate successfully.
To upgrade existing HP XC systems, perform the following tasks:
1.
Upgrade the HP SFS client software on the head node (see Section 2.3.1).
2.
Run the sfsconfig command on the head node (see Section 2.3.2).
3.
Update the golden image (see Section 2.3.3).
4.
When Portals compatibility is no longer needed, disable Portals compatibility (see Section 2.3.4).
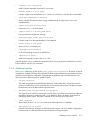
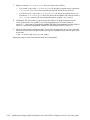
2.3.1 Step 1: Upgrading the HP SFS client software
To upgrade the HP SFS client software on an HP XC head node, perform the following steps:
1.
Shut down all nodes except the head node.
2.
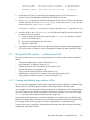
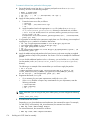
On the head node, stop all jobs that are using Lustre file systems.
To determine what processes on the head node are using a Lustre file system, enter the fuser
command as shown in the following example, where /data is the mount point of the file system. You
must enter the command as root user; if you run the command as any other user, no output is
displayed:
# fuser -vm /data
/data
USER
root
user2
user2
user3
user3
user3
user3
user3
user3
user1
PID
303
10993
16408
22513
31820
31847
31850
31950
31951
32572
ACCESS
..c..
..c..
..c..
..c..
..c..
..c..
..c..
..c..
..c..
..c..
COMMAND
su
csh
ssh
csh
res
1105102082.1160
1105102082.1160
mpirun
srun
bash
Alternatively, you can enter the following command (enter the command as root user; if you run the
command as any other user, the command only reports the current user’s references):
# lsof /data
COMMAND
PID
USER
FD
TYPE DEVICE
SIZE
su
5384
root cwd
DIR 83,106 294912
csh
10993
user2 cwd
DIR 83,106
4096
ssh
16408
user2 cwd
DIR 83,106
4096
csh
22513
user3 cwd
DIR 83,106
4096
/data/user3/bids/noaa/runs/0128
res
31820
user3 cwd
DIR 83,106 12288
/data/user3/bids/noaa/runs/0096
110510208 31847
user3 cwd
DIR 83,106 12288
/data/user3/bids/noaa/runs/0096
110510208 31850
user3 cwd
DIR 83,106 12288
/data/user3/bids/noaa/runs/0096
mpirun
31950
user3 cwd
DIR 83,106 12288
/data/user3/bids/noaa/runs/0096
srun
31951
user3 cwd
DIR 83,106 12288
/data/user3/bids/noaa/runs/0096
bash
32572
user1 cwd
DIR 83,106 294912
3.
NODE
393217
52428801
52428801
39682049
NAME
/data/user1
/data/user2/bonnie
/data/user2/bonnie
39649281
39649281
39649281
39649281
39649281
393217 /data/user1
Unmount all Lustre file systems on the head node, by entering the following command:
# sfsumount -a
Upgrading HP SFS client software on existing HP XC systems
2–9
4.
Remove all of the existing HP SFS RPM files on the head node in the order in which they were
installed, as shown in the following example:
NOTE: In the example shown here, the python-ldap package is removed. This package
needs to be removed only on HP Integrity systems. Omit this command on all other systems.
# rpm -ev lustre-modules-version_number \
lustre-lite-version_number \
python-ldap-version_number \
hpls-lustre-client-version_number \
hpls-diags-client-version_number
5.
Reboot the head node.
6.
Install the new HP SFS client software on the head node, using the instructions provided in Steps 1
through 4 in Section 2.2.1.
When you have finished upgrading the HP SFS client software on the head node, proceed to Section 2.3.2
to run the sfsconfig command on the head node.
2.3.2 Step 2: Running the sfsconfig command after upgrading the client software
When you have finished upgrading the HP SFS Version 2.2 client software on the head node, you must run
the sfsconfig command on the node.
Running the sfsconfig command alters the contents of configuration files on the head node, as follows:
•
The script creates a new /etc/modprobe.conf.lustre file that contains the appropriate
settings, and includes the new file in the /etc/modprobe.conf file.
•
The script updates the /etc/sfstab and /etc/sfstab files as follows:
•
Converts any mount directives that use the ldap: protocol to the http: protocol (unless the
-L|--keepldap option is specified). Note that the ldap: protocol is supported in HP SFS
Version 2.2 for backward compatibility; it will not be supported in the next major release of the
HP SFS product.
•
Comments out mount directives that use the http: protocol and adds equivalent directives
using the lnet: protocol (unless the -H|--keephttp option is specified).
Perform the following steps:
1.
Make a copy of the /etc/sfstab.proto file, as shown in the following example:
# cp /etc/sfstab.proto /etc/sfstab.proto.ldap
2.
Enter the sfsconfig command on the head node, as follows:
# sfsconfig all
3.
2–10
When the sfsconfig command has completed, verify that the configuration files have been
updated, as follows:
•
Examine the /etc/modprobe.conf.lustre file and the /etc/modprobe.conf file to
ensure that the options lnet settings and the lquota settings have been added. See
Appendix B for additional information on the settings in the configuration files
•
Examine the /etc/sfstab and /etc/sfstab.proto files to ensure that the mount
directives using the lnet: protocol have been added.
Installing and configuring HP XC systems
NOTE: The sfsconfig command uses the http: protocol to get configuration information from the
HP SFS servers. If the head node does not have access to the HP SFS servers over a TCP/IP network, or if
the servers are offline, the sfsconfig command will not be able to configure the head node correctly,
and you will have to modify the configuration file manually. For instructions on how to do this, see
Appendix B.
When you have finished running the sfsconfig command, proceed to Section 2.3.3 to update the golden
image.
2.3.3 Step 3: Updating the golden image
Complete the upgrade process, by performing the following steps:
1.
Mount the file systems by entering the following commands:
# service sfs gensfstab
# service sfs start
2.
Update the /etc/modprobe.conf file.
When you install and configure the HP SFS client software on the head node, the
/etc/modprobe.conf file is changed. This file is not updated in the golden image and you must
therefore add the following line to the existing /etc/modprobe.conf file in the golden image (that
is, the /var/lib/systemimager/images/base_image/etc/modprobe.conf file):
# include /etc/modprobe.conf.lustre
3.
If the head node has a different number of Gigabit Ethernet devices than the other nodes in the
HP XC cluster, the sfsconfig command may have added tcp entries to the options lnet
settings on the head node that are not appropriate for the other nodes. If this happens, edit the
/etc/modprobe.conf.lustre file on the head node so that the options lnet settings
contain a common set of Gigabit Etherernet devices. This may involve removing the tcp entries if a
Gigabit Ethernet interconnect is not being used.
4.
Create a new or updated golden image, by running the cluster_config utility. For information on
running this utility, refer to the HP XC System Software Administration Guide.
The cluster_config utility creates a new or updated new golden image, which includes the
updated HP SFS software and the updated /etc/sfstab.proto, /etc/modprobe.conf, and
/etc/modprobe.conf.lustre files.
If all of the client systems that access an HP SFS system have now been upgraded to HP SFS Version 2.2,
proceed to Section 2.3.4 to disable Portals compatibility.
2.3.4 Step 4: Disabling Portals compatibility
If some of the client systems that access the HP SFS system have not yet been upgraded to HP SFS
Version 2.2, skip this step.
If all of the client systems that access the HP SFS system have now been upgraded to HP SFS Version 2.2,
Portals compatibility is no longer needed on the servers or the client systems. You must disable Portals
compatibility on the HP SFS servers and set the portals_compatibility attribute to none on all of the
client systems that access the HP SFS servers.
To disable Portals compatibility on the servers and client systems, perform the following steps. Note that you
must perform these steps on each client system that accesses the HP SFS system:
1.
Unmount all Lustre file systems on the client nodes.
2.
Disable Portals compatibility mode on the HP SFS servers; for information on how to do this, refer to
Chapter 8 of the HP StorageWorks Scalable File Share System Installation and Upgrade Guide,
Upgrading HP SFS client software on existing HP XC systems
2–11
specifically the section titled Disabling Portals compatibility mode (when client nodes have been
upgraded).
3.
On the head node in the HP XC system, edit the /etc/modprobe.conf.lustre file and change
the portals_compatibility setting to none.
4.
Use the cluster_config utility to update the golden image with the modified
/etc/modprobe.conf.lustre file.
5.
Propagate the modified /etc/modprobe.conf.lustre file to all nodes.
6.
Remount the Lustre file systems on the nodes.
Repeat these steps on each HP XC system that accesses the HP SFS system.
2.4
Downgrading HP SFS client software on HP XC systems
The HP XC version on the client nodes must be capable of interoperating with the HP SFS server and client
versions. In addition, the HP SFS client version must be capable of interoperating with the HP SFS server
version on the servers in the HP SFS system. See Section 1.3.2 for details of which HP XC and HP SFS
versions can interoperate successfully.
See Section 1.3.2 for details of which HP XC and HP SFS versions can interoperate successfully.
To downgrade the HP SFS client software on the HP XC head node, perform the following steps:
1.
Stop all jobs that are using Lustre file systems.
To determine what processes on the head node are using a Lustre file system, enter the fuser
command as shown in the following example, where /data is the mount point of the file system. You
must enter the command as root user; if you run the command as any other user, no output is
displayed:
# fuser -vm /data
/data
USER
root
user2
user2
user3
user3
user3
user3
user3
user3
user1
PID
303
10993
16408
22513
31820
31847
31850
31950
31951
32572
ACCESS
..c..
..c..
..c..
..c..
..c..
..c..
..c..
..c..
..c..
..c..
COMMAND
su
csh
ssh
csh
res
1105102082.1160
1105102082.1160
mpirun
srun
bash
Alternatively, you can enter the following command (enter the command as root user; if you run the
command as any other user, the command only reports the current user’s references):
# lsof /data
COMMAND
PID
USER
FD
TYPE DEVICE
SIZE
su
5384
root cwd
DIR 83,106 294912
csh
10993
user2 cwd
DIR 83,106
4096
ssh
16408
user2 cwd
DIR 83,106
4096
csh
22513
user3 cwd
DIR 83,106
4096
/data/user3/bids/noaa/runs/0128
res
31820
user3 cwd
DIR 83,106 12288
/data/user3/bids/noaa/runs/0096
110510208 31847
user3 cwd
DIR 83,106 12288
/data/user3/bids/noaa/runs/0096
110510208 31850
user3 cwd
DIR 83,106 12288
/data/user3/bids/noaa/runs/0096
mpirun
31950
user3 cwd
DIR 83,106 12288
/data/user3/bids/noaa/runs/0096
srun
31951
user3 cwd
DIR 83,106 12288
/data/user3/bids/noaa/runs/0096
bash
32572
user1 cwd
DIR 83,106 294912
2–12
Installing and configuring HP XC systems
NODE
393217
52428801
52428801
39682049
NAME
/data/user1
/data/user2/bonnie
/data/user2/bonnie
39649281
39649281
39649281
39649281
39649281
393217 /data/user1
2.
Unmount all Lustre file systems on the head node, as follows:
# sfsumount -a
3.
Remove all of the existing HP SFS RPM files on the head node in the order in which they were
installed, as shown in the following example:
NOTE: In the example shown here, the python-ldap package is removed. This package
needs to be removed only on HP Integrity systems. Omit this command on all other systems.
# rpm -ev lustre-modules-version_number \
lustre-version_number \
python-ldap-version_number \
hpls-lustre-client-version_number \
hpls-diags-client-version_number
4.
Reboot the head node.
5.
Enable Portals compatibility mode on the HP SFS system.
6.
Replace or edit the /etc/sfstab.proto file on the head node, as follows:
•
If you saved a copy of the /etc/sfstab.proto file during the upgrade process, replace the
/etc/sfstab.proto file on the head node with the older (saved) version of the file.
•
If you did not save a copy of the /etc/sfstab.proto file during the upgrade process, you
must edit the /etc/sfstab.proto file on the head node and replace any entries that use the
lnet: or http: protocols with the corresponding entries using the ldap: protocol.
7.
Install the HP SFS client software using the process described in HP SFS documentation for that
version of the software. For example, if you are downgrading the HP SFS client software to
Version 2.1-1, refer to the HP StorageWorks Scalable File Share Client Installation and User Guide for
Version 2.1 and the HP StorageWorks Scalable File Share Release Notes for Version 2.1-1.
8.
Create the new golden image, by running the cluster_config utility. For information on running
this utility, refer to the HP XC System Software Administration Guide.
Downgrading HP SFS client software on HP XC systems
2–13
2–14
Installing and configuring HP XC systems
3
Installing and configuring Red Hat Enterprise Linux
and SUSE Linux Enterprise Server 9 SP3 client
systems
To allow client nodes to mount the Lustre file systems on an HP SFS system, the HP SFS client software and
certain other software components must be installed and configured on the client nodes. This chapter
describes how to perform these tasks on Red Hat Enterprise Linux (RHEL) and SUSE Linux Enterprise
Server 9 SP3 (SLES 9 SP3) systems.
This chapter is organized as follows:
•
HP SFS client software for RHEL and SLES 9 SP3 systems (Section 3.1)
•
Building your own client kit (Section 3.2)
•
Installing the HP SFS client software on RHEL and SLES 9 SP3 systems (new installations) (Section 3.3)
•
Upgrading HP SFS client software on existing RHEL and SLES 9 SP3 systems (Section 3.4)
•
Downgrading HP SFS client software on RHEL and SLES 9 SP3 systems (Section 3.5)
When the client nodes have been configured as described in this chapter, file systems from the HP SFS
system can be mounted on the clients, as described in Chapter 4.
NOTE: Before you start to install or upgrade the HP SFS client software on your client systems, make sure
that you have read the HP StorageWorks Scalable File Share Release Notes, particularly Section 2.2, the
installation notes for client systems.
3–1
3.1
HP SFS client software for RHEL and SLES 9 SP3 systems
The SFS Client Enabler is on the HP StorageWorks Scalable File Share Client Software CD-ROM in the
client_enabler/ directory.
The layout of the directory is as follows:
client_enabler/VERSION
/build_SFS_client.sh
/src/common/autotools/autoconf-version.tar.gz
/automake-version.tar.gz
/cfgs/build configuration files
/diags_client/diags_client.tgz
/gm/gm sources
/kernels/vendor/dist/kernel sources
/lustre/lustre-version.tgz
/lustre_client/lustre_client.tgz
/python-ldap/python ldap sources
/qsnet/qsnet sources
/tools/uname
/src/arch/distro/config files
/src/arch/distro/lustre_patches/lustre patches
/src/arch/distro/patches/kernel patches
The content of the directory are as follows:
•
The build_SFS_client.sh script.
This is a sample script for building HP SFS client kits.
See Section 3.2.2 for information on using the sample script to build an HP SFS client kit.
•
The src/ subdirectory
This subdirectory has subdirectories for each architecture and distribution for which client-enabling
source software is provided, as well as a common subdirectory. The architecture and distributionspecific software is under the arch/distro directory hierarchy. Software that is generally
applicable is in the common subdirectory.
The possible architecture and distribution directory combinations are as follows:
•
i686/RH9
This directory contains the client-enabling configuration and patches for Red Hat 9 and AS 2.1.
3–2
•
i686/RHEL3.0_U5
•
ia32e/RHEL3.0_U5
•
ia64/RHEL3.0_U5
•
x86_64/RHEL3.0_U5
•
i686/RHEL3.0_U6
•
ia32e/RHEL3.0_U6
•
ia64/RHEL3.0_U6
•
x86_64/RHEL3.0_U6
•
i686/RHEL3.0_U7
•
ia32e/RHEL3.0_U7
•
ia64/RHEL3.0_U7
•
x86_64/RHEL3.0_U7
•
i686/RHEL3.0_U8
Installing and configuring Red Hat Enterprise Linux and SUSE Linux Enterprise Server 9 SP3 client systems
•
ia32e/RHEL3.0_U8
•
ia64/RHEL3.0_U8
•
x86_64/RHEL3.0_U8
•
i686/RHEL4_U1
•
ia32e/RHEL4_U1
•
ia64/RHEL4_U1
•
x86_64/RHEL4_U1
•
i686/RHEL4_U2
•
ia32e/RHEL4_U2
•
ia64/RHEL4_U2
•
x86_64/RHEL4_U2
•
i686/RHEL4_U3
•
ia32e/RHEL4_U3
•
ia64/RHEL4_U3
•
x86_64/RHEL4_U3
•
i686/RHEL4_U4
•
ia32e/RHEL4_U4
•
ia64/RHEL4_U4
•
x86_64/RHEL4_U4
•
i686/SLES_9
•
ia32e/SLES_9
•
ia64/SLES_9
•
x86_64/SLES_9
The arch/distro subdirectories may also contain additional kernel patches in a patches
subdirectory and Lustre patches in a lustre_patches subdirectory.
The common subdirectory contains sources for Lustre, build tools, interconnects, diagnostic tools,
kernels, Lustre client tools and configurations.
3.2
Building your own client kit
When you build an HP SFS client kit using the SFS Client Enabler, you will perform some or all of the
following tasks (depending on the client architecture/distribution you are building for). Detailed instructions
are given in Section 3.2.2:
•
Identify the source code required.
•
Identify the appropriate Lustre patches.
•
Identify the appropriate Lustre kernel patches.
•
Patch the kernel.
•
Rebuild the kernel with the appropriate kernel configuration file.
•
Patch the Lustre sources with the appropriate Lustre patches.
•
Rebuild any interconnect drivers.
•
Rebuild Lustre.
•
Rebuild additional user-space tools.
The remainder of this section is organized as follows:
•
Prerequisites for the SFS Client Enabler (Section 3.2.1)
•
Building an HP SFS client kit using the sample script (Section 3.2.2)
•
Output from the SFS Client Enabler (Section 3.2.3)
Building your own client kit
3–3
•
Locating the python-ldap and hpls-diags-client packages (Section 3.2.4)
•
List of patches in the client-rh-2.4.21-32 series file (Section 3.2.5)
•
Additional patches (Section 3.2.6)
3.2.1 Prerequisites for the SFS Client Enabler
To build a customized HP SFS client kit using the SFS Client Enabler, you must have the following resources:
•
An appropriate system on which to perform the build.
This system must meet the following criteria:
•
It must run the same architecture and distribution as the client node on which you intend to install
the HP SFS client software.
•
It must have 5GB of free storage.
At a minimum, you will need about 3GB of storage, but in most cases you will need more.
•
It must have the required compilers for building a kernel.
•
It must have certain packages installed.
Depending on your client distribution, some or all of the following or similar packages will be
needed and will be provided on the source media for your distribution:
•
•
•
•
•
•
•
•
•
rpm
make
tar
rpm-build
readline-devel
ncurses-devel
modutils/module-init-tools
fileutils/coreutils
It must have the following utilities in the path:
•
•
automake Version 1.7.9
autoconf Version 2.59
These utilities are required for building Lustre; they are provided on the HP StorageWorks
Scalable File Share Client Software CD-ROM under the client_enabler/src/common/
autotools directory, and are normally built by the sample script (when you use that method to
build your HP SFS client kit, as described in Section 3.2.2).
•
An appropriate Linux kernel source.
You will find some Linux kernel sources in the client_enabler/src/common/kernels/
vendor/distro/ directories on the HP StorageWorks Scalable File Share Client Software CDROM.
•
Appropriate kernel patches.
You will find additional kernel patches in the client_enabler/src/arch/distro/patches
directory on the HP StorageWorks Scalable File Share Client Software CD-ROM. In this directory, you
will find a file that lists the patches to be applied and the order in which they must be applied.
See Section 3.2.6 for details of the additional patches.
•
Appropriate Lustre sources.
You will find some Lustre sources in the client_enabler/src/common/lustre directory on the
HP StorageWorks Scalable File Share Client Software CD-ROM.
3–4
Installing and configuring Red Hat Enterprise Linux and SUSE Linux Enterprise Server 9 SP3 client systems
•
Additional Lustre patches (some distributions only).
Where appropriate, you will find additional Lustre patches in the client_enabler/src/arch/
distro/lustre_patches directory on the HP StorageWorks Scalable File Share Client Software
CD-ROM. In this directory, you will find a file that lists the patches to be applied and the order in
which they must be applied. Not all distributions require patches to the Lustre sources, so this directory
may or may not exist for your particular distribution.
•
Optionally, you may need the sources for your interconnect driver. The sources for Myrinet and
Quadrics interconnect drivers are in the appropriate architecture/distribution subdirectory under the
client_enabler/src/common/gm and client_enabler/src/common/qsnet directories
on the HP StorageWorks Scalable File Share Client Software CD-ROM. If you are using a Quadrics
interconnect, make sure that you use the QsNetII kernel patch tarball file that is suitable for your
client kernel.
Source files for the Voltaire InfiniBand interconnect drivers can be obtained directly from Voltaire. For
more information, refer to the Voltaire Web site at www.voltaire.com.
3.2.2 Building an HP SFS client kit using the sample script
This section describes how to build an HP SFS client kit using the sample script provided on the
HP StorageWorks Scalable File Share Client Software CD-ROM. The build_SFS_client.sh example
script works for many common distributions, and HP recommends that you use it if possible. However, if the
script does not work for your client distribution, you can build the kit manually; for more information, see
Appendix C.
Before you start to build the client kit using the build_SFS_client.sh sample script, note the following
points:
•
The build_SFS_client.sh sample script builds Lustre file system support into the following
kernels:
•
RHEL 4 Update 4 (2.6.9-42.0.2.EL)
•
RHEL 4 Update 3 (2.6.9-34.0.2.EL)
•
RHEL 4 Update 2 (2.6.9-22.0.2.EL)
•
RHEL 4 Update 1 (2.6.9-11.EL)
•
RHEL 3 Update 8 (2.4.21-47.EL)
•
RHEL 3 Update 7 (2.4.21-40.EL)
•
RHEL 3 Update 6 (2.4.21-37.EL)
•
RHEL 3 Update 5 (2.4.21-32.0.1.EL)
•
Red Hat Linux 9/AS2.1 (2.4.21-31.9)
•
SLES 9 SP3 (2.6.5-7.244)
•
CentOS 4.3 (2.6.9-34.0.2.EL)
The script may also work with a number of other distributions, but these will require that the
--distribution command line argument is set to an appropriate value and may require that
other arguments are supplied, such as --kernel or --kernel_type. For example, when building
the HP SFS client kit for the CentOS 4.3 distribution, you must specify --distribution
RH_EL4_U3 as the first argument and --kernel kernel_srpm as the last argument on your
command line, as shown in the following example. The command in this example will build client
software using the appropriate kernel and configuration with Myrinet interconnect support:
# /mnt/cdrom/client_enabler/build_SFS_client.sh --distribution RH_EL4_U3
--config auto --config gm --kernel /home/kernel-2.6.9-34.0.2.EL.src.rpm
•
In most cases, the build_SFS_client.sh script must be run by an ordinary user and must not be
run as root user. There are two exceptions, as follows; in these cases, the script must be run as the
root user:
•
When the script is being run on a SLES 9 SP3 system
•
When the script is being used to build the InfiniBand interconnect driver
Building your own client kit
3–5
•
If you are building on a SLES 9 SP3 system, you must make sure that the /usr/src/packages/
[BUILD|SOURCES|SPECS] directories are all empty. You must also have an appropriate kernelsource package installed and if your kernel is already built in the /usr/src/linux directory, add
the --prebuilt_kernel option to the command line when you run the build_SFS_client.sh
script.
•
If the SFS Client Enabler fails to build the hpls-diags-client package, you can find a prebuilt
version of the package in the appropriate directory for your client architecture/distribution
combination on the HP StorageWorks Scalable File Share Client Software CD-ROM. To skip building
the hpls-diags-client package as part of the sample script, add the following option to the
command line when you run the build_SFS_client.sh script:
--diags_client ""
•
The prerequisites for running the script are described in Section 3.2.1.
•
To see a full list of the options available with the build_SFS_client.sh script, enter the following
command:
$ /mnt/cdrom/client_enabler/build_SFS_client.sh --help
To see detailed help on a specific option, enter the following command:
$ /mnt/cdrom/client_enabler/build_SFS_client.sh --option help
To use the sample script to build an HP SFS client kit, perform the following steps:
1.
Mount the CD-ROM image, as shown in the following example:
$ mount /dev/cdrom /mnt/cdrom
CAUTION: The /mnt/cdrom mount point is a safe one; use it if possible. If you use another
mount point, there is a possibility that the sample script will fail to build the client kit. To reduce
the possibility of failure, work with a short mount point that only has letters and numbers in it
(that is, no special characters).
2.
Change to the directory where you want to perform the build, as shown in the following example:
$ cd /build/SFS_client_V2.2
CAUTION: Do not perform the build in the /tmp directory or in any subdirectory of the /tmp
directory. Many distributions clean out the contents of the /tmp directory on a regular basis and
in doing so may interfere with the build process.
3.
Run the build_SFS_client.sh script, as follows. This command does not build any high-speed
interconnect support into the HP SFS client kit; you must specify the options that are suitable for your
interconnect, as described below:
$ /mnt/cdrom/client_enabler/build_SFS_client.sh --config auto
•
Quadrics interconnect:
•
To add support for the Quadrics interconnect driver, add the following to the command
line:
--config qsnet
•
To change the qsnet driver tar file used, add the following to the command line:
--qsnet path_to_qsnet_driver_source
•
To change the qsnet kernel patches, add the following to the command line:
--qsnet_kernel_patch_tarball path_to_qsnet_kernel_patch_tarball
•
3–6
To drop any of the qsnet options, specify "" as the path.
Installing and configuring Red Hat Enterprise Linux and SUSE Linux Enterprise Server 9 SP3 client systems
•
Myrinet interconnect:
•
To add support for the Myrinet interconnect driver, add the following to the command line:
--config gm
•
To change the gm source RPM file used, add the following to the command line:
--gm path_to_gm_driver_source_RPM
•
•
To drop the Myrinet option, specify "" as the path.
Voltaire Infiniband interconnect:
To add support for a Voltaire InfiniBand interconnect, add the following to the command line:
--no_infiniband
This unconfigures the standard Linux InfiniBand from the kernel so that the Voltaire Infiniband
driver can be built against it.
NOTE: To determine which interconnects will build successfully for your client
distribution/architecture, please see Table 1-2 and Table 1-3 in Section 1.3.
4.
3.2.2.1
If your client nodes are using a Voltaire InfiniBand interconnect to connect to the HP SFS system, you
must now perform the additional steps described in Section 3.2.2.1 to complete the building of the
HP SFS client kit.
Additional steps for systems using Voltaire InfiniBand interconnect
This section applies only if you are building an HP SFS client kit for client nodes that connect to the HP SFS
system using a Voltaire InfiniBand interconnect.
NOTE: When you are building an HP SFS client kit with Voltaire InfiniBand interconnect support, do not
include support for any other high-speed interconnect.
Where a Voltaire InfiniBand interconnect is used to connect client systems to the HP SFS system, you must
perform the following steps (in addition to the steps described in Section 3.2.2) to complete the building of
the HP SFS client kit. If you are building against a Version 2.4 kernel, you must use a Voltaire InfiniBand
Version 3.4.5 interconnect driver. If you are building against a Version 2.6 kernel, you must use a Voltaire
InfiniBand Version 3.5.5 interconnect driver.
Perform the following steps as root user:
1.
If the system where you are building the kit is an x86_64 or em64t architecture, ensure that the 64-bit
and 32-bit GCC (GNU Compiler Collection) build tools are installed on the system.
These build tools are required for the build process for the Voltaire InfiniBand interconnect. If they are
not already installed, install them now; for example, you may need to install the i386 variant of the
glibc-devel package.
2.
On the system where you are building the HP SFS client kit, install the kernel .rpm file that was
created by the build_SFS_client.sh script for the appropriate architecture, as shown in the
following example. In this example, the .rpm file for an em64t architecture using the 2.4.21-37
kernel is installed:
# rpm –i output/rpms/ia32e/kernel-2.4.21-37.EL_SFS2.2_0.ia32e.rpm
On RHEL 4 nodes and other nodes running Version 2.6 kernels, you must also install the kernel
development RPM, as follows:
# rpm –i output/rpms/x86_64/kernel-smp-devel-2.6.9-22.EL_SFS2.2_0.x86_64.rpm
Building your own client kit
3–7
3.
Edit the bootloader configuration file so that the new kernel is selected as the default for booting. If
your boot loader is GRUB, you can alternatively use the /sbin/grubby --set-default
command, as shown in the following example:
# grubby --set-default /boot/vmlinuz-2.4.21-37.EL_SFS2.2_0
4.
Reboot the system to boot the new kernel, as follows:
# reboot
5.
Copy the built Linux tree to the /usr/src/linux directory, as follows:
# mkdir -p /usr/src/linux
# cd /usr/src/linux
# (cd /build/SFS_client_V2.2/build/linux; tar -cpf - .) | tar -xpf -
6.
If the client node is running a Version 2.6 kernel, skip this step.
On RHEL 3 nodes and other nodes running Version 2.4 kernels, fix the /lib/modules build link, as
follows:
# rm –f /lib/modules/‘uname –r‘/build
# ln –s /usr/src/linux /lib/modules/‘uname –r‘/build
# ln -s /usr/src/linux /lib/modules/‘uname -r‘/source
7.
Install the Voltaire InfiniBand interconnect source .rpm file, as follows:
# rpm -i path_name/ibhost-3.4.5_22-1.src.rpm
8.
Build the Voltaire InfiniBand interconnect software, as follows:
# rpmbuild -ba /usr/src/redhat/SPECS/ibhost-3.4.5_22-1.spec
9.
Copy the resulting RPM files to the output directory, as follows:
# cd /build/SFS_client_V2.2
# cp /usr/src/redhat/SRPMS/ibhost-3.4.5_22-1.src.rpm output/rpms/srpm/
# cp /usr/src/redhat/RPMS/ia32e/ibhost-hpc-3.4.5_221rhas3.k2.4.21_40.EL_SFS2.2_0smp.ia32e.rpm
/usr/src/redhat/RPMS/ia32e/ibhost-biz-3.4.5_221rhas3.k2.4.21_40.EL_SFS2.2_0smp.ia32e.rpm output/rpms/ia32e/
10. Remove the previous Lustre build files, and create a new directory in which you will rebuild them, as
follows:
# rm -f output/rpms/*/lustre*.rpm
# mkdir build_stage2
# cd build_stage2
11. You must now run the build_SFS_client.sh script again with the prebuilt kernel and Voltaire
InfiniBand interconnect software, as follows:
•
If a Voltaire InfiniBand Version 3.4.5 interconnect driver is used, run the script as follows. Note
that the trailing -1 in the interconnect version is not used in the command:
# /mnt/cdrom/client_enabler/build_SFS_client.sh
--config auto --kernel /usr/src/linux
--prebuilt_kernel --vib /usr/src/redhat/BUILD/ibhost-3.4.5_22
--prebuilt_vib --allow_root
•
If a Voltaire InfiniBand Version 3.5.5 interconnect driver is used, run the script as follows:
# /mnt/cdrom/client_enabler/build_SFS_client.sh
--config auto --kernel /usr/src/linux
--prebuilt_kernel --vib /usr/src/redhat/BUILD/ibhost-3.5.5_18
--prebuilt_vib --allow_root
12. Copy the build Lustre RPM files into the previous output directory in the build area, as follows:
# cp output/rpms/srpms/lustre*.rpm ../output/rpms/srpms/
# cp output/rpms/ia32e/lustre*.rpm ../output/rpms/ia32e/
# cd ../
3–8
Installing and configuring Red Hat Enterprise Linux and SUSE Linux Enterprise Server 9 SP3 client systems
When a Voltaire InfiniBand Version 3.4.5 interconnect driver is used, the ARP resolution parameter on each
of the client nodes must be changed after the HP SFS client software has been installed on the client node.
This task is included in the installation instructions provided later in this chapter (see Step 11 in
Section 3.3.2).
3.2.3 Output from the SFS Client Enabler
The build_SFS_client.sh script creates output .rpm files in architecture-specific directories. You will
use these files for installing the client software on the client node. The following example indicates the output
file names for the x86_64 architecture using the 2.4.21-37.EL (RHEL3 Update 6) kernel:
•
output/rpms/x86_64/kernel-smp-2.4.21-37.EL_SFS2.2_0_w4C12hp.x86_64.rpm
This file will not be present on SLES 9 SP3 systems, because the kernel is already patched and a new
kernel is not needed to use the HP SFS software on these systems.
•
output/rpms/x86_64/lustre-1.4.6.42.4.21_37.EL_SFS2.2_0_w4C12hpsmp_200609050206.x86_64.rpm
•
output/rpms/x86_64/lustre-modules-1.4.6.42.4.21_37.EL_SFS2.2_0_w4C12hpsmp_200609050206.x86_64.rpm
•
output/rpms/x86_64/hpls-lustre-client-2.2-0.x86_64.rpm
•
output/rpms/x86_64/hpls-diags-client-2.2-0.x86_64.rpm
The hpls-diags-client package provides HP SFS client diagnostic utilities.
•
output/rpms/x86_64/gm-2.1.26-2.4.21_37.EL_SFS2.2_0_w4C12hp.x86_64.rpm
This file is only present if you built with support for a Myrinet interconnect driver.
•
output/rpms/x86_64/qsnetmodules-2.4.2137.EL_SFS2.2_0_w4C12hpsmp.5.23.2qsnet.x86_64.rpm
This file is only present if you built with support for a Quadrics interconnect driver.
When building on a SLES 9 SP3 system, the RPM files will be under the /usr/src/packages/RPMS
directory.
CAUTION: There are other RPM files in the output directories; do not use these files.
3.2.4 Locating the python-ldap and hpls-diags-client packages
When you are installing the client software, you must install the python-ldap package, and you also have
the option of installing the hpls-diags-client package. When you use the SFS Client Enabler to build
your own HP SFS client kit, these files are not included in the kit. You can locate these packages as follows:
•
python-ldap
For some distributions, the python-ldap package provided on the source media for the distribution
is not suitable for use with the HP SFS software. For such distributions, HP provides a modified version
of the python-ldap package in the appropriate directory for the client architecture/distribution
combination on the HP StorageWorks Scalable File Share Client Software CD-ROM. If a modified
version of the package is provided for your client architecture/distribution, you must install that
version of the package.
If a modified version of the python-ldap package is not provided for your client architecture/
distribution on the HP StorageWorks Scalable File Share Client Software CD-ROM, you must install
the python-ldap package provided in the source media for your distribution (if it is not already
installed).
Building your own client kit
3–9
•
hpls-diags-client
Use the version of the hpls-diags-client package that you built when you created the HP SFS
client kit; however, if the package failed to build, you can find the hpls-diags-client package
(for some architectures and distributions) on the HP StorageWorks Scalable File Share Client Software
CD-ROM, in the appropriate directory for your particular client architecture/distribution combination.
3.2.5 List of patches in the client-rh-2.4.21-32 series file
Each series file contains a list of patches that are applied to the kernel during the build process. The
client-rh-2.4.21-32 series file contains the following list of patches:
•
configurable-x86-stack-2.4.21-rh.patch
Makes the in-kernel user-space-thread stack size configurable for x86.
•
configurable-x86_64-2.4.21-rh.patch
Enables compile time configuration of larger in-kernel user-space-thread size for x86_64 and ia32e
(em64t).
•
pagecache-lock-2.4.21-chaos.patch
Provides access to locks on Linux page cache for Lustre.
•
exports_2.4.19-suse.patch
Exports symbols from the kernel.
•
lustre_version.patch
Adds a lustre_version header file to the kernel tree.
•
vfs_intent-2.4.21-32_rhel.patch
Adds intent-based locking, which is key to Lustre client operation.
•
iod-rmap-exports-2.4.21-chaos.patch
Exports symbols from the kernel.
•
export-truncate.patch
Exports symbols from the kernel.
•
dynamic-locks-2.4.21-rh.patch
Provides a prerequisite patch for vfs-pdirops-2.4.21-rh.patch.
•
vfs-pdirops-2.4.21-rh.patch
Adds per-directory-locking for improved Lustre client performance.
•
tcp-zero-copy-2.4.21-chaos.patch
Zero-copy TCP patch: improves TCP stack performance (reduces CPU consumption).
•
add_page_private.patch
Adds a structure required by Lustre client.
•
nfs_export_kernel-2.4.21-rh.patch
Adds the capability to export Lustre as NFS.
3–10
Installing and configuring Red Hat Enterprise Linux and SUSE Linux Enterprise Server 9 SP3 client systems
•
listman-2.4.21-chaos.patch
Adds 2.6 kernel-compatible list utilities for use in Lustre.
•
bug2707_fixed-2.4.21-rh.patch
Provides a bugfix for a race between create and chmod which can cause files to be inaccessible.
•
inode-max-readahead-2.4.24.patch
Allows individual file systems to have varying readahead limits. Used by Lustre to set its own
readahead limits.
•
export-show_task-2.4-rhel.patch
Exports the show_task kernel symbol.
•
compile-fixes-2.4.21-rhel_hawk.patch
Fixes several kernel compile-time warnings.
•
grab_cache_page_nowait_gfp-rh-2.4.patch
Provides a bug fix for allocation deadlock in VM subsystem.
•
remove-suid-2.4-rhel.patch
Security fix for suid-related issues.
•
nfsd_owner_override.patch
Fix for NFS exporting of Lustre to an HP-UX client.
•
fsprivate-2.4.patch
Adds a field required by Lustre to the struct file.
Note that the three mkspec patches do not patch the kernel; they only patch the utilities that are used to
build an RPM file with the rpms command.
3.2.6 Additional patches
The patches subdirectory in each of the client_enabler/src/arch/distro directories on the HP
StorageWorks Scalable File Share Client Software CD-ROM contains additional required patches for that
architecture and distribution combination. These patches are applied as part of the build process. The
following are the patches required for an RHEL3 system:
•
nfs_32k_fix.patch
This patch can provide increased NFS performance for a Lustre client that is exporting a Lustre file
system as an NFS server to client nodes that are not running the Lustre protocol. The patch increases
the maximum amount of data transferred per transaction.
•
NFS_POSIX_lock_for_distributed_servers.patch
This patch allows an NFS client mounting a Lustre file system served from a Lustre client to implement
the POSIX locking API. It changes the NFS lockd daemon to allow it to interact correctly with an
underlying Lustre file system. The patch is required for NFS serving from a Lustre client.
•
e1000_irq.patch
Allows setting of driver irq in netdev structure for balancing Lustre I/O schedulers.
•
arp_ignore-2.4.21-32.diff
Prevents client node from replying to an ARP request if the request is for an IP address configured on
the client node on a different interface than the interface receiving the request.
Building your own client kit
3–11
3.3
Installing the HP SFS client software on RHEL and SLES 9 SP3
systems (new installations)
NOTE: HP does not provide prebuilt binary packages for installing the HP SFS client software for RHEL and
SLES 9 SP3 systems. You must build your own HP SFS client kit as described in Section 3.2 and then install
some prerequisite packages and the HP SFS client software.
The HP SFS client version must be capable of interoperating with the HP SFS server version on the servers
in the HP SFS system. See Section 1.3.1 for details of which HP SFS server and client software versions can
interoperate successfully.
To install the HP SFS software on RHEL and SLES 9 SP3 client systems, and to configure the client nodes to
support HP SFS functionality, perform the following tasks:
1.
Verify that the prerequisite packages are present on the client node (see Section 3.3.1).
2.
Install the HP SFS client software (see Section 3.3.2).
3.
Run the sfsconfig command on the client node (see Section 3.3.3).
4.
Complete the remaining configuration tasks on the client node (see Section 3.3.4).
5.
Configure boot-time mounting of file systems (see Section 3.3.5).
3.3.1 Step 1: Verifying that prerequisite packages are present
There are a number of packages that may be required on RHEL and SLES 9 SP3 client nodes before you
attempt to install the HP SFS client software on the nodes. The list of required packages varies for individual
distributions. Some of these packages are listed here. This is not an exhaustive list, and not all of the
packages listed are needed on all client distributions; the list is intended to highlight some packages that
may not normally be on a client system, but that may be required in order for the HP SFS client software to
work correctly.
Depending on your client distribution, some or all of the following or similar packages will be needed and
will be provided on the source media for your distribution or on the HP StorageWorks Scalable File Share
Client Software CD-ROM:
•
rpm
•
tar
•
python Version 2.2 or greater
•
openldap-clients
•
PyXML
•
modutils
•
fileutils
•
python-ldap
For some distributions, the python-ldap package provided on the source media for the distribution
is not suitable for use with the HP SFS software. In these cases, HP provides a modified version of the
python-ldap package in the appropriate directory for the client architecture/distribution
combination on the HP StorageWorks Scalable File Share Client Software CD-ROM. If a modified
version of the package is provided for your client architecture/distribution, you must install that
version of the package.
If a modified version of the python-ldap package is not provided for your client
architecture/distribution, you must install the python-ldap package provided in the source media
for your distribution (if it is not already installed).
When you have verified that the prerequisite packages are present on the client node, proceed to
Section 3.3.2 to install the client software.
3–12
Installing and configuring Red Hat Enterprise Linux and SUSE Linux Enterprise Server 9 SP3 client systems
3.3.2 Step 2: Installing the client software
To install the HP SFS client software on a client node, perform the following steps:
1.
Mount the HP StorageWorks Scalable File Share Client Software CD-ROM on the target client node,
as follows:
# mount /dev/cdrom /mnt/cdrom
2.
Change to the top level directory, as follows:
# cd /mnt/cdrom
3.
The distribution directory contains a number of subdirectories, with one subdirectory for each
architecture. Within each subdirectory, there is a further subdirectory for each operating system
distribution for that architecture. Identify the correct directory for the operating system and architecture
on your client node, then change to that directory, as shown in the following example.
In this example, the architecture is ia32e and the operating system is RHEL 3 Update 5:
# cd ia32e/RHES3.0/
In these directories (where applicable), you can find the python-ldap-version_number.rpm
package and the hpls-diags-client-version_number.rpm package. Where provided, the
python-ldap package must be installed. The hpls-diags package provides some HP SFS client
diagnostic utilities.
If you wish to install the optional package, copy it to the temporary directory, as follows:
# cp hpls-diags-client-version_number.rpm /tmp
4.
Section 3.1 provides instructions for building the packages that you need to install the HP SFS client
software. When you have completed the instructions in Section 3.1, you will have created the
packages listed in Table 3-1. The packages will be appropriate for your client architecture and
distribution.
Table 3-1 Client software packages
Package name
Description
Mandatory/Optional
Requires
hpls-lustreclientversion_number.rpm
SFS client utilities
Mandatory
openldap-clients
kernel-smpversion_number.rpm
A kernel with built-in
support for Lustre
Optional for SLES 9 SP3
systems; mandatory for all
other systems.
lustre-modulesversion_number.rpm
Base Lustre modules
Mandatory
python-ldapversion_number.rpm
Provides an API to access
LDAP directory servers
from Python programs
Mandatory where
provided1
lustreversion_number.rpm
Lustre utilities
Mandatory
gmversion_number.rpm
Support for Myrinet
interconnect
Mandatory where
provided
ibhost-bizversion_number.rpm
Support for Voltaire
InfiniBand interconnect
Mandatory if a Voltaire
InfiniBand interconnect is
to be used
python2
python-ldap
1. See Section 3.3.1.
Installing the HP SFS client software on RHEL and SLES 9 SP3 systems (new installations)
3–13
Note the following points:
•
In kits where the gm package is provided, it must be installed even if no Myrinet interconnect is
used. The package is needed to resolve symbols in the Lustre software.
•
The hpls-lustre-client package requires the openldap-clients package. The
openldap-clients package is usually part of your Linux distribution.
•
The lustre package requires the python2 and python-ldap packages. The python2
package is usually part of your Linux distribution.
Copy the packages you have built to the temporary directory, as follows. In this example, the
gm-version_number.rpm package is included and is copied:
#
#
#
#
#
#
cd
cp
cp
cp
cp
cp
/build/SFS_client_V2.2/output/rpms/ia32e
kernel-smp-version_number.rpm /tmp/
lustre-modules-version_number.rpm /tmp/
lustre-version_number.rpm /tmp/
hpls-lustre-client-version_number.rpm /tmp/
gm-version_number.rpm /tmp/
If a modified version of the python-ldap package is provided for your client architecture/
distribution, copy the python-ldap package from the HP StorageWorks Scalable File Share Client
Software CD-ROM to the temporary directory, as follows:
# cp python-ldap-version_number.rpm /tmp/
5.
If any of the prerequisite packages are not installed, install them now—for example, ibhost-biz
(if a Voltaire InfiniBand interconnect is to be used) or openldap-clients.
Where a Voltaire InfiniBand Version 3.5.5 interconnect driver is installed, reboot the kernel after
installing the ibhost-biz-version_number.rpm file, then verify that the InfiniBand stack loads
properly, by entering the following command:
# service voltaireibhost start
If the command fails, reinstall the ibhost-biz-version_number.rpm file and then reboot the
kernel again.
Where a Voltaire InfiniBand Version 3.4.5 interconnect driver is installed, you do not need to reboot
the kernel.
6.
Install the packages as shown in the following example. You must install the packages in the order
shown here (otherwise, the package manager may attempt to install the Lustre modules before the
kernel module; this would result in the Lustre modules failing to install properly).
•
For RHEL client systems, install the packages as follows. In this example, the gmversion_number.rpm package is included in the kit, and must be installed. The optional
hpls-diags-client package and the python-ldap package are also installed:
# cd /tmp
# rpm –ivh kernel-smp-version_number.rpm
# rpm –ivh gm-version_number.rpm
# rpm -ivh lustre-modules-version_number.rpm \
lustre-version_number.rpm \
python-ldap-version_number.rpm \
hpls-lustre-client-version_number.rpm \
hpls-diags-client-version_number.rpm
•
For SLES 9 SP3 client systems, install the packages as follows. In this example, the optional
hpls-diags-client package and the python-ldap package are also installed. If the
kernel-smp-version_number.rpm has already been installed, omit the first command:
# cd /tmp
# rpm –ivh kernel-smp-version_number.rpm
# ln -s init.d/sfs /etc/init.d/sfs
# rpm -ivh --force --nodeps lustre-modules-version_number.rpm \
lustre-version_number.rpm \
python-ldap-version_number.rpm \
3–14
Installing and configuring Red Hat Enterprise Linux and SUSE Linux Enterprise Server 9 SP3 client systems
hpls-lustre-client-version_number.rpm \
hpls-diags-client-version_number.rpm
NOTE: The kernel package makes a callout to the new-kernel-pkg utility to update the boot
loader with the new kernel image. Ensure that the correct boot loader (GRUB, Lilo, and so on)
has been updated.
The installation of the package does not necessarily make the new kernel the default for
booting—you may need to edit the appropriate bootloader configuration file so that the new
kernel is selected as the default for booting.
When you install the lustre-modules.rpm file, the following messages may be displayed. You
can ignore these messages:
depmod: *** Unresolved symbols in
/lib/modules/2.4.21-40.EL_SFS2.2_0/kernel/net/lustre/kviblnd.o
depmod:
gid2gid_index
depmod:
vv_set_async_event_cb
depmod:
base_gid2port_num
depmod:
cm_connect
depmod:
pkey2pkey_index
depmod:
cm_reject
depmod:
cm_cancel
depmod:
vv_hca_open
depmod:
cm_listen
depmod:
cm_accept
depmod:
cm_disconnect
depmod:
vv_dell_async_event_cb
depmod:
port_num2base_gid
depmod:
vv_hca_close
depmod:
ibat_get_ib_data
depmod:
cm_create_cep
depmod:
port_num2base_lid
depmod:
cm_destroy_cep
7.
Use the name of the kernel RPM file to determine the kernel version by entering the following
command:
# echo kernel_rpm_name | sed -e ’s/kernel\-\(.*\)\.[^\.]*\.rpm/\1/’
-e ’s/\(smp\)-\(.*\)/\2\1/’
8.
Update the kernel module database by entering the following command:
# depmod -ae -F /boot/System.map-kernel_version kernel_version
where kernel_version is the kernel version determined in the previous step, for example,
2.4.21-2099X5smp.
9.
Reboot the system to boot the new kernel, as follows:
# reboot
10. If a Voltaire InfiniBand interconnect is used, you must configure an IP address for the ipoib0
interface on the client node. This IP address, which is not automatically configured by the
voltaireibhost service, is required for Lustre to be able to use the InfiniBand interconnect.
For example, to configure an address for the ipoib0 interface on an RHEL 3 system, add an
/etc/sysconfig/network-scripts/ifcfg-ipob0 script (similar to the scripts used for the
Gigabit Ethernet interfaces) with the appropriate address and then restart the network service. The
following is an example of such a script:
DEVICE=ipoib0
ONBOOT=yes
BOOTPROTO=static
IPADDR=192.168.0.‘ifconfig eth0 | grep inet | awk ’{print \$2}’ | awk -F
: ’{print \$2}’ | awk -F . ’{print\$4}’‘
NETMASK=255.255.255.0
BROADCAST=192.168.0.255
MTU=1500
Installing the HP SFS client software on RHEL and SLES 9 SP3 systems (new installations)
3–15
TIP: Alternatively, you can use the ib-setup tool to configure this setting on each client node.
11. This step applies only if a Voltaire InfiniBand Version 3.4.5 interconnect driver is used.
You must change the ARP resolution parameter on each of the client nodes. By default, this parameter
is set to Dynamic Path Query; you must now update it to Static Path Query (unless there is
a specific reason why it needs to be set to Dynamic Path Query).
To update the ARP resolution parameter, perform the following steps on each client node where a
Voltaire InfiniBand Version 3.4.5 interconnect driver is used:
a.
Stop the Voltaire InfiniBand interconnect software by entering the following command:
# service voltaireibhost stop
CAUTION: You must stop the interconnect software before you proceed to Step b. If you do not,
the parameter that you change in Step b will be reset to the default the next time the client node
is rebooted.
b.
In the /usr/voltaire/config/repository.rps file, replace the following value:
"sa-queries"=0x00000001
with this value:
"sa-queries"=0x00000000
c.
Restart the Voltaire InfiniBand interconnect software by entering the following command:
# service voltaireibhost start
TIP: Alternatively, you can use the ib-setup tool to configure this setting on each client node.
12. When you have installed the client kernel, there should be an initrd file (/boot/initrdkernel_version.img) on the client node; however, if the modprobe.conf or modules.conf
file on the client node is not suitable for the client kernel supplied with the HP SFS client software, the
initrd file will not be created.
If the initrd file does not exist after you have installed the client kernel, you must modify the
modprobe.conf or modules.conf file, and then create the initrd file manually (see
Section 7.1.1 for instructions). When you have finished creating the initrd file, you can safely
return the modules.conf file to its previous state.
When you have finished installing the HP SFS client software, proceed to Section 3.3.3 to run the
sfsconfig command on the client node.
3.3.3 Step 3: Running the sfsconfig command after installing the software
When you have finished installing the HP SFS Version 2.2 client software on the client node, you must
configure the options lnet settings and the lquota settings on the client node. You can use the
sfsconfig command to configure these settings automatically.
Run the sfsconfig command by entering the following command, where server_name is the name of
an HP SFS system that the client node will access:
# sfsconfig --server server_name[--server server_name] [--server server_name --server
server_name...] all
The sfsconfig command creates a new /etc/modprobe.conf.lustre or
/etc/modules.conf.lustre file (depending on the kernel distribution of the client) that contains the
appropriate settings, and includes the new file in the /etc/modprobe.conf or /etc/modules.conf
file.
3–16
Installing and configuring Red Hat Enterprise Linux and SUSE Linux Enterprise Server 9 SP3 client systems
When the script has completed, examine the /etc/modprobe.conf.lustre or /
etc/modules.conf.lustre file and the /etc/modprobe.conf or /etc/modules.conf file to
ensure that the options lnet settings and the lquota settings have been added (see Appendix B for
more information on the settings).
Note that the sfsconfig command uses the http: protocol to get configuration information from the
HP SFS servers. If the client node does not have access to the HP SFS servers over a TCP/IP network, or if
the servers are offline, the sfsconfig command will not be able to configure the client node correctly, and
you will have to modify the configuration file manually. For instructions on how to do this, see Appendix B.
When you have finished configuring the options lnet and lquota settings, proceed to Section 3.3.4
to complete the remaining additional configuration tasks.
3.3.4 Step 4: Completing other configuration tasks
To complete the configuration of the client node, perform the following tasks:
1.
Configure interconnect interfaces (see Section 3.3.4.1).
2.
Check that the python2 package is loaded (see Section 3.3.4.2).
3.
Configure the NTP server (see Section 3.3.4.3).
4.
Configure firewalls (see Section 3.3.4.4).
5.
Configure the slocate package (see Section 3.3.4.5).
3.3.4.1
Configuring interconnect interfaces
This section describes specific configuration steps that you may need to perform depending on the
interconnect type and configuration that is used in the HP SFS system.
The section is organized as follows:
•
Configuring Gigabit Ethernet interfaces (Section 3.3.4.1.1)
•
Configuring Voltaire InfiniBand interfaces (Section 3.3.4.1.2)
No specific configuration steps are required for Quadrics or Myrinet interconnects.
3.3.4.1.1
Configuring Gigabit Ethernet interfaces
If a client node uses more than one Gigabit Ethernet interface to connect to an HP SFS system, the
arp_ignore parameter must be set to 1 for all client node interfaces that are expected to be used for
interaction with Lustre file systems. This setting ensures that a client node only replies to an ARP request if
the requested address is a local address configured on the interface receiving the request.
You can set the arp_ignore value for an interface after a client node has been booted; you can also
configure a node so that the arp_ignore value is set automatically when the node is booted, by adding
the arp_ignore definition to the /etc/sysctl.conf file.
For example, if a client node uses interfaces eth1 and eth2 for interaction with an HP SFS system, both of
these interfaces must have the arp_ignore parameter set to 1. To set this value on a running client node,
enter the following commands:
# echo "1" > /proc/sys/net/ipv4/conf/eth1/arp_ignore
# echo "1" > /proc/sys/net/ipv4/conf/eth2/arp_ignore
To configure the client node so that the values are automatically set when the client node is booted, add the
following lines to the /etc/sysctl.conf file:
net.ipv4.conf.eth1.arp_ignore = 1
net.ipv4.conf.eth2.arp_ignore = 1
Installing the HP SFS client software on RHEL and SLES 9 SP3 systems (new installations)
3–17
It is possible to restrict the interfaces that a client node uses to communicate with the HP SFS system by
editing the options lnet settings in the /etc/modprobe.conf or /etc/modules.conf file; see
Appendix B.
3.3.4.1.2
Configuring Voltaire InfiniBand interfaces
If the HP SFS system uses a partitioned InfiniBand interconnect, you may need to configure additional
InfiniBand IP (IPoIB) interfaces on the client node.
For information about partitioned InfiniBand interconnect configurations, refer to Chapter 2 of the
HP StorageWorks Scalable File Share System Installation and Upgrade Guide.
IPoIB interfaces are named ipoib0, ipoib1, and so on; you can use the ib-setup command to create
and delete these interfaces.
To create an IPoIB interface on a client node, perform the following steps:
1.
If any Lustre file systems are mounted on the client node, unmount them.
2.
Enter the sfsconfig -u command and verify that the lnet and kviblnd modules are unloaded.
(If these modules are not unloaded, the kernel retains the old connection network IDs (NIDs) and may
later refuse to connect to the HP SFS servers.)
3.
Enter the ib-setup command using the following syntax:
/usr/voltaire/scripts/ib-setup --add_interface --pkey pkey --ip ip_address
--netmask netmask --mtu mtu --active 1
The system automatically chooses the next available ipoib interface name.
For example:
[root@delta12_EL4_u3 ~]$ /usr/voltaire/scripts/ib-setup --add_interface --pkey
0xffff --ip 172.32.0.112 --netmask 255.255.255.0 --mtu 1500 --active 1
You added interface ipoib0
Auto configuration is done on delta12 using IP 172.32.0.112 Netmask
255.255.255.0 Broadcast 172.32.0.255 Mtu 1500
If you need to delete an IPoIB interface on a client node, perform the following steps:
1.
If any file systems are mounted on the client node, unmount them.
2.
Enter the sfsconfig -u command and verify that the lnet and kviblnd modules are unloaded.
(If these modules are not unloaded, the kernel retains the old connection network IDs (NIDs) and may
later refuse to connect to the HP SFS servers.)
3.
Enter the ib-setup command using the following syntax:
/usr/voltaire/scripts/ib-setup --delete_interface interface_number
For example:
[root@axis12_EL4_u3 ~]$ /usr/voltaire/scripts/ib-setup --delete_interface 0
Please note: this changes will be valid only on the next IB restart
[root@delta12_EL4_u3 ~]$
3.3.4.2
Checking that the python2 package is loaded
The commands that are used to mount and unmount file systems on the client nodes require that the
python2 package is installed on the client node. You can check if this package is installed by entering the
following command on the client node:
# rpm –qa | grep python
Check the output to see if the python2 package is listed. The python2 package is usually part of your
Linux distribution.
3–18
Installing and configuring Red Hat Enterprise Linux and SUSE Linux Enterprise Server 9 SP3 client systems
3.3.4.3
Configuring the NTP server
For the HP SFS diagnostics to work correctly, the date and time on the client nodes must be synchronized
with the date and time on other client nodes, and with the date and time on the servers in the HP SFS system.
In addition, synchronizing the date and time on the systems keeps the logs on the systems synchronized, and
is helpful when diagnosing problems.
As a result, HP strongly recommends that you synchronize the date and time on client nodes with the date
and time on other client nodes, and with the date and time on the servers in the HP SFS system, even though
the systems do not need to be synchronized in order for Lustre to function correctly.
To synchronize the systems, you can enable the NTPD service on the client nodes, and configure the client
nodes to use the same NTP server that the servers in the HP SFS system use (configured on the administration
server).
3.3.4.4
Configuring firewalls
If you intend to run a firewall on your client nodes, you must make sure that it does not block any
communication between the client and the servers in the HP SFS system. If you encounter any problems while
your firewall is running, please disable the firewall and see if the problems can be reproduced. Your
HP Customer Support representative will be able to help you to set up your firewall.
3.3.4.5
Configuring the slocate package on client nodes
The slocate package may be installed on your system. This package is typically set up as a periodic job
to run under the cron daemon. To prevent the possibility of a find command executing on the global file
system of all clients simultaneously, the hpls-lustre-client package searches the
/etc/cron.daily/slocate.cron file and the /etc/updatedb.conf file (if it exists) for references
to lustre or lustre_lite. If no reference is found, lustre and lustre_lite are added to the list
of file systems that the slocate package ignores. This list is in either the /etc/cron.daily/
slocate.cron file or the /etc/updatedb.conf file, depending on the client distribution. When
lustre and lustre_lite are added to this list, all lustre and lustre_lite file systems are ignored
when the slocate package executes a find command.
If you wish to enable the slocate package to search lustre and lustre_lite file systems, remove
the lustre and lustre_lite entries from the /etc/cron.daily/slocate.cron file (or from the
/etc/updatedb.conf file, depending on the distribution) and add a comment containing the text
lustre and lustre_lite at the end of the file.
3.3.5 Step 5: Configuring boot-time mounting of file systems
When you have finished installing and configuring the client node as described in Section 3.3.1 through
Section 3.3.4, configure the client node to mount Lustre file systems at boot time by editing the
/etc/sfstab and /etc/sfstab.proto files. For more information, see Section 4.7.
3.4
Upgrading HP SFS client software on existing RHEL and
SLES 9 SP3 systems
The HP SFS client version must be capable of interoperating with the HP SFS server version on the servers
in the HP SFS system. See Section 1.3.1 for details of which HP SFS server and client software versions can
interoperate successfully.
To upgrade existing RHEL and SLES 9 SP3 client systems, perform the following tasks:
1.
Upgrade the HP SFS client software (see Section 3.4.1).
2.
Run the sfsconfig command on the client node (see Section 3.4.2).
3.
When Portals compatibility is no longer needed, disable Portals compatibility (see Section 3.4.3).
Upgrading HP SFS client software on existing RHEL and SLES 9 SP3 systems
3–19
3.4.1 Step 1: Upgrading the HP SFS client software
To upgrade the HP SFS client software on RHEL and SLES 9 SP3 client systems, perform the following steps:
1.
On the node that you are going to upgrade, stop all jobs that are using Lustre file systems.
To determine what processes on a client node are using a Lustre file system, enter the fuser
command as shown in the following example, where /data is the mount point of the file system. You
must enter the command as root user; if you run the command as any other user, no output is
displayed:
# fuser -vm /data
/data
USER
root
user2
user2
user3
user3
user3
user3
user3
user3
user1
PID
303
10993
16408
22513
31820
31847
31850
31950
31951
32572
ACCESS
..c..
..c..
..c..
..c..
..c..
..c..
..c..
..c..
..c..
..c..
COMMAND
su
csh
ssh
csh
res
1105102082.1160
1105102082.1160
mpirun
srun
bash
Alternatively, you can enter the following command (enter the command as root user; if you run the
command as any other user, the command only reports the current user’s references):
# lsof /data
COMMAND
PID
USER
FD
TYPE DEVICE
SIZE
su
5384
root cwd
DIR 83,106 294912
csh
10993
user2 cwd
DIR 83,106
4096
ssh
16408
user2 cwd
DIR 83,106
4096
csh
22513
user3 cwd
DIR 83,106
4096
/data/user3/bids/noaa/runs/0128
res
31820
user3 cwd
DIR 83,106 12288
/data/user3/bids/noaa/runs/0096
110510208 31847
user3 cwd
DIR 83,106 12288
/data/user3/bids/noaa/runs/0096
110510208 31850
user3 cwd
DIR 83,106 12288
/data/user3/bids/noaa/runs/0096
mpirun
31950
user3 cwd
DIR 83,106 12288
/data/user3/bids/noaa/runs/0096
srun
31951
user3 cwd
DIR 83,106 12288
/data/user3/bids/noaa/runs/0096
bash
32572
user1 cwd
DIR 83,106 294912
2.
NODE
393217
52428801
52428801
39682049
NAME
/data/user1
/data/user2/bonnie
/data/user2/bonnie
39649281
39649281
39649281
39649281
39649281
393217 /data/user1
Unmount all Lustre file systems on the client node that you are going to upgrade, by entering the
following command:
# sfsumount -a
3.
Remove all of the existing HP SFS RPM files on the client node, except the kernel, in the order in which
they were installed, as shown in the following example:
NOTE: For some distributions, the python-ldap package provided on the source media for
the distribution is not suitable for use with the HP SFS software. For these distributions, HP
provides a modified version of the python-ldap package in the appropriate directory for the
client architecture/distribution combination on the HP StorageWorks Scalable File Share Client
Software CD-ROM.
If a modified version of the python-ldap package is provided for your client architecture/
distribution on the HP StorageWorks Scalable File Share Client Software CD-ROM for the
version you are upgrading to, you must remove the existing version of the package and install
the appropriate version.
3–20
Installing and configuring Red Hat Enterprise Linux and SUSE Linux Enterprise Server 9 SP3 client systems
If a modified version of the python-ldap package is not provided for your client architecture/
distribution on the HP StorageWorks Scalable File Share Client Software CD-ROM for the
version you are upgrading to, you do not need to remove (and reinstall) the python-ldap
package.
In the example shown here, the python-ldap package is removed.
# rpm -ev lustre-modules-version_number \
lustre-lite-version_number \
python-ldap-version_number \
hpls-lustre-client-version_number \
hpls-diags-client-version_number
4.
If you have the optional gm-version_number.rpm file installed, remove it, as shown in the
following example:
# rpm –ev gm-version_number
5.
Reboot the client node.
6.
Install the new HP SFS client software, as described in Steps 1 through 12 in Section 3.3.2.
7.
When you have finished installing the new client software, you can remove the old kernel file as
follows (this is an optional task; removing the old kernel frees up space on the client node):
# rpm -ev kernel-smp-old_version_number
When you have finished upgrading the HP SFS client software, proceed to Section 3.4.2 to run the
sfsconfig command on the client node.
3.4.2 Step 2: Running the sfsconfig command after upgrading the software
When you have finished upgrading the HP SFS Version 2.2 client software on the client node, you must run
the sfsconfig command on the client node.
Running the sfsconfig command alters the contents of configuration files on the client node, as follows:
•
The sfsconfig command creates a new /etc/modprobe.conf.lustre or
/etc/modules.conf.lustre file (depending on the kernel distribution of the client) that contains
the appropriate settings, and includes the new file in the /etc/modprobe.conf or
/etc/modules.conf file.
•
The sfsconfig command updates the /etc/sfstab and /etc/sfstab files as follows:
•
Converts any mount directives that use the ldap: protocol to the http: protocol (unless the
-L|--keepldap option is specified). Note that the ldap: protocol is supported in HP SFS
Version 2.2 for backward compatibility; it will not be supported in the next major release of the
HP SFS product.
•
Comments out mount directives that use the http: protocol and adds equivalent directives
using the lnet: protocol (unless the -H|--keephttp option is specified).
To run the sfsconfig command, enter the following command:
# sfsconfig all
When the script has completed, verify that the configuration files have been updated:
•
Examine the /etc/modprobe.conf.lustre or /etc/modules.conf.lustre file and the /
etc/modprobe.conf or /etc/modules.conf file to ensure that the options lnet settings
and the lquota settings have been added. See Appendix B for additional information on the
settings in the configuration files.
Upgrading HP SFS client software on existing RHEL and SLES 9 SP3 systems
3–21
•
Examine the /etc/sfstab and /etc/sfstab.proto files to ensure that the mount directives
using the lnet: protocol have been added.
NOTE: The sfsconfig command uses the http: protocol to get configuration information from the
HP SFS servers. If the client node does not have access to the HP SFS servers over a TCP/IP network, or if
the servers are offline, the sfsconfig command will not be able to configure the client node correctly,
and you will have to modify the configuration file manually. For instructions on how to do this, see
Appendix B.
If all of the client systems that access the HP SFS system have now been upgraded to HP SFS Version 2.2,
proceed to Section 3.4.3 to disable Portals compatibility.
3.4.3 Step 3: Disabling Portals compatibility
If some of the client systems that access the HP SFS system have not yet been upgraded to HP SFS
Version 2.2, skip this step.
If all of the client systems that access the HP SFS system have now been upgraded to HP SFS Version 2.2,
Portals compatibility is no longer needed on the servers or the client systems. You must disable Portals
compatibility on the HP SFS servers and set the portals_compatibility attribute to none on all of the
client systems that access the HP SFS servers.
To disable Portals compatibility on the servers and client systems, perform the following steps. Note that you
must perform these steps on each client system that accesses the HP SFS system:
1.
Unmount all Lustre file systems on the client nodes.
2.
Disable Portals compatibility mode on the HP SFS servers; for information on how to do this, refer to
Chapter 8 of the HP StorageWorks Scalable File Share System Installation and Upgrade Guide,
specifically the section titled Disabling Portals compatibility mode (when client nodes have been
upgraded).
3.
On the client node, edit the /etc/modprobe.conf.lustre or /etc/modules.conf.lustre
file and change the portals_compatibility setting to none.
4.
Remount the Lustre file systems on the client nodes.
Repeat these steps on each client system that accesses the HP SFS system.
3.5
Downgrading HP SFS client software on RHEL and SLES 9 SP3
systems
The HP SFS client version must be capable of interoperating with the HP SFS server version on the servers
in the HP SFS system. See Section 1.3.1 for details of which HP SFS server and client software versions can
interoperate successfully.
To downgrade the HP SFS client software on RHEL or SLES 9 SP3 systems, perform the following steps:
1.
On the node that you are going to downgrade, stop all jobs that are using Lustre file systems.
To determine what processes on a client node are using a Lustre file system, enter the fuser
command as shown in the following example, where /data is the mount point of the file system.
You must enter the command as root user; if you run the command as any other user, no output is
displayed:
# fuser -vm /data
/data
3–22
USER
root
user2
user2
PID
303
10993
16408
ACCESS
..c..
..c..
..c..
COMMAND
su
csh
ssh
Installing and configuring Red Hat Enterprise Linux and SUSE Linux Enterprise Server 9 SP3 client systems
user3
user3
user3
user3
user3
user3
user1
22513
31820
31847
31850
31950
31951
32572
..c..
..c..
..c..
..c..
..c..
..c..
..c..
csh
res
1105102082.1160
1105102082.1160
mpirun
srun
bash
Alternatively, you can enter the following command (enter the command as root user; if you run the
command as any other user, the command only reports the current user’s references):
# lsof /data
COMMAND
PID
USER
FD
TYPE DEVICE
SIZE
su
5384
root cwd
DIR 83,106 294912
csh
10993
user2 cwd
DIR 83,106
4096
ssh
16408
user2 cwd
DIR 83,106
4096
csh
22513
user3 cwd
DIR 83,106
4096
/data/user3/bids/noaa/runs/0128
res
31820
user3 cwd
DIR 83,106 12288
/data/user3/bids/noaa/runs/0096
110510208 31847
user3 cwd
DIR 83,106 12288
/data/user3/bids/noaa/runs/0096
110510208 31850
user3 cwd
DIR 83,106 12288
/data/user3/bids/noaa/runs/0096
mpirun
31950
user3 cwd
DIR 83,106 12288
/data/user3/bids/noaa/runs/0096
srun
31951
user3 cwd
DIR 83,106 12288
/data/user3/bids/noaa/runs/0096
bash
32572
user1 cwd
DIR 83,106 294912
2.
NODE
393217
52428801
52428801
39682049
NAME
/data/user1
/data/user2/bonnie
/data/user2/bonnie
39649281
39649281
39649281
39649281
39649281
393217 /data/user1
Unmount all Lustre file systems on the client node that you are going to downgrade, as follows:
# sfsumount -a
3.
Remove all of the existing HP SFS RPM files on the client node, except the kernel, in the order in which
they were installed, as shown in the following example:
NOTE: For some distributions, the python-ldap package provided on the source media for
the distribution is not suitable for use with the HP SFS software. For these distributions, HP
provides a modified version of the python-ldap package in the appropriate directory for the
client architecture/distribution combination on the HP StorageWorks Scalable File Share Client
Software CD-ROM.
If a modified version of the python-ldap package is provided for your client architecture/
distribution on the HP StorageWorks Scalable File Share Client Software CD-ROM for the
version you are upgrading to, you must remove the existing version of the package and install
the appropriate version.
If a modified version of the python-ldap package is not provided for your client architecture/
distribution on the HP StorageWorks Scalable File Share Client Software CD-ROM for the
version you are upgrading to, you do not need to remove (and reinstall) the python-ldap
package.
In the example shown here, the python-ldap package is removed.
# rpm -ev lustre-modules-version_number \
lustre-version_number \
python-ldap-version_number \
hpls-lustre-client-version_number \
hpls-diags-client-version_number
4.
If you have the optional gm-version_number.rpm file installed, remove it, as shown in the following
example:
# rpm –ev gm-version_number
5.
Reboot the client node.
6.
Enable Portals compatibility mode on the HP SFS system.
Downgrading HP SFS client software on RHEL and SLES 9 SP3 systems
3–23
7.
Replace or edit the /etc/sfstab.proto file on the client node, as follows:
•
If you saved a copy of the /etc/sfstab.proto file during the upgrade process, replace the
/etc/sfstab.proto file on the client node with the older (saved) version of the file.
•
If you did not save a copy of the /etc/sfstab.proto file during the upgrade process, you
must edit the /etc/sfstab.proto file on the client node and replace any entries that use the
lnet: or http: protocols with the corresponding entries using the ldap: protocol.
8.
Install the HP SFS client software using the process described in HP SFS documentation for that
version of the software. For example, if you are downgrading the HP SFS client software to
Version 2.1-1, refer to the HP StorageWorks Scalable File Share Client Installation and User Guide for
Version 2.1 and the HP StorageWorks Scalable File Share Release Notes for Version 2.1-1.
9.
When you have finished installing the earlier version of the client software, you can remove the later
kernel file as follows (this is an optional task; removing the unneeded kernel file frees up space on the
client node):
# rpm -ev kernel-smp-later_version_number
Repeat these steps for each client node that needs to be downgraded.
3–24
Installing and configuring Red Hat Enterprise Linux and SUSE Linux Enterprise Server 9 SP3 client systems
4
Mounting and unmounting Lustre file systems on client
nodes
This chapter provides information on mounting and unmounting file systems on client nodes, and on
configuring client nodes to mount file system at boot time. The topics covered include the following:
•
Overview (Section 4.1)
•
Mounting Lustre file systems using the sfsmount command with the lnet: protocol (Section 4.2)
•
Mounting Lustre file systems using the mount command (Section 4.3)
•
The device field in the sfsmount and mount commands (Section 4.4)
•
Mount options (Section 4.5)
•
Unmounting file systems on client nodes (Section 4.6)
•
Using the SFS service (Section 4.7)
•
Alternative sfsmount modes (Section 4.8)
•
Restricting interconnect interfaces on the client node (Section 4.9)
•
File system service information and client communications messages (Section 4.10)
4–1
4.1
Overview
NOTE: Before you attempt to mount a Lustre file system on a client node, make sure that the node has been
configured as described in Chapter 2 or Chapter 3. In particular, the client node must have an options
lnet setting configured in the /etc/modprobe.conf.lustre or /etc/modules.conf.lustre
file.
A Lustre file system can be mounted using either the sfsmount(8) command (the recommended method)
or the standard mount(8) command with a file system type of lustre. This chapter describes the syntax
of the device field in the sfsmount and mount commands and the Lustre-specific mount options that are
available.
To mount a Lustre file system at boot time, the /etc/fstab file can be used. However, a problem with using
the /etc/fstab file is that the mount operations happen early in the boot sequence. If there is a syntax
error in the mount directive or an HP SFS server is down, the boot will hang. At that point, you will be unable
to log into the node to diagnose the problem. For this reason, HP SFS provides the SFS service. The SFS
service starts later in the boot sequence and uses an /etc/sfstab.proto or
/etc/sfstab file to describe the Lustre file systems that are to be mounted at boot time. In addition, the
SFS service uses the sfsmount command instead of the standard mount command.
The SFS service and associated sfsmount command provide the following additional features that are not
available with the /etc/fstab file and the standard mount command:
•
The SFS service starts after the sshd(8) daemon; this allows you to log in and diagnose problems
even if a mount operation hangs.
•
The SFS service supports mounting in the background using the bg mount option.
•
If the Lustre file system or HP SFS server is temporarily stopped or down, the mount operation normally
fails. However, when used by the SFS service, the sfsmount command continues to retry the mount
operation until the file system or the HP SFS server is restarted. This feature, which is controlled by the
[no]repeat mount option, means that when a node boots you are guaranteed that all Lustre file
systems are correctly mounted and available to your applications.
•
The sfsmount command supports a number of additional mount options to control client caching
and the remote procedure call (RPC) communication mechanism between a client node and the HP
SFS server.
•
The SFS service allows you to have a common /etc/sfstab.proto file. When started, the SFS
service generates a local /etc/sfstab file from the /etc/sfstab.proto. This allows you to
mount different file systems, or use different mount options, on different nodes.
The syntax of the device field in the sfsmount and mount commands is quite complex—for example:
lnet://10.0.128.2@vib0:/south-mds3/client_vib
For convenience, the sfsmount command also supports an optional http: mount protocol. With this
syntax, you specify the name of the server and the name of the file system. The syntax for this is simpler and
more intuitive—for example:
http://south/data
The http: protocol is normally used when running the sfsmount command interactively—it must not be
used to mount file systems on large numbers of client nodes at the same time.
The mount methods described so far use the zeroconf feature of the Lustre file system. This feature is based
on the LNET communication mechanism in Lustre. In this chapter and in other chapters in this guide, this
mechanism is referred to as the lnet: protocol. In previous releases of the HP SFS software, LNET was not
present and the mount(8) command was not used. Instead, the lconf command was used to load the
appropriate Lustre modules and mount the file systems. To support backwards compatibility, the sfsmount
command continues to support the original syntax using the ldap: protocol. In the next major release of
HP SFS, the lconf command and the associated ldap: protocol will not be supported. HP recommends
4–2
Mounting and unmounting Lustre file systems on client nodes
that you convert existing systems to use the lnet: protocol. The process for converting from the ldap:
protocol to the lnet: protocol is described in Chapter 2 (for HP XC systems) and Chapter 3 (for other types
of client systems).
A Lustre file system comprises a number of MDS and OST services. A Lustre file system cannot be mounted
on a client node until all of the file system services are running. To determine if a file system is ready to be
mounted, use the show filesystem command on the HP SFS system to check the file system state. If the
file system state is started, the mount operation will complete normally. If the file system state is
recovering, the mount command will stall until the file system state goes to started—a process that
takes several minutes. Do not interrupt the mount operation; the recovery process does not start until a client
attempts to mount the file system. If the file system is in any other state (such as stopped), the mount
operation cannot complete. You must correct the situation on the HP SFS server (for example, by starting the
file system). Refer to the HP StorageWorks Scalable File Share System User Guide for more information on
the show filesystem command and on starting file systems.
The Lustre file system is a network file system; that is, when the file system is mounted, the client node
communicates with remote servers over an interconnect. When a client node has mounted (or is attempting
to mount) the file system, you can check the status of the connections using the sfslstate command. This
command is described in Section 4.10.1.
4.2
Mounting Lustre file systems using the sfsmount command with the
lnet: protocol
NOTE: Lustre file systems must be mounted as root user, and the environment—in particular the PATH—
must be that of root. Do not use the su syntax when when changing to root user; instead, use the
following syntax:
su The sfsmount(8) command supports the standard mount command using the lnet: protocol. The
sfsmount command provides useful options that are not available with the standard mount command.
The syntax of the command is as follows:
sfsmount [lnet://]device mountpoint [-o options]
Where:
lnet://
Is an optional prefix.
device
See Section 4.4 for a description of this field.
mountpoint
Specifies the mount point of the file system that is to be mounted. Do not
include a trailing slash (/) at the end of the mount point.
options
See Section 4.5 for information on the mount options that can be used with the
sfsmount command.
TIP: If the server is very busy, the mount command may not wait for long enough for the server to
respond, and may report that the operation has failed before the server has been able to respond. To
prevent this from happening, HP recommends that you use the -o repeat option with the sfsmount
command. This greatly reduces the probability of such failures. See Section 4.5 for more details on the
repeat option.
Examples
# sfsmount lnet://3712584958@gm0,3712584935@gm0:/south-mds3/client_gm /mnt/data
-o acl,usrquota,grpquota
# sfsmount lnet://35@elan0,34@elan0:/south-mds3/client_elan /usr/scratch
# sfsmount lnet://10.0.128.2@vib0,10.0.128.1@vib0:/south-mds3/client_vib /data
Mounting Lustre file systems using the sfsmount command with the lnet: protocol
4–3
TIP: If the client node has access to the HP SFS system on a TCP/IP network, you can generate the correct
address to be used in the sfsmount command with the lnet: protocol by entering the sfsmount
command with the -X option and the http: protocol, as shown in the following example:
# sfsmount -X http://south/test /mnt/test
4.3
Mounting Lustre file systems using the mount command
NOTE: Lustre file systems must be mounted as root user, and the environment—in particular the PATH—
must be that of root. Do not use the su syntax when when changing to root user; instead, use the
following syntax:
su You can use the standard mount(8) command to mount file systems manually. You must specify lustre as
the file system type.
See Section 4.5 for information on the mount options for Lustre file systems.
Examples
# mount -t lustre 3712584958@gm0,3712584935@gm0:/south-mds3/client_gm /mnt/data
-o acl,usrquota,grpquota
# mount -t lustre 35@elan0,34@elan0:/south-mds3/client_elan /usr/scratch
# mount -t lustre 10.0.128.2@vib0,10.0.128.1@vib0:/south-mds3/client_vib /data
4.4
The device field in the sfsmount and mount commands
The syntax of the device field in the sfsmount and mount commands is as follows:
mdsnodes:/mdsname[/profile]
Where:
mdsnodes
Is in the format address@network[,address@network]
address is the network ID (NID) of the MDS server in the HP SFS system (as shown by the
sfsview command on the client node or by the sfsmgr show server command on
the HP SFS server)
network is typeN (type is one of tcp, elan, gm, vib and N is the network instance
number—typically 0 (zero))
You can specify two entries; the address of the server where the MDS service normally runs (the
first entry), and the address of the backup server for the MDS service (the second entry).
For example:
35@elan0,33@elan0
mdsname
Is in the format system_name-mds_service
system_name is the HP SFS system name (or system nickname, if the nickname attribute is
specified on the system)
4–4
Mounting and unmounting Lustre file systems on client nodes
mds_service is the name of the MDS service on the HP SFS system (as shown by the
sfsmgr show filesystem command on the HP SFS server)
For example:
south-mds3
profile
Is in the format client_type, and type is one of tcp, elan, gm, vib
4.5
Mount options
Table 4-1 describes the options that can be specified in the -o option list with the mount command
and/or the sfsmount command for Lustre file systems. Some of the options are processed by the
sfsmount command; some are processed by the SFS service (as described in Section 4.7); others are
processed by the sfsconfig command only (see Appendix A for more information).
Table 4-1 Mount options
Name
mount and/or sfsmount
Description
lconf|sfslconf
sfsmount
Specifies whether the lconf command or the sfslconf
command is to be used for the mount operation. The lconf
command is used by default when the sfsmount
command is used with the ldap: protocol.
The sfslconf command has been deprecated since
HP SFS Version 2.0.
acl
mount and sfsmount
Specifies whether access control lists (ACLs) are to be used
with the mount point. If ACLs are to be used, they must be
enabled on the Lustre file system.
user_xattr
mount and sfsmount
Specifies whether extended attributes are to be used with
the mount point. If extended attributes are to be used, they
must be enabled on the Lustre file system.
usrquota
mount and sfsmount
Enables user quotas. If quotas are to be used, the quota
functionality must be enabled on the Lustre file system.
grpquota
mount and sfsmount
Enables group quotas. If quotas are to be used, the quota
functionality must be enabled on the Lustre file system.
bg[=N]
sfsmount
Specifies that the file system is to be mounted in the
background after a timeout of N seconds. If you do not
specify that the file system is to be mounted in the
background, it will be mounted in the foreground.
If you specify the bg option without specifying a number of
seconds, the default timeout is 30 seconds.
fg
sfsmount
Specifies that the file system is to be mounted in the
foreground. This is the default behavior (unless you specify
the bg option).
onmount=script
sfsmount
Specifies a script that will be run after the mount operation
has completed. This option is useful in conjunction with
background mount operations.
Mount options
4–5
Table 4-1 Mount options
4–6
Name
mount and/or sfsmount
Description
[no]repeat
sfsmount
Specifies whether repeated attempts are to be made to
mount the file system (until the mount operation succeeds),
or if only one attempt is to be made to mount the file system.
When the sfsmount command is run interactively, the
default for this option is norepeat. When the sfsmount
command is used by the SFS service, the SFS service adds
the repeat mount option unless the /etc/sfstab or
/etc/sfstab.proto file specifies norepeat.
To reduce the possibility of the mount operation failing as a
result of the mount command timing out before the server
has had time to respond, HP recommends that you do not
specify the norepeat option in the /etc/sfstab or
/etc/sfstab.proto file.
[no]auto
mount and sfsmount
Specifies whether the file system is to be automatically
mounted at boot time. The default is auto (that is, the file
system is to be automatically mounted at boot time).
With the mount command, this option is used in directives
in the /etc/fstab file. With the sfsmount command,
the option is used in directives in the /etc/sfstab and
/etc/sfstab.proto files.
verbose
sfsmount
Invokes the lconf command with the --verbose option.
net=value[n]
sfsmount
This option is ignored by the sfsmount command. The
functionality of the option has been superseded by the use
of an appropriate options lnet setting in the
/etc/modprobe.conf.lustre or
/etc/modules.conf.lustre configuration file.
nal=value[n]
sfsmount
Same as the net option.
max_cached_mb=value sfsmount
Specifies how much client-side cache space is to be used for
a file system.
max_dirty_mb=value
sfsmount
Specifies how much dirty data can be created on a client
node for each OST service. The default value of this
parameter is 32 (that is, 32MB).
max_rpcs_in_flight= sfsmount
value
Specifies the number of simultaneous RPCs that can be
outstanding to a server. If the max_dirty_mb option is
specified, the max_rpcs_in_flight option must have
the same value.
xxxxxxx
sfsmount
For mount operations using the lnet: or http: protocols,
passes the options unchanged to the mount command.
For mounts using the ldap: protocol, invokes the lconf or
sfslconf command with the --xxxxxxx option (where
xxxxxxx is any valid lconf option without an argument).
xxxxxxx=yyyyyyy
sfsmount
For mount operations using the lnet: or http: protocols,
passes the options unchanged to the mount command.
For mounts using the ldap: protocol, invokes the lconf or
sfslconf command with the --xxxxxxx yyyyyyy
option pair (where xxxxxxx is any valid lconf option
with a single argument).
server=name
N/A
Specifies the name of the HP SFS server on the external
network. This option is ignored by the sfsmount
command. It is good practice to use the fs option when
using the lnet: protocol; the option allows the
sfsconfig command to locate the appropriate HP SFS
server. See Appendix A for a description of the sfsconfig
command.
Mounting and unmounting Lustre file systems on client nodes
Table 4-1 Mount options
4.6
Name
mount and/or sfsmount
Description
fs=name
N/A
Specifies the name of the file system. This option is ignored
by the sfsmount command. The option allows the
sfsconfig command to process the appropriate file
system. It is good practice to use the fs option when using
the lnet: protocol; otherwise, it is hard to determine the
file system name. See Appendix A for a description of the
sfsconfig command.
keepurl
N/A
Specifies that an address is not to be converted to an
lnet: address. This option is ignored by the sfsmount
command. The option directs the sfsconfig command
not to automatically convert an entry that uses the ldap: or
http: protocol to the lnet: protocol.
ignoreif
sfsmount
This option is ignored by the sfsmount command. The
functionality of the option has been superseded by the use
of an appropriate options lnet setting in the /etc/
modprobe.conf.lustre or /etc/
modules.conf.lustre configuration files.
matchif
sfsmount
This option is ignored by the sfsmount command. The
functionality of the option has been superseded by the use
of an appropriate options lnet setting in the /etc/
modprobe.conf.lustre or /etc/
modules.conf.lustre configuration files.
Unmounting file systems on client nodes
You can use either the standard umount(8) command or the sfsumount command to unmount Lustre file
systems that have been mounted as follows:
•
File systems mounted with the mount command
•
File system mounted with the sfsmount command and the lnet: protocol
•
File systems mounted with the sfsmount command and the http: protocol
You cannot use the umount command to unmount file systems that were mounted with the sfsmount
command and the ldap: protocol; in such cases, you must use the sfsumount command to unmount the
file systems.
To unmount a file system using the umount command, enter the command using the following syntax:
umount mountpoint [-o options]
The sfsumount command provides useful options that are not available with the standard umount
command—see Table 4-2 for a list of the options.
When unmounting file systems mounted with the lnet: protocol or the http: protocol, the sfsumount
command calls the umount command.
When unmounting file systems mounted with the ldap: protocol, the sfsumount command calls the
lconf command.
To unmount a file system on a client node using the sfsumount(8) command, enter the command using
the following syntax. The command unmounts the file system and unloads all Lustre kernel modules:
sfsumount filesystem|mountpoint [-o options]
or
sfsumount -a
where:
-a
Specifies that all Lustre file systems that are currently mounted on the client node are to be
unmounted.
Unmounting file systems on client nodes
4–7
filesystem
Specifies the name of the Lustre file system that is to be unmounted.
mountpoint
Specifies the mount point of the file system that is to be unmounted. This is the recommended
argument. Do not include a trailing slash (/) at the end of the mount point.
Table 4-2 lists the options that can be used with the umount and sfsumount commands.
Table 4-2 Options that can be used with the umount and sfsumount commands
Name
umount and/or sfsumount Description
lconf|sfslconf
sfsumount
Specifies whether the lconf command or the sfslconf
command is to be used for the unmount operation. The
lconf command is used by default if the file system was
mounted with the ldap: protocol.
The sfslconf command has been deprecated since
HP SFS Version 2.0.
[no]repeat
sfsumount
Specifies whether repeated attempts are to be made to
unmount the file system (until the operation succeeds), or if
only one attempt is to be made to unmount the file system.
The default is norepeat.
If repeat is specified, repeated attempts to unmount the
file system are only made if the following errors occur:
• File system busy. (Attempt the unmount operation again
in the hope that the program that is using the file system
will have completed.)
• LDAP busy. (Attempt the unmount operation again in the
hope that the LDAP server will now be available.)
Invokes the lconf or umount command with the
--verbose option.
verbose
sfsumount
xxxxxxx
umount and sfsumount For file systems mounted with the lnet: or http:
protocols, passes the options unchanged to the umount
command
For file systems mounted with the ldap: protocol, invokes
the lconf or sfslconf command with the --xxxxxxx
option (where xxxxxxx is any valid lconf option without
an argument).
xxxxxxx=yyyyyyy
umount and sfsumount For file systems mounted with the lnet: or http:
protocols, passes the options unchanged to the umount
command
For file systems mounted with the ldap: protocol, invokes
the lconf or sfslconf command with the --xxxxxxx
yyyyyyy option pair (where xxxxxxx is any valid lconf
option with a single argument).
A file system unmount operation can stall if any component of the file system on the HP SFS system is not in
the running state (as shown by the show filesystem command entered on a server in the HP SFS
system).
TIP: You can force a file system unmount operation to proceed (even if the file system is stopped, or an HP
SFS server is shut down), by using the -f option with the sfsumount command or the umount
command.
Note that the -f option can only be used when unmounting file systems that were mounted with the lnet:
or http: protocol. You cannot use the -f option when unmounting file systems that were mounted with
the ldap: protocol.
4–8
Mounting and unmounting Lustre file systems on client nodes
An alternative method of unmounting Lustre file systems on the client node is to enter the service sfs
stop command, as described in Section 4.7. However, note that when you run the service sfs stop
command, only the file systems specified in the /etc/sfstab file are unmounted. File systems that were
mounted manually are not unmounted.
4.7
Using the SFS service
This section is organized as follows:
•
Mounting Lustre file systems at boot time (Section 4.7.1)
•
Rebuilding the /etc/sfstab file at boot time (Section 4.7.2)
•
The service sfs start command (Section 4.7.3)
•
The service sfs reload command (Section 4.7.4)
•
The service sfs stop command (Section 4.7.5)
•
The service sfs status command (Section 4.7.6)
•
The service sfs cancel command (Section 4.7.7)
•
The service sfs help command (Section 4.7.8)
•
Disabling and enabling the SFS service (Section 4.7.9)
For more information on the SFS service commands, see the sfstab(8), manpage.
4.7.1 Mounting Lustre file systems at boot time
NOTE: To be able to mount Lustre file systems, the client node must be configured as described in
Chapter 2 or Chapter 3. In particular, the client node must have an options lnet setting configured in
the /etc/modprobe.conf.lustre or /etc/modules.conf.lustre file.
The /etc/sfstab file on each client node is used to specify which Lustre file systems are to be mounted
each time the node is booted. There must be one entry in this file for each Lustre file system that is to be
automatically mounted when the node is booted. You can create entries in the /etc/sfstab file manually,
and you can also update the file dynamically at boot time using the /etc/sfstab.proto file on the
single system image.
The file systems can be mounted in the background so that the mount operations do not delay the boot
process.
NOTE: You can also use the fstab file to specify which Lustre file systems are to be mounted at boot time.
However, because the fstab file is processed before the sshd daemon is started, you will not be able to
log into the client node to debug any problems that arise during the mount operations.
In addition, the /etc/sfstab file provides additional options that are not available if you use the fstab
file. For example, the bg option, which specifies that the file system is to be mounted in the background,
cannot be used in the fstab file.
Mount directives in the /etc/sfstab.proto file and the /etc/sfstab file can be specified in any of
the following formats:
lnet://mdsnodes:/mdsname[/profile] mountpoint sfs mountoptions 0 0
http://system_name/filesystem mountpoint sfs mountoptions 0 0
ldap://system_name|serverlist/filesystem mountpoint sfs mountoptions 0 0
See Section 4.2 and Section 4.8 for information on the syntax of the directives, and see Section 4.5 for
details of the mount options that can be used in the /etc/sfstab and /etc/sfstab.proto files.
Using the SFS service
4–9
To configure a client node to automatically mount a file system at boot time, perform the following steps:
1.
On the client node, create a directory that corresponds to the mount point that was specified for the
file system when it was created, as shown in the following example:
# mkdir /usr/data
2.
Create an entry for the Lustre file system either in the /etc/sfstab file on the client node or in the
/etc/sfstab.proto file.
Each time the client node is booted, the file systems specified in the /etc/sfstab file are mounted (with
the exception of any file systems that have the noauto option specified). When the client node is shut down,
all Lustre file systems are unmounted. In addition, you can use the SFS service to mount file systems specified
in the /etc/sfstab file, or to unmount all file systems listed in the /etc/sfstab file at any time (see
Section 4.7).
If you no longer want a file system to be mounted each time the client node is booted, delete (or comment
out) the entry for the file system from the /etc/sfstab file or the /etc/sfstab.proto file. You can
comment out an entry by inserting a # at the start of the line.
4.7.2 Rebuilding the /etc/sfstab file at boot time
You can create a file called /etc/sfstab.proto on the single system image of the client system and
use this file to specify which HP SFS Lustre file systems are to be mounted on the individual client nodes at
boot time. Sections of the /etc/sfstab.proto file can apply to all, or a subset of all, of the client nodes.
When a client node is booted, the SFS service processes the /etc/sfstab.proto file and updates the
contents of the /etc/sfstab file on the client node as appropriate. When the /etc/sfstab file is
processed in turn, the SFS service mounts the specified file systems on the client node.
If the /etc/sfstab.proto file does not exist, the /etc/sfstab file (if one exists) on the client node is
processed as it stands. If an /etc/sfsftab file does not exist on a client node, and the
/etc/sfstab.proto file contains information about file systems to be mounted on that client node, the
SFS service automatically creates the /etc/sfstab file on the client node and copies across the
appropriate sections from the /etc/sfstab.proto file.
The /etc/sfstab file on each client node can also contain information that is specific to that client node.
The SFS service does not overwrite such node-specific information when it updates the /etc/sfstab file
after processing the /etc/sfstab.proto file.
The structure and format of the /etc/sfstab.proto file is as follows:
•
Comment lines start with # (pound sign) and are ignored, for example:
# This is a comment line.
•
Directive lines start with #% (pound sign followed by percentage sign) and allow you to specify which
client nodes the information is to be copied to. The following extract shows an example of directive
lines in a client system called delta:
#% ALL
#% delta1
#% delta[1-3,5]
•
Copy on all nodes.
Copy on node delta1 only.
Copy on nodes delta1, delta2, delta3, delta5.
The following are examples of mount directives in the /etc/sfstab.proto file:
lnet://35@elan0,34@elan0:/south-mds3/client_elan /usr/data sfs
server=south,fs=data 0 0
lnet://35@elan0,34@elan0:/south-mds4/client_elan /usr/scratch sfs
server=south,fs=scratch 0 0
lnet://35@elan0,34@elan0:/south-mds5/client_elan /usr/test sfs
server=south.fs=test 0 0
As described in Section 4.1, client nodes may be able access an HP SFS system on more than one network.
You must ensure that the entries in the /etc/sfstab.proto file contain the correct information to allow
each client node to access the HP SFS system on the appropriate network.
4–10
Mounting and unmounting Lustre file systems on client nodes
CAUTION: When you move an entry from a client node’s /etc/sfstab file to the
/etc/sfstab.proto file, you must delete the entry from the static section of the /etc/sfstab file (that
is, the section of the file outside of the lines generated when the /etc/sfstab.proto file is processed).
Each mount entry for a client node must only exist either in the /etc/sfstab.proto file or in the static
section of the /etc/sfstab file.
Example
The following is an example of a complete /etc/sfstab.proto file in a client system called delta.
Example 4-1 /etc/sfstab.proto file
# This file contains additional file system information for all the
# nodes in the cluster. When a node boots, this file will be
# parsed and from it a new /etc/sfstab will be created.
#
# How this file is organized:
#
# * Comments begin with # and continue to the end of line
#
# * Each non-comment line is a line that may be copied to /etc/sfstab
#
verbatim.
#
# * Some comments begin with #% followed by a node selector to
#
indicate that the following lines until the next #% or the end of
#
file (whichever comes first) will only be copied to the /etc/sfstab
#
on the indicated node or nodes. A node selector is either a
#
single node name, like delta12, or a list of nodes in a condensed
#
notation, like delta[1-5,7]. In the condensed notation, the
#
node prefix is followed by a set of square brackets. Inside the
#
square brackets are comma separated terms. Each term is either a
#
range i-j, indicating nodes i to j inclusive, or a single node
#
number. There can be any number of terms within the square
#
brackets.
#
# * One comment can begin with "#% ALL". The lines following it until
#
the next #% line or the end of file (if there are no more #% lines)
#
will be copied to the fstab on every node.
#
#% ALL
# Put lines here that you want copied directly to the /etc/sfstab on
# every node
lnet://35@elan0,34@elan0:/south-mds3/client_elan /usr/data sfs server=south,fs=data
0 0
#% delta1
# Put lines here that you want copied directly to the /etc/sfstab on
# delta node 1
lnet://35@elan0,34@elan0:/south-mds4/client_elan /usr/scratch sfs
server=south,fs=scratch 0 0
lnet://35@elan0,34@elan0:/south-mds5/client_elan /usr/test sfs server=south,fs=test
0 0
#% delta[2-16]
# Put lines here that you want copied directly to the /etc/sfstab on
# delta nodes 2 to 16
lnet://35@elan0,34@elan0:/south-mds4/client_elan /usr/scratch sfs
server=south,fs=scratch 0 0
Using the SFS service
4–11
After the /etc/sfstab.proto file shown above is processed by the SFS service, the /etc/sfstab file
on the delta1 node will include the following lines:
##################### BEGIN /etc/sfstab.proto SECTION #####################
.
.
.
lnet://35@elan0,34@elan0:/south-mds3/client_elan /usr/data sfs server=south,fs=data
0 0
lnet://35@elan0,34@elan0:/south-mds4/client_elan /usr/scratch sfs
server=south,fs=scratch 0 0
lnet://35@elan0,34@elan0:/south-mds5/client_elan /usr/test sfs server=south,fs=test
0 0
.
.
.
# ###################### END /etc/sfstab.proto SECTION ######################
The /etc/sfstab file on the delta2 node will include the following lines:
##################### BEGIN /etc/sfstab.proto SECTION #####################
.
.
.
lnet://35@elan0,34@elan0:/south-mds3/client_elan /usr/data sfs server=south,fs=data
0 0
lnet://35@elan0,34@elan0:/south-mds4/client_elan /usr/scratch sfs
server=south,fs=scratch 0 0
.
.
.
###################### END /etc/sfstab.proto SECTION ######################
Any existing node-specific lines in the /etc/sfstab file remain unchanged.
4.7.2.1
Tips for editing the /etc/sfstab.proto file
The SFS service does not simply replace the contents of the /etc/sfstab file with information from the
/etc/sfstab.proto file. Instead (as explained in Section 4.7.2) the SFS service only replaces the
content for which it is responsible. Typically, if you are creating an /etc/sfstab.proto file for the first
time, you will delete the old /etc/sfstab file. If you do not delete the file, the next time you boot the client
or start the SFS service, the new /etc/sfstab file will contain the original content and the new content
from the /etc/sfstab.proto file.
You can test whether your /etc/sfstab.proto file is working correctly by using the gensfstab option
with the service sfs command, as follows:
# service sfs gensfstab
This command creates a new /etc/sfstab file but does not mount or otherwise process the
/etc/sfstab file.
4.7.3 The service sfs start command
If the SFS service has not already been started on the client node, entering the service sfs start
command mounts all of the file systems listed in the /etc/sfstab file.
If the SFS service has already been started when the service sfs start command is entered, the
command behaves in the same way as the service sfs reload command (see Section 4.7.4).
4.7.4 The service sfs reload command
The service sfs reload command cancels pending mount operations, then reloads the
/etc/sfstab file and mounts any entries that are not already mounted.
4.7.5 The service sfs stop command
The service sfs stop command unmounts all Lustre file systems specified in the /etc/sfstab file.
4–12
Mounting and unmounting Lustre file systems on client nodes
4.7.6 The service sfs status command
The service sfs status command shows information on the status (mounted or unmounted) of Lustre
file systems on the client node.
4.7.7 The service sfs cancel command
The service sfs cancel command cancels pending mount operations that are taking place in the
background. This command can be used to cancel repeated background attempts to mount file systems in
situations where the attempts have no possibility of completing, either because there is a configuration error
in the /etc/sfstab file, or a server in the HP SFS system is down.
CAUTION: If a mount operation is pending because the MDS service or an OST service is not responding,
the service sfs cancel command may not cancel the mount operation. The service sfs cancel
command only works on pending mount operations that have not taken place either because the LDAP
server is not responding or because there is a syntax or other error in the /etc/sfstab file.
4.7.8 The service sfs help command
The service sfs help command displays a short description of SFS service commands. For more
information on the SFS service commands, see the sfstab(8) manpage.
4.7.9 Disabling and enabling the SFS service
There are some situations where you must ensure that a file system is not mounted by any client node for a
period of time while other actions are being performed (for example, while a file system repair session is
being run). In such situations, you may find it useful to disable the SFS service to prevent it from automatically
mounting file systems on the client node if the node is rebooted during this period. You can disable the SFS
service on a client node by entering the chkconfig(8) command, as follows:
# chkconfig --del sfs
To enable the SFS service on a client node, enter the following command:
# chkconfig --add sfs
Alternatively, if you do not want to disable the SFS service on client nodes, but want to prevent a particular
file system from being mounted at boot time, you can edit the /etc/sfstab.proto file (or the
/etc/sfstab files) and use the noauto option to specify that the file system is not to be mounted at boot
time.
Using the SFS service
4–13
4.8
Alternative sfsmount modes
In addition to supporting the standard mount command with the lnet: protocol (as described in
Section 4.4), the sfsmount command also supports the following mount modes:
•
The standard mount command with the http: protocol. (see Section 4.8.1).
•
The lconf command with the ldap: protocol (see Section 4.8.2).
Support for the ldap: protocol is provided for backward compatibility; however, the ldap: protocol
will not be supported in the next major release of the HP SFS software—only the lnet: and http:
protocols will be supported.
4.8.1 Mounting Lustre file systems using the sfsmount command with the http:
protocol
NOTE: Lustre file systems must be mounted as root user, and the environment—in particular the PATH—
must be that of root. Do not use the su syntax when when changing to root user; instead, use the
following syntax:
su The sfsmount command supports the standard mount command with the http: protocol. To use the
http: protocol, the client node must have access to the HP SFS servers over a TCP/IP network.
NOTE: The http: mount protocol is intended to provide a convenient way to mount a file system without
having to specify complex lnet: options. However, it is not intended for use in systems where more than
32 client nodes may be mounting a file system at the same time (for example, when the client nodes are
booted).
The syntax of the sfsmount command using the http: protocol is as follows:
sfsmount [http://]system_name/filesystem [/mountpoint] [-o options]
Where:
http://
Is an optional prefix.
system_name
Is any name or IP address that resolves to an alias on the HP SFS system.
filesystem
Is the name of the Lustre file system that is to be mounted.
mountpoint
A local directory where the file system is to be mounted.
See Section 4.5 for information on the options that can be used with the sfsmount command.
4–14
Mounting and unmounting Lustre file systems on client nodes
4.8.2 Mounting Lustre file systems using the sfsmount command with the ldap:
protocol
NOTE: Lustre file systems must be mounted as root user, and the environment—in particular the PATH—
must be that of root. Do not use the su syntax when when changing to root user; instead, use the
following syntax:
su NOTE: The network or networks that a client node can use to access the HP SFS system may or may not be
configured with an alias IP address. If an alias IP address is not configured on a network that client nodes
use to access the HP SFS system, mount instructions using the ldap: protocol must specify the names of the
first and second servers in the HP SFS system (that is, the administration and MDS servers) rather than the
HP SFS system name.
For backward compatibility with earlier versions of the HP SFS software, the sfsmount command currently
supports the lconf command with the ldap: protocol. Note, however, that the ldap: protocol will not
be supported in the next major release of the HP SFS software—only the lnet: and http: protocols will
be supported.
The syntax of the sfsmount command using the ldap: protocol is as follows:
sfsmount ldap://system_name|serverlist/filesystem [/mountpoint] [-o options]
Where:
ldap://
Is a required prefix for mounts using the ldap: protocol.
system_name|serverlist
Specifies the HP SFS system where the Lustre file system is located. This field is used to access an
LDAP server that contains configuration data for the file system.
If this field contains a system name (that is, contains a single name), this name must resolve to an
alias IP address on a network in the HP SFS system. Alias IP addresses are (optionally)
configured on networks in the HP SFS system, and are served by the HP SFS server that is
running the administration service. If this service fails over to a backup server, the alias also fails
over to the backup server.
If this field contains a list of servers, the names of both the administration and MDS servers in the
HP SFS system must be specified. The sfsmount command attempts to get configuration data
from the first server specified. If the attempt fails, the command then attempts to get the
configuration data from the second server. This functionality allows client nodes to access the
server where the administration service is running on a network that does not have an alias
configured; this could be a Gigabit Ethernet network or an InfiniBand interconnect.
filesystem
Is the name of the Lustre file system that is to be mounted.
mountpoint
A local directory where the file system is to be mounted.
See Section 4.5 for information on the options that can be used with the sfsmount command.
Alternative sfsmount modes
4–15
4.9
Restricting interconnect interfaces on the client node
When a Gigabit Ethernet interconnect is used to connect client nodes to an HP SFS system, the default
behavior is for only the first Gigabit Ethernet interface on a client node to be added as a possible network
for file system traffic.
To ensure that the correct interfaces on the client node are available for file system traffic, you must ensure
that the options lnet settings in the /etc/modprobe.conf.lustre or
/etc/modules.conf.lustre file are correct. Use the sfsconfig command to set the options, or see
Appendix B for information on setting the options manually.
4.10 File system service information and client communications
messages
You can use the sfslstate command to view information on the connection state of file system services
on a client node; see Section 4.10.1 for more information.
Messages relating to communications failures and recovery are displayed in the /var/log/messages
files. See Section 4.10.2 for examples and explanations of these messages.
Refer to Chapter 4 of the HP StorageWorks Scalable File Share System User Guide for more information on
file system states with reference to client connections.
4.10.1Viewing file system state information using the sfslstate command
When Lustre mounts a file system on a client node, the node has a connection with the MDS service and
with each OST service used by the file system. You can use the sfslstate command to view information
on the state of each of these connections.
The syntax of the sfslstate command is as follows:
sfslstate [filesystem_name] [-v]
To view a summary of connection states for all file systems on a client node, enter the sfslstate command
without arguments on the node, as shown in the following example. In this example, there are two file
systems, data and scratch:
# sfslstate
data: MDS: FULL OSTs: FULL
scratch: MDS: FULL OSTs: FULL
To display information about one file system, specify the name of the name of the file system with the
sfslstate command, as shown in the following example. Note that you must enter the name of the file
system, not the mount point:
# sfslstate data
data: MDS: FULL OSTs: FULL
To display information about each OST service, specify the -v option with the sfslstate command.
Note the following points regarding service connection states:
4–16
•
The FULL state shows that the service is fully connected and operating normally. You will be able to
perform I/O operations to a file system where all services are in the FULL state.
•
If an HP SFS service is not in the FULL state, the connection to that service is not operating normally.
Any attempts to perform I/O operations to the file system that uses the service will stall.
•
During a mount request, it is normal for the NEW state to be shown.
•
If a connection fails to establish immediately, the state of the connection alternates between the
CONNECT state and the DISCONN state.
Mounting and unmounting Lustre file systems on client nodes
•
If a server in the HP SFS system is shut down or crashes, or if the file system itself is stopped, all client
connections go to the DISCONN state. Typically, the connections go back to alternating between the
CONNECT state and the DISCONN state after about 50 seconds. The REPLAY_WAIT state indicates
that the connection has been established and that the file system is recovering; in this case, the state
changes to FULL within a few minutes.
A convenient way to check the state of all nodes is to use the pdsh command as shown in the following
example:
# pdsh -a sfslstate | dshbak -c
NOTE: There is a known bug in the sfslstate command: during the mount process, the command
sometimes crashes with a backtrace. If this happens, wait for a few seconds and then enter the
sfslstate command again. This problem is normally only seen when large numbers (hundreds) of client
nodes are being mounted at the same time.
Table 4-3 shows a summary of the connection states displayed by the sfslstate command on a client
node.
Table 4-3 File system service connection states
State
Description
FULL
The service is fully connected and operating normally.
NEW
The mount request is being processed.
CONNECT
An attempt is being made to connect to the service.
DISCONN
The client node is disconnected from the service.
REPLAY-WAIT
The connection has been established and the file system is recovering; the state
normally changes to FULL within a few minutes.
4.10.2Examples of communications messages
On client nodes, the sshd service starts before the SFS service starts; this means that if a client node is
experiencing mount problems, it is possible to log into the node to examine the /var/log/messages file.
On compute nodes, the syslog service forwards logs to the consolidated log, so that if the utility nodes
that run the syslog_ng service are operating, the log messages may also be seen in the consolidated logs.
Note that the syslog_ng service starts after the SFS service starts; this means that the consolidated logs
on utility nodes are not updated until the SFS service finishes mounting any file systems that are mounted in
the foreground.
The following are examples and descriptions of some selected log messages associated with Lustre file
system mount operations:
•
The following message shows that the SFS service has issued a mount request for the data file
system:
server: sfsmount: /usr/sbin/sfsmount http://sfsalias/hptc_cluster /hptc_cluster
-o net=vib,max_cached_mb=128,lconf,repeat,dport=33009
•
The following message extract shows that a mount request has finished. The file system is mounted
and is operating normally:
server: sfsmount: Done. lconf output: loading module: libcfs srcdir …LOV:
hptc_cluster …OSC_n1044_sfsalias-ost185_MNT_client_vib
.
.
.
•
The following message shows that the InfiniBand network is not yet ready. The vstat command is
showing a status of PORT_INITIALIZE instead of PORT_READY.
sfsmount: Waiting for IB to be ready.
File system service information and client communications messages
4–17
•
The following message shows that the client node is attempting to connect to a server in the HP SFS
system:
kernel: Lustre: 4560:0:(import.c:310:import_select_connection())
MDC_n1044_sfsalias-mds5_MNT_client_vib: Using connection NID_16.123.123.102_UUID
In this example, the connection is to the mds5 service on server 16.123.123.102. On its own, this
message does not indicate a problem. If the connection fails, Lustre will try to connect to the backup
(peer) server in the HP SFS system after approximately 50 seconds. Lustre will continue alternating
between the primary and backup servers. It is normal to see this message for the duration of the (ten
minute) recovery process.
•
The following message shows that an ARP (Address Resolution Protocol) request failed:
kernel: Lustre: 2988:0:(vibnal_cb.c:2760:kibnal_arp_done()) base_gid2port_num
failed: -256
Under load, ARP requests sometimes fail; to deal with this problem, Lustre retries the ARP request five
times. In addition, an ARP request to an HP SFS server that is down will always fail. See the previous
point for an example of a message showing details of a failed ARP request.
•
The following message shows the occurrence of a problem in Lustre that may later cause file
operations to hang:
LustreError: 21207:0: (ldlm_resource.c:365:ldlm_namespace_cleanup()) Namespace
OSC_n208_sfsalias-ost188_MNT_client_vib resource refcount 4 after lock cleanup;
forcing cleanup.
If this message appears in the /var/log/messages file, reset the client node at the earliest
convenient time to prevent problems from occurring later. For more information on this problem, see
Section 7.3.5.
4–18
Mounting and unmounting Lustre file systems on client nodes
5
Configuring NFS and Samba servers to export Lustre
file systems
HP SFS allows client systems to use the NFS or SMB (using Samba) protocols to access Lustre file systems. If
you intend to use this functionality, you must configure one or more HP SFS client nodes as NFS or Samba
servers to export the file systems. This chapter provides information on configuring such servers, and is
organized as follows:
•
Configuring NFS servers (Section 5.1)
•
Configuring Samba servers (Section 5.2)
5–1
5.1
Configuring NFS servers
Some legacy client systems can only use the NFS protocol; HP allows such systems to access Lustre file
systems via NFS servers. NFS servers are specialized Lustre clients that access the Lustre file system and
export access to the file system over NFS. To use this functionality, you must configure one or more HP SFS
client nodes as NFS servers for the Lustre file systems. For information on how to configure your client system
as an NFS server, refer to the documentation for your client system.
Once you have configured an HP SFS client node as an NFS server to provide access to Lustre file systems,
there are a number of configuration changes that you can make on both the NFS server and the NFS client
systems in order to optimize NFS performance.
The following sections provide information on supported configurations for NFS server and client systems,
and on how to optimize NFS performance for Lustre file systems:
•
Supported configurations for NFS servers and client systems (Section 5.1.1)
•
Configuration factors for NFS servers (Section 5.1.2)
•
Configuration factors for multiple NFS servers (Section 5.1.3)
•
NFS access — file and file system considerations (Section 5.1.4)
•
Optimizing NFS client system performance (Section 5.1.5)
•
Optimizing NFS server performance (Section 5.1.6)
5.1.1 Supported configurations for NFS servers and client systems
Table 5-1 shows details of the HP SFS client node that has been qualified for use as an NFS server in this
HP SFS release. (Other HP SFS client nodes based on the same kernel are also likely to be suitable for this
purpose.)
Table 5-1 HP SFS client node qualified for use as NFS server
Distribution
Kernel Version
Red Hat Enterprise Linux 3 Update 7
2.4.21
NOTE: You cannot configure a system that is running a Version 2.6 kernel as an NFS server.
Table 5-2 lists the NFS client systems that have been successfully tested with the qualified NFS server
configuration.
Table 5-2 NFS client systems tested with the qualified NFS server
5–2
Distribution
Kernel Version
Fedora Core 4
Default version shipped with the distribution.
HP-UX 11.0
Default version shipped with the distribution.
Red Hat Enterprise Linux 3 Update 4
Default version shipped with the distribution.
Red Hat Enterprise Linux 4
Default version shipped with the distribution.
Red Hat Enterprise Linux 3 AS
Default version shipped with the distribution.
Red Hat Linux 9
Default version shipped with the distribution.
Mepis 3.3.1
Default version shipped with the distribution.
Solaris 10
Default version shipped with the distribution.
OpenSUSE 10
Default version shipped with the distribution.
FreeBSD 5.4 RC3
Default version shipped with the distribution.
Configuring NFS and Samba servers to export Lustre file systems
5.1.2 Configuration factors for NFS servers
When configuring HP SFS client nodes as NFS servers, consider the following points:
•
A Lustre file system may be exported over NFS or over Samba, but may not be exported over both
NFS and Samba at the same time.
•
Multiple HP SFS client nodes configured as NFS servers may export different Lustre file systems.
•
Multiple HP SFS client nodes configured as NFS servers may export the same Lustre file system.
•
The NFS server must be an HP SFS client node that only provides NFS server services. Do not run
applications or other services on the NFS server.
•
Only use an HP SFS enabled NFS server for NFS exports; using other Lustre clients may result in data
coherency problems.
•
Ensure that the NFS server and the HP SFS servers have synchronized clocks using Network Time
protocol (NTP).
•
When stopping a Lustre file system that has been exported over NFS, you must first stop the NFS
server before you stop the Lustre file system.
•
The NFS server must be running a Linux 2.4 based kernel with the HP SFS client software installed.
Using a Linux 2.6.x kernel on the NFS server is not supported in this release.
•
If the NFS server is configured to access the Lustre file system via an InfiniBand interconnect, the
Voltaire InfiniBand Version 3.4.5 interconnect driver must be used, because it is compatible with Linux
2.4.x kernels.
•
The NFS server must have the following ports open for the services to work correctly:
•
TCP and UDP: Port 111 (portmapper)
•
TCP and UDP: Port 2049 (NFS)
•
TCP and UDP Ports: 1024–65535 (dynamic ports allocated by portmapper)
•
The lockd daemon must be active on the NFS server and on all NFS client systems accessing the
exported file system. The lockd daemon is a standard NFS component that provides file locking
services to the NFS client systems. NFS file coherency is dependent on proper use of POSIX file
locking when multiple NFS client systems are accessing the same file on an NFS server.
•
If the NFS server will serve HP-UX NFS client systems, and you want file locking to work, add
insecure to the entries in the /etc/exports file on the NFS server.
For example, if the current parameters are as follows:
/mnt/scratch *(rw,sync,no_root_squash)
Add insecure so that the parameters are as follows:
/mnt/scratch *(rw,sync,no_root_squash,insecure)
•
HP recommends that you create multiple swap areas (of the same priority) if you have multiple devices
on independent channels. This allows the kernel to swap in parallel. Also, HP recommends that you
keep swap areas on less-used devices/channels, so that heavy non-swap I/O is not hindered by
swap I/O.
Configuring NFS servers
5–3
5.1.3 Configuration factors for multiple NFS servers
NFS services may be configured to expand the throughput and performance of the NFS services to the NFS
client systems by having multiple NFS servers. The basic setup procedure of an NFS server is not affected
by the use of multiple NFS servers; however, the following guidelines are recommended:
•
All NFS servers that are exporting the same file system must export it by the same name.
•
NFS client systems should be uniformly distributed across the multiple NFS servers. This is done using
the fstab entry of the NFS client system (or automounter maps).
•
If using the fsid capability in an NFS export entry, this fsid must be the same across all of the NFS
servers that are exporting the same file system.
•
HP SFS Version 2.2-0 supports a maximum of four NFS servers. Using more than four servers is not
supported at this time.
5.1.3.1
An example configuration with multiple NFS servers
Figure 5-1 shows an example of a system configured to serve a Lustre file system via NFS. In this
configuration, there are four NFS servers (Nfsgate1, Nfsgate2, Nfsgate3, Nfsgate4), and four NFS client
systems.
Figure 5-1 Example configuration with four NFS servers
HP SFS System
InfiniBand switch(s)
SFS Client & NFS Server
Nfsgate1
SFS Client & NFS Server
Nfsgate2
SFS Client & NFS Server
Nfsgate3
SFS Client & NFS Server
Nfsgate4
Gigabit switch(s)
NFS Client 1
NFS Client 2
NFS Client 3
NFS Client 4
Each of the NFS servers has the following entries in its /etc/exports file:
/mnt/lustre *(rw,sync)
Each of the NFS client systems has the following entries in its /etc/fstab files:
•
NFS Client #1:
Nfsgate1:/mnt/lustre /mnt/lustre nfs nfsvers=3,tcp,rw,rsize=32768,wsize=32768 0 0
•
NFS Client #2:
Nfsgate2:/mnt/lustre /mnt/lustre nfs nfsvers=3,tcp,rw,rsize=32768,wsize=32768 0 0
•
NFS Client #3:
Nfsgate3:/mnt/lustre /ant/lustre nfs nfsvers=3,tcp,rw,rsize=32768,wsize=32768 0 0
•
NFS Client #4:
Nfsgate4:/mnt/lustre /mnt/lustre nfs nfsvers=3,tcp,rw,rsize=32768,wsize=32768 0 0
Note that the NFS client systems are uniformly distributed across the four NFS servers.
5–4
Configuring NFS and Samba servers to export Lustre file systems
5.1.3.2
NFS performance scaling example
Figure 5-2 illustrates how performance is affected when the number of NFS servers and client systems is
increased in a system configured as in Figure 5-1.
Figure 5-2 NFS performance scaling
NFS performance scaling
HP SFS Version 2.2-0
250000
Default stripe size; Default stripe count
nfs_readahead=0; 8GB files
Aggregate throughput in KB/sec
200000
150000
Initial write
Rewrite
Read
100000
Re-Read
50000
0
1
2
3
4
Number of NFS servers and NFS clients
5.1.4 NFS access — file and file system considerations
Because NFS Version 3 client systems issue 32KB transfer size requests, the layout of the Lustre stripe size
can impact performance. The stripe size is set when the Lustre file system is created; however, you can
override this by setting the stripe size for individual files using the lfs setstripe command.
For optimum NFS performance, the stripe size must be a multiple of 32KB. If the default stripe size for the
file system (4MB) is chosen, or if the rules described in Chapter 6 for individual files are applied, the stripe
size will always be a multiple of 32KB.
5.1.5 Optimizing NFS client system performance
To optimize NFS performance, consider the following recommendations for NFS client systems:
•
Increase the NFS file system block size by adding the following parameters when mounting the NFS
volume:
wsize=32768
rsize=32768
proto=tcp
nfsvers=3
These parameters can be specified when the mount command is entered, or by placing them in the
/etc/fstab file. For more information, see the mount(8) and nfs(5) manpages.
•
On NFS Linux client systems, kernels at Version 2.6 or later have shown better performance (by as
much as 30%) than kernels at Version 2.4.
•
If file or record locking is going to be used, ensure that the NFS lock daemon is enabled on both the
NFS client system and the NFS server.
Configuring NFS servers
5–5
5.1.6 Optimizing NFS server performance
To optimize NFS performance, consider the following recommendations for the configuration on the HP SFS
client node that has been configured as an NFS server:
•
As part of the installation of the HP SFS client software on client nodes, the kernel on the client node
is patched to provide support for Lustre file systems. In addition, patches are supplied to improve NFS
client system read performance. Included in these patches is a variable that allows you to tune the
NFS performance on the NFS server, as follows:
/proc/sys/lustre/nfs_readahead
This variable sets the number of kilobytes that will be read ahead when the NFS server is performing
sequential I/O from a Lustre file system. For optimal NFS client system performance, HP recommends
that you set this variable to 64.
This value lets Lustre know that a minimum of 64KB is to be read ahead. This amount is sufficient to
assist the NFS 32KB requests that the client node will request.
The recommended setting is based on having the stripe size configured as recommended in
Section 5.1.4.
When you are tuning the nfs_readahead value, start with a value of 64KB and increment it as
needed to achieve maximum read performance.
HP recommends that you increment the value in steps of 32KB.
5.2
•
HP recommends that the /proc/sys/portals/debug value is set to 0 (zero). (Note that the value
of this variable may already be set to 0 (zero); if this is the case, you do not need to make any
change to it.)
•
Because NFS Version 3 client systems exert pressure on the NFS server’s virtual memory subsystem,
HP recommends that the NFS server utilizes multiple disks to provide storage area for paging.
Configuring Samba servers
HP SFS allows Windows® and CIFS (Common Internet File System) client systems to access Lustre file systems
via Samba.
To use Samba to access Lustre file systems, you must configure one or more HP SFS client nodes as Samba
servers. There are many configuration options for a Samba server; please consult the Samba documentation
for the configuration information. You can find more information about Samba at http://www.samba.org.
When configuring HP SFS client nodes as Samba servers to export Lustre file systems, you must take the
following constraints into consideration:
•
Only one Samba server may be configured to export any given Lustre file system or subdirectory of a
Lustre file system.
This limitation is due to the cache consistency and locking models that are implemented by Samba.
5–6
•
A Lustre file system may be exported over NFS or over Samba, but may not be exported over both
NFS and Samba at the same time.
•
Multiple HP SFS client nodes configured as Samba servers may export different Lustre file systems via
Samba (but they may not export the same Lustre file system or subdirectories of the same Lustre file
system, as stated earlier).
•
When stopping a Lustre file system that has been exported over Samba, you must first stop the Samba
server before you stop the Lustre file system.
•
In the smb.conf configuration file on the Samba server, you must specify use sendfile = no as
an active option.
Configuring NFS and Samba servers to export Lustre file systems
•
The functionality that allows Lustre file systems to be exported via Samba is intended for
interoperability purposes. When a Lustre file system is exported via Samba, performance will be
lower than when the file system is accessed directly by a native HP SFS client system.
•
Client systems that have been successfully tested using a Samba server to access Lustre file systems
include the following:
•
•
Windows client systems:
•
Windows 98
•
Windows XP Home Edition
•
Windows XP Professional Edition
Other client systems:
•
Red Hat Enterprise Linux 3
•
Red Hat Enterprise Linux 4
•
Fedora™ Core 4
•
Fedora™ Core 5
•
SUSE® Linux Enterprise Server 10
•
FreeBSD 5.4-RC3
There are many configuration options for a Samba server. Please consult the Samba documentation for the
configuration information; refer to the http://www.samba.org Web site.
Configuring Samba servers
5–7
5–8
Configuring NFS and Samba servers to export Lustre file systems
6
User interaction with Lustre file systems
This chapter is organized as follows:
•
Defining file stripe patterns (Section 6.1)
•
Dealing with ENOSPC or EIO errors (Section 6.2)
•
Using Lustre file systems — performance hints (Section 6.3)
6–1
6.1
Defining file stripe patterns
Lustre presents a POSIX API as the file system interface; this means that POSIX-conformant applications work
with Lustre.
There are occasions when a user who is creating a file may want to create a file with a defined stripe pattern
on a Lustre file system. This section describes two methods of doing this: the first method uses the
lfs executable (see Section 6.1.1), and the second method uses a C program (see Section 6.1.2).
It is also possible to set the stripe configuration on a subdirectory, so that all of the files created in the
subdirectory will inherit the stripe attributes of the subdirectory in preference to those of the file system. See
Section 6.1.3 for information on how to set the stripe configuration on a subdirectory.
6.1.1 Using the lfs executable
From the command line, the lfs executable can be used to determine information about user files. The
lfs getstripe command displays the striping information about a file and the lfs setstripe
command creates a file with the defined striping pattern. Detailed help on the lfs executable is available
from the lfs help menu.
This example creates a file with a stripe width of 4MB, where the system decides the starting OST service
and the number of stripes. It then shows the settings defined by the system.
The commands in the following example assume that the /mnt/lustre/mydirectory directory exists
and can be written to:
$ lfs setstripe /mnt/lustre/mydirectory/file 4194304 -1 0
$ lfs getstripe /mnt/lustre/mydirectory/file
OBDS:
0: ost1_UUID
1: ost2_UUID
./file
obdidx
0
1
$ lfs find --verbose
OBDS:
0: ost1_UUID
1: ost2_UUID
./file
lmm_magic:
lmm_object_gr:
lmm_object_id:
lmm_stripe_count:
lmm_stripe_size:
lmm_stripe_pattern:
obdidx
0
1
objid
68
68
file
0x0BD10BD0
0
0x2c009
2
4194304
1
objid
68
68
objid
0x44
0x44
group
0
0
objid
0x44
0x44
group
0
0
The example output shows that the file resides on a file system that has two OST services, ost1_UUID and
ost2_UUID with OST indices 0 (zero) and 1 respectively. The file has a stripe count of 2 and so resides on
both OST services. The stripe size is 4MB. The additional information is for Lustre internal use.
The stripe size must be a multiple of the largest possible page size on any client node. The largest page size
supported on Lustre client nodes is 64KB (for ia64), so that any stripe size specified must be a multiple of
64KB.
The setstripe command prints the following warning if you attempt to set a file stripe size that does not
conform to this rule:
error: stripe_size must be an even multiple of 65536 bytes.
Note that this rule applies to individual files and not to default file system settings, which are described in
Chapter 5 of the HP StorageWorks Scalable File Share System User Guide.
6–2
User interaction with Lustre file systems
6.1.2 Using a C program to create a file
The following C program fragment shows an example of how to create a file with a defined stripe pattern;
the program also determines that the file system is a Lustre file system.
Example 6-1 C program fragment—creating a file with a defined stripe pattern
#
#
#
#
#
#
#
include
include
include
include
include
include
include
<stdlib.h>
<limits.h>
<libgen.h>
<stdio.h>
<sys/vfs.h>
<lustre/liblustreapi.h>
<linux/lustre_idl.h>
int stripe_size=1024*1024*8; /*
/*
int stripe_offset=-1;
/*
int stripe_count=2;
/*
8MB - different from HP StorageWorks SFS */
V2.2-0 default stripe size of 4MB
*/
default start OST
*/
stripe count of 2
*/
int main(int argc, char *argv[])
{
struct statfs statbuf;
int sts;
char *dirpath;
char *filename;
if (argc != 2) {
fprintf(stderr, "Usage: stripefile <file_path>\n");
exit(EXIT_FAILURE);
}
filename = argv[1];
dirpath = strdup(filename);
dirpath = dirname(dirpath);
sts = statfs(dirpath,statbuf);
if (sts < 0)
{
perror ("statfs");
fprintf(stderr, "directory path %s\n", dirpath);
exit(EXIT_FAILURE);
}
if (statbuf.f_type == LOV_MAGIC_V0 || statbuf.f_type == LOV_MAGIC_V1)
{
printf("It’s a lustre fileystem\n");
if (llapi_file_create(filename, stripe_size, stripe_offset,
stripe_count, 0))
{
fprintf(stderr, "striping failure\n");
exit(EXIT_FAILURE);
}
}
else
{
fprintf(stderr, "%s (f_type 0x%x) is not a lustre File System\n",
dirpath, statbuf.f_type);
exit(EXIT_FAILURE);
}
exit(EXIT_SUCCESS);
}
To compile the program, enter the following command:
$ gcc -o /tmp/stripefile -g /tmp/stripefile.c -llustreapi
Defining file stripe patterns
6–3
6.1.3 Setting a default stripe size on a directory
If you want to create many files with the same stripe attributes and you want those files to have a stripe
configuration that is not the default stripe configuration of the file system, you can create the files individually
as described earlier in this chapter. Alternatively, you can set the stripe configuration on a subdirectory and
then create all of the files in that subdirectory. All of the files created in the subdirectory will inherit the stripe
attributes of the subdirectory in preference to those of the file system.
For example, the following code creates10 files in one subdirectory, with the stripe configuration of the files
defined by the stripe setting of the directory. Each file has a stripe size of 8MB, and has two stripes, with
the first stripe on each file being on the first OST service:
# mkdir ./stripe_example
# lfs setstripe ./stripe_example 8388608 0 2
# for i in ‘seq 1 10‘ do ; echo $i > ./stripe_example/file${i} ; done
When a subdirectory is created, it inherits the default stripe pattern of the containing directory.
Note that the stripe size attribute on the directory must be at least the size of the page size on the client
node. Where the stripe size is larger than this minimum value, it must be an exact multiple of the page size.
6.2
Dealing with ENOSPC or EIO errors
Your application may encounter the ENOSPC error code (or alternatively the EIO error code). In traditional,
nonparallel file systems, such errors usually mean that all of the file system storage is occupied with file data.
With a parallel file system such as Lustre, there are other possible explanations for the error. The following
are the most likely reasons for the error:
•
The number of inodes available for the file system or for the OST services in the file system may be
used up.
•
One or more of the OST services in the file system may be full.
•
The file system may be completely full.
Section 6.2.1 through Section 6.2.3 describe how to determine if the error is caused by one of the first two
reasons, and if so, how to deal with the problem.
If the file system is completely full, you will not be able to create new files on the file system until one or both
of the following actions are taken:
•
Existing files are deleted
•
More OST services are added to the file system
Instructions for adding OST services to a file system are provided in the Adding OST services to a file
system section in Chapter 5 of the HP StorageWorks Scalable File Share System User Guide.
If the default email alerts are being used on the HP SFS system, an out-of-space alert will be delivered to a
system administrator when the file system service usage reaches a certain level—usually before an
application error is encountered.
The Managing space on OST services in Chapter 5 of the HP StorageWorks Scalable File Share System
User Guide describes how to monitor the system for full OST services and how to manage out-of-space alerts.
6–4
User interaction with Lustre file systems
6.2.1 Determining the file system capacity using the lfs df command
You can use the lfs df command to determine if the file system is full, or if one or more of the OST services
in the file system are full. You can run the lfs df command as an unprivileged user on a client node (in
the same way as the df command).
The following is example shows output from the lfs df command. In this example, the output shows that
the ost6 service is more used than the other OST services:
# lfs df
UUID
south-mds1_UUID
south-ost1_UUID
south-ost2_UUID
south-ost3_UUID
south-ost4_UUID
south-ost5_UUID
south-ost6_UUID
1K-blocks
1878906672
2113787820
2113787820
2113787820
2113787820
2113787820
2113787820
Used
107974228
126483704
156772176
121219808
127460220
124710884
297275048
Available Use% Mounted on
1770932444
5 /mnt/southfive[MDT:0]
1987304116
5 /mnt/southfive[OST:0]
1957015644
7 /mnt/southfive[OST:1]
1992568012
5 /mnt/southfive[OST:2]
1986327600
6 /mnt/southfive[OST:3]
1989076936
5 /mnt/southfive[OST:4]
1816512772
14 /mnt/southfive[OST:5]
filesystem summary:
12682726920 953921840 11728805080
UUID
south-mds2_UUID
south-ost7_UUID
south-ost8_UUID
1K-blocks
36696768
41284288
41284288
Used
2558360
2814296
2676024
Available Use% Mounted on
34138408
6 /mnt/southfive_home[MDT:0]
38469992
6 /mnt/southfive_home[OST:0]
38608264
6 /mnt/southfive_home[OST:1]
82568576
5490320
77078256
filesystem summary:
7 /mnt/southfive
6 /mnt/southfive_home
6.2.2 Dealing with insufficient inodes on a file system
If all of the inodes available to the MDS service in a file system are used, an ENOSPC(28) error is returned
when an attempt is made to create a new file, even when there is space available on the file system. In
addition, if there are no inodes available on an OST service over which a file is to be striped, an attempt
to create a new file can return an EIO(5) error. You can confirm that a problem exists, as follows:
1.
Determine whether there is space available on the file system, as shown in the following example for
file system data. Enter this command on the client node:
# df –h /mnt/data
Filesystem
data
#
Size
4.0T
Used
2.8T
Avail
1.2T
Use%
70%
Mounted on
/mnt/data
The output in this example shows that space is still available on the file system.
2.
Check the free inode count on the file system, by entering the following command on the client node:
# df -hi /mnt/data
Filesystem
data
#
3.
Inodes
256M
IUsed
256M
IFree
0
IUse%
100%
Mounted on
/mnt/data
Determine whether it is the MDS service or an OST service that has no free inodes, as follows:
a.
Check the OST services by entering the command shown in the following example on the client
node:
# cat /proc/fs/lustre/osc/OSC_delta57_sfs-south-ost*_MNT_client_gm/filesfree
1310597
0
1310597
1310597
#
In this example, delta57 is the client node where the command is being run; south is the
name of the HP SFS system; and client_gm indicates that a Myrinet interconnect is being
used.
Dealing with ENOSPC or EIO errors
6–5
b.
Check the MDS service by entering the command shown in the following example on the client
node:
# cat /proc/fs/lustre/mdc/MDC_delta57_south-mds5_MNT_client_gm/filesfree
10
#
In this example, delta57 is the client node where the command is being run; south is the
name of the HP SFS system; mds5 is the name of the MDS service the client node is connected
to; and client_gm indicates that a Myrinet interconnect is being used.
If all of the inodes on the MDS service are used, no new directories or files can be created in the file system;
however, the existing files can continue to grow (as long as there is space available in the file system). In
this situation, new files can only be created if existing files are deleted. For each new file to be created, one
existing file must be deleted.
If all of the inodes on an OST service are used, no new files that would be striped over that OST service can
be created. However, you can change the striping pattern of the file so that the exhausted OST device will
be avoided; this will allow new files to be created. (See Section 6.1 of this guide for more details on file
striping.)
6.2.3 Freeing up space on OST services
To free up space on an OST service, you can migrate one or more large files from the service to another
location. Instructions on how to do this are given later in this section.
It is also possible to ensure that no new files are created on an OST service by deactivating the service;
when a service is deactivated, no new files are created on the service. However, this is not a complete
solution, because data will continue to be written to existing files on the service. The recommended solution
is to deactivate the OST service, then migrate the files to another service, and finally make a decision about
whether to reactivate the OST service. The instructions for deactivating and activating OST services are
provided in the Managing space on OST services section in Chapter 5 of the HP StorageWorks Scalable
File Share System User Guide.
To free up space on one or more OST services, you first need to determine the storage occupancy of the
services and to identify the size of the objects on the services. Section 6.1.1 describes how to use the lfs
find command to get details about a specific file, including its constituent OST services, the file stripe and
the number of stripes.
The lfs df command can be used to determine the storage occupancy of each OST service. If you find
that certain OST services are filling too rapidly and you want to manually relocate some files by copying
them, you can use the lfs find command to identify all of the files belonging to a particular OST service
in a file system.
To free up space on an OST service, perform the following steps:
1.
Determine the UUID of the OST service in one of the following ways:
•
Using the cat command, as follows:
# cat /proc/fs/lustre/osc/OSC_*/ost_server_uuid
south-ost49_UUID
FULL
south-ost50_UUID
FULL
south-ost51_UUID
FULL
south-ost52_UUID
FULL
The first column of the output contains the UUID of each of the OST services.
•
Using the lfs df command, as follows:
# lfs df /mnt/data
UUID
south-mds9_UUID
south-ost49_UUID
south-ost50_UUID
6–6
1K-blocks
Used Available Use% Mounted on
1878906672 107896252 1771010420
5 /mnt/data[MDT:0]
2113787820 683205232 1430582588
32 /mnt/data[OST:0]
2113787820 682773192 1431014628
32 /mnt/data[OST:1]
User interaction with Lustre file systems
south-ost51_UUID
south-ost52_UUID
filesystem summary:
2113787820 681296236 1432491584
2113787820 532323328 1581464492
8455151280 2579597988 5875553292
32 /mnt/data[OST:2]
25 /mnt/data[OST:3]
30 /mnt/data
#
2.
Deactivate the OST service, as described in the Managing space on OST services section in
Chapter 5 of the HP StorageWorks Scalable File Share System User Guide.
3.
Use the lfs find command to find all files belonging to the OST service, as shown in the following
example, where the OST service is south-ost51_UUID, on the mount point /mnt/data, and the
output is stored in the /tmp/allfiles.log file:
# lfs find --recursive --obd south-ost51_UUID /mnt/data 2>&1 > /tmp/allfiles.log
4.
5.
6.3
Use the list of files in the /tmp/allfiles.log file to find several large files and relocate those files
to another OST service, as follows:
a.
Create an empty file with an explicit stripe using the lfs setstripe command, or create a
directory with a default stripe.
b.
Copy the existing large file to the new location.
c.
Remove the original file.
If you decide to reactivate the OST service, follow the instructions provided in the Managing space on
OST services section in Chapter 5 of the HP StorageWorks Scalable File Share System User Guide.
Using Lustre file systems — performance hints
This section provides some tips on improving the performance of Lustre file systems, and is organized as
follows:
•
Creating and deleting large numbers of files (Section 6.3.1)
•
Large sequential I/O operations (Section 6.3.2)
•
Variation of file stripe count with shared file access (Section 6.3.3)
•
Timeouts and timeout tuning (Section 6.3.4)
•
Using a Lustre file system in the PATH variable (Section 6.3.5)
•
Optimizing the use of the GNU ls command on Lustre file systems (Section 6.3.6)
•
Using st_blksize to determine optimum I/O block size (Section 6.3.7)
6.3.1 Creating and deleting large numbers of files
You can improve the aggregate time that it takes to create large numbers of small files or to delete a large
directory tree on a Lustre file system by sharing the work among multiple HP SFS client nodes.
As an example, if you have a directory hierarchy comprising of 64 subdirectories, and a client population
of 16 client nodes, you can share the work of removing the tree so that one process on each client node
removes four subdirectories. The job will complete in less time than it would if you were to issue a single
rm -rf command at the top level of the hierarchy from a single client.
Note also that for best performance in situations of parallel access, client processes from different nodes
should act on different parts of the directory tree to provide the most efficient caching of file system internal
locks (a large number of lock revocations can impose a high penalty on overall performance).
Similarly, when you are creating files, distributing the load among client nodes operating on individual
subdirectories yields optimum results.
Using Lustre file systems — performance hints
6–7
6.3.1.1
Improving the performance of the rm -rf command
If the rm -rf command is issued from a single client node to a large directory tree populated with hundreds
of thousands of files, the command can sometimes take a long time (in the order of an hour) to complete
the operation. The primary reason for this is that each file is unlinked (using the unlink() operation)
individually and the transactions must be committed to disk at the server. Lustre directory trees are not sorted
by inode number, but files with adjacent inode numbers are typically adjacent on disk, so that successive
unlink operations cause excessive unnecessary disk-seeking at the server.
The speed of such operations can be increased by pre-sorting the directory entries by inode number. The
HP SFS software includes a library and a script that you can use to pre-sort the library. You can do this in
either of two ways:
•
Edit your script to prefix existing rm -rf commands with an LD_preload library, as in the following
example:
LD_PRELOAD=/usr/opt/hpls/lib/fast_readdir.so /bin/rm -rf
/mnt/lustre/mydirectories
•
Change your script to replace invocations of the rm -rf command with the wrapper script supplied
with the HP SFS software, as shown in either of the following examples:
/bin/sfs_rm -rf /mnt/lustre/mydirectories
Or:
RM=/bin/sfs_rm
.
.
.
${RM} -rf /mnt/lustre/mydirectories
Tests using the library as described above showed faster performance (by up to ten times the speed) in the
execution time for removing large directories.
Though the library can be used with other Linux commands, no performance improvement was shown when
it was tested with commands such as ls or find. HP recommends that you use the library only for rm
operations on large directories.
6.3.2 Large sequential I/O operations
When large sequential I/O operations are being performed (that is, when large files that are striped across
multiple OST services are being read or written in their entirety), there are some general rules of thumb that
you apply; also, there are some Lustre tuning parameters that can be modified to improve overall
performance. These factors are described here.
I/O chunk size
In HP SFS Version 2.2, the MTU of the I/O subsystem is 4MB per operation. To give optimum performance,
all I/O chunks must be at least this size. An I/O chunk size that is based on the following formula ensures
that a client can perform I/O operations in parallel to all available Object Storage Servers:
chunk_size = stripe_size * ost_count
where stripe_size is the default stripe size of the file system and ost_count is the number of OST
services that the file system is striped across.
Large sequential write operations
If you are writing large sequential files, you can achieve the best performance by ensuring that each file is
exclusively written by one process.
If all processes are writing to the same file, best performance is (in general) obtained by having each client
process write to distinct, non-overlapping sections of the same file.
6–8
User interaction with Lustre file systems
6.3.3 Variation of file stripe count with shared file access
When multiple client processes are accessing a shared file, aligning the file layout (file stripe size and file
stripe count) with the access pattern of the application is beneficial. For example, consider a file system with
the following configuration:
•
Four Object Storage Servers
•
Four SFS20 arrays attached to each Object Storage Server
•
Each array populated with eleven 250GB disks, configured as one 2TB LUN with RAID5 redundancy
(that is, a total of 16 OST LUNs, one LUN on each of the SFS20 arrays)
•
File system stripe size of 4MB
An application using the file system has the following client access pattern:
•
16 client processes
•
Each process accesses a 4MB chunk with a stride of 16 (that is, the file is logically divided into a
number of chunks; the number being a multiple of 16).
In such a configuration, each client process accesses a single OST service for all of its data. This
configuration optimizes both the internal Lustre LDLM traffic and the traffic patterns to an OST service.
6.3.4 Timeouts and timeout tuning
When a file system is created, a Lustre timeout attribute is associated with the file system. The Lustre
timeout attribute, which can be configured, is set to 200 seconds by default. This attribute is used to
calculate the time to be allocated to various Lustre activities. In highly congested or slow networks, and in
cases where client nodes are extremely busy, it may be necessary to increase the default value of the
Lustre timeout attribute for the file system.
This section provides information on how the Lustre timeout attribute is used in various Lustre activities.
Client-side timeouts
When a client node sends an RPC to a server in an HP SFS system, the client node expects to get a response
within the period defined by the Lustre timeout attribute. In normal operation, RPCs are initiated and
completed rapidly, and do not exceed the time allocated for them. If the server does not respond to the client
node within the defined time period, the client node reconnects to the server and resends the RPC.
If a client node times out and reconnects to the server in this way, some time later you may see a message
similar to the following in the server logs:
Sep 13 11:23:57 s8 kernel: Lustre: sfsalias-ost18: haven't heard from
172.32.0.6@vib in 461 seconds. Last request was at 1158142576. I think it's
dead, and I am evicting it.
This message means that the server has detected a non-responsive client connection (that is, there has been
no activity for at least 2.25 times the period specified by the Lustre timeout attribute) and the server is
now proactively terminating the connection.
Note that this is the normal means of evicting client nodes that are no longer present. Client nodes ping
their server connections at intervals of one quarter of the period specified by the Lustre timeout
attribute so that no live client connection will be evicted in this way.
Using Lustre file systems — performance hints
6–9
Server-side timeouts
Server-side timeouts can occur as follows:
•
When client nodes are connected to MDS and OST services in the HP SFS system, the client nodes
ping their server connections at intervals of one quarter of the period specified by the Lustre
timeout attribute. If a client node has not been in contact for at least 2.25 times the period specified
by the Lustre timeout attribute, the Lustre software proactively evicts the client node.
•
If an RPC from the client node is an I/O request, the server needs to transfer data to or from the client
node. For this operation, the server allocates a timeout value of half of the value of the Lustre
timeout attribute. If an error occurs during transmission, or the transfer operation fails to complete
within the allocated time, the server evicts the client node.
When this happens, the next RPC from the client node receives a negative acknowledgement code
from the server to indicate that the client node has been evicted. This causes the client node to
invalidate any dirty pages associated with the MDS or OST service, and this in turn can lead to
application I/O errors.
Timeouts associated with lock revocations
It is possible to trigger timeouts unexpectedly as a result of the way that Lustre deals with locks and lock
revocations.
The Lustre software coordinates activity using a lock manager (LDLM). Each OST is the lock server for all
data associated with a specific stripe of a file. A client node must obtain a lock to cache dirty data
associated with a file, and at any given moment, a client node holds locks for data that it has read or is
writing. For another client node to access the file, the lock must be revoked.
When a server revokes a lock from a client node, all of the dirty data must be flushed to the server before
the time period allocated to the RPC expires (that is, half of the value Lustre timeout attribute). Issuing
a command such as ls -l on another client node in an active directory can be enough to trigger such a
revocation on client nodes, and thus trigger a timeout unexpectedly, in a borderline configuration.
When a lock revocation fails in this way, a message similar to the following is shown in the client node log:
2005/09/30 21:02:53 kern i s5 : LustreError:
4952:0:(ldlm_lockd.c:365:ldlm_failed_ast()) ### blocking AST failed (-110): evicting
client b9929_workspace_9803d79af3@NET_0xac160393_UUID NID 0xac160393 (172.22.3.147)
ns: filter-sfsalias-ost203_UUID lock: 40eabb80/0x37e426c2e3b1ac01 lrc: 2/0 , 0 mode:
PR/PR res: 79613/0 rrc: 2 type: EXT [0->18446744073709551615] (req 0>18446744073709551615) flags: 10020 remote: 0xc40949dc40637e1f expref: 2 pid: 4940
Tuning Lustre timeout parameters
Several parameters control client operation:
•
The Lustre timeout attribute value.
•
Two parameters associated with client transactions to each OST service; these parameters are
important for write operations from the client node:
•
The /proc/fs/lustre/osc/OSC_*/max_dirty_mb parameter is a client-side parameter
that controls how much dirty data can be created on a client node for each OST service. The
default value of this parameter is 32 (that is, 32MB).
•
The /proc/fs/lustre/osc/OSC_*/max_rpcs_in_flight parameter controls the
number of simultaneous RPCs that can be outstanding to a server. The default value of this
parameter is 8.
These two parameters are used to keep the Lustre pipeline full in the case of write operations so that
maximum bandwidth can be obtained.
6–10
User interaction with Lustre file systems
The parameters that control client operation interact as shown in the following example. In this example, the
configuration is as follows:
•
There are 30 OST services, one on each server in the HP SFS system.
•
All client nodes and servers are connected to a single switch with an overall throughput of 1Gb/sec.
•
The max_dirty_mb parameter on the client node is 32MB for each OST service that the client node
is communicating with.
•
The value of the Lustre timeout attribute for the file system is 100 seconds (the default).
•
The timeout period for I/O transactions is 100 seconds (that is, half of the value of the Lustre
timeout attribute).
In such a configuration, there could be a maximum of 960MB of data to be sent if a client node were to
access all OST services. If ten client nodes all flushed data at the same time, it would take under 90 seconds
to flush all the data.
If there were an imbalance in the network processing, it is possible that an individual RPC could be delayed
beyond the I/O transaction timeout limit. If this happens, the server evicts the client node for nonresponsiveness.
For write operations, one way to avoid such problems is to set the max_dirty_mb parameter to a lower
value. However, this solution has the disadvantage of making the Lustre pipeline less deep and can impact
overall throughput. It also has no impact on read operation traffic.
The best way to avoid transaction timeouts is to combine the following actions:
•
Segment traffic so that (under most situations) a single client node accesses a limited number of OST
service.
•
Set an appropriate value for the Lustre timeout attribute (see Section 6.3.4.1).
CAUTION: In the /proc/sys/lustre directory, there is a configuration variable called
ldlm_timeout. This variable is for Lustre internal use on servers only; it is used by the LDLM lock
manager to detect and evict failed clients that have not yet been evicted as a result of being inactive for
greater than 2.25 times the period specified by the Lustre timeout file system attribute. Do not change
the value of the ldlm_timeout variable.
6.3.4.1
Changing the Lustre timeout attribute
The value of the Lustre timeout attribute on the file system can be changed using the modify
filesystem command in the HP SFS system. Refer to Chapter 5 of the HP StorageWorks Scalable File
Share System User Guide for more information.
NOTE: Before you change the Lustre timeout attribute, you must first unmount the file system on all
client nodes. When you have changed the attribute, the client nodes can remount the file system.
Note that the Lustre timeout attribute is also used by Lustre in a recovery scenario where an Object
Storage Server or MDS server is disconnected, or fails, or reboots. In this case, the timeout period used for
client nodes to reconnect to the server is 1.5 times the value of the Lustre timeout attribute. If you
increase the value of the Lustre timeout attribute, when a server boots it will wait longer for client nodes
to reconnect before giving up on them. This can impact overall file system startup time.
Keep the following formula in mind when changing the value of the Lustre timeout attribute:
Lustre timeout attribute value/2 >= number of clients * max_dirty_mb /
(bandwidth to each host)
Using Lustre file systems — performance hints
6–11
6.3.5 Using a Lustre file system in the PATH variable
HP strongly recommends that you do not add a Lustre file system into the PATH variable as a means of
executing binaries on the Lustre file system. Instead, use full paths for naming those binaries.
If it is not possible to exclude a Lustre file system from the PATH variable, the Lustre file system must come as
late in the PATH definition as possible, to avoid a lookup penalty on local binary execution. Also, do not
specify the same Lustre path more than once.
6.3.6 Optimizing the use of the GNU ls command on Lustre file systems
On modern Linux systems, the GNU ls command often uses colorization by default to visually highlight the
file type; this is especially true if the command is run within a terminal session. This is because the default
shell profile initializations usually contain an alias directive similar to the following for the ls command:
alias ls='ls --color=tty'
However, running the ls command in this way for files on a Lustre file system requires a stat() call to be
used to determine the file type. This can result in a performance overhead, because the stat() call always
needs to determine the size of a file, and that in turn means that the client node must query the object size
of all the backing objects that make up a file.
As a result of the default colorization setting, running a simple ls command on a Lustre file system often
takes as much time as running the ls command with the -l option. (The same is true if the -F, -p, or the
--classify option, or any other option that requires information from a stat() call, is used.)
If you want your ls commands to avoid incurring this performance overhead, add an alias directive similar
to the following to your shell startup script:
alias ls='ls --color=none'
6.3.7 Using st_blksize to determine optimum I/O block size
Many legacy applications use the st_blksize of the stat structure returned from the stat() system
call to determine the optimum I/O block size for operations. In the case of Lustre, this field contains the stripe
size of the file. If you intend to read small amounts of data from a file (for example, 4KB), ensure that your
application is not reading more data than it requires. You can check the size of the I/O blocks issued by
your application by using an application such as strace to examine the return values of the read system
calls.
6–12
User interaction with Lustre file systems
7
Troubleshooting
This chapter provides information for troubleshooting possible problems on client systems. The topics
covered include the following:
•
Installation issues (Section 7.1)
•
File system mounting issues (Section 7.2)
•
Operational issues (Section 7.3)
•
Miscellaneous issues (Section 7.4)
7–1
7.1
Installation issues
This section deals with issues that may arise when the HP SFS software is being installed on the client nodes.
The section is organized as follows:
•
The initrd file is not created (Section 7.1.1)
•
Client node still boots the old kernel after installation (Section 7.1.2)
7.1.1 The initrd file is not created
When you have installed the client kernel (see Section 3.3.2), there should be an initrd file (/boot/
initrd-kernel_version.img) on the client node; however, if the modules.conf file on the client
node is not suitable for the client kernel supplied with the HP SFS client software, the initrd file will not
be created.
If the initrd file does not exist after you have installed the client kernel, you must modify the
modules.conf file, and then create the initrd file manually. When you have finished creating the
initrd file, you can safely return the modules.conf file to its previous state.
To modify the modules.conf file and create the initrd file, perform the following steps:
1.
Load the modules.conf into an editor. The contents of the file will be similar to the following:
alias parport_lowlevel parport_pc
alias eth0 tg3
alias eth1 tg3
alias scsi_hostadapter1 cciss
alias scsi_hostadapter2 qla2200
alias scsi_hostadapter3 qla2300_conf
alias scsi_hostadapter4 qla2300
alias scsi_hostadapter5 sg
options qla2200 ql2xmaxqdepth=16 qlport_down_retry=64 qlogin_retry_count=16
ql2xfailover=0
options qla2300 ql2xmaxqdepth=16 qlport_down_retry=64 qlogin_retry_count=16
ql2xfailover=0
post-remove qla2300 rmmod qla2300_conf
options ep MachineId=0x3064 txd_stabilise=1
Identify the module names. On the alias lines, the module name is the third entry (for example,
parport_pc); on the options lines, the module name is the second entry (for example,
qla2200).
2.
Use the name of the kernel RPM file to determine the kernel version by entering the following
command:
# echo kernel_rpm_name | sed -e ’s/kernel\-\(.*\)\.[^\.]*\.rpm/\1/’
-e ’s/\(smp\)-\(.*\)/\2\1/’
3.
Look at the contents of the /lib/modules/kernel_version directory (where
kernel_version is the kernel version determined in the previous step). If any of the modules listed
in the modules.conf file is not present in the /lib/modules/kernel_version directory,
comment out the corresponding line in the modules.conf file.
4.
When you have finished modifying the modules.conf file, save the file.
5.
Create the initrd file by entering the following command:
# mkinitrd /boot/initrd-kernel_version kernel_version
6.
Verify that there is an appropriate entry for the initrd file in the boot loader on the client node.
When the initrd file has been successfully created, you can safely return the modules.conf file to its
previous state.
7–2
Troubleshooting
7.1.2 Client node still boots the old kernel after installation
If a client node does not boot the new kernel after the HP SFS client software has been installed on the node,
it may be because the new kernel has not been defined as the default kernel for booting.
To correct this problem, edit the appropriate bootloader configuration file so that the new kernel is selected
as the default for booting and then reboot the client node.
Alternatively, if your boot loader is GRUB, you can use the /sbin/grubby --set-default command.
7.2
File system mounting issues
This section deals with issues that may arise when client nodes are mounting Lustre file systems. The section
is organized as follows:
•
Client node fails to mount or unmount a Lustre file system (Section 7.2.1)
•
The sfsmount command reports device or resource busy (Section 7.2.2)
•
Determine whether Lustre is mounted on a client node (Section 7.2.3)
•
The SFS service is unable to mount a file system (SELinux is not supported) (Section 7.2.4)
•
Troubleshooting stalled mount operations (Section 7.2.5)
7.2.1 Client node fails to mount or unmount a Lustre file system
If the sfsmount(8) or sfsumount(8) commands hang or return an error, look at the
/var/log/messages file on the client node, or the relevant console log, to see if there are any error
messages. In addition, consider the following possible causes for failing to mount a file system:
•
The Lustre modules are not configured on the client node.
If you built your own client kernel, you must run the depmod command after you reboot the client
node with the correct kernel installed, to have the Lustre modules correctly registered with the
operating system (see Section 3.3.2).
•
The client node is not configured correctly.
Make sure that the client node is configured as described in Chapter 2 or Chapter 3. To check if the
client configuration is correct, enter the following command, where server is the name of the
HP SFS server that the client node needs to access to mount the file system:
# sfsconfig -s server
If the client configuration is not correct, enter the following command to update the configuration files:
# sfsconfig -s server conf
•
The client is experiencing difficulties in communicating with the HP SFS services.
Use the information provided in Section 4.10 to determine whether the client node is experiencing
difficulty in communicating with the HP SFS services. Note that it may take up to 100 seconds for
some of the messages described in that section to be recorded in the logs.
If the client node is experiencing difficulty in communicating with the HP SFS services, ensure that all
the MDS and OST services that make up the file system in question are actually available. Check that
the servers required by the services are booted and running, and determine whether a failover
operation is taking place; that is, whether a server has failed and its services are being failed over to
the peer server. Refer to Chapter 4 of the HP StorageWorks Scalable File Share System User Guide
for details of how to view file system information.
If any of the file system services are in the recovering state, they cannot permit new client nodes to
mount file systems, or existing client nodes to unmount file systems; the services must complete the
recovery process before the client nodes can mount or unmount file systems.
When the failover operation completes, the client nodes normally recover access to the file system.
File system mounting issues
7–3
•
The interconnect may not be functioning correctly.
If all of the MDS and OST services associated with the file system are available and the client node
has been configured correctly but is still failing to mount or unmount a file system, ensure that the
interconnect that the client node is using to communicate with the servers is functioning correctly.
If none of the above considerations provides a solution to the failure of the mount or unmount operation,
reboot the client node. Rebooting the node unmounts all mounted Lustre file systems. If the failed operation
was a mount operation, you can attempt to mount the file system again when the server has rebooted.
7.2.2 The sfsmount command reports device or resource busy
When a Myrinet interconnect is used to connect the client nodes to the HP SFS system, Lustre uses
GM port 4 on the client nodes. If there is a GM/MPICH application running on the client node, the MPICH
software may use GM port 4, and the client node will not be able to mount the Lustre file system. When this
problem occurs, a message similar to the following is displayed:
# sfsmount delta/deltaone
sfsmount: mount error 32.
mount.lustre: mount(0xdd48fa1c@gm0,0xdd48faaa@gm0:/delta-mds1/client_gm,
/mnt/deltaone) failed: No such device
mds nid 0:
0xdd48fa1c@gm
mds nid 1:
0xdd48faaa@gm
mds name:
delta-mds1
profile:
client_gm
options:
rw,acl,user_xattr
Are the lustre modules loaded?
Check /etc/modules.conf and /proc/filesystems
To determine the exact source of the error, examine the dsmeg file on the client node, by entering the
following command:
# dmesg | grep -v "Unknown symbol"
.
.
.
GM: NOTICE: libgm/gm_open.c:312:_gm_open():kernel
GM: Could not open port state in kernel.
LustreError: 13304:0:(gmlnd_api.c:172:gmnal_startup()) Can't open GM port 4: 5
(busy)
LustreError: Error -5 starting up LNI gm
LustreError: 13304:0:(events.c:621:ptlrpc_init_portals()) network
initialisation failed
#
You can verify that port 4 is in use on the client by entering the following command:
# /opt/gm/bin/gm_board_info|grep -i busy
0:
1:
2:
4:
5:
6:
BUSY
BUSY
BUSY
BUSY
BUSY
BUSY
3230
2125
2815
2822
2823
2836
(this process [gm_board_info])
!!port 4 is busy here
You can prevent this problem from occurring by configuring Lustre to use a different port on the client, as
described here. To change the configuration, you must edit the /etc/modules.conf file on all of the
client nodes using the Myrinet interconnect, and on all of the servers in the HP SFS system. You must also
change the RAM disk image on the HP SFS Object Storage Servers so that the change will not be lost when
a server is next booted.
7–4
Troubleshooting
To configure Lustre to use a different port on the client node when using a Myrinet interconnect, perform the
following steps:
1.
On the administration server and on the MDS server in the HP SFS system, perform the following
tasks:
a.
Stop all file systems, by entering the stop filesystem filesystem_name command for
each file system.
b.
Back up the /etc/modprobe.conf file, as follows:
# cp /etc/modprobe.conf /etc/modprobe.conf.save
c.
Edit the /etc/modprobe.conf file to add the following line:
options kgmnld port=port_number
where port_number is the number of the port that Lustre is to use. HP recommends that you
use a high-numbered port, for example, port 15 if there are 16 ports available.
2.
Change the RAM disk for the Object Storage Servers as follows:
a.
Copy the /etc/modprobe.conf file from one of the Object Storage Servers to the
administration server and back it up, by entering the following commands on the administration
server:
# scp root@oss_name:/etc/modprobe.conf /tmp/modprobe.conf
# cp /tmp/modprobe.conf /tmp/modprobe.conf.ost.save
b.
Edit the /tmp/modprobe.conf file to add the following line:
options kgmnld port=port_number
c.
Update the RAM disk image with the changed /etc/modprobe.conf file by using the
hplsrdu(8) command as follows:
# hplsrdu -c /tmp/modprobe.conf /etc/modprobe.conf
.
.
.
Save modified ramdisk/PXE config ? [y|n] y
3.
Reboot all Object Storage Servers in the HP SFS system, as shown in the following example. In this
example, there are four Object Storage Servers, south3 through south6:
sfs> shutdown server south[3-6]
sfs> boot server south[3-6]
4.
On each client node, edit the /etc/modprobe.conf file or the /etc/modules.conf file
(depending on the distribution) to add the following line:
options kgmnld port=port_number
5.
Reboot the client nodes.
7.2.3 Determine whether Lustre is mounted on a client node
To determine whether Lustre is mounted on a client node, enter the sfsmount command, as shown in the
following example. The command shows details of the Lustre devices that are mounted on the node. In this
example, /mnt/lustre is the mount point of the Lustre file system:
# sfsmount
data on /mnt/lustre type lustre (rw,osc=lov1,
mdc=MDC_client0_mds1_MNT_client_elan)
7.2.4 The SFS service is unable to mount a file system (SELinux is not supported)
If the SFS service is unable to mount a file system, but the file system can be mounted using the sfsmount
command, it may be because the SELinux security feature is enabled on the client node. To work around
this problem, disable the SELinux feature by editing the /etc/sysconfig/selinux and change the
SELINUX setting to disabled. Reboot the client node to bring the change into effect.
File system mounting issues
7–5
7.2.5 Troubleshooting stalled mount operations
If a mount operation stalls, you can troubleshoot the problem on the HP SFS system. Refer to Chapter 9 of
the HP StorageWorks Scalable File Share System User Guide (specifically the Troubleshooting client mount
failures section) for more information.
7.3
Operational issues
This section deals with issues that may arise when client nodes are accessing data on Lustre file systems. The
section is organized as follows:
•
A find search executes on the global file system on all client nodes (Section 7.3.1)
•
Investigating file system problems (Section 7.3.2)
•
Reset client nodes after an LBUG error (Section 7.3.3)
•
Access to a file system hangs (Section 7.3.4)
•
Access to a file hangs (ldlm_namespace_cleanup() messages) (Section 7.3.5)
•
Troubleshooting a dual Gigabit Ethernet interconnect (Section 7.3.6)
7.3.1 A find search executes on the global file system on all client nodes
If a find command executes on the global file system on all client nodes simultaneously, it may be because
the slocate package is installed on client nodes. See Section 2.2.3.4 or Section 3.3.4.5 for instructions
on how to configure the slocate package to prevent this problem.
7.3.2 Investigating file system problems
This section provides some useful tips for investigating and solving potential problems with file systems.
To determine how a file is striped across OST services, enter the command shown in the following example,
where the file is called scratch:
# lfs getstripe scratch
OBDS:
0: OST_south2_UUID
1: OST_south2_2_UUID
2: OST_south2_3_UUID
3: OST_south2_4_UUID
./scratch
obdidx
1
objid
2
objid
0x2
group
0
You cannot change the striping configuration on an existing file; however, you can recreate a file and
change the striping configuration on the new file.
To recreate a file with a new striping configuration, perform the following steps:
1.
Use the cp command to copy the incorrectly striped file to a new file name, as shown in the following
example, where the incorrectly striped file is called scratch:
# cp scratch scratch.new
# lfs getstripe scratch.new
OBDS:
0: ost1_UUID
1: ost2_UUID
2: ost3_UUID
3: ost4_UUID
./scratch.new
7–6
Troubleshooting
obdidx
0
1
2
3
2.
objid
1860
1856
1887
1887
objid
0x744
0x740
0x75f
0x75f
group
0
0
0
0
Rename the new file to the original name using the mv command, as shown in the following example:
# mv scratch.new scratch
mv: overwrite ’scratch’?
# lfs getstripe scratch
OBDS:
0: ost1_UUID
1: ost2_UUID
2: ost3_UUID
3: ost4_UUID
./scratch
obdidx
0
1
2
3
y
objid
1860
1856
1887
1887
objid
0x744
0x740
0x75f
0x75f
group
0
0
0
0
7.3.3 Reset client nodes after an LBUG error
When an LBUG error occurs on a client node, the client node must be restarted. In the event of an LBUG
error, HP recommends that you reset the client node rather than perform a controlled shutdown and reboot.
This is because an LBUG error results in a client thread becoming permanently unresponsive but continuing
to hold whatever resources/locks it may have; because the resources can never be released, a controlled
shutdown procedure will not complete successfully.
When an LBUG error occurs, messages similar to the following are displayed on the console or in the
/var/log/messages file:
delta51:May 26 17:02:19 src_s@delta51 logger: lustre: upcall: LBUG: A critical
error has been detected by the Lustre server in ldlm_lock.c ldlm_lock_cancel
1042. Please reboot delta51.
delta52:May 26 17:02:20 src_s@delta52 logger: lustre: upcall: LBUG: A critical
error has been detected by the Lustre server in lib-move.c lib_copy_buf2iov
341. Please reboot delta52.
7.3.4 Access to a file system hangs
The Lustre software coordinates activity using a lock manager (LDLM). At any given moment, a client node
holds locks for data that it has read or is writing. For another client node to access the file, the lock must be
revoked.
The Lustre software frees locks as follows:
•
When a lock that is held by a client node is requested by another client node, the Lustre software
requests the client node that owns the lock to give back the lock. If the client node in question has just
crashed, the Lustre software must wait for 6 to 20 seconds before concluding that the client is not
responding. At this point, the Lustre software evicts the crashed client node and takes back the lock.
•
If a client node has not been in contact for at least 2.25 times the period specified by the Lustre
timeout file system attribute, the Lustre software proactively evicts the client node, but does not
revoke any lock held by the client node until the lock is needed by another client node.
In the second case, it is possible that a lock may not be revoked until several hours after a client node
actually crashed, depending on file access patterns. This explains why a client node may successfully mount
a file system but access to the file system immediately hangs.
Operational issues
7–7
In a situation where only one or two client nodes have crashed and a lock is needed, there is a pause of 6
to 20 seconds while the crashed client nodes are being evicted. When such an event occurs, Lustre attempts
to evict clients one by one. A typical log message in this situation is as follows:
2005/09/30 21:02:53 kern
i
s5 : LustreError:
4952:0:(ldlm_lockd.c:365:ldlm_failed_ast()) ### blocking AST failed (-110): evicting
client b9929_workspace_9803d79af3@NET_0xac160393_UUID NID 0xac160393 (172.22.3.147)
ns: filter-sfsalias-ost203_UUID lock: 40eabb80/0x37e426c2e3b1ac01 lrc: 2/0 , 0 mode:
PR/PR res: 79613/0 rrc: 2 type: EXT [0->18446744073709551615] (req 0>18446744073709551615) flags: 10020 remote: 0xc40949dc40637e1f expref: 2 pid: 4940
After an interval of 6 to 20 seconds, the message is repeated for the next crashed client node.
When enough time has elapsed, Lustre proactively evicts nodes, and a message similar to the following is
displayed:
2005/10/27 11:04:00 kern
i
s14: Lustre: sfsalias-ost200 hasn't heard from
172.22.1.211 in 232 seconds. I think it's dead , and I am evicting it.
7.3.5 Access to a file hangs (ldlm_namespace_cleanup() messages)
A Lustre problem can cause access to a specific file to hang. This results in one of the following two
scenarios:
•
I/O operations on the file hang, but the file can still be accessed using the ls -ls command.
In this scenario, I/O operations hang and can only be killed by a signal (or fail) after a minimum of
approximately100 seconds.
To determine if this scenario has arisen, enter the cat command for the file. If the command hangs,
press Ctrl/c. The cat command will terminate approximately 100 seconds later (but will not show the
file contents).
•
An unmount operation on a Lustre file system causes an LBUG ldlm_lock_cancel() error on the
client node.
In this scenario, unmounting a Lustre file system on a client node leads to an LBUG message being
logged to the /var/log/messages file. This is due to LDLM lock references that cannot be cleaned
up.
Detecting the cause of the problem
If a client node is evicted by an OST or MDS service and also reports a message similar to the following, it
is likely that one of the two problem scenarios described above (especially the scenario concerning the
unmount operation) will occur at some point in the future:
LustreError: 21207:0: (ldlm_resource.c:365:ldlm_namespace_cleanup()) Namespace
OSC_n208_sfsalias-ost188_MNT_client_vib resource refcount 4 after lock cleanup;
forcing cleanup.
In these circumstances, you may also see a message similar to the following in the client logs:
LustreError: 61:0:(llite_lib.c:931:null_if_equal()) ### clearing inode with
ungranted lock ns: OSC_n208_sfsalias-ost188_MNT_client_vib lock: 00000100763764c0/
0x86d202a4044bda23 lrc: 2/1,0 mode: --/PR res: 115087/0 rrc: 3 type: EXT [0->24575]
(req 0->24575) flags: c10 remote: 0x98aa53884a4d12d6 expref: -99 pid: 738
This type of message is useful, as it helps you to identify which particular object on the OST device has the
locking issue. For example, this text:
res: 115087/0
indicates that the problem is on the 115087 resource or object.
While it is not always simple to map back from an OST or MDS object to a specific file on the file system,
the information in these messages can be used for detailed analysis of the problem and correlation of client
node and server log messages.
7–8
Troubleshooting
Preventing and correcting the problem
You can take action to prevent access to files hanging as described above; however, if you find that an
application has already hung, you can take corrective action. The preventive and corrective actions are as
follows:
•
Preventive action
If the ldlm_namespace_cleanup() message is seen on a client node, but the node is performing
normally without any visible hangs, reset the client node at the earliest available opportunity (when
the reset operation does not impact normal system operation). HP recommends that you reset the
node rather than performing a controlled shutdown; this is because unmount operations can cause
the LBUG error described above.
•
Corrective action
If you find that access to one or more files is hanging, you must reset all client nodes that have printed
an ldlm_namespace_cleanup() message since they were last rebooted. Note that you must reset
all such nodes, not just those nodes where the file is hanging or those nodes involved in the same job.
When the client nodes have been reset, wait for 10 minutes to allow the HP SFS servers enough time
to detect that the client nodes have died and to evict stale state information. After that, you will again
be able to access the file where the problem occurred.
If I/O access to the file still hangs after this delay, stop the Lustre file systems and then start them
again.
Please report such incidents to your HP Customer Support representative so that HP can analyze the
circumstances that caused the problem to occur.
7.3.6 Troubleshooting a dual Gigabit Ethernet interconnect
When a dual Gigabit Ethernet configuration is in place and a Lustre file system has been mounted on a
client node, there are a number of commands that you can use to verify the connectivity between client
nodes and the HP SFS servers and also to ensure that the connections are performing correctly.
To ensure that the client is aware of all of the server links that it needs be able to connect to, enter the lctl
command on the client node, as follows:
# lctl --net tcp peer_list
The output from the command varies depending on the configuration of the network. The format of the output
is as follows:
12345-server_LNET [digit]local_addr->remote_addr:remote_port connections
where:
server_LNET
Shows the lnet: specification of the server.
local_addr->remote_addr
Shows the addresses of the local and remote hosts.
remote_port
Shows the port of the acceptor daemon; the default value is
988.
connections
Shows the number of active connections to the peer. For each
peer, the correct number is three, because an outbound
connection, an inbound connection, and a control connection
are made for each peer.
Operational issues
7–9
In the following example, the output from a fully dual-connected configuration is shown; in this example
delta6 is the client node:
[root@delta6 ~]# lctl --net tcp peer_list
12345-10.128.0.72@tcp
12345-10.128.0.72@tcp
12345-10.128.0.73@tcp
12345-10.128.0.73@tcp
12345-10.128.0.74@tcp
12345-10.128.0.74@tcp
[1]10.128.0.61->10.128.0.72:988
[0]10.128.8.61->10.128.8.72:988
[1]10.128.0.61->10.128.0.73:988
[0]10.128.8.61->10.128.8.73:988
[1]10.128.0.61->10.128.0.74:988
[0]10.128.8.61->10.128.8.74:988
#3
#3
#3
#3
#3
#3
Only HP SFS servers that are actively serving a device will be shown.
To list each of the connections, enter the following command:
[root@delta6 root]# lctl --net tcp conn_list
[12345-10.128.0.72@tcp O[1]10.128.8.61->10.128.8.72:988 262142/262142 nonagle
12345-10.128.0.72@tcp I[1]10.128.8.61->10.128.8.72:988 262142/262142 nonagle
12345-10.128.0.72@tcp C[1]10.128.8.61->10.128.8.72:988 262142/262142 nonagle
12345-10.128.0.72@tcp O[0]10.128.0.61->10.128.0.72:988 262142/262142 nonagle
12345-10.128.0.72@tcp I[0]10.128.0.61->10.128.0.72:988 262142/262142 nonagle
12345-10.128.0.72@tcp C[0]10.128.0.61->10.128.0.72:988 262142/262142 nonagle
12345-10.128.0.73@tcp O[1]10.128.8.61->10.128.8.73:988 262142/262142 nonagle
12345-10.128.0.73@tcp I[1]10.128.8.61->10.128.8.73:988 262142/262142 nonagle
12345-10.128.0.73@tcp C[1]10.128.8.61->10.128.8.73:988 262142/262142 nonagle
12345-10.128.0.73@tcp O[0]10.128.0.61->10.128.0.73:988 262142/262142 nonagle
12345-10.128.0.73@tcp I[0]10.128.0.61->10.128.0.73:988 262142/262142 nonagle
12345-10.128.0.73@tcp C[0]10.128.0.61->10.128.0.73:988 262142/262142 nonagle
12345-10.128.0.74@tcp O[1]10.128.8.61->10.128.8.74:988 262142/262142 nonagle
12345-10.128.0.74@tcp I[1]10.128.8.61->10.128.8.74:988 262142/262142 nonagle
12345-10.128.0.74@tcp C[1]10.128.8.61->10.128.8.74:988 262142/262142 nonagle
12345-10.128.0.74@tcp O[0]10.128.0.61->10.128.0.74:988 262142/262142 nonagle
12345-10.128.0.74@tcp I[0]10.128.0.61->10.128.0.74:988 262142/262142 nonagle
12345-10.128.0.74@tcp C[0]10.128.0.61->10.128.0.74:988 262142/262142 nonagle
To list the interfaces that may be used for interaction with Lustre file systems, enter the following command:
[root@delta6 root]# lctl --net tcp interface_list
10.128.0.61: (10.128.0.61/255.255.255.0) npeer 0 nroute 3
10.128.8.61: (10.128.8.61/255.255.255.0) npeer 0 nroute 3
The only interfaces that will be listed are the interfaces that are explicitly named in the options lnet
settings in the /etc/modprobe.conf.lustre or /etc/modules.conf.lustre file.
7.4
Miscellaneous issues
This section contains information on miscellaneous issues that may arise when client nodes are using Lustre
file systems:
The section is organized as follows:
•
socknal_cb.c EOF warning (Section 7.4.1)
7.4.1 socknal_cb.c EOF warning
A message similar to the following may occasionally be displayed on one or more client nodes:
Jun 29 14:38:21 delta65 kernel: Lustre:
2473:(socknal_cb.c:1508:ksocknal_process_receive()) [00000101fd7e6000]
EOF from 0xa800008 ip 10.128.0.8:988
This problem may be caused by incorrect settings in the /etc/hosts file on a client node, or by the fact
that two (or more) client nodes are sharing an IP address.
If this occurs, examine the /etc/hosts file on the client nodes to verify that they are correctly set up. The
hostname must not be mapped to 127.0.0.1, and no two client nodes can have the same IP address.
7–10
Troubleshooting
A
Using the sfsconfig command
The sfsconfig command is a tool that you can use to automatically perform the following tasks on client
nodes:
•
Configure the correct options lnet settings in the /etc/modprobe.conf and
/etc/modprobe.conf.lustre files or the /etc/modules.conf and
/etc/modules.conf.lustre files (depending on the client distribution).
(In the remainder of this appendix, references to the /etc/modprobe.conf file can be understood
to include also the /etc/modprobe.conf.lustre file, and references to the /etc/
modules.conf file can be understood to include also the /etc/modules.conf.lustre file.)
•
Add entries to the /etc/hosts file.
•
Configure the lquota setting.
•
Convert existing mount directives.
To configure the /etc/modprobe.conf or /etc/modules.conf file correctly, the sfsconfig
command needs to have information about each of the HP SFS servers that will be accessed for file system
mount operations. The sfsconfig command uses the http: protocol to get configuration information
from the HP SFS servers. If the client node does not have access to the HP SFS servers over a TCP/IP network,
or if the servers are offline, the sfsconfig command will not be able to configure the client node correctly,
and you will have to modify the configuration file manually, as described in Appendix B.
TIP: If the configuration of a server in the HP SFS system changes (at any time), you can run the
sfsconfig command again to reconfigure the settings in the /etc/modprobe.conf or
/etc/modules.conf file.
The sfsconfig command analyzes the client node to find the interconnects that can be used to connect
to the HP SFS servers. It then determines the appropriate options lnet settings for the node (including
the appropriate setting for the portals_compatibility attribute) and updates the
/etc/modprobe.conf file or the /etc/modules.conf file on the node accordingly. Unless the
-a|--all option is specified with the sfsconfig command, options lnet settings are configured
only for the interconnects that are identified as being needed.
In addition, the command adds an entry (short system name or system nickname) in the /etc/hosts file
for each HP SFS system that will be accessed by the client. This supports the use of server names in the
sfsmount command with the ldap: protocol.
The sfsconfig command gathers the list of servers that need to be accessed from several sources, as
follows:
•
The -s|--server option(s) specified on the command line when the sfsconfig command is run.
(Note that you can use the -s|--server name option more than once with the sfsconfig
command, to specify multiple HP SFS servers.)
•
The /etc/sfstab file—all entries.
•
The /etc/sfstab.proto file—all entries.
•
The /etc/fstab file—entries of the lustre type.
•
The /proc/mounts file—entries of the lustre and lustre_lite types.
Theses sources are not mutually exclusive—the command uses all of these sources to gather information. If no
/etc/sfstab and /etc/sfstab.proto file exists (for example, on a new HP SFS client system), you
can create the files as described in Section 4.7.1 before you run the sfsconfig command.
A–1
The sfsconfig command also adds the lquota setting (which is needed to allow the client node to use
quotas functionality) in the /etc/modprobe.conf or /etc/modules.conf file.
The sfsconfig command also updates the file system mount directives in the /etc/sfstab and
/etc/sfstab.proto files.
The syntax of the sfsconfig command is as follows:
sfsconfig [options] [target]
Where the options are one or more of the following:
-X|--noexec
Displays the changes that are needed; the changes are not performed if this
option is specified.
-H|--keephttp
Specifies that the http: mount directives in the /etc/sfstab and /etc/
sfstab.proto files are to be preserved.
-L|--keepldap
Specifies that the ldap: mount directives in the /etc/sfstab and /etc/
sfstab.proto files are to be preserved.
-a|--all
Specifies that the command is to configure options lnet settings for all
networks detected on the client. The default is to configure settings only for
those networks that are detected as being needed.
Specifying the -a|--all option prevents the possibility of a network not
being configured because the sfsconfig command (mistakenly) assumes
that the network is not needed.
However, there is a drawback to using the -a|--all option; if the option is
specified, the sfsconfig command will configure all networks, including
slow internet access networks that are not to be used as interconnects, and
may cause the tcp lnet packets to be incorrectly routed.
HP recommends that you do not use the -a|--all option unless you have
detected a problem such as a network not being configured by the
sfsconfig command.
-s|--server name Adds a named HP SFS server to the list of servers that the client is to connect
to. (May be used more than once to specify more than one server.)
-u|--unload
Specifies that the command is to attempt to unload lnet modules before
reconfiguring the /etc/modprobe.conf or /etc/modules.conf file.
Unloading the lnet modules ensures that the new settings will be used the
next time a Lustre file system is mounted on the node. If this option is not
used, the existing settings will still apply on the node, because modules only
read the /etc/modprobe.conf or /etc/modules.conf file when they
boot.
The --unload option may fail if there are applications using the lnet
modules on the client node. The sfsconfig command attempts to unmount
all mounted Lustre file systems before it unloads existing lnet modules.
If the --unload option fails, you must reboot the client node to bring the
new options lnet settings into effect.
A–2
-q|--quiet
Specifies that the command is to run in quiet mode and will not ask for
confirmation of actions during processing.
-v|--verbose
Displays verbose information.
-h|--help
Displays help on the usage of the command.
-V|--version
Displays the command version.
Using the sfsconfig command
The target can be one or more of the following:
conf
Specifies that the /etc/modprobe.conf or /etc/modules.conf file is
to be updated. The command configures the options lnet settings for all
interconnects that can be used to access the file systems served by the
identified or specified servers. You can later edit the /etc/
modprobe.conf or /etc/modules.conf file to restrict the interfaces
that can be used for mounting file systems.
tab
Specifies that the /etc/sfstab and the /etc/sfstab.proto files are to
be updated.
hosts
Specifies that the /etc/hosts file is to be updated. The command adds an
entry for each HP SFS system that will be accessed.
all
Specifies that all of the above targets are to be updated.
If no /etc/sfstab or /etc/sfstab.proto file exists on the client node, you must use the
-s|--server name option to specify an HP SFS server that needs to be accessed.
The sfsconfig command performs the following actions:
•
Enumerates the interconnects on the client node.
•
Checks if the modprobe.conf.lustre or modules.conf.lustre file exists.
•
Checks for the necessary option lnet entry in the modprobe.conf.lustre or
modules.conf.lustre file.
•
Lists the changes that are proposed.
•
Backs up the old file.
•
Adds the necessary entries to the configuration files.
If the /etc/sfstab and the /etc/sfstab.proto files are specified as targets (by specifying the conf
or all targets), the sfsconfig command converts the existing entries as follows:
•
Converts any mount directives that use the ldap protocol to the http: protocol (unless the
-L|--keepldap option is specified).
•
Comments out mount directives that use the http: protocol and adds equivalent directives using the
lnet: protocol (unless the -H|--keephttp option is specified).
If the command encounters problems when upgrading the files, it reports the reason for the problems. For
example, if any of the interconnects specified in the /etc/sfstab or /etc/sfstab.proto files do not
exist on the client node, the sfsconfig command reports the problem.
Examples
To add the appropriate options lnet settings and lquota entries to the /etc/modprobe.conf or
/etc/modules.conf file, enter the following command:
# sfsconfig conf
To convert the mount directives in the /etc/sfstab and /etc/sfstab.proto files to the lnet:
protocol, enter the following command:
# sfsconfig tab
The following command adds the appropriate options lnet settings and lquota entries to the
/etc/modprobe.conf or /etc/.modulesconf file and converts the mount directives in the
/etc/sfstab and /etc/sfstab.proto files to the lnet: protocol:
# sfsconfig all
To update the existing lnet: mount directives in the /etc/sfstab and /etc/sfstab.proto files
while keeping the existing ldap: and http: mount directives, enter the following command:
# sfsconfig -H -L tab
A–3
The following command adds the required options lnet setting to the /etc/modprobe.conf or
/etc/modules.conf file; it also updates the existing lnet: mount directives in the /etc/sfstab and
/etc/sfstab.proto files, while keeping the existing ldap: and http: mount directives:
# sfsconfig -H -L all
Pseudo mount options
Note that the following pseudo mount options are provided as part of the /etc/sfstab and
/etc/sfstab.proto mount options list for use by the sfsconfig command only. These options are
ignored by the sfsmount command:
server=name
Specifies the name of the HP SFS server on the external network.
fs=name
Specifies the name of the file system.
keepurl
Specifies that the address is not to be converted to an lnet address.
The sfsconfig command uses these options to verify file system access information. Specifying both the
server=name and fs=name pseudo mount options maximizes the usefulness of the sfsconfig
command.
A–4
Using the sfsconfig command
B
Options for Lustre kernel modules
This appendix is organized as follows:
•
Overview (Section B.1)
•
Setting the options lnet settings (Section B.2)
•
Modifying the /etc/modprobe.conf file on Linux Version 2.6 client nodes manually (Section B.3)
•
Modifying the /etc/modules.conf file on Linux Version 2.4 client nodes manually (Section B.4)
B–1
B.1
Overview
To support the functionality provided in HP SFS Version 2.2, the /etc/modprobe.conf and
/etc/modprobe.conf.lustre files or the /etc/modules.conf and
/etc/modules.conf.lustre files (depending on the client distribution) on the HP SFS client nodes must
be configured with the appropriate settings. You can use the sfsconfig command to modify the files
automatically (see Appendix A), or you can edit the files manually, as described in Section B.3 and
Section B.4.
(In the remainder of this Appendix, references to the /etc/modprobe.conf file can be understood to
include also the /etc/modprobe.conf.lustre file, and references to the /etc/modules.conf file
can be understood to include also the /etc/modules.conf.lustre file.)
The following configuration changes are needed to support the functionality provided in HP SFS
Version 2.2:
•
The options lnet settings in the /etc/modprobe.conf or /etc/modules.conf file must be
configured to enable the client node to use the Lustre networking module (LNET) to mount Lustre file
systems.
Note the following points:
•
•
Earlier releases of the HP SFS software used the ldap: protocol to mount file systems. In this
release, although the ldap: protocol is still supported (for backward compatibility), the lnet:
and http: protocols are preferred.
•
The lnet: protocol is the protocol that will most often be used for mounting Lustre file systems.
•
The ldap: protocol will not be supported in the next major release of the HP SFS software.
•
To use the http: protocol, the client node must have access to the HP SFS servers over a TCP/
IP network. The http: mount protocol is intended to provide a convenient way to mount a file
system without having to specify complex lnet: options. However, it is not appropriate for use
in systems where more than 32 client nodes may be mounting a file system at the same time (for
example, when the client nodes are booted).
•
You can restrict the Gigabit Ethernet interfaces that a client node uses for interaction with an HP
SFS system, by specifying options lnet settings only for the interfaces that are to be used.
The appropriate portals_compatibility option must be specified in the options lnet
settings.
HP SFS servers that are accessed by client nodes that have not been upgraded to HP SFS Version 2.2
must run in Portals compatibility mode. To support this functionality, the portals_compatibility
option must be specified on all HP SFS client nodes.
•
•
If any of the HP SFS systems that the client accesses is running in Portals compatibility mode, the
portals_compatibility attribute on the client node must be set to weak.
•
If none of the HP SFS systems that the client accesses is running in Portals compatibility mode,
the portals_compatibility attribute on the client must be set to none.
If quotas functionality is to be used, the appropriate lquota entries must be added to the
/etc/modprobe.conf or /etc/modules.conf file.
See Section B.2 for examples of options lnet settings in the /etc/modprobe.conf.lustre or
/etc/modules.conf.lustre file.
B–2
Options for Lustre kernel modules
B.2
Setting the options lnet settings
The options lnet settings are critical in ensuring both connectivity and performance when client nodes
access the HP SFS system. When you are determining the appropriate settings for the client nodes, take
account of the following rules:
•
There can only be one entry for any network type other than Gigabit Ethernet interconnects.
•
For Gigabit Ethernet networks, match the numerical identifier for a network and the identifier of the
server, if possible.
If a client node will connect to more than one HP SFS system and it is not possible to match the
numerical identifiers, use the next available identifier instead.
For all interconnect types other than Gigabit Ethernet, the numeric identifier is always 0.
•
When a client node connects to a non-bonded, dual Gigabit Ethernet interconnect, there are three
possible lnet options settings. The network chosen is dependant on the network topology and
the client address, as detailed below:
•
tcp0(ethX,ethY)
This setting specifies that the client node has dual Gigabit Ethernet links and can communicate
on both links. The ethX and ethY fields must be set to the appropriate client devices.
•
tcp1(ethX)
This setting specifies that the client node can communicate only with the first listed Gigabit
Ethernet interconnect on the HP SFS system (as shown by the sfsmgr show network
command on the HP SFS servers). This setting is used where a client node has a single Gigabit
Ethernet link that is on the same network as the first listed interconnect on the server.
•
tcp2(ethY)
This setting specifies that the client node can communicate only with the second listed Gigabit
Ethernet interconnect on the HP SFS system (as shown by the sfsmgr show network
command on the HP SFS servers). This setting is used where a client node has a single Gigabit
Ethernet link that is on the same network as the second listed interconnect on the server.
The following are examples of options lnet settings:
•
Quadrics interconnect; the client node accesses only HP SFS Version 2.2 servers that are not running
in Portals compatibility mode:
options lnet networks=elan0 portals_compatibility=none
•
Bonded Gigabit Ethernet interconnect; the client node accesses only HP SFS Version 2.2 servers that
are not running in Portals compatibility mode:
options lnet networks=tcp0(bond0) portals_compatibility=none
•
Gigabit Ethernet interconnect on eth1; the client node accesses HP SFS Version 2.2 servers, some of
which are running in Portals compatibility mode, and others that are not:
options lnet networks=tcp0(eth1) portals_compatibility=weak
•
Two (non-bonded) Gigabit Ethernet interconnects (eth1 and eth2), which the client node uses to
access different HP SFS systems, and an InfiniBand interconnect. The client node accesses only
HP SFS Version 2.2 servers that are not running in Portals compatibility mode:
options lnet networks=tcp0(eth1),tcp1(eth2),vib0 portals_compatibility=none
•
Two (non-bonded) Gigabit Ethernet interconnects grouped within a single lnet network, which the
client node uses to connect to an HP SFS system that is configured with a dual Gigabit Ethernet
interconnect. The client node accesses only HP SFS Version 2.2 servers that are not running in Portals
compatibility mode:
options lnet networks=tcp0(eth1,eth2) portals_compatibility=none
Setting the options lnet settings
B–3
•
Two (non-bonded) Gigabit Ethernet interconnects, which the client node uses to access two different
HP SFS systems. One of the HP SFS systems is configured with a dual Gigabit Ethernet interconnect;
the second HP SFS system is configured with a single Gigabit Ethernet interconnect. The client node
accesses only HP SFS Version 2.2 servers that are not running in Portals compatibility mode:
options lnet network=tcp0(eth1,eth2),tcp1(eth1) portals_compatibility=none
Section B.2.1 provides instructions for testing the options lnet settings in the configuration files.
B.2.1 Testing the options lnet settings
You can use the lctl ping command to test the options lnet settings in the /etc/modprobe.conf
or the /etc/modules.conf files by attempting to connect to a server where a specific Lustre file system’s
services are running. However, note the following constraints:
•
There must be no Lustre file system mounted on the node where you are performing the connectivity
test.
•
In cases where a Quadrics interconnect is used, you cannot use the lctl ping command to test
connectivity.
To test connectivity to a specific Lustre file system, perform the following steps:
1.
Make sure that the file system is started on the HP SFS server. Use the sfsmgr show filesystem
command on a server in the HP SFS system to view the state of the file systems.
2.
Load the lnet module on the client node, as follows:
# modprobe lnet
3.
Initialize all networks, by entering the following command:
# lctl net up
LNET configured
#
4.
Determine the NID of an appropriate server for use in the connectivity test, as follows:
a.
The server that the client node attempts to contact must be actively serving the file system’s
services; you can determine which servers are running a file system’s services by entering the
show filesystem filesystem_name command (on a server in the HP SFS system), as
shown in the following example. In this example, the south2, south3, or south4 servers
could be used in the connectivity test, because they are all running services in the data file
system:
sfs> show filesystem data
.
.
.
MDS Information:
Name
----mds6
LUN
--6
Array
----1
Controller
---------scsi-1/1
Files
-------469M
Used
---0%
Service State
------------running
Running on
---------south2
Controller
---------scsi-1/1
scsi-2/1
scsi-3/1
scsi-4/1
Size(GB)
-------2048
2048
2048
2048
Used
---14%
14%
14%
14%
Service State
------------running
running
running
running
Running on
---------south3
south4
south3
south4
OST Information:
Name
----ost6
ost7
ost8
ost9
B–4
LUN
--11
11
11
11
Array
----3
4
5
6
Options for Lustre kernel modules
b.
When you have identified an appropriate server for the test, enter the following command on
that server, to identify the NID of the server:
# lctl list_nids
34@elan
0xdd498cfe@gm
10.128.0.41@tcp
#
5.
Enter the lctl ping command to verify connectivity, as shown in the following example, where
server_nid is the NID identified in Step 4. If the connection is successful, the command returns a
list of the NIDs of the available servers:
# lctl ping server_nid
The following is an example of testing connectivity over a Myrinet interconnect:
# lctl ping 0xdd498cfe@gm
12345-0@lo
12345-34@elan
12345-0xdd498cfe@gm
12345-10.128.0.41@tcp
#
•
If there is a problem with connectivity, a message similar to the following is displayed.
failed to ping 10.128.0.41@tcp: Input/output error
If this happens, continue with the remaining steps in this procedure (the remaining steps are
needed to clean up the system after the test), and then examine your option lnet settings to
determine the cause of the problem.
•
6.
If the connection is successfully completed, continue with the remaining steps in this section.
These steps are needed to clean up the system after the test.
Unconfigure the lnet networks, by entering the following command:
# lctl net down
LNET ready to unload
#
7.
Identify and then remove all of the Lustre modules that were loaded on the client node as a result of
your tests, as shown in the following example. In this example, the kgmlnd and lnet modules were
loaded for the test:
# rmmod libcfs
ERROR: Module libcfs is in use by kgmlnd,lnet
# rmmod kgmlnd lnet libcfs
If the test failed, there is a problem with the options lnet settings in the (/etc/modprobe.conf or
/etc/modules.conf) configuration file on the client node. Correct the settings and then perform the test
again.
Setting the options lnet settings
B–5
B.3
Modifying the /etc/modprobe.conf file on Linux Version 2.6 client
nodes manually
TIP: You can restrict the Gigabit Ethernet interfaces that a client node uses for interaction with an HP SFS
system, by specifying options lnet settings only for the interfaces that are to be used.
On client nodes that are running a Linux 2.6 kernel, modify the /etc/modprobe.conf file as follows:
1.
Identify the correct settings for the interconnects that are to be used to connect to the HP SFS system.
2.
Create the /etc/modprobe.conf.lustre file.
3.
Add the following line to the /etc/modprobe.conf file:
include /etc/modprobe.conf.lustre
4.
To configure the options lnet settings on the client node, add an entry to the
/etc/modprobe.conf.lustre file to specify the networks that are to be used to connect to the
HP SFS system. Use the following syntax:
options lnet option1=value1 [option2=value2...]
The syntax of the supported options is as follows:
networks=network1[,network2...]
portals_compatibility=weak|none
When listing the networks, put the fastest interconnect first in the networks option list; this ensures
that the fastest interconnect will be used (where possible) for file system I/O operations.
The following example shows the entry for a system that uses a Gigabit Ethernet interconnect and a
Myrinet interconnect. In this example, none of the servers that the client will access are running in
Portals compatibility mode:
options lnet networks=gm0,tcp0(eth1) portals_compatibility=none
See Section B.2 for more examples of options lnet settings.
5.
To enable the client node to use quotas functionality, add the following lines to the
/etc/modprobe.conf.lustre file:
install lov /sbin/modprobe lquota ; /sbin/modprobe
install mdc /sbin/modprobe lquota ; /sbin/modprobe
install osc /sbin/modprobe lquota ; /sbin/modprobe
remove mdc /sbin/modprobe -r --ignore-remove mdc ;
B.4
--ignore-install lov
--ignore-install mdc
--ignore-install osc
/sbin/modprobe -r lquota
Modifying the /etc/modules.conf file on Linux Version 2.4 client
nodes manually
TIP: You can restrict the Gigabit Ethernet interfaces that a client node uses for interaction with an HP SFS
system, by specifying options lnet settings only for the interfaces that are to be used.
On client nodes that are running a Linux 2.4 kernel, modify the /etc/modules.conf file as follows:
1.
Identify the correct settings for the interconnects that are to be used to connect to the HP SFS system.
2.
Create the /etc/modules.conf.lustre file.
3.
Add the following line to the /etc/modules.conf file:
include /etc/modules.conf.lustre
B–6
Options for Lustre kernel modules
4.
To configure the options lnet settings on the client node, add an entry to the
/etc/modules.conf.lustre file to specify the networks that are to be used to connect to the
HP SFS system. Use the following syntax:
options lnet option1=value1 [option2=value2...]
The syntax of the supported options is as follows:
networks=network1[,network2...]
portals_compatibility=weak|none
When listing the networks, put the fastest interconnect first in the networks option list; this ensures
that the fastest interconnect will be used (where possible) for file system I/O operations.
The following example shows the entry for a system that uses a Gigabit Ethernet interconnect and a
Myrinet interconnect. In this example, none of the servers that the client will access are running in
Portals compatibility mode:
options lnet networks=gm0,tcp0(eth1) portals_compatibility=none
See Section B.2 for more examples.
5.
To enable the client node to use quotas functionality, add the following lines to the
/etc/modules.conf.lustre file:
add below lov lquota
add below mdc lquota
add below osc lquota
post-remove mdc /sbin/modprobe -r lquota
Modifying the /etc/modules.conf file on Linux Version 2.4 client nodes manually
B–7
B–8
Options for Lustre kernel modules
C
Building an HP SFS client kit manually
This appendix describes how to build an HP SFS client kit manually (that is, not using the sample script
provided by HP).
The appendix is organized as follows:
•
Overview (Section C.1)
•
Building the HP SFS client kit manually (Section C.2)
•
Output from the SFS Client Enabler (Section C.3)
•
Locating the python-ldap and hpls-diags-client packages (Section C.4)
C–1
C.1
Overview
The build_SFS_client.sh example script provided on the HP StorageWorks Scalable File Share Client
Software CD-ROM works for many common distributions, and HP recommends that you use it if possible.
The use of the script is described in Section 3.2.
However, if the script does not work for your client distribution, you can build the kit manually, as described
in this appendix.
The specific instructions for building an HP SFS client kit for your client systems may vary depending on your
client distribution. In most cases, any user that has an rpm build environment configured can build an
HP SFS client kit. There are two exceptions, as follows; in these cases, the kit must be built as the root user:
C.2
•
When the script is being run on a SLES 9 SP3 system
•
When the script is being used to build the InfiniBand interconnect driver
Building the HP SFS client kit manually
TIP: In some of the steps in this procedure, you have a choice between building RPM files or using an
alternative process (for example, in Step 14, you can build a kernel RPM file or create a built kernel tree).
In general, HP recommends that you build the RPM files, because you can deploy the RPM files on multiple
client nodes.
Only in cases where only one client node will be used, or each client node is unique, or where RPM files
cannot be deployed, should you use the alternative processes.
To build the HP SFS client kit manually, perform the following steps:
1.
Ensure that the prerequisites for building a client kit (as described in Section 3.2.1) are in place.
2.
Create the directory where you will perform the build.
For the purposes of the examples, this will be assumed to be the /build/SFS_client_build/
directory, for which the following commands would be used:
$ mkdir -p /build/SFS_client_build/
$ cd /build/SFS_client_build/
3.
4.
In the directory you created, create the following subdirectories:
•
src/
•
build/
•
output/
•
tools/
Set and export the PATH environment variable to include tools/bin, as follows:
$ export PATH=/build/SFS_client_build/tools/bin:"${PATH}
5.
If your versions of the autoconf and automake utilities are not as specified in Section 3.2.1,
rebuild the appropriate versions under the tools/ directory, as follows:
$
$
$
$
$
$
$
$
$
$
C–2
cp /mnt/cdrom/client_enabler/src/common/autotools/auto*.tar.gz tools/
cd tools/
tar -xzpf autoconf-2.59.tar.gz
cd autoconf-2.59
./configure --prefix=/build/SFS_client_build/tools
cd ../
tar -xzpf automake-1.7.9.tar.gz
cd automake-1.7.9
./configure --prefix=/build/SFS_client_build/tools
cd ../../
Building an HP SFS client kit manually
6.
If you wish to build RPM files, it is best to create an rpmmacros file (if one does not already exist for
the build user). This is created in the output/ directory and will result in all RPM activity taking
place in that directory, including the resulting RPM files being placed there. To create this file enter the
commands shown in the following example (changing text where appropriate for your build
environment and directories):
$ echo "#
# Macros for using rpmbuild
#
%_topdir
/build/SFS_client_build/output/
%_rpmtopdir
%{_topdir}
%_tmppath
%{_rpmtopdir}/tmp
%buildroot
%{_rpmtopdir}/root
%_builddir
%{_rpmtopdir}/build
%_sourcedir
%{_rpmtopdir}/src
%_specdir
%{_rpmtopdir}/specs
%_rpmdir
%{_rpmtopdir}/rpms
%_srcrpmdir
%{_rpmdir}/srpms
%packager
bob@builder
%vendor
Hewlett-Packard
%distribution Hewlett-Packard SFS Custom client
%_unpackaged_files_terminate_build 0
%_missing_doc_files_terminate_build 0" > output/.rpmmacros
$ mkdir -p output/tmp output/root output/build output/src output/specs
output/rpms/srpms
$ export HOME=/build/SFS_client_build/output/
7.
If necessary, copy the appropriate kernel sources to the src/ directory, as shown in the following
example. These sources are not modified during the build process.
NOTE: If your kernel source files are already extracted, retain a directory name and do not copy
the Linux kernel sources directly into the src/ directory.
$ cp -pR /usr/src/linux-2.4.21 src/
If you are building a kernel RPM file, you will need to start with a kernel SRPM file, as shown in the
following example:
$ cp -p /mnt/cdrom/client_enabler/src/common/kernels/RedHat/EL3/kernel-2.4.2140.EL.src.rpm src/
8.
Copy the Lustre source file from the client_enabler/src/common/lustre directory on the HP
StorageWorks Scalable File Share Client Software CD-ROM to the src/ directory, as shown in the
following example:
$ cp -p /mnt/cdrom/client_enabler/src/common/lustre/lustre-V1.4.tgz src/
9.
If your interconnect is a Quadrics interconnect (supported version is Version 5.11.3) or Myrinet
interconnect (supported version is Version 2.1.23), copy the interconnect driver sources to the src/
directory, as shown in the following examples.
The following example copies the sources for the Quadrics interconnect driver:
$ cp -p
/mnt/cdrom/client_enabler/src/common/qsnet/qsnetmodules-5.23.2qsnet.p1.tar.bz2
/mnt/cdrom/client_enabler/src/common/qsnet/qsnetpatches-RedHat-2.4.2140.EL.qp2.0_hp.tar.bz2 src/
The following example copies the Myrinet interconnect driver sources:
$ cp -p /mnt/cdrom/client_enabler/src/common/gm/gm-2.1.26-hpls.src.rpm src/
10. If your client kernel has additional patches listed in the client_enabler/src/arch/distro/
patches/series file, copy the additional patches from the HP StorageWorks Scalable File Share
Client Software CD-ROM to the src/ directory, as shown in the following example:
$ cp /mnt/cdrom/client_enabler/src/x86_64/RHEL3.0_U7/patches/* src/
Building the HP SFS client kit manually
C–3
11. If your client has additional Lustre patches listed in the client_enabler/src/arch/distro/
lustre_patches/series file, copy the additional patches from the HP StorageWorks Scalable
File Share Client Software CD-ROM to the src/ directory, as shown in the following example:
$ cp -p
/mnt/cdrom/client_enabler/src/i686/SuSE_9.0/lustre_patches/
SuSE_python2.3_bug2309.patch src/
12. Copy the lustre_client source file from the client_enabler/src/common/
lustre_client directory on the HP StorageWorks Scalable File Share Client Software CD-ROM to
the src/ directory, as shown in the following example:
$ cp -p
/mnt/cdrom/client_enabler/src/common/lustre_client/lustre_client.tgz src/
13. Copy the diags_client source file from the client_enabler/src/common/diags_client
directory on the HP StorageWorks Scalable File Share Client Software CD-ROM to the src/
directory, as shown in the following example:
$ cp -p
/mnt/cdrom/client_enabler/src/common/diags_client/diags_client.tgz src/
14. Build the kernel.
There are two alternative processes for building the kernel; you can create an RPM file, or you can
create a built kernel tree; both of these processes are described here.
To create a kernel RPM file, perform the following steps:
a.
Install the kernel SRPM file, as follows:
b.
Add the Lustre patches, as follows:
$ rpm -ivh src/kernel-2.4.21-40.EL.src.rpm
i.
Extract the Lustre sources, as follows:
$ cd build
$ tar -xzpf ../src/lustre-V1.4.tgz
$ cd ..
ii.
Copy the Lustre patches from the Lustre source tree into the output/src directory and
modify the kernel.spec file appropriately.
iii.
Copy all files listed in the appropriate series file under the build/lustre-V1.4/
lustre/kernel_patches/series/ directory into the output/src directory, as
follows:
$ for i in $(cat build/lustre-V1.4/lustre/kernel_patches/series/clientrh-2.4.21-40); do cp
build/lustre-V1.4/lustre/kernel_patches/patches/"$i" output/src/; done
iv.
c.
Add the appropriate PatchNN: <patch_name> and %patchNN -p1 lines to the
kernel.spec file (output/specs/kernel.spec). Add the patches in the order they
appear in the series file.
Determine whether any kernel patches are required for the interconnect; if any are needed, add
them now.
Most interconnects will not require any kernel patches. Refer to your interconnect manufacturer
for information on whether any patches are needed for your interconnect, and how the patches
are to be added.
The following are two extracts from a kernel.spec file that add the qsnet patches (for a
Quadrics interconnect) to the kernel:
Source40: qsnetpatches-RedHat-2.4.21-40.EL.qp2.0_hp.tar.bz2
tar -xjf $RPM_SOURCE_DIR/qsnetpatches-RedHat-2.4.21-40.EL.qp2.0_hp.tar.bz2
cd qsnetpatches-RedHat-2.4.21-40.EL.qp2.0_hp/
tar -xjpf qsnetpatches.tar.bz2
cd ../
cat qsnetpatches-RedHat-2.4.21-40.EL.qp2.0_hp/qsnetpatches/*.patch | patch p1
C–4
Building an HP SFS client kit manually
d.
Add the additional required patches to the kernel.spec file in the same way that you applied
the Lustre patches. See Section 3.2.6 for a list of additional patches.
You can find the additional patches in the src directory; the series file (which lists the
patches) is on the HP StorageWorks Scalable File Share Client Software CD-ROM under the
client_enabler/src/arch/distro/patches/ directory.
The following is an example of the command that you would use to copy the required patches
into the output/src/ directory:
$ for i in $(cat /mnt/cdrom/client_enabler/src/x86_64/RHEL3.0_U7/patches/
client_RHEL3_U7_series);
do cp src/"$i" output/src/; done
e.
f.
Modify the kernel.spec file, as follows:
•
Set the release to a unique identifier so that this kernel can be easily distinguished from the
standard kernel.
•
Turn off all build targets except the build target that is appropriate for your system.
Modify the kernel config files as appropriate for your system and your interconnects.
For example, the following settings are required for an x86_64 architecture system with a
Quadrics interconnect:
#
# Quadrics QsNet device support
#
CONFIG_QSNET=m
CONFIG_ELAN3=m
CONFIG_ELAN4=m
CONFIG_EP=m
CONFIG_EIP=m
CONFIG_RMS=m
CONFIG_JTAG=m
CONFIG_IOPROC=y
CONFIG_PTRACK=y
#
# Set the stack size
#
# CONFIG_NOBIGSTACK is not set
CONFIG_STACK_SIZE_16KB=y
# CONFIG_STACK_SIZE_32KB is not set
# CONFIG_STACK_SIZE_64KB is not set
CONFIG_STACK_SIZE_SHIFT=2
You can find the config files in the output/src directory. (Note that you can generate a
customized and correct config file by following the instructions (provided below) for creating a
built kernel tree.)
g.
Build the kernel, by entering the following command:
$ rpmbuild -ba output/specs/kernel.spec
h.
Copy the built kernel sources from the output/build to the build/ directory, and fix the
tree, as follows:
$
$
$
$
cp -pr output/build/kernel-2.4.21/linux-2.4.21/ build/
cd build/linux/
make dep
cd ../../
Building the HP SFS client kit manually
C–5
To create a built kernel tree, perform the following steps:
a.
Extract the kernel sources from the src/ directory and put them in the build/linux/
directory, as shown in the following example:
$
$
$
$
b.
mkdir -p build/linux
cd src/linux-2.4.21/
tar -cpf - ./ | (cd ../../build/linux; tar -xpf -;)
cd ../../
Apply the Lustre patches, as follows.
i.
Extract the Lustre source files, as follows:
$ cd build
$ tar -xzpf ../src/lustre-V1.4.tgz
$ cd ..
ii.
Apply the patches listed in the appropriate series file (under the build/lustreV1.4/lustre/kernel_patches/series/ directory) to the kernel tree, as follows:
$ for i in $(cat build/lustre-V1.4/lustre/kernel_patches/series/clientrh-2.4.21-40); do cat
build/lustre-V1.4/lustre/kernel_patches/patches/"$i" | (cd build/linux;
patch -p1); done
c.
If any patches are needed for the interconnect, apply them now. The following is an example of
applying the qsnet patches for a Quadrics interconnect:
$ tar -xjf src/qsnetpatches-RedHat-2.4.21-40.EL.qp2.0_hp.tar.bz2
$ cd qsnetpatches-RedHat-2.4.21-40.EL.qp2.0_hp/
$ tar -xjpf qsnetpatches.tar.bz2
$ cd ../
$ cat qsnetpatches-RedHat-2.4.21-40.EL.qp2.0_hp/qsnetpatches/*.patch | (cd
build/linux; patch -p1)
d.
Apply the additional required patches to the kernel sources in the same way that you applied
the Lustre patches in Step b of this procedure. See Section 3.2.6 for an example list of additional
patches.
You can find the additional patches in the src directory; you can find the series file (which
lists the patches) in the /mnt/cdrom/client_enabler/src/arch/distro/patches/
directory.
The following is an example of the command that you would use to apply the patches:
$ for i in $(cat
/common/linux/kits/lustre/jimi_clients/current/SFS_V2_2_South_ce_cd/
client_enabler/src/x86_64/RHEL3.0_U7/patches/client_RHEL3_U7_series);
do cat src/"$i" | (cd build/linux; patch -p1); done
e.
Regenerate the kernel config file.
•
If it is necessary for your system requirements, modify the config file.
•
If the config file does not require any customizations for your requirements, enter the
following commands:
$ cd build/linux
$ make oldconfig
$ cd ../../
NOTE: Note that if you are using an x86_64 or i686 system, you must configure the following
setting:
CONFIG_STACK_SIZE_16KB=y
f.
Build the kernel and modules.
Depending on your client distribution and architecture, the command line varies. For example,
for i686 (ia32), ia32e (em64t), x86_64 architectures, the command is as follows:
$ make dep clean; make bzImage modules
For ia64 architectures, the command is as follows:
$ make dep clean; make compressed modules
C–6
Building an HP SFS client kit manually
15. Build the interconnect driver trees.
•
If you are building the HP SFS client kit with support for a Voltaire InfiniBand interconnect, see
Section 3.2.2.1; perform Steps 1 through 9 of that section.
•
For other interconnect types, refer to your interconnect manufacturer's instructions for this task.
16. Build Lustre, as follows:
a.
Extract the Lustre sources, as follows:
$ cd build
$ tar -xzpf ../src/lustre-V1.4.tgz
$ cd ..
b.
Configure the Lustre sources.
Note that different options are required for different architectures, as follows:
•
If you are configuring support for a Myrinet interconnect, you must add the following
options to the configure command line (changes will be required for specific
distributions and architectures):
--with-gm=/build/SFS_client_build/build/gm-2.1.26_Linux
--with-gm-libs=/build/SFS_client_build/build/gm-2.1.26_Linux/binary/
.gm_uninstalled_libs/lib64/.libs
--with-gm-install=/build/SFS_client_build/build/gm-2.1.26_Linux/binary/
.gm_uninstalled_libs
•
If you are configuring support for a Quadrics interconnect, you must add the following
option to the configure command line:
--with-qsnet=/build/user/neil/U4/build//qsnetmodules-5.23.2qsnet//BUILD/
qsnetmodules-5.23.2qsnet
•
If you are configuring support for a Voltaire InfiniBand interconnect, you must add the
following option to the configure command line:
--with-vib=/build/SFS_client_build/build/vib
The following is an example of configuring the Lustre sources:
$ cd build/lustre-V1.4
$ sh -x autogen.sh
$ ./configure --with-linux=/build/SFS_client_build/build/linux/
--disable-oldrdonly-check --disable-ldiskfs --enable-clientonly
--disable-hostname-resolution --with-rpmarch=x86_64 --libdir=/usr/lib64
--enable-POSIX-filelocking --disable-liblustre --disable-doc --disableserver
$ cd ../../
c.
Build the Lustre tree, as follows. Note that the make rpm command is optional; it creates the
Lustre RPM files:
$
$
$
$
cd build/lustre-V1.4
make
make rpm
cd ../../
17. Build the hpls-lustre-client software.
There are two alternative processes for building the hpls-lustre-client software: you can
create RPM files, or you can build a tree. Both of these methods are described here.
To create hpls-lustre-client RPM files, perform the following steps:
a.
Extract the sources, as follows:
$ cd build
$ tar -xzpf ../src/lustre_client.tgz
$ cd lustre_client
Building the HP SFS client kit manually
C–7
b.
Generate the spec file, by entering the following commands:
$ m4 -D_VERSION=2.2 -D_RELEASE=0 -D_LICENSE=commercial
-D_URL=http://www.hp.com/go/hptc -D_DISTRIBUTION="%{distribution}"
-D_VENDOR="SFS client manual" -D_PACKAGER=put_your_email_address_here
-D_HPLS_INSTALL_DIR="/usr/opt/hpls" -D_STANDALONE_BUILD=1 lustreclient.spec.m4
> ../../output/specs/lustre-client.spec
c.
Copy the hpls-lustre tarball file into the output/src directory, by entering the following
command:
$ cp hpls-lustre.tar.gz ../../output/src/
d.
Build the RPM file, as follows:
$ rpmbuild -ba ../../output/specs/lustre-client.spec
$ cd ../../
To build a hpls-lustre-client tree, perform the following steps:
a.
Extract the sources, as follows:
$
$
$
$
b.
cd build
tar -xzpf ../src/lustre_client.tgz
cd lustre_client
tar -xzpf hpls-lustre.tar.gz
Build the tree, as follows:
$ cd lustre
$ make STANDALONE_BUILD=1
$ cd ../../../
18. Build the hpls-diags-client software.
There are two alternative processes for building the hpls-diags-client software: you can create
RPM files, or you can build a tree. Both of these methods are described here.
To create hpls-diags-client RPM files, perform the following steps:
a.
Extract the sources, as follows:
$ cd build
$ tar -xzpf ../src/diags_client.tgz
$ cd diags_client
b.
Generate the spec file, by entering the following commands:
$ m4 -D_VERSION=2.2 -D_RELEASE=0 -D_LICENSE=commercial
-D_URL=http://www.hp.com/go/hptc -D_DISTRIBUTION="%{distribution}"
-D_VENDOR="SFS client manual" -D_PACKAGER=put_your_email_address_here
-D_HPLS_INSTALL_DIR="/usr/opt/hpls" -D_STANDALONE_BUILD=1 diags.spec.m4 >
../../output/specs/diags.spec
c.
Copy the hpls-diags tarball file into the output/src directory, by entering the following
command:
$ cp hpls-diags.tar.gz ../../output/src/
d.
Build the RPM file, as follows:
$ rpmbuild -ba ../../output/specs/diags.spec
$ cd ../../
To build a hpls-diags-client tree, perform the following steps:
a.
Extract the sources, as follows:
$
$
$
$
b.
cd build
tar -xzpf ../src/diags_client.tgz
cd diags_client
tar -xzpf hpls-diags.tar.gz
Build the tree, as follows:
$ cd diags
$ make STANDALONE_BUILD=1
$ cd ../../../
C–8
Building an HP SFS client kit manually
C.3
Output from the SFS Client Enabler
When you build an HP SFS client kit manually, the output directories for the RPM files are as follows:
On RHEL systems:
•
/usr/src/redhat/RPMS/
•
/usr/src/redhat/SRPMS/
On SLES 9 systems:
•
/usr/src/packages/RPMS/
•
/usr/src/packages/SRPMS/
If you made any changes to the process described in Section C.2, your output directories may be different.
If you created and used the rpmmacros file as described in Step 6 in Section C.2, your output directories
will be under the output/rpms/ directory.
In the output directories, you will find the following files, which you will use for installing the client software
on the client node:
•
kernel-smp-version_number.rpm
This package will not be created for SLES 9 systems (it is not needed for these systems). The standard
kernel is already patched to an appropriate level, so no new patches are required.
•
lustre-version_number.rpm
•
lustre-modules-version_number.rpm
•
gm-version_number.rpm
This file is present only if you built support for a Myrinet interconnect driver.
•
qsnetmodules-version_number.rpm
This file is present only if you built support for a Quadrics interconnect driver.
•
hpls-lustre-client-version_number.rpm
•
hpls-diags-client-version_number.rpm
CAUTION: There are other RPM files in the output directories; do not use these files.
C.4
Locating the python-ldap and hpls-diags-client packages
When you are installing the client software, you will need to install the python-ldap package, and you
also have the option of installing the hpls-diags-client package. When you use the SFS Client
Enabler to build your own HP SFS client kit, these files are not included in the kit. You can locate these
packages as follows:
•
python-ldap
For some distributions, the python-ldap package provided on the source media for the distribution
is not suitable for use with the HP SFS software. For such distributions, HP provides a modified version
of the python-ldap package in the appropriate directory for the client architecture/distribution
combination on the HP StorageWorks Scalable File Share Client Software CD-ROM. If a modified
version of the package is provided for your client architecture/distribution, you must install that
version of the package.
If a modified version of the python-ldap package is not provided for your client architecture/
distribution, you must install the python-ldap package provided in the source media for your
distribution (if it is not already installed).
Output from the SFS Client Enabler
C–9
•
hpls-diags-client
If possible, use the version of the hpls-diags-client package that you built when you created
the HP SFS client kit. However, if the package failed to build, you can find the hpls-diagsclient package on the HP StorageWorks Scalable File Share Client Software CD-ROM, in the
appropriate directory for your particular client architecture/distribution combination.
C–10
Building an HP SFS client kit manually
Glossary
administration server
The ProLiant DL server that the administration service runs on. Usually the first server in the system.
See also administration service
administration service The software functionality that allows you to configure and administer the HP SFS system.
See also administration server
ARP
Address Resolution Protocol. ARP is a TCP/IP protocol that is used to get the physical address of a client
node or server. The system that sends the ARP request broadcasts the IP address of the system it is
attempting to communicate with. The request is processed by all nodes on the subnet and the target node
returns its physical address to the sending node.
default
A value or parameter that is automatically set by an application or process when an alternate is not
provided by means external to that application or process.
distribution media
The media that is used to make software kits available for installation. The HP SFS system software is
typically distributed on CD-ROM.
DHCP
Dynamic Host Control Protocol. A protocol that dynamically allocates IP addresses to computers on a
local area network.
DNS
Domain Name Service. A general-purpose data query service chiefly used to translate host names into
Internet addresses.
domain
A branch of the Internet. A domain name is a logical name assigned to an Internet domain. A fully
qualified domain name is the full name of a domain specified all the way to the root domain.
Dynamic Host Control See DHCP
Protocol
fabric (Fibre Channel)
The host bus adapters (HBAs), cables, and Fibre Channel switches that make up a storage area network
(SAN).
fabric (interconnect)
A collection of hardware that makes up an interconnect. See interconnect network.
file system
See Lustre File System
firmware
The instructions stored in non volatile devices (for example, ROM or EPROM) on a peripheral controller or
system CPU board. On a peripheral controller, firmware is the instruction that is responsible for the
peripheral’s operation. Firmware is also the first instruction that runs when a system is turned on.
fully qualified host
name
A host name that is specified all the way to the root domain. For example, south1.my.domain.com is
a fully qualified host name.
See also domain
gateway
A routing device that connects two or more networks. Local data is isolated to the appropriate network,
and non-local data is passed through the gateway.
golden image
A collection of files that are distributed to one or more client systems.
iLO
Integrated Lights Out. A self-contained hardware technology available on ProLiant DL servers that allows
remote management of any server within the system.
Integrated Lights Out
See iLO
interconnect network
The interconnect network links each server to each client system and is used to transfer file data between
servers and clients. The interconnect comprises an interconnect adapter in each host, cables connecting
hosts to switches, and interconnect switches.
interconnect switch
The hardware component that routes data between hosts attached to the interconnect network.
Glossary–1
Internet address
A unique 32-bit number that identifies a host’s connection to an Internet network. An Internet address is
commonly represented as a network number and a host number and takes a form similar to the following:
192.168.0.1.
internet protocol
See IP
IP
Internet Protocol. The network layer protocol for the Internet protocol suite that provides the basis for the
connectionless, best-effort packet delivery service. IP includes the Internet Control Message Protocol
(ICMP) as an integral part. The Internet protocol suite is referred to as TCP/IP because IP is one of the two
most fundamental protocols.
IP address
See Internet address
Jumbo packets
Ethernet packets that are larger than the Ethernet standard of 1500 bytes.
kernel
The core part of the operating system that controls processes, system scheduling, memory management,
input and output services, device management, network communications, and the organization of the file
systems.
LND
Lustre Networking Device layer that implements a network type.
LNET
Lustre Networking Model API.
Lustre File System
A networked file system that is coherent, scalable, parallel, and targeted towards high performance
technical computing environments.
MAC address
Machine Access Control Address; also known as a hardware address. The physical address that
identifies an individual Ethernet controller board. A MAC address is a 48-bit number that is typically
expressed in the form xx-xx-xx-xx-xx where x is a hexadecimal digit or a-f.
MDS server
The ProLiant DL server that the MDS service runs on. Usually the second server in the system.
See also MDS service
MDS service
The software that serves meta-data requests from clients and Object Storage Servers. There is an MDS
service associated with each file system.
See also MDS server
mount
The operation of attaching a file system to an existing directory and making the file system available for
use. Lustre file systems are mounted using the sfsmount(8) command.
See also unmount
mount point
A directory that identifies the point in the file system where another file system is to be attached.
MPI
Message Passing Interface. A library specification for message-passing, proposed as a standard by a
broadly based committee of vendors, implementors, and users.
MTU
Maximum Transfer Unit. The largest IP packet size that can be sent or received by a network interface.
netmask
A 32-bit bit mask that shows how an Internet address is to be divided into network and host parts.
network
Two or more computing systems that are linked for the purpose of exchanging information and sharing
resources.
Network File System
See NFS
NFS
Network File System. A service that allows a system (the server) to make file systems available across a
network for mounting by other systems (clients). When a client mounts an NFS file system, the client’s
users see the file system as if it were local to the client.
NFS mounted
A file system that is mounted over a network by NFS rather than being physically connected (local) to the
system on which it is mounted.
See also NFS
NID
Lustre networking address. Every node has one NID for each network.
Glossary–2
Object Storage Server A ProLiant DL server that OST services run on.
See also OST service
OST service
The Object Storage Target software subsystem that provides object services in a Lustre file system.
See also Object Storage Server
Portals
A message passing interface API used in HP SFS versions up to and including Version 2.1-1.
Python
Python is an interpreted, interactive, object-oriented programming language from the Python Software
Foundation (refer to the www.python.org Web site).
reboot
To bring the system down to the firmware level and restart the operating system.
RHEL
Red Hat Enterprise Linux.
role
A system function that is explicitly assigned to one or more servers in the system. The following roles can
be assigned to servers: administration server, MDS (meta-data) server, Object Storage Server.
root
The login name for the superuser (system administrator).
See also superuser
root login
See root
rsh
Remote shell. A networking command to execute a given command on a remote host, passing input to it
and receiving output from it.
Samba
Software that allows a non-Window server to export file systems to Windows clients. Samba is an
implementation of the CIFS file sharing protocol.
SLES
SUSE Linux Enterprise Server.
ssh
Secure Shell. A shell program for logging into and executing commands on a remote computer. It can
provide secure encrypted communications between two untrusted hosts over an insecure network.
superuser
A user possessing privileges to override the normal restrictions on file access, process control, and so
forth. A user who possesses these privileges becomes a superuser by issuing the su command, or by
logging into the system as the user root.
TCP/IP
The standard Ethernet protocol that was developed for Internet networking; it encompasses both a
network layer and transport layer protocols. TCP provides for reliable, connection-oriented data transfer.
unmount
The process that announces to the system that a file system previously mounted on a specified directory is
to be removed. Lustre file systems are unmounted using the sfsumount(8) command.
See also mount
URL
Uniform Resource Locator. The address of a file or other resource accessible on the Internet. The type of
file or resource depends on the Internet application protocol. For example, using the HyperText Transfer
Protocol (HTTP), the file can be an HTML page, an image file, or a program such as a CGI application or
Java applet. Such an address would look like this: http://www.hp.com, which is the URL for the HP
corporate Web site.
Glossary–3
Glossary–4
Index
C
client configurations
additional tested configurations 1-6
configurations that do not work with
HP SFS 1-9
untested configurations 1-7
client enabler
additional steps for InfiniBand
interconnect 3-7
building a client kit manually C-1
building a client kit using the sample
script 3-5
prerequisites 3-4
client kit
additional steps for InfiniBand
interconnect 3-7
building manually C-1
building using sample script 3-5
prerequisites for building 3-4
client nodes
downgrading Red Hat Enterprise
Linux and SUSE Linux Enterprise
Server 9 SP3 client nodes 3-22
downgrading XC client nodes 2-12
installing Red Hat Enterprise Linux
and SUSE Linux Enterprise Server 9
SP3 client nodes 3-13
installing XC client nodes 2-2
prerequisite packages 3-12
upgrading Red Hat Enterprise Linux
and SUSE Linux Enterprise Server 9
SP3 client nodes 3-19
upgrading XC client nodes 2-9
configuring
client node as NFS server 5-3
firewalls on client nodes 2-5, 3-19
interconnects on client nodes 2-4,
3-17
NTP server 2-5, 3-19
D
downgrading
Red Hat Enterprise Linux and SUSE
Linux Enterprise Server 9 SP3 client
nodes 3-22
XC client nodes 2-12
Dual Gigabit Ethernet interconnect,
troubleshooting 7-9
E
EIO error 6-4
ENOSPC error 6-4
F
failure to mount or unmount Lustre file
system 7-3
file stripe patterns, defining 6-2
file system state, viewing information
4-16
file systems
mounting at boot time 4-9
unmounting on client nodes 4-7
firewalls, configuring on client nodes
2-5, 3-19
I
initrd file 7-2
Installing 3-1
Red Hat Enterprise Linux and SUSE
Linux Enterprise Server 9 SP3 client
nodes 3-13
installing
XC client nodes 2-2, 3-12
interconnect interfaces, restricing on
client nodes 4-16
interconnects
configuring on client nodes 2-4,
3-17
L
LBUG error 7-7
lfs df command 6-4
lfs executable 6-2
lfs find command 6-4
lock revocations 6-10
Lustre file system
overview 1-2
performance hints 6-7
user interaction 6-2
See also file systems
Lustre timeout attribute, changing 6-11
M
mounting file systems
at boot time 4-9
N
naming conventions ix
NFS
client configuration 5-5
optimizing NFS performance 5-5
server configuration 5-3
supported configurations 5-2
NFS protocol
accessing Lustre file systems 5-1
NTP server, configuring on client nodes
2-5, 3-19
P
Portals compatibility
disabling 2-11, 3-22
options lnet settings B-2
using for interoperability 1-4
python2 package, checking if loaded
3-18
R
Red Hat Enterprise Linux client nodes
downgrading 3-22
installing 3-13
upgrading 3-19
rm -rf command, improving
performance 6-8
S
Samba
accessing Lustre file systems 5-1
SFS client enabler 3-2, 3-3
SFS service
cancel command 4-13
disabling 4-13
enabling 4-13
help command 4-13
reload command 4-12
start command 4-12
status command 4-13
stop command 4-12
using 4-9
sfslstate command 4-16
sfstab file, rebuilding at boot time 4-10
sfstab.proto file 4-10
editing 4-12
slocate, configuring 2-5, 3-19
SMB protocol
accessing Lustre file systems 5-1
stripe size, setting default on a directory
6-4
SUSE Linux Enterprise Server 9 SP3
client nodes
downgrading 3-22
installing 3-13
upgrading 3-19
T
timeout parameters, tuning 6-10
timeouts and timeout tuning 6-9
troubleshooting Dual Gigabit Ethernet
7-9
U
unmounting file systems on client nodes
4-7
upgrading
Red Hat Enterprise Linux and SUSE
Linux Enterprise Server 9 SP3 client
nodes 3-19
XC client nodes 2-9
Index–1
V
viewing file system state information
4-16
X
XC client nodes
downgrading HP SFS software 2-12
installing HP SFS software 2-2, 3-12
upgrading HP SFS software 2-9
Index–2