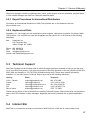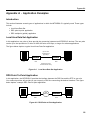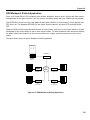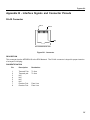
1
MT56DSU-S Syncronous 56K bps Data Service Unit User Guide MT56DSU-S User Guide PN: S000327A Copyright ©2003 by Multi-Tech Systems, Inc. All rights reserved. This publication may not be reproduced, in whole or in part, without prior written permission from MultiTech Systems, Inc. Multi-Tech Systems, Inc. makes no representations or warranties with respect to the contents hereof and specifically disclaims any implied warranties of merchantability or fitness for any particular purpose. Furthermore, Multi-Tech Systems, Inc. reserves the right to revise this publication and to make changes from time to time in the content hereof without obligation of Multi-Tech Systems, Inc. to notify any person or organization of such revisions or changes. Revision A Date Description 12/30/2003 Initial release of MT56DSU-S User Manual on CD. Trademarks MultiTech and the MultiTech logo are trademarks of Multi-Tech Systems, Inc. All other references are trademarks of their respective companies. Technical Support France India U.K. U.S., Canada Rest of World [email protected] [email protected] [email protected] [email protected] [email protected] World Headquarters Multi-Tech Systems, Inc. 2205 Woodale Drive Mounds View, Minnesota 55112 U.S.A. (763) 785-3500 or (800) 328-9717 U.S. FAX (763) 785-9874 Technical Support (800) 972-2439 www.multitech.com +33 1-64 61 09 81 +91 124 6340778 +44 118 959 7774 1 800 972-2439 +763 717-5863 Contents Chapter 1.1 1.2 1.3 1.4 1 - Introduction ..................................................................................... 5 Introduction ............................................................................................. 6 About This Manual .................................................................................. 6 Description ............................................................................................. 7 CSU/DSU Basics ................................................................................... 7 1.4.1 1.4.2 1.5 1.6 DSU Functions ..................................................................................... 7 CSU Functions ..................................................................................... 7 Features ................................................................................................. 8 Specifications ......................................................................................... 9 Chapter 2 - Front & Back Panel Descriptions ................................................ 10 2.1 Introduction ........................................................................................... 11 2.2 Front Panel ........................................................................................... 11 2.3 Back Panel ........................................................................................... 12 2.3.1 2.3.2 2.3.3 2.4 2.5 POWER Connector ............................................................................. 12 RS232 Connector ................................................................................ 12 LINE Connector .................................................................................. 12 Switch Settings ..................................................................................... 13 Shunts .................................................................................................. 14 Chapter 3 - Unpacking & Setup ....................................................................... 15 3.1 Introduction ........................................................................................... 16 3.2 Unpacking ............................................................................................. 16 3.3 Telecom Safety Warnings ..................................................................... 16 3.4 Setup .................................................................................................... 17 3.5 V.35 Shunt ............................................................................................ 18 Chapter 4 - Diagnostics .................................................................................... 19 4.1 Introduction ........................................................................................... 20 4.1.1 4.1.2 4.1.3 4.1.4 Loopback Test .................................................................................... 20 Line Loopback Test ............................................................................ 21 DSU Loopback Test ............................................................................ 21 DSU Back-to-Back Test ..................................................................... 22 Chapter 5 - Service & Warranty ....................................................................... 23 5.1 Multi-Tech Systems, Inc. Warranty & Repairs Policies ......................... 24 5.1.1 5.1.2 5.1.3 5.1.4 5.2 Repairs ................................................................................................. 26 5.2.1 5.2.2 5.2.3 5.2.4 5.3 5.4 Warranty ............................................................................................. 24 U.S. and Canadian Customers ............................................................ 24 International Customers (outside U.S.A. and Canada) ........................ 25 International Distributors ..................................................................... 25 Repair Procedures for U.S. and Canadian Customers ........................ 26 Repair Procedures for International Customers ................................... 26 Repair Procedures for International Distributors .................................. 27 Replacement Parts ............................................................................. 27 Technical Support ................................................................................. 27 Internet Site .......................................................................................... 27 Appendix ............................................................................................................ 28 Appendix A - Application Examples ................................................................ 29 Introduction ...................................................................................................... 29 Local Area Data Set Application ...................................................................... 29 DDS Point-To-Point Application ....................................................................... 29 DDS Multipoint (Polled) Application ................................................................. 30 Appendix B - Interface Signals and Connector Pinouts ................................. 31 RJ-48 Connector .............................................................................................. 31 DB25S Connector ............................................................................................ 32 DB25S Connector with V.35 Interface ............................................................. 33 Loopback Cable (MTS P/N 45640100) ............................................................ 34 Back-To-Back Cable (MTS P/N 45050000) ..................................................... 35 Appendix C - Regulatory Information ............................................................. 36 FCC Regulations for Telephone Line Interconnection ...................................... 36 Canadian Limitations Notice ............................................................................ 37 Chapter 1 - Introduction Chapter 1 - Introduction 1.1 Introduction The Multi-Tech Systems MultiDSU, model number MT56DSU-S is a synchronous 56 Kbps data service unit (DSU). As a combined DSU and Channel Service Unit (CSU), it provides a direct connection to the DATAPHONE® Digital Service (DDS) network. The MT56DSU-S connects a synchronous Data Terminal Equipment (DTE) device to remote equipment using DDS network lines at 56 Kbps speeds for point-to-point and multi-point service. Figure 1-1. MultiDSU Modem 1.2 About This Manual Chapter 1 - Introduction contains an introduction to the MT56DSU-S product and its features and functions. Chapter 2 - Front and Rear Panel Descriptions provides front panel LED descriptions and rear panel connector descriptions, DIP-switch settings, and an RS232/V.35 shunt description. Chapter 3 - Unpacking and Setup provides unpacking, safety warnings, setup procedures, and how to change the shunt from the default RS232 position to the V.35 position. Chapter 4 - Diagnostic Testing explains how to set up and run a diagnostic test. Chapter 5 - Service and Warranty provides instructions on getting service for your MultiDSU at the factory, a statement of the limited warranty, information about our user bulletin board service, and space for recording information about your MultiDSU prior to calling Multi-Tech's Technical Support. The final three sections explain how to use our bulletin board service (BBS), and get support through CompuServe and the Internet. Appendix A - Application Examples illustrates several DSU/CSU uses that may help in understanding your particular installation site. Appendix B - Interface Signal and Connector Pinouts lists the various electronic signals and connector pinouts related to the MT56DSU-S. Appendix C - Regulatory Information 6 Chapter 1 - Introduction 1.3 Description The MT56DSU-S is compact, easy to operate and has the features to allow flexibility in meeting your transmission requirements. The DDS is a service for transmission of digital signals via digital transmission facilities exclusively. The MT56DSU-S is designed to meet AT&T Technical Publication 62310 requirements. As such, the MT56DSU-S provides all the functions required on the customer side of the network. You will find the MT56DSU-S easy to install, use and maintain. It is recommended that you read the entire manual early in your experience with the MT56DSU-S so you can appreciate all of the MT56DSU-S features and options. 1.4 CSU/DSU Basics A DSU (Data Service Unit) and a CSU (Channel Service Unit) are typically connected to provide the interface between DTE (data terminal equipment) and a DDS or other four-wire network. The DSU processes serial synchronous digital data over the DDS network or other four-wire unloaded twisted-pair network. The MT56DSU-S contains the functions of a DSU and CSU in a single package. 1.4.1 DSU Functions The DSU encodes data as pulses on the communications line by converting the customer data stream to bipolar format for transmission over the digital network. 1.4.2 CSU Functions The CSU terminates the digital circuit at the customer site. It performs line conditioning functions, ensures network compliance with FCC rules, and responds to test commands (either from the Telco central office (CO) or from the DSU). The figure below shows the MT56DSU-S in a basic DDS network installation. DDS Network DTE DSU DSU DTE Figure 1-2. Basic DSU/CSU Configuration 7 Chapter 1 - Introduction 1.5 Features The MT56DSU-S provides many useful features. Standard features include V.35 and EIA-232-D interfaces on the data port (DTE device) and a synchronous rate of 56 Kbps on both the data port and trunk, and userselectable clocking option. Your Multi-Tech DSU/CSU provides the following features: Supports direct connection to the DATAPHONE Digital Data Service (DDS) or compatible network Standard EIA-232-D and V.35 interfaces on the data port (DTE device) and DDS interface on the line • Multiple selectable clocking - Internal clocking - DDS (slave) clocking • Multiple MT56DSU-S-activated diagnostic tests - Local loopback test - Digital loopback test • Multiple Telco-activated diagnostic tests - DSU loopback test - CSU loopback test 8 Chapter 1 - Introduction 1.6 Specifications Model Number: Device Operation: Data Rates: Synchronous Interfaces: Data (RS232) Data (V.35) Line (DDS) Power Requirements: Temperature: Humidity: Dimensions: Weight: Certification: Compatibility: FIC Codes: USOC Jack: Transmitter/Receiver: Modulation Transmit Level Output Impedance Receive Levels Input Impedance Delay Times (in secs.) MT56DSU-S combined DSU and CSU 56 Kbps (Data port and line) DB25S (female) - Data port DB25S (female) - Data port with an adapter cable RJ-48 8-position keyed jack - Line 115V AC, 50-60 Hz, 2 Watts 32 to 120° F (0 to 50° C) 20 to 90% (non-condensing) 1" H x 4.125" W x 5.5" D 2.5 cm H x 10.8 cm W x 14.2 cm D 8 oz. (224 g) FCC Part 15 Class B FCC Part 68 UL Listed AT&T Pubs 62310 04DU5-56 RJ-48S bipolar return to zero (BRZ) 1.4V peak (+6dBm) into 135 Ohm at 56 Kbps 135 ohms +6 to -45 dBm 135 ohms RTS/CTS DCD on DCD off 0.4 0.3 0.2 9 Chapter 2 - Front & Back Panel Descriptions Chapter 2 - Front & Back Panel Descriptions 2.1 Introduction This chapter describes the front panel LEDs and back panel connectors. The front panel has one row of LEDs. Two back panel connectors provide the data and DDS or LADS connections. A circular power connector is provided to connect the external power supply. 2.2 Front Panel The front panel has five LEDs that provide the status of the line. The V35 LED lights if V.35 interface signaling is used. The line LEDs display status whether the line is transmitting or receiving frames, and line status. Figure 2-1. Front Panel TD Transmit Data (TD) LED blinks when data is being transmitted - on for a space and off for a mark. RD Receive Data (RD) LED blinks when data is being received - on for a space and off for a mark. V35 The V35 LED lights when the shunt is in the V35 position. NS The No Signal (NS) LED lights when no signal is received from the network or when the signal is too weak for normal operation. OOS The Out Of Service (OOS) LED lights when an outage condition occurs. This happens when there is a failure in the digital service that is detected by the network and the Telco sends a repetitive OOS sequence. CD The Carrier Detect (CD) LED lights when a carrier signal is received from the network. 11 Chapter 2 - Front & Back Panel Descriptions 2.3 Back Panel All the cable connections, including one power connection and two signal connections, are made at the back panel of the DSU. The RS232 connector is used to connect the DSU to an RS232 or V.35 device, and the LINE connector connects to a DDS or LADS (Local Area Data Set) circuit. The cable connections are shown in Figure 2-2 and defined in the following sections. POWER RS232 LINE Figure 2-2. Back Panel 2.3.1 POWER Connector The POWER connector is used to connect the external wall type transformer power supply to the DSU. The wall transformer plugs directly into an AC outlet. 2.3.2 RS232 Connector The RS232 (Data) connector is used to connect the DSU to a sync device, such as, multiplexers, routers, or legacy equipment such as cluster controllers. The RS232 connector is a DB-25 female connector located on the back panel of the DSU. The RS232 data connector interface can be switched to a V.35 interface. For the V.35 interface, an internal data shunt has to be moved from the default RS232 position to the V.35 position. To change the shunt, refer to the "Shunt" paragraph in this chapter. Also refer to Appendix A for special cabling requirements for the V.35 mode. 2.3.3 LINE Connector The LINE connector is used to connect the DSU to a 56K DDS circuit or LADS. This connector is an RJ-48 (keyed) jack on the back panel of the unit. 12 Chapter 2 - Front & Back Panel Descriptions 2.4 Switch Settings An 8-position DIP switch is located on the right side of the MT56DSU-S printed circuit board (when viewed from the front, as in Figure 2-3). The DIP switch functions are described in the following table. 1 2 3 4 5 6 7 8 DIP-Switch Figure 2-3. Switch Settings Table 2-1. Switch Settings Switch Mode Position Description 1 Reset 2 Clocking 3 Loopback UP* DOWN UP* DOWN UP* DOWN Normal Reset DDS Internal Normal Loopback 4-8 Not Used *Factory default setting 13 Chapter 2 - Front & Back Panel Descriptions 2.5 Shunts V.35 signal levels are more reliable for high speed data and/or longer cable distances. For higher speeds and/or longer distances, V.35 is preferred. EIA-232-D signal levels are intended for data rates of 19.2 Kbps or less and cable lengths of 50 feet or less. There are two shunt positions in the middle left side of the printed circuit board that configure the data port for either RS232 or V.35 operation. The shunt positions are shown in Figure 2-3. V.35 Shunt Position RS232 Shunt Position Figure 2-3. Shunts The shunt position closest to the DIP switches is for RS232 data interface and the other one is for V.35 data interface. The shunt is shown in the RS232 (default) position in Figure 2-3. To change the position of a shunt, refer to the V.35 Shunt in Chapter 3. 14 Chapter 3 - Unpacking & Setup Chapter 3 - Unpacking & Setup 3.1 Introduction This chapter describes the unpacking of the DSU, cable connections depending on whether EIA-232-D or ITU-T V.35 interface signaling is used on the data port, and how to configure the unit dependent on your site situation. Once the DSU is configured, then the data port can be connected to your data device. 3.2 Unpacking The shipping box contains the DSU, power adapter, and a documentation CD with a User's Guide. Inspect the contents for signs of any shipping damage. If damage is observed, do not power up the unit, contact Multi-Tech's Technical Support for advice (refer to Chapter 5 - Warranty). If no damage is observed, place the DSU in its final location and verify the signal levels (EIA-232-D or ITU-T V.35) for the data port, and connect your cables, phone lines, and power supply. 3.3 Telecom Safety Warnings 1. Never install telephone wiring during a lightning storm. 2. Never install telephone jacks in wet locations unless the jack is specifically designed for wet locations. 3. This product for use with UL and cUL listed computers. 4. Never touch uninsulated telephone wires or terminals unless the telephone line has been disconnected at the network interface. 5. Use caution when installing or modifying telephone lines. 6. Avoid using a telephone (other than a cordless type) during an electrical storm. There may be a remote risk of electrical shock from lightning. 7. Do not use the telephone to report a gas leak in the vicinity of the leak. 8. To reduce the risk of fire, use only 26AWG or larger telecommunications cord. 16 Chapter 3 - Unpacking & Setup 3.4 Setup Perform the following procedure to connect your cables and, if necessary, change to V.35 signaling on the data port. 1. If the DTE device has a V.35 interface, the internal shunt must be moved to the V.35 position and a V.35 adapter cable must be connected to the data connector (labeled “RS232”). Refer to V.35 Shunt for procedures on moving the shunt to the V.35 position. Refer to Appendix A for cable details. If the DTE device has an EIA-232-D interface, a standard RS232 (straight-thru) cable can be used. POWER RS232 LINE To DTE Device To Power Outlet To Line Jack Figure 3-1. Back Panel Connections 2. Connect the external wall transformer power supply to the DSU, then plug the power supply into a live AC outlet. The DSU has no power switch; however, when power is applied to the unit, the front panel LEDs will light. 3. Connect the DTE device to the RS232 connector on the back of the DSU. 4. Connect an RJ-48 phone cable to the LINE connector on the back of the DSU. Connect the other end of the phone cable to the local access line jack. 17 Chapter 3 - Unpacking & Setup 3.5 V.35 Shunt Either EIA-232-D or ITU-T V.35 electrical signal interface can be selected on the Data connector. Units are shipped with EIA-232-D signal levels selected. Use the following procedure to select V.35. CAUTION : This procedure requires opening the unit. Like most products of this type, this product contains components that are sensitive to static and static discharge. Use your best efforts to avoid static discharge when contacting the components inside this unit. WARNING: Always disconnect the power cord before opening the enclosure to avoid any chance of electric shock. 1. Unplug the power cord. 2. The enclosure consists of two halves. Using a Phillips screwdriver, remove the two screws from the bottom of the unit. Remove the top half. 3. Carefully pry the shunt out of its RS232 socket and insert it into the V.35 socket. V.35 Shunt Position RS232 Shunt Position Figure 3-2. Shunts 4. Carefully reassemble the unit, making sure no foreign objects are accidentally left inside. 5. The DSU is now configured for V.35 signal levels. To connect to a device with a 34-pin Winchester female V.35 connector, use an adapter cable with a 25-pin female connector at one end and a 34-pin Winchester male connector at the other end. Using the signal pin designations in Appendix A, you can make or order a cable from most any cable vendor. 18 Chapter 4 - Diagnostics Chapter 4 - Diagnostics 4.1 Introduction The DSU is set to a default of Normal (non-diagnostic) mode at the factory. When diagnostics are to be run, change the Loopback DIP switch as described in Chapter 2 of this manual. When a failure occurs in the digital facility (Telco equipment), the network will detect the failure and send a repetitive OOS signal sequence to your equipment. Your equipment can detect local loop failure by the absence or distortion of the digital signal. If an OOS is received when data is expected, check the remote (farend) transmitting equipment. If the remote equipment is transmitting properly, contact your telephone company. If the Telco is required to perform remote tests, the channel will be temporarily interrupted and loss of data may occur. The following sections describe the tests that are available for the DSU. 4.1.1 Loopback Test This test allows you to test the local DTE and local DSU. Use the following steps to perform the Loopback Test. 1. Set DIP switch #3 to the down position. 2. Send data from your DTE, it should be “looped back” to your DTE. If you have access to a Bit Error Rate Tester, this can be used in place of the DTE. DTE (Or BERT Tester) Local DSU (In Loopback Test Mode) Figure 4-1. Loopback Test Diagram 20 Chapter 4 - Diagnostics 4.1.2 Line Loopback Test This test enables you to test the local DTE, the local DSU, the communications link, and the remote DSU. Use the following steps to perform the Trunk Loopback Test. 1. Set DIP switch #3 on the remote DSU to the down position. 2. Send data from the local DTE, it should be looped back to the local DTE. If you have access to a Bit Error Rate Tester, this can be used in place of the local DTE. Network Local DTE (or BERT Tester) Local DSU Remote DSU (In Line Loopback Test Mode) Figure 4-2. Line Loopback Test Diagram 4.1.3 DSU Loopback Test This test lets you verify proper DSU operation by matching a transmitted signal to the “looped-back” receive signal. Refer to Appendix B for cable description. 1. Obtain a DSU Loopback cable (#45640100) from Multi-Tech, or assemble one. Refer to Appendix B for instructions on building the Loopback cable. 2. Plug the Loopback cable into the back panel Line jack. 3. Send data from your DTE, it should be “looped back” to your DTE. If you have access to a Bit Error Rate Tester, this can be used in place of the DTE. Loopback Cable DTE DSU being tested Figure 4-3. DSU Loopback Test 21 Chapter 4 - Diagnostics 4.1.4 DSU Back-to-Back Test This test lets you connect two DSUs with a back-to-back cable to verify proper DSU operation. Using a DSU that is known to be operational, you can test a second DSU that is suspect. 1. Obtain a DSU Back-to-Back cable (#45050000) from Multi-Tech, or assemble one. Refer to Appendix B for instructions on building the Back-to-Back cable. 2. Plug the cable into each DSU’s Line jack. 3. On the “good” DSU, set DIP switch #3 to the down position. 4. Set one DSU to internal clocking and the other DSU to DDS clocking. 5. Send data from your DTE, it should be “looped back” to your DTE. If you have access to a Bit Error Rate Tester, this can be used in place of the DTE. DTE “Suspect” DSU Back-to-Back Cable “Good” DSU in Loopback Mode Figure 4-4. DSU Back-to-Back Test Diagram 22 Chapter 5 - Service & Warranty Chapter 5 - Service & Warranty 5.1 Multi-Tech Systems, Inc. Warranty & Repairs Policies 5.1.1 Warranty Multi-Tech Systems, Inc., (hereafter “MTS”) warrants that its products will be free from defects in material or workmanship for a period of two, five, or ten years (depending on model) from date of purchase, or if proof of purchase is not provided, two, five, or ten years (depending on model) from date of shipment. MTS MAKES NO OTHER WARRANTY, EXPRESS OR IMPLIED, AND ALL IMPLIED WARRANTIES OF MERCHANTABILITY AND FITNESS FOR A PARTICULAR PURPOSE ARE HEREBY DISCLAIMED. This warranty does not apply to any products which have been damaged by lightning storms, water, or power surges or which have been neglected, altered, abused, used for a purpose other than the one for which they were manufactured, repaired by Customer or any party without MTS’s written authorization, or used in any manner inconsistent with MTS’s instructions. MTS’s entire obligation under this warranty shall be limited (at MTS’s option) to repair or replacement of any products which prove to be defective within the warranty period or, at MTS’s option, issuance of a refund of the purchase price. Defective products must be returned by Customer to MTS’s factory – transportation prepaid. MTS WILL NOT BE LIABLE FOR CONSEQUENTIAL DAMAGES, AND UNDER NO CIRCUMSTANCES WILL ITS LIABILITY EXCEED THE PRICE FOR DEFECTIVE PRODUCTS. 5.1.2 U.S. and Canadian Customers In the event that service is required, products may be shipped, freight prepaid, to our Mounds View, Minnesota, factory: Multi-Tech Systems, Inc. 2205 Woodale Drive Mounds View, MN 55112 Attn: Repairs, Serial #______ A Returned Materials Authorization (RMA) is not required. Return shipping charges (surface) will be paid by MTS. Please include inside the shipping box a description of the problem, a return shipping address (must have street address, not P.O. Box), a telephone number, and if the product is out of warranty, a check or purchase order for repair charges. For out of warranty repair charges, go to: www.multitech.com. Extended two-year overnight replacement agreements are available for selected products. Please call MTS at 888 288-5470, extension 5308, or visit our web site at www.multitech.com for details on rates and coverages. Please direct your questions regarding technical matters, product configuration, verification that the product is defective, etc., to our Technical Support department at 800 972-2439 or e-mail [email protected]. Please direct your questions regarding repair expediting, receiving, shipping, billing, etc., to our Repair Accounting department at 800 328-9717 or +763 785-3500, or e-mail [email protected]. Repairs for damages caused by lightning storms, water, power surges, incorrect installation, physical abuse, or user-caused damages are billed on a time-plus-materials basis. 24 Chapter 5 - Service & Warranty 5.1.3 International Customers (outside U.S.A. and Canada) Your original point of purchase reseller may offer the quickest and most economical repair option for your Multi-Tech product. You may also contact any Multi-Tech sales office for information about the nearest distributor or other repair service for your Multi-Tech product: www.multitech.com. In the event that factory service is required, products may be shipped, freight prepaid, to our Mounds View, Minnesota, factory. Recommended international shipment methods are via Federal Express, UPS or DHL courier services, or by airmail parcel post; shipments made by any other method will be refused. A Returned Materials Authorization (RMA) is required for products shipped from outside the U.S.A. and Canada. Please contact us for return authorization and shipping instructions on any international shipments to the U.S.A. Please include inside the shipping box a description of the problem, a return shipping address (must have street address, not P.O. Box), your telephone number, and if the product is out of warranty, a check drawn on a U.S. bank or your company’s purchase order for repair charges. Repaired units will be shipped freight collect, unless other arrangements are made in advance. Please direct questions regarding technical matters, product configuration, verification that the product is defective, etc., to our Technical Support department nearest you, as listed at http://www.multitech.com/ COMPANY/offices/DEFAULT.ASP., or e-mail [email protected]. When calling the U.S., please direct questions regarding repair expediting, receiving, shipping, billing, etc., to our Repair Accounting department at +763 717-5631 in the U.S.A., or e-mail [email protected]. Repairs for damages caused by lightning storms, water, power surges, incorrect installation, physical abuse, or user-caused damages are billed on a time-plus-materials basis. 5.1.4 International Distributors Procedures for international distributors of Multi-Tech products are on the Distributor Web site at http:// www.multitech.com/PARTNERS/login/. 25 Chapter 5 - Service & Warranty 5.2 Repairs 5.2.1 Repair Procedures for U.S. and Canadian Customers In the event that service is required, products may be shipped, freight prepaid, to our Mounds View, Minnesota factory: Multi-Tech Systems, Inc. 2205 Woodale Drive Mounds View, MN 55112 Attn: Repairs, Serial # ____________ A Returned Materials Authorization (RMA) is not required. Return shipping charges (surface) will be paid by MTS. Please include, inside the shipping box, a description of the problem, a return shipping address (must have street address, not P.O. Box), your telephone number, and if the product is out of warranty, a check or purchase order for repair charges. For out of warranty repair charges, go to www.multitech.com Extended two-year overnight replacement service agreements are available for selected products. Please call MTS at (888) 288-5470, extension 5308 or visit our web site at: www.multitech.com for details on rates and coverages. Please direct your questions regarding technical matters, product configuration, verification that the product is defective, etc., to our Technical Support department at (800) 972-2439 or email [email protected]. Please direct your questions regarding repair expediting, receiving, shipping, billing, etc., to our Repair Accounting department at (800) 328-9717 or (763) 717-5631, or email [email protected]. Repairs for damages caused by lightning storms, water, power surges, incorrect installation, physical abuse, or user-caused damages are billed on a time-plus-materials basis. 5.2.2 Repair Procedures for International Customers Your original point of purchase Reseller may offer the quickest and most economical repair option for your Multi-Tech product. You may also contact any Multi-Tech sales office for information about the nearest distributor or other repair service for your Multi-Tech product. Visit our website at: www.multitech.com In the event that factory service is required, products may be shipped, freight prepaid to our Mounds View, Minnesota factory. Recommended international shipment methods are via Federal Express, UPS or DHL courier services, or by airmail parcel post; shipments made by any other method will be refused. A Returned Materials Authorization (RMA) is required for products shipped from outside the U.S.A. and Canada. Please contact us for return authorization and shipping instructions on any International shipments to the U.S.A. Please include, inside the shipping box, a description of the problem, a return shipping address (must have street address, not P.O. Box), your telephone number, and if the product is out of warranty, a check drawn on a U.S. bank or your company’s purchase order for repair charges. Repaired units shall be shipped freight collect, unless other arrangements are made in advance. Please direct your questions regarding technical matters, product configuration, verification that the product is defective, etc., to our Technical Support department nearest you or email [email protected]. When calling the U.S., please direct your questions regarding repair expediting, receiving, shipping, billing, etc., to our Repair Accounting department at: +(763) 717-5631 in the U.S.A., or email [email protected]. 26 Chapter 5 - Service & Warranty Repairs for damages caused by lightning storms, water, power surges, incorrect installation, physical abuse, or user-caused damages are billed on a time-plus-materials basis. 5.2.3 Repair Procedures for International Distributors Procedures for International Distributors of Multi-Tech products are on the distributor web site: www.multitech.com 5.2.4 Replacement Parts SupplyNet, Inc., can supply you with replacement power supplies, cables and connectors for selected MultiTech products. You can place an order with SupplyNet via mail, phone, fax or the Internet at the following addresses: Mail: SupplyNet, Inc. 614 Corporate Way Valley Cottage, NY 10989 Phone: 800 826-0279 Fax: 914 267-2420 Email: [email protected] Internet: http://www.thesupplynet.com 5.3 Technical Support Multi-Tech Systems has an excellent staff of technical support personnel available to help you get the most out of your Multi-Tech product. If you have any questions about the operation of this unit, please call 800 9722439 (USA and Canada) or 763 785-3500 (international and local). Please have modem information available. You can also contact Technical Support by e-mail at the following addresses: Country Email Telephone U.S.A., Canada France: India: U.K.: Rest of world: [email protected] [email protected] [email protected] [email protected] [email protected] 800 972-2439 +(33) 1-64 61 09 81 +91 (124) 6340778 +(44) 118 959 7774 +763 717-5863 Please note the status of the modem before contacting Technical Support. Status information can include the state of the LED indicators, screen messages, diagnostic test results, problems with a specific application, etc. 5.4 Internet Site Multi-Tech is a commercial provider on the Internet. Multi-Tech has a Web site at: www.multitech.com. 27 Appendix Appendix Appendix A - Application Examples Introduction This section illustrates several types of applications in which the MT56DSU-S is typically used. These types include: Local Area Data Set DDS point-to-point application DDS multipoint (polled) application Local Area Data Set Application In this application, two pairs of wires provide the connection between two MT56DSU-S devices. The two pairs can be up to the equivalent of 3 miles of AWG #26 wire at 56 Kbps, or longer for subrate applications. The figure below depicts a typical Local Area Data Set application. Up to 3 miles of AWG 26 wire @ 56 Kbps DTE DSU DSU DTE (Requires two pairs of interconnection wires) Figure A-1. Local Area Data Set Application DDS Point-To-Point Application In this application, the MT56DSU-S provides the interface between the DDS line and the DTE at your site. Your network provider will provide (at your request) a DDS line connecting the desired locations. The figure below depicts a sample DDS Point-to-point application. DDS Network DTE DSU DSU DTE Figure A-2. DDS Point-to-Point Application 29 Appendix DDS Multipoint (Polled) Application Since your Central Office (CO) equipment must include “Multipoint Junction Units” (MJUs) and other special arrangements for this type of service, you may need to coordinate efforts with your network service provider. The MT56DSU-S at the host end is the Master Station (also called the “Control Station”), which typically has RTS forced on. The attached MT56DSU-Ss are called “Remote stations” and have RTS controlled by the DTE. Multipoint DDS provides communication between a control station and two or more remote stations. All data transmitted by the control station is sent to each remote station. For data transmitted from the remote stations, the MJUs combine bit streams from the remote stations into a single, serial bit stream sent to the control station. The figure below shows a typical Multipoint (Polled) application. DSU (“Master Station”) Host with Database Application DDS Network with Multipoint Equipment DTE DSU (“Remote Station”) DSU (“Remote Station”) DTE DTE DSU (“Remote Station”) DSU (“Remote Station”) DTE Figure A-3. DDS Multipoint (Polled) Application 30 Appendix Appendix B - Interface Signals and Connector Pinouts RJ-48 Connector Pin 1 Pin 8 Key As viewed from the rear Figure B-1. Connector DESCRIPTION This connector ties the MT56DSU-S to the DDS Network. The RJ-48 connector is keyed for proper insertion of a keyed RJ-48 plug. PIN IDENTIFICATION Pin Description Destination 1 2 3 4 5 6 7 8 Transmit Pair Transmit pair N/C N/C N/C N/C Receive Pair Receive Pair To Line To Line From Line From Line 31 Appendix DB25S Connector 13 25 12 24 11 10 23 9 22 8 21 20 7 6 19 5 18 4 17 3 16 2 15 1 14 Figure B-2. Connector DESCRIPTION This connector ties the MT56DSU-S to the DTE. The DB25S connector has the following pinout configuration. PIN IDENTIFICATION Pin Description Signal 1 2 3 4 5 6 7 8 15 17 20 Chassis Ground Transmit Data Received Data Request To Send Clear To Send Data Set Ready Signal Ground Carrier Detect Transmit Clock Receive Clock Data Terminal Ready SD RD RTS CTS DSR SG CD TC RC DTR 32 Appendix DB25S Connector with V.35 Interface 13 25 12 24 11 10 23 22 9 8 21 20 7 6 19 5 18 4 17 3 16 2 15 1 14 Figure B-3. Connector DESCRIPTION The DB25 connector also ties the MT56DSU-S to a DTE with a V.35 interface. When a V.35 interface device is connected to a MT56DSU-S, the internal shunt has to be moved to the V.35 position. The V.35 interface for the DB25 connector has the following pinout configuration. PIN IDENTIFICATION Pin 1 7 4 5 6 8 20 2 12 3 22 15 21 17 18 Description Chassis Ground Signal Ground Request To Send Clear To Send Data Set Ready Carrier Detect Data Terminal Ready Transmit Data (A) Transmit Data (B) Receive Data (A) Receive Data (B) Transmit Clock (A) Transmit Clock (B) Receive Clock (A) Receive Clock (B) 33 Appendix Loopback Cable (MTS P/N 45640100) 1 8 Figure B-5. Loopback Cable Connector DESCRIPTION This cable lets you test the MT56DSU-S when a second DSU is not available. When the DSU generates a signal, this cable “loops” the signal back to the DSU for comparison to the original signal sent. You can order this cable (#45640100) from Multi-Tech, or build one using the instructions below. Refer to Chapter 4 for test procedures. SCHEMATIC 1 2 3 4 RJ48S 5 6 7 8 TRANSMIT TRANSMIT RECEIVE RECEIVE 6" Figure B-6. BUILD INSTRUCTIONS 1. Strip cable insulation 3/4" 2. Cut wires 3, 4, 5, 6 off. 3. Strip wires 1, 2, 7, 8 1/4" 4. Solder wires 1 and 8 together. 5. Solder wires 2 and 7 together. 6. Cover solder connections with 1" of shrink tube. 34 Appendix Back-To-Back Cable (MTS P/N 45050000) 1 8 Figure B-7. Back-toBack Cable Connector DESCRIPTION This cable lets you test a suspect DSU by connecting it to a known good DSU. It tests the suspect DSU by connecting its Transmit signal to the Receive circuits of the good DSU. You can order this cable from MultiTech (#45050000), or build one using the instructions below. Refer to Chapter 4 for test procedures. SCHEMATIC 8 7 6 5 4 RJ48S 3 2 1 1 2 3 4 RJ48S 5 6 7 8 7" Figure B-8. BUILD INSTRUCTIONS 1. Strip cable installation 3/4". 2. Strip wires 1,2,7 and 8 on one end of cable and 8,7,2 and 1 on other end 1/4". 3. Cut unstripped wires off. 4. Solder wire 1 on one connector to 8 on the other. 5. Solder wire 2 on one connector to 7 on the other. 6. Solder wire 7 on one connector to 2 on the other. 7. Solder wire 8 on one connector to 1 on the other. 8. Cover solder connections with 1" of shrink tube. 35 Appendix Appendix C - Regulatory Information FCC Regulations for Telephone Line Interconnection 1. This equipment complies with Part 68 of the FCC rules. On the outside surface of this equipment is a label that contains, among other information, the FCC registration number and ringer equivalence number (REN). If requested, this information must be provided to the telephone company. 2. As indicated below, the suitable jack (USOC) connecting arrangement for this equipment is shown in Appendix B. If applicable, the facility interface codes (FIC) and service order codes (SOC) are also indicated. 3. The ringer equivalence number (REN) is used to determine the quantity of devices which may be connected to the telephone line. Excessive REN’s on the telephone line may result in the devices not ringing in response to an incoming call. In most, but not all areas, the sum of the REN’s should not exceed five (5.0). To be certain of the number of devices that may be connected to the line, as determined by the total REN’s, contact the telephone company to determine the maximum REN for the calling area. 4. If this equipment causes harm to the telephone network, the telephone company will notify you in advance. But if advance notice isn’t practical, the telephone company will notify the customer as soon as possible. Also, you will be advised of your right to file a complaint with the FCC if you believe it is necessary. 5. The telephone company may make changes in its facilities, equipment, operations, or procedures that could affect the operation of the equipment. If this happens, the telephone company will provide advance notice in order for you to make necessary modifications in order to maintain uninterrupted service. 6. If trouble is experienced with this equipment (the model of which is indicated below) please contact Multi-Tech Systems, Inc. at the address shown below for details of how to have repairs made. If the trouble is causing harm to the telephone network, the telephone company may request you remove the equipment from the network until the problem is resolved. 7. No repairs are to be made by you. Repairs are to be made only by Multi-Tech Systems or its licensees. Unauthorized repairs void registration and warranty. 8. This equipment cannot be connected to public coin service provided by the telephone company. (Contact the state public utility commission, public service commission or corporation commission for information.) Manufacturer: Multi-Tech Systems, Inc. Model Number: MT56DSU-S FCC Pt 68 Registration #: AU7USA-24704-XD-N Ringer Equivalence: N/A SOC Codes: 6.0N Modular jack (USOC): RJ-48S Service Center in U.S.A.: Multi-Tech Systems, Inc. 2205 Woodale Drive Mounds View, MN 55112 USA (763) 785-3500 or (800) 328-9717 U.S. Fax (763) 785-9874 36 Appendix Canadian Limitations Notice Notice: The ringer equivalence number (REN) assigned to each terminal device provides an indication of the maximum number of terminals allowed to be connected to a telephone interface. The termination of a interface may consist of any combination of devices subject only to the requirement that the sum of the ringer equivalence numbers of all the devices does not exceed 5. Notice: The Industry Canada label identifies certificated equipment. This certification means that the equipment meets certain telecommunications network protective, operational and safety requirements. The Industry Canada does not guarantee the equipment will operate to the user’s satisfaction. Before installing this equipment, users should ensure that it is permissible to be connected to the facilities of the local telecommunications company. The equipment must also be installed using an acceptable method of connection. The customer should be aware that compliance with the above conditions may not prevent degradation of service in some situations. Repairs to certified equipment should be made by an authorized Canadian maintenance facility designated by the supplier. Any repairs or alterations made by the user to this equipment, or equipment malfunctions, may give the telecommunications company cause to request the user to disconnect the equipment. Users should ensure for their own protection that the electrical ground connections of the power utility, telephone lines and internal metallic water pipe system, if present, are connected together. This precaution may be particularly important in rural areas. Caution: Users should not attempt to make such connections themselves, but should contact the appropriate electric inspection authority, or electrician, as appropriate. 37 S000327A