1
OWNER’S MANUAL
FOR TECHNICAL ASSISTANCE
CONTACT:
Merit Industries, Inc. Customer Service Department
USA and Canada call toll-free:
1-800-445-9353
Outside the USA and Canada call: (215) 639-4700
FAX: (215) 639-5346
2525 State Rd., P.O. Box 5004, Bensalem, PA 19020-8529
merit industries, inc.
PM0109-0D
COPYRIGHT 1997 MERIT INDUSTRIES, INC.
Site Preparation
In determining the location for your Megatouch XL
video game, consideration must be given to a
suitable, grounded electrical outlet. Since the game
is a computerized device, it should have a separate
circuit, if at all possible. If a separate circuit is not
available, care should be taken to provide a clean
and constant voltage. As a basic guideline, never
connect the unit to a circuit that also supplies power
to freezers, coolers or other high power consuming
and electrical noise generating equipment.
the CPU and CRT-500 I/O boards, the power supply
and the main harness; in the upright and cabaret
versions, the CPU section houses the CPU and
CRT-500 I/O boards, the power supply, the main
harness, the CD player and volume control.
The Dallas key and boot PROM are located on the
CRT-500 I/O board, as is the volume control for the
countertop version. The volume control for the
upright and cabaret models, is located at the front of
the PC shelf (see Figures 4, 6 and 7 for locations).
Coin Mech/Coin Box Section
Game Description
13” Countertop
The Megatouch XL comes housed in a 13”
countertop cabinet, a 19” cabaret cabinet or a 19”
upright cabinet.
The countertop model has 4 key-locked
compartments: the CPU section, the CD-ROM
access, the coin mech section and the coin box. The
upright and cabaret models also have 4 key-locked
compartments: the CPU section, the coin mech
section, the coin box and the rear door. The
countertop is equipped with one coin mech and the
upright and cabaret models have two; optional bill
acceptors are available for all models.
CD-ROM Compartment (countertop model only)
Located on the left side of the game, the CD-ROM
door allows access to the CD-ROM player.
Rear Door Compartment (upright/cabaret models)
The rear compartment of the 19” upright allows
access to the rear of the monitor, the
communications board and the touchscreen
controller
CPU Section
The CPU section is accessible from the rear of the
unit in the countertop and from the front of the
upright and cabaret versions. In the countertop, The
CPU section houses the CRT, the monitor controls,
PM0109-0D
The coin mech/coin box section is accessible from
the front of the unit. This section is key-locked for
security purposes. A sturdy metal box, located within
the coin mech section, holds all coins deposited into
the machine. The coin box is separately key-locked
for security.
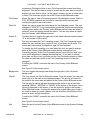
Also located within the cavity of the coin mech are 2
internal switches, ”SETUP” and “CALIBRATE,” and
the coin meter. Location of these switches can be
seen in Figure 4. Pressing the “SETUP” button will
bring you to the Megatouch Setup screen (see
Figure 1). See the next section for calibration
instructions.
19” Upright/19” Cabaret
The coin mech and coin box are accessible from the
front of the cabinet. Both doors are key-locked for
security purposes.
Also located within the cavity of the coin mech are 2
internal switches, ”SETUP” and “CALIBRATE,” and
the coin meter. Location of these switches can be
seen in Figures 5 and 7. Pressing the “SETUP”
button will bring you to the Megatouch Setup screen
(see Figure 1). See the next section for calibration
instructions. The remote monitor controls are also
located inside the coin mech section, Velcroed to the
top of the coin box.
MEGATOUCH™ XL MANUAL
1
COPYRIGHT 1997 MERIT INDUSTRIES, INC.
Screen Calibration
Follow the instructions below for degaussing a
monitor.
The machine must be in the idle mode or game
select mode to calibrate the touchscreen.
•
Find the “CALIBRATE” button located behind the
coin mech and press it to enter the screen
calibration mode.
•
Touch the center of the first circle that appears
on the screen. Once you release your finger, a
second circle will appear on the screen.
NOTE: YOU MUST HOLD YOUR FINGER ON THE CIRCLE
FOR APPROXIMATELY 2 SECONDS FOR THE
CALIBRATION TO BE RECOGNIZED.
•
Touch the center of the second circle that
appears on the screen.
•
Once the second circle is touched, a crosshair
will appear on the screen. To test the calibration
of the screen, touch the crosshair with your
finger and slowly drag your finger around the
screen. The crosshair should follow your
movement.
•
1. Plug in your degaussing coil.
2. Hold the coil about three feet from the monitor,
press the trigger to activate the magnetic field
(for circular-shaped coils, orient the coil so you
see the monitor through the hole in the middle;
for wand-shaped coils, point the wand towards
the screen).
3. Move the coil in a circular motion around the
face of the monitor and slowly approach the
game.
4. Continuing to move the coil in a circular motion,
slowly back away from the monitor.
5a. CIRCULAR-SHAPED COILS: When you are
about three feet away, quickly turn the coil
perpendicular to the monitor and release the
trigger.
5b. WAND-SHAPED COILS: When you are about
three feet away, point the wand away from the
monitor and release the trigger.
Touch the “EXIT TEST” icon.
NOTE: On upright models, if you open the
monitor door while the machine is on, you will
have to recalibrate the touchscreen.
Degaussing your Monitor
If your monitor is displaying “purity problems,” (a
display with purity problems will have parts of an allwhite screen affected by blotches of color) the
monitor needs to be degaussed using a “degaussing
coil.” A degaussing coil is a circular electromagnet,
used to cancel out any stray magnetic fields that may
build up on a metal object.
Monitor Colors Adjustment
Procedure
For adjusting the colors on any of our monitor types,
we suggest following the procedures described
below.
The vertical/horizontal controls and
brightness/contrast controls are located on the
monitor control panel, Velcroed inside the game. The
monitor RGB controls are located on the monitor
neckboard. Adjust the RGB controls until the screens
look as suggested in the following steps.
Ducksan/Telco/Tatung Monitors
All of our monitors have built-in degaussing coils that
are automatically activated on power-up. If your
game is experiencing minor purity problems, try
powering down the game for 5 minutes and then
reapplying power to activate the degaussing coil. If
the problem is not corrected, you will have to use a
manual degaussing coil.
PM0109-0D
1. Set the game to the Run 21 game screen.
2. Adjust the vertical and horizontal size and
vertical and horizontal position to make sure that
the game screen fills the monitor screen and that
the game screen is centered.
3. Adjust the brightness and contrast controls until
the playing cards are a light, ivory color.
(Adjusting the brightness and contrast can also
correct for a lack of sharpness in the picture.)
MEGATOUCH™ XL MANUAL
2
COPYRIGHT 1997 MERIT INDUSTRIES, INC.
4. Exit Run 21 and enter the Hoop Jones game
screen. Make sure that the court surface is
greenish in color and look for a clean, white
border around the number on the player’s jersey.
5. Exit Hoop Jones and enter the Great Solitaire
game screen. Make sure that the game
background is a light, greenish-gray.
Maintenance
Cleaning the Cabinet
•
the plastic tubing and ground strap attached to the
lid. Press up on the spring-loaded levers located on
each side of the lid. Push the lid forward and pick it
up to remove. See the decal inside the lid for a
diagram of locations.
NOTE: DO NOT USE ANY ABRASIVE SOLVENTS, ACID OR
VINEGAR-BASED CLEANSERS ON THE MONITOR OR
SIDE DECALS. OVER TIME, SUCH CLEANSERS
COULD HARM THE TOUCHSCREEN AND ERASE THE
DECALS. BE CAREFUL NOT TO USE COMMERCIAL
CLEANERS CONTAINING ANY OF THESE
SUBSTANCES.
Cleaning the Compact Disc and CD Player
The cabinet should be cleaned with a damp cloth
and mild detergent.
•
Clean the CD and CD player approximately
every 90 days, or if you experience any problems
with the CD player.
•
CD cleaning supplies can be purchased from
your local record store or audio supply house.
Cleaning the Touchscreen Monitor
•
The touchscreen glass should be cleaned with a
damp cloth and isopropyl alcohol or a nonammonia cleanser. Do not use any abrasive or
vinegar-based cleansers, as they will damage
the touchscreen glass.
To gain access to the entire surface of the monitor
screen on the upright model, you will have to release
the monitor door latches. To do so, open the coin
mech door. Located inside, above and to the right
and left of the coin mech, are two monitor door
latches. Loosen the thumbscrews securing the
latches and rotate the latches to release the monitor
door. See Figure 5.
To gain access to the entire surface of the monitor
screen on the cabaret model, you will have to
release the monitor door latches. To do so, open the
coin mech door. Located inside, above and to the
right and left of the coin mech, are two monitor door
slide-latches. Loosen the thumb nuts securing the
latch and slide the latch open. Pull up on the bottom
of the bezel to remove it (NOTE: TO FULLY
REMOVE THE BEZEL, YOU MUST DISCONNECT
THE GROUND BRAID).
To gain access to the entire surface of the monitor
screen on the countertop model, you will have to
remove the top of the machine. To remove the top of
the machine, unlock and open the rear door.
Disconnect the fan power connector and disconnect
PM0109-0D
To activate the game for use with a CD-ROM lens
cleaner, turn off the game and set DIP Switch 2-1 to
“ON.” Turn on the game and follow the instructions
displayed on the screen.
Fan Operation
•
To ensure proper operation of the game, it is
important that all fans are operating correctly
and that the air flow is unobstructed. Make sure
nothing is placed inside the cabinet or next to the
fan vents that would inhibit the flow of air. Also, if
any fans are not operating, it is important that
they be replaced.
Troubleshooting
Coin Jam
The game also has coin jam and stringing detection
software. Should a coin become jammed in the
mech or someone tries to string the mech, a
continuous tone will be emitted by the game and the
words “COIN JAM” will be displayed on the screen.
If the game emits the coin jam indicator sound when
powered up, this may indicate that the NORMALLY
CLOSED contacts of the coin mechanism are being
used. The NORMALLY OPEN contacts must be
used.
MEGATOUCH™ XL MANUAL
3
COPYRIGHT 1997 MERIT INDUSTRIES, INC.
box allows the time period to be set from 1 to 4
weeks. The factory defualt setting is two (2)
weeks.
Also, see the accompanying Troubleshooting Guide.
4
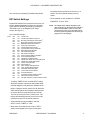
DIP Switch Settings
Physical DIP switches are reserved for future use. All
current operator-adjustable functions are controlled
by the soft DIP switches (accessed by touching the
“OPTIONS” icon on the Megatouch XL Setup
screen. See Figure 1).
List of Soft DIP Settings*
TIMER1
YES
YES
YES
YES
YES
YES
YES
NO
BLK
YES
YES
YES
4/300K
YES
YES
YES
YES
$/¢
YES
YES
YES
NO
NO
YES
YES
YES
NO
NO
These settings are only available if “6 STARS
ENABLED?” is set to “YES.”
*NOTE: The soft DIP switch settings displayed on your
game will depend on which games are selected as
active in the Game Menu screen, as well as the
program version used in your game. DIP controls
for inactive games and games not included in your
program will not be displayed.
ALLOW SEX?
ALLOW SEX DURING ATTRACT? 2
MYSTERY PHRAZE SEX CATEGORY? 2
MATCH’EM UP BABES AND HUNKS? 2
MEMOREE BABES AND HUNKS? 2
TRIVIA SEX CATEGORY? 2
PIX MIX BABES AND HUNKS? 2
PLAYER SELECTABLE LANGUAGE
MAIN MENU BACKGROUND
SOLITAIRE FREE GAME
SOLITAIRE CONTINUE?
TRIVIA SHOW CORRECT ANSWER?
TRIVIA ROUNDS/BONUS?
CONQUEST CONTINUATION?
POWER SOLITAIRE SPLIT COLUMN MOVE
POWER SOLITAIRE FREE GAME
PIX MIX CONTINUATION
CREDS PRICE DISPLAY?
NO STRIP POKER CONTINUATION?
NO STRIP POKER MOAN SOUNDS
NO CHECKERS CONTINUATION?
YES AUTO CLEAR HIGH SCORES3
YES 6 STARS ENABLED?
NO HI-SCORE ACCESS FROM 6 STARS?4
NO VBB ACCESS FROM 6 STARS?4
NO VOLUME CONTROL ACCESS FROM 6 STARS4
NO
NO
NO
NO
NO
YES
PRPL
NO
NO
NO
5/1M
NO
NO
NO
NO
1
Touching “TIMER” for the “ALLOW SEX?” setting
allows the operator to set times during which adultoriented categories and games are available to the
players. Using the arrows, set the time at which the
adult-oriented games and categories will be turned
on and set the time at which they’ll be turned off.
The time is set using 24 hour, “military” time. The
factory defualt settings are set to turn on at 22:00
(10:00 pm) and to turn off at 6:00 (6:00 am).
2
These settings are only available if “ALLOW
SEX?” is set to “TIMER” or “YES.”
3
When Auto Clear High Scores is set to “YES” a
small box will appear to the right. Touching this
PM0109-0D
MEGATOUCH™ XL MANUAL
4
COPYRIGHT 1997 MERIT INDUSTRIES, INC.
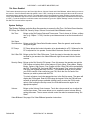
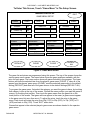
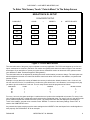
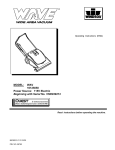
To Enter This Screen, Touch The “Setup” Button In The Coin Mech Section
MEGATOUCH XL
SETUP
COIN-IN
MENU
GAME
MENU
DISPLAY
BOOKS
OPTIONS
VIDEO
TEST
TOUCH
SCREEN
TEST
HIGH
SCORES
CLEAR
CREDITS
FREE
CREDITS
SYSTEM
SETTINGS
5
EXIT
Figure 1 - Megatouch Setup Screen
Setup Screen Functions
Coin-In Menu:
Game Menu:
Display Books:
Options:
Video Test
Touchscreen Test:
High-Scores:
Clear Credit:
Free Credit:
System Settings:
Exit:
PM0109-0D
Enters the coin/credit setup screen.
Enters the game menu selection screen.
Enters the bookkeeping statistics screen.
Displays the soft DIP switch settings screen. The DIP switches displayed on this
page will vary depending on which games are active (see page 4 for a list of DIP
switch settings).
Displays video test screens. Touch screen to cycle through.
Enters the touchscreen test for checking touchscreen calibration.
Enters the clear high scores screen. Touch game to select, touch “CLEAR
CURRENT” to clear the high scores for that game. Touch “CLEAR ALL” to clear all
high scores. Activate Six Stars* to clear high scores (*see next page).
Erases all credits on the machine.
Adds credit without using coin switch. Free credits are listed separately in the
books screen.
Enters the system settings screen which gives the operator access to the Set Time,
Set Serial Game Number, PC Dump, Set 6 Star PIN, Security Setup, Volume Control
and Video Billboard screens. See the next page for explanations of each system
settings option.
Returns the game to the attract mode.
MEGATOUCH™ XL MANUAL
5
COPYRIGHT 1997 MERIT INDUSTRIES, INC.
*Six Stars Enabled
This feature allows the access to the Clear High Scores, Volume Control and Video Billboard, without having to remove
the coin box. If the Six Stars Enabled dip switch is set to “YES,” touching the screen during the idle mode will cause six
numbered stars to appear on the screen. Touching these stars in the programmed order will bring a screen with icons
for the Video Billboard, High Scores and Volume Control screens (provided the appropriate DIP switches have been set
to “YES”). To set the sequence in which the stars must be touched, go to the “System Settings” screen, touch the “Set
Six Star PIN” icon and set the sequence.
System Settings
The System Settings controls allow the operator to access the Set Time, Set Serial Game Number,
PC Dump, Set 6 Star PIN, Security Setup, Volume Control and Video Billboard screens.
Set Time:
Brings up the Set System Date and Time screen. Time is shown in 24-hour, military
time (e.g. 5:00pm = 17:00). Use the up and down arrows to set the time and/or the
date.
Set Game
Serial Number: Brings up the Set Game Serial Number screen. Enter the game’s serial number
using the keypad.
PC Dump:
PC Dump allows the books information to be downloaded to a PC. Software for the
PC is required for it to operate. Contact Merit Customer Service for information.
Set 6 Star PIN: Brings up the Set 6 Star PIN screen. Touch the stars in the order they must be
touched to give access to the Video Billboard, High Scores and Volume Control
screens.
Security Setup: Brings up the Set Security PIN screen. From this screen, the operator can set the
PIN number and select which of the features (Coin-In Menu, Game Menu, Display
Books, Options, High Scores, Free Credits and Set 6 Star PIN) will be protected by
the PIN. To set the PIN, first touch “SET” on the keypad. Then, enter your 4-digit
PIN using the keypad and touch “ENTER”. The game will prompt you to re-enter
your PIN to confirm. After confirming your PIN, touch the icon for each of the
features you wish to protect with the PIN.
To unlock a feature, touch the appropriate icon in the Set Up screen. The game will
display the PIN keypad. Enter the PIN using the keypad. Once the PIN has been
entered, all options become available (without having to enter the PIN for each
option). After exiting the Set-Up screen, the PINs become active again for all
appropriate options.
Volume:
Brings up the Volume Control screen. Touch the volume control icon to adjust the
volume up or down. This screen allows you to sample the sound volume without
exiting the screen. The on-screen volume control can also be accessed using “Six
Stars.”
Video Billboard: See page 9 for Video Billboard operation instructions.
PM0109-0D
MEGATOUCH™ XL MANUAL
6
COPYRIGHT 1997 MERIT INDUSTRIES, INC.
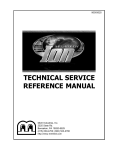
To Enter This Screen, Touch “Game Menu” In The Setup Screen
MEGATOUCH XL
EXIT
GAME MENU SETUP
CARD
GAMES
QUIZ
GAMES
1 Solitaire
.25
4 Eleven Up
.25
SPORT &
SKILL
2 Power Sol
STRATEGY
.25
NEW
GAMES
EROTIC
3 Tritowers
.25
Solitaire
Quikmatch
Royal Flash
Trivia Whiz
Match‘em Up
Mem-O-Ree
Tritowers
Fourplay
Conquest
Checkerz
11-UP
Mystery Phraze
Hoop Jones
Power Solitaire
Strip Poker
More Games
DEFAULT
CLEAR
CLEAR 1
DEFAULT
ALL
Figure 2 - Game Menu Screen
The game list and prices are programmed using this screen. The top of the screen shows the
various game menu names. The menu below shows the game positions available, with the
price for each game. The lower section shows all games included in the program. The lower
buttons will clear the selected item from the players’ game menu (CLEAR 1), clear all of the
games from the players’ game menu (CLEAR), reset the selected game menu to the default
setting (DEFAULT) and reset all of the game menus to the default settings (DEFAULT ALL).
To program the game menu, first select the category you want the game to have, by touching
that category’s icon at the top of the screen. Choose the menu position you want the game to
occupy, by touching that position. Then touch the game name from the game list on the
lower portion of the screen. That game will now appear in the menu (a game cannot appear
in the game menu list more than once). To adjust the price, touch the price in the game
menu. Each touch will rotate the price from 25¢ (1CR), to 50¢ (2CR), to 75¢ (3CR), to $1
(4CR) and back to 25¢ (1CR). Touch “EXIT” when done.
Games that appear in the selected player’s game menu are shown shaded in the operator
game menu.
PM0109-0D
MEGATOUCH™ XL MANUAL
7
COPYRIGHT 1997 MERIT INDUSTRIES, INC.
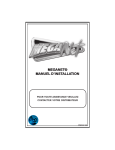
To Enter This Screen, Touch “Coin-In Menu” In The Setup Screen
MEGATOUCH XL SETUP
COIN/CREDIT SETUP
COIN INPUT
COINS
=
CREDITS
&
METER PULSES
1E
1
1
1
2E
1
1
1
3E
1
1
1
4E
1
1
1
Figure 3 - Coin-In Menu Screen
The coin/credit ratios of the game may be adjusted to meet any application. The CPU board supports up to four coin
inputs, mechanical or electronic. (Electronic coin mechs are typically used when more than one type of coin needs to
be accepted. If you would like to convert your game from a mechanical mech to an electronic mech, please contact
your distributor or Merit Technical Support for wiring details.)
The coin/credit ratios can be adjusted by touching the screen at the location you want to change. The meter pulse can
also be adjusted so that the coin meter can show the actual cash value of the coins in the cashbox, not just the total
number of coins.
Example: Let’s say that in the country of Atlantis the currency is called units. Atlantis, however, has a 1 unit coin, a 2
unit coin and a 5 unit coin. You decide that 1 credit on the game should cost 1 unit. However, to encourage more play
you want to give 6 credits for a 5 unit coin. The coin setup screen would be programmed as follows:
COIN INPUT
1E
2E
3E
4E
COINS
1
1
1
1
=
CREDITS
1
2
6
1
&
METER PULSES
1
2
5
1
For every 1 unit coin, the game would give 1 credit and count 1 pulse on the mechanical coin counter. For every 2 unit
coin, the game would give 2 credits and count 2 pulses on the mechanical meter. For every 5 unit coin, the game would
give 6 credits and pulse the mechanical meter 5 times. The mechanical meter will now display the total number of
“units” in the cashbox, not total coins or credits. Press “DEFAULT” to return to the factory settings. Press “EXIT” to
return to the GAME SETUP menu.
Any unused coin inputs must be set to the same settings as the LOWEST of the used inputs for the credit algorithm to
work properly. See COIN INPUT 4E for an example.
PM0109-0D
MEGATOUCH™ XL MANUAL
8
COPYRIGHT 1997 MERIT INDUSTRIES, INC.
Megatouch™ XL Video Billboard Operating Instructions
The Megatouch™ XL Video Billboard allows for six, separate advertising screens. Two of the screens
can only be accessed using “Six Stars” (and are intended for use by the location owner), the other four
screens are accessed using the Video Billboard icon located on the System Settings screen.
The Video Billboard provides several font styles, sizes and colors, a choice of background colors and
designs, as well as a variety of clip art. The basic Video Billboard screen is shown below, followed by
the operating instructions. A maximum of 16 screen objects (a line of text or a piece of clip art) can be
placed on any given screen.
7,0(5
)217
)8// 6&5((1
%$&.*5281'
&/($5 $'
&/,3 $57
6&5((1
(;,7
Å
Æ
1
2
3
4
5
6
7
8
9
0
%$&.
63$&(
$
Q
W
E
R
T
Y
U
I
O
P
&
%
(
)
A
S
D
F
G
H
J
K
L
“
\
63$&(
?
Z
X
C
V
B
N
M
,
.
‘
ENTER
!
Figure 4 - Primary Video Billboard Screen
To access the Video Billboard, enter the System Settings screen and touch the Video Billboard
icon to display the primary video billboard screen.
Icon Functions:
Keyboard:
The keyboard is used for entering all text into the displayed screen. Once text
is displayed on the screen, it can be moved by touching the desired text and
sliding your finger to the location where you want it placed. The cursor can be
moved to a new location by touching the desired location.
Timer:
Allows the user to set the amount of time the given screen is displayed during
the idle mode. The timer can be set from 0 to 20 seconds in 5 second
PM0109-0D
MEGATOUCH™ XL MANUAL
9
COPYRIGHT 1997 MERIT INDUSTRIES, INC.
increments. (Setting the timer to zero (0) will prevent the screen from being
displayed. This can be used to design a screen that the user does not want to
display, but does want to store it in the game’s memory for use at a later time
or date.) The timer can only be set at the Primary Video Billboard screen.
Full Screen:
Allows the user to view a full screen preview of the designed screen. While in
FULL SCREEN, graphics and text can be repositioned by selecting and
touching the glass in the new location.
Clear Ad:
Allows the user to erase the entire design for the displayed screen. This icon
changes to “DELETE” if any screen object is selected (objects are selected by
touching them while in the Primary Video Billboard screen; when an object is
selected, a box will appear around the object). You can only delete an object
from the Primary Video Billboard screen.
Screen X:
Touching this icon toggles through each of the video billboard screens (where
“X” is the number of the screen).
Font:
This icon accesses the Font Formatting screen. The Font Formatting screen
allows the user to select from 4 styles of font, 3 font sizes and 8 colors. The
screen also has controls for alignment: right, left and centered.
To change the font formatting, you must select the text you want to change
while at the Primary Video Billboard screen (before entering the Font
Formatting screen). At the Font Formatting screen, touch the font style, size,
color and/or alignment to change the selected text. (If you wish to change
more than one line of text, you must exit the Font Formatting screen to select
the other text and then return to the Font Formatting screen to make the
changes.)
Touching the “DONE” icon exits the user to the Primary Video Billboard
screen.
See Figure 5 for the screen layout.
Background:
This icon toggles the background design through each of the 10 preset
backgrounds.
Clip Art:
This icon access the Clip Art Selection screen. From this screen, the user can
select clip art to be used on the displayed screen. The clip art is inserted at
the position the cursor was last placed in the Primary Video Billboard screen.
The clip art size can be adjusted by selecting the piece of clip art and then
selecting “SMALL,” “MEDIUM” or “LARGE” at the bottom of the screen. Once
clip art is displayed on the screen, it can be moved by going to the Primary
Video Billboard screen, touching the desired clip art and sliding your finger to
the location where you want it placed. Use the scroll bar at the bottom of the
screen to move through the clip art.
Touching the “DONE” icon exits the user to the Primary Video Billboard
screen.
See Figure 6 for the screen layout.
Exit:
PM0109-0D
Exits the user from the Primary Video Billboard screen to the System Settings
screen.
MEGATOUCH™ XL MANUAL
10
COPYRIGHT 1997 MERIT INDUSTRIES, INC.
7,0(5
)217
)8// 6&5((1
%$&.*5281'
&/($5 $'
&/,3 $57
6&5((1
(;,7
SELECT TYPE
SELECT SIZE
STYLE A
E
WHITE
BLUE
E
RED
GREEN
BLACK
PURPLE
YELLOW
BROWN
67</(%
STYLE C
E
67</('
SELECT COLOR
SELECT
ALIGNMENT
_____
_______
_____
_____
_______
_____
_____
_______
_____
DONE
Figure 5 - Video Billboard Font Formatting Screen
7,0(5
)217
)8// 6&5((1
%$&.*5281'
&/($5 $'
&/,3 $57
6&5((1
SMALL MEDIUM
(;,7
DONE
LARGE
Figure 6 - Video Billboard Clip Art Screen
PM0109-0D
MEGATOUCH™ XL MANUAL
11
COPYRIGHT 1997 MERIT INDUSTRIES, INC.
FIGURE 4 - 13” COUNTERTOP
PM0109-0D
MEGATOUCH™ XL MANUAL
12
COPYRIGHT 1997 MERIT INDUSTRIES, INC.
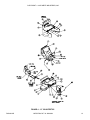
FIGURE 5 - 19” UPRIGHT (FRONT VIEW)
FIGURE 6 - 19” UPRIGHT (REAR VIEW)
PM0109-0D
MEGATOUCH™ XL MANUAL
13
COPYRIGHT 1997 MERIT INDUSTRIES, INC.
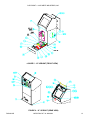
FIGURE 7 - 19” CABARET (FRONT VIEW)
FIGURE 8 - 19” CABARET (REAR VIEW)
PM0109-0D
MEGATOUCH™ XL MANUAL
14
COPYRIGHT 1997 MERIT INDUSTRIES, INC.
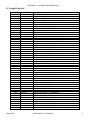
MEGATOUCH XL PARTS LISTS
Megatouch XL COP
Part List
CALLOUT #
1
2
3
4
5
6
7
8
9
10
11
11a
11b
12
13
14
15
16
17
18
19
20
21
21a
21b
21c
21d
22
22a
22b
22c
23
24
25
26
27
28
29
30
31
32
33
PM0109-0D
PART #
SA0100-01
MW0009-01
MW0015-01
HW8741
SA4084-02
HW8993-02
HW8018-01
MW0038-01
HW9001
SA0108-01
SA0111-01
SA5129-01
HW8087
HW8953
SA0102-01
CN7508
CN7501
EC9154
SW3005
MW0012-01
SA0104-01
MW0010-01
EC9840
HW8171-01
EC0003-01
SA0103-01
EC9377
EC9824
HW8078
HW8067
SA0112-01
SA10025-01
SA10023-01
SA0101-01
SA0118-01
SA0105-01
WD0001-01
WD0001-02
MW0013-01
MW0016-01
MW0014-01
HW8734-01
MW0024-01
MW0023-01
HW8911-01
MW5164-01
DESCRIPTION
ASSY, MEGATOUCH XL, CTOP
CHASSIS, CTOP, XL
BRACKET, LOCK, CTOP XL
LOCK, CIRC, BNT, DIFF, 1/2”
SPEAKER ASSY, 4”, W/6-PIN CONN
LAZY SUSAN, 12” DIA, 15 DEG. STOPS
ANTI-SKID PAD, 11.5”DIA, RA65 RBR
CORD CLAMP, XL
TUBING, PLASTIC
HARNESS, MAIN, CTOP, XL
HARNESS, DISPLAY, AC, CTOP, XL
GASKET/BEZEL ASSY
TAPE, NEOP, .18W X .38THK, PSA
BEZEL, 13’ T/S
HARNESS, COIN BOX, MGATCH XL, CTOP
METRIMATE PLUG, 12 PIN
METRIMATE PIN, FEMALE 20-24 AWG
COUNTER, 12V FROG EYE MTG
PB SWITCH, MOMENTARY (SETUP/CALIBRATE)
BRACKET, CONN/COUNTER, CTOP XL
DISPLAY/MOTHERBOARD ASSY, XL
FRAME, DISPLAY, CTOP, XL
TOUCHSCREEN CONTROLLER, SMT3
PCB GUIDE, 8”, SNAP-ON, DEEP CHANNEL
CD-ROM PLAYER, IDE, 4X
TOUCHSCREEN/VGA DSPLY ASSY, 13”
MONITOR, VGA, 13” (W/ CHASSIS BOARD & FRAME)
TOUCHSCREEN OVERLAY, 13’
TAPE, POLYESTER, 1”, W/ADH
TAPE, FOAM, .5W X .03 THK, DBL
ASSY, MOTHER BOARD & I/O, XL
PCA, CRT-402, DE-AMER, RISER BOARD
PCA, I/O BOARD, XL VID, CTOP
ASSY, MOTHERBOARD
CABLE, POWER EXTENSION, CD-ROM
COVER ASSY, CTOP, XL
SIDE PANEL, RIGHT, CTOP XL
SIDE PANEL, LEFT, CTOP XL
TOP, CTOP, XL
DOOR, CTOP, XL
PLATE, LATCH, CTOP, XL
LOCK, W/O CAM, 564, 5/8”L (REAR DOOR)
CAM, LOCK (REAR DOOR)
BOLT, LOCK, CTOP, XL
PIN, SPRING, STL, .094OD X .50L
HINGE, REAR DOOR CTTS
MEGATOUCH™ XL MANUAL
15
COPYRIGHT 1997 MERIT INDUSTRIES, INC.
34
35
36
37
38
39
40
41
42
EC9410
SA0117-01
SA0106-01
EC7528
MW0011-01
SW4024
TA10028-01
SA0119-01
MW0039-01
HW8727
MW0037-01
GL3100-01
GL3101-01
SA7297-06
HW9461-03
PM8928-09
HW8249
HW8295
SA5161-01
MW0017-01
MW5153-01
EC9797
SA0109-01
PM0109-0D
FAN, TUBAXIAL, 3”, 110V
CABLE, POWER EXTENSION, FAN
PWR ENTRY ASSY, CTOP, XL, 120V
POWER SUPPLY, SW, PS/2-PC
BARCKET, PWR SUPPLY, CTOP, XL
ROCKER SW, DPST, 250V, PANEL MTG
PCA, RS-485 COMMUNICATIONS BD, XL SYS
DOOR ASSY, CD-ROM ACCESS, XL, CTOP
DOOR, CD-ROM ACCESS, XL, CTOP
LOCK, FLAT, STR, DIFF, 1-1/8 CAPKY (CD DOOR/COIN BOX)
CAM, LOCK, .75 X 2.0
DECALS AND SIGNS
DECAL, SIDE PANEL, XL, CTOP
DECAL, FRONT, XL, CTOP
SIGN HOLDER, MEGATOUCH XL (HOLDER & SIGN ASSEMBLY)
SIGN HOLDER, PETG, 4 X 12, CTOP
SIGN, MEGATOUCH XL, CTOP
COIN MECHS/BILL ACCEPTORS
25¢ USA
FR/PLATE, SINGLE, M, .25, ROLL DOWN
$1 CANADIAN
FR/PLATE, SINGLE, M, $1 CANADIAN
COIN BOX ASSY
HARNESS, COIN BOX, MECHANICAL, CTOP, XL
COIN BOX, CTOP, XL
DOOR, COIN BOX, CTOP
COIN BOX/JCM B/A ASSY, $1-20, XL
JCM B/A DBV-45 $1-20, W/ STACKER
HARNESS, JCM B/A, CTOP, XL
MEGATOUCH™ XL MANUAL
16
COPYRIGHT 1997 MERIT INDUSTRIES, INC.
19” Upright Parts List
CALLOUT #
1
2
3
4
5
6
7
8
9
10
11
12
13
14
15
16
17
18
19
20
21
22
23
24
24a
24b
24c
24d
24e
24f
24g
24h
25
25a
25b
25c
26
26a
26b
26c
26d
26e
26f
26g
26h
27
27a
27b
28
PM0109-0D
PART #
EC2001
HW8711
HW8716
HW8960
MW5001-01
MW5003-01
MW5003-02
MW5006-01
SB0010-01
SA4084
WD2017-01
SA0063-01
SA5117-05
HW8756
SA0058-01
SW4024
TA10028-01
EC2187-01
HW6366
EC9840
MW0057-01
SA3209-01
MW0044-01
SA3234-01 (-02)
WD2018-01
MW0063-01
EC0007-01
EC7528
SA0077-01
EC0003-01
EC2191-06
SA0067-01
SA0112-01
SA10025-01
SA10023-01
SA0101-01
SA3202-05
SA3210-03
EC9378
EC9823
HW8078
HW8067
WD2013-01
MW5008-01
MW5008-02
SA3230-01
MW5014-01
HW8951-02
HW8713
DESCRIPTION
POWER CORD, 120V
ANCHOR PLATE FOR CAM LOCK
LOCK, FLAT, STR, #564, 1-7/16” (REAR DOOR)
LEG LEVELER, 2”, 3/8-16THD
STAY LID, URTS, 19”
BRACKET, CRT ADJUST, LEFT
BRACKET, CRT ADJUST, RIGHT
COVER, PERFORATED, SPEAKER, 4”
COM, POWER CABLE
SPEAKER ASSY, 4”
CABINET, 19” URTS, XL/260, FA, BLK
HARNESS, POWER, DUAL FANS, URTS
FAN ASSY, 3”, 12V DC, 2 PIN, W/GUARD
CAM, BENT, 1/8” OFFSET
HARNESS, POWER SWITCH, URTB/URTS/CAB, XL
ROCKER SWITCH, DPST, 250V, PNL MTG
PCA, RS-485 COMM, XL SYS
RIBBON CABLE, 9 COND, 31”L
MOUNTING POST, KNURLED
TOUCHSCREEN CONTROLLER BOARD, SMT-3
COVER, FAN PROTECTOR
BRACKET ASSY, METER/TEST SWITCH
DOOR LOCK LATE, UR
SHELF, PC POWER, URTS, XL (-02 “CE” APPROVED ASSY)
SHELF, 19” VIDEO, UNIVERSAL
PLATE, MTG, PC/PWR, XL
TERMINAL BLOCK, 4 POSITION
POWER SUPPLY, SWT, PS-2/PC
HARNESS, MAIN, XL
CD-ROM PLAYER, IDE, 4X
RIBBON CABLE, 2X20 PIN, IDE, 7”L
HARNESS, VOLUME POT, URTS/CAB, 260
ASSY, MOTHERBOARD & I/O, XL
PCA, CRT-402, DE-AMER, RISER BOARD
PCA, I/O BOARD, XL VID, CTOP
ASSY, MOTHERBOARD
SHELF ASSY, TS/CRT (VGA)
TS/CRT (VGA) ASSY, COLOR, 19”
MONITOR, VGA, 19”
T/S OVERLAY, 19”
TAPE, POLYESTER, 1”, W/ADHESIVE
TAPE, FOAM, .5W, .03THK,DBL
SHELF, CRT MTG, 19” URTS
BRACKET, CRT LEFT, 19” URTS
BRACKET, CRT RIGHT, 19” URTS
BEZEL ASSY, 19” URTS
BEZEL/HINGE ASSY, 19” URTS
BEZEL, MONITOR, 19” URTS
LOCK, FLAT, STR, 564, 1-7/16 KYRM
MEGATOUCH™ XL MANUAL
17
COPYRIGHT 1997 MERIT INDUSTRIES, INC.
19” Cabaret Parts List
CALLOUT #
PART #
DESCRIPTiON
1
EC2001
POWER CORD, 120V
2
MW1672-01
CONTROL PANEL, 19” CABARET
3
MW1671-01
BRKT, GLASS, UPPER, 19” CABARET
4
MW1670-01
SPEAKER, MTG BRKT, 19” CAB
5
HW8951-01
BEZEL, MONITOR, 19” CABARET
6
WD5060-01
WOOD CABINET, URTS, 19” CABARET
7
SA4084
SPEAKER ASSY, 4”
8
SA3209-01
BRACKET ASSY, METER/TEST SWITCH
9
HW8960
LEG LEVELER, 2”, 3/8-16THD
10
GL2411-03
PLEXI, CLEAR, 19” CABARET, SIGN
11
MW1674-01-0A
MONITOR, SUPPORT LEFT, 19” CABARET
12
MW1674-02-0A
MONITOR, SUPPORT RIGHT, 19” CABARET
13
HW8979
SLIDE LATCH
14
SA0058-01
HARN, PWR SWITCH, URTB/URTS/CAB, XL
14a
SW4024
ROCKER SWITCH, DPST, 250V, PNL MTG
15
SB6058-01
FLUOR LAMP ASSY, 120V/60HZ, 15W
15a*
LB2100
LAMP, FLUOR, 15W, F15T8CW
16
MW0028-01
PLATE, POWER ENTRY
17
HW6366
MOUNTING POST, KNURLED
18
TA10028-01
PCA, RS-485 COMM, XL SYS
19
EC2187-01
RIBBON CABLE, 9 COND, 31”L
20
EC9840
TOUCHSCREEN CONTROLLER BOARD, SMT-3
21
SA0014-01
HARN, E/M/CREJ, 19” CABARET
22
SA3266-03-0B
CRT ASSY, 19” CABARET, XL
22a*
EC9378
MONITOR, VGA, 19”
22b*
EC9823
T/S OVERLAY, 19”
22c*
HW8078
TAPE, POLYESTER, 1”, W/ADHESIVE
22d*
HW8067
TAPE, FOAM, .5W, .03THK,DBL
22e
WD5061-01-0A
SHELF, MONITOR, 19” CABARET
23*
SA3234-01 (-02) SHELF, PC POWER, URTS, XL (-02 “CE” APPROVED ASSY)
23a
WD2018-01
SHELF, 19” VIDEO, UNIVERSAL
23b
MW0063-01
PLATE, MTG, PC/PWR, XL
23c
EC0007-01
TERMINAL BLOCK, 4 POSITION
23d
EC7528
POWER SUPPLY, SWT, PS-2/PC
23e
SA0077-01
HARNESS, MAIN, XL
23f
EC0003-01
CD-ROM PLAYER, IDE, 4X
23g
EC2191-06
RIBBON CABLE, 2X20 PIN, IDE, 7”L
23h
SA0067-01
HARNESS, VOLUME POT, URTS/CAB, 260
24*
SA0112-01
ASSY, MOTHERBOARD & I/O, XL
24a
SA10025-01
PCA, CRT-402, DE-AMER, RISER BOARD
24b
SA10023-01
PCA, I/O BOARD, XL VID, CTOP
24c
SA0101-01
ASSY, MOTHERBOARD
*This part is not called out in the drawing. It is either part of an assembly that is shown, or it is an assembly
in which all of the parts are shown separately.
PM0109-0D
MEGATOUCH™ XL MANUAL
18
COPYRIGHT 1997 MERIT INDUSTRIES, INC.
Merit Video
Limited Warranty
Merit Industries, Inc. warrants it’s video countertop and
upright machines to be free from defects in material
and workmanship for a period of six months from the
date of delivery or seven months from the date of
shipment from its facilities, whichever occurs first. The
warranty covers all electrical components (except fuses
and light bulbs) and printed circuit boards. Other items
are covered by warranty periods offered by the original
equipment manufacturers (power supplies - 90 days;
video monitors - 90 days).
Failure due to misuse, vandalism, excessive or
intentional abuse, operation outside specified
conditions (including, but not limited to, improper
electrical power source), fire, water damage, acts of
God, acts of war and civil unrest are specifically
excluded.
Merit products are carefully inspected and thoroughly
tested prior to packing and shipment. Any damage
discovered upon receipt of goods, whether obvious or
concealed, must be reported immediately to the
delivering carrier and claims made directly to them.
Merit assumes no responsibility for damages once the
product has left its facilities and any disputes regarding
transportation damage must be resolved with the
shipping company(s).
Merit will repair or replace, at its option, any
component, part or assembly that fails under warranty,
provided that the failed item is returned, shipping
charges prepaid, to Merit’s repair facility and Merit is
notified of the failure within the warranty period. Merit
reserves the right to request the serial numbers of the
item and/or game which has failed , and copies of sales
invoices, bills of lading or other documents as required
to determine the validity of the warranty coverage. Merit
will return or replace warranty items, as specified
above, shipping charges prepaid, by ground
transportation.
Merit’s obligation shall be limited to repair or
replacement as stated above, and shall specifically
exclude any liability for consequential damages or loss
of earnings.
Merit may, at its discretion, provide replacement parts
under warranty prior to receiving defective items
without incurring any ongoing obligation to extend such
accommodations.
PM0109-0D
In certain instances, due to geographical or other
considerations, Merit may offer PCB warranty service
on an extended time basis as follows:
(a) User notifies Merit in writing (or FAX) of PCB
failure, providing dates of failure, serial numbers
and a brief description of failure symptoms.
(b) Failed PCBs are accumulated for a time
period or quantity accumulation, as designated
by Merit and sent in one shipment to save
shipping expenses.
(c) Merit honors warranty as per dates of failure
notification.
The above terms and conditions constitute the sole
obligation, written or implied, of Merit Industries under
its warranty coverage.
PROPRIETARY
THE INFORMATION CONTAINED HEREIN IS THE
EXCLUSIVE PROPERTY OF MERIT INDUSTRIES,
INCORPORATED AND SHALL NOT BE USED,
DISTRIBUTED OR REPRODUCED IN WHOLE, OR IN
PART, WITHOUT THE EXPRESS WRITTEN
PERMISSION OF MERIT INDUSTRIES,
INCORPORATED.
FCC WARNING
THIS EQUIPMENT COMPLIES WITH THE
REQUIREMENTS IN PART 15 OF FCC RULES FOR
A CLASS “A” COMPUTING DEVICE. OPERATION IN
A RESIDENTIAL AREA MAY CAUSE
INTERFERENCE TO RADIO AND TV RECEPTION
REQUIRING THE OPERATOR TO TAKE WHATEVER
STEPS ARE NECESSARY TO CORRECT THE
INTERFERENCE.
MEGATOUCH™ XL MANUAL
19