1
MPD820_I7.qxd
4/2/04
9:10
AM
Page
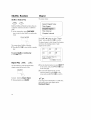
Registering your model with MAGNAVOX
2+
makes you eligible for all of the valuable benefits listed
below, so don't miss out. Complete and return your Product Registration
Card at once to ensure:
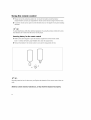
Know these
I G VOX
safety
symbols
Congratulations
on your purchase,
and welcome to the "family!'"
Dear
MAGNAVOX
product
owner:
Thane you for your confidence in MAGNAVOX.
You've selected one of the best-built, best-bacEed
unic may cause all electrical
products
please
power
available today.We'll
to Eeep you happy with
do everything in our
your
purchase
for
the
safety
do not
many years to come.
_
closely
and outstanding service networks
in the industry.What's more, your purchase guarantees you'll receive all the information and special
offers for which you qualify, plus easy access to accessories from our convenient home shopping networE.
Most importantly, you can count on our uncompromising commitment to your total satisfaction.
All of this is our way of saying welcome
for investing in a MAGNAVOX
product.
- and thanes
RS. To get the most from your MAGNAVOX
purchase,
be sure to complete
and return your
Product
Registration
Card
at once.
remove
Tile "exclamation
As a member of the MAGNAVOX
"family," you're
entitled to protection
by one of the most comprehensive warranties
of everyone
shock.
For
in your
household,
product
covering.
point"
calls
: _toen,td°rnet d _h_t u _e_ ofs°erd_i_:_: tYu;:
to prevent
maintenance
WARNING:To
operating
and
problems.
reduce
the
risk of fire
or electric shockchis apparatusshould
not be exposed to rainor moisture_and
objects filled with liquids, suchasvases,
should not be placed on this apparatus.
CAUTION: To prevent electric shock,
match wide blade of plug to wide slot,
fully insert
ATTENTION: Pour &viter les choc
&lectriques.introduire la lame la plus large
de lafichedans la borne correspondante
de la prise et pousser jusqu_au foncL
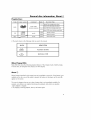
For Customer Use
Enter below the Serial No. which is
located on the rear of the cabinet.
Retain this information for future
reference.
Model No.
Serial No.
IMPORTANT
1. Read
these
SAFETY
INSTRUCTIONS
instructions.
2.
Keep
these
3.
Heed
all warnings.
4.
Follow
12.
Use only with
tripod,
instructions.
the
by the manufactuler"
Do not use this apparatus
near
13.Unplug
7.
only with
Do not block
dry cloth.
Do not install
storms
time.
in accordance
with
instructions.
near
14.Refer
9.
produce
heat,
apparatus
any heat sources
Do not
defeat
(including
amplifiers)
that
15.Battery
prevent
Plug
prong,
convenience
where
cord from
receptacles,
plug
does
usage
CAUTION
To
batter'y leakage which may result in
damage, or damage
•
Do not mix batteries
being
at plugs,
and the point
and new
(old
or"
carbon
and alkaline,
Remove
etc.).
batteries when the unit is not used
for a long time.
16.Apparatus
shall
dripping
not
be exposed
to
or splashing.
they exit fi-om the apparatus,
17.Do
11.Only
to rain or" moisture,
nor'mallx or" has been dropped,
Install all batteries comectly, + and - as
marked on the unit,
•
the power
cord or plug is
•
of the obsolete
on or" pinched, particularly
when the
type plug
for" your" safety, If the provided
for replacement
to qualified set'vice
is required
bodily injury, property
to the unit;
plug has two blades with one
does not fit into your" outlet, consult an
walked
of
have fallen into the appar'atus, the appar'atus
The wide blade or the third prong are
10.Protect
lightning
damaged, liquid has been spilled or objects
not oper'ate
has two blades and a thbd grounding
electrician
outlet.
during
has been damaged in any way,
has been exposed
wider than the other: A gr'ounding
provided
Servicing
such as powel_supply
the
safety purpose
of the ____d
polarized or
grounding-type
plug.
A polarized
all servicing
personnel,
such as r'adiators, heat register's, stoves, or
other" apparatus
this apparatus
or" when unused for" long periods
any ventilation
openings.
Install
the manufacturer's
8.
moving
combination
to avoid injury from tip-over:
water.
6. Clean
a car't is
used, use caution when
all instructions.
stand,
or sold with
the apparatus,When
the cart/appar'atus
5.
cart,
br'acket, or" table specified
use attachments/accessories
specified
by the manufacturer:
not
place
any sources
on the
apparatus
objects,
lighted
18oThis product
of danger
(e.g. liquid filled
candles).
may contain lead and mercul 7,
Disposal of these matedaB may be regulated
due to environmental considemfions,
For
disposal
please
or the
or recycling
information,
contact your local authorities
Electronic
Industries
Alliance
www.eiae.org.
EL 6475-E005:04/01
:
Safety
Precautions
Power Sources
This unitoperatesona suppliedACadaptor,
car adaptor,or a rechargeable
batterypack.
• Makesurethat the inputvoltageof the AC
adaptoris in linewith the localvoltage.
Otherwise,the ACadaptorand unit maybe
damaged.
• Donottouchthe ACadaptorwith wet
handsto preventelectricshock.
• Whenconnectingwith carpower(cigarette
lighter)adaptor,be surethe inputvoltageof
the adaptoris identicalwith carvoltage.
• UnplugtheACadaptorfrom the outlet or
removethe batterypackwhenthe unit is
not usedfor long periodsof time.
• Holdthe plugto disconnecttheACadaptor.
Donot pull the powercord.
• UnplugtheACadaptorto cut the powerif
liquid or objectsgetinsidethe unit.
• Takecarenotto dropthe unit or subjectit to
strongshocks,whichmaycausemalfunction.
Note:Whenthe playeris in usefor a long
periodof time,the surfacewill be heated.Thisis normal.
Maintenance
• Donottouchthe lens!
• If the playeris broughtdirectlyfrom a cold
to a warm location,or is placedin a very
damproom,moisturemaycondenseonthe
lensinsidethe player. If this occurs,the
playerwill not operatenormally.Leavethe
OnPlacement
poweronfor aboutonehourwith no discin
thedisc tray until normalplaybackis
Avoidplacingthe unit in the following places.
possible.
• Underdirect sunlightor neara sourceof
• Avoiddust.Keepthedisctray closedafter
heatsuchas a heater.
use.If thereis dust onthe lens,usea
• Neverleavethe unitin a closedautomobile,
cleaningdiscto clean.
on a dashboardor an unstableshelf.Excess
heatmaydeformthe cabinor causemalfunction.
Handlingdiscs
• Whereit is verydustyor sandy.
• Wet or humidplaces,suchas bathroom.
• Donot attachpaperor tapeto the disc.
• Nearsourcesof strongmagnetism,suchas
• Keepthe discawayfrom directsunlightor
a television,speaker,or magnet.
heatsources.
• Wherethereis a lot of movementor vibra• Storethe discin a disccaseafter playback.
tion, suchas on a cardashboardor an
• Toclean,wipe the discoutwardsfrom the
unstableshelf.
centerwith a soft, lint-freecleancloth.
• Whereit is extremelyhotor cold.
• Wherethe unit is exposedto rainor water.
ForSafety
• Donot disassemble
the unitfor laserrays
are dangerous
to eyes.
Anyserviceshouldbe donebyqualified
servicepersonnel.
Contents
Important Safety Instructions .................................................................. 3
Safety Precautions
....................................................................................
4
About MPD820 ............................................................................................
6
Controls
Main Unit ..........................................................................................................
Remote Control ....................................................................................................
7
8
Power Supply
Using the AC power adaptor ..................................................................................
Using the battery pack ..........................................................................................
9
10
Using the remote control ........................................................................................
12
General disc information,
About Q
...................................................... 13
Basic Operations
Playback ............................................................................................................
Language & channel select, DVD Menu Play, Pause ....................................................
Fast Searching, Slow Play ......................................................................................
Repeat ..............................................................................................................
Shuffle, Random, Digest ........................................................................................
14
15
16
17
18
Bookmark, Zoorn, Scanning CDs ..............................................................................
Subtitles, Angles ..................................................................................................
Using TIME SEARCH ............................................................................................
Programming DVD and CD tracks ............................................................................
19
20
21
22
MP3 Operation and Viewing JPEG files ................................................ 23
OSD: On-screen Display features
General OSD Operations, Title, Chapter ....................................................................
Language, Subtitles ..............................................................................................
Angle, TT Time, CH Tirne, Repeat ............................................................................
Time Display, Playing CDs ......................................................................................
24
25
26
27
Setup Menu functions
General Setup Menu operation ................................................................................
General Setup:TV Display ......................................................................................
SPDIE Captions, Screen Saver, Audio Setup ..............................................................
Speaker Setup, Dolby submenus ..............................................................................
28
29
30
31
3D Processing, LCD, Password Setup ........................................................................
Preference Page: Default, Parental ..........................................................................
32
33
Connecting to additional equipment ......................................................
Technical Specifications ..........................................................................
Troubleshooting ........................................................................................
Limited Warranty ......................................................................................
34
37
38
4o
About MPD820
High Defintion
About DVDs
TheplayeradoptsMPEG2codingformatand
= Title, Chapter
bringsthe horizontalresolutionover500lines.
Tohelpyouskipand searchcontent,the
imagesor musicof a DVDare dividedinto
UniqueFunctions
units.A title is madeupof several
chapters,andeachchapterhasa number
Mutli-AngleandMulti-Languagecapability.
for search(chapternumberingmaynotbe
Parentallockmakesit easyto controlthe
contentof discs.
availableon all DVDs).SomeDVDsmaybe
structuredwith morethanonetitle.
Zoom
Youcanenlargepicturestwo or threeor four
timesthe originalsize.
Youcanalsoshrinkpicturesby 25%-50%.
Multi - Functions
Fastforward,fast reverse,slow play,frame
play,repeatplayand programplay.
CAUTION
Use of controlsor adjustmentsor performanceof proceduresother than
herein may result in hazardousradiation exposureor other unsafeoperation.
Time Search
It cansearcha specificparton a disc,
especiallygoodfor watchingactionmovies.
AudioOutput
Analogaudiooutputor opticaldigitalaudio
outputenablesyouto connectto an amplifier
to enjoyhighquality soundeffects.
Supplied accessories
Makesuretheseitemsareill the package.If
an itemis missing,pleasecontactyourdealer.
•
x Audio/ Videocable
•
x Remotecontrol
•
x Caradaptor
•
x ACpoweradaptor
•
x Rechargeable
batterypack
•
x Warrantycard
•
x Userguide
The set complies with the FCC-Rules,
Part 15and with 21 CFR1040.10.
Operationis subjectto the following
two conditions:
1.Thisdevice may not causeharmful
interference, and
2. Thisdevice mustaccept any interference received, includinginterference that may cause undesired
operation,
Canada
English:This digital apparatusdoesnot
exceedthe ClassB limits for radio noise
emissionsfrom digital apparatusas set out
in the RadioInterferenceRegulationsof
the CanadianDepartmentof
Communications.
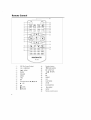
Controls
r
@ @@@@
\
Main Unit
Displaypanel
Speaker
OPEN
_:,
CHG- batterychargeindicator
POWER- powerindicator
Infraredfor remotecontrol
_
+ / -
(,i5}_
MONITOR
_6):,
SETUP
,:17},
TITLE
_,t-_,
Magnet
@
VOLUME
(_[I
II (PAUSE)
_2_:,
• (STOP)
(PLAY)
Directionbuttons:A, T, I_, _
_qo> OK
_tq)
MENU
,:_
2_,
RETURN
_2_
PHONE1 & PHONE
2
AUDIO/ VIDEO
TVOUT/ TFTON
COAXIAL
(DIGITAL
AUDIO
OUTPUT)
DCIN 9V
ON--OFF
,:2
_",
Typeplate
_._ TIP :
* DonotadjusttheTV OUT/TIT ONswitchat random.Keepthe TV OUT/TIT ON switchin
the TIT ON positionwhenthe POWERswitch is setto ON.
Remote
Control
SET
DIGEST
MENU
RESUME PLAYMODE ZOOM
TITLE
REPEAT
A - B
--@
_:iO;
,:ii'_
f
STOP
PAUSE
SLOWPLAY
I
RETURN
_
-TIME SEARCH
':h'--
_
J
MAGNAVOX
<i-
:_,
OSD(On-Screen
Display)
0)) LANGUAGE
@
,._
5;.
I_(IAUDIO
DIGEST
RESUME
MENU
TITLE
I¢
"_7}
_1_
t9_
_
Directionbuttons:A, T, I_,
to;,
• /OK
Numberbuttons
k_) TIMESEARCH
If,. SLOWPLAY
o_,o RETURN
REPEAT
A-B
PLAYMODE
ZOOM
SUBTITLE
Q2]
..(STOP)
_3)
|| (PAUSE)
"2_
ANGLE
SETUP
Remotecontrolsensor
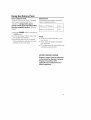
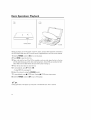
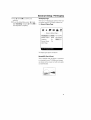
Using the AC power adaptor
I
Connectto power
1 Connectthe player'sACadaptorto the DCIN jackas shown.
2 Plugthe ACadaptorinto a poweroutlet.
v/ TIP:
Turnoff the playerbeforeunpluggingtheACadaptorsoasto avoiddamageto the player.
The type plate is located on the bottom of the player.
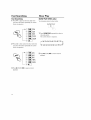
Using the Battery
Pack
Attachthe batterypackproperlyfollowing
the explanationbelow.Make surethat the
batterypackis attachedfirmly to the player
whenusingit. Otherwise,the batterymay
becomedetachedand causeinjuryor
damage.Chargeyourbatterybeforeusing.
Attachingthe Battery Pack
Disconnect
theACadaptorandthepowercord
fromtheplayer,beforeyouattachthe battery
pack.
1 Turnthe playeroff.
2 Turnthe playerupsidedown.
3 Insertthe batterypack'scatchesinto the
player'scorrespondingholes.Then,slide
the batterypackuntil it is attachedfirmly.
Chargingthe Battery Pack
We recommend
youchargein roomtemperature(68°F)conditions.Neverdisposeof in fire
orwater.
1 Turnthe playeroff.
2 Attach the batterypackto the player.
Connectthe suppliedACadaptorandthe
powercordto the player.When charging
starts,the CHGindicatorilluminatesred.
When chargingis completed,the CHG
indicatorturns off.
FJ
v/" TIP:
v/" TIP:
Removethe batterypackfrom the player
whennot in use.
Detachingthe Battery Pack
1 Turnthe playeroff.
2 Disconnectthe ACadaptorand the power
cordfrom the player.
3 Turnthe playerupsidedown.
4 Slidethe batterypack'slock switch,then
slide off the batterypackas shown.
lO
Whenchargingis in progress,do not disconnectthe ACadaptorandthe powercorduntil
the CHGindicatorturnsoff.
Whenthe playeristurnedoff, the charging
time is approximately
4.5-6.5hours
(dependingon environmental
conditions).
Theattachedbatterypackmaybecome
warm whenyouare chargingit or operating the player.This is normal.
A batteryicon _
is shownon the
screenwhen batterypowerpackis running
low.
Using the Battery Pack
Power shutdownmode
Thepowercircuit in yourplayeris designed
with a powershutdownmode.This is
activatedonlyduring battery power
operation ofthe player when the battery
becomescompletely drained.Whenthis
happens:
1 Adjust the POWERswitch on the playerto
the OFFposition.
2 Connectyourplayerto the ACpowerwith
the suppliedpoweradaptor.
3 Letthe playerstandidle for 30 seconds
beforeswitchingon againto resumedisc
operationon ACpowersupply.
Playback time
limes shownareapproximate.
Actualtimes
dependon operatingconditions.
Playeron, LCDdisplay on
2.5 hr.
Playeron, LCDdisplay off
4 hr.
Safety
• Donot usein high temperatureor near
heat sources.
• Neverconnectthe positiveand negative
poleswith metal.
• Donotopenthe battery,referservicingonly
to qualifiedservicepersonnel.
BATTERYDISPOSALCAUTION:
Batteries contain chemical substances,
so theyshouldbe disposedof properly.
Disposein accordance with
applicable local, state/provincialor
federal regulations.
11
Using the remote
control
1 Pleaseremovethe protectiveplastictab (ontop of the batteryinsidethe battery
compartment)
if youhavejust unpackedthe remotecontrolandare usingfor the first time.
2 Tousethe remotecontrol,pointit at the infraredsensoron the player'sfront panelavoiding
obstacles.
_W" TIP:
Toavoidinterferencewith otherelectricalequipment,try usingthe remotecontrolwith a minimumdistanceof 7 inchesfromthe sensoronthe player.
Inserting battery for the remote control
1 Referto the abovediagramto openthe batterycompartmentof the remotecontrol.
Insert1 x lithium3V battery,type CR2025,
thenclosethe compartment.
2 Removethe batteryif the remotecontrolis not usedfor longperiodsof time.
#
XS
13
TIP:
Generally,batterieslast for aboutoneyear.Replacethe batteriesif the remotecontroldoesnot
work.
Batteries contain chemical substances,so theyshouldbe disposedofproperly.
12
General disc information,
About ®
Playable Discs
TYPE
DISC: LOGO
CONTENT
SIZE
12CM
audio video
DVD
(motion pictures)
8CM
PLAYING TIME
about 2hrs (single-side
disc)
about 4hrs (double-side
disc)
about 80 rains (single-side
about 160 mins (double-side
CD
audio
DIGITAL
AUDIO
audio
MP3
12CM
about 74 mins
8CM
about 20 rains
8CM
about 600 rains
disc)
disc)
• Themarksshownin the followingchartare usedin the manual.
MARK
INDICATION
functions of DVD
functions of CD
When Playing DVDs
ManyDVDdiscshavethe following playbackfeatures:Title,Chapter,Audio, Subtitle,Angle,
TT(]qtle)Time,OH(Chapter)Time,Repeat,andTime Display.
About Q
All thefeaturesdescribedin this manualmaynotbe availableon everydisc.If the featureis not
availableon the disc,youwill be unableto operatethefeatureon the player,andthe icon®
appearson the screen.
Thiscanalsohappenwhenyoutry to playa featurethat is not immediatelyavailable.For
example,somefeaturesare enabledonlyduringdisc playback,while othersare possible
onlyif playbackis stopped.
• Trystoppingor startingplayback,thentry the featureagain.
13
Basic Operations:
Playback
%
%
T
POWER
ON/OFF
OPEN
VOLUME
Beforeyoubegin,turn onthe powerof yourTV,stereo,andanyotherequipmentconnectedto
the DVDPlayer.MakesuretheTVandthe stereo(if applicable)are setto thecorrectchannel.
1 Slidethe POWERswitchto ONto turn on the player.
2 PressOPENto openthe disctray.
3 Placea disc intothe tray.If the DVDis recordedon onlyone side,placethe discin thetray
with the labelfacing upandthe shinysidefacingdown.SomeDVDsare recordedon both
sides.Make surethe labelof the sideyouwant to playis facing up.
4 Pressthe tray doordownto closethe tray.
5 Tostartplayback,press_ (PLAY)/OK.
- ToplayMP3CDs,seepage23.
6 Adjustthe volumebyusingthe VOLUMEcontrol.
7 Tostopplayback,press• (STOP)
once.Pressing• (STOP)
twice stopsresume.
8 Slidethe POWERswitchto OFFtoturn offthe player.
TIP:
Duringoperationof the playeryoumay heara mechanicalnoise.This is normal.
14
Language & channel select, DVD Menu Play, Pause
DVD Language selection
Differentdiscsdiffer in languages.Youcan
selecta languagein a variety of ways:
• Usingthe 0SDto enterthe Audio
submenuto select.If a languageis
includedfromthis Audiosubmenu:
English
French
Spanish
Chinese
Japanese
is recordedon the disc,you can select
sounds,subtitlesor disc menulanguages.
If not, the languagerecordedon the disc is
shown.
• PressLANGUAGEO)), the screen
showsin sequence
Some DVDs have title menus and chapter
menus.
1 PressI_ (PLAY)/OK,to start playback
Menu.
2 Press_ or _, to skip the next or
previous title/chapter.
3 Pressthe number buttons to select another
title/chapter.
• PressTITLE/MENU
once or more to return
to the respective menu / resume playback.
Pause and Frame-by-frame
Playback (for DVDs only)
1 Duringplayback,pressII(PAUSE).Playwill
pauseandthe soundwill be mute.
_,udio 1/2:AC3
Audio
5.1CH
2 Whenplayinga DVD,pressII(PAUSE)
repeatedlyto seethe pictureadvanceone
frameat a time.Thesoundwill remain
mute.
• PressingII(PAUSE)repeatedlyduringAudio
CD,MP3,or JPEGplaybackwill haveno
effect.
2/2:AC351CH
.......................................................................
J
3 Press_ (PLAY)/OK
to resumenormalplayback.
Channel select (for DVDs & CDs)
You mayselectthe rightchannelor left
channelor stereofrom a multi-channeldisc.
• PressAUDIO _[(], the screenshowsin
sequence:
S¸
-_
Mono Right
Mix-Mono
Stereo
...........................
ii
....................................
15
Fast Searching
Slow Play
Fast Searching
SLOW PLAY (DVDsonly)
1 Press_,_,to playfast forward.Eachtime
youpressthe buttonrepeatedly,the screen
showsin sequence:
Youcallenjoyscenesill slowmotion.
--_F_I} _
SLOW PLAY
2X
_4X
1 8x
'_ _16X
'_ _
1 PressSLOWPLAYrepeatedlyto selecta
slow playoption.
Thescreenshowsin sequence.
32X
2 Press_,_ to fast reversethe disc.Eachtime
youpressthe buttonrepeatedly,the screen
showsin sequence:
--_'_
_
2X
E_
4X
r q8x
'_ _
32X
3 Press_ (PLAY)/OK
to resumenormal
playback.
16
2 Press_ (PLAY)/0Kto resumenormal
playback.
Repeat play options
Repeatingselective segments
YoumaypressA-B to playselective
segmentsrepeatedly.
Repeat Play
REPEAT
1 PressI,,- (PLAY)/OK
to startdisc playback.
2 Whenthe discreachesthe pointwhereyou
want repeatedplaybackto begin,press
Thisbuttoncanbeusedto repeata title,
chapter,track,disc,or a specificportionof a
disc.
A-B.
Thescreenshows:
k
DVD and CD repeat options
Youmay repeata title or chapter.
| Torepeata chapter,pressREPEAT.
Thescreenwill show
S
"\
L
J
Chapter
/
2 Torepeata title, pressREPEATagain.
Thescreenwill show
/
_'
k J " Title
jA
3 Whenthe disc reachesthe point where
youwant to endthe segment,pressA-B
again.Thesegmentwill beginplaying
repeatedly.
• Ona DVD,makesurethe entireA-B
segmentis within a singleChapter.Ona
VideoCDor AudioCD,theA-B segment
shouldbe within a singletrack.
Thescreenshows:
S
j
_X
\ j
AB
j
3 Repeatall:
PressREPEATseveraltimes.
Thescreenshows",k /_ ALL".
To cancel repeat playback
• PressREPEATagainuntil " ,L _/ ALL"
disappears.
Tocancel and resume normalplayback
• PressA-B again until " \," J-" A B"
disappears.
17
Shuffle, Random
Digest
Thescreenshows:
Shuffleor RandomPlay
-x
S
Select Digest Type "
BoththeShuffleandRandom
optionsallowyou
to playthecontentsof yourdiscin a different
order.
Title Digest
1 Indiscstopposition,pressPLAYMODE
Title Interval
onceor moreto selectshuffleor randomplay
mode.
PLAY MODE
ThescreenshowsShuffleor Random:
Chapter
Interval
Usethe • or • buttonsto select"Chapter
Digest"andpress• (PLAY)/OK
to confirm.
Theplayerbeginsto lookthroughthe chapters,
andshowsthe startingpictureof each
chapteronthe screen.
2 Press• (PLAY)/OK
to startshuffleor random
play.
Tocancel shuffleor randomplay
• Press•(STOP).
Select(01-26):
m ..... 01)Nex t
Type : Chapter(Title
/
_-2
Digest Play _
i-
.
Usethis functionto scanthroughthetitle/
chaptercontentofthetrackor disc.
DIGEST
I
Example
• SelectingChapterDigest
1 DuringplaybackpressDIGEST.
18
Exit
2 Usethedirectionbuttonsto selectNEXT
on the screen,and press• (PLAY)/OK
to go
to the next page.
3 Tocancelthe digestfeature,usethe
directionbuttonsto selectExit onthe
screenand press• (PLAY)/OK
to confirm.
v/TIP:
If youhavestoredbookmarkson a DVDdisc,
there will be one moredigestoption:
BookmarkDigest.
Bookmark
Zoom,
Scanning
CDs
Bookmark
Zoom Play
Thebookmark
feature lets youmarka pointon
the discthat youcango to quickly.Youcan
store upto 12 bookmarksperdisc.Whenyou
turnthe playeroff or removethe disc,bookmarksare cleared.
Thisfunctioncall be usedto watch a motionor
still picture.Theplayerhas3 zoomin 2X,3X,
4X and3 zoomout views1/2, 1/3, and 1/4.
Creatinga Bookmark
1 Duringplayback,pressRESUMEon the
remote.
--*The Bookmark Menu appears.
2 Whenyou reachthe sceneyou want to
mark,press• (PLAY)/OK
3 If you want to mark anotherpoint, press
• the buttonto movethe cursorto next
spot.Whenyou reachanothersceneyou
want to mark,press• (PLAY)/OK
--*pressRESUMEto closethe Bookmark
Menuand resumeto normalplayback.
Using a Bookmark
1 Duringplayback,pressRESUME.
--*The Bookmark Menu appears.
2 Usethe directionbuttonsto highlightthe
bookmarkedsceneyouwant to play.
3 Press • (PLAY)/OK
to go to the placeyou
marked.
1 PressZOOMduringplayback.
Thescreenshows:
Yourpictureis enlargedtwice the originalsize.
2 PressZOOM repeatedlyto further enlarge
by3 times(3X)or 4 times(4X).
3 Forzoomout viewsony press<, A, T, •,
to movethe enlargedpicture.
4 Tocancelzooming,pressrepeatedly
ZOOM until the picture is in normalsize.
Scanning CDs
1 Instopmode,pressDIGEST
Thescreenshows:
/-
\\
Scan
J
Z
\
/
-'*The playerscansfirst ten secondsof each
track.
To cancelScanningandplayback:
• press• (STOP).
STOP
i19
Subtitles
Angles
Selecting DVD Subtitles
Angles
Thisoperation
worksonlywith discsonwhich
multiplesubtitlelanguagearerecorded.
Somediscshaveimageswith a numberof
differentviewingangles.Forexample,whenyou
watcha runningtrain,youmaywatchit from
thefront,the left windoworthe rightwindow
withoutstoppingit.
1 PressSUBTITLE_
repeatedlyuntil the
desiredlanguageis selected.
Thescreenshows
S
..........................................................................
Example:
If DVDhasfourviewingangleoptions.
1 Press_
to selectANGLE1.
SCREEN
Subtitle 01/03:ENGLISH
]
1/4
To cancel subtitle :
• PressSUBTITLE_
repeatedlyuntil the
screenshows"SubtitleOff"
2 Press _
repeatedlyto selectother
angles,the screenshowsrespectively:
v/" TIP:
• Forsomediscssubtitlescannotbe
removed.
• Differentdiscsdiffer in the languageof
subtitles.
2O
8£:q
2/4(selectANGLE2)
8Sq
3/4(selectANGLE3)
8_
4/4(selectANGLE4)
3 Toresumenormalplayback,press _.
Using TIME SEARCH
With this button,youcantogglebetween3
TIMESEARCH
options.Youmaydirectlyentera
time,title or chapternumberto fast searchona
disc,andplayfrom that point.
How to search a DVD title or a
chapter
Forexample:Searching
to chapter2 ill title 6.
1 PressTIME SEARCH.
Selecting to play your DVDfrom a
specific elapsed playback time:
1 PressTIMESEARCHrepeatedly
untilthe
screenshows:
Track : --/xx,
where xx denotes the total number
of tracks on your CD.
-*CD playbackwill startfrom the selected
tracknumber.
Thescreenshows:
Title 03/30 Chapter _/04
2 Pressa directionbuttonand movethe
cursorto highlightthe title number.
Thescreenshows:
Title #_130 Chapter 01/04
3 Pressbutton6 to selecttitle 6.
Thescreenshows:
I
Title O6/3OChapter 01/04 I
4 Repeatthe stepsabove,selectchapter2 in
title 6.
21
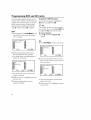
Programming
DVD and CD tracks
To playbacka DVD/CDprogram:
Tousetheprogramplayback
feature,youmust
enterthe orderin whichyouwantthetitles (and Youcanplayyourprogramby highlighting
chapters)
on theDVDorthe tracksonthe CDto
Startandpressing• (PLAY)/0K
playbycreatinga program.Program
display
TIP:
optionsmayvaryaccording
to yourDVDand
If the chaptersor tracksyouwant to program
showTT-- (Title)aswell as61-1--(Chapter).
aremorethan 10,youcanhighlightNEXTand
press• (PLAY)/0K
to go to the nextpage.
DVDs
1 DuringplaybackpressPLAYMODEonceor To cancel a program
moreuntil the screenshowsthe program
box.Forexample:
• Press• (STOP)
until Program:Off
appears.
Program:
CDs
1 PressPLAYMODEuntilthe screenshows:
Chapter
(01-35)
r_l__
[]-D-D-D--
Io71-r___
D-[]--
2 Usethe numberbuttonsontheremoteto
enterthechapteryouwantto playfirst.
-*The chapternumberyouenteredappearsin
thebox.Thescreenshows:
Program: Chapter (01-35)
[] 08
[]
___
Ib'-4
__
D__
r_l __
lUTl__
lUa__
D-ITa__
-*The cursorjumpsto the nextspot in the
programlist section.
3 Makesurethe boxis highlightedand enter
yournexttrack.
4 Continueaddingchaptersuntil your
programis complete.
22
Program: Track (01-20)
ro_
_-___
Ib-a__
iS-d__
__
1571__
158__
I_1__
[]__
2 Usethe numberbuttonson the remoteto
enterthetracknumberyouwant in the box.
Thescreenshows:
Program: Track (01-20)
[] 08
D-Iba__
D--
D-to7{- r_l__
D-[]--
-*The cursorjumpsto the next spot in the
programlist section.
3 Makesurethe boxis highlightedand enter
yournexttrack.
Playing MP3 discs
Viewing JPEG files
MP3
Programming MP3 tracks
SelectTrackswith Menu
1 Inserta disc,the playerreadsthe disc.The
TVscreendisplaysmainmenu.
1 Ill stop mode,pressPLAYMODEonceor
moreto bringupthe filelist.
2 Usethedirectionbutton• to selectthe
songswhich youwant to be programmed.
PressRESUMEto confirm,and "Add to
Playlist" will be displayed.
3 Whenyourprogramis complete,press
PLAYMODEagain,"Playlist" will be
displayed.Press• (PLAY)/OK
to start
playback.
I
0:00
001/012
00:00
Folder
(_
1
2 Press• to selecta musicfolder.Press•
(PLAY)/OR
to confirmselection.Example:
SelectCD02•
Tocancel yourprogram
• Yourprogramis to start playback
memorisedbythe player,and is
deleted/cancelled
whenyouremoveyour
MP3discfrom the player.
OtherMP3 functions
00:00
001/012
00:00
Folder
_
DuringplaybackMP3discs,the unit features
mute,volumecontrol,repeatplayandetc.
Operationsarethe sameas CD.
wave-12
wave-13
_
wave-11
wave-14
i1
Viewing JPEG files
wave-15
Youcall alsoview JPEGstill photoson this
player.
3 Usethe directionbuttonsto selecta track.
1 Inserta disc,the playerreadsthe disc.
Press• (PLAY)/OK
to startplayback.
2 Press• to selecta picturefolder.Press•
4 Instop mode,selectthe foldericonon the
(PLAY)/OK
to confirmselection.
left side,thenpress• (PLAY)/OK
to
3 Usethedirectionbuttonsto selecta track.
returnto the mainmenu.
Press• (PLAY)/OK
to view a photo.
5 Press_ or_,q to playa previous
ornexttrack. -_ If yourfoldercontainsmorethanone
photo,the playerwill then automatically
enterthe slideshowmode.Usingthe full
displayscreen,this showsthe rest of the
JPEGfiles, one-by-one,locatedin the
selectedcurrent folder.
23
General
OSD Operations
OSD operation (for DVDs and
CDs)
OSD: Title,
Chapter
Selecting Title
Somediscscontain morethan onetitle. Each
title is dividedinto chapters.Toselecta title:
TheOn-ScreenDisplay(OSD)containsmany
playbackfeatures.
| Whilethe disc is playing,pressOSD on
• Toseethe OSDMenu,pressthe OSD
the remoteto bringupthe Menu.
buttononthe remotecontrolwhilea disc is
2 If "Title" on the Menuisn't highlighted,use
playing.DuringOSDMenuoperation,your
the directionbuttons• or • to highlightit.
picturezoomsout.
• Usethe directionbuttons• or • to move
3 Press_ (PLAY)/OKTheboxto the right is
will be highlighted.
throughthe differentplaybackfeaturesin
the OSDMenu.Whena playbackfeatureis
4 Usethe numberbuttonson the remote
highlighted,press_ (PLAY)/OI(andthe box
controlto entera title numberthat you
to the rightwill be highlighted.
want to play.
• Usethe directionbuttons• or • to move
throughthe choices.
v/ TIP :
• Toreturnto the normalplaybackscreen,
Somediscsonlyhaveonetitle.
pressthe OSDbutton.
Selecting a Chapter
Youcan skipto a specificchapterby using
the Chapterfeature in the Menu.
| Whilethe disc is playing,pressOSDonthe
remoteto bringup the Menu.
2 Pressthe directionbuttons• or • to highlight "Chapter".
3 Press_ (PLAY)/OK,
the boxto the rightis
will be highlighted.
4 Usethe numberbuttonson the remoteto
entera chapternumberthat youwant to
play.
_/" TIP:
TheChapterfeaturewon't work if the disc
isn't formattedwith separatechapters.You
canalsoadvanceto the nextchapterby
pressing_ onthe remotecontrolandgo to
the precedingchapterbypressing_,q.
24
OSD: Language
Subtitles
Changing the Audio Language
Changing the Subtitle language
If the disc was createdwith different
languagetracks(recordedin different
languages),youcan usethe OSDMenuto
temporarilychangethe DVDplayer'sAudio
Languagesetting.
If the disc was createdwith different
subtitles,you canusethe OSDMenuto
changethe Subtitle language.
1 Whilethe discis playing,pressOSDon the
remoteto bring upthe Menu.
1 Whilethe disc is playing,pressOSDonthe
2 Pressthe• or • to highlight"Subtitle".
remotecontrolto bringup the Menu.
2 Pressthe directionbuttons• or • to
highlight"Audio".
3 Press_ (PLAY)/OK,
the audiolanguages
appearonthe screen.
4 Pressthe• or • to movethroughtheaudio
languages
thatareavailableonthedisc.Press
the_ (PLAY)/OK
whentheaudiolanguage
youwantto useis highlighted.
YJt/ TIP:
TheLanguage
featureonlyworksif the discwas
createdwith multipleaudiotracks.Whenyou
choosean audiolanguage
fromthe OSDMenu,
youonlyoverridethe audiolanguagesettingin
the DVDplayer'smainmenutemporarily.
Theaudio languagecanalsobechanged
throughthe DVDplayermenu.
3 Pressthe_ (PLAY)/OK,
the subtitle
languagesappears.
4 Press• or • to movethroughthe subtitle
languages
that are availableonthe disc.
Press_ (PLAY)/OK
whenthe subtitle
languageyouwant to useis highlighted.
Dv/" TIP:
Changingthe subtitlelanguagewith OSD
will onlyaffect the disccurrentlybeing
played.Whenthe disc is removedor the
playeris turnedoff,the subtitlelanguage
will revertto the languagesettingspecified
throughthe DVDplayermainmenu.
Thesubtitlelanguagecanalsobe changed
by usingthe SUBTITLE_
button(see
page20,SelectingOVOSubtitles.)
25
OSD: Angle,TT Time, CH Time, Repeat
Changing the Camera Angle
Repeat
SomeDVDscontain scenesrecordedfrom
different angles.Thecameraanglewill not
changeif the DVDdoesnotcontain
sequencesrecordedfrom different camera
angles.
| Whilethe disc is playing,pressOSDonthe
remotecontrolto bring upthe Menu.
2 Press• or • to highlight"Angle".
3 Press_ (PLAY)/OK,
the boxto the right is
now highlighted.
4 Usethe numberbuttonsto enteran angle
numberthat youwant to play.
Thedefault modefor the repeatfeature is
Off.Thereare three repeatoptions:
• C} Chapter- repeatsthe chapterthat is
playing
• C} Title- repeatsthetitle that is playing
Setting TT (Title) Time
Youcanskipto a specifictitle time by using
the "IT(Title)Time feature in the Display.
| Whilethe disc is playing,pressOSDonthe
remotecontrolto bring upthe Menu.
2 Press• or • to highlight"TT(Title)Time".
3 Press_ (PLAY)/OK,
the boxto the right is
now highlighted.
4 Usethe numberbuttonsto entera title time
that you want to play.
Setting CH (Chapter) Time
Youcanskipto a specificchaptertime by
usingthe CH (Chapter)Time feature in the
Menu.
1 Whilethe disc is playing,pressOSDon
the remotecontrolto bringupthe Menu.
2 Press• or • to highlight"CH(Chapter)
Time".
3 Press_ (PLAY)/OI(,
the boxto the right is
now highlighted.
4 Usethe numberbuttonsto entera chapter
time that youwant to play.
2,5
• {} All - repeatsthedisc that is playing
• Off
1 Duringplayback,pressOSDonthe remote
controlto bringupthe Menu.
2 Press• or • to highlight"Repeat"
3 Press_ (PLAY)/OK,
the repeatoptions
appears.
4 Press• or • to movethroughthe repeat
options.Press_ (PLAY)/OK
whenthe
repeatoptionyouwant to useis
highlighted.
5 Tocancelrepeat:
• Gotothe Repeatfeaturein the Menuand
selectOff.
OSD: Time Display
Playing CDs
Changing the Time Disp(Display)
CDdiscshavethe following playback
features:Track,Disc11me,TrackTime,
Repeat,andTime Display.
Youcallchangethetime displayedonthe
screen:]1tieElapsed,
TitleRemain,Chapter
Elapsed
andChapterRemaining.
| Whilethe disc is playing,pressOSDonthe
remotecontrolto bringup the Menu.
2 Press• or • to highlight"Time Disp".
3 Press_ (PLAY)/OI(,
the time options
appears.
4 Press• or • to movethroughthe time
options.Press_ (PLAY)/OK
whenthe
optionyouwant to useis highlighted.
Changing the Displayed Time
Youcanchangingthe time displayedon the
screen: Single (Track)ElapsedTime,
Single (Track)RemainTime, Total (Disc)
ElapsedTime, andTotal (Disc)Remain
Time.
1 Whilethe disc is playing,pressOSDonthe
remotecontrolto bringup the Menu.
2 Press• or • to highlight"TimeDisp".
3 Press_ (PLAY)/OK,
the time options
appears.
4 Press• or • to movethroughthe time
options.Press_ (PLAY)/OK
whenthe
optionyouwant to useis highlighted.
Selecting a specific track
1 Whilethe discis playing,pressOSDon
the remotecontrolto bringupthe Menu.
2 Press• or • to highlight"Track".
3 Press_ (PLAY)/OK,
the boxto the rightis
nowhighlighted.
4 Usethe numberbuttonsto entera track
numberthat youwant to play.
Repeat
Thedefault modefor the repeatfeature is
Off. Thereare two repeatoptionsfor CUs:
• All- repeatsthediscthat is playing
• Track-repeatsthe currenttrackthat is
playing
| Whilethe discis playing,pressOSDon the
remotecontrolto bringupthe Menu.
2 Press• or • to highlight"Repeat".
3 Press_ (PLAY)/OI(,
the repeatoptions
appears.
4 Press• or • to movethroughthe repeat
options.Press_ (PLAY)/OI(
whenthe
repeatoptionyouwant to useis
highlighted.
27
General Setup Menu operations
Thescreenshows:
Menu Setting
Functionsmayvery accordingto the Disc
and youradditionalequipmentsuchas
connectingwith speakersytstem.Setthe
following functionsfor the playerto obtain
the bestviewing status.
1 PressSETUPto enterthe SetupMenu.
SETUP
-- AudioSetup Page -Dotby Digital Setup
Equalizer
3D Processing
Main Page
F ........................
TheSetupMenuappearson the screen,with
iconsacrossthe top of the screen,illustrating GeneralSetup,Audio Setup,LCDSetup
Page,PreferenceSetup,PasswordSetup,and
ExitSetup.
Thescreenshows:
• Press• or • to highlight"Dolby Digital
Setup",and press• (PLAY)/0Kto enter
"Dolby Digital Setup"page.
Thescreenshowsthe submenu:
-- Dolby Digital Setup
-- Setup Menu -- Main Page --
--
D.R.C.
L - Mono
Audio Setup
R - Mono
Mix - Mono
Audio Setup
Preference Setup
Password Setup
Exit Setup
• Press • or • to select"L - Mono
Thescreenshows:
2 Press• or • to selectyour optionand
press• (PLAY)/0Kto confirm.
Example:Press• to highlight"Audio
Setup",press• (PLAY)/0Kto enter
"Audio Setup Page"
28
-- Dolby Digitai Setup
--
stereo
D.R.C.
Audio Setup
R - Mono
Mix - Mono
General Setup: TV Display
• Press• (PLAY)/OK
to confirmyour
selection.
3 Toexit the SetupMenu,pressTto highlight"Exit Setup"andpress• (PLAY)/OK
to
exit SetupMenucompletely.
TV Display Page
Thereare 3 TVdisplaytype optionswhichyou
can selectfromthe TVDisplaysubmenuon
the General Setup Page.
-- General
Setup Page
--
Normal/PS
SPDIF Output
RAW
Captions
On
Screen Saver
On
Normal/LB
Main Page
TVdisplaytypeoptionsasfollows:
Normal/PS (Pan& Scan)
This is selectedwhenthe playeris connected
to a standardscreenTV.Widescreenimages
are shownon the screen,butwith someparts
cut automatically.
29
SPDIF, Captions,
Screen
Saver, Audio
Normal/LB (letterbox)
This is selectedwhenthe playeris connected
to a standardscreenTV.Widescreenimages
are shownon the screen,with a blackframe
onthe top and bottom.
Setup
Captions(closed Captioning)
Screencaptionsareavailableonlyon DVDsand
TVsencoded
with thecaptionfunction.For
DVDswhichhavecaptions,youwill needto
connectyourplayerto yourTVin orderto select
andenablethecaptionon/offoption.
• On
Theclosedcaptionis shown.
• Off
Theclosedcaptionis turnedoff.
Wide
This is selectedwhenthe playeris connected
to a widescreenTV.
ScreenSaver
Whenthescreensaveris on,the screensaver
imageappearswhen the playerstopsorthe
imageis frozenfor a few minutes.
• On:Enablesthe screensaver.
• Off:Disablesthe screensaver.
TIP:
Audio Setup
Thesubmenustructureis:
Youcanalsopressthe MONITORbutton on
the playerto changethe displaymode
between"4:3"and "16:9".
SPDIFOutput
• SPDIFOFF:Nosignalis outputfromthe
digitalport.
• SPDIF/RAW:
Selectthiswhenthe DVDplayer
is connected
with a digitalamplifierthrough
digitalport.Whena DolbyDigitaldiscor
MPEGdiscis played,thedigitaloutputwill be
optional.Thepoweramplifierto be
connected
musthaveDolbyDigitalandMPEG
decoding.
• SPDIF/PCM:
Selectthiswhenthe DVDplayer
is connected
with a 2-channel
digitalstereo
amplifier.Whena DolbyDigitalor MPEGdisc
is played,the digitalportwill outputin
PCM2-channelformat.
-- Audio Setup Page --
Dolby Digital Setup
Equalizer
3D Processing
Main Page
MPD820_I7.qxd
4/2/04
Speaker
9:10
Setup,
AM
Page
3_
Dolby submenus
Speaker Setup Page
• D.R.C
Thesubmenustructureis:
TheDynamicRangeCompression
(D.R.C.)is
usefulfor nightime viewing. DRCreduces the
highsand lows by compressingand levelling
outthe volumerangeduring disc playback.
-- Speaker
Setup Page
-
f
ht/Rt
Audio Setup
-- Dolby Digital Setup -Dual Mono
DIRIC.
STR
--
--FULL
--
--
_
_3/4
--
--I/2
--
--1/4
Audio Setup
• Lt/Rt
Theoutput signalwill be incorportedto left
and right channel.
• Stereo
Theoutput signalwill be incorportedto
stereo.
Dolby Digital Setup Page
Thesubmenustructureis:
__1_ -h
OFF
_..,_a:J :lt]l_:l
Equalizer Page
Youcan selectgraphicequalizeroptions
accordingto the genreof the musicbeing
played.
-- Dolby Digital Page -L
Stereo
-- Equalizer Page --
D.R.C.
Audio Setup
R-Mono
Mix-Mono
Rock
Pop
Live
Dance
Techno
Classic
l,,1_a
l_lil
i_I'_I'_i
_I'_i_I
• Dual Mono
This is the output modeof the L and R
signalsof the set audio output.If it is set to
"Mix-Mono", the functiononly workswhen
the DVUbeingplayedis 5.1-channel.
Soft
Thesetting structureis:
• Press• or Tto selectyour EQoption.
Confirmby pressing• (PLAY)/0K
31
3D Processing,
LCD, Password
Setup
3D Processing Page
Password Setup Page
Thesubmenustructureis:
Thesubmenustructureis:
-- 3D Processing Page -
-- Password Setup Page
on
Reverb Mode
Off
Audio Setup
.orma_
Password
Main Page
_'gJ|vill t11_1
I[,._Tt'MI_ I
• V SURR(Virtual Surround)
Youcanselectto turntheVirtualSurround
soundon andoff.
• ReverbMode
ReverbMode allowsyouto optimisesound
effects.Selectfrom8 options,or none(off):lift,
Concert,LivingRoom,Hall, Bathroom,
Cave,Arenaor Church
PasswordMode
• On:passwordmodeactivated."PARENTAL"
isdimmedandcannotbe selected.
• lift: The passwordis swichedoff,
"PARENTAL"
canbe selected.
ChangingyourPassword
Selectthe Passwordsubmenuto changethe
code.Thescreenshows:
Monitor Setup Page
PressMonitor to changethese display
Otd Password
settings:
New Password
1 Brightness
Youcan usethe + or - directionbuttons
Confirm PWD
to adjust the brightness.
2 Color
Youcan usethe + or - direction buttons
to adjust the color.
3 Display Mode
Youcanusetile + or - buttonsto change
the displaymode.
• Normal
Thepictureis ill normalsize.
• Full
Thepicturewill fit onfull screen.
32
Followthe screeninstructions
to enteryour
password.
_t/" TIP:
Thedefaultpasswordis 99999
Preference
Page: Default,
Thesubmenustructureis:
-- Preference
Parental
How to set your Parental Lock
Password
Page --
Subtitle
ENG
French
Disc Menu
ENG
Spanish
Country Region
Parental
USA
08
Chinese
Japanese
Default
Main Page
1 Whenill the disc stopposition,press
SETUPon the remotecontrolto enterthe
"Setup Menu - Main Page".
2 Press• to highlightPreferenceSetup.
3 Pressthe • (PLAY)/0Kto confirmandenter
the PreferencePage.
4 Press• to highlightParental.
5 Usethe • andthe •or•
to selectyour
DVDrating.Press• (PLAY)/0K
to confirm.
- Whena discthat is ratedhigherthanthe
parentallockset ratingis played,thesecurity
passwordwill berequired.
FJ
_'/" TIP:
TIP:
The"Preference Setup"only canbe selected whenthe playeris in stop mode.
Default >> Reset
Eachfunctionsettingreturnsto the default
setting if youselectthis option.
Parental
With the parentallockfunction,you may
selectan age control ratingfor playbackof
discson the player.Forexample,youcan
selectand lock onto"PG",wherebyyou cannot playdiscsrated higherthan PG.TheDVD
ratingsavailableonthis playerare:
1 KIDSAF
2G
3 PG
4PG 13
5 PGR
6R
7 N017
8 ADULT
- Forsecurity,whenthePasswordisset Onthe
parentallockfunctioncannotbe selected.You
will needto switchyourPassword
Offfirst
(seepage32,Password)
- SomeDVDsarenotencodedwith a rating,
althoughthe movieratingis printedonthe
disccase/packaging.
Theparentallockwill
notblockviewingof suchdiscs.
- Magnavoxcannotguarantee
the availability
of parentalcontrolwith all discs,andthereforedeniesanyliabiltyassociatedwith
unintended
viewing.
33
MPD820_17.qxd
4/2/04
Connecting
9:11
AM
Page
to additional
[]
/
/
3_
equipment
\,
J
/
TV OUT
Youcan connect the player to a TV or an amplifier to enjoy DVDsor karaoke.
Connectinga TV and a Stereo/Amplifier (see [])
1 Connectthe yellow endof the suppliedcableto the VIDEOIN jackof the TV.Connectthe
blackendto the AUDIO/VIDEO jack on the player.
2 Connectthe red endof samecableto theAUDIOIN Rjack on the speaker.Connectthe
white endto the AUDIOIN Ljack on the speaker.
3 Connectthe ACadaptorintothe DCIN 9V onthe player.Connectthe otherend ofthe AC
adaptorinto a poweroutlet.
Using Headphones
• Insertheadphones
intothe PHONESjack of the player.
• Turnoff the powerwhen insertingor disconnectingheadphones.
Take care when usingheadphones
•
•
34
Hearingsafety:listenat a moderatevolume.Usingheadphones
at highvolumecan
impairyourhearing.
Trafficsafety:do not usewhile drivingor cyclingas youmaycausean accident.
MPD820_17.qxd
4/2/04
Connecting
9:11
AM
Page
to additional
3_
equipment
Connectingto a TVOnly
TVhasonlya singleAntennaIn or RF-Injack
Before you begin, make sure you have an RF modulator and extra RF coaxial cables.
These are not supplied with the player, but are available from Magnavox or most
consumer electronics retailers.
Connectthe black end of the suppliedcable to the player'sAUDIO/ VIDEOjack.
Connectthe otheryellow end tothe VIDEOIN jack on the RFmodulator.TheVIDEOIN
jack onthe RFmodulatoris usuallyyellowand mightbe labelledVIDEO,CVBS,COMPOSITE,
or BASEBAND.
2 Connectthe red end of the samecable to one of the AUDIOIN jacks on the RF
modulator.Audiojackson the RFmodulatorusuallyare red(right)andwhite (left).Matchthe
cablecolorto the jack color.
3 Youprobablyalreadyhavean antennaor CableTVsignalconnectedto the ANTENNAIN jack
onyourTV.
Disconnectit now fromtheTV. Reconnectthe antennaor CableTV signalto the
ANTENNAIN jack on yourRFmodulator.
35
MPD820_17.qxd
4/2/04
Connecting
9:11
AM
Page
3_
to additional
equipment
Connectan RFcoaxial cable (not supplied)to the RF OUT,ANTENNAOUT,or TOTV
jack on the RFmodulator. TheRFOUTjack maybe labelleddifferentlyamongdifferent
brands.Referto the instructionsprovidedwith yourRFmodulator.
Connectthe otherend of the sameRFcoaxial cable to the
ANTENNA IN or RF IN jack on yourTV.
YourRFmodulatorshouldhavea Channel3/4 switch.Thesettingofthis switch determinesthe
TVchannelon whichyouwill watch materialsplayingonthe DVDPlayer.
Setthe RFmodulator's Channel3/4 switch to either3 or 4,whichever TVchannel is
leastused in yourarea. If yourRFmodulatorhasa modulator/antenna
switch,set it
accordingly.Referto the instructionsthat camewith the RFmodulator.
Turnon yourTV and choose channel3 or 4. Choosethe samechannelto which youset
the RFmodulator'sChannel3/4 switch.
Connectthe player'sAC adaptorto a poweroutletand turnon the DVD player's
POWERswitch to ON. If no discis ill the player,youshouldseethe player'sscreen
saveron the TVscreen.
36
MPD820_17.qxd
4/2/04
9:11
AM
Page
3_
Technical Specifications
Laser
wavelength 650mm
Video system
Frequency response
Signal/noise
ratio
Audio distortion + noise
NTSC
20Hz - 20KHz - ldB
>_85dB
.< -80(1KHz)
Channel separation
>/85dB
Dynamic range
>_.80dB
Audio out
(analog audio)
Output level: 2V - 10%
Load impedance: 10K%o
Output
Video out
Power supply
Operatingtemperature
range
Power Consumption
Dimensions
Weight
Output level: lVp - p - 20%
Load impedance: 75%0
DC 9V 2.2A
32 - 122iF
_<20W
8.66 x 6.10 x1.14 (inches)
2.22 (Ib)
Magnavox reserves the right m make designand specification changesfor product
improvementwithout prior notice.
This productincorporatescopyrightprotectiontechnologythat is protectedby methodclaims
of certainU.S.patentsand other intellectualpropertyrights ownedby Macrovision
Corporationandother rights owners.Use of this copyrightprotectiontechnologymustbe
authorizedby MacrovisionCorporation,and is intendedfor homeand otherlimited viewing
usesonly unlessotherwiseauthorizedby MacrovisionCorporation.Reverseengineeringor
disassemblyis prohibited.
37
MPD820_17.qxd
4/2/04
9:11
AM
Page
3_
Troubleshooting
If a fault occurs,first checkthe pointslisted
below beforetaking the set for repair.
If you are unableto remedya problemby
following these hints,consultyourdealeror
servicecenter
WARNING:
Do not open the set as there is a risk of
electric shock. Under no circumstances
shouldyou try to repair the set yourself,
as this will invalidate the warranty.
No picture
• Checkif the playeris connectedsecurely.
• Makesureyouoperatethe TVcorrectly.
• Makesureyouset the colorsystem
correctly.
Bad soundquality
• Make surethe audiooutput modeis set
correctly.
• Make sureyou did notconnectanycables
from the DVDplayerto a Stereo's
"PHONOIN" jack.
• Make sureyou did notconnectthe player'sCOAXIALdigital audio outjack to an
analogjack on the Stereo.(Analogaudio
jacksare usuallylabeledas suchand are
usuallyred andwhite. Coaxialjacksare
usuallyblack.)
No sound/power
• Checkif the playeris connectedsecurely.
• Checkvolumeon the player
• Disconnectheadphonewhennot using
headphone.
• Makesureyouoperatethe TVor amplifier
correctly.
Disc cannotplay
• MakesureyouhaveselectedDVDplayer
• Checkyou haveloadeda disc in the player
positionon the amplifier.
if empty.
• Thepowercircuit in your playeris
• Checkyou haveloadeda disc properly
designedwith a powershutdownmode.
with the label sideup.
This is activatedonlyduring battery
• Discdirty/damaged.Cleanthe disc.
power operationof the playerwhen
• Moisturehascondensedin the player.
the batterybecomescompletely
Removethe disc and leavethe playerto
drained.When this happens:
adjust to the surroundingtemperature.
1 Adjust the POWERswitch on the play- Remotecontroldoes not work
er to the OFFposition.
• Removeobstaclesbetweenthe remote
2 Connectyour playerto ACpowerwith
control andthe player,and point directly
the suppliedpoweradaptor.
insteadof at a wide angleat the infrared
3 Letthe playerstandidle for 30 seconds
sensoron the player.
beforeswitchingon againto resume
• Batterymaybeexhausted.Replacethe
disc operationon AC powersupply.
batterywith a new one.
• Toavoidinterferencewith other
Loudnoise when operatingthe player
• This is normaland due to mechanical
electricalequipment,try usingthe remote
controlwith a minimumdistanceof 7 inchparts.Playbackis not affected.
esfromthe sensoronthe player.
The playerfeels very warm
• Whenthe playeris ill usefor a longperiod
of time,the surfacewill be heated.This is
normal.
38
MPD820_17.qxd
4/2/04
9:11
AM
Page
3_
Troubleshooting
Image rolls and no color
• Thecolorsystemof the playerdoesn't
matchyour TV.Selectthe correctTVTYPE
until yourTV showsnormalcolor.
An AudioCD will not play.
• SomeAudio CDsavailableon the market
are copy protected.These
discswill not
playon this DVDplayer.Seeyour retailer
for optionsregardingnon-protectedAudio
CDs.
Disc play is irregular or DVD disc menu
operationis faulty.
• Dueto the inconsistencyof disc formats
providedbyvariousdisc manufacturers,
your DVDplayermay requirea playability
enhancementor upgrade.As DVD
technologyhasadvanced,these enhancementshavebecomebothcommonand
easyto complete.Pleasecontact
Magnavoxat 1-800-705-2000
for
assistance.
The DVD player will not select some
features,such as Angles,Subtitles,or
multi-languageAudio.
• Thefeature maynot be availableon the
disc.If it is not, the (J_ will appearon
the TVscreen.Checkthe disc caseto see
if the disc hasthe feature.If the disc does
not havethe feature,the DVDplayer
cannotcreatethe feature.Thisis not a
malfunctionof the DVDplayer.
Or,the feature maynot be availableat the
presenttime. Somefeaturesare only
availableduringplayback,while other
itemscan be accessedonlywhen playis
stopped.Trystoppingor startingplayback,
then try the feature again.
Forthe latestproductinformation& news visit:
http://www.magnavox.com
Environmentalinformation
We havedoneour bestto reducethe packagingand makeit easyto separateinto3 materials: cardboard,styrofoam,andplastic.
Yourset consistsof materials which can be recycled if disassembledby a
specialized company.Please observe the local regulations regardingthe
disposalof packaging, dead batteries and old equipment.
39
MPD820_17.qxd
4/2/04
9:11
AM
Page
4_
IIIII_ Ii II;I m]k'A'/:W
i! [!_1 _,i Ik'4
PORTABLE
DVD
PLAYER
90 days FreeProduct Exchange/ 91 days-Oneyear Reduced-CostExchange
This product must be carried in for an exchange.
WHO
IS COVERED?
MAKE
SURE
YOU
KEER-
You must have proof of the date of purchase to exchange
your product.A
sales receipt or other
document
showing
Please keep your sales receipt or other document showing
proof of date of purchase.Attach
it to the owner's manual
the date that
such proof.
and keep both nearby.Also
keep the original box and
packing material in case you need to return your produce.
you purchased
the product
is considered
BEFORE
WHAT
IS COVERED?
EXCHANGING
THE
PRODUCT.,.
Please check your owner's manual before exchanging the
product.
Adjustments
of the controls
discussed there
Warranty
coverage begins the day you buy your product.
For 90 days thereafter, you may exchange the defective
product for a free new or renewed product through
may save you time
Magnavox.
From 91 days to one year from tJ_e date of purchase, you will
LIMITATION
MAGNAVOX
pay a preset exchange fee to obtain a new or renewed
product. Follow the exchange procedures
on the next
CIRCUMSTANCES
and money.
OF LIABILITY
AND REMEDY,..
IS NOT LIABLE UNDER ANY
FORANY
DIRECT,
INDIRECT,
page.This exchange opportunity
ends one year after the
date of purchase.The
replacement
product
is covered only
SPECIAL, INCIDENTAL,
OR CONSEQUENTIAL
DAMAGES,
HOWSOEVER
INCURRED,
EVEN IF
NOTIFIED
OFTHE
POSSIBILITY OF SUCH DAMAGES.
for the warranty
warranty
on the
TOTHE
EXTENT
PERMITTED
BY LOCAL
REMEDIES PROVIDED
IN THIS WARRANTY
period of the original product.When
original product expires, the warranty
the
on
LAW, THE
all replaced products
also expires.
When it is necessary for you to ship the product to Magnavox
STATEMENTAREYOUR
SOLEAND
EXCLUSIVE
REMEDY.
THIS LIMITED WARRANTY
GIVESYOU
SPECIFIC
for exchange, you wilt pay the shipping costs for shipment
LEGAL RIGHTS,AND
RIGHTSWHICHVARY
to
Magnavox. Magnavox wilt pay the shipping costs when
returning a product to you.
WHAT
•
product
improper
repair
of antenna
product.
systems
outside
of
repair and/or part replacement
because of
installation,
abuse, neglect, misuse, accident,
unauthorized
repair or other
control
of Magnavox.
•
TO EXCHANGE
YOUR
PRODUCT
IN THE U.S.A.,
PUERTO
RICO, OR U.S. VIRGIN
ISLANDS...
FOLLOWTHE
INSTRUCTIONS
STATED PREVIOUSLY
labor charges for installation
or setup of the product,
adjustment
of customer
controls
on the product, and
installation
or
the product.
•
STATE/PROVINCE.
IS EXCLUDED?
Your warranty
does not cover:
•
shipping charges to return defective
cause not
a product
that requires
modification
enable it to operate
in any country
within
the
or adaptation
to
other than the
by these modifications.
or consequential
damages
the product.
of incidental
(Some states do not allow
or consequential
damages,
exclusion
may not apply to you.This
not limited to, prerecorded
material,
•
righted or not copyrighted.)
a produce used for commercial
(including
WHERE
Warranty
resulting
but not limited
IS EXCHANGE
exchange
or institutional
to rental
from
but is
copypurposes
purposes).
where
the
product is officially distributed
by Magnavox. In countries
where Magnavox does not distribute
the product, the
local Magnavox service organization
will attempt
to
exchange the product,
although there may be a delay if
the
appropriate
product
is not
readily
THE IMPLIED WARRANTIES
MERCHANTABILITY
AND
RO.
MAY LAST, THIS
MAY
LIMITATION
EXCHANGE
Please contact
A PRODUCT
IN
NOTAPPLYTOYOU.
CANADA,..
Magnavox at:
1-800-705-2000
In Canada, this warranty
is given in lieu of all other
warranties.There
are no other warranties,
express
implied, including any implied warranties
merchantability
or fitness for a particular
below
on the product.Also,
warranty
registration
us to notify
the
or
of
purpose.
model
and serial
520890,
Miami,
you if necessary.
#
FL 33152,
USA,
numbers
please fill out and mail your
card promptly.
It will be easier
MODEL#
EL650SE004 / 11-02
4O
TO
NOT ALLOW
LIMITAIMPLIED WARRANTY
available.
Box
AND
OFTHE
BECAUSE SOME STATES DO
TIONS
ON HOW
LONG AN
SERIAL
Magnavox,
OF NON-INFRINGEMENT,
FITNESS FOR A PARTICU-
LOCALITY
OF THE USER, LIMITED
IN DURATION
THE DURATION
OFTHIS
EXPRESS WARRANTY.
Please record
in all countries
U.S.A., PUERTO RICO,AND
U.S.VIRGIN
IMPLIED WARRANTIES,
INCLUDING
REMEMBER...
AVAILABLE?
is available
PAGE. IN THE
ISLANDS,ALL
TO
the exclusion
so the above
includes,
whether
IN THE"WHAT
IS COVERED"
SECTION,
OR REFERTO
THE EXCHANGE
INSTRUCTIONS
ON THE NEXT
LAR PURPOSE,ARE
SPECIFICALLY
DISCLAIMED,
TOTHE
EXTENT
INCONSISTENTWITH
LAW
country
for which it was designed, manufactured,
approved and/or authorized,
or repair of products
damaged
incidental
YOU MAY ALSO HAVE OTHER
FROM STATE/PROVINCE
TO
(402)
536-4171
found
for
MPD820_17.qxd
4/2/04
9:11
AM
Page
4_
EXCHANGE
To exchange
your
If you exchange
product
the
with
product
Magnavox
within
(per
INSTRUCTIONS
the
warranty
90 days of the original
conditions
purchase,
there
stated
If you exchange the product
more than 90 days after but less than one year after
contact
Magnavox at 1-800-705-2000
to determine
the preset cost for exchange.
If you do not
have your
To obtain
a replacement
I.
Magnavox
Contact
2. Complete
3. Pack the
original
sales receipt,
product
from
at 1-800-705-2000
or if you have any questions,
previously),
remember:
is no cost to you. _
the day of original
call Magnavox
purchase,
at 1-800-705-2000.
Magnavox:
to determine
the cost for
the Exchange Form below.
product and its accessories
in the original
exchange.
box or a suitable
alternative.You
will
receive
replacement
accessories
with your replacement
product.
For packing details, call Magnavox at 1-800-705-2000.
4. Put the completed
Exchange Form, a copy of the original sales receipt, and the proper payment
envelope. DO NOT SEND CASH. Do not staple
Documents
Enclosed." Place this envelope in the
or clip these items togethel:
box with the product.
amount
Label the envelope
into an
"Return
5. Seal the box with packing tape and return the product via United
Parcel Service (UPS), insured and freight prepaid,
to the address provided
by Magnavox. For details, call 1-800-705-2000.A
replacement
will be sent to you via UPS
within
48 business
hours
of Magnavox'
receipt
of the
product.
*When it is necessary for you to ship the product to Magnavox for exchange, you will pay tJ_e shipping
Magnavox. Magnavox will pay the shipping costs when returning a product to you.
EXCHANGE
Your Address
(street
address
to which
costs for shipment
to
FORM
replacement
should
be delivered,
no
RO. boxes
allowed):
Name:
Street Address:
Apt.
City:
#:
State/Province:
Phone
(day):
Exchange
Method
Phone
Fee:
Zip Code/Postal
+ SalesTax:
of Payment:
Check/Money
(Check
=
Total:
one. Please, no cash or CODs.)
order
Check/Money
Account
American
Code:
(night):
order
No.
number
Expiration
date
Express
Visa
Novus/Discover
MasterCard
Signature:
Detailed
Model
reason
for
return,
use additional
Number
Remember,
•
The
•
Completed
paper
Serial
the
return
box should
include
if necessar
Number
the
following:
product,
Exchange
Form
and
sales
receipt,
•
Accessories
•
Payment,
supplied
with
the
product,
and
if applicable.
41
MPD820_17.qxd
4/2/04
9:11
AM
Page
4_
MAGNAVOX
A Division of Philips Consumer Electronics North America
Knoxville, Tennessee 37914-1810, U.S.A
Meet Magnavox
http://www.ma
at the Internet
gnavox.com
MPD820
IB8486EO01
Printed in China
BK412