1
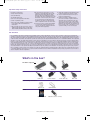
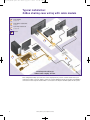
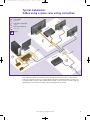
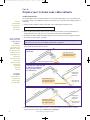
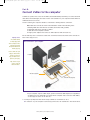
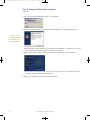
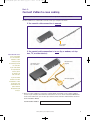
Zv_Guide_Mech8.qxd:zv data sheet copy.qxd
7/28/08
1:53 PM
Page 2
Get Going Guide
Welcome to Zv!
Thank you for your purchase of the Zv-100 bundle. Included in this bundle is ZvBox and everything
you need to get your new hi-def Zv channel up and running on your HDTV. Soon you will be enjoying
all that the Internet and your computer have to offer – the latest Internet movies and shows, local
media from your computer's hard drive and DVD player, even web browsing and checking email.
Please follow the step-by-step instructions in the following pages of this Get Going Guide and the
on-screen steps of the Zv Installation Wizard. If you run into any problems, please refer to the Zv
Support page at www.zeevee.com, where you will find answers to frequently asked questions and
helpful tips from ZeeVee experts and other ZvBox customers. If you still cannot find the answers
you need, our technical support hotline at 877-4ZEEVEE (877-493-3833) is here to help.
After you have completed your ZvBox installation and are enjoying your new Zv channel, we welcome
you to join us at www.zeevee.com to share your experiences and ideas with the Zv community.
Thanks again and see you online.
Zv_Guide_Mech8.qxd:zv data sheet copy.qxd
7/28/08
1:53 PM
Page 3
Important Safety Instructions
1. Read these instructions.
2. Keep these instructions.
3. Heed all warnings.
4. Follow all instructions.
5. Do not use this apparatus near water.
6. Clean only with dry cloth.
7. Do not block any ventilation openings. Install
in accordance with the manufacturer’s
instructions.
8. Do not install near any heat sources such as
radiators, heat registers, stoves, or other apparatus (including amplifiers) that produce heat.
9. Do not defeat the safety purpose of the
polarized or grounding-type plug. A polarized plug has two blades with one wider
than the other. A grounding type plug has
two blades and a third grounding prong. The
wide blade or the third prong are provided
for your safety. If the provided plug does
not fit into your outlet, consult an electrician for replacement of the obsolete outlet.
10. Protect the power cord from being walked
on or pinched, particularly at plugs, convenience receptacles, and the point where
they exit from the apparatus.
11. Unplug this apparatus during lightning storms
or when unused for long periods of time.
12. Only use attachments/accessories specified by the manufacturer.
13. Refer all servicing to qualified service
personnel. Servicing is required when the
apparatus has been damaged in any way,
such as power-supply cord or plug is damaged, liquid has been spilled or objects have
fallen into the apparatus, the apparatus has
been exposed to rain or moisture, does not
operate normally, or has been dropped.
FCC Statement
FCC Compliance and Advisory Statement: This hardware device complies with Part 15 of the FCC rules. Operation is subject to the following two
conditions: 1) this device may not cause harmful interference, and 2) this device must accept any interference received including interference that
may cause undesired operation. This equipment has been tested and found to comply with the limits for a Class B digital device, pursuant to Part 15
of the FCC Rules. These limits are designed to provide reasonable protection against harmful interference in a residential installation. This equipment
generates, uses, and can radiate radio frequency energy and, if not installed or used in accordance with the instructions, may cause harmful interference to radio communications. However there is no guarantee that interference will not occur in a particular installation. If this equipment does
cause harmful interference to radio or television reception, which can be determined by turning the equipment off and on, the user is encouraged
to try to correct the interference by one or more of the following measures: 1) reorient or relocate the receiving antenna; 2) increase the separation
between the equipment and the receiver; 3) connect the equipment to an outlet on a circuit different from that to which the receiver is connected;
4) consult the dealer or an experienced radio/TV technician for help. Any changes or modifications not expressly approved by the party responsible for compliance could void the user’s authority to operate the equipment. Where shielded interface cables have been provided with the product
or specified additional components or accessories elsewhere defined to be used with the installation of the product, they must be used in order to
ensure compliance with FCC regulations.
What’s in the box?
The main components:
ZvBox
ZvRemote
ZvReceiver
Cords and cables:
USB cable
Power adapter
Coax cables (4)
Coax cabling connectors:
Splitters (2)
Channel filter
Other
Get Going Guide
1
Batteries (2) (for remote)
© 2008, ZeeVee, Inc. All rights reserved.
VGA cable
Zv_Guide_Mech8.qxd:zv data sheet copy.qxd
7/28/08
1:53 PM
Page 4
What’s about to happen
The following is an overview of the steps you’ll take while setting up ZvBox. Note that during
setup, you’ll follow instructions in both this guide, and in our on-screen software. Together they
will help you to do the following:
1. Install a channel filter on the coaxial cabling providing TV service to your home. The filter
creates an empty TV channel that ZvBox uses to broadcast your new, private, hi-def Zv
channel. The filter also reflects the signal from your ZvBox, so it can get to all the HDTV’s
in the house, and prevents your Zv channel from leaving your home.
2. Connect ZvBox to your computer. This allows ZvBox to capture the video and sound
output of your computer, for conversion into your Zv channel.
3. Connect ZvBox to your home’s coaxial cabling, which ZvBox uses to broadcast the
Zv channel to all the HDTVs in your home.
4. Connect your HDTV’s antenna input to your home’s coaxial cabling. This allows the
HDTV to access and tune in your Zv channel.
5. Tune in your new Zv channel, and optimize the picture for your HDTV.
That’s it. Once those steps are completed, you’re ready to watch Zv!
ZvBox Operation:
Fundamental Technical Concepts
Cable TV Channels: All the cable channels in your lineup exist on your coaxial cable simultaneously,
which means the cable can be quite crowded.
Channel Filter: Usually there are gaps (empty channels) in the lineup where we can place our
Zv channel. To be certain, we include a channel filter which creates a gap. The filter “blocks”
a given channel by reflecting its energy, while allowing others to pass through. That reflective
property keeps the cable company’s channel from entering the home, and the Zv channel from
leaving the home.
Splitters: Splitters take a coax input and split the signal into two equal outputs (the signal’s
energy gets divided by 2). Splitters can pass signals from their input to their outputs or from their
outputs to their input. That means they can be used to split a signal, or to combine two signals.
Coaxial Cabling System: A cable system can be thought of as a tree. The cable company’s feed
enters the root of that tree and feeds forward through the splitters to the leaves (TV, cable
modem, etc.)
ZvBox “reflected” Installation: One easy installation is to feed the Zv signal “backwards”
into one of the leaves of the tree (at a coax connection for a cable modem, TV, etc.). The signal
travels toward the root, reflects off the filter, and then travels back to all the leaves.
ZvBox “Forward Feed” Installation: It is also possible to “combine” your cable company’s main
coax feed with the feed from the ZvBox, using a reversed splitter (as a combiner). This eliminates the need for the channel filter, but you must know which cable at the root of the tree is
the one that goes to the ZvBox.
These are only brief highlights of the concepts used to allow you to create your own HDTV channel
on your home’s cable network. Please visit www.zeevee.com for a much expanded and detailed
theory of operation and set of application guidelines. This “Getting Going Guide” details the
fastest way to get your ZvBox up and transmitting using the supplied components. There are
many possible variations that should allow for just about any installation to be accommodated.
© 2008, ZeeVee, Inc. All rights reserved.
2
Zv_Guide_Mech8.qxd:zv data sheet copy.qxd
7/28/08
1:53 PM
Page 5
Typical installation:
ZvBox sharing coax wiring with cable modem
A
in your den/office
see pages 4-6
B
in your utilities room/basement
see page 3
C
in your living room/bed room
see pages 7-8
V
HDT
ox
pb
-to
Set
V
HDT
new items
V
HDT
C
m
ode
le m
Cab
r
itte
Spl
les
cab
A
G
V
A
B
le
cab
B
S
U
r
ilte
el f
n
n
Cha
Installing and setting up
ZvBox takes roughly an hour.
This configuration likely represents the easiest deployment if you have a cable modem near your
computer. It makes it easy for ZvBox to share the coaxial cabling that feeds the modem, and simplifies
connection. In this setup the channel filter is connected to the input of the first splitter in the system.
3
© 2008, ZeeVee, Inc. All rights reserved.
Zv_Guide_Mech8.qxd:zv data sheet copy.qxd
7/28/08
1:53 PM
Page 6
Typical installation:
ZvBox using a spare coax wiring connection
A
in your den/office
see pages 4-6
B
in your utilities room/basement
see page 3
C
in your living room/bed room
see pages 7-8
V
HDT
ox
pb
-to
Set
V
HDT
new items
V
HDT
C
r
itte
Spl
les
cab
A
VG
r
ilte
el f
n
n
Cha
m
A
ode
le m
Cab
B
le
cab
B
S
U
This configuration likely represents the easiest deployment if you do not have a cable modem
near your computer, but do have a coaxial cabling connection nearby that ZvBox can connect to.
If needed, ZvBox can share coaxial cabling with a TV, DVR, or other set-top box. In this setup the
channel filter is connected to the input of the second splitter in the system.
© 2008, ZeeVee, Inc. All rights reserved.
4
Zv_Guide_Mech8.qxd:zv data sheet copy.qxd
7/28/08
1:53 PM
Page 7
Part A:
Prepare your in-home coax cable network
Install channel filter
Follow this
Get Going Guide
until prompted to
follow steps on
your computer.
The channel filter creates an empty channel in your TV lineup that ZvBox can use to localcast your
computer’s output to your HDTVs. The filter also prevents your new channel from getting outside of
your home.
1. Find the channel number printed on the label of the channel filter, and write it here:
2. Before making any changes, make sure your TV, Internet, and phone service (if applicable) are
working properly. If not, call your service provider for help before installing ZvBox.
If you are unsure
which connection
is the input to
a splitter…
Look for a marking
that says IN or does
*NOT* have a number
like -7dB near it. There
is usually only one. It
may be hard to read.
Still not sure?
Disconnect the cable
from the input.
Cable service should
be temporarily
disconnected
throughout
the home.
3. Find where the main coaxial cable delivering TV service first enters your home. Typical locations
are a utility room, basement, or garage.
Important: If you live in a condominium or apartment, find where the main coaxial cable
delivering TV service first enters YOUR condominium or apartment.
4. Important: Select the configuration below that looks most like your existing main cable setup.
Then, install the channel filter as shown.”
If your main cable setup
looks like this…
s,
TV’
To
ox
ZvB
nd
a
dem
mo
e
l
cab
Install channel filter here.
Connect directly to the input
of the splitter if possible.
Main coaxial cable delivering service
If your main cable setup looks like
this, AND you are planning to
connect your ZvBox next to
your cable modem….
If you have a
cable amplifier
make sure that it is
connected to the
main feed, before
the channel filter.
s
TV’
To
ox
ZvB
d
n
ma
ode
m
le
cab
To
Existing splitter
creates line for
cable modem
Install channel filter here.
Connect directly to the input
of the splitter if possible.
Main coaxial cable
delivering service
Otherwise…
s
TV’
To
ox
ZvB
d
an
To
Install channel filter here.
Connect directly to the input
of the splitter if possible.
dem
mo
e
l
cab
Existing splitter
creates line for
cable modem
Main coaxial cable
delivering service
5. Retest your TV, Internet and phone service to ensure they still work properly. If not, visit the
support section of our web site at www.zeevee.com/support
5
© 2008, ZeeVee, Inc. All rights reserved.
Zv_Guide_Mech8.qxd:zv data sheet copy.qxd
7/28/08
1:53 PM
Page 8
Part B:
Connect ZvBox to the computer
Software to operate Zv is stored on the ZvBox, and automatically loads when you connect the USB
cable. Once the install begins, the latest version of Zv software for your computer and the ZvBox is
downloaded from our servers.
1. Before starting, the computer should be on and have a working Internet connection.
Note: Make the connections shown in the illustration below in the following order:
1. Existing VGA* cable from monitor to ZvBox (the monitor will go blank)
2. New VGA* cable from computer to ZvBox
3. USB cable from computer to ZvBox
4. Plug in power adapter and connect to ZvBox (monitor will come back on)
Laptop users:
The default settings
on many laptops turn
off the computer’s video
output port(s), which
will prevent ZvBox from
working properly.
Check to make sure your
laptop’s external video
port(s) are active. For
help, consult the user’s
guide for your laptop.
Do not make any other connections at this time. You will be instructed to make other connections
later in the setup process.
ZvBox connected to your computer
Monitor
Computer
Existing VGA cable
(connects to monitor)
Tip: look for a topic
such as “using an
external monitor”.
USB cable (supplied)
New VGA cable (supplied)
*If your computer only has a DVI output, you'll need a DVI-to-VGA adapter (not supplied) to
use ZvBox. For more information on using various computer video connectors with ZvBox,
see the Support section of our web site.
2. You may be prompted to allow the Zv Setup software to run. Allow it to do so.
# If “autorun” on your computer is turned off, you’ll need to run “StartZv.exe” from the Zv drive.
© 2008, ZeeVee, Inc. All rights reserved.
6
Zv_Guide_Mech8.qxd:zv data sheet copy.qxd
7/28/08
1:53 PM
Page 9
Part B: Connect ZvBox to the computer
continued
3. The Zv Setup download window will appear on your monitor:
4. Once the software is installed, you will be guided through the rest of the installation process:
Follow the on-screen
Zv Installation Wizard
until prompted to return
to this Get Going Guide.
# Note that parts of the installation process may take several minutes to complete. Do not cancel
the process even though there appears to be little or no progress.
5. When prompted, click “Finish”, and the following screen should appear on your computer:
# If the screen does not appear, click on the Zv icon in the Systray of your computer’s Start Bar,
and choose “Launch Zv Installation Wizard now”.
6. Restart your computer if prompted by the setup windows.
7
© 2008, ZeeVee, Inc. All rights reserved.
Zv_Guide_Mech8.qxd:zv data sheet copy.qxd
7/28/08
1:53 PM
Page 10
Part C:
Connect ZvBox to coax cabling
Begin Part C when you have been instructed to do so by the Zv Installation Wizard
1. Connect ZvBox to a coaxial cable connection near your computer as shown.
If the coaxial cable connection is unused:
To
k
jac
all
w
e
l
cab
ial
x
a
co
New or existing
coaxlal cable
Cable Modem users:
If you connect ZvBox
to a coax cable that’s
attached to a cable
modem, test your
modem after you make
the connection.
If the coaxial cable connection is in use (by a modem, set-top
box, TV, or other device):
Cable modem, set-top
box, or other device
New coaxial cables
(supplied)
If your cable modem
no longer functions
as before, please
use another coax
cable connection.
If you move ZvBox
to another coax cable
not attached to a cable
modem, move your
channel filter to the
position shown in
the bottom diagram
on Page 3.
New splitter (supplied)
ble
l ca
a
i
x
coa
ting
s
i
Ex
2. After you connect ZvBox to your home’s coaxial cabling, click “Next” in the “Connect ZvBox”
screen on your computer, then follow the instructions on-screen. The Zv Installation Wizard will
create a new channel for you. Use the space below to write down the channel number shown on
the Zv Installation Wizard.
Your Zv channel number:
© 2008, ZeeVee, Inc. All rights reserved.
8
Zv_Guide_Mech8.qxd:zv data sheet copy.qxd
7/28/08
1:53 PM
Page 11
Part D:
Connect your HDTV to coax cabling
Follow this
Get Going Guide until
prompted to follow
steps on your HDTV.
Begin Part D when you have been instructed to do so by the Zv Installation Wizard
1. Check to see what’s attached to the antenna input on your HDTV.
2. If there’s a coaxial cable from the wall connected to the HDTV’s antenna input, your HDTV is connected correctly and you can skip to Part E.
3. Otherwise, connect your HDTV as shown in the diagram below:
New A/V cables or HDMI
cable, if not previously
installed (not supplied)
Set-top box
To antenna input on HDTV
New coaxial cables (supplied)
New splitter (supplied)
Existing coaxlal cable
Part E:
Tuning in your Zv channel
Follow this
Get Going Guide until
prompted to follow
steps on your HDTV.
Use your HDTV’s remote control to enter your Zv channel number, excluding the ".99" at the end,
then wait a few moments to see if the HDTV tunes in Zv.
If not, enter the Zv channel number with ".1" at the end instead of ".99" (on some remotes the
decimal point "." may be a dash "-"), wait a few moments.
If the HDTV still doesn't tune in Zv, enter the full Zv channel number including the ".99" at the end,
wait a few moments.
This process helps many HDTVs auto-scan for a new channel. If the above doesn't work for your
HDTV, you'll need to perform a full "channel scan" to add new channels to the HDTV. This can take
30-45 minutes. Consult your HDTV's owner's manual for help.
Important: when performing the channel scan, set your HDTV to scan cable channels, not
over-the-air channels.
9
© 2008, ZeeVee, Inc. All rights reserved.
Zv_Guide_Mech8.qxd:zv data sheet copy.qxd
7/28/08
1:53 PM
Page 12
Part E: Tuning in your Zv channel
continued
When the channel scan is complete, return to the beginning of Part E, and start again.
When the HDTV tunes in the Zv channel, you’ll see the following on your HDTV screen:
To complete your Zv Installation and Set Up process, follow the Zv instructions on your TV screen
Troubleshooting Tip
If your HDTV won’t tune in your Zv channel after a full channel scan:
1. Without stopping the installation process on the computer, disconnect ZvBox and take it and its
power supply to the HDTV.
2. Connect ZvBox directly to the HDTV’s antenna input as shown, and plug in ZvBox:
ZvBox
HDTV
Coaxlal cable
3. Follow the steps in Part E above for tuning in your Zv channel.
If the HDTV successfully tunes in* the Zv channel:
1. Reconnect ZvBox at your computer, then reconnect the HDTV to your coaxial cabling system
2. If your HDTV displays the following message, follow the instructions on your HDTV screen:
3. If your HDTV displays any other Zv screen:
a. Return to your computer
b. Click on the Zv icon in the system tray at the lower right of your computer screen
c. Choose “Launch Zv Installation Wizard Now” and complete the steps in the wizard*.
*If the HDTV still can’t tune in the Zv channel, see the support section of our web site at
www.zeevee.com/support.
© 2008, ZeeVee, Inc. All rights reserved.
10
Zv_Guide_Mech8.qxd:zv data sheet copy.qxd
7/28/08
1:53 PM
Page 1
Using ZvRemote
The ZvRemote is designed to control your computer. Note that:
• Button functions can vary, depending on the software application being controlled.
• Some buttons are reserved for future use (i.e. the TV buttons).
LED (light-emitting diode)
flashing amber = low battery,
or out of range of computer
mouse touchpad
PC Power
Suspends/Resumes PC
ZV
wakes up ZvRemote if in
sleep mode (sleep mode
conserves batteries)
mouse touchpad
touch to move cursor
vertical scrolling
left-right mouse buttons
media control
Left, Right, Up, Down
keys are also computer
arrow keys, OK is also
the Enter key
window controls
help to switch between,
maximize, minimize
or close windows
shortcut keys
launches Zv, our
ten-foot application
that helps you find and
watch content from the
comfort of your couch
5-way control
launch Zv
INPUT
launches or closes
on-screen keyboard
transport buttons
control media playback
in many software
applications
Need more information?
For the most complete
and up-to-date information
on the ZvRemote, including
our online tutorial, visit
our web site at:
www.zeevee.com/support
CLEAR
same as Escape (esc) key
© 2008, ZeeVee, Inc. All rights reserved.