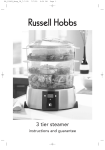
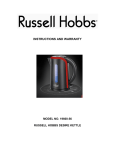
1
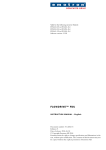
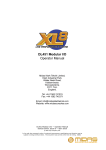
PROBLEM SOLVING
•
•
•
•
•
•
•
•
•
•
•
•
Kettle switches OFF before it has boiled.
Generally caused by scale build up inside, and can be resolved by
descaling.
Alternately, the kettle may have accidentally been used without water
or insufficient water, causing the safety cut-out device to operate. Reset as explained below.
Re-setting the boil dry safety cut-out
Wait 5 minutes for the kettle to cool, and then refill with cool water.
Push the ON/OFF switch, and after about 25 minutes the kettle will
automatically re-set itself, and start to boil.
Kettle does not work
Check the power supply is switched ON at the wall socket.
If the kettle has boiled dry the safety cut-out will have operated (see
paragraph above)
Water has a plastic taste
Generally this only occurs after the first use, and is not a problem if the
water boiled on the initial use is discarded as recommended in the section
‘Using Your Kettle’. If the problem persists, fill the kettle to the MAX level,
and add 2 teaspoons of bicarbonate of soda. Boil and discard the water.
Kettle forms scale inside and/or water turns cloudy.
If you live in hard water area this is normal, and is caused by calcium
and magnesium carbonates in the water, and therefore regular descaling
will be essential. If you wish to find out more about the type of water
in your area, your local water company can give you advice.
Should the supply cord get damaged, it must be replaced by the manufacturer
or its service agents in order to avoid a hazard. If service becomes necessary
within the warranty period, the appliance should be returned to an approved
Amalgamated Appliances Pty Ltd Service Centre. Servicing outside the
warranty period is still available but this will be chargeable.
CHANGING THE FITTED/MOULDED PLUG
Should the need arise to change the fitted/moulded plug, follow these
instructions:
Mains (AC) Operation. This unit is designed to operate on 230V current
only. Connecting to other power sources may damage the unit.
Connect three-pin plug as follows:
The wires in this mainslead are coloured
in accordance with the following code:
Green/Yellow = Earth
Blue = Neutral
Brown = Live
SERVICE
There are no user serviceable parts in this appliance. If the appliance is not
operating correctly, please check that:
1 You have followed the instructions correctly.
2. The unit has been wired correctly and the wall socket is switched on.
3. The mains power supply is ON.
If the appliance still does not work:
In the first instance, consult your retailer for possible repair or replacement.
If your retailer fails to solve your problem and you need to return the
appliance, make sure that:
1. The unit is packed carefully, complete in its original packaging.
2. Proof of purchase is attached.
3. Give the reason why you are returning it.
If service becomes necessary within the warranty period the appliance
should be returned to an approved Amalgamated Appliances (Pty) Ltd
Service Centre. Servicing outside the warranty period is still available,
however it will be chargeable.
PLEASE AFFIX YOUR PROOF OF PURCHASE/RECEIPT HERE.
IN THE EVENT OF A CLAIM UNDER WARRANTY,
THIS RECEIPT MUST BE PRODUCED.
WARRANTY
Amalgamated Appliances (Pty) Limited (“the Supplier”) warrants to the
original purchaser of this product (“the Customer”) that this product will be
free of defects in material and workmanship which under normal, personal,
family or household purpose manifest themselves within a period of 365
days from the date of purchase or in respect of commercial or professional
purposes, manifest themselves within a period of 90 days from the date of
purchase. Any claim in terms of the warranty must be supported by a proof
of purchase. If such proof is not available, then notwithstanding anything
to the contrary herein, the Supplier’s normal charge for service and/or spares
will be payable by the Customer upon collection of the repaired product.
If a claim is made in terms of the aforesaid warranty within the first 7 days
from the date of purchase, the faulty product will be exchanged (provided
that the product is in its original packaging with all accessories). Failing
return of the product within 7 days, the Supplier’s liability shall be limited
on return to the Supplier of the product or parts thereof, to the replacement
or repair (in the sole discretion of the Supplier, or its duly authorised service
dealer) of the product to eliminate any defect in workmanship or materials
found to be due exclusively to any acts or omissions on the parts of the
Suppliers, of which defects the Supplier shall have been notified in writing
by the Customer within the aforesaid warranty period. The warranty provided
herein and the obligations of the Supplier as aforesaid are in lieu of, and the
Customer waives, all other warranties, guarantees, conditions or liabilities,
express or implied, arising by law or otherwise, including without limitation,
any obligation of the Supplier in respect of any injury, loss or damage (direct,
indirect or consequential) arising out of the use of, or inability to use, this
product and whether or not occasioned by the Supplier’s negligence (gross
or otherwise) or any act or omission on its part. The warranty does not
include and will not be construed to cover products damaged as a result
of disaster, misuse, abuse or any non-authorised modification of the product.
The warranty does not include replacement of light bulbs, heater bars,
paper bags or any glass, plastic bowl or jug or other expendables. During
the warranty period the product should be taken to a service centre of the
Supplier or one of its duly authorised service agents. The Supplier neither
assumes nor authorises any other person to assume for it, any additional
liability in connection with the sale or servicing of its products.
INSTRUCTIONS/WARRANTY
AMALGAMATED APPLIANCES (PTY) LTD
29 HERONMERE ROAD
BOOYSENS 2016
TEL: +27 (11) 490-9000
PO BOX 39186
BOOYSENS 2016
FACSIMILE: +27 (11) 490-9399
CAPE TOWN
DURBAN
TEL: (021)
535 0600
MONTANA
TEL: (031) 792 6000
Win prizes on line: www.russellhobbs.co.za
S10106AA
Concorde Printing: (031) 701 3687
MODEL: 10585
360º CORDLESS KETTLE
INTRODUCTION
Thank you for purchasing our Russell Hobbs 360º Cordless Kettle – Model
10585. Each unit has been manufactured to ensure safety, reliability, and
ease of use. Before first use, please read these instructions carefully, and
keep them for further reference.
IMPORTANT SAFEGUARDS
When using your Russell Hobbs 10585 - 360º Cordless Kettle, basic
precautions should always be followed including the following:
• Make sure the power used, corresponds to the one indicated on the
rating label.
• Use the cordless kettle only for needed use as described in the instruction
manual.
• Do not open lid when the water is boiling.
• Never put the kettle near or on cooker hotplates or gas burner.
• Never fill above the “MAX” mark, and always place enough water to
cover the element.
• Do not cover.
• Do not immerse unit, plug or cord in water or allow for liquid to come
into contact with any part of the kettle.
• Close supervision is necessary when any appliance is used by or near
children.
• Operate the kettle on a smooth level surface.
• Never operate the kettle with a damaged power cord or plug, or after
it has fallen or been damaged in any way.
• Do not use outdoors.
• Do not let cord touch hot surfaces.
• To disconnect, grip plug, and pull from wall outlet. Never pull on the cord.
• Do not try to cover, extend or stretch the mains cable.
• Never attempt to open any part or dismantle the controls. Responsibility
for failure cannot be accepted if this instruction has been ignored.
• This product is intended for household use only. Industrial or commercial
use invalidates the warranty.
• Use only original base provided.
• To reduce the risk of electrical hazards, it is recommended not to use
an extension cord or a plug adaptor.
SAVE THESE INSTRUCTIONS. THIS APPLIANCE IS FOR HOUSEHOLD USE ONLY.
PARTS NAME AND LOCATION
1.
2.
3.
4.
5.
6.
7.
8.
Flip-top lid
ON/OFF Switch
Neon light indicator
360º power base
Water level indicator
Trigger release lid
Mesh filter
Cord storage
USING YOUR KETTLE
Before first use please follow these instructions:
Remove the kettle and all the accessories from the carton. It is recommended
to keep the box and protective packaging until such time as you are satisfied
that the kettle is in good working order.
REMEMBER: NOT TO LEAVE PROTECTIVE PACKAGING LYING AROUND,
AS IT COULD BE DANGEROUS AROUND INFANTS.
• Place the kettle on a dry, smooth level surface, and adjust the cord
to the desired length.
• Fill the kettle to the ‘MAX’ level and boil. Discard the water and repeat
this twice.
POSITION
Place the power base on a stable, level surface. Arrange the power supply
cable so it doesn’t overhang and can’t be caught or tripped over.
FILLING
NOTE: Keep clear of waterspout during boiling, as steam will escape from
the lid.
1.
Fill it through the spout or lid. ‘To open the lid, simply press the
trigger release, part 6, on the top of the handle.
a. The water must be between ‘ MAX’ and 400ml (2 cups)
b. Be economical, do not boil more water than is needed.
c. To improve the quality of your drinks always use fresh water.
NOTE: Using purified or mineral water will extend the life of your kettle by
reducing lime and scale build up.
2.
Ensure the lid is closed properly otherwise the kettle might not switch
OFF when it boils.
3.
Plug the power base into the wall socket and if necessary switch
the socket ON.
4.
With the kettle positioned properly on the base, switch kettle ON by
pressing the knob at the top of the handle part. 2
5.
Your kettle will reach boiling point and switch OFF automatically. To
re-boil, simply wait a few seconds then re-set the ON/OFF button.
•
boil-dry cut-out operate prematurely. As the element is mounted under
the kettle, there are no ‘nooks and crannies’ to give the scale a foothold.
It can build up only where it can be seen and dealt with.
There are various kettle cleaners/kettle descalers, that remove scaling
and markings, which are available from supermarkets, chemists and
other stores.
MINIMISE SCALE BUILD-UP
Scale deposits may be white, colored, or even rusty. They overheat the
element, reduce its working life, and make the boil-dry cut-out operate
prematurely. As the element is mounted under the kettle, there are no nooks
and crannies to give the scale a foothold. It can build up only where is can
seen and dealt with.
Rinse the kettle with clean water and wipe its walls if you see scale in the
kettle, or a film on the water. Empty the kettle after use. Descale frequently
– how often depends on the frequency of use and the water condition in your
area. Use a descaler suitable for use in plastic products (even metal kettles
have plastic parts). Follow the instructions on the descaler, rinse several times,
then fill, boil and discard the water, to ensure no residues are left.
NOTE: Products returned under warranty which are faulty due to scaling
will be subject to a repair charge.
WE HIGHLY RECOMMEND YOU USE PURIFIED OR MINERAL WATER, AS
THIS WILL DRASTICALLY EXTEND THE LIFE SPAN OF YOUR KETTLE.
Discolouration of the internal part of the kettle due to water conditions in
your area will not be regarded as a malfunction. It is recommended to clean
your kettle regularly.
NOTE: Never overfill kettle with water, as this may prevent the kettle from
switching OFF and cause water to overflow from the spout.
6.
To switch the kettle OFF manually, simply press the control switch
at the top of handle. Part. 2
GENERAL
Remove the kettle from the power base before pouring.
To avoid the risk of splashing, poor slowly and don’t over-tilt the kettle
Don’t tilt the kettle backwards; water might get onto the control area. If this
happens, let the kettle dry before use – sit it somewhere warm for 12 hours.
When you lift the kettle, you may see moisture on the power base. Don’t
worry – it’s the steam used to switch the kettle OFF automatically, which
then condenses and escapes via the vents under the kettle. You may see
some discolouration at the base of the kettle. Again, don’t worry – this is
due to the bounding of the element to the bottom of the kettle.
INSUFFICIENT WATER – BOIL DRY PROTECTION
Insufficient water will shorten the life span of the element. A safety boildry/cut-out device will switch the kettle OFF automatically. Should the kettle
be accidentally switched ON without any water, or without sufficient water
to cover the element, or be allowed to boil dry, the cut-out device should
be activated. Allow your kettle to cool for a 25 minutes before refilling, to
permit this device to re-set. Place the kettle on a dry work surface until it
is cold. Don’t fill it unless is its cold, or it may splatter.
CARE & MAINTENANCE
•
•
•
•
Always unplug the kettle at the mains, and leave to cool before cleaning.
Clean the outside with a damp cloth, and buff with a dry cloth. DO NOT
USE SCOURING POWDER, OR ANY OTHER CLEANING PRODUCTS
AS THEY MAY DISCOLOUR YOUR KETTLE.
Keep all connectors and sockets dry. Do not put kettle of power base
in any liquid.
In hard water areas, it is necessary to remove scale and water deposit
markings in the kettle. Scale deposits may be white, coloured or even
rusty. They overheat the element, reduce its working life, and make the
NOTE: When using powdered descaler or citric acid, always add water.
Never use in an empty kettle
WATER FILTER
Scale particles suspended in the water may give it a cloudy or greasy
appearance. The filter will prevent these particles going into drink. If you
see deposits on the filter, clean it, otherwise the performance of your kettle
will drop, your drinks may contain scale, and the water inside the kettle may
look cloudy.
CLEANING THE FILTER
1. Check your hands are free from soap, or anything, which might leave
a taint.
2. Switch the kettle OFF (press the switch), and let is cool down fully.
3. Press the lid release trigger Part.1.
4. Grip the top of the filter and pull it up out of its grooves. Part. 2.
5. Either brush it lightly with a soft brush, under running water or when
descaling your kettle, drop the filter in too. Rinse thoroughly before use.
6. Rinse the kettle; in case of any scale, particles have fallen inside.
7. To replace, simply slide the filter back down the grooves on either side
of the spout, inside the kettle. Part. 3.
8. Close the lid. Fill with water and resume regular use.