1
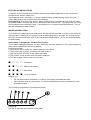
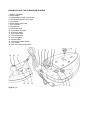
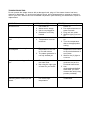
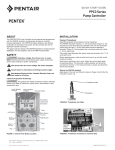
Iron Maven ™ J490A
Home Ironing System With CSS™
Instructi o n Manual
CONGRATULATIONS
We would like to thank you, and congratulate you for purchasing the ultimate home ironing system
from Reliable Corporation.
A professional home ironing system, starting with the J490A and using a high quality-ironing table
(preferably with vacuum and blowing functions) is the surest way of achieving professional results
at home.
The excellent steam quality of this product will allow you to save time while ironing. The powerful
steam flow softens the fibres in the fabric, allowing you to lay it down quickly and easily with the
ergonomic iron. You will wonder how you ironed without it.
For your safety and to fully enjoy the advantages of this product, please take a few minutes to read
all the important safeguards and care instructions. Keep this manual handy and review the product
warranty card for your reference.
IMPORTANT SAFEGUARDS
When using your Reliable™ home ironing system, basic safety precautions should always be
followed. Please read the following instructions carefully as they provide important information
concerning how to install, use and care for this steam iron station.
•
•
•
•
•
•
•
•
•
•
•
•
•
•
•
Use the ironing system only for its intended use.
To protect against a risk of electric shock, do not immerse the iron or boiler in water or any
other liquids.
The ironing system should always be turned OFF before plugging it into or unplugging from
a wall outlet. Never pull the power cord to disconnect from the outlet; instead grasp the
plug and pull to disconnect.
Do not let the power cord to touch hot surfaces. Let the ironing system cool completely
before putting it away.
Do not operate this product with a damaged cord, plug, or if it has been dropped or
damaged. To avoid risk of electric shock, do not disassemble or attempt to repair the unit
on your own. Return the unit to Reliable Corporation (see warranty) for examination, repair
or replacement.
Close supervision is necessary for any appliance being used by or near children. Do not
leave the ironing system on while unattended.
When you are using the iron, make sure it is on a firm base and not left standing on
inflammable material.
Keep ventilation slots free from dust.
Never drop or insert any object into ventilation slots
To prevent overheating, unravel the electrical cord completely.
Do not operate where aerosol (spray) products are being used or where oxygen is being
administered.
To disconnect, turn all controls to the off position, then remove plug from the main power.
Never put away your steam iron while it is still hot. There is no need for emptying the tank
unless you intend to leave it unused for a long period of time.
Attention: Please make sure that before you begin ironing, you wait for the steam ready
orange light to light up. If it does not, please call contact an authorized service depot
before using.
This product is intended for household use only - maximum 15-20 hours per week.
Follow all user instructions in this manual. Please do not leave the hot iron on the iron
rest (that sits on top of the boiler) unattended or for a period longer than 1 hour. If the
iron needs to stay on for longer than 1 hour, reduce the temperature to the lowest setting.
•
FAILURE TO FOLLOW THESE INSTRUCTIONS WILL VOID THE WARRANTY.
ELECTRICAL INSTRUCTIONS
To avoid a circuit overload, do not operate another high-wattage appliance on the same circuit
simultaneously with the steam iron.
If an extension cord is necessary, a 15-amp rated cord with a polarized plug should be used.
Cords rated for less may overheat and cause damage.
Polarized Plug: This steam iron system uses a polarized plug (one blade is wider than the other).
As a safety feature, this plug will fit into a polarized outlet only one way. If the plug does not fit fully
into the power outlet, reverse the plug. If it still does not fit, contact a qualified electrician. Do not
attempt to defeat this safety feature.
WATER INSTRUCTIONS
Your steam iron system has been planned for use with normal tap water. In order to extend the life
of this product, if where you are living the level of water hardness is very high, we recommend to
use 50% of normal water with 50% of demineralised or distilled water. Do not use softened water
or bottled water.
Instructions To Programme The Anti-Calc Feature
To set the de-scaling programme, you have to identify the water hardness in your area through the
water tester supplied with the ironing station.
Proceed as follows:
a. Immerse the litmus paper into a water glass for one second
b. Take out the litmus paper and shake it in order to dry it,
c. Wait one minute and refer to the scale here below,
d. The number of red squares show the water hardness,
e. The litmus paper can be used only one time
!
"
"
"
Soft water
!
!
"
"
Medium hard water
!
!
!
"
Hard water
!
!
!
!
Very hard water
Diagram (A)
•
•
For soft and medium hard water, it is okay to use regular untreated tap water.
For hard water and very hard water, it is recommended that you use a combination of tap
and distilled water.
The de-scaling programmer is arranged as follows:
Diagram (B)
Red L.E.D. indicates the hardness of the water.
PROGRAMMING INSTRUCTIONS
1
There are 4 red L.E.D. lights, each one representing a different level of water hardness.
One red L.E.D. light is for the softest water, four red L.E.D. lights is for the hardest water.
2
To set the programme, hold the button “R” (Diagram B - #6) button down while at the same
time turning the boiler on/off switch (Diagram C - #5) on.
3
The green led (5) will start to flash.
4
“Push” and “release” the “R” button until you have the correct number of red L.E.D. lights lit
as per the litmus paper test. Hold the “R” button down for 5 seconds until you hear an
audible “beep”. Once you hear the beep, the programme is set.
5
To verify the setting you have made, you can repeat steps #2-#3 and you will see the
number of red L.E.D. lights lit up as per your selection (including the flashing green light).
Release the “R” button and after 15 seconds the lights will automatically go off.
ANTI-CALC WARNING ALARM
If you hear a beeping sound from the boiler, and at the same time all the red L.E.D lights are
flashing (after 1 minute they will stop flashing and stay on), this means that it is time to proceed
with the de-scaling of the boiler tank.
ATTENTION! It will be still possible to work for a short time while the boiler is in the alarm
mode, after which the steam station will auto-protect itself from the scale and stop working
until you de-scale the boiler.
SPECIAL NOTE::
The J490A anti-calc warning system will automatically shut itself off after 57 gallons (218 litres) of
water, if the programming instructions have not been followed.
It is suggested that you first clean the boiler following the cleaning instructions outlined on page 7.
Then programme the anti-calc system following the instructions above (#2-#5) to reset the
programmer.
Reset The Programme
Once you have de-scaled the boiler (see section Maintenance Of The Boiler) you have to proceed
with the RESET before starting to iron again. Repeat step #2 (in the programme instructions above
and hold the “R” button down for 10 seconds. When you hear the beap, the programme is reset.
TEST FIRST, THEN IRON
Prior to ironing on delicate fabrics, it is a good idea to do a test in a hidden area (like the reverse
side) to ensure that no damage is done to the fabric. We will not assume any responsibility in case
you do not comply with these instructions.
DESCRIPTION OF THE STEAM IRON SYSTEM:
1. Steam regulation
2. Boiler switch
3. Orange steam ready control light
4. Red water finished control light
5. Iron switch
6. Boiler safety valve cap
7. Iron rest pad
8. Release clip
9. Cold water tank
10. Cold water tank cap
11. Electrical cable
12. Iron control light
13. Thermostat dial
14. Iron sole plate
15. Steam button
16. Continuous steam button
17. Iron handle
18. Anti-calc monitoring system
Diagram (C)
HOW TO USE YOUR IRONING SYSTEM
1. Unscrew the water fill cap (10).
2. Using a bottle or any other container, fill the tank (9) up to a maximum of .7 quarts of water
(0.65L or 2.75 cups) or remove the tank by pushing the lever (8) outwards while
simultaneously lifting the water tank out, take it to a faucet and fill it as well to the maximum
amount. Put the cap back on the boiler when done, and place the water container back into
its original position.
3. Connect the electrical cord to the main power outlet.
4. Turn on the boiler and the iron switches (2 & 5). The lights of the switches should come on.
5. Adjust the thermostat dial on the iron (13) to the required temperature.
6. If you hear a slight hum coming from the steam generator, this means that the pump is
moving water from the water tank to the boiler where the necessary steam is generated for
ironing.
7. When using the iron for the first time, we recommend that you allow the steam to come out
(for 10-15 seconds) by pressing the steam button (15) on the iron (without placing the iron
on good fabric) in order to eliminate any possible residue that may have been built up by
treatments during the production process.
8. You will be ready to start ironing in about 3-4 minutes, once the boiler builds up enough
pressure. The orange control light (3) will light up when you are ready to start.
9. If the iron has not been used recently, there may be condensation in the steam hose.
Simply press the iron steam button (15) for a few seconds to flush any condensation
(water) out of the steam hose.
10. During use, the orange steam ready warning light (3) will alternately turn on and off. This is
normal because it indicates that steam is being generated in the boiler.
11. It is safe to leave water in the pressure tank when the iron is not in use. If it is for an
extended period of time (months) then it is best to flush out the remaining water. To do so,
follow the water removal instructions as outlined in the maintenance of the boiler section.
This model is provided with following features:
Red control light (4)
A red warning light turns on to signal that the water in the tank has been exhausted and there will
also be the sound of a buzzer in case you did not see the red light. A continual humming of the
pump comes before this. At this point you have to switch off the ironing system by turning the
power switch off, fill the tank with water and switch back on.
Continuous steam button (16)
If you need a steady steam supply, press the continuous steam button (16) down and the push it
towards the back of the iron to lock it. To unlock it, simply reverse this procedure.
IRONING TIPS
Dry Ironing
For ironing without steam, select the temperature (13) you require that matches the fabric you want
to iron. Turn on the iron switch (5) and the control light (12) on the iron will light up. As soon as
the light (12) goes out, the iron has reached the right temperature. Do not press the steam button
(15) when you are ironing without steam.
Eliminating Shine
If you are pressing dark coloured fabrics you may find that using an ironing shoe made with
Teflon® is beneficial to eliminating the chance of the fibres melting and creating “shine”. An
optional ironing shoe #J40T is recommended to solve this problem.
How to iron?
Everyone has their own idea on the best way to iron, and really there is no one right way. The
most important thing to remember is to set the temperature dial on the iron (13) to the temperature
that most closely matches the fabric that you are pressing.
Some people will naturally use more steam, some people less steam, some prefer to pass over the
fabric a few times, others prefer less times. Ironing in some ways is an art, and like any art form,
there are many interpretations on the “right way”.
Our best suggestion to you is to experiment, and see what works best and what is the most
comfortable for you. Ironing is a tough enough job without the iron supplier telling you that you are
doing it the wrong way. Enjoy the process, and have fun with this amazing ironing tool.
FILLING THE TANK
Equipped with CSS™ (Continuous Steam System) your steam iron system can be filled anytime
during the ironing operation.
MAINTENANCE OF THE BOILER
To maintain your steam ironing system in good condition and to ensure constant performance, we
recommend that you periodically clean the boiler once or twice a year depending on the hardness
of the water:
Cleaning Instructions
Attention: Before cleaning the boiler with the supplied de-scaling powder, please make sure that
the boiler is at room temperature, that it has not been used for at least 8 hours, and that the boiler
is disconnected from the power source.
1. Unscrew and remove the filling cap (6) that is in the middle of the ironing rest pad (7) with
the tool provided, turn the boiler over and eliminate all water remaining in the boiler.
2. Dissolve completely the contents of the single package of de-scaling powder in 2 cups
(0.5l) of water.
3. Pour the solution into the boiler (Attention: Do not put the dissolved solution into the water
container).
4. Leave the solution in the boiler for one night with the filling cap off.
5. Completely empty the contents of the boiler and rinse three or four times with water in order
to eliminate possible residues of scale.
6. It is a good idea to spray the first steam onto a cloth and not directly on any surface since
there still may be scale in the system.
Attention: It is not recommended that you use any other chemical to clean this product. Doing so
will automatically void the warranty.
TECHNICAL DESCRIPTION
120V Power
1750W
Cold water tank capacity
0.65L
Working pressure
4bar
Safety valve
Yes
REPLACEMENT & OPTIONS
#J45T – Teflon® ironing shoe
#JTPOWDER Cleaning powder
TROUBLESHOOTING
Do not operate the steam cleaner with a damaged cord, plug or if the steam cleaner has been
dropped or damaged. To avoid risk of electric shock, do not disassemble or attempt to repair the
unit on your own. Return the unit to Reliable Corporation (see warranty) for examination, repair or
replacement.
PROBLEM
No steam is released through
the steam iron.
POSSIBLE CAUSES
1. Steam on/off switch is
not turned on.
2. Water tank is empty.
3. Unit is not plugged in.
4. Generator is not fully
heated.
REMEDY
1. Turn steam on/off
switch on.
2. Put required amount of
water into tank.
3. Plug unit into outlet.
4. Wait for light (3) to turn
on.
1. Turn iron on/off switch
on.
2. Turn the temperature
dial to the appropriate
setting.
The iron soleplate remains
cold.
1. Iron is not switched on.
2. Temperature is set at
minimum.
Water drops are leaking from
the soleplate.
1. The soleplate
temperature is too low
to iron with steam.
2. The steam generator is
not fully heated yet.
1. Increase the
temperature on the dial
to the marks between 2
and 3 dots.
2. Wait for the (3) light to
come on.
Dirty steam is coming out of
iron.
1. There may be scale in
the water tank.
2. Not using the right type
of water for your boiler.
1. Clean the steam
generator as per the
enclosed instructions.
2. Use
demineralised/distilled
water after you have
cleaned the tank (using
powder provided).
1. Leaving the iron on the
iron rest at high
temperature
1. Do not leave the iron on
unattended.
Yellowing and/or melting of the
plastic.
www.reliablecorporation.com