1
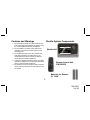
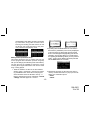
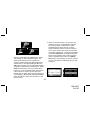
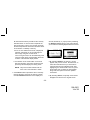
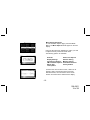
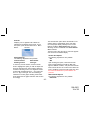
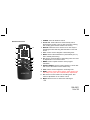
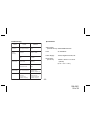
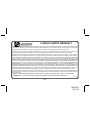
Shuttle User Guide SIR-PNP2
128-6901
1 of 28
Congratulations
You are one step closer to experiencing Sirius Satellite Radio. Sirius will revolutionize your in-home
or vehicle entertainment with:
· 100 streams of original programming, including –
60 streams of completely commercial-free music – guaranteed.
40 streams of news, sports and entertainment
· Coast-to-Coast reception and Digital-quality sound
All music content is selected and developed in-house by Sirius’ team of Master Music Programmers
– talented and seasoned professionals who love the music as much as the listeners. World-class
partners such as ESPN, ABC, CNBC, Bloomberg, Discovery and Radio Disney are developing
news, sports and entertainment programming.
Your Audiovox Shuttle receiver must be used with an adapter kit, such as the Audiovox Home kit or
Vehicle Kit as required by your specific installation needs. These kits are available at retailers where
Audiovox main units are sold.
Audiovox Home Kit: Part Number SIR-HK1
Audiovox Vehicle Kit: Part Number SIR-CK1 (with wireless FM Transmitter)
Part Number SIR-CK2 (without wireless FM Transmitter)
-2-
128-6901
2 of 28
THIS PAGE LEFT BLANK INTENTIONALLY
-3-
128-6901
3 of 28
Contents
Cautions and Warnings ...................................... 5
Shuttle System Components .............................. 5
Introduction .......................................................... 6
Enjoying Your Sirius Shuttle ................................ 6
Sirius Shuttle Controls ......................................... 7
Basic Operation ................................................... 9
Tuning by Category .......................................... 9
Content Listing Options (Look Ahead) ............ 9
Direct Tuning .................................................... 10
Setting/Using Stream Preset Buttons .............. 10
Preset List Mode .............................................. 11
Display Button .................................................. 11
Memory (MEMO) Button (S-Seek Function) ..... 12
Menu Display Options ......................................... 15
Sirius ID ........................................................ 16
Display Settings ............................................ 16
Confirmation Tone Options .......................... 16
FM Transmitter Options ................................ 17
Add or Skip .................................................... 17
Lock Options ................................................. 17
Lock/Unlock Default Code Function ............. 18
Edit Code ...................................................... 18
Audio Level Options ...................................... 18
Antenna Aiming (Home Installation) ............ 18
Memory Options ............................................ 19
Time Based Features ................................... 19
Clock ............................................................. 19
Format ........................................................... 20
Alarm Clock .................................................. 20
Alarm Time ................................................... 21
Program Alert ................................................ 21
Time Day ....................................................... 21
Stream .......................................................... 22
Program Alert On/Off ..................................... 22
Auto Shutdown .............................................. 22
Sleep Mode ................................................... 22
Factory Default .............................................. 23
Remote Control Unit ............................................ 23
Troubleshooting .................................................. 25
Specifications ...................................................... 25
Warranty ............................................................... 26
-4-
128-6901
4 of 28
Cautions and Warnings
Shuttle System Components
1. Do not install the Shuttle in a position that hinders
your view through the windshield, or obstructs viewing of the dashboard indicators and displays.
2. Do not install the unit where it may obstruct the
operation or deployment of safety devices, such
as airbags, etc.
3. Do not allow operation of the unit to detract from
safe driving practices; remember that you are
responsible as the vehicle operator to adhere to
all safe driving and traffic regulations.
4. This device complies with Part 15 of the FCC Rules.
Operation is subject to the condition that this device
does not cause harmful interference.
5. By adhering to these warnings and safety considerations, serious accidents and/or personal injury can
be avoided.
Shuttle Unit
Remote Control Unit
P/N1363539
Batteries for Remote
(2) “AAA”
-5-
128-6901
5 of 28
Introduction
The Audiovox SIRIUS® Shuttle processes the satellite
signals received by the externally mounted antenna
(purchased separately as part of the Home or Vehicle
Kits). The Shuttle recognizes and decodes the incoming
SIRIUS® program information and provides an audio
signal to your radio or other audio output equipment.
NOTE: The SIRIUS® signal can be received and
processed virtually anywhere as long as there
are no obvious satellite signal obstructions
such as nearby buildings, high terrain,
parking garages or tunnels.
The Shuttle is typically installed in an
accessible location of the vehicle (dash area),
consistent with line-of-sight operation of the
remote control, and/or within easy reach of the
driver. For home use, situate the Shuttle
close to your stereo receiving equipment.
Enjoying Your SIRIUS® Shuttle
You can begin to enjoy Sirius® Satellite Radio as soon
as the Shuttle and Kit installation are complete:
1. Set up your Audiovox Shuttle using the installation instructions included in your Home Kit or
Vehicle Kit, or with the help of a professional
installer.
NOTE: Refer to Antenna Aiming (page 18) during
the installation procedure.
2. When power is available to the unit, note that the
integral Power button LED icon lights red. Then
press the Power button to turn on the Shuttle.
3. The Sirius logo (
) appears on the display
followed by the Sirius preview stream. If this is the
first time using the Shuttle, the screen will display
“Updating Channels”. If not, go to stream 184 using
the direct channel method, page 9, Direct Tuning.
4. To obtain the Sirius identification (ID) number,
press the MENU button. The Menu Options
page appears with the Sirius ID option high
lighted. Press the Encoder knob and the 12
digit Sirius ID number will appear. Write the number
here for future reference.
5. Activate your Sirius® radio service ---- it’s easy. You
have one of two choices to activate your service:
-6-
128-6901
6 of 28
(a) Visit the website at siriusradio.com and click on
the “JOIN” section. You will then need to follow
some simple directions and provide Sirius with
some basic information in order to activate your
service.
(b) Call Sirius at 1-866-845-7474. One of our
friendly Customer Care representatives will
take the necessary information and walk you
through the activation process.
MEMORY BAND
BUTTON BUTTON
MENU
BUTTON
DISPLAY ENCODER KNOB AND
BUTTON PUSH-TO-SELECT
(ENTER) BUTTON
POWER
BUTTON
(w/RED
LED ICON)
CATEGORY
SEARCH
(UP/DOWN)
BUTTONS
LCD
DISPLAY
INFRARED
SENSOR
Sirius® Shuttle Controls
The Audiovox Sirius® Shuttle Unit provides seven control buttons, an Encoder knob and 10 number keys.
Power Button:
This button applies power to and removes power from
the Sirius® Shuttle as follows:
1. A momentary press of the power button turns on
the receiver. The Sirius logo/name (
) initially
appears on the LCD display for 3 seconds, followed
by the Default screen.
2. A momentary press of the power button turns off
the receiver. While the unit powers down, the
Audiovox logo appears for 2 seconds and the
unit turns off.
NUMBER
BUTTONS
3-DIGIT STREAM
NUMBER
AUTO SIZING/
SCROLLING
SONG TITLE
8-CHARACTER
CATEGORY
NAME
SIGNAL
STRENGTH
INDICATOR
Display 1 Default Screen
STREAM
NAME
AUTO SIZING/
SCROLLING
ARTIST NAME
CLOCK
BAND/PRESET
BANK NUMBER
-7-
128-6901
7 of 28
Encoder Knob and Select Button:
The Encoder knob is the primary control for navigating
through the various lists and option menus available on
the unit. In the default mode, the Encoder knob provides
sequential tuning through the available program streams.
Clockwise (CW) rotation tunes up one stream-per-detent,
while Counterclockwise (CCW) rotation tunes down one
stream-per-detent. When in the list mode, turning the Encoder knob CCW and CW scrolls down and up, respectively, through the various menus and lists. The current
selection from the list will be highlighted on the display.
When the item is highlighted, press the Encoder knob
(Select Button) to enter the selection. Pressing and
holding the Encoder knob will tune to the previously
selected stream.
Memory (MEMO) Button (S-SEEK Function):
This feature allows the user to capture and store the current program data information (Stream Name & Number/
Artist & Song title). You can store up to 20 Artist/Song Title
combinations. The Shuttle also has the capability to search
the current incoming Sirius signal, and thereby alert you if
it matches the Artist/Song title stored in Shuttle memory.
Category Buttons:
The Up or Down category buttons allows the user to advance through the stream groups based on content category. By turning the rotary Encoder knob, the user can
then scroll up or down through the streams within that
category. Once a choice has been made, it can be entered by pressing the Select Button.
BAND Button (BAND)/Preset Tune (P. TUNE):
Each momentary press of the BAND Button allows the
user to switch between 3 bands of Stream presets (10
presets each A, B and C). Pressing and holding the
BAND Button for 2 seconds initiates preset tuning that
will display and tune all stored preset streams in
sequence. This is indicated by the reverse image of
the stream number and band preset number on the
Display (DISP) Button:
This button allows the user to choose one of several ways
of presenting the Stream Name, Artist and Song title information on the LCD screen.
Menu (MENU) Button:
The MENU Button is used to access “Menu Options”
which displays the user setup menu, plus other feature/
function adjustments.
-8-
128-6901
8 of 28
display. Pre-set tuning continues until the user decides
to terminate this function by pressing and holding the
BAND Button for 2 seconds.
Keypad Buttons 0-9:
These buttons are used to directly enter a desired stream
number. They are also used when entering and recalling
preset stream numbers into memory.
Category List Display
Basic Operation
With the unit properly installed, activated and connected
to your home or vehicle audio system, proceed as follows:
1. Press the Power button; the Shuttle turns on and
the Sirius logo appears for 3 seconds followed by
the default display for the stream and tuning mode
in effect prior to turnoff.
2. Rotate the Encoder knob to select and play the
desired stream, or use the Category Up/Down
buttons to tune and select a desired stream based
on genre.
Tuning By Category
When in Category Tuning Mode, each momentary
press of the Category Up/Down Button(s) advances
through the available Genres:
1. Using the Encoder knob, select the
desired stream.
2. Press the Encoder knob to select that stream.
3. Once the stream has been selected, the unit will
revert to the default screen and your selection
will be played.
Content Listing Options (Look Ahead)
This feature allows you to view what is playing on other
streams without having to change the current stream you
are listening to. The content listing options are selected
by using the DISP button. When the default screen is
displayed on the LCD, pressing and holding the DISP
Button will display all the available stream numbers and
stream names. The second press of the DISP button
will display all currently available artists. The third press
of the DISP button will display song titles.
-9-
128-6901
9 of 28
While in the Category List menu, pressing the DISP
button changes Stream List to Artist List. The available
content listing now displays information by the Artist
Name. Category Artist Name Display
Category Song Title Display
The DISP button is also used during category tuning.
Consecutively pressing the DISP button while tuning by
category will display the Stream Name, Artist Name or
Song Title within the selected category.
While the preceding screens are displayed, rotating the
Encoder knob allows navigation through the list. When
the desired selection is highlighted, press the Encoder
knob and your selection will be played.
Direct Tuning
Streams can also be directly accessed by pressing the
Encoder knob and using the 0-9 number keys to numerically enter the desired stream. Once the desired stream
number has been entered, press the Encoder knob again
to play.
Setting/Using Stream Preset Buttons
The unit contains 10 preset buttons. There are three banks
of preset memory locations offering a total of 30 presets.
These banks are designated A, B and C and can be selected using the BAND button. The display in the lower
right hand side changes to show the corresponding Preset bank. Each bank will store 10 user-preferred streams.
Select the desired stream you wish to save into memory
by using the Encoder knob, the direct tuning method or the
category tuning method. With the desired stream playing,
press and hold any of the numbered keypad buttons (0-9);
the corresponding preset number will flash. A confirmation tone is heard, confirming that the preset has been
stored. Continue this procedure for storing all desired
streams. To retrieve a preset stream, momentarily press
and release the number button corresponding to the desired stream.
-10-
128-6901
10 of 28
Press and
Hold BAND
Button
Press and
Hold BAND
Button
Preset List Mode
To search by list for a preset, press and hold the BAND
button to enter Preset Tune mode. When in the Preset
Tune Mode, press and hold the DISP button for 2 seconds; this exits normal preset tuning and enters a 6-line
menu mode which displays the Preset number (A-1), a
single space and the 20-character stream name. While
in the Preset List menu, pressing the DISP button once
will change to Artist List; a second press of the DISP
button changes to Song List.
While the contents of the preset listing are displayed,
rotate the Encoder knob to navigate through the list.
When the desired selection is highlighted, press the
Select Button and the stream will be played.
Display Button
Pressing the Display button from the Default display
toggles between the artist name/song title screen or
large letter format. When the letter size changes, the
field will scroll. This feature is useful when viewing the
display at a distance.
NOTE: The field will scroll only if the length of the artist
or title cannot be viewed in its entirety.
Pressing and holding the Display button will
enter the stream list mode. While in the
Stream List mode, any subsequent press of
-11-
128-6901
11 of 28
the DISPbutton will display program information
by Artist Name, Song Title or stream name.
Pressing and holding the DISP button will exit
the Stream List mode and return to the previously selected tuning/display mode.
Memory Button (S-Seek Function):
This feature allows the user to capture and store the
current program data information (Artist & Song title)
with up to 20 listings (20 Artist/Song Title combinations).
The unit also has the capability to search the current
incoming Sirius signal and alert the user when a saved
song is being played.
1. While the Shuttle is in either of the two standard
display modes, momentarily pressing and releasing the MEMO button stores the current program
data information within the Shuttle’s memory. A
Memory Stored pop-up screen, followed by “X Used/
Y Empty” will each appear for 1 second.
2. By holding down the MEMO button for 3 seconds,the
stored memory information (one at a time) is displayed
on the LCD screen in page format. Use the Encoder
knob to scroll through the 20-page listing and view the
information. This function allows you to recall information regarding the Artist/Song Title for your own personal
review. To return to the default tuning mode press and
hold the MEMO button for 3 seconds.
3. Momentarily pressing the Encoder knob while in
memory recall mode results in a pop-up screen displaying two selectable options:
Delete
S-Seek
-12-
128-6901
12 of 28
Turning the Encoder knob highlights the options
and pushing the knob selects the option. The
delete option allows the user to delete the
currently featured artist/ song title selection from
S-Seek memory. The default setting is NO. If the
YES option is chosen, the currently featured Artist/
Song Title is deleted from S-Seek memory. The SSeek option allows the user to turn the S-Seek
function on or off. The default setting is S-Seek on.
If the off option is chosen, the user will not be
alerted when a stored artist song title selection is
currently playing. Momentarily pressing the MEMO
button will exit the current menu and return to the
previous menu.
4. When the S-seek function is on each time the
Shuttle is turned on, it automatically searches
the incoming signal to determine if a match
exists between the signal and the currently
saved information stored in receiver memory. If
one or more matches are found, pop-up screen
momentarily appears for 2 seconds and displays
the Phrase S-Seek Alert. An audible beep tone
will be heard indicating that a match has been
found. The display then reverts to the S-Seek
Alert screen which displays the current matches.
You can now select the Artist/Song that you wish
to listen to.
-13-
128-6901
13 of 28
No stored match alert is provided for the currently
selected stream. To ensure that no duplicate entries are stored in memory, the receiver will check
the stored input data to ensure the information about
to be stored is not already in memory.
second, followed by a pop-up screen presenting
the Replace-Cancel options. This prompt allows
you to make the following Replace/Cancel choices:
a. If one or more matches are found, a display list
appears, and allows you to scroll through the
list of songs using the Encoder knob.
Once a song is found, it can be selected by press
ing the Encoder knob, and the display will revert
to either of the selected display modes.
b. If a selection is not chosen within 10 seconds
after the last action, the screen will revert to the
previously selected display and tuning mode.
NOTE: Play of the current selection will continue until a new selection is made.
5. If the MEMO button is pressed to save a currentlyplaying selection, and all of the memory spaces
are full, S-Seek Full will flash on the display for 1
a. By selecting Replace, the memory list will
appear, and you can use the Encoder knob to
select the information that you would like to
overwrite with the new Artist/Song Title. After
highlighting the selected title in the list, press
the Encoder knob to delete the stored Artist/
Song Title,and replace it with the updated
information.
b. By selecting Cancel, the prompt screen would
disappear and revert to the original screen.
-14-
128-6901
14 of 28
Menu Display Operations
To enter the Menu Options page, press the MENU
Button. The Menu Options list will appear on the LCD
display.
Using the Encoder knob, highlight the option you wish
to adjust and then press the Encoder knob.
The following options are available:
Sirius ID
Display Settings
Confirm Tone Options
FM Transmitter Options
Add or Skip
Lock Options
Audio Level Options
Antenna Aiming
Memory Options
Time Based Features
Factory Default
If, while in the menu screen function, a button is not
pressed within 10 seconds from the previously
selected function, the unit exits the menu screen
function and reverts to the default screen display.
-15-
128-6901
15 of 28
Sirius ID
Displays your 12 digit Sirius ID number. No
adjustments are allowed in this mode. To exit
this option, press the Encoder knob or Menu
Button.
Sirius ID
The Auto Dimmer option allows the Shuttle to use
ambient light to automatically sense and determine the proper display intensity for the current
lighting conditions (Auto Dimmer On). The auto
dimming function is disabled when Auto Dimmer
Off is selected.
The Font Type s allow the user to select the appearance of text on the Shuttle display.
Confirm Tone Options
Display Settings
The following adjustments are possible:
Contrast Control
Dimming Control
The following adjustments are possible:
ON
OFF
Upon entering this option, rotate the Encoder
knob to toggle between Tone On or Off. High
light the desired condition, and press the Encoder
knob to enter the tone On or Off function. When the
tone is enabled, a beep tone will sound each time
the Power On/Off button or preset buttons are
pressed.
Auto Dimmer
Font Type
To enter any of these modes, use the Encoder
knob to highlight the option you wish to adjust and
press the Encoder knob. Upon entering either the
contrast or dimming control, a 10 segment horizon
tal bar graph is displayed with a “-” sign to the left
and a “+” sign to the right. The current setting is
indicated on the bar graph. Rotating the Encoder
knob adjusts the bar graph indication and function
accordingly.
FM Transmitter Options
The following adjustments are possible:
FM On/ Off
-16-
128-6901
16 of 28
Upon entering this mode, rotating the Rotary
Encoder knob to toggle between the FM ON
or FM OFF function/display selection. To select
and/or exit this function, press the Encoder knob
(No button activity for 10 seconds will also exit this
function.)
NOTE: It is recommended that you turn the FM
Transmitter off if you are using the low level
audio outputs in your particular application.
Add or Skip
Upon entering this mode, a stream list is displayed with the
current stream in play highlighted. Rotate the Encoder knob
to navigate the list and highlight the stream to be adjusted.
Once a stream has been highlighted, pressing the Select
Button displays the text “Skip” next to the stream, and prevents the stream from being accessible during any of the
tuning modes. Skipped streams can only be accessed either
through direct stream number entry or by returning to this
menu and going through the same process to return the
skipped stream to the list. Upon adding a stream, the text
“Skip” is removed from alongside the stream number/ name.
used to lock/unlock stream access. All future entries
into this mode displays a stream list with the current
stream in play highlighted. The Encoder knob is used to
navigate the list and highlight the stream to be adjusted.
Once a stream has been highlighted, pressing the Encoder knob displays the text “Lock” next to the stream
and prevents the stream from being accessible during
any of the tuning modes. Locked streams can be accessed only by direct stream number entry, at which time
the user will be prompted to enter the previously stored
4-digit code. Once the correct code has been entered,
the audio begins to play. The stream returns to the locked
status if the stream is changed or the vehicle/unit is
turned off (or by returning to this menu and going through
the same process to return the stream to the list). Upon
adding a stream, the text “Lock” is removed from alongside the stream number/name.
Lock Options
Upon entering this mode for the first time, the user is
prompted to enter a four digit numerical code that is
Lock/Unlock Default Code Function
The first time the Lock/Unlock function is accessed,
the user must enter the default lock code. The default
lock code is “0000”. This code can be maintained or
changed. To change the default lock code perform the
following procedure:
-17-
128-6901
17 of 28
1. Press the MENU button to access the User
Menu.
2. Rotate the Encoder knob to select the
“Lock Options”.
3. Press the Encoder knob.
4. Rotate the Encoder knob to highlight “Edit Code”.
5. Press the Encoder knob.
6. Enter the default code “0000”.
7. The “New Code” prompt will appear. Enter your
newfour digit code using the 0-9 number buttons.
You will then be prompted to confirm the new
code by entering your code again.
8. The lock code is now changed.
Edit Code
Upon entering this mode, the user is prompted to
enter the current four digit numerical code being used
to lock/unlock stream access. Once the correct code
has been entered, the user is prompted to enter the
new 4-digit code twice. The second entry is requested
for confirmation.
Audio Level Options
Upon entering this mode, a 10 segment horizontal bar
graph is displayed with a “-“ sign to the left and a “+” sign
to the right. The current setting is indicated on the bar
graph. Rotating the Encoder knob will adjust the bar
graph audio level indication and audio gain, accordingly.
To select and exit this function, press the Encoder knob.
No button activity for 10 seconds will also exit
thisfunction.
Antenna Aiming (Home Installation)
Upon entering this mode, two 10 segment horizontal
bar graphs are displayed with a “-“ sign to the left and a
“+” sign to the right. The satellite signal strength is displayed by the SAT graph. The terrestrial signal strength
is displayed by the TER graph. Position the antenna to
optimize either the satellite or terrestrial signal. The current
setting is indicated on the bar graph. Moving the antenna
location adjusts the bar graphs signal strength, represented
by the filled-in bar graph squares, thus ensuring optimum
reception. To exit this function, press the Select Button.
NOTE: Terrestrial repeaters are typically used in large
urban areas where structures may affect the line
of sight satellite signal. Terrestrial signals (TER)
may not be available in your geographic location.
-18-
128-6901
18 of 28
Memory Options
In this mode, the user can turn the Memory Search
Function (S-Seek) ON or OFF. In addition, all 20 Memory
Locations can be cleared.
On the display, the top line displays the text,M e m o r y
Options.
The following adjustment options are possible:
1. Automatic Memory Search function - On or Off.
Use the Encoder knob to select between the 2
options by highlighting the desired selection. Then
press the Encoder knob to enter the option.
2. Clear all Memory Locations. Press the Encoder
knob; a prompt display screen appears confirming Are You Sure? Select “Yes” or“ No” and press the
Encoder knob.
Upon entering this mode, rotate the Encoder knob to
highlight the desired function and press the Encoder
knob.
NOTE: No button activity for 10 seconds will also
exit the desired (highlighted) function.
Clock
When entering this menu option, you can set up the
clock shown on the default display, based on the
format desired, the time zone in which you reside and
Daylight Savings Time, if used. The clock data is provided via the Sirius stream, and will update based on
the received signal.
Time Based Features
The following adjustments are possible:
Clock
Alarm Clock
Program Alert
Auto Shutdown
Sleep Mode
Format:
The clock format option provides:
12 Hour (Default)
24 Hour
Use the Encoder knob to highlight the desired for
mat and press the Encoder knob.
-19-
128-6901
19 of 28
Time Zone:
The Time Zone option provides:
(GMT-9:00) Alaska
(GMT-8:00) Pacific
(GMT-7:00) Mountain
(GMT-6:00) Central
(GMT-5:00) Eastern
(GMT-4:00) Atlantic
(GMT-3:30) Newfoundland (Abbreviated as
GMT-3:30 Newfndlnd)
Use the Encoder knob to highlight the desired
time zone and press the Select Button.
Daylight Savings Time (DST) Observance:
Activate this function if your area is subject to DST;
rotate the Encoder knob to toggle between DST
Observed (default) or DST Not Observed.
information has been lost, the shuttle will
not display the time information and
preprogrammed alarms will not be
triggered until the shuttle updates the
time information using the satellite
signal.
Alarm Clock:
When this menu option is highlighted and selected,
you will be able to set the unit to turn on at a specific
time. The last selected stream prior to shutdown will
be present when the Alarm feature is activated. Additionally, a series of beep tones will be heard. Press
any button on the front panel to silence the alarm
tones. The alarm will trigger again at the set time
unless the Alarm Off feature is selected under the
Set Alarm function.
Set Alarm (Default-Off)
Use the Encoder knob to toggle between Alarm
On or Alarm Off and press the Select Button
for desired alarm status. When the alarm is on
the time will be displayed on the default screen in
reverse image.
NOTE: When the shuttle has not been turned on
or has been removed from the docking
port for any length of time be sure to
position the antenna toreceive the
satellite signal so the time can be
automatically updated. If the time
-20-
128-6901
20 of 28
Alarm Time
When this menu option is highlighted and
selected the current alarm setting is displayed.
The factorydefault is 12:00PM. By pressing the
category buttons the hours can be increased or
decreasedin one hour increments. AM or PM
will switch automatically when the AM or PM
threshold has been exceeded. By rotating the
Encoder knob the minutes can be increased or
decreasedin one minute increments. Rotating
the Encoder knob in a clockwise (CW) direction
will increase the minutes and in a counterclock
wise (CCW) direction will decrease the min
utes. When the desired time is displayed, press
the Encoder knob.
NOTE: Loss of the satellite signal by the shuttle
will result in a series of alarm tones only.
Program Alert
When this menu option is highlighted and selected, you will be able to program the unit to switch
to a selected stream at a specific time. On the display, Set Stream Alert will occupy the top text line.
The following adjustments are accessible:
Program Time/Day (Default-12:00pm, Monday)
Stream (Default-Currently Playing Stream)
Program Alert On/Off (Default-Off)
Time/Day:
Rotating the Encoder knob toggles between
Time and Day.
If Time is selected, pressing the category
buttons the hours can be increased or decreased
in one hour increments. AM or PM will switch
automatically when the AM or PM threshold
has been exceeded. By rotating the Encoder
knob the minutes can be increased or decreased
in one minute increments. Rotating the Encoder
knob in a clockwise (CW) direction will increase
the minutes and in a counterclockwise (CCW)
direction will decrease the minutes. When the
desired time is displayed, press the Encoder
knob.
If Day is selected, the screen displays a default
day of Monday, with selectable choices of Monday, Tuesday, Wednesday, Thursday, Friday,
Saturday or Sunday. Use the Encoder knob to
-21-
128-6901
21 of 28
increase (CW) or decrease (CCW) to se
lect the desired day from the default value
(Monday).
NOTE: This function is especially useful when the
shuttle is being powered by battery (Car etc.).
Stream:
Rotate the Encoder knob to scroll through a
listing of all the Sirius streams in a circular
motion. The listing should encompass all 5
available lines. When the desired stream is
highlighted,press the Encoder knob.
The following options are available in this mode:
Enabled
Disabled (Default)
Rotate the Encoder knob to toggle between
Enabled and Disabled. When the desired shut
down status is highlighted, press the Encoder
knob.
Program Alert On/Off:
Rotate the Encoder knob to toggle between
Program Alert On or Program Alert Off.
When the desired alert status is high
lighted, press the Encoder knob.
Auto Shutdown
In this mode, you have the option of programming the unit to automatically shut off after a 1hour period without any user intervention. After 59
minutes of inactivity, a beep tone sounds, and a
display prompt appears on the screen, stating
Cancel Auto Shutdown. Press the Encoder knob
to terminate the function temporarily.
Sleep Mode:
In this mode, you have the capability of program
ming the unit to shut off after a selected period of
time. The screen displays Sleep Mode on the top
line, with optional time settings as follows:
Sleep Off
15 minute
30 minute
45 minute
60 minute
-22-
128-6901
22 of 28
Sleep Off is the factory default setting. Rotate the
Encoder knob to toggle through the desired sleep
times. When the desired time is highlighted, press
the Encoder knob. The unit will now turn off after the
selected time has expired
Factory Default
The Factory Default screen displays the text Restore
Default Settings with the following adjustments:
Yes/No
Upon entering this mode, rotating the Encoder knob
toggles between the “Yes” or “No” function/display
selection. If “Yes” is chosen, the unit reverts to the original factory settings for the following parameters:
• All Presets revert to empty
• Auto Dimming On
• Display Contrast to 50%
• Display Mode to Auto
• FM Modulator to On
• Audio Output Level to 70%
• Access to all skipped Shuttles (Locked streams remain locked)
•
•
•
•
•
Memory Search On
Memory Locations are erased
12 Hour Clock Format
Eastern Time Zone
Daylight Savings Time Observed
Factory Default
Remote Control Unit
The wireless remote control supplied with the Shuttle is
capable of operating most of the features from a remote location. Each button on the remote control functions in the same way as the button on the Shuttle unit.
For a full description of a keypad button or function refer
to the preceding sections in this manual. For optimal
operation of the remote control, always aim it toward
the Remote Sensor on the front panel of the main unit.
-23-
128-6901
23 of 28
1. POWER - Turns the Shuttle on and off.
Remote Control Unit
1
2. Presets 0-9- These buttons are used to directly enter a
desired stream number. They are also used when entering
and recalling preset stream numbers into memory.
12
2
3. DISPLAY- allows the user to choose one of three ways of
presenting the Artist and Song title information on the LCD
screen.
4. CAT- Used to access categories in descending order.
3
11
10
4
9
5
8
7
6
5. BAND- Used to switch between the 3 preset bands (A, B, C)
and to activate preset tuning.
6. CH- Used to access streams in descending order. Also used
for adjustments in the various menus.
7. MEMO- Used to capture and store current program
information.
8. SELECT/ DIRECT- Used to confirm selection in various lists
and menus. Also allows for direct stream entry.
9. CAT+ Used to access categories in ascending order.
10. MENU- Used to access “Menu Options” which displays the
user setup menu plus other feature/function adjustments.
11. CH+ Used to access streams in ascending order. Also
used for adjustments in the various menus.
12. MUTE- Allows the user to silence the audio signal.
-24-
128-6901
24 of 28
Troubleshooting
Specifications
PROB AB L E
C AU SE
REMEDY
Shuttle does
not turn on
Blown fuse, power cable
not properly connected
Check fuse check power
cable
Audio Output
(100-250 ohms): 650mV RMS Maximum
Check antenna
display
message
Satellite antenna not
connected
Check satellite connection to Shuttle
Fuse:
3A Slow Blow
Power Supply:
10-16V, Negative Ground, DC
Antenna or cable is
faulty
Contact system installer
or vendor
FM modulator frequency
contains static
switch to another FM
frequency
Vehicle antenna not
connected to radio
Check vehicle antenna
cable.
No signal on
Shuttle display
Check for obstacles
over or around antenna
Change location to
eliminate nearby
obstacles (bridges, etc.)
No sound
1. Audio cables not
connected.
2. Incorrect FM
modulator Frequency
1. Check cables at
Shuttle and radio.
2. Select another FM
modulator frequency.
FAULT
Audio static or
loss of clarity
Dimensions
(W x H x D):
132mm x 86.5mm x 47.5mm
(w/knob)
(5.19” x 3.4” x 1.87” )
-25-
128-6901
25 of 28
12 MONTH LIMITED WARRANTY
AUDIOVOX CORPORATION (the Company) warrants to the original retail purchaser of this product that should this product or any part thereof, under
normal use and conditions, be proven defective in material or workmanship within 12 months from the date of original purchase, such defect(s) will
be repaired or replaced with new or reconditioned product (at the Company's option) without charge for parts and repair labor.
To obtain repair or replacement within the terms of this Warranty, the product is to be delivered with proof of warranty coverage (e.g. dated bill of
sale), specification of defect(s), transportation prepaid, to an approved warranty station or the Company at the address shown below.
This Warranty does not extend to the elimination of externally generated static or noise, to correction of antenna problems, to costs incurred for
installation, removal or reinstallation of the product, or to damage to tapes, compact discs, speakers, accessories, or vehicle electrical systems.
This Warranty does not apply to any product or part thereof which, in the opinion of the Company, has suffered or been damaged through alteration,
improper installation, mishandling, misuse, neglect, accident, or by removal or defacement of the factory serial number/bar code label(s). THE
EXTENT OF THE COMPANY'S LIABILITY UNDER THIS WARRANTY IS LIMITED TO THE REPAIR OR REPLACEMENT PROVIDED ABOVE
AND, IN NO EVENT, SHALL THE COMPANY'S LIABILITY EXCEED THE PURCHASE PRICE PAID BY PURCHASER FOR THE PRODUCT.
This Warranty is in lieu of all other express warranties or liabilities. ANY IMPLIED WARRANTIES, INCLUDING ANY IMPLIED WARRANTY OF
MERCHANTABILITY, SHALL BE LIMITED TO THE DURATION OF THIS WRITTEN WARRANTY. ANY ACTION FOR BREACH OF ANY
WARRANTY HEREUNDER INCLUDING ANY IMPLIED WARRANTY OF MERCHANTABILITY MUST BE BROUGHT WITHIN A PERIOD OF 48
MONTHS FROM DATE OF ORIGINAL PURCHASE. IN NO CASE SHALL THE COMPANY BE LIABLE FOR ANY CONSEQUENTIAL OR
INCIDENTAL DAMAGES FOR BREACH OF THIS OR ANY OTHER WARRANTY, EXPRESS OR IMPLIED, WHATSOEVER. No person or
representative is authorized to assume for the Company any liability other than expressed herein in connection with the sale of this product.
Some states do not allow limitations on how long an implied warranty lasts or the exclusion or limitation of incidental or consequential damage so
the above limitations or exclusions may not apply to you. This Warranty gives you specific legal rights and you may also have other rights which vary
from state to state.
U.S.A. : AUDIOVOX CORPORATION, 150 MARCUS BLVD., HAUPPAUGE, NEW YORK 11788 l 1-800-645-4994
CANADA : CALL 1-800-645-4994 FOR LOCATION OF WARRANTY STATION SERVING YOUR AREA
128-6464
-26-
128-6901
26 of 28
THIS PAGE LEFT BLANK INTENTIONALLY
-27-
128-6901
27 of 28
© 2003 Audiovox Electronics Corporation
128-6901
-28-
128-6901
28 of 28