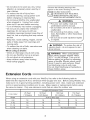
1
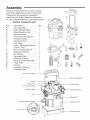
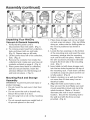
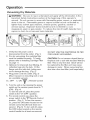
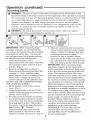
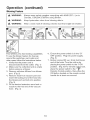
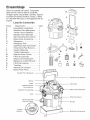
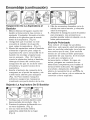
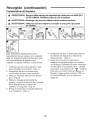
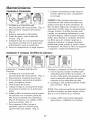
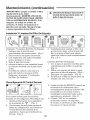
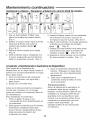
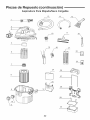
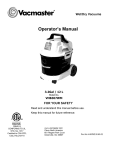
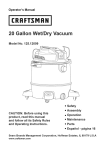
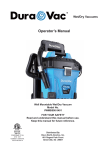
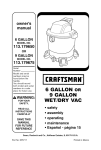
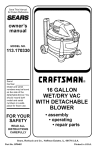
Operator's
Manual
Wall Mount 5 Gallon Wet/Dry Vacuum
Model No. 125.16825
• Safety
CAUTION:
Before using this
product, read this manual and
follow all its Safety Rules
and Operating Instructions.
• Assembly
• Operation
• Maintenance
• Parts
• Espa_ol
- pagina 17
Sears Brands Management Corporation, Hoffman Estates, IL 60179 U.S.A.
www.craftsman.com
Warranty
CRAFTSMAN
ONE YEAR FULL WARRANTY
FOR ONE YEAR from the date of purchase, this product is warranted against any
defects in material or workmanship. A defective product will be replaced free of
charge.
For warranty coverage details to obtain free replacement, visit the web site:
www.craftsman.com
This warranty does not cover filters, hose or attachments, which are
expendable parts that can wear out from normal use within the warranty period.
This warranty is void if this product is ever used while providing commercial
services or if rented to another person.
This warranty gives you specific legal rights, and you may also have other rights
which vary from state to state.
Sears Brands Management
Corporation,
Hoffman Estates, IL 60179
iMPORTANT
SAFETYiNSTRUCTiONS
READ
AND
UNDERSTAND
ALL
INSTRUCTIONS BEFORE USINGTHiS
VACUUM
Read and understand this owner's manual and
all labels on the Wet/Dry Vacuum cleaner before
operatin9, Safety is a combination of common
sense, stayin9 alert and knowin9 how your
vacuum works. Use this Wet/Dry Vac only as
described in this manual. To reduce the risk of
personal injury or damage to your Wet/Dry Vac,
use only Craftsman recommended accessories.
For household use only
SAVETHISMANUAL
FOR FUTURE
REFERENCE,
When using an electrical appliance, basic
precautions should always be followed
includin 9 the following:
WARNING:
RiSK OF FIRE, ELECTRIC SHOCK OR iNJURY:
- Do not run vac unattended.
- Do not vacuum, or use this Wet/Dry Vac
near flammable liquids, gases, or
explosive vapors like 9asotine or other
fuels, tighter fluids, cleaners, oil-based
paints, natural 9as, hydrogen, or explosive
dusts like coal dust, magnesium dust,
9rain dust, or gun power. Sparks inside the
motor can ignite flammable vapors or dust.
- Do not vacuum anythin 9 that is burnin 9 or
smokin 9, such as cigarettes, matches, or
hot ashes.
. Keep cord away from heated surfaces.
° Do not expose to rain. Store indoors.
° Do not unplu 9 by pultin 9 on cord. To
unplug, 9rasp the plug, not the cord.
° Do not use with damaged cord, ptu 9 or
other parts.
° If vac is not workin 9 as it should, has
been dropped, damaged, left outdoors, or
dropped intowater, take it to a service
dealer for inspection and repair before
usin 9 it again.
- Do not pull or carry by cord, use cord as
handle, close a door on cord, or pull cord
around sharp edges or corners.
° Do not run Wet/Dry Vac over cord.
° Do not handle plu9 or the Wet/Dry Vac
with wet hands.
° To reduce the risk of health hazards from
vapors or dusts, do not vacuum toxic
materials.
° Do not store near hazardous materials.
° Do not use this Wet/Dry Vac with a torn
filter or without the filter installed except
when vacuumin 9 liquids as described in
the operation section of this manual.
- Donotallowtobeusedasa toy.Close
attention
isnecessary
whenusedbyor
nearchildren.
- Toreduce
theriskofinjuryfrom
accidental
starting,
unplug
powercord
before
changing
orcleaning
filter.
- DonotleaveWet/Dry
Vacunattended
whenplugged
in. Unplug
fromoutlet
whennotinuseandbefore
servicing.
- TurnoffWet/Dry
Vacbefore
unplugging.
- Donotputanyobject
intoventilation
openings.
Donotvacuum
withany
ventilation
openings
blocked;
keepfreeof
dust,lint,hairoranything
thatmayreduce
airflow.
- Keephair,looseclothing,
fingers,
andall
partsofbodyawayfromopenings
and
moving
parts.
- Toreduce
theriskoffalls,useextracare
whencleaning
onstairs.
Whenusingasblower:
-
Observe the following warnings that
appear on the motor housing of your Vac:
GROUNDING
NOT REQUIRED.
OUBLE INSULATED
WHEN SERVICING USE ONLY
IDENTICALREPLACEMENTPARTS.
_
f
,A
WARNING
*_
• For your own safety, read and
understand owner's manual.
• Do not allow unit to be in operation if
unattended.
• Do not pick up hot ashes, coals,
toxic, flammable or other hazardous
materials.
• Do not use around explosive liquids
,,,or
vapors,
j
_. WARNING: To reduce the risk of
electric shock - do not expose to rain store indoors.
Direct air discharge only at work area.
Do not use Wet/Dry Vac as a sprayer.
Do not direct air at bystanders.
Keep children away when blowing.
Wear safety goggles.
WARNING: When using blower:
Wear safety goggles labeled "ANSI
Z87.1" on the package. Turn unit off
before setting on ground or releasing
grasp of handle. Electric shock could
occur if used on wet surfaces. Direct
tool discharge only at work area.
Do not direct discharge at bystanders.
Keep children away.
Extension Cords
When using an extension cord with your Wet/Dry Vac refer to the following table to
determine the required A.W.G. (American Wire Gauge) wire size. Before using Wet/Dry Vac,
make sure it is in good working condition, including power cord. Also, make sure extension
cord is in good working condition prior to use. Make repairs or replacements before using
the vacuum cleaner. Only use extension cords that are rated for outdoor use.
Length of Extension
Cord
25 Feet
7.5 Meters
50 Feet
15.25 Meters
0-6
18
16
16
14
7-10
18
16
14
12
11-12
16
16
14
13-16
14
12
110V-120V
Amps
100 Feet
30.5 Meters
150 Feet
45.7 Meters
A.W.G Wire Size
12
Not recommended
introduction
This Wet/Dry Vac is intended for household use. It may be used for vacuuming of
wet or dry media and may be used as a
blower.
Read this operator's manual to familiarize
yourself with the product features and to
understand the specific usage of your new
WetiD ry Vac.
Table of Contents
Section
Page
Warranty ...............................................
Important Safety Instructions ................
Introduction ...........................................
Table of Contents .................................
Assembly ...............................................
Carton Contents List .........................
General Assembly ..............................
Mounting Rack And Storage
Assembly ............................................
Mounting The Vacuum Onto The
Wall Mount Assemmbly ......................
Polarized Plug ....................................
Operation ..............................................
Vacuuming Dry Materials ....................
Vacuuming Liquids ..............................
Blowing Feature ..................................
2
2
4
4
5
5
6
6
7
7
8
8
9
10
Section
Page
Maintenance ........................................ 11
Emptying The Tank .......................... 11
Installing & Cleaning Cartridge
Filter ..................................................
11
Installing & Cleaning Foam Sleeve
Filter ..................................................
12
Resetting The Remote Control .......... 12
Changing The Battery ........................ 13
Cleaning And Disinfecting The
Wet/Dry Vac ...................................... .13
Storage .............................................. 13
Troubleshooting .................................... 14
Repair Parts .........................................
15
Assembly
Remove entire contents of carton. Check
each item against the carton contents list.
If any parts are missing or damaged,
return the unit to the retailer of purchase,
or call 1-800-469-4663 for part replacement.
Carton
Content
Lists
Key
A
B
C
D
E
F
G
H
I
J
K
L
M
N
O
P
Q
R
S
T
Description ....................
Qty.
Vac Assembly ...................
1
Hose Storage Rack .........
1
Steel Mounting Rod ........
1
Mounting Rack ...............
1
Accessory Storage Bin ... 1
Accessory Bag ...................
1
Standard Hose ...............
1
Flex Hose .....................
1
Floor / Squeegee Nozzle .. 1
Crevice Toot ..................
1
Round Dusting Brush ...... 1
Extension Wands ............. 2
Car Nozzle .......................
1
Cartridge Filter ...............
1
Air/Noise Diffuser ............
1
Remote Control Handle ..... 1
Foam Filter .....................
1
Screws ...........................
3
Operator's Manual ..........
1
Collection Bag ...................
1
H
L
I
J
K
M
Hose Stroage Rack
Steel Mounting
Handle
Power Head
Accessory
Storage
Mounting Rack
_
['_
_'_
_L_:.__ 5,,.." _l._ \ "_
o;;he
c
._
\1 )_
Rod
Power Switch
)1_,
_
_
Air/Noise
Diffuser
vacu
x ens,onWanOS Co,,oc ,
owercoi
r ....
Accessory
5
Bag
Assembly (continued)
]
Unpacking
Your Wet/Dry
Vacuum & General Assembly
1. Place hose storage rack on top of steel
rod and snap into place. (Fig. 6a) While
doing so, make sure the locking tabs on
the rod are positioned as shown in
Fig. 6b.
2. Locate the two openings on the bottom
of the mounting rack and insert the wire
accessory storage into the mounting
rack until it locks into place. Make sure
the wire accessory storage is directed
towards the front side of the mounting
rack. (Fig. 7)
3. Insert steel rod with hose storage rack
into the two holes located on the top of
the mounting rack. Push down until the
rod buttons snap into place and the rod
is fully seated. (Fig. 8)
4. Select a location on a wall stud that is
1. Verify that the power cord is
disconnected from the outlet. (Fig. 1)
2. To remove power head from collection,
tank, pull down latch on right side.
(Fig. 2) Repeat step on left side.
3. Lift the power head off of the collection,
tank. (Fig. 3)
4. Remove the contents from inside the
collection tank; make sure you have all
contents as listed on page 5. (Fig. 4)
5. Place power head back on collection,
tank and secure latches, insert the
air/noise diffuser into the blowing port
and lock into place. ( Fig. 5)
Mounting
Rack and Storage
not more than 20 feet away from an
electrical outlet.
5. Align the three screw holes so that
they are over the stud. Make sure wall
mount assembly is level and mark the
whole locations. Make a 1/8-inch
diameter pilot hole in each marked
location. Secure the mounting rack to
the wall stud with the three screws
provided. (Fig. 9)
Assembly
WARNING! To prevent personal injury or
product damage:
• Do not mount the rack over 5 feet from
the floor.
• Do not screw the rack to drywall only.
Secure the screws to a stud.
• Do not hang from or sit on the mounting
rack.
• Do not exceed maximum weight limit of
40 pounds placed on the rack.
6
Assembly
Mounting
(continued)
The Vacuum
The Wall Mount
Onto
Assembly
1. Measure the distance from the top
screw hole of the mounting rack to the
closest electrical outlet and add 12
inches to the measurement to provide
some slack. Wind the remainder of the
cord around the cord wrap bracket
located on the rear of the vacuum.
2. Make sure the cord is not wound
around the hanging hook (A). (Fig. 11)
3. Mount the vacuum onto the mounting
rack by aligning the vac hanging hook
(A) with slot (B) on the mounting rack
and slide downward until it locks.
(Fig. 12) When mounting the vac onto
the mounting rack, hold the excess cord
to make sure it does not get caught
between the mounting rack and the rear
of the vac.
5. Secure the desired accessory, such as
the remote control handle, onto the end
of the hose.
6. Store hose on holder rack. Accessories
can be stored on power head accessory
storage and wall mount assembly.
Polarized
Plug
To reduce the risk of electrical shock,
this appliance has a polarized plug (one
blade is wider than the other). This plug
will fit in a polarized outlet only one way.
If the plug does not fit fully in the outlet,
reverse the plug. If it still does not fit,
contact a qualified electrician to install
the proper outlet. Do not change the
plug in any way. Double insulation[-D-]
eliminates the need for the three wire
grounded power cord and grounded
power supply system.
4. Insert the locking end of the hose into
the port of the container and lock in
place. (Fig. 13) To install additional
hose, insert end into other hose and
lock in place.
Removing
The Vacuum
From The Wall Mount
1. Disconnect the power cord from the
electrical outlet. (Fig. 1)
2. Press and hold the release lever with
your left hand. (Fig. 2)
3. Then, lift the vacuum up off the
mounting rack by the handle with your
right hand. (Fig. 3)
Assembly
Operation
Vacuuming
Dry Materials
,_kWARNING:
Be sure to read, understand and apply all the information in the
Important Safety Instructions section at the beginning of this operator's
manual. Do not vacuum in areas with flammable gases, vapors, or explosive
dusts in the air. Flammable gases or vapors include but are not limited to;
lighter fluid, solvent type cleaners, oil-base paints, gasoline, alcohol or
aerosol sprays. Explosive dusts include but are not limited to; coal,
magnesium, grain or gun powder. To reduce the risk of health hazards from
vapors or dust, do not vacuum toxic materials.
1. Verify that the power cord is
disconnected from the outlet. (Fig. 1)
2. For dry vacuuming, the cartridge filter
must be installed correctly. To verify,
please refer to Installing Cartridge Filter
on page 11.
3. Optional, for improved dust filtering, fit
collection bag onto the tank. Fit the
flange onto the inlet stub, taking care
not to damage the bag. (Fig. 2)
4. Plug power cord into outlet. (Fig. 3)
Mount vacuum on mounting rack or use
as a portable vacuum.
0
OFF
I ON _
Remote Control
@
5. Turn the unit on by pressing the power
switch on the vacuum power head to "l"
(ON). (Fig. 4)
To turn the unit off, place the power
switch to the "0" (OFF) position.
6. For remote control use, place the
power switch to the '_'"Remote
Control
position. (Fig. 5) To turn the vacuum
on, press the ON button located on the
remote control handle forat least one
second. (Fig. 6) To turn unit off, press
the OFF button located on the remote
control handle for at least one second.
DO NOT USE THE CARTRIDGE
FOR LIQUID VACUUMING.
FILTER
CAUTION: Do not vacuum drywall dust or
fireplace soot or ash with standard Wet/Dry
filter. This is very fine dust which will not
be captured by the filter and may cause
damage to motor. When vacuuming fine
dust use a fine dust filter (sold separately).
Operation
Vacuuming
(continued)
Liquids
,_k WARNING:
Be sure to read, understand and apply all the information in the
Important Safety Instructions section at the beginning of this operator's manual.
Do not vacuum in areas with flammable gases, vapors, or explosive dusts in the
air. Flammable gases or vapors include but are not limited to; lighter fluid,
solvent type cleaners, oil-base paints, gasoline, alcohol or aerosol sprays.
Explosive dusts include but are not limited to; coal, magnesium, grain or gun
powder. To reduce the risk of health hazards from vapors or dust, do not
vacuum toxic materials.
WARNING:
Do not plug in power cord to power outlet, make sure plug is
disconnected before assembling the wet/dry vac.
IMPORTANT! When vacuuming large
quantities of liquids, we recommend that
you remove the vacuum from the mounting
rack and put it on the floor. The vacuum
can be heavy when full of liquids and may
be difficult to remove from the rack.
1. Verify that the power cord is
disconnected from the outlet. Verify that
the container is clean and free of dust
and dirt. (Fig. 1)
2. Remove cartridge filter as shown in
Removing and Cleaning Cartridge Filter
on page 11. Then, install the foam
sleeve filter as shown in Installing Foam
Sleeve Filter on page 12 and secure
power head back on the collection tank.
DO NOT USE THE CARTRIDGE FILTER
FOR LIQUID VACUUMING.
3. Fit the desired nozzle to the vacuum
hose. (Fig. 2)
4. Verify that the switch is in the 'O' OFF
position before plugging the power cord
into the outlet. (Fig. 3)
5. For large amounts of liquid vacuuming,
it is recommended to place the vacuum
on the floor. Turn the unit on by placing
the power switch to the 'l' ON position.
For remote control use,place the power
switch to the "_
" Remote
Control position; then press the ON
button located on the remote control
handle for at least one second. (Fig. 4)
6. After wet vacuuming, turn the machine
off and remove plug from power supply.
Empty contents of collection tank. See
emptying instructions on page 11. To
prevent the risk of possible mildew,
clean and dry the inside and outside of
the collection tank, and remove the foam
filter and allow to air dry before storage.
IMPORTANT! When vacuuming large
quantities of liquids, do not immerse the
nozzle completely in the liquid; leave a gap
at the tip of the nozzle opening to allow air
inflow. The machine is fitted with a float
valve that stops the suction action when the
tank reaches its maximum capacity.When
the tank has reached its maximum capacity,
you will notice an increase in motor speed.
When this happens, turn off the machine,
disconnect from power supply, and empty
the liquid into a suitable receptacle or drain.
To continue vacuuming, refit the power
head to the container. After wet vacuuming,
turn the machine off and remove plug from
power supply. To prevent the risk of
possible mildew, empty the container, clean
and dry the inside and outside of the
container, and remove the foam filter
andallow to air dry before storage.
REMEMBER! The foam filter must be
removed after wet vacuuming, and a
cartridge filter must be installed before
dry vacuuming again.
Operation
(continued)
Blowing Feature
,_L WARNING:
Always wear safety goggles complying with ANSI Z87.1 (or in
Canada, CSAZ94.3) before using blower.
,_
WARNING:
Keep bystanders
,_
WARNING:
Wear a dust mask if blowing creates dust that might be inhaled.
clear from blowing debris.
6.
This Wet/Dry Vac has blowing capabilities.
To use the blower feature for cleanup
around the workshop, yard, patio and
other areas follow the instructions below.
1. Verify that the power cord is
disconnected from the outlet. (Fig. 1)
2. Make sure the collection tank is empty
before using as a blower.
3. Remove air/noise diffuser from blower
7.
port. (Fig. 2)
4. Remove hose from vacuum port and
insert the locking end of the hose into
the blower port and lock into position.
(Fig. 3)
5. Fit the desired extension wand and or
nozzle to the free end of the vacuum
hose. (Fig. 4)
10
Ensure the power switch is in the "O"
OFF position. Plug into power supply.
(Fig. 5)
Before turning ON vac, firmly hold loose
end of the hose. Turn the unit on by
placing the power switch to the 'l' ON
position. (Fig. 6) For remote control_ use,
place the power switch to the "-'_'-"
Remote Control position, then press the
ON button located on the remote control
handle for at least one second.
Maintenance
Emptying The Collection Tank
6. Empty tank contents into a proper
waste container.
7. Place power head on collection tank
and secure latches.
NOTICE! The filters included are made of
high quality materials designed to stop
small dust particles. The cartridge filter
should be used for dry pick-up and small
amounts of liquids. A dry cartridge filter is
necessary to pick up dust. If the cartridge
filter is wet, it will clog quickly and be
difficult to clean. Handle the filter carefully
when removing it for cleaning and replacing
it. Check the filters for tears or small holes,
a small hole can let dust pass through and
out of the cleaner. Do not use a filter with
holes or tears in it, replace it immediately.
1. Verify that the power cord is
disconnected
from the outlet. (Fig. 1)
2. Disconnect the hose from the vacuum.
(Fig. 2)
3. Remove the vacuum from the mounting
rack.
4. Undo the latches and remove the power
head from the collection tank. (Fig. 3)
5. Place power head on a soft, clean
surface upside down while emptying
collection tank.
Installing
& Cleaning Cartridge
Filter
Installing Cartridge Filter
1. Verify that the power cord is
disconnected from the outlet. (Fig. 1)
2. Disconnect the hose from the vacuum.
3. If vacuum is secured on wall mount
Removing and Cleaning Cartridge Filter
1. Position power head in the upside down
position. If the retainer nut was used to
secure the filter, remove retainer nut by
turning counter clockwise.
2. Carefully lift filter up from filter
cage. (Fig. 5)
assembly, remove and place on floor.
4. Undo the latches and remove the power
head from the collection tank.
5. Place power head on a clean surface in
upside down position.
6. Slide the cartridge filter over the filter
cage with the flat end of the filter
towards the power head. (Fig. 2)
Carefully push filter down until it is fully
seated on the power head. (Fig. 3)
7. To secure filter; put on retainer nut and
turn clockwise to tighten until snug.
(Fig. 4) Or press down firmly on top of
filter around retainer bolt to allow filter
to snap in place.
NOTE: For best cartridge filter cleaning
results, cleaning should be conducted
outdoors and not indoors.
3. To clean a dry cartridge filter after it has
been removed, gently tap it against the
inside wall of the container or brush the
dirt off. Debris will begin to break up,
loosen and fall.
11
Maintenance
IMPORTANT!
cartridge filter
performance.
FILTER FOR
(continued)
Clean or change the
regularly for best
ALWAYS USE CARTRIDGE
DRY VACUUMING.
,_k WARNING: Always disconnect
the plug from the power outlet
before removing the power head
from the collection tank.
If the machine is used with out the
cartridge filter, the motor will burn out and
the warranty will be voided. Always keep
spare filters on-hand.
Installing & Cleaning Foam Sleeve Filter
Installing Foam Sleeve Filter
1. Verify that the power cord is
disconnected from the outlet. (Fig. 1)
2. Disconnect the hose from the vacuum.
3. If vacuum is secured on wall mount
assembly, remove and place on floor.
4. Undo the latches and remove the power
head from the collection tank.
5. Place power head on a clean surface in
upside down position.
6. If cartridge filter is on filter cage, remove
catridge filter. Refer to Removing and
Cleaning Cartridge Filter on Page 11.
7. Carefully slide foam sleeve filter down
over the filter cage making sure the
whole cage is covered. (Fig. 2 & 3)
Removing & Cleaning Foam Sleeve Filter
1. Power head is in the upside down
position, carefully remove foam sleeve
filter. (Fig. 4)
2. Use a mild soap and water solution
to wash foam sleeve filter. (Fig. 5 )
3. Rinse with clean water. (Fig. 6)
4. Allow filter to air dry before installing
and using again.
Resetting The Remote Control
If the remote control stops working, it
needs to be reset. Reset as follows:
1. Set the power switch on the vacuum to
the remote control position "_"
(Fig. 1)
2. Press the RESET button on the side of
the power head with pointed object such
as paper clip or a pen tip until the
indicator lights up. (Fig. 2)
12
3. Release the RESET button once the red
indicator light lights up and immediately
press and hold the "ON" button on the
remote control handle until the vacuum
powers on. (Fig. 3)
4. If the "ON" button is not pressed and
held within a 15 second window, the
reset will not be successful. Repeat
steps 2-3 to reset the remote control.
Maintenance
Changing
The Battery-
(continued)
Replace Only With A 23AE 12V Alkaline Battery
1. Take a Phillips screwdriver and remove
the screws on the remote control. (Fig. 1)
2. Slide back the remote cover so that
the white triangle on the remote cover
points to the unlock symbol '_".
(Fig. 2 & 3)
3. Remove the remote cover from the
handle. (Fig. 4)
4. Lift the foam cover to expose the battery
and remove the old battery. (Fig. 5)
5. Insert the new battery with the
terminals in the direction shown and
make sure to replace the foam cover.
(Fig. 6 & 7)
6. Replace the remote control by aligning
the white triangle on the side cover to
the unlock symbol "_" on the handle.
(Fig. 8)
7. Slide the remote cover so that the white
triangle is over the locked symbol "if".
(Fig. 9 & 10)
8. Secure the cover with the screws. Do
not over tighten. (Fig. 11)
Cleaning And Disinfecting The
Wet/Dry Vac
2. Let solution stand for 20 minutes,
carefully swishing every few minutes,
making sure to wet all inside surfaces
of the tank.
3. Empty the tank after 20 minutes. Rinse
with water until bleach smell is gone.
Allow tank to dry completely before
sealing the motor on the collection tank.
To keep your Wet/Dry Vac looking its best,
clean the outside with a cloth dampened
with warm water and mild soap.
To clean the container:
1. Dump debris out.
2. Wash container thoroughly with warm
water and mild soap.
3. Wipe out with dry cloth.
Storage
Before storing your Vac, the collection tank
should be emptied and cleaned. The
cord should be wrapped around the unit
and the hose should be stored as
described in this manual. Accessories
Before prolonged storage or as needed
(i.e., waste water pick up) the collection
tank should be disinfected.
To disinfect the collection tank:
1. Pour 1 gallon of water and 1 teaspoon
chlorine bleach into the tank.
should be kept in the same area as the
Vac so they can be readily available. The
Vac should be stored indoors.
13
TROUBLESHOOTING
, ,WARNING:
BEFORE
TO REDUCE
THE
RISK
OF ELECTRIC
SHOCK-UNPLUG
TROUBLESHOOTING,
Problem
Possible
Vacuum will not operate
1) No power supply.
Causes
1) Check power supply - cord,
breakers, fuses.
2) Faulty power cord.
2) Unplug and check the power
cord. if damaged, have it
repaired by a professional.
3) Collection
tank full.
Corrective
Action
3) Empty collection
tank.
4) Switch in the wrong position
4) Press the ON '1'button on
the power head.
Dust comes out from motor cover.
1) The cartridge filter is
missing or damaged,
1) Attach or replace cartridge
filter.
Reduced efficiency and
motor/speed vibration,
1) There is a blockage in the
nozzle, hose, or the tank
inlet. The cartridge filter is
clogged by fine dust.
1) Check nozzle, hose and
tank inlets for blockage.
Take off the filter and clean it.
Or install new cartridge filter.
Remote will not operate
1) Battery is dead.
1) Replace the battery.
14
Repair Parts
125.16825
5 Gallon Wall IVlountable
Garage
Wet/Dry
Vac
Always order by part number, not by key number. Always mention the model number when ordering parts.
The model number is found on the serial plate located on the vacuum. To order parts, call 1-800-469-4663,
,_ WARNING: Servicing of double-insulated wet/dry vacuumm with double-insulated wet/dry
vacuum, two systems of insulation are provided instead of grounding. No grounding means is
provided on a double-insulated appliance, nor should a means for grounding be added.
Servicing a double insulated wet/dry vacuum requires extreme care and knowledge of the
system, and should be done only by qualified service personnel. Replacement parts for a
double-insulated wet/dry vacuum must be identical to the parts they replace. Your
double-insulated wet/dry vac is marked with the words 'double insulated' and the symbol IFll
(square within a square) may also be marked on the appliance.
r"""-I
Key Number
1
Part Number
VW01PI.10.01
Description
Handle
2
3
WODQ10.04.12
VW01 P1.10.00
Power Switch
Power Head
1
1
4
TVQTZH.04.00
Air/Noise Diffuser
1
5
TVQTZS.03.YZ
Float
1
6
VJ51PF.10.04
FV9543.11.01
Fi!ter Cage
Retainer
1
1
9
FV9543.11.10
VW01P1.20.01
Cartridge F!!ter
Collection Tank
1
1
10
TVQTXK.04.02
Vacuum Port Deflector
1
11
TVQTXK.06.01
Vacuum Port Assembly
1
12
13
TVQTDK. 11.00
FV5843.01.00
Latch Assembly
Hose
2
1
14
FV5861.01.00
Flex Hose
1
15
FV5771.03.01
Car Nozzle
1
16
FV5773.01.00
Round Brush
1
17
FV5708.00.00
Floor / Squeegee Nozzle
1
18
19
FV5771.01.02
FV5331.01.01
Crevice Tool
Remote Control Handle
1
1
20
FV5331.10.00
Remote Control
1
21
FV5901.01.01
Extension Wands
2
22
BOA2SP.48.42C
Screws
3
23
VW02P1.20.D6.01
Operator's Manual
1
24
FV9502.04.00
Foam Filter
1
25
26
FV9612.01.00.01
VW02P1.20.02
Collection Bag
Hose Holding Rack
1
1
27
VW02P1.20.01
Steel Mounting
1
28
VW01 P1.30.02
Mounting
29
FV9204.01.01
Accessory Storage Bin
1
30
FV9244.01.00
Accessory Bag
1
7
8
15
Quantity
1
Rad
Rack
1
Repair Parts (continued)
5 Gallon Wall Mountable
Wet/Dry
13
Vac
14
15
2
3
4
17
16
19
@
20
24
21
26
27
25
28
12
29
3O
16
18
Manual Del Usuario
Aspiradora Para Mojado/Seco Colgable
Modelo
No. 125.16825
• Seguridad
PRECAUCION: Antes de usar este
producto, lea este manual y siga
todas las Reglas de Seguridad
las Instrucciones.
Sears Brands Management
www.craftsman.com
y
Corporation,
17
•
•
•
Ensamblaje
Recogida
Mantenimiento
•
Partes
Hoffman
Estates, IL 60179 U.S.A.
Garantia
UN ANO DE GARANTIA
COMPLETA
CRAFTSMAN
Antes de usar este producto, lea este manual y siga todas las Reglas de Seguridad
y las Instrucciones. POR UN ANO desde el d_ade compra, este producto es
garantizado contra cualquier defecto en el material u obra. Un producto defectuoso
ser_ remplazado sin ning_n cargo. Para rnas detalles de la cobertura de garantia y
obtener un remplazo gratis, visite la pagina web www.craftsman.com esta garantia
no cubre los filtros,manguera o accesorios, los cuales son partes prescindibles
que se pueden gastar con el uso normal en el periodo de la garantia. Esta garantia
es cancelada si el producto es usado alguna vez mientras se proporcionan s
ervicios comerciales o si es rentada a otra persona. Esta garantia le da derechos
legales especificos, y usted puede tener otros derechos quecambian de estado a
estado.
INSTRUCCi0NE$
DE$EGURll)AD
IMPORTANTEI
Lea y entienda
todas las instrucciones
de usar esta aspiradora
antes
Lea y entienda el manual del usuario y
todas tas etiquetas en la aspiradora
mojado/seco antes de utilizar. La seguridad
es una combinaci6n de sentido com0n, hay
que permanecer alerta y saber como su
aspiradora trabaja. Utilizar esta aspiradora
mojado/seco sotamente seg0n Io descrito
en este manual. Para reducir et riesgo de
da_os corporates o de da_o a su
aspiradora mojado/seco, utilice solamente
los accesorios recomendados Craftsman®.
Para Uso Domestico Solarnenteo
ESTE
MANUAL
PARA REFEREHCIA EN EL FUTURO.
Cuando use un aparato el6ctrico, siempre
debe de seguir las precauciones b_sicas
incluyendo las siguientes:
ADVERTENCIA:
REDUCIR EL RIESGO DE FUEGO, SACUDIDA
ELI_CTRICA O DE LESION:
- No deje ta aspiradora desatendida
cuando este desenchufada.
- No timpie con la aspiradora, o utilice esta
aspiradora mojado/seco cerca de tiquidos
inflamables, gases, o vapores explosivos
como la gasolina u otros combustibles,
liquido de butano, limpiadores, pinturas a
18
base de aceite, gas natural, hidr6geno, o
explosivos como el polvo de carb6n, el
polvo de magnesio, et polvo de grano, o
p61vora. Las chispas dentro del motor
pueden encender vapores inflamables o
polvos combustibles.
- No aspire objetos que est_n encendidos o
echando humo, por ejemplo cigarritlos,
f6sforos, o las cenizas calientes.
- Mantenga el cord6n et6ctrico lejos de
superficies calientes.
- No exponga a la Iluvia. Atmacene en
interiores.
- No desenchufe tirando del cord6n. Para
desenchufar, agarrare el enchufe, no et
cord6n.
- No utilice con el cord6n, el enchufe u
otras piezas da_adas.
- Si su aspiradora mojado/seco no est_
trabajando como debe, hay piezas que
fattan, se ha caido o se ha
da_ado, ha sido dejada la intemperie, o ha
caido en et agua, devu61vala a un centro
de servicio independiente.
- No tire ni Ileve por el cable, ni utilice el
cord6n de uso como manija, no cierre
puertas sobre el cord6n, o le de tirones
alrededor de bordes o de esquinas fitosas.
- No pase la aspiradora mojado/seco
encima de su cord6n el6ctrico.
- No toque el enchufe o la aspiradora
mojado/seco con las manos mojadas.
-Parareducir
elriesgodepeligros
parala Observe las siguientes advertencias que
saludporvapores
o polvo,noaspire
aparecen en la cubierta det motor de su
materiales
t6xicos.
- Noutilicenialmacene
cercademateriates aspiradora.
petigrosos.
- Noutiticeestaaspiradora
mojado/seco
UN SISTEMA DE CONEXlON A TIERRA
ISLAMIENTO DOBLE - NO REQUIERE
conunfiltrorasgado
o sinelfiltroinstatado r_
SEPARADO - UTILICE SOLAMENTE
excepto
allimpiar
liquidos
conla
PIEZAS DE REPUESTO ID!_NTICAS.
aspiradora
seg0nlodescrito
enlasecci6n
delaoperaci6n
deestemanual.
f
,_ ADVERTENCIA:
- Noutilicecomo
juguete.
Lam_xima
• Para su propia seguridad, lea y
atenci6n
esnecesaria
cuando
sea
entienda el manual del usuario.
utitizada
porni_oso cercade6stos.
• No tenga en marcha la aspiradora
- Parareducir
elriesgodetesiones
debido
desatendida.
a unarranque
accidental,
desenchufe
et
No recoja cenizas calientes, carbones,
cord6n
el6ctrico
antesdecambiar
o de
materiales
toxicos, inflamables u
limpiar
etfiltro.
otros materiales peligrosos,
- Nodejelaaspiradora
mojado/seco
• No utilize alrededor de liquidos o de
desatendida
cuando
esteconectada
a un
tomacorriente.
Desenchufe
delacorriente x,_apo res explosivos.
J
el6ctrica
cuando
noestesiendo
utilizada
yantesdedarleservicio
deajustes
y
,A ADVERTENCIA: Para reducir el
reparaciones.
riesgo de sacudidas electricas no
-Apague
suaspiradora
mojado/seco
antes
exponga a la Iluvia. Almacene en
dedesenchufar.
interiores.
- Noponganing0n
objetoenlasaberturas
detaventilaci6n.
Noutitice
laaspiradora ,_, ADVERTENCIA:Cuando use el
conninguna
delasaberturas
dela
soplador: use lentes de seguridad
ventilaci6n
bloqueadas;
mantenga
librede etiquetados como "ANSI Z87.1" en el
potvo,
pelusa,
cabeltos
o cualquier
cosa
paquete. Apague la unidad antes de
quepueda
reducir
elflujodeaire.
)onerla en el suelo o al soltar el mango.
- Mantenga
elcabello,
ropasuetta,
dedos, Jna sacudida el6ctrica puede ocurrir si
ytodastaspartes
delcuerpo
lejosde
es usado en superficies mojadas. Dirija
aberturas
ydepiezasm6viles.
la descarga de aire hacia el _rea de trabajo.
- Parareducir
elriesgodecaidas,
utitice
No dirija el aire hacia las personas que
cuidado
adicional
atlimpiar
enlas
est6n presentes. Mantenga a los ni_os lejos
escateras.
CORDON DE EXTENSION
AI utilizar un cord6n de extensi6n con su aspiradora mojado/seco refi@ase a la siguiente
tabla para determinar et tamado requerido del cord6n de A.W.G. Antes de usar la
aspiradora asegQrese de que el cord6n el6ctrico y el cord6n de la extensi6n est_n en
buenas condiciones para hacer el trabajo. Haga las reparaciones o los reemplazos antes
de usar la aspiradora. Unicamente use cordones de extensi6n con capacidad nominal
)ara uso a la intemperie.
Longitud
110V-120V
25 Pies
7.5 Metros
Amps
del cord6n de extensi6n
50 Pies
15.25 Metros
100 Pies
30.5 Metros
150 Pies
45.7 Metros
A.W.G Tama_o del cord6n
0-6
18
16
16
14
7-10
18
16
14
12
11-12
16
16
14
13-16
14
12
12
No se recomienda
19
Introducci6n
Esta Aspiradora
de Mojado/Seco
fue hecha
Lea este manual
del usuario
para
para el uso del hogar. Puede ser usada para
aspirar medios h0medos o secos y puede
familiarizarse con el producto y sus
caracteristicas y para entender el uso
set usada como un soplador.
especifico
Mojado
de su nueva Aspiradora
de
Seco.
Indice
Secci6n
P&gina
Secci6n
Ma ntenimiento
Garantia
.................................................................18
Instrucciones De Seguridad Importantes ...........18
Cord6n
Vaciando
De Extensi6n .............................................19
Introducci6n
Desempaque
..................................................27
El Contenedor
...............................27
Instalaci6n Y Limpieza Del Filtro
De Cartucho ........................................................
27
............................................................20
Indice .........................................................................
20
Ensamblaje ..............................................................
21
Lista De Contenido
P&gina
Instalaci6n
Y Limpieza
Del Filtro
De Esponja ..........................................................
28
Reconflgurando Et Control Remoto ...............28
............................................21
De Su aspiradora
Cambiando
Y Ensamblaje .......................................................22
Montage Y Ensamblaje Del Bastidor ..............22
Suspensi6n De La Aspiradora AI
Bastidor ....................................................................
23
Limpiando
La Bateria ....................................29
y Desinfectando
La
Aspiradora de Mojado/Seco .........................29
Almacenamiento
...............................................29
Diagnostico
Bajar La Aspiradora De El Bastidor .............. 23
Enchufe Polarizado ..........................................23
Recogida .................................................................24
Aspirando Materials Secos ..............................24
..........................................................
30
Piezas De Repuesto ............................................31
Aspirando Liquidos ............................................25
Caracteriticas Del Soplador ............................26
2O
Ensamblaje
Sacar el contenido del carton. Compruebe
cada articulo contra la IJstade contenido.
Si alguna parte esta perdida o da_ada, regrese
la unidad a la tienda donde la compro, o Ilame
al 1-800-469-4663 para el reemplazamiento de
la parte.
Lista De Contenido
Clave
A
B
C
D
E
F
G
H
I
J
K
L
M
N
O
P
Q
R
S
T
Descripci6n ..................
Ensamblaje
DeLaAspirad0ra......
Bastidor Para Manguera ...
Varilla Para el Bastidor .......
Bastidor Para Montaje ........
MarcoParaBolsaDeAccesorios...
Botsa Para Accesorios .........
Manguera ........................
Manguera Flex ................
Cepill0ParaElSuel0ConEscurrid0r
...
Herramienta Para Ranuras .....
Cepillo Redondo ...............
Tubos Extensores ..............
Boquilla Para Carros ........
Filtro de Cartucho ............
Difusor De Ruidos/aire .....
Manija Con Control Remoto....
Filtro De Esponja ............
Tomiltos ...........................
Manual Del Usuario ...........
Botsa Para Polvo ................
Cant.
1
1
1
1
1
1
1
1
1
1
1
2
1
1
1
1
1
3
1
1
E
F
K
L
M
R
S
Bastidor Para Manguera
Varilla Para El Bastidor
Mango
Motor
Interruptor
Almacenamiento
De Accesorios
Difusor De Ruidos/aire
Bastidor Para Montaje
Asas
Portal De Aspirar
Almacenamiento
Para Los Tubos
-Envase
Bolsa Para Accesorios
EI6ctricoC
o rd 6 n
21
Ensarnblaie(continuation)
Desempaque
Y Ensamblaje
De Su Aspiradora
1. Coloque le bastidor par la manguera
arriba de la varilla y precione para que
entre en su sitio. (Fig. 6a) Aseghrese de
que los botones esten en la posicion
que se mustra en la. (Fig. 6b)
2. Localize las dos aberturas en la parte
inferior del bastidor para montaje e
inserte el marco para la bolsa de
accesorios en el bastidor. Asegurese de
que el marco para accesorios es dirijido
hacia el frente del bastidor. (Fig. 7)
3. Inserte la varilla para el bastidor dentro
de los dos huecos encontrados en la
parte superior del bastidor. Empuje la
varilla hacia adentro hasta que los
botones encajen en su lugar. (Fig. 8)
4. Seleccione un lugar en la pared que
tenga montante no mas de 20 pies de
un tomacorriente.
5,
Alinee los tres agujeros del bastidor que
esten sobre el montante de la pared.
Verifique que el bastidor este nivel y
marque los agujeros. Taladre agujeros
de piloto de 1/8 de pulgada de diametro
en las puntos para los agujeros. Sujete
el bastidor con los tres tornillos. (Fig. 9)
1. Verifique que el cordon electrico este
desconectado del enchufe. (Fig. 1)
2. Para quitar el cabezal del contenedor
desencaje la asa del lado derecho
hacia abajo. (Fig. 2) Repita en el lado
izquierdo.
3. Levante la tapa que esta sobre el
envase. (Fig. 3)
4. Saque el contenido dentro del envase,
asegL'_resede tener todo el contenido
seg[3n Io enumerado en la pa_gina21.
(Fig. 4)
5. Coloque el cabezal en el contenedor
y asegure las asas. Inserte el difusor de
Aire/Ruido en el portal de soplador.
( Fig. 5)
IViontaje Y Ensamblaje
Bastador
Del
ADVERTENCIA! Para prevenir lesiones o
da5os al producto:
• No monte el bastidor a mas de 5 pies
del piso.
• No sujete los tornillos alas paredes de
tablero de yeso solamente. Sujete los
tornillos al montante detras de los
tableros de yeso.
• No se cuelgue del bastidor ni se siente
en el.
• No exceda el peso limite de 40 libras/18
kilos.
22
Ensarnblaje (continuaci6n)
Suspenci6n
Bastidor
De La Aspiradora
al
1. Mida la distancia del agujero superior del
bastidor al tomacorriente mas cercano y
agreguele 12 pulgadas. Envuelva el cordon
excesiva en los ganchos para la cuerda
detras de la aspiradora. (Fig.10)
2. Asegurese que el cordon no este
envuelto al rededor de el gancho
paracolgarlaaspiradora.
(Fig.11)
3. Monte las aspiradora sobre el bastidor
alineando el gancho para colgar la
aspiradora (A) con la ranura (B) en el
bastidor de montaje y bajela hasta
queseasegure.
(Fig. 12) Cuando
monte la aspiradora sobre el bastidor,
detenga el exeso del cordon para
asegurarse de que no se atore entre
el bastidor y la parte tracera de la
aspiradora.
4. Inserte el extremo de conexion de la
manguera en el portal de aspirar y de
vuelta hacia adentro para asegurar
(Fig. 13) Para instalar manguera
adicional, asegure las mangueras
insertando una punta dentro de la otra.
Bajando
La Aspiradora
De El Bastidor
. Verifique que el cordon electrico este
desconectado del enchufe. (Fig. 1)
2. Presione la palanca de liberacion con
su mano izquierda. (Fig. 2)
3. Con su mano derecha retire la
aspiradora aislandola de su lugar.
(Fig. 3)
23
5. Elija los accesorios deseados como la
manija con control remoto, y coloquela
sobre la manguera.
6. Almacene la manguera sobre el bastidor
para manguera. Los accesorios se
pueden guardar sobre el cabezal o en la
bolsa para accesorios.
Enchufe
Polarizado
Parareducir
elriesgodesacudidas
electricas, este aparato electrodomestico
tiene un enchufe polarizado (una hoja es
mas ancha que la otra). Este enchufe
entrara en un tomacorriente
polarizado
solamente de una manera. Si el enchufe
no entra por completo en el
tomacorriente, volteelo. Si sigue sin
entrar, pongase en contacto con un
electricista competente para instalar el
tomacorriente
adecuado. No modifique
el enchufe. Aislamiento doble r_
elimina la necesidad de un enchufe de
tres cables con tierra y de un sistema de
conexion a tierra separado.
Recogida
Aspirando IVlateriales Secos
_k ADVERTENCIA: Aseg0rese de leer, entender y aplicar toda la informacion en la
Secciondelnstrucciones
deSeguridadlmportandesalprincipiodeeste
manual
del usuario. No limpie con la aspiradora en areas con gases Inflamables, vapores,
o polvos explosivos en el aire. Los gases o los vapores inflamables incluyen pero
no se limitan a; Ifquido de butano, solventes en forma de aerosol para limpiar,
pinturas a base de aceite, gasolina, alcohol o aerosol. El polvo explosivo incluye
peronoselimitaa;polvodecarbon,
granodemagnesioopolvora.
Parareducir
el riesgo de los vapores a la salud no aspire materiales toxicos con la aspiradora.
,
NO UTILICE EL FILTRO DE CARTUCHO
PARA ASPIRAR LiQUIDOS CON LA
ASPIRADORA
1. Verifique que el cordon electrico este
desconectado del enchufe. (Fig. 1)
2. Para aspiar en seco, el filtro de catucho
debe de ser instalado correctamente.
Para verificar refierase a Instalaci6n Y
PRECAUCl6N: No limpie el polvo de yeso
o cemento con la aspiradora, el hollfn o la
ceniza de la chimenea utilizando un filtro
estandar mojado/seco. Este es un polvo
muy fino el cual no sera capturado por el
filtro y puede causar da5o al motor.
Cuando aspire polvos finos, utilize un filtro
para polvos finos (vendido pot aparte).
Limpieza Del Filtro De Cartucho en la
pa_gina27.
3. Enchufe la aspiradora del tomacorriente
(Fig. 2) Coloque la aspiradora sobre el
bastidor o utilice de forma portatil.
4. Coloque el retenedor del filtro encima
del cartucho del filtro y apriete hacia
abajo dando vuelta a la manija hacia la
derecha. (Fig. 4)
O=OFF
I=ON_=RemoteControl
5. Encienda el motor moviendo el
interruptor a la posicion de 'l' (ON).
(Fig. 4) Apague el motor moviendo el
interruptora la posicion de "O" (OFF).
6. Para uso con control remoto mueva el
interruptor de la aspiradora a la
posicion de " _ " Control Remoto.
(Fig 5) Para encender la aspiradora
optima el boton "ON" en el Control
Remoto pot Io menos un segundo.
(Fig 6). Para apagar la aspiradora
oprima el boton "OFF" por, por Io
menos un segundo.
24
Recogida
Aspirando
_
,_
(continuacion)
Liquidos
ADVERTENCIA: Aseg_rese de leer, entender y aplicar toda la informaci6n en la
Secci6n de Instrucciones de Seguridad Importandes al principio de este manual
delusuario.
Nolimpieconlaaspiradoraen,_reascongasesinflamables,
vapores, o Polvos explosivos en el aire. Los gases o los vapores inflamables
incluyen pero no se limitan a; liquido de butano, solventes en forma de aerosol
paralimpiar,
pinturasabasedeaceite,
gasolina, alcohol o aerosol. EIpolvo
explosivo incluye pero no se limita a; polvo de carb6n, grano de magnesio o
polvora. Para reducir el riesgo de los vapores a la salud no aspire materiales
t6xicos con la aspiradora.
ADVERTENClA: No enchufe el cord6n electrico al tomacorrientes,
aseg_rese de
que no este conectada al tomacorriente
antes de ensamblar su aspiradora.
IlVlPORTANTE! AI aspirar grandes
cantidades de iiquidos con ia
aspiradora, recomendamos
retirar la
aspiradora del bastidor y ponerla en el
piso. La aspiradora puede ser muy
pesada cuando se Ilena de liquidos y
dificil de retirar del bastidor.
1. Verifique que el cordon electrico este
desconectado del enchufe. Verifique
que el envase este limpio y libre de
polvo. (Fig. 1)
2. Quite filtro de cartucho como se
musestra en Quitando y Limpiando el
Filtro De Cartucho en pa_gina 27. Luego
instale el filtto de esponja como se
muestra en Instalaci6n Y Limpieza Del
Filtro De Esponja en la pa_gina28 y
asegure el cabezal sobre el contenedor.
NO UTILICE EL FILTRO DE CARTUCHO
PARA ASPIRAR LiQUIDOS CON LA
ASPIRADORA.
3. Coloque a la manguera la boquilla que
desea utilizar. (Fig. 2)
4. Verifique que el interruptor este en
posicion de apagado 'O' OFF antes de
enchufar el cordon electrico en el
enchufe. (Fig. 3)
5. Cuando aspire grandes cantidades de
liquidos, le recomendamos retirar la
aspiradora del soporte de montaje y
colocarla en el piso. Encienda el motor
moviendo el interruptor a la posici6n de '1'.
(Fig 6) Para uso con control remoto
mueva el interruptor a la posicion
6.
de
_ Control Remoto, luego oprima
el boton "ON" en el Control Remoto por Io
menos un segundo.
Despues de cada uso, vacie el envase
en un recepta_culo apropiado o un
desaguadero desatornillando la tapa de
drenaje. Mire las instrucciones de
Vaciando El Contenedor en la pa_gina
27. Para evitar el riego de aparicion de
moho, ade el recipiente, limpie y seque
el filtro de esponja y dejelo secar al aire
antes de almacenarlo. (Fig. 6)
IlVIPORTANTE! AI aspirar grandes
cantidades de liquidos con la aspiradora,
no sumerja la apertura de la manguera
totalmente en el liquido; deje un boquete
en la extremidad de la manguera para
permitir afluencia del aire. La m_quina
esta equipada con un flotador que
detiene la acci6n de succi6n cuando el
envase alcanza su capacidad m_xima.
Usted notar_ un aumento en velocidad
del motor. Cuando esto suceda, apague
la m_quina, descon_ctela del
tomacorriente,
y drene el liquido. Para
continuar aspirando, reinstale la tapa
del drenaje. AI terminar de aspirar,
cerci6rese que el interruptor est_ en
posici6n de apagado y quite el enchufe
del tomacorriente.
Vaci_ el envase,
limpie y seque el interior y el exterior
antes de almacenar.
25
Recogida
(continuaci6n)
Caracter_sticas del Soplador
_lL ADVERTENCIA: Siempre utilizeanteojos de seguridad que conformen con ANSi Z87.1
(O EN CANADA, CSAZ94.3) antes de usar el soplador.
ADVERTENCIA: lVlantengaa las personas alejadas del los residuos soplados.
,_
ADVERTENCIA: Utilize una mascara antipolvo si al soplar se craa polvo clue pueda
set inhalado.
6,
Esta Aspiradora Mojado/Seco tiene
capacidades de ser usada como soplador.
Siga las siguientes instructiones para usar
las caracteristicas de limpiar como
soplador en patios, talleres, y otras Areas.
7,
1. Verifique que el cordon electrico este
desconectado del enchufe. (Fig. 1)
2. AsegL_rese de que el envase este
vacio antes de usar como soplador.
3. Remove air/noise diffuser from blower
port. (Fig. 2)
4. Retire la manguera del portal de
aspirar y inserte el extremo de conexion
de la manguera en el portal del
soplador y aseg0rela. (Fig. 3)
5. Ponga la extension o boquilla deseada
a la manguera. (Fig. 4)
26
Aseg0rese de que el interruptor este en
la posicion de apagado y enchufe al
tomacorriente.
(Fig. 5)
Antes de encender la aspiradora,
asegure la manguera entre sus manos
con firmeza. Encienda el motor moviendo
el interruptor a la posicion de T. (Fig 6)
interruptor a la posicion de "_"
Control
Para uso con control remoto mueva el
Remoto, luego optima el boton "ON" en
el Control Remoto por Io menos un
segundo.
IVlantenirniento
Vaciando el Contenedor
7. Coloque nuevamente la tapa sobre el
envase, alinee las asas, y asegOrelas
en su lugar.
1. Verifique que el enchufe este
desconectado del tomacorriente. (Fig. 1)
2. Desconecte la manguera del envase.
(Fig. 2)
3. Retire la aspiradoras del bastidor.
4. Suelte las asas y quite la tapa del
envase. (Fig. 3)
5. Coloque la tapa en una superficie limpia
en posicion invertida con la jaula hacia
arribamientras vacia el contenedor.
6. Vacie el contenedor en un lugar propicio.
Instalaci6n
iAVISO! El filtro incluido esta hecho con
materiales de alta calidad disefiado para
atrapar partfculas de polvo pequefias. El
filtro se debe utilizar para recoger en seco
solamente. Un filtro seco es necesario para
recoger el polvo. Si el filtro de polvo esta
mojado, se estropeara rapidamente y sera
muy diffcil limpiar. Utilice cuidado al quitar
el filtro para limpiarlo y cambiarlo. Examine
los filtros para ver si tienen rasgones o
agujeros pequefios, un agujero pequefio
puede dejar pasar el polvo a traves y fuera
del aspirador. No utilice un filtro con agujeros
o rasgones, cambie inmediatamente.
Y Limpieza Del Filtro De Cartucho
Instalacion Y Limpieza Del Filtro De
Cartucho
1. Verifique que el enchufe este
desconectado del tomacorriente. (Fig. 1)
2. Desconecte la manguera del envase.
3. Si la aspiradora esta sobre el bastidor
quite y pongala en el piso.
4. Quite la tapa del envase.
5. coloque la tapa en una superficie limpia
en posicion invertida con la jaula hacia
arriba.
6. Instale el filtro de cartucho sobre la jaula
del cartucho con el extremo piano del
filtro hacia el cabezal de la aspiradora.
(Fig. 2) Introduzca con cuidado el filtro
hasta que encaje. (Fig. 3)
7. Para asegurar el filtro, ponga el
retenedor y gire a la derecha para
apretar hasta que adjuste. (Fig. 4)
27
Quitando y Limpiando el Filtro De Cartucho
1. Con la tapa en posicion invertida quite
cuidadosamente el filtro de cartucho. Si
se us6 el retenedor para asegurar el filtro,
quite el retenedor girandolo en sentido
contrario de las manecillas del reloj.
2. Sostenga y hale cuidadosamente el filtro
para remover. (Fig. 5)
NOTA: Para mejores resultados de limpieza
del filtro la limpieza se debe realizar al aire
libre y no en el interior de su vivienda.
3. Limpie el filtro suavemente golpeando
ligeramente o cepillando la suciedad.
IVlantenirniento (continuaci6n)
illVIPORTANTE! Limpie o cambie el filtro
regularmente para mejor
funcionamiento.
SIElVIPRE UTILICE EL
FILTRO DE CARTUCHO PARA LIIVIPIAR
CON LA ASPIRADORA EN SECO. Si la
m_quina se utiliza sin el filtro de
cartucho, el motor se quemara y la
garant_a ser_ anulada. Siempre tenga
a mano repuestos de los filtros.
iAdvertencia! Siempm desconecte el
enchufe del tomacorriente antes de
quitar la tapa del envase.
Instalaci6n Y Limpieza Del FUtro De Esponja
Instalaci6n Y Limpieza Del Filtro De Esponja
1. Verifique que el enchufe este
desconectado del tomacorriente. (Fig. 1)
2. Desconecte la manguera del envase.
3. Si la aspiradora esta sobre el bastidor
quite y pongala en el piso.
4. Quite la tapa del envase.
5. col6que la tapa en una superficie limpia
en posici6n invertida con la jaula hacia
arriba.
6. Si el filtro de cartucho esta sobre la
jaula del cartucho remueva el filtro.
Refierase a la pagina 27 Instalaci6n
Del Filtro De Cartucho.
Reconfigurando
7,
Cuidadosamente resbale el filtro de e
sponja hacia abajo, sobre la jaula del
filtro y empuje el filtro hacia adentro
hasta que cubra la jaula completamente.
(Fig. 2 & 3)
Limpieza Del Filtro De Esponja
1. Con la tapa en posici6n invertida quite
Cuidadosamente el filtro de esponja.
(Fig. 4)
2. Utilice una soluci6n de jab6n y agua
para lavar el filtro de esponja. (Fig 5 )
3. Enjuague con agua limpia. (Fig. 6)
4. Permita que el filtro se seque antes de
instalar y de usar otra vez.
El Control Remoto
3. Suelte el boton de REINICIO cuando se
encienda la luz indicadora roja e
inmediatamente presione el boton "ON"
(encendido) en el control remoto y
mantengalo presionado hasta que la
aspiradora se encienda. (Fig. 3)
4. Si boton "ON" no se mantiene
presionado durante 15 segundos,
el reinicio no se Ilevara a cabo. Repita
los pasos 2 y 3 para reiniciar.
Si el control remoto para de funcionar,
necesita ser reconfigurado. Reconfigure asi:
1. Oprima el interruptor de la aspiradora
en la posicion de '_
" (Fig. 1)
2. Con la punta de una pluma oprima el
boton de configuracion, encontrado en
el lado derecho del cabezal de la
aspiradora, hasta que el indicador se
ilumine. (Fig. 2)
28
IVlantenirniento (continuaci6n)
Cambiando La Bater_a- Remplace La Bater_a Con Una De 23AE De AIcalino
1. Use un destornillador "Philips" pare
retirar los tornillos del control remoto.
5. Inserte la bateria nueva con los terminales
en la direcciSn ilustrada y asegQresede
reemplazar la tapa de esponja. (Fig. 6 & 7)
6. Fije el control remoto a la manija, alineando
la flecha con el simbolo del candado
abiert " _ ". (Fig. 8)
7. Deslice el control remoto hacia atras hasta
(Fig. 1)
2. Deslice el control remoto hacia el frente
hasta que la flecha este sobre el
simbolo del candado abierto"_".
(Fig. 2 & 3)
3. Retire el control remoto de la manija.
(Fig. 4)
4. Quite la baterfa vieja y remplacela con
la nueva asegurando que los terminos
esten en la posicion correcta. (Fig. 5)
Limpiando
y Desinfectando
que la flecha este sobre el simbolo del
candado cerrado "1_" (Fig. 9 & 10)
8. Asegure el control remote con los tornillos.
No sobre apriete Io tornillos. (Fig. 11)
la Aspiradora
de IViojado/Seco
Para mantener su Aspiradora de
Mojado!Seco en su mejor estado, limpie el
exterior con un pa5o humedecido con agua
tibia y jabon suave.
1. Vacie los escombros del contenedor.
2. Lave el contenedor con agua tibia y
jabon suave.
3. Seque con una toalla seca.
3. Vacie el contenedor despues de 20
minutos. Enjuague con agua hasta
que el olor del cloro (desinfectante)
desaparezca.
4. Deje secar completamente al
contenedor antes de sellar el motor
en el contenedor.
Antes de el almacenamiento prolongado o
cuando sea necesario (i.e. al recoger
aguas de residuos) el contenedor debe de
ser desinfectado.
Para desinfectar el contenedor:
1. Eche un galon de agua y una
cucharadita de cloro (desinfectante) en
el contenedor.
2. Deje reposar la solucion por 20 minutos,
revolviendo cuidadosamente cada
Antes de almacenar la aspiradora, el
contenedor debe de ser vaciado y
limpiado, cordon electrico debe de ser
enrollado y la manguera debe de ser
guardada como se describe en este
manual. Los accesorios deben de ser
pocos minutos, asegurandose de que
todas las partes de adentro del
contenedor se mojen.
Almacenamiento
mantenidos en aspiradora para que
puedan estar disponibles. La
aspiradora debe de ser almacenada
en interiores.
29
Diagnostico
ADVERTENCIA:
TOMACORRIENTE
SIEMPRE DESCONECTE
ANTES DE DIAGNOSTICAR.
Sintoma
Posibles
Aspiradora no funciona
1) No esta conectada
tomacorriente.
Causas
EL ENCHUFE DEL
Como
al
Corregir
1) Inspeccione
cord6n,
el tomacorriente,
caja de fusibles
haga que sea reparado
profesional.
3) Envase
Ileno.
4) Interruptor
equivocada.
Polvo sale de la cubierta
Eficacia
motor.
reducida
del motor.
y vibraci6n
del
Control
1 ) El filtro de cartucho
puesto o esta daSado.
no esta
1 ) Hay una obstrucci6n
en la
boquilla, la manguera,
o la
entrada del envase. O el filtro
Remoto
no funciona
1 ) Bateria
por polvo fino.
esta agotada.
30
por un
3) Vacie el envase.
en la posicion
esta bloqueado
y fusibles.
2) Desenchufe
y examine el
cord6n electrico. Si est_ daSado,
2) Cord6n electrico
defectuoso.
4) Precione
aspiradora.
el Boton
ON 'l' en la
1 ) Ponga un filtro de cartucho
reemplace.
1 ) Examine
las entradas
o
de la
boquilla, de la manguera y del
envase para saber si hay una
obstrucci6n.
Saque el filtro y
limpielo. O instale un filtro nuevo.
1) Remplace
con bateda
nueva.
Piezas de Repuesto
125.16825
Aspiradora
Para iVlojado/Seco
Colgable
Siempre ordene pot el n_rnero de parte, no pot el n_rnero clave. Siernpre rnencione el n_rnero de rnodeio
cuando ordene partes. El n_rnero de rnodeio esta Iocalizado en la plata de serie en la aspiradora,
para
ordenar partes llarne al: 1-800-469-4663.
,_ ADVERTENCIA: En la aspiradora mojado/seco con aislamiento doble se proporcionan
dos medios de aislamiento en vez de conexi6n a tierra. No se proporciona ningLin medio
de conexi6n a tierra a un aparato electrodom6stico con aislamiento doble, ni se debe
aSadir a este ningun medio de conexi6n a tierra. El servicio de ajustes y reparacines de
la aspiradora con aislamiento doble requiere extremo cuidado y conocimiento del
sistema, y debe ser realizado Linicamentepor personal de servicio autorizado. Su
aspiradora esta marcada con las palabras 'double insulated' el simbolo F'_ (cuadrado
dentro de un cuadrado) tambien esta marcado en el a_)arato.
Numero Clave Numero Del Dibujo
Descripci6n
Cantidad
1
2
3
VW01PI.10.01
WODQ10.04.12
VW01PI.10.00
Mango
Interruptor
Motor
1
1
1
4
5
TVQTZH.04.00
TVQTZS.03.YZ
Difusor De Ruidos/aire
Flota
1
1
6
7
VJ51PF.10.04
FV9543.11.01
Jaula
Fermo Per Filtro
1
1
8
9
FV9543.11.1 0
VW01 P1.20.01
Retenedor
Envase
1
1
10
TVQTXK.04.02
Deflector
11
12
TVQTXK.06.01
TVQTDK. 11.00
Asamblea-Portal
Asas
13
FV5802.01.00
Manguera
1
14
15
FV5861.01.00
FV5771.03.01
Manguera Flex
Boquilla Para Carros
1
1
16
FV5773.01.00
Cepillo Redondo
1
17
FV5708.00.00
CepilloPara El SueloCon Escurridor
1
18
FV5771.01.02
Herramienta
Para Ranuras
1
19
FV5331.01.01
Manija Del Control Remoto
1
20
21
FV5331.1 0.00
FV5901.01.01
Control Remoto
Tubos Extensores
1
2
22
Tornillos
24
BOA2SP.48.42C
VW02P1.20.D6.01
FV9502.04.00
3
1
1
25
FV9612.01.00.01
26
VW02P1.20.02
27
28
VW02P1.20.01
VW01 P1.30.02
29
30
23
De Filtro
1
de Aspirar
Manual Del Usuario
Filtro De Esponja
Bolsa Para Polvo
Bastidor Para Manguera
Barilla Para El Bastidor
1
2
1
1
Bastidor Para Montaje
1
1
FV9204.01.01
Marco Para Bolsas De Accesorios
1
FV9244.01.00
Bolsa Para Accesorios
1
31
Piezas de Repuesto (continuaci6n)
Aspiradora
Para
IViojado/Seco
Colgable
13
14
15
2
3
4
17
16
19
7
2O
21
@
24
26
27
25
28
9
18
•
12_
29
30
32
?