1
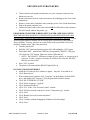
PRINTER SETUP PROCEDURES Overview This document describes how to install printers in a TaxWise Online network or standalone environment. TaxWise desktop is not addressed, since the desktop version is not used in CA1. Procedures are for Windows 7 computers, only. Windows 8 is not prevalent on AARP or depot computers in the CA1 region and Windows XP is not to be used. Troubleshooting suggestions are also included. Table of Contents Table of Contents Overview .......................................................................................................................................... 1 Related Documents ........................................................................................................................... 2 Security Precautions ......................................................................................................................... 2 Overview, Definitions, and Conventions ......................................................................................... 2 Printer Sharing Preparation .............................................................................................................. 3 Setup the computer for File and Printer Sharing .......................................................................... 3 Enabling File and Printer Sharing ............................................................................................. 3 Disabling File and Printer Sharing. ........................................................................................... 4 Printer Sharing without File Sharing ........................................................................................ 4 Printer Sharing/Standalone Printer (Wired) ..................................................................................... 4 Connect the Computers and Switch or Router ............................................................................. 4 Decide which computer will be the print server computer........................................................... 4 Let Windows Automatically Install The Printer Driver ............................................................... 5 Manually Install the Printer Driver............................................................................................... 5 Name the printer on the print server computer ............................................................................. 5 Share the printer on the print server computer ............................................................................. 5 Install the shared printer on the other network computers. .......................................................... 6 Network Printers (Wired and Wireless) ........................................................................................... 7 General Guidelines for installing a network printer ..................................................................... 7 HP LaserJet 1022n Preparation .................................................................................................... 8 HP LaserJet 1102W Wireless Network Printer Setup .................................................................. 8 Brother HL-2270DW Wireless Network Printer Setup................................................................ 9 Installing the Printer Driver – For Other Printers ....................................................................... 13 Adding a separate print server device ............................................................................................ 14 Removing a printer driver from the computer ................................................................................ 14 Troubleshooting Printer Installations ............................................................................................. 14 APPENDIX 1 – SELECTING THE PROPER PRINTER ............................................................. 16 APPENDIX 2 – INSTALLING A PRINT SERVER DEVICE ..................................................... 18 AARP Foundation Tax-Aide October 2, 2014 Page 1 of 18 PRINTER SETUP PROCEDURES Related Documents The following Volunteer ShareNet documents provide the procedures for setting up and troubleshooting a Local Area Network (LAN) and, if applicable, connection of the LAN to the host site’s Internet access point. This document assumes the LAN is operational. If not the appropriate reference procedure should be followed to set up the LAN prior to using the procedures in this document. Technology Hardware/Networking o Networking TaxWise Desktop Guide TYXX o Networking Checklist Troubleshooting Guide Technology Software/TaxWise Online o Wireless site connections for TWO Guide TYX o Wired site connections for TWO Guide TYXX The CA1 Northern California Tax-Aide website has the following documents on the Technology Specialist page: Typical Site Requirements and Setup for TaxWise Online Networking Setup Checklist and General Troubleshooting Internet Connection Sharing/Internet Access Computer Alternative Security Precautions Client server networking of the TWO Alternative Preparation Solution (APS) is allowed, but only on a secure wireless network. TWO users on Public wireless networks need to disable file sharing; printer sharing is allowed. Overview, Definitions, and Conventions Printers can be connected in one of three configurations: Standalone. In the standalone and shared configuration, the printer is connected to one computer. Shared. If the computers are networked, the printer is directly connected to one computer and shared on the network with other computers. Network. A network printer has a network interface card or wireless radio and is directly connected to the network, not a computer. It is accessed by all computers. If available, the network printer is the preferred method as it does not require a dedicated computer, called a print server computer, to be on all the time. Since the network printer doesn’t require resources of a dedicated print server computer, that computer is not bogged down servicing print requests which can cause the computer to operate sluggishly. The following printer configurations are discussed in this document. Examples of installing some common AARP Foundation Tax-Aide October 2, 2014 Page 2 of 18 PRINTER SETUP PROCEDURES models of Tax-Aide network printers are provided in the Network Printers (Wired and Wireless) section of this document. • Printer Sharing/Standalone Printer (Wired) • Network Printers (Wired and Wireless) Other printer setup definitions: • Print server computer – a computer that has a printer connected to it by a USB cable. Other computers on the network send their print jobs to the printer through this computer. This printer is called a shared printer. This is the same connection as used on a standalone computer, but in that case the printer is not shared. • Print server module or print server device – a network device that converts a nonnetwork printer to a network printer. The device connects to the printer via a USB connection and connects the printer to the network via a wired or wireless, or both, adapter. Printer Sharing Preparation Setup the computer for File and Printer Sharing. Before you set up the printers for printer sharing, the computer operating system has to be configured to allow file and printer sharing, in general. Use of standalone or network printers do not require that File and Printer Sharing be turned on. There are two configurations of File and Printer Sharing. The first case is full File and Printer Sharing that is used on secure networks, e.g., non-public networks that require a WPA2-PSK security key to be entered before attaching devices to the network. This is the typical case when you use an AARP router to connect to a site’s network or when you use Hosted Networks Internet Connection Sharing. The second case is when you are using a Public Wi-Fi system such as a library, Starbuck’s, etc. In this case, you will have Printer Sharing enabled on the Print Server computer, but File sharing turned off. File and printer sharing should be turned off on all other computers. These three procedures will now be described. Enabling File and Printer Sharing. To enable File and Printer Sharing, do the following: Go to the Control Panel Click on the Network and Sharing Center In the left panel, click “Change advanced sharing settings” Check the following options under “Home or Work (current profile) o Network Discovery Turn on network discovery o File and Printer Sharing Turn on file and printer sharing AARP Foundation Tax-Aide October 2, 2014 Page 3 of 18 PRINTER SETUP PROCEDURES o Public folder sharing Turn off Public folder sharing o File sharing connections Use 128-bit encryption to help protect file sharing connections o Password protected sharing Turn on password protected sharing o Homegroup connections Use user accounts and passwords to connect to other computers Click “Save changes” – you may be prompted to log off the computer to apply changes – if so, click the option to “Log off now” Disabling File and Printer Sharing. To disable File and Printer Sharing, select the options in the previous section to enable File and Printer Sharing, except change the following step to disable File and Printer Sharing: o File and printer sharing Turn off file and printer sharing o Click “Save changes” – you may be prompted to log off the computer to apply changes – if so, click the option to “Log off now” Printer Sharing without File Sharing. Enable File and Printer Sharing as described above. Then follow the below procedures to disable File sharing: Open the Control Panel and go to: Administrative Tools-> Computer Management -> Shared Folders -> Shares In the window to the right, right-click, and select “Stop Sharing” any folders that don’t have a “$” at the end of their name – these must remain shared. Examples o Do not stop sharing folders like “C$” o Do stop sharing folders like “UTS13” Close all windows and return to the desktop Printer Sharing/Standalone Printer (Wired) Connect the Computers and Switch or Router The network should be fully established and operational before using the following procedures. Decide which computer will be the print server computer The computer with the printer directly connected to it, using either a parallel printer cable* or a USB printer cable, will be the print server computer. It can be any computer on the network. AARP Foundation Tax-Aide October 2, 2014 Page 4 of 18 PRINTER SETUP PROCEDURES *NOTE: Parallel printer, Centronics, ports and cables have been out of use for many years. Therefore, present day computers do not have parallel printer ports to connect to these printers. The alternative, when the computer does not have a parallel printer port and the printer does, is to purchase a conversion cable that converts the parallel cable to a USB cable. Let Windows Automatically Install The Printer Driver Windows 7 can automatically install drivers for many devices with no intervention from the user except to plug in the device to a USB port. To use this feature the computer must be connected to the Internet. Then, plug in the device that you want to install and wait. Windows will go to its internal device list or, if not there, to the Internet to get the latest driver and install it. This is a good first option if the printer has never been installed on the computer. If this fails, then use the method, below. Manually Install the Printer Driver If the printer driver needs to be installed on the print server computer do it now, following the manufacturer’s instructions, and physically connect the printer. The computer will recognize it. When done, print a test page, to assure it works properly. The printer installation process will give the printer a generic name based on the printer model. It is better to give the printer a unique name so it is easy to recognize. If you have a network that has two HP 1022n printers installed, it will be much easier if they each have a unique name rather than both being called “HP LaserJet 1022n” or whatever the default name is. Names should be short and simple, e.g., LIBRARY, SENIOR CENTER 1, SENIOR CENTER 2, HP ROOM 12, or something similar. Name the printer on the print server computer Naming a Printer 1) Click on Start -> Devices and Printers 2) Right-click on the printer 3) Click on "Printer Properties" 4) Type the new name into the top line under “General Tab“ 5) Click “OK” to finish the name change. Put a label on the printer showing the name you gave it. (Don’t write the name on the printer case with a marker pen; it’s almost impossible to get off without damaging the plastic). Share the printer on the print server computer Sharing the printer 1) Right-click on the printer name you want to share 2) Select "Printer Properties" 3) Select the “Sharing” tab AARP Foundation Tax-Aide October 2, 2014 Page 5 of 18 PRINTER SETUP PROCEDURES 4) 5) 6) 7) 8) Put a check in the box by "Share this printer" Click “OK” To set as the Windows default printer, right-click the printer Select "Set as Default Printer" Close “Device and Printers” Install the shared printer on the other network computers. 1. Before setting up the printer on all other computers, check in the Control Panel to make sure that the Firewall status is ON for each computer. 2. If you are on a Public network, follow the previous instructions to turn off File and Printer Sharing on these computers Installing a shared printer on a computer 1) Click Start -> “Devices and Printers” 2) Click on “Add a printer” 3) Click on “Add a network, wireless or Bluetooth Printer” 4) Select the correct printer if it shows on the list (if it doesn’t, skip to * ); 5) Click “Next,” and the printer will install 6) When finished, select as default printer at your option 7) Print a test page 8) Click Finish and skip the next numbered paragraphs * If you didn’t find the printer in step 4, do the following 9) Click "The Printer that I wanted isn't listed” 10) Click “Browse for a printer” or “Select a shared printer by name” following the format in the window or “Add a printer by using a TCP/IP address its name” 11) Click “Next” 12) Click the computer that has the shared printer 13) Click the printer 14) Click “Select” 15) Click “Next” and the printer will install 16) When finished, select as default printer at your option 17) Print a test page 18) Click Finish If you cannot find the printer on the network, try shutting down and restarting the computers. Always start the print server computer first. If this doesn’t work, refer to the document, “Network Setup Checklist and General Troubleshooting” on the CA1 Northern California Website. Virus Warning. Windows may give a warning about printer drivers and viruses; just confirm that you want to go ahead. Then click “Finish.” AARP Foundation Tax-Aide October 2, 2014 Page 6 of 18 PRINTER SETUP PROCEDURES Print a test page from each computer, if you haven’t already done so. On each computer, right-click on the printer, then select ”Printer Properties,” and then “Print a test page.” It is advisable to set the printer you will use for TaxWise as the Windows default printer on all computers on your network. That way, TaxWise will automatically select it as its default printer. To do this, right-click on the printer and select, “Set as default printer.” However, there are situations where you may not want this printer to be the Windows default printer; for instance, someone using their personal computer that wishes to keep their default printer as their home printer. Then, they will have to select the site printer each time they print in TWO. Network Printers (Wired and Wireless) Printers directly connected to a network are easy to setup and do not require the use of Windows Printer Sharing, which is potentially less secure. Networked printers also offer more flexibility because they do not require a print server computer that always has to be powered on and connected to the network. This section provides general guidelines and instructions for three specific models of AARP Foundation Tax-Aide purchased network printers. Appendix 2 has instructions for setting up other AARP Foundation Tax-Aide purchased non-network printers using separate print server devices. NOTE: Devices connected to a network are given a host name and an IP address. The host name never changes, but the IP address may (unless you make configuration changes to not allow this). For home device connections, the IP address will usually change. Therefore, it is better to set up the printer so the computers on the network look for it by its host name, not IP address. This is the default setting for many printers, i.e., the HP P1102W. If you don’t know the printer’s host name, but do know the IP address, you can work with your network manager to set the router such that the printer will always have the same IP address. A static, i.e., non-changing, IP address can be assigned to the printer and the driver installed with this IP address, but this requires more network configuration. The router must be set up properly to allow assignment of a static IP address and the printer has to be set up with that IP address assigned to it. Consult your printer user manual and router user manual for detailed instructions. Or contact the TCS for help. General Guidelines for installing a network printer The best method to use to setup your network printer is to follow the procedures in the printer user manual. Also, you should check for the latest software drivers for your printer and the operating system you are using by visiting the manufacturer’s website. If you no longer have the user manual, the manual can usually be found on the manufacturer’s website, also. Due to the large variety of printers used in the Tax-Aide program it is very difficult to describe the procedures for installing each printer in this document. The procedures described, represent a compromise and method that can be used on most computers and printers. AARP Foundation Tax-Aide October 2, 2014 Page 7 of 18 PRINTER SETUP PROCEDURES HP LaserJet 1022n Preparation The procedures in this paragraph provide the preliminary steps to set up the printer for driver installation. Then it refers to the section, “Installing the Printer Driver – For Other Printers,” for the remaining procedures. 1. Have the network operational. 2. Download the printer installation file, “LJ1018_1020_1022_Full_Solution.exe” from the HP website 3. Reset the HP1022N to its factory defaults. a. From the powered off state do the following i. With the printer disconnected from the network and the USB port, turn on the printer while pressing the red CANCEL and green GO buttons. Continue to press the buttons until the printer is in the Ready state (at least 10 seconds until all LEDs are flashing simultaneously). ii. If you have problems during the season, doing this hard reset will often fix them iii. To assure the printer has been reset, press and hold the green Go button for 5 seconds until the green LED starts to flash. A Self Test Configuration page will print. b. If the reset has been done correctly the IP Address will be 0.0.0.0. If not, return to step i. and hold the two buttons for a longer time. 4. Go to the “Installing the Printer Driver – For Other Printers” section to finish the installation HP LaserJet 1102W Wireless Network Printer Setup This AARP Tax-Aide purchased wireless printer is a convenient alternative to the wired printers or print servers. All software required to setup and configure the printer is contained within the printer itself, or automatically downloaded from the Internet, almost eliminating the need for an installation DVD; though the DVD can be used for those that prefer. The installation basically involves connecting the printer to a computer via a USB cable. If this is the first installation on the computer, the computer will search the Internet for the applicable driver installation file and begin to install automatically. Be patient and wait for the installation to start. If the printer has ever been installed on the computer before, you will probably have to use the DVD to install the printer in wireless mode. Part of the setup routine will ask if it will be a wired or USB connection – choose the applicable option; wireless, unless you are installing it as a standalone or shared printer installation. It is a waste to use this printer in shared or standalone mode and it shouldn’t be done except for very unique situations. Any non-network capable printer can be used in this mode, and should be the preferred printer. AARP Foundation Tax-Aide October 2, 2014 Page 8 of 18 PRINTER SETUP PROCEDURES After installation, the host name and current IP address of the printer can be obtained from the configuration page obtained by pressing the red “X” button on the printer until a page starts to print. The other computers are setup up by starting Internet Explorer, going to the host name and running the setup routine from the “Smart Setup” tab on the menu that is displayed. [If you have trouble connecting to the printer with its host name, use the current IP address from the configuration page]. The Smart Setup procedure is exactly the same as the USB installation, except that it will automatically set the workstations up in wireless printing mode. If the printer can’t be found on the network, the printer can be set up with a static IP address. This can be setup in the printer configuration menu and in the computer driver software. The router will have to be configured for this option, as well. You may need the network manager at the host site to assist in this setup. See the printer and router manuals for instructions. This completes the installation procedures for the HP LaserJet 1102W Brother HL-2270DW Wireless Network Printer Setup PURPOSE: This section provides easy installation instructions for the HL-2270DW. There are several ways to install this printer. This document sets up the printer using a USB or network patch cable for initial setup of the printer as a wireless printer. The purpose of this section is to condense the User Guide instructions to an easily accomplished, step-by-step procedure. If you are going to use a different connection, e.g., wired or shared, then you should use the User’s Guide, instead. Similarly, if you have trouble executing this procedure or it fails, you need to refer to the User’s Guide. However, if you complete each step in this document, you should have no trouble. WHAT YOU WILL NEED Printer DVD USB cable OR network patch cable [see note, below] Blank paper in the printer NOTE ON CABLES: Cables are not included with the printer. You will have to provide your own. The best option is to use a USB cable, but that cable may not be available at all sites. Thus, a patch cable may be the only choice. PRELIMINARY SETUP AARP Foundation Tax-Aide October 2, 2014 Page 9 of 18 PRINTER SETUP PROCEDURES Turn on all network equipment and make sure your computer connects to the Internet at your site Remove the printer from its carton and remove all packaging per the User Guide instructions Remove, rotate, and re-install the toner cartridge per the User Guide instructions Plug in the printer and turn it on Connect the patch cable to the router/switch OR the USB cable to the computer – DO NOT attach either to the printer, yet PROCEDURE IF PRINTER IS BEING SETUP AFTER A PREVIOUS SETUP SKIP THIS SECTION AND GO TO INSTALLATION PROCEDURES IF YOU ARE INSTALLING A BRAND NEW PRINTER STRAIGHT FROM ITS CARTON! If you are moving this printer to another site to set it up again, you must reset the printer to factory defaults. You may also have to set the printer to factory defaults if you have problems with the setup. This is the procedure: Turn the printer OFF Hold the “GO” button and turn the printer ON, still holding the “GO” button Watch the LEDS – when all the LEDs have lit up and the “READY” LED goes off, release the “GO” button. Make sure all the LEDs turn off. o NOTE: The “READY” LED turns on then off very quickly, so you may miss it going on. If, after a couple of seconds, all LEDs are lit except for “READY,” this step was successful Press “GO” six times The printer will restart and the READY light will be on INSTALLATION PROCEDURES Install the CD and wait for a window to appear – may take 10 seconds or so Click “Run start.exe” o If the window doesn’t appear, click “Computer” on the desktop, click the DVD drive, and double-click “start.exe” if the program didn’t launch, already Click “HL-2270DW/HL-2275DW” Click “Select Language – English” Click “Install printer driver” Click “Yes” in the “User Account Control” window Click “Wireless network connection” in the “Connection type” window Click “Next” Click “Brother Peer-to-Peer network printer” Click “Next” Click “Continue without changing the Windows firewall settings” Click “Next” AARP Foundation Tax-Aide October 2, 2014 Page 10 of 18 PRINTER SETUP PROCEDURES Click “Next,” in the “Select features” window, leaving all items checked as they are Click “No” to “WPS or AOSS” setup in the “Setting up wireless” window Click “Next” Click “Checked and confirmed” in the “Important notice” window Click “Next” Click “Temporarily use an Ethernet cable” or “Temporarily use a USB cable,” depending on what you’re using Attach the patch cable OR the USB cable to the printer when prompted For patch cable o Click “Next” o The program will search for the printer. When it is found, click “Next” For USB cable o Continue The program will search for the wireless network – this can take a couple of minutes In the ensuing window, click “Checked and confirmed” Click Next The next window will display the SSID that was found Click “Yes” to “Connect using this setting” Click “Next” Click “Next” in “Wireless network settings confirmation” window Disconnect the patch or USB cable when prompted Click “Next” if it doesn’t automatically advance to the following window Click “Next” in “Important Notice” window Click “Next” to install driver A “WLAN report” will be printed when install is complete indicating “Connection OK” Click “Next” Click “Next” in “User’s Guide” window Skip registration by clicking “Next” Click “Finish” in “Setup complete” window In the next window, click “Receive info for all firmware updates” or your choice Click “OK” You will get an option to participate in the Brother Produce Research program. Your choice – if you choose to do it, you will have to install a small program. Close all windows and click “Exit” on installation home page to get back to the desktop Remove the CD AARP Foundation Tax-Aide October 2, 2014 Page 11 of 18 PRINTER SETUP PROCEDURES TEST THE PRINTER OPERATION Click “Start” Click “Devices and Printers” Right-click the “Brother HL-2720DW,” which is the default printer Click “Printer properties” Click “Print test page” A test page should print Click “Preferences” Click “Print Profiles” tab Click “General Print” profile Click “OK” OR o OPTIONAL: Click “Toner Save Print” Click “OK” Click “OK” to exit “Printer properties” window If using a USB cable, a second HL-2720DW printer will exist – this is the USB install Setup is complete – close all windows YOU’RE FINISHED. THE PRINTER IS NOW CONNECTED TO THE NETWORK. INSTALLING THE PRINTER ON OTHER COMPUTERS ON THE NETWORK Insert the CD into the drive and proceed with the installation as for the first time installation Eventually, you will get to a point where the installation program will find the printer on the network. Then just follow the procedures to install it. If you get to the point where it asks whether you want to do a USB, Network, or other type of installation, then the printer was NOT found on the network and you should abort the procedure. o The most likely problem here is that the computer is not connected to the network/Internet o Connect the printer to the network/Internet and start over YOU’RE FINISHED. OTHER COMPUTERS CAN NOW PRINT. TROUBLESHOOTING THE BROTHER HL-2270DW If any of the above steps don’t work properly or the network or printer isn’t discovered, you will need to go to the User’s Guide and start from scratch In this case, you should set the printer to factory defaults, described above, to clear the bad setting from the printer AARP Foundation Tax-Aide October 2, 2014 Page 12 of 18 PRINTER SETUP PROCEDURES If the printer prints in duplex mode, switch the duplex mode off by selecting one of the profiles described in the procedure under the “Test printer operation” section Installing the Printer Driver – For Other Printers The procedures in this section will work for most network printers. You will need the printer installation file which is available from the manufacturer’s site. This procedure assumes your network is fully functional and the printer has been reset according to the manufacturer’s instructions. 1. Connect the printer to the network, router or switch, with a patch cable 2. Extract the downloaded printer installation file to a flash drive. Right-click the downloaded file and click “7-Zip” then “Extract files...” Change the drive letter to the flash drive and click “OK” a. 7-Zip is a free utility program that is included on all AARP imaged computers. It can be downloaded from: http://www.7-zip.org. 3. Install the printer on the computer a. Go to “Devices and Printers” b. Right-click and select “Add a printer” c. Select “Add a local printer” d. Check “Create a new port” e. Select “Advanced TCP/IP port monitor” f. Click “Next” g. The “Add Advanced TCP/IP port wizard” will start h. Click “Next” i. Enter the following i. Enter host name or IPv4 address: Enter the printer Host Name (preferred) or IP address from the Configuration Page ii. If the printer configuration page includes a Host Name and IP address, it is better to use the Host Name. That way it is not required to set a static IP address in the printer. iii. If you are using a separate print server device attached to a non-networked printer, you may want to use the IP address iv. Port name: “TCP_IP Printer Port” v. Check “Always print to this device, even if its IP address changes” j. Click “Next” k. Click “Finish” l. If you get a message that the computer can’t communicate with the printer, repeat the instructions at step ix, by entering an IPv4 address instead of Host Name. m. Choose the Manufacturer and then the printer model i. If the model is not listed, click, “Have disk” ii. Click browse and find the printer .inf file in the flash drive extracted folder iii. Highlight the .inf file and click “Open,” and then “OK” xiv. Highlight your printer model and click “Next” n. Select a printer name o. Click “Next” AARP Foundation Tax-Aide October 2, 2014 Page 13 of 18 PRINTER SETUP PROCEDURES p. q. r. s. Click “Do not share this printer” Click “Next” Click “Print a test page” After the test page prints, click “Close” and “Finish” i. If the test page did not print, review this procedure ii. Troubleshoot the installation to make sure all cables are connected, power is turned on, and the network still works iii. If no problem is found, remove the printer as described in the next to last section of this document, “Removing a printer driver from the computer,” and reinstall the printer. . Adding a separate print server device This procedure is located in Appendix 2, since it is very specialized and rarely, if ever, used in CA1. Removing a printer driver from the computer A printer driver is not removed from the computer when a printer is “deleted” or “removed.” To remove the driver, do the following: • Go to “Devices and Printers” • Right-click the printer and click “Remove device” • Verify you want to remove the printer in the ensuing windows Restart the computer • Click ‘Start,” then enter “Printui /s” and press “Enter” • Click the “Drivers” tab • Select the printer and click “Remove” • Check “Remove printer and driver package” • Click “OK,’ then “Yes,” then “Delete,” then “OK” • If you created a TCP/IP port for the printer, remove it by clicking the “Ports” tab o Highlight the TCP/IP port you created o Click “Delete Port” then “OK” • Click “Close” • Restart the computer NOTE: If in any of the above steps you get a warning that the device can’t be removed, the port can’t be deleted, etc., then reboot the computer and try again. Troubleshooting Printer Installations Once setup, the printer installation should remain stable, but there are always things that can occur to prevent printing. Below are some common things to check: • Make sure all equipment is turned on – router, switches, printer • If all computers can’t print, then the problem is with the network or printer • If only one computer can’t print, then the problem is with the computer configuration • Make sure that all cables are connected AARP Foundation Tax-Aide October 2, 2014 Page 14 of 18 PRINTER SETUP PROCEDURES • • • • • • • • • o USB cable between computer and printer for shared printing o Patch cable between printer and router/switches for a wired network printer Look at the printer icon and see if it indicates the printer is “Ready.” If it isn’t, right-click the icon and select “Use printer online” Make sure the port is setup correctly o Right-click on the printer icon and select Printer Properties o Select the Ports tab and click Configure Port…. o Make sure that the IP address is correct, the Protocol is Raw, and the port is 9100 Make sure your network is functioning properly other than for the printer. Can you “see” the other computers on the network? If not, refer to the “Network Checklist & Troubleshooting” document on the ShareNet If everything is functioning except the printer, review the “Installing the printer” section, above, to change the printer properties to use an IP address rather than a Host Name Make sure that all the IP addresses are correct and all equipment is on the same network o Click the “Start” icon o Type “cmd” and the press “Enter” o In the DOS window, type “ipconfig /all” o Scroll up the window until you see the “Ethernet Adapter” or “Wireless Adapter,” depending on the connection you are using o Verify that the first three octets of the IP address are the same as the printer ▪ Print a test page for the printer to determine the printer’s IP address ▪ If they aren’t the same, then some equipment is connected to the wrong network – connect it to the proper network If using a print server device, can you access the device’s administration page from the computer that has the problem? If not is the computer’s IP address correct and in the same subnet as the print server Attach the printer to the USB port, add the printer locally and make sure it prints in this configuration. Right click on the Printer icon and select “Troubleshoot,” if it exists o If it doesn’t exist, click the “Start” icon and type “Services.” Select “Local Services” from the choices and find “Print Spooler” in the list. Right-click it, and ▪ If “Start” is grayed out, click “Restart” ▪ If “Stop” is grayed out, click “Start” Reset the printer to factory defaults and totally remove the printer driver package from the computer(s) as described earlier in this document. Reinstall the printer using the above procedures. AARP Foundation Tax-Aide October 2, 2014 Page 15 of 18 PRINTER SETUP PROCEDURES APPENDIX 1 – SELECTING THE PROPER PRINTER It is generally more economical to purchase a network printer that supports large capacity toner cartridges over a non-network printer that only takes the smaller cartridges. Though the cost of the large cartridge printer may be more than the cheaper printers, the savings in cartridge costs when using the large cartridges could quickly compensate for the initial cost difference. The smaller printer cartridges cost approximately 2/3 of the larger cartridges and output about half of the printed pages. While smaller sites with few computers may fare well with the cheaper printers, larger sites with many computers, that may also be open several days a week during the season, will most certainly find the larger cartridge printers will save on cartridge replacement costs. Examine your current set of printers and evaluate the options for acquiring the most economical printer solution: • Does the printer support networking – wired and/or wireless? • Evaluate where you can use larger toner cartridges with your existing set of printers – do your printers accept both large and small cartridges? • Can you add a print server to an existing non-network printer that supports large toner cartridges? • Use your network printers at appropriate sites • How many large toner cartridges does it take to offset the additional cost of a network printer? • Determine the manufacturer’s recommended printer rating for the number of pages per month • What is the proper selection for sites that currently utilize many printers o Multiple printers (shared or individual) or o Network printer with larger toner cartridge • Determine the lifetime costs of o More expensive printers which may have lower cartridge costs o Cheaper printers which may have more expensive cartridge costs The following table can be used as a guide for yield comparisons for some of the more popular Tax-Aide printers. Printer Yield Comparisons Table AARP Foundation Tax-Aide October 2, 2014 Page 16 of 18 PRINTER SETUP PROCEDURES Use this table to help determine the best printer to use at large verses smaller volume tax sites. AARP Foundation Tax-Aide October 2, 2014 Page 17 of 18 PRINTER SETUP PROCEDURES APPENDIX 2 – INSTALLING A PRINT SERVER DEVICE Download the Printer Software 1. Run the downloaded file and it will create a folder of setup files which can be copied to a flash drive for use on multiple systems 2. The process from here is to setup the print server then setup up the printer using these downloaded files. Set the print server to a fixed IP address 1. Reset the print server to factory defaults (usually by holding the reset button as the print server is powered on) this default will normally allow the print server to pick up an IP address when it is attached to the local network. Make sure that the Print server is really reset by following the instructions in the documentation completely and exactly 2. Connect the print server and printer to the network in which they are going to be used 3. The print server will normally come with software that will find the print server on the network (For Belkin F1UP0301 that software is psf.exe). Run the software and note the IP address of the print server. This address will be of the form 192.168.x.yyy where x is typically 0, 1, or 2 and yyy is a 3 digit number. If the print server does not have an address within the same subnet as the computer upon which the setup is being done (i.e. x is the same for both print server and computer) then the reset to factory defaults was not done correctly. 4. Open a web browser and type the IP address of the router into the address bar and press Enter or click GO 5. The router status page will typically be displayed with the possibility of selecting an IP address tab 6. Select the IP address tab and disable DHCP client, type in the chosen fixed IP address and subnet mask. a. The IP address must be of the form 192.168.x.yyy. X must be the same number as the rest of the addresses in the network in which the print server will be installed. yyy must be an address that is not currently used on the network. b. The Gateway address may also have to be typed in and can be found from another computer c. Click apply changes (or equivalent) Add the Network Printer Run the procedures in the “Installing the Printer Driver – For Other Printers” section, above. AARP Foundation Tax-Aide October 2, 2014 Page 18 of 18