1
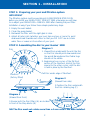
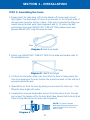
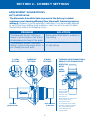
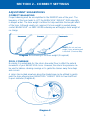
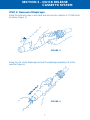
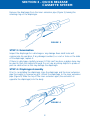
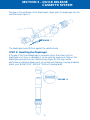
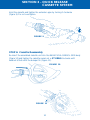
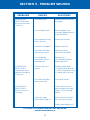
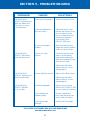
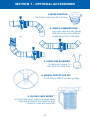
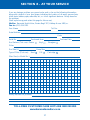
New Age Technology
For All Pool Sur faces
TOLL-FREE CUSTOMER CARE HOTLINE
0800 110 885
www.zodiac.co.za
WARNING! In terms of Section 2 of the Import and
Export Control Act of 1989 (Act 45 of 1983), it is illegal to
export automatic pool cleaners and parts thereof. Section 4
of the Act provides that anyone convicted of exporting automatic pool cleaners and parts thereof may be sentenced to a
10 (ten) year term of imprisonment and a fine of
R40 000 (forty thousand Rand).
Copyright Reserved © 2002
Instruction Manual
Dear Customer,
Thank you for buying a BARACUDA® GENIUS® 3000. It is thanks to you that we
have achieved our position as worldwide market leader.
No automatic pool cleaner equals your new BARACUDA® GENIUS® 3000 for
performance, efficiency and reliability. Because of its simple New Age technology
and unique design, your BARACUDA® GENIUS® 3000 is virtually maintenancefree.
• Your BARACUDA® GENIUS® 3000 has no moving parts to jam, wear, or come
adrift. No nuts, bolts, screws, gears or wheels to corrode.
• Its innovative long-life cassette diaphragm system sucks up dirt, debris, bugs,
leaves and even pebbles.
• Your BARACUDA® GENIUS® 3000 has a unique fluted disc that optimises the
collection of all dirt, debris and leaves in your pool.
• Your BARACUDA® GENIUS® 3000 will quickly and quietly clean an average
pool wall-to-wall, top-to-bottom in a normal filtration cycle (excluding steps
and martini seats).
• In the event of requiring under-warranty repairs, please take your
BARACUDA® GENIUS® 3000 to your closest Pool Shop or alternatively please
phone our Customer Care Hotline 0800 110 885 and we will direct you to the
BARACUDA® warranty agent nearest to you.
IT’S EASY TO INSTALL. JUST READ THE INSTRUCTIONS IN
THE MANUAL CAREFULLY.
THE CONTENTS OF YOUR BARACUDA® GENIUS® 3000 BOX
ARE AS FOLLOWS:
•
•
•
•
•
•
•
One BARACUDA® GENIUS® 3000 Head
Eight Baracuda Long Life Hose Sections (not In Head)
One Auto Weir Valve
One Hose Protection Mesh (not In Head)
One Warranty Card
One Instruction Manual
One Finned, Fluted Disc (in Head Only unit to be fitted by customer – see
Section 1 on page 2, Step 2).
This pool cleaner is covered by one or more of the following patents: 84/10036,86/1841,86/6841
Des 94/0843, Des 94/0844. 94/0845, Des 94/4756 and Des 98/0111.
BARACUDA® is a Registered Trade Mark.
Genius® is a Registered Trade Mark.
Specifications and equipment subject to change without prior notice.
INDEX
Page No.
SECTION 1 – INSTALLATION
Step One
Preparing your pool and filtration system
2
Step Two
Assembling your Baracuda® Genius® 3000
2
Step Three
Assembling the Hoses
3
SECTION 2 – CORRECT SETTINGS
Adjustment Suggestions: Auto Weir Valve
4
Correct Balancing
5
Pool Coverage
5
SECTION 3 – QUICK RELEASE CASSETTE SYSTEM
Cassette Mechanism – Explanation
6
Step One
Procedure to Remove Diaphragm
6
Step Two
Removal of Diaphragm
7
Step Three
Examination
8
Step Four
Diaphragm Assembly
8
Step Five
Resetting the Diaphragm
9
Step Six
Cassette Reassembly
10
SECTION 4 – HOW TO KEEP YOUR
BARACUDA® GENIUS® 3000 HAPPY
SECTION 5 – PROBLEM SOLVING
11
12-13
SECTION 6 – PARTS IDENTIFICATION
Exploded Diagram – BARACUDA® GENIUS® 3000
14
SECTION 7 – OPTIONAL ACCESSORIES
15
SECTION 8 – AT YOUR SERVICE
1
16 – 17
SECTION 1 – INSTALLATION
STEP 1: Preparing your pool and filtration system
IMPORTANT
The filtration system must be operating at its MAXIMUM WATER FLOW
before you install your BARACUDA® GENIUS® 3000, otherwise you will have
to re-adjust your BARACUDA® GENIUS® 3000 after cleaning the pool filter.
Installation is easy if you follow these simple preliminary steps:
1. Empty the weir basket.
2. Clean the pump basket.
3. Backwash the filter until the sight glass is clear.
4. Adjust all return jets (whether your pool has one, two or more) to point
downwards and towards each other so that you DO NOT see a circular
water flow or waves on the surface of your pool.
STEP 2: Assembling the disc to your Genius® 3000
Diagram 1
1. Viewed from underneath the unit, the fins
on the Disc should point downwards and
the words Baracuda and the Zodiac logo
should not be visible.
2. Beginning at one corner of the flat front
section of the FlexiFoot, stretch the Disc
around to the other corner, until the disc
is held in place by the FlexiFoot.
Disc
Pull Disc under edge of FlexiFoot.
FlexiFoot
(factory fitted)
Diagram 2
(Viewed from side)
2. Position the Disc underneath
the Disc retaining Lug (C)
A
B
C
Diagram 3
(Viewed from front)
B
3. Ensure both the Disc Pillars (A) are located
in front of the Stop blocks (B)
B
A
A
NB:The Disc must not rotate more than ± 4 mm once it has been installed.
2
SECTION 1 – INSTALLATION
STEP 3: Assembling the Hoses
1. Always insert the male hose cuff into the female cuff. Hoses must connect
fairly tightly. The ideal length of hose is from the weir to the furthest point of
the pool plus one extra section of hose. If the weir is opposite the steps, use
lowest step as furthest point (See Diagrams 4 and 5). To ensure the best
performance from your BARACUDA® GENIUS® 3000, please ensure only
genuine BARACUDA® long life hoses are used.
Weir
Diagram 4: Ideal Hose length
2. Attach your BARACUDA® GENIUS® 3000 to the male end (smaller side) of
the assembled hose.
Weir
Diagram 5: Ideal Hose Length
3. Fit the Hose Protection Mesh over the cuff of the hose to help prevent the
hose from wearing at the weir. Position the protection mesh so that ±10 cm is
exposed outside the weir.
4. Bleed all the air from the hose by placing one end over the return jet – thus
filling the hose length with water.
5. Keeping the hose-ends underwater, move it from the return line to the weir
and connect the female cuff to the Auto Weir Valve. Ensure that the Auto Weir
Valve is firmly attached to the hose (See Diagram 6).
NOTE: To obtain maximum
diaphragm efficiency, please ensure a
genuine BARACUDA® Auto Weir
Valve is used.
23
Diagram 6
3
SECTION 2 – CORRECT SETTINGS
ADJUSTMENT SUGGESTIONS
AUTO WEIR VALVE
The Baracuda® Auto Weir Valve is preset at the factory to obtain
maximum pool cleaning efficiency.Your Baracuda® Genius is preset on
setting 3. However, if you do experience difficulties, it can be manually adjusted
to one of the three settings (high, medium or low).You will only need to adjust
the Auto Weir Valve if the following occurs:
PROBLEM
SOLUTION
The Baracuda Genius 3000 pool
cleaner is performing too fast and/or
climbing above the level of the water.
Reduce Auto Weir Valve to medium or
low setting
The Baracuda® Genius® 3000 pool
cleaner is performing slowly and/or is
not climbing the pool walls.
Increase Auto Weir Valve to medium
or high setting
®
1. LOW
SETTING
®
2. MEDIUM
SETTING
1
2 3
3
3. HIGH
SETTING
TURNING YOUR BARACUDA®
GENIUS OFF IS MADE EASY
WITH THE
AUTO
WEIR
VALVE.
1 2
A
B
You no longer
need to remove
the Baracuda®
Auto weir valve
from the weir.
1 2
Water flow
Simply depress the red pivoted
arm (A), until it locks
open the flow door.
This end
plugs into weir
Hose attaches
to this end
4
To recommence pool cleaner
operation, release the pivoted
arm (A) by pressing down
on the flow door (B).
It’s that simple!
SECTION 2 – CORRECT SETTINGS
ADJUSTMENT SUGGESTIONS
CORRECT BALANCING
Proper balancing must be accomplished in the DEEPEST area of the pool. The
buoyancy of the hose tends to LIFT the BARACUDA® GENIUS® 3000 especially
in deeper water. The hose weight is utilized to help neutralise the buoyant effect
of the hose. Although usually not required, if a hose weight is needed, please
contact BARACUDA® on 0800 110 885 whereby we will supply a hose weight at
no charge.
Incorrect
Correct
Incorrect
NOTE: Do not use hose
weight if your swimming pool
is less than 2,1 metres deep.
Diagram 7: Positioning of the hose weight (if required)
POOL COVERAGE
Normally it is undesirable for the return line water flow to affect the natural
movement of your BARACUDA® hose. However, the return line pressure can
be used to balance cleaning coverage or to guide the cleaner away from steps
and corners.
A return line located anywhere along the shaded area can be utilised to gently
push the hose, allowing your BARACUDA® GENIUS® 3000 to free itself from
in-pool obstacles (Diagram 8).
Diagram 8
5
SECTION 3 – QUICK RELEASE
CASSETTE SYSTEM
The BARACUDA® GENIUS® 3000 has a long life diaphragm and a Quick Release
Cassette System.This unique feature allows almost instantaneous access to the
diaphragm.
Large foreign objects, such as children’s toys, tree branches and rocks, should be
removed manually from your pool prior to operating an automatic pool cleaner.
In the event of a blockage occuring, the Quick Release Cassette System allows
you the opportunity to remove the blockage or check the diaphragm for damage
in seconds at the poolside.
The Quick Release Cassette System also allows you to reset the diaphragm which
may also resolve performance problems such as: running and stopping, coverage
problems and/or your Baracuda® Genius® 3000 not climbing the pool walls.
STEP 1: Procedure to Remove Diaphragm
Hold the BARACUDA® GENIUS® 3000 with one hand and unscrew the cassette
swivel nut ± 3 TURNS anticlockwise (Figure 1).
FIGURE 1
Pull the cassette system from the BARACUDA® GENIUS® 3000 body (Figure 2).
FIGURE 2
6
SECTION 3 – QUICK RELEASE
CASSETTE SYSTEM
STEP 2: Removal of Diaphragm
Grasp the extension pipe in one hand and unscrew the cassette ± 2 TURNS anticlockwise (Figure 3).
FIGURE 3
Grasp the rim of the diaphragm and pull the diaphragm assembly out of the
cassette (Figure 4).
FIGURE 4
7
SECTION 3 – QUICK RELEASE
CASSETTE SYSTEM
Remove the diaphragm from the inner extension pipe (Figure 5), leaving the
retaining ring on the diaphragm.
FIGURE 5
STEP 3: Examination
Inspect the diaphragm for a blockage or any damage. Even small holes will
compromise its operation. If any damage is evident, i.e. a cut or hole on the sides
of the diaphragm, replace it.
If there is a blockage, carefully remove it. If this can’t be done, a garden hose may
be used to flush the obstacle through. Do not use any sharp objects to probe or
push an obstruction as this may damage the diaphragm.
STEP 4: Diaphragm Assembly
Prior to re-installing the diaphragm, rinse the diaphragm and the inner extension
pipe thoroughly to remove any grit. Attach the diaphragm to the inner extension
pipe (Figure 6). Slide the top of the inner extension pipe (the end which is
opposite the diaphragm) into the body.
FIGURE 6
8
SECTION 3 – QUICK RELEASE
CASSETTE SYSTEM
Pressing on the underside of the diaphragm’s ridges, push the diaphragm into the
cassette body (Figure 7).
FIGURE 7
The diaphragm should fit flush against the cassette body.
STEP 5: Resetting the Diaphragm
If the gap of the throat/diaphragm is excessive (more than 5mm), yet the
diaphragm is not torn or damaged, it can be reset by leaving one ridge on the
diaphragm exposed from the cassette body (Figure 8).This may resolve
performance-related problems such as: running and stopping, coverage problems
and/or your BARACUDA® GENIUS® 3000 not climbing walls.
FIGURE 8
9
SECTION 3 – QUICK RELEASE
CASSETTE SYSTEM
Hold the cassette and tighten the extension pipe by turning it clockwise
(Figure 9). Do not overtighten.
FIGURE 9
STEP 6: Cassette Reassembly
Re-insert the assembled cassette unit into the BARACUDA® GENIUS® 3000 body
(Figure 10) and tighten the cassette swivel nut ± 3 TURNS clockwise until
handnut is flush with the bumper fin (Figure 11).
FIGURE 10
FIGURE 11
10
SECTION 4 – HOW TO KEEP YOUR
BARACUDA® GENIUS® 3000 HAPPY
However good an automatic pool cleaner is, remember that it was developed to
assist you with the maintenance of your swimming pool. From time to time it will
need a little assistance from you. Here’s what you can do to help:
1. Weir basket, pump strainer basket, cartridge filter, skim filter, sand filter
(whichever is applicable) should be thoroughly cleaned on a regular basis to
ensure optimum pool cleaner efficiency.
N.B.
ALWAYS disconnect the hose from the weir or vacuum line
BEFORE backwashing your filter.
2. Always store your BARACUDA® Long Life Hose in a straight line – never coil
or leave hose coiled in sun.
3. Periodically inspect parts for wear.The FlexiFoot, disc and bumper fin are the
most critical. As the disc wears, it begins to curl at the outer edges.When the
depth of the channels between the treads on the FlexiFoot are 3 mm or less,
replace the FlexiFoot.
4. In the event of an object becoming stuck in the diaphragm, clear it quickly and
easily by following the simple instructions laid out for diaphragm maintenance
under Section 3 – Quick Release Cassette System.
5. To maintain optimum performance from your BARACUDA® GENIUS® 3000,
we recommend that your cassette diaphragm is reset when required.
(See Section 3: Quick Release Cassette System, page 9, step 5.)
IMPORTANT
Sunlight (ultraviolet rays), water and swimming pool chemicals can take their toll
on your automatic pool cleaner.To extend the lifespan of your BARACUDA®
GENIUS® 3000 and hose:
1. Ensure that your pH is at the recommended levels as per the table below at all
times as recommended. A low pH is detrimental to most types of plastics and
rubbers and will seriously damage your Automatic Pool Cleaner.
2. Remove your BARACUDA® GENIUS® 3000 from the pool before chemical
shock treatment and re-install it after a minimum of four hours.
RECOMMENDED WATER BALANCE
Chlorine:
1,0 – 1,5 ppm
pH Level:
pH Fibreglass: 7,0 – 7,2
pH Marbelite:
7,2 – 7,6
Total Alkalinity:
80 – 120 ppm
NOTE:
Due to the harsh environment in which your pool cleaner operates, your BARACUDA®
GENIUS® 3000 may discolour during normal use over a period of time.This, however,
will not affect the cleaning performance of your unit.
11
SECTION 5 – PROBLEM SOLVING
PROBLEMS
The BARACUDA®
GENIUS® 3000 works
slowly, runs then stops,
or not at all.
The BARACUDA®
GENIUS® 3000 is
working slowly and air
bubbles are noticable at
the return jet.
CHECKS
SOLUTIONS
Is the filter clean?
Backwash and rinse the filter
thoroughly.
Are the baskets clean?
Remove baskets, clean
thoroughly (Baskets must be
in good condition).
Is the vacuum lid sitting
flush in the weir?
Remove and re-install.
Is vacuum lid damaged?
Replace vacuum lid.
Is the Auto Weir Valve
and the hose secure?
Make sure that the
connections are sealed.
Is the Diaphragm
operational or does it
need adjusting?
Refer Section 3
(Quick Release Cassette
System page 6-10).
Is there a leak in the
system?
Possible problem areas:
• Possible leak at pump lid.
• Check the pump lid o-ring.
• Possible leak in the hose.
Is the Auto Weir Valve
below water level?
Check level of water.
Use the return flow jet to
push hose away from steps.
(Refer to “Pool Coverage”
page 5).
The BARACUDA®
GENIUS® 3000 is
sticking in corners or
at the steps.
Check hose length
(Refer Section1 page 3).
Shorten the hose so that it
does not reach the steps.
Install a wheel deflector kit.
TOLL-FREE CUSTOMER CARE HOTLINE 0800 110 885
www.baracuda.zodiac.co.za
12
SECTION 5 – PROBLEM SOLVING
PROBLEMS
The BARACUDA®
GENIUS® 3000 does not
reach the shallow end
of the pool or moves
in a fixed pattern.
The BARACUDA®
GENIUS® 3000 climbs
above the water level.
CHECKS
SOLUTIONS
Is the hose long enough?
Add more sections of hose.
Is the hose affected by
the return flow?
Adjust the return outlet
towards the bottom of the
pool to make sure that
the jet of water does not
influence the direction
of the BARACUDA®
GENIUS® 3000 hose.
Are the hose lengths
straight?
Make sure that the hose
lengths are in good condition.
Never roll up /coil hoses.
Is there too much
suction?
Check that the Auto Weir
Valve is not blocked by
leaves and preventing the
water from flowing through
the Auto Weir Valve.
Adjust Auto Weir Valve
setting (Refer to correct
settings page 4)
The BARACUDA®
GENIUS® 3000 does not
climb the walls easily.
Is there sufficient suction?
The BARACUDA®
GENIUS® 3000 falls
on its one side.
Is the float damaged?
Return to your nearest
BARACUDA® GENIUS® 3000
to your Dealer for checking.
Is the cassette unit
swivelling freely?
Remove cassette unit
from main body and rinse
both to flush out debris.
Is the hose weight
attached?
Remove the hose weight.
Make sure the filter is clean.
Adjust Auto Weir Valve
setting (Refer to correct
settings page 4)
TOLL-FREE CUSTOMER CARE HOTLINE 0800 110 885
www.baracuda.zodiac.co.za
13
SECTION 6 – PARTS IDENTIFICATION
EXPLODED DIAGRAM – GENIUS 3000
8
2
9
10
3
11
7
12
13
6
1
DESCRIPTION
1. Main Body with Apron
2. Collar
3. Bumper Fin
4. Foot Flange
5. Flexi Foot
6. Float
7. Weight
8. Extension Pipe with
Hand-nut
9. Compression Ring
10. Cassette Diaphragm
Chamber
11. Inner Extension Pipe
12. Retaining Ring
13. Long Life Cassette
Diaphragm
14. Finned, Fluted Disc
4
5
14
14
SECTION 7 – OPTIONAL ACCESSORIES
1.WEIR ADAPTOR
Fits suction inlets from 40 to 60 mm.
23
2. WEIR COMBINATIONS
Auto weir valve and weir elbows
illustrating some of the different
combinations that can be used.
23
23
3. AIM FLOW DIVERTER
To allow pool cleaner to
clean close to return flow.
4. WHEEL DEFLECTOR KIT
If unit sticks in difficult corners eg. steps.
5. IN-LINE LEAF EATER™
An in-line filter which collects all leaves, seeds,
twigs and grit before they reach the weir.
Connects in-line with the hoses.
15
SECTION 8 – AT YOUR SERVICE
NOTES
16
SECTION 8 – AT YOUR SERVICE
If you are having a problem you cannot solve, mail or fax us the following information,
along with a sketch of your pool shape, indicating the location of all weirs, vacuum lines,
inlets, stairs, ladders, spas, waterfalls, etc., or other significant features. Briefly describe
the problem.
(Send a photocopy and retain this page for future use.)
Mail to: Baracuda South Africa, Private Bag X127, Halfway House 1685, or
Fax to: (011) 314-5225
Your Name
Tel. No.
Postal Address
Code
Serial No
Purchased from
Pool Surface (Tick one): Plaster ■
Purchase Date
Vinyl ■
Fibreglass ■
Other
Pool Size (L)
Type of Filter (Tick one):
Pump Size
Sand ■
D.E. ■
Cartridge ■
Filter Size (or Model No.)
Briefly describe the problem:
TOLL-FREE CUSTOMER CARE HOTLINE 0800 110 885
www.baracuda.zodiac.co.za
17
New Age Technology
For All Pool Sur faces
TOLL-FREE CUSTOMER CARE HOTLINE
0800 110 885
www.zodiac.co.za
WARNING! In terms of Section 2 of the Import and
Export Control Act of 1989 (Act 45 of 1983), it is illegal to
export automatic pool cleaners and parts thereof. Section 4
of the Act provides that anyone convicted of exporting automatic pool cleaners and parts thereof may be sentenced to a
10 (ten) year term of imprisonment and a fine of
R40 000 (forty thousand Rand).
Copyright Reserved © 2002
Instruction Manual