1
Viewer Software
User's Manual
Ver. 3.20
E
ENGLISH
Contents
Introduction
Important ....................................................................................... 4
Copyright Information ................................................................... 4
Trademark Information ................................................................. 4
Conventions .................................................................................. 4
Overview ................................................................................... 5
Viewer Overview ....................................................................... 6
Java Viewers ................................................................................ 6
Helper Viewer ............................................................................... 7
Operating Environment ............................................................. 8
Java Viewer Ver.3.20 .................................................................... 8
Helper Viewer Ver.3.20 ................................................................. 8
Java Viewers
Preparations for Using the Java Viewer ................................. 10
Using Internet Explorer ............................................................... 10
Using Netscape Navigator or Communicator ............................ 10
Starting Up the Java Viewer ................................................... 12
Using "LiveApplet" .................................................................. 13
"LiveApplet" Screens .................................................................. 13
Starting Camera Control ............................................................. 15
Controlling the Camera .............................................................. 16
Changing the Camera Angle ................................................................. 16
Changing the Camera Zoom Ratio ....................................................... 17
Selecting the Camera ............................................................................ 18
Using Presets ........................................................................................ 18
Adjustment of Backlight ......................................................................... 19
Taking a Snapshot of the Video ............................................................ 20
Using "Glimpse" ...................................................................... 22
"Glimpse" Screen ....................................................................... 22
Helper Viewer
Preparations for Using the Helper Viewer .............................. 24
Difference between 2 Helper Viewers ........................................ 24
Installing the Helper Viewer ....................................................... 24
Using Browsers Other Than the Recommended
Products ...................................................................................... 26
Starting Up Helper Viewer ...................................................... 27
Starting Up from the Web Browser ............................................ 27
Starting Up Independently .......................................................... 27
Connecting to a Camera Server ............................................. 28
Specifying a Connection Target and Connecting ....................... 28
Selecting a Registered Camera Server and Connecting ........... 29
Disconnecting ............................................................................. 29
Using the Helper Viewer ......................................................... 30
"Helper Viewer" Screens ............................................................ 30
Panorama Window ................................................................................ 31
Starting Camera Control ............................................................. 32
Controlling the Camera .............................................................. 33
Changing the Camera Angle ................................................................. 33
Changing the Camera Zoom Ratio ....................................................... 34
Selecting the Camera ............................................................................ 35
Using Presets ........................................................................................ 35
Changing the Video Source Size .......................................................... 36
Using Full-Screen Mode ........................................................................ 36
Adjustment of Backlight ......................................................................... 37
Stopping and Restarting Video Display ................................................ 37
Registering a camera site during connection ....................................... 38
Saving and Printing Still Pictures ............................................... 39
Saving Still Pictures to Files ................................................................. 39
Printing Still Pictures ............................................................................. 39
Displaying Information ................................................................ 40
Video Information .................................................................................. 40
Connection Information ......................................................................... 40
Camera Information ............................................................................... 40
Helper Viewer Settings
Helper Viewer Settings ........................................................... 42
Specifying the "Starting protocol" Setting ............................................. 42
"HTTP protocol" Settings ...................................................................... 43
"Performance" Setting ........................................................................... 44
"Display option" Setting ......................................................................... 45
Registering and Changing the Server .................................... 46
Registering in a Camera Site List .............................................. 46
Adding to a list ....................................................................................... 46
Changing or deleting registration details in the list .............................. 47
Registering in the Relay Server List ........................................... 48
Adding a relay server to the list ............................................................ 48
Changing or deleting registration details in the list .............................. 49
Appendix
Error Messages ...................................................................... 50
Index ....................................................................................... 55
Introduction
This manual describes how to use the WebView Livescope Ver. 3.20 Viewer software.
The two types of viewer are Java viewers and the Helper Viewer, and the video sender
can use one or the other as required. Both types provide the same basic functions for
viewing videos, but differ in terms of other features and functions. The preparations for
using the two viewer types and the required operating environment also differ
depending on the computer hardware and software used to run the viewer.
Read this manual carefully before you use the viewer to ensure that you make the best
possible use of this product.
Store this manual in a safe place after you finish reading it.
Important
Copyright © 2002 by Canon, Inc. All rights reserved. The unauthorized transfer of all or
any part of the contents of this manual is forbidden.
The contents of this manual are subject to change without notice.
Every effort has been made to ensure that content of this manual is free from errors.
If you encounter any errors, omissions or apparent inaccuracies, contact the
manufacturer.
Notwithstanding above, the manufacturer accepts no liability whatsoever arising from
the results of using this product.
Copyright Information
Under copyright law, video or still images photographed by the client cannot be used for any purpose other than
personal enjoyment without prior permission from the copyright holder
Trademark Information
Canon and Canon logo are registered trademarks of Canon Inc.
Microsoft Windows, Windows NT, and Microsoft Internet Explorer are registered trademarks of the Microsoft
Corporation in the United States and other countries.
Netscape is a trademark of Netscape Communications Corporation.
All other company or product names used in this document are trademarks or registered trademarks of their
respective holders.
* In this manual, "Microsoft Windows" is abbreviated as simply "Windows".
Conventions
c
Note
e
Tip
4
Indicates important notes or restrictions that must be observed when using this product. Always
read these notes.
Indicates additional information or explanations for a procedure. You should read these items.
Overview
■ WebView Livescope is the system that allows camera control and live video distribution from a
remote location.
■ The system is configured of a camera server and viewer software. The camera server distributes
live videos taken by the video camera to the Internet or an Intranet. The viewer software can
display those videos and remotely control the camera.
Introduction
■ The WebView Livescope system can be used in a wide range of applications such as distributing
live videos from a Web site and monitoring.
The following types of camera servers are available:
• Network Camera Server VB101
• Network Camera VB-C10/VB-C10R
• WebView Livescope camera server ver. 3.10
The following types of Viewer Software packages are available:
• WebView Livescope viewer software (This manual: provided free of charge with camera
server product)
• WebView Livescope MV ver. 2.0/LE software
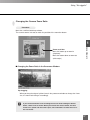
WebView Livescope is an video distribution system that enables users to
actively (by performing operations by oneself) view live (showing now) video
from Web pages by allowing users to change camera angle and zoom magnification.
Video Sender
Live
(Camera server)
Video Recipient
(Viewer software)
Sending the current video
VB101
Viewing by switching angle and zoom magnification
VB-C10
Offers an easy way
to provide live information contents.
Active
Offers the advantage of
being able to actively select desirable
parts from live video according to
the user's purposes.
5
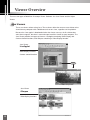
Viewer Overview
There are two types of WebView Livescope Viewer Software: the Java Viewer and the Helper
Viewer.
Java Viewers
These are viewers written using Java. These viewers allow the camera server videos to be
viewed on any computer with a Web browser that runs Java, regardless of the platform.
Because the Java applet is downloaded when the viewer starts up, the first video takes
some time to appear, but there is no need to pre-install the viewer on your computer. The
Java Viewer provides two types of viewers: LiveApplet containing Video Display and
Camera Control functions, and Glimpse containing a Video Display function.
Java Viewer
LiveApplet
Video display functions
Camera control functions
Click
➤
Panorama picture
Java Viewer
Glimpse
Video display functions
6
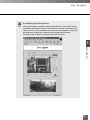
Helper Viewer
This is a viewer that runs as a helper application. This viewer provides video display and
camera control functions and appears in a separate window at startup. While the Helper
Viewer has to be pre-installed, it offers the advantage of displaying the first video quickly. At
present, only a Windows version of this viewer is available.
Introduction
Click
➤
Panorama picture
c
Note
● There are two types of Helper Viewers: the Helper Viewer that is packaged
with the VB101 network camera server and the VB-C10/VB-C10R network
camera, and the Helper Viewer that can be downloaded at no charge from
the WebView World Web site (see p. 24).
● Panorama pictures must be registered in advance at the camera server.
7
Operating Environment
Java Viewer Ver. 3.20
Web Browser
A Web browser that runs Java.
Microsoft Internet Explorer 4.01 or later recommended.
Netscape Navigator or Communicator 4.78 or later
recommended. (excluding 6.01 and 6.1)
Computer
Operating
System
IBM PC/AT Conpatible
Windows 98 Second Edition, Windows Me, Windows NT 4.0
(requires IE 4.01 or later), Windows 2000, Windows XP
* This viewer is installed in the camera server and automatically downloads to the client when accessed.
* Operation is unstable when used with an OS or Web browser other than those noted above.
Helper Viewer Ver. 3.20
Web Browser
A Web browser that runs Java.
Microsoft Internet Explorer 4.01 or later recommended.
Netscape Navigator or Communicator 4.78 or later
recommended.
Computer
Operating
System
IBM PC/AT Conpatible
Windows 98 Second Edition, Windows Me, Windows NT 4.0
(requires IE 4.01 or later), Windows 2000, Windows XP
* Must be installed in advance from the CD-ROM supplied with the camera server.
8
Chapter 1
Java Viewers
This chapter describes the preparations required for using the WebView
Livescope Java viewers and explains how to use the viewers.
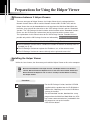
Preparations for Using the Java Viewer
The Java Viewer is automatically downloaded from the camera server. There is no need to install it in
advance. However, depending on the type of Web browser you are using and your software settings,
you must change your Web browser settings.
Using Internet Explorer
Internet Explorer has a setting that specifies whether the use of Java is permitted.
From the "View" menu, select "Internet Options" and click the "Advanced" tab. Then
set "Java JIT compiler enabled" as the "Java VM" setting.
In Internet Explorer 5 or later, you must install the Java VM.
* For Internet Explorer 4.01
Using Netscape Navigator or Communicator
Netscape Navigator and Netscape Communicator also have a setting that specifies
whether the use of Java is permitted.
Select "Preferences" from the "Edit" menu, click "Advanced" and then click in the
"Enable Java" checkbox.
* For Netscape Navigator 6.2
c
Note
10
The settings for the Web browser vary depending on the version used. Refer
to the settings given here and check your browser version.
e
When You are Connected to a LAN
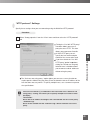
Note
If the camera server is used via an Intranet and you specify the Web browser proxy
setting manually, videos are distributed via the proxy. This can result in a slower
frame rate and proxy server overload.
Use the procedure shown below to set up a "No proxy" connection. Note that if
you are accessing a camera server that is located outside a firewall on the internet,
registration is not required for the camera server.
Setup Examples
1
Java Viewers
Using Internet Explorer
From the "View" menu, select "Internet Options" and click the "Connection" tab.
In the "Exception" field, add "Camera server IP address:HTTP conversion
server service port". If there are multiple settings, use a semicolon (;) as the
separator.
* For Internet Explorer 4.01
Using Netscape Navigator or Communicator
Select "Preferences" from the "Edit" menu and click "Proxies".
In the "No proxy for" setting for "Manual proxy configuration", add "Camera
server IP address:HTTP conversion server service port". If there are multiple
settings, use a comma (,) as the separator.
* For Netscape Navigator 6.2
The settings for the Web browser vary
depending on the version used. Refer to
the settings given here and check your
browser version.
11
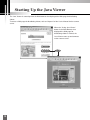
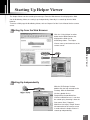
Starting Up the Java Viewer
The Java Viewer is started up from the Web browser that displayed the Web page for distributing
videos.
To create a Web page for distributing videos, refer to Chapter 5 of the User's Manual for the camera
server.
When the "Using Java Viewer"
button in the Web Browser that
displayed the Web page for
distributing videos is clicked, the
Java Viewer starts up and connects
to the camera server.
Click
➤
12
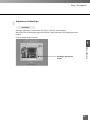
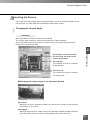
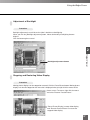
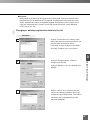
Using "LiveApplet"
"LiveApplet" is a viewer with a GUI that allows the user to change the camera angle, zoom ratio and
backlight adjustment settings.
"LiveApplet" Screens
The functions of the GUI displayed on the Web browser are briefly described below.
1
1
2
Java Viewers
3
4
5
11
1
10
9
8
7
6
Reduce resolution button and Increase resolution button
The right-hand button makes the displayed video source one level smoother, while
the left-hand button makes it one level coarser. Making the image coarser increases
the frame rate, while making it smoother improves the video quality.
* Depending on the camera server, the video source size change button is occasionally not displayed.
2
Camera selection bar
When multiple cameras are installed on the camera server, this bar can be used to
select the camera.
3
Tilt scroll bar
Used to change the camera tilt angle (up and down movement)
4
Zoom scroll bar
Used to change the zoom ratio.
Moving the button up zooms in (telephoto) and moving it down zooms out (wideangle).
5
Panorama view button
Displays the pop-up panorama window. Panorama pictures must be saved at the
camera server. Panorama pictures will not be displayed if not saved.
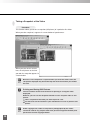
13
Camera control status window
6
Used to display camera control information ("Camera controllable", "Camera not
controllable", "Awaiting turn", "Remaining camera control time").
Start control button
7
Used to acquire camera control privileges.
Backlight adjustment button
Compensates for backlighting. Useful when the video appears dark due to
8
backlighting. Click the button again to cancel.
Presets
Allows you to control the camera by selecting preset camera positions registered
9
beforehand on the camera server.
Pan scroll bar
Used to change the camera pan angle (left and right movement).
10
Snapshot button
11
Shows a snapshot of the currently displayed video frame in a separate window. The
snapshot image can then be printed or saved.
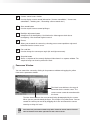
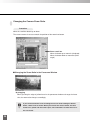
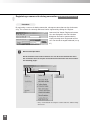
Panorama Window
You can control the camera by clicking in the panorama window or dragging the yellow
frame on the panorama window.
The black frame indicates the range of
movement for the camera center. The
camera center cannot be moved outside
this frame.
The blue frame indicates the area currently being photographed by the camera.
When you are granted control privileges, this changes to a yellow frame. You can
control the camera pan and tilt by dragging this frame and control the camera
zoom by resizing this frame.
c
Note
14
The size of the panorama window may differ from that shown above if field of
view restrictions have been specified on the camera server.
Using "LiveApplet"
Starting Camera Control
Although multiple clients can simultaneously connect to the camera server, multiple clients
cannot simultaneously control the camera. Consequently, "control privileges" has been
introduced by which only the client who currently holds the control privileges can control the
camera. Backlight adjustment and presets can also only be used when you have control
privileges.
Procedure
Click the [Start control] button to acquire control privileges.
1
Java Viewers
Camera control status window
Shows the camera control status.
■ Camera Control Status Displays
The display changes depending on the camera control status.
1
2
3
Camera is not controlled.
You have clicked the
[Start control] button and
the camera server is
being contacted. This
display does not appear if the
camera server responds
immediately.
Awaiting control privilege
reservation. The number
beside the person icon
shows the estimated time
until control privileges are granted.
However, you may be granted
control privileges before this
number reaches "0" because other
users may cancel camera control or
withdraw from the queue.
4
5
6
You have been granted
control privileges. The
number beside the clock
icon is your period of
exclusive control.
You can retain control
privileges even though
your period of exclusive
control has expired. This
is because there are no camera
control requests from other clients.
For some reason, you
have been disconnected
from the camera control
server, you could not
connect to the camera control
server at startup, or your connection
was not permitted. The status
display panel turns red.
15
Controlling the Camera
Once you have been granted camera control privileges, you have complete control over the
camera angle, the zoom ratio and the backlight adjustment setting.
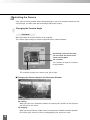
Changing the Camera Angle
Procedure
Move the button on the pan scroll bar or tilt scroll bar.
The camera angle changes to match the position of the scroll bar buttons.
By clicking a point on the video,
you can move the center of the
camera to that point.
Tilt scroll bar
This scroll bar changes the camera's
tilt (up or down).
Pan scroll bar
This scroll bar changes the camera's pan (left or right).
■ Changing the Camera Angle in the Panorama Window
By clicking
When you click in the panorama window, the camera pans and tilts so that the place
you clicked is in the center.
By dragging
When you drag inside the yellow frame in the panorama window to another position,
the camera pans and tilts so that it is photographing the area in the frame.
16
Using "LiveApplet"
Changing the Camera Zoom Ratio
Procedure
Move the scroll bar button up or down.
The camera zooms in or out to match the position of the zoom bar button.
1
Java Viewers
Zoom scroll bar
Move the button up to zoom in
(telephoto)
Move the button down to zoom out
(wide-angle)
■ Changing the Zoom Ratio in the Panorama Window
By dragging
When you drag the edge of yellow frame in the panorama window to change the frame
size, the zoom ratio changes accordingly.
e
Tip
If you click outside the frame and drag the mouse while holding the button
down, a blue frame is drawn. When you release the mouse button, the blue
frame turns yellow and the camera pans, tilts and zooms to shoot the area in
the new frame.
17
Selecting the Camera
Procedure
When multiple cameras are installed on the camera server, you can switch between
cameras. Click in the Camera selection bar to view the list of cameras. When you select a
camera from the list of names, the display changes to show the video from that camera.
Camera selection bar
Using Presets
Procedure
You can control the camera by selecting preset camera positions (presets) registered on the
camera server.
Click in the Presets selection bar to view the list of preset positions. When you select a
preset position from the list, the display changes to show the video from that position.
Preset selection bar
c
Note
18
The presets and camera selection options displayed are those set on the
camera server. If no presets or additional cameras are registered on the
camera server, no selection options are shown.
Using "LiveApplet"
Adjustment of Backlight
Procedure
Backlight adjustment is useful when the video is dark due to backlighting.
When you click the [Backlight adjustment] button, video darkened by backlighting become
brighter.
Click the button again to cancel.
1
Java Viewers
Backlight adjustment
button
19
Taking a Snapshot of the Video
Procedure
This function allows you to take a snapshot (still picture) of a particular live video.
When you take snapshot, it appears in a new window of your browser.
When you click on the camera
icon, the still picture at the time
you took the snapshot appears in
a new window.
c
Note
e
Tip
Because a new still picture is captured when you click the camera icon, the
still picture displayed may be fractionally later than the moment you clicked
the icon.
Printing and Saving Still Pictures
The Java viewers do not have functions for printing or saving the video
displayed.
However, you can use the Snapshot function to save and print video as still
picture.
Take a snapshot of the video you want to print or save.
Use the Save or Print function in your web browser to save or print the still
picture.
c
Note
20
Under copyright law, video or still pictures photographed by the viewer
cannot be used for any purpose other than personal enjoyment without prior
permission from the copyright holder
Using "LiveApplet"
c
Note
Customizing the Viewer Screen
The function buttons and other aspects displayed in the Java Viewer can be
customized according to camera server settings. Functions restricted by the
camera server can be customized so that they are not displayed, or they may
be made to be displayed in a different way according to the setting.
For details, refer to the User's Manual of the camera server.
1
Java Viewers
21
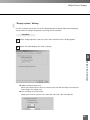
Using "Glimpse"
The "Glimpse" viewer is a light-weight Java viewer. It has a short download time as it has no camera
control functions and only displays video images.
This viewer is useful for viewing videos from multiple sites, as shown below..
"Glimpse" Screen
The Glimpse viewer is used only for viewing videos; it does not include camera control
functions.
22
Chapter 2
Helper Viewer
This chapter describes the preparations required for using the WebView
Livescope Helper Viewer and explains how to use the viewer.
Preparations for Using the Helper Viewer
Difference between 2 Helper Viewers
There are two types of Helper Viewers: the Helper Viewer that is packaged with the
Network Camera Server VB101 and the Network Camera VB-C10/VB-C10R, and the
Helper Viewer that can be downloaded at no charge from the WebView World Web site.
Hereafter, they were will be referred to as the "VB Package Version" and the "Download
Version". The "VB Package Version" includes all the functions of the "Download Version".
Please use the VB Package Version when you have purchased the camera server.
The explanations in this manual center on the VB Package Version. Functions that are
possible only with the VB Package Version are indicated by VB Package Version only .
Functions added in the VB Package Version
● The VB Package Version creates a Shortcut execution file icon on the desktop after it is
installed (see p. 25).
● The VB Package Version can register the IP address, etc., of the camera server.
● The VB Package Version can connect directly to the registered camera site.
Installing the Helper Viewer
Unlike the Java viewers, the client must pre-install the Helper Viewer on his or her computer.
c
Note
Because the WebView Livescope Version 3.20 Helper Viewer uses ActiveX
control, Microsoft Internet Explorer 4.01 or later must be installed. Check that
Microsoft Internet Explorer 4.01 or later is already installed before installing
the Helper Viewer.
Procedure
1
For the VB Package Version, load the CD-ROM
supplied with the product into the CD-ROM drive.
Double-click "MonSetup.exe" on the CD-ROM to
start up the installer.
For the Download Version, download the set-up
program from the WebView World Web site (URL:
http://www.canon.com/webview/) and double-click
the program to start up the installer.
Click the Next button.
24
Specify the folder where the Viewer is to be
2
installed and click Next.
If no folder specification is required, simply click
Next.
Specify the menu name to be registered in the
Program menu of the Start menu, then click Next.
3
2
Helper Viewer
Check the settings and selections thus far and
4
click Next to confirm. Make the file copy and
registry settings, etc., then install.
Click Finish to complete the installation. A shortcut
5
icon is created on the Desktop.
VB Package Version only
c
Note
● If the Helper Viewer of WebView Livescope ver. 3.10 or earlier is already
installed, when you try to install the new version, a dialog box appears
asking you if you want to uninstall the old version. If you want to reinstall,
click Yes, and the new version will be installed after the installer uninstalls
the currently installed Helper Viewer.
● Two types of WebView Livescope Helper Viewers cannot be installed in the
same machine.
● It cannot be installed in a machine in which WebView Livescope MV ver. 1.0
has been installed.
25
Preparations for Using the Helper Viewer
Using Browsers Other Than the Recommended Products
To launch and run the Helper Viewer from a Web browser, the recommended browsers are:
Microsoft Internet Explorer 4.01 or later, and
Netscape Navigator or Communicator 4.78 or later.
The use of any browser other than these may require some setup measures. If you cannot
launch the viewer after installation, launch the Web browser and register the Helper Viewer
as a helper application. For information on registering helper applications, refer to the
documentation provided with your browser.
MIME type
x-webview-h
Extension
wvh
Application
MonView.exe (For Download Version, it is WebView.exe)
The application "MonView.exe" or "WebView.exe" is installed into
the folder specified for the installation.
C:\Program Files\Canon\WebView\Viewer\3.2 (default installation
folder)
26
Starting Up Helper Viewer
The Helper Viewer can be started up in two ways: From the Web browser that displayed the Web
site for distributing videos, or starting it up independently. Normally it is started up from the Web
browser.
To create a Web page for distributing videos, refer to Chapter 5 of the User's Manual for the camera
server.
Starting Up from the Web Browser
Click the "Using Helper" or other
button on the Web browser that
displayed the Web site for
distributing videos . The Helper
Viewer starts up and connects to the
camera server.
2
Click
Helper Viewer
➤
Starting Up Independently
With the VB Package Version,
Double-click
➤
double-click the icon created on the
Desktop. With the Download
Version, double-click c:/
ProgramFiles/Canon/WebView/
Viewer/3.2/WebView.exe. It can also
be started up by choosing it from the
Start menu: Start | Program |
WebView Livescope | Helper Viewer.
No connection to the camera server
is made when the Helper Viewer is
started up independently.
27
Connecting to a Camera Server
When you use the Helper Viewer to connect to a camera server and monitor, if the Helper Viewer
was started up from the Web browser, it automatically connects to the camera server, but if the
Helper Viewer was started up independently, you need to specify a connection target or select a
registered connection target.
You can also change the connection target to another camera server while you are still connected to
one camera server, or start up multiple Helper Viewers and connect each one to a different camera
server.
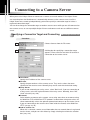
Specifying a Connection Target and Connecting
VB Package Version only
Procedure
1
Choose Connect from the File menu.
2
A dialog box for specifying a connection target
appears. Enter each item and click OK to make a
connection to the camera server.
■ Host Name
Specify the IP address of the camera server.
■ Port No.
Specify the port numbers. of the camera server. They are the values that were
specified on the camera server. Normally they can be used with the default setting.
■ Relay Server
If you are not connecting to a relay server, select "Not Used"; if you are connecting to
a relay server, select the registered name of the relay server. Normally, leave "Not
Used" selected (see p. 48).
■ Protocol
Select whether to connect to the camera server using auto select or to connect using
the WebView-TCP or WebView-HTTP protocol. In connections using auto select, the
viewer automatically selects the optimum protocol and connects to the camera server.
If you are connecting to the camera server from inside the firewall, select WebViewHTTP (see pp. 42, 43).
■ Add to camera site
When this is selected, camera server information that was entered above is registered
into the viewer, and you can view videos by simply selecting them from the selection
box (see p. 29).
28
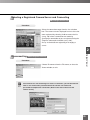
Selecting a Registered Camera Server and Connecting
VB Package Version only
Procedure
Select the connection target from the site selection
box. The camera servers displayed here are sites that
were registered by selecting "Add to camera site list
(see p. 28)" when a connection was made by
specifying a connection target, or registered using the
"Register connected site button (see p. 38)".
See p. 46 for details on registering or changing a
server.
2
Helper Viewer
Disconnecting
VB Package Version only
Procedure
Choose Disconnect from the File menu, or close the
Viewer window, to exit.
c
Note
You connect to a site containing user access restrictions, you will be asked to
enter a user name and a password. Enter the correct user name and
password to complete the connection. (Refer to the User's Manual of the
camera server.)
29
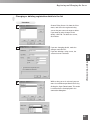
Using the Helper Viewer
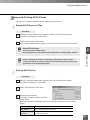
The Helper Viewer provides a GUI that allows you to change the camera angle, zoom ratio and
backlight adjustment settings.
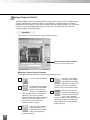
"Helper Viewer" Screens
The functions of the GUI displayed when the helper viewer starts up are briefly described below.
1
2
3
VB Package Version only
4
5
VB Package Version only
6
7
8
9
10
14
1
13
12
11
Reduce resolution button and Increase resolution button
The right-hand button makes the displayed video source one level smoother, while
the left-hand button makes it one level coarser. Making the image coarser increases
the frame rate, while making it smoother improves the video quality.
2
Full screen mode button
Displays the video at full-screen size. Press the [Esc] key to return to the original
video size.
3
Pause/Restart button
Pauses moving pictures during play, or starts play if currently stopped.
4
Register connected site button VB Package Version only
Lets you register a camera site during connection.
5
Site Selection dialog box VB Package Version only
Lets you connect to a registered camera site by selecting it here.
6
Camera selection bar
Can be used to select the camera when multiple cameras are installed on the camera
server.
7
30
Tilt scroll bar
Used to change the camera tilt angle (up and down movement)
Zoom scroll bar
8
Used to change the zoom ratio.
Moving the button up zooms in (telephoto) and moving it down zooms out (wideangle).
Panorama view button
9
Displays the pop-up panorama window. Panorama pictures must be saved at the
camera server. Panorama pictures will not be displayed if not saved.
Camera control status window
Used to display camera control information ("Camera controllable", "Camera not
10
controllable", "Awaiting turn", "Remaining camera control time").
Start Control button
11
Used to acquire camera control privileges.
Backlight adjustment button
12
2
Compensates for backlighting. Useful when the video appears dark due to
backlighting. Click the button again to cancel.
Helper Viewer
Presets
Allows you to control the camera by selecting preset camera positions registered
13
beforehand on the camera server.
Pan scroll bar
14
Used to change the camera pan angle (left and right movement).
Panorama Window
You can control the camera by clicking in the panorama window or dragging the yellow
frame on the panorama window.
The black frame indicates the range of
movement for the camera center. The
camera center cannot be moved outside
this frame.
The blue frame indicates the area currently being photographed by the camera
when you do not hold camera control privileges.
When you are granted control privileges, this changes to a yellow frame. This
frame not only indicates the area being photographed by the camera, but you can
also control the camera pan and tilt by dragging the entire frame around and
control the camera zoom by dragging the edge of the frame to change its size.
c
The size of the panorama window may differ from that shown above if field of
view restrictions have been specified on the camera server.
Note
31
Starting Camera Control
Although multiple clients can simultaneously connect to the camera server, multiple clients
cannot simultaneously control the camera. Consequently, "control privileges" has been
introduced by which only the client who currently holds the control privileges can control the
camera. The use of backlight adjustment and presets is also limited to the client who
currently holds the control privileges.
Procedure
Click the [Start Control] button to acquire control privileges.
Camera control status window
Shows the camera control status.
■ Camera Control Status Displays
The display changes depending on the camera control status.
1
2
3
32
Camera is not controlled.
Awaiting control privilege
reservation. The number
beside the person icon
shows the estimated time
until control privileges are granted.
However, you may be granted
control privileges before this number
reaches "0" because other users
may cancel camera control or
withdraw from the queue.
You have been granted
control privileges. The
number beside the clock
icon is your period of
exclusive control.
4
5
You can retain control
privileges even though
your period of exclusive
control has expired. This
is because there are no camera
control requests from other clients.
For some reason, you
have been disconnected
from the camera control
server, you could not
connect to the camera control server
at startup, or your connection was
not permitted. The status display
panel turns red.
Using the Helper Viewer
Controlling the Camera
Once you have been granted camera control privileges, you have complete control over the
camera angle, the zoom ratio and the backlight compensation setting.
Changing the Camera Angle
Procedure
Move the button on the pan scroll bar or tilt scroll bar.
The camera angle changes to match the position of the scroll bar buttons.
Also, if you click a point on the image, the camera moves so that the point you clicked
becomes the center of the video.
2
Helper Viewer
By clicking a point on the video,
you can move the center of the
camera to that point.
Tilt scroll bar
This scroll bar changes the camera's
tilt (up or down).
Pan scroll bar
This scroll bar changes the camera's
pan (left or right).
■ Changing the Camera Angle in the Panorama Window
By clicking
When you click in the panorama window, the camera pans and tilts so that the place
you clicked is in the center.
By dragging
When you drag inside the yellow frame in the panorama window to another position,
the camera pans and tilts so that it is photographing the area in the frame.
33
Changing the Camera Zoom Ratio
Procedure
Move the scroll bar button up or down.
The camera zooms in or out to match the position of the zoom bar button.
Zoom scroll bar
Move the button up to zoom in (telephoto)
Move the button down to zoom out (wideangle)
■ Changing the Zoom Ratio in the Panorama Window
By dragging
When you drag the edge of yellow frame in the panorama window to change the frame
size, the zoom ratio changes accordingly.
e
Tip
34
If you click outside the frame and drag the mouse while holding the button
down, a blue frame is drawn. When you release the mouse button, the blue
frame turns yellow and the camera pans, tilts and zooms to shoot the area in
the new frame.
Using the Helper Viewer
Selecting the Camera
Procedure
When multiple cameras are installed on the camera server, you can switch between
cameras. Click in the Camera selection bar to view the list of cameras. When you select a
camera from the list of names, the display changes to show the video from that camera.
Camera selection bar
2
Helper Viewer
Using Presets
Procedure
You can control the camera by selecting preset camera positions (presets) registered on the
camera server.
Click in the Presets selection bar to view the list of preset positions. When you select a
preset position from the list, the display changes to show the video from that position.
Preset selection bar
c
Note
The presets and camera selection options displayed are those set on the
camera server. If no presets or additional cameras are registered on the
camera server, no selection options are shown.
35
Changing the Video Source Size
Procedure
If multiple video source sizes are specified on the camera server, these buttons can be used to
select the size used for display. Changing the video source size does not change the size of the
video displayed.
* The effects of the Picture Source Size Change button may not be reflected in all camera servers.
Makes the video source one level coarser (faster frame rate)
Makes the video source one level smoother (better video quality)
Using Full-Screen Mode
Procedure
You can use this function to view the video displayed at full-screen size. If you click the [Fullscreen mode] button and then click [OK] in the confirmation dialog box that appears, the video
appears at full-screen size. To revert to the
original video size, press the [Esc] key. If you
click the right mouse button in while in fullscreen mode, a
pop-up menu
appears from which
you can choose to
return to the
original video size
or pop up the
panorama window
on the current
video.
36
Using the Helper Viewer
Adjustment of Backlight
Procedure
Backlight adjustment is useful when the video is dark due to backlighting.
When you click the [Backlight adjustment] button, videos darkened by backlighting become
brighter.
Click the button again to cancel.
2
Helper Viewer
Backlight adjustment button
Stopping and Restarting Video Display
Procedure
Moving picture displays can be stopped or restarted. Click the Pause/Restart button. Moving picture
displays can also be stopped on the menu that is displayed when you right click the mouse on the
picture screen. To resume, right click the mouse
and select "Resume Paused Picture" .
"Pause Picture Display" to stop video display
and "Resume Paused Picture" to restart the
stopped video display.
37
Registering a camera site during connection
VB Package Version only
Procedure
By registering a camera site during connection, subsequent connections to that site become
easy. The camera site currently connected can be registered by clicking the "Register
connected site" button. Registered camera
sites are displayed in the Site Selection
dialog box and can be connected to by
simply selecting them. Registered camera
sites can also be changed or deleted (see p.
47).
e
Menu-based Operations
Tip
All the functions accessed via buttons can also be accessed from the menu
bar. Functions that can only be accessed from the menu bar are discussed on
the following pages.
* See p. 46 for details on using the Camera Sites list and the Relay
Servers list.
38
Using the Helper Viewer
Saving and Printing Still Pictures
You can save and print snapshots of live video you want to retain.
Saving Still Pictures to Files
Procedure
1
2
When the video you want to save appears, click the "Pause/Restart" button.
The video is displayed as a still picture.
Select "Save" from the "File" menu.
When it ends, the moving picture display resumes when you click the "Pause/Restart" button.
e
Tip
Note
2
Helper Viewer
c
Saved File Formats
Files are saved in JPEG format.
Saved still pictures can be viewed using a Web browser or image display software.
Under copyright law, video or still pictures photographed by the viewer
cannot be used for any purpose other than personal enjoyment without prior
permission from the copyright holder
Printing Still Pictures
Procedure
1
When the video you want to print appears, click the "Pause/Restart" button.
The video is displayed as a still image.
2
3
Select "Print" from the "File" menu.
Specify the print settings.
To change the printer settings, click the
[Setup] button.
When you have finished printing, click the "Pause/Restart" button to restart video
display.
Setting
Details
Print position
Specifies the print position for the image.
Print camera
information
Ticking this checkbox prints camera parameters such as the pan and
tilt angles with the image.
39
Using the Helper Viewer
Displaying Information
Dialog boxes can be displayed that show the video, connection and camera information. To view
this information, select "Video information", "Connect Information" or "Camera Information" from
the "View" menu.
Video Information
● Frame rate
Received frame rate
● Size
Data capacity per frame
● Captured image size
Height and width of the video data being
received
● Compression type
Server's video compression method
Connection Information
● Protocol
WebView-TCP or WebView-HTTP
● Video [WV-TCP]
IP address of camera server:port number
● Camera control [WV-TCP]
IP address of camera server:port number
● Video/Camera [WV-HTTP]
IP address of camera server:port number
● Relay server
IP address of relay server; Port No. of
video, camera control, and HTTP
● Proxy
Proxy usage information
● Local time
Local time on the camera server (GMT)
Camera Information
● Pan
Current camera pan angle
● Tilt
Current camera tilt angle
● Zoom
Current camera zoom (viewing angle) value
● BackLightMode
Current backlight adjustment ON/OFF
status
● CameraModel
Model of the camera
40
Chapter 3
Helper Viewer Settings
This chapter describes how to specify the software environment settings for
the WebView Livescope Ver. 3.20 Helper Viewer.
Helper Viewer Settings
From the "Setup property" window, you can specify a range of settings governing the operation of the
helper viewer. Normally, there is no need to alter these settings.
Specifying the "Starting protocol" Setting
Specify whether connection to the camera server is to be made using the WebView-TCP
protocol or the WebView-HTTP protocol.
Procedure
1
Select "Setup properties" from the "View" menu.
2
Select "Protocol for starting with WVH file" in "Starting protocol" tab.
● "Auto select connection"
Use this setting when you do not know
the details of the connection
environment. When this option is
selected, the viewer first tries to connect
using WebView-TCP and then tries
WebView-HTTP.
● "WV-TCP protocol connection"
This setting uses the WebView-TCP
protocol used specifically by WebView
for TCP connections. To penetrate
firewalls with this protocol, a dedicated
application gateway is required.
● "WV-HTTP protocol connection"
This setting uses the WebView-HTTP protocol, which is the WebView protocol that conforms
to the ordinary HTTP standard. The HTTP proxy can be used as is and the firewall can be
passed.
c
Note
42
Viewing videos from behind a firewall
To view videos from behind a firewall using the WebView-HTTP protocol, you
must specify the HTTP proxy settings. You can set the same settings as the
HTTP proxy specified in your Web browser. If you want to access videos from
behind a firewall, this is normally specified here. (See P.43 for details.)
"HTTP protocol" Settings
Specify these settings when you are connecting using the WebView-HTTP protocol.
Procedure
1
Select "Setup properties" from the "View" menu and then select the "HTTP protocol"
tab.
Ticking the "Use WV-HTTP proxy"
2
checkbox allows you to use a
proxy that uses HTTP. This then
allows you to penetrate firewalls.
In "WV-HTTP proxy server",
specify the host name and port
number of the server to be used.
If you have ticked the "Use WV-
3
Helper Viewer Settings
HTTP proxy" option in above,
ticking the "Do not use the proxy
for local hosts" checkbox allows
you to connect to local addresses
without using the proxy.
The "Set hosts not using proxy." option allows you to access servers that do not
require proxies without using the proxy. Enter the domain name or IP address of the
host that does not use proxies. To specify multiple hosts, use a comma to separate
the specifications.
e
Tip
You can use asterisks (*) as wildcards in the host name in the "Set hosts not
using proxy." setting. This allows you to specify multiple host names at once.
(Example)
192.168.100.*
Hosts with an IP address that begins with "192.168.100." do not use the proxy.
*.webview.co.jp
Hosts on the network with the "webview.co.jp" domain name do not use the
proxy.
43
"Performance" Setting
You can use the WV-TCP protocol high-speed TCP mode to achieve faster video frame
rates.
* The effects of the "Faster" setting may not be reflected in all camera servers.
Procedure
1
Select "Setup properties" from the "View" menu and then select the "Performance" tab.
2
Select "WV-TCP protocol option".
● "Camera control"
Uses the normal WV-TCP protocol.
● "Video rate"
Uses the WV-TCP high-speed protocol. The level of improvement depends on the
circumstances, but the frame rate in this mode is generally 10% to 40% faster than
when the "Camera control" option is selected. However, camera control responses
may be slower.
c
Note
44
The frame rate may not improve due to network traffic or other factors.
Helper Viewer Settings
"Display option" Setting
Use this setting to specify the size of the video displayed at startup. Note that the opening
screen shown at startup is displayed at an image size of 320x240.
Procedure
1
Select "Setup properties" from the "View" menu and then select "Display option".
2
Select "Set video display size used at startup".
3
Helper Viewer Settings
● "Adjust to default image size"
When you connect to the server, the viewer starts up with the image size matched
to the image size initially sent.
● "Use a display size in list below"
Allows you to select any of 4 sizes: 640×480, 320×240, 160×120 or 80×60.
45
Registering and Changing the Server
VB Package Version only
The VB Package Version lets you register the camera server and relay server and thereafter you can
connect simply by selecting a registered server. Here we explain how to change the registration of
the camera site and relay server.
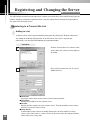
Registering in a Camera Site List
Adding to a list
A camera server can be registered during connection by clicking the "Register connected
site" button or choosing "Register Site" in the File menu. If the site is currently not
connected, it can be registered following the procedure below:
Procedure
1
Choose "Camera Site List" from the View
menu. When the camera site list appears,
click Add.
2
46
Enter each item and click OK. The site is
added to the list.
■ Nickname
Any name can be given to the camera server being registered.
■ Host Name
Specify the IP address of the camera server.
■ Port No.
Specify the Port numbers of each camera server. The port numbers are the values
that were set on the camera server.
■ Relay Server
If connections to the camera site being registered is not to be made via a relay
server, select "Not Used"; if a relay server is to be used, select the registered name
of the relay server (see p. 48).
■ Protocol
Select whether to connect to the camera server using auto select or to connect using
the WebView-TCP or WebView-HTTP protocol. In connections using auto select, the
viewer automatically selects the optimum protocol and connects to the camera server.
If you are connecting to the camera server from inside the firewall, select WebViewHTTP (see pp. 42, 43).
Changing or deleting registration details in the list
Procedure
1
Choose "Camera Site List" from the View
menu, and select the registered camera site
that you want to change or delete.
If you want to make changes in the details,
click Edit. To delete a site, click Delete.
3
If you are changing details, make the
Helper Viewer Settings
2
changes and click OK.
If you are deleting a site, the selected site is
deleted.
3
While a camera site is selected, you can
move it to a different position in the list by
clicking the Up or Down button. This order is
reflected in the list displayed in the Site
Selection dialog box.
47
Registering in the Relay Server List
Adding a relay server to the list
Procedure
Choose Relay Server List from the View
1
menu. When the relay server list appears,
click Add.
Enter each item and click OK. The relay
server is added to the list.
2
■ Relay Name
Any name can be given to the relay server being registered.
■ Host Name
Specify the IP address of the relay server.
■ Port No.
Specify the Port numbers of each camera server. The port numbers are the values
that were set on the camera server.
■ Set the camera using the relay server
If the relay server is to be used in connections established by selecting a camera
site, you can specify the camera site that can be connected via a registered relay
server.
48
Registering and Changing the Server
Changing or deleting registration details in the list
Procedure
1
Choose Relay Server List from the View
menu, and select the registered relay
server that you want to change or delete.
If you want to make changes in the
details, click Edit. To delete the server,
click Delete.
2
If you are changing details, make the
changes and click OK.
If you are deleting a relay server, the
selected server is deleted.
3
Helper Viewer Settings
3
While a relay server is selected, you can
move it to a different position in the list by
clicking the Up or Down button. This order
is reflected in the list displayed in the
connection dialog box.
49
50
Appendix
Messages displayed in the viewers are explained in this section.
Error Messages
Java Viewer Error Messages
52
Situation
At connection
Message
too many clients
Details
The limit on the number of video server connections has been exceeded.
Solution
Access to the camera server is apparently overcrowded.
Wait some time and then reconnect.
Situation
At connection
Message
can't connect
version mismatched
Details
The camera server is a different version.
Solution
Clear the Web browser cache.
Situation
At connection
Message
failed to connect to the camera control server.
Details
The viewer cannot connect to the camera server.
Solution
There is a coding error in the Web page used for video distribution,
or there is a problem on the camera server. Check with the administrator of the video
distribution Web page.
Situation
During camera control privileges acquisition
Message
couldn't get camera control
Details
The limit on the number of people queuing for camera control privileges has been
exceeded.
Solution
Access to the camera server is apparently overcrowded. Wait some time and then
try again to acquire control privileges.
Situation
At connection
Message
camera control is disabled
Details
The viewer cannot connect to the camera control server.
Solution
This is normal operation because camera control is prohibited by the camera server.
Situation
At connection
Message
camera is off-line or abnormal
Details
The connected camera is switched off or the RS cable is not connected.
Solution
There is a problem with the camera server (with the camera power supply or the
RS cable connection). Check with the administrator of the camera server.
Situation
At connection
Message
disconnected
Details
The connection time limit has expired or the connection was cut due to restart
processing on the camera server.
Solution
To reconnect, reload (refresh) the Web page in your Web browser.
Helper Viewer Error Messages
Situation
At connection
Message
No response from video server.
The viewer could not connect to the video server.
Solution
There is a coding error in the Web page used for video distribution, or there is a
problem on the camera server. Check with the administrator of the camera server.
Situation
At connection
Message
Network is busy. Please try again later.
Details
The limit on the number of video server connections has been exceeded.
Solution
Access to the camera server is apparently overcrowded. Wait some time and then
try again to acquire control privileges.
Situation
At connection
Message
No response from camera control server. You can use video only.
Details
The viewer could not connect to the camera control server.
Solution
This is normal operation because camera control is prohibited by the camera server.
Appendix
Details
53
Error Messages
54
Situation
At connection
Message
Couldn’t get camera control privileges.
Details
The limit on the number of people queuing for camera control privileges has been
exceeded.
Solution
Access to the camera server is apparently overcrowded.
Wait some time and then reconnect.
Situation
At connection
Message
You do not have video server access privileges.
Details
There is a restriction applied in the camera server settings that limits the IP
addresses of clients allowed to connect.
Solution
This is normal operation. This situation is set up by the camera server administrator.
Situation
At connection
Message
Camera switched off or faulty.
Details
The connected camera is switched off or the RS cable is not connected.
Solution
There is a problem with the camera server (with the camera power supply or RS
cable connection).
Situation
At connection
Message
Invalid WVH file.
Details
There was an error in the information in the WVH file.
Solution
There is a coding error (WVH file) in the Web page used for video distribution, or there
is a problem on the camera server. Check with the administrator of the web page.
Situation
At disconnection
Message
Disconnected
Details
The connection time has expired or the connection was cut due to restart processing on
the camera server.
Solution
Restart your Helper Viewer.
Index
A
M
Allowing Java to be used 10
MIME type 26
B
P
Backlight adjustment 14,19,31,37
Pan scroll bar 13,16,30,33
Panorama view button 13,30
Panorama window 14,16,31,33
Performance setting 44
Presets 14,18,31,35
Proxy 11,43
C
Camera angle 16,33
Camera control 15,32
Camera control status display 15,32
Camera selection bar 13,18,30,35
Camera zoom ratio 17,34
Connection information display 40
Control privileges 15,32
R
Reduce resolution button 13,30
Relay Server 28,48
D
S
Displaying camera information 40
Download Version 24
Saving and printing still pictures 39
Setup property 42
Snapshot (still pictures) 20
Start control button 14,15,31,32
Starting protocol setting 42
Startup display size setting 45
Stopping and restarting video display 37
F
Full-screen mode 36
Appendix
G
Glimpse 6,22
Glimpse screen
T
22
Tilt scroll bar 13,16,30,33
H
V
Helper Viewer 7,24
VB Package Version 24
Video information display 40
I
Increase resolution button 13,30
J
Java Viewer 6,8,10
L
LiveApplet 6,13
LiveApplet screens 13
W
When you are connected to a LAN 11
WV-HTTP protocol 28,40,42,46
WV-TCP protocol 28,40,42,46
WVH 26,42
Z
Zoom scroll bar 13,17,30,34
55
PUB.YT1-1330-000
© CANON INC.2002