1
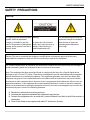
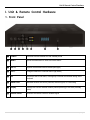
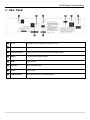
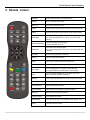
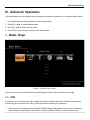
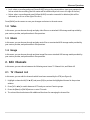
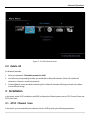
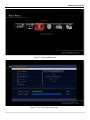
ATSC Digital Receiver v0.0.1.4 (185) 320.564.4807 User Guide mvtvwireless.com SAFETY PRECAUTIONS SAFETY PRECAUTIONS CAUTION: The lightning flash with arrowhead symbol, within an equilateral triangle, is intended to alert the user to the presence of dangerous voltage and to prevent from risk of electric shock. Warning: To reduce the risk of electric shock, don’t open the cover or cabinet. Refer servicing to qualified personnel only. The exclamation point within an equilateral triangle is intended to alert the user to important operating and maintenance (servicing). Caution: The user is cautioned that changes or modifications not expressly approved by the party responsible for compliance could void the user's authority to operate the equipment. For a Class B digital device or peripheral, the instructions furnished the user shall include the following or similar statement, placed in a prominent location in the text of the manual: Note: This equipment has been tested and found to comply with the limits for a Class B digital device, pursuant to part 15 of the FCC Rules. These limits are designed to provide reasonable protection against harmful interference in a residential installation. This equipment generates, uses and can radiate radio frequency energy and, if not installed and used in accordance with the instructions, may cause harmful interference to radio communications. However, there is no guarantee that interference will not occur in a particular installation. If this equipment does cause harmful interference to radio or television reception, which can be determined by turning the equipment off and on, the user is encouraged to try to correct the interference by one or more of the following measures: Reorient or relocate the receiving antenna. Increase the separation between the equipment and receiver. Connect the equipment into an outlet on a circuit different from that to which the receiver is connected. Consult the dealer or an experienced radio/TV technician for help i|P age SAFETY PRECAUTIONS WARNING: The STB should not be exposed to dripping or splashed liquids. No objects filled with liquids, such as vases, should be placed on the STB. WARNING: Do not put a candle or lamp on the housing, as this can cause a risk of fire. WARNING: The unit should be connected to a power supply only of the type described in the operating instructions or as marked on the unit. If you are not sure of the type of power supply to your home, consult your local dealer or power company. WARNING: Do not open the housing on this unit, as this may expose you to dangerous voltages and radiation. WARNING: The mains plug is used as the disconnect device, the disconnect device shall remain readily operable. WARNING: The battery of remote control should not be exposed excessive heat such as sunshine, fire or the like. WARNING: Maintenance personnel must use the appropriate tools and replacement parts as specified by the manufacturer. Note: Do not open the housing to avoid the unit direct exposure to radiation. Unit Cleaning: After the unit power is turned off, you can clean the housing, panel and remote control with a soft cloth lightly moistened with a mild detergent solution. Attachments: Never add any attachments and/or equipment without the manufacturer consent; as such additions may result in the risk of fire, electric shock or other personal injury. Locating: Slots and openings in the housing are provided for ventilation to protect it from overheating. Do not block these openings or allow them to be blocked by placing the STB on a bed, sofa or other similar surface, nor should it be placed over a radiator or heat register. Power Cord Protection: Place the power supply cord out of the way, where it will not be walked on. Please take special attentions to cords at plugs, convenience receptacles and the point where they exit from the unit. ii | P a g e SAFETY PRECAUTIONS Object and Liquid Entry: Never put objects of any kind into this STB through openings, as they may touch dangerous voltage points or short-out parts that could result in a fire or electric shock. Never spill any liquid on the STB. Note: Moisture may be formed inside the unit in the following conditions: When the unit is suddenly moved from a cold environment or an air-conditioned room to a warm place. Immediately after a heater has been turned on. In a steamy or very humid room. If the moisture forms inside the unit, it may not operate properly. To correct this problem, turn on the power and wait about two hours for the moisture to evaporate. Parts Replacement: When parts need to be replaced, user should make sure the service technician use the replacement parts specified by the manufacturer or having the same characteristics as the original part. Unauthorized replacement may put the unit in the risk of fire, electric shock or other hazards. Safety Check: After all the maintenances and repairs are done, user is required to request the service technician to conduct the overall safety check to ensure the machine is in the proper operating condition. iii | P a g e Table of Contents Table of Contents SAFETY PRECAUTIONS................................................................................................................ i I. Unit & Remote Control Hardware .............................................................................................. 3 1. Front Panel .................................................................................................................................... 3 2. Rear Panel...................................................................................................................................... 4 3. Remote Control.............................................................................................................................. 5 II. Basic Operations ..................................................................................................................... 6 1. Off/Standby/On Modes ................................................................................................................. 6 2. Adding Channels to Your STB ....................................................................................................... 6 3. Watching and Recording Live TV.................................................................................................. 6 3.1. Viewing Program Information ................................................................................................. 6 3.2. Controlling Playback with Timeshift....................................................................................... 8 3.3. Using the Electronic Program Guide ...................................................................................... 8 3.4. Favorite Groups ....................................................................................................................... 9 4. Recording Live Video...................................................................................................................11 4.1. Dual Tuning Capabilities .......................................................................................................11 5. Watching Recorded Video via the PVR ......................................................................................12 III. Advanced Operations ........................................................................................................... 14 1. Media Player ................................................................................................................................14 1.1. PVR.........................................................................................................................................14 1.2. Video ......................................................................................................................................15 1.3. Music......................................................................................................................................15 1.4. Image .....................................................................................................................................15 2. Edit Channels ...............................................................................................................................15 2.1. TV Channel List ......................................................................................................................15 2.2. Delete All ................................................................................................................................16 3. Installation ...................................................................................................................................16 3.1. ATSC Channel Scan ...............................................................................................................16 3.2. ATSC Auto Scan ....................................................................................................................18 4. System Setup ..............................................................................................................................18 4.1. Language ...............................................................................................................................19 1|P a g e Table of Contents 4.2. TV System ..............................................................................................................................19 4.3. Display Settings .....................................................................................................................19 4.4. Local Time..............................................................................................................................19 4.5. Timer Settings .......................................................................................................................20 4.6. Parental Lock .........................................................................................................................21 4.7. OSD Settings ..........................................................................................................................23 4.8. Favorite Groups .....................................................................................................................23 4.9. PVR Storage ...........................................................................................................................23 4.10. PVR Settings ........................................................................................................................24 4.11. Other.....................................................................................................................................24 5. Tools ............................................................................................................................................25 5.1. Information ............................................................................................................................25 5.2. Factory Settings ....................................................................................................................25 5.3. Software Upgrade by OTA .....................................................................................................26 5.4. Remove USB device safely ...................................................................................................26 6. Conditional Access......................................................................................................................27 6.1. Token Status..........................................................................................................................27 6.2. About CA ................................................................................................................................27 IV. Troubleshooting ................................................................................................................... 28 V. Technical Specifications ....................................................................................................... 30 2|P a g e Unit & Remote Control Hardware I. Unit & Remote Control Hardware 1. Front Panel 1 POWER Switches the unit between On and Standby mode 2 MENU Opens the Main Menu or exits the current menu 3 VOL +/- Adjusts volume and controls menus (left/right) 4 CH +/- Changes channels or controls menus (up/down) 5 OK Selects an item in the menu, or brings up a channel list window during video playback 6 Status LEDs Indicates whether the unit is powered, detects signal, or is recording 7 Display Displays the current channel number (while operating) or the time (Standby mode) 8 Remote Sensor Receives the remote control’s infrared signal 3|P a g e Unit & Remote Control Hardware 2. Rear Panel 1 TO TV Modulator video output (on Channel 3 or 4) 2 VIDEO Composite video output 3 OPTICAL S/PDIF Optical S/PDIF for LPCM or Bitstream audio output 4 AUDIO L/R RCA stereo audio outputs 5 HDMI HDMI output 6 ATSC IN Off-air antenna input 7 AC IN Power input 8 POWER ON/OFF Switches power on or (completely) off 4|P a g e Unit & Remote Control Hardware 3. Remote Control [POWER] Switches unit between On and Standby mode [MUTE] Mutes or unmutes audio output [EXIT TO] Exits to live TV while in a menu [LAST] Toggles between the previously selected and current channels [INFO] Shows the information and parameters of the current channel [REW ◄◄] Rewinds the current program Also cycles through speeds of x2, x4, x8, x16, and x24 while rewinding [PLAY/PAUSE ►II] Pauses or plays the current program Activates Timeshift for live TV [FFW ►►] Fast-forwards the current program. Also cycles through speeds of x2, x4, x8, x16, and x24 while fastforwarding [STOP ■] Stops recording, playback, or Timeshift. [REC ●] Starts recording current channel [PVR] Opens the Personal Video Recorder (PVR) menu [CH ▲/▼] Moves the highlight bar or changes channel up/down [VOL ◄/►] Moves the highlight bar or changes volume left/right Also jumps forward or backward in the current program [OK] Selects a program, highlight line, or parameter value. Also shows the channel list while watching TV [MENU] Used to display the Main Menu or return to the previous menu [BACK] Return to the previous menu [Yellow/AUDIO] Opens the Audio Mode window [Green/GUIDE] Opens the Electronic Program Guide (EPG) window [Blue/CC] Opens the Closed Captioning window Numeric keypad Inputs numbers and letters [Red/ZOOM] Select aspect ratio (Auto, 4:3 Letterbox, 4:3 Pan & Scan, 16:9) [FAV] Opens the Favorites window 5|P a g e Basic Operations II. Basic Operations 1. Off/Standby/On Modes Your Set Top Box (STB) has three power modes: 1. Off mode: This is when the power cable is unplugged, and/or the Power On/Off Switch on the rear panel is in the Off position. The STB will not be operational in this power mode. 2. Standby mode: This is when the power cable is plugged into a wall outlet, the Power On/Off Switch on the rear panel is in the On position, and the user has not pressed [POWER]. In Standby mode, the current time will be visible on the STB’s front panel display. 3. On mode: This is when the power cable is plugged into a wall outlet, the Power On/Off Switch on the rear panel is in the On position, and the user has pressed [POWER] on either the front of the STB or the remote control. In On mode, the STB will output video and audio to your TV and will be operational. Press the Power button while in On mode to return the unit to Standby mode. 2. Adding Channels to Your STB To add channels to your STB, navigate to the Main Menu > Installation > ATSC Installation > ATSC Auto Scan (details on how to operate the Main Menu and advanced menu functions can be found in III. Advanced Operations under 4. Installation). To begin scanning, highlight the Search option with the navigation buttons and select with [OK]. Now, the STB will start scanning channels. While the STB is scanning, you should see the progress bar and channel list fill up in the window. When scanning has completed and the Search End dialog appears, press [OK] to return to the Main Menu. 3. Watching and Recording Live TV To watch live TV, press [EXIT TO] while in any menu. 3.1. Viewing Program Information While watching a program, press [INFO] to open the information window. This window will show the current channel number, the channel ID, the title of the current and next program on the channel, the program’s video resolution and audio format, and the current date and time. It will also indicate if the STB has detected Electronic Program Guide (EPG) or Closed Captioning (CC) content. Press [INFO] again to open a window with extended EPG information, if available. Press [INFO] or [BACK] to close the window. 6|P a g e Basic Operations Figure 1: Scanning channels via ATSC Auto Scan Figure 2: Live TV with information window 7|P a g e Basic Operations 3.2. Controlling Playback with Timeshift When watching live TV, pressing [PLAY/PAUSE ►II] will start Timeshift, which allows the user to pause the current program, buffering it to an attached USB storage device. This allows the user to control live content. To use Timeshift, the Timeshift setting must be set to ON in the PVR Setting menu and a USB storage device must be attached to the STB. 3.3. Using the Electronic Program Guide Figure 3: The Electronic Program Guide window Your STB can read metadata from incoming channels, allowing it to generate an Electronic Program Guide (EPG) with detailed information about programs such as name, description, start and finish time, rating, and more. This information is provided live via your ATSC connection, and is thus dependent on each channel’s provider. To open the EPG, press [GUIDE] while watching live TV. 1. You can highlight channels with [CH ▲/▼] and navigate through past, current, and upcoming events with [VOL ◄/►]. The highlighted event’s information will be displayed in the top-left panel of the EPG window. 2. Press [Red/ZOOM] to display navigation buttons on the bottom of the EPG window. 3. Press [Green/GUIDE] to set a timer for the selected program. 4. To close the EPG window, press [BACK] or [MENU]. 8|P a g e Basic Operations 3.4. Favorite Groups Figure 4: The TV Channel List menu With your STB, you can create custom lists of channels called Favorite Groups. When watching live TV, you can switch from complete channel list (All TV) to these Favorite Groups to display only specific channels in your TV Channel List and EPG. To add channels to your Favorite Groups: 1. Open the Main Menu by pressing [MENU] and navigate to Edit Channel > TV Channel List. Pressing [VOL ◄/►] will switch between All TV and your various Favorite groups. 2. Press [FAV] on the remote. The FAV label on the bottom-left of the window should now be highlighted grey. 3. Highlight a channel with the navigation buttons, then press [OK] to bring up the Favorite Group list. 4. Highlight a Group with the navigation buttons, and press [OK] to add the channel to the selected Group. Repeat this step for every Group where you want this channel to be listed. 5. When you are finished, press [MENU] or [BACK] to return to the TV Channel List. Channels which have been assigned to Favorite groups will be indicated by a heart symbol to the left of the channel’s line. 6. Once you have finished assigning channels to Favorite Groups, press [MENU] or [BACK] to open the Save dialog. Select Yes with [OK] to save your changes. 9|P a g e Basic Operations Figure 6: Adding Channels to Favorite Groups Figure 5: Switching between Favorite Groups 10 | P a g e Basic Operations To switch between Favorite Groups: 1. Press [FAV] while watching live TV to open the Favorite window. 2. Navigate your Favorite Groups using [CH ▲/▼] and press [OK] to open the channel list of the highlighted group. 3. With [VOL ◄/►], you can switch between the complete channel list (All TV) and each Favorite Group. To switch to a channel, navigate to it with [CH ▲/▼] and select it with [OK]. 4. Press [BACK] to close the Favorite Group window. To rename your Favorite Groups: 1. Open the Main Menu by pressing [MENU] and navigate to System Setup > Favorite (keep pressing [CH ▼] until the item Favorite is visible, and press [OK] to open the menu). 2. Navigate to the Favorite Group you wish to edit with [CH ▲/▼], and select it with either [VOL ◄/►] or [OK] to open the Rename window. 3. Input letters and numbers by using the on-screen keyboard or the numeric keypad on your remote. Press [Yellow/AUDIO] to toggle Caps, and [Red/ZOOM] to delete characters. Press [Blue/CC] or highlight the OK button and select with [OK] when you are done entering the new name to return to the Rename menu. 4. Exit the Rename menu with [BACK] or [MENU] when you are finished. 4. Recording Live Video In TV mode, pressing the [REC ●] button will open a dialog asking if you would like to record the current program. Select Yes to begin recording. While the STB is recording, the uppermost status indicator LED on the front of the STB will show a solid red light. You must have a Verimatrix smartcard and a USB storage device inserted into the unit in order to enable recording. PVR functionality requires an active subscription from your service provider. While recording a program, pressing the [STOP ■] button will open a window asking: “Stop recording: [Name of Channel]?”. Select Yes to end recording, or No to close the window. You may also set timers for recording future programs in the EPG or the Timer Settings menu. In the EPG, pressing [Red/ZOOM] while highlight a program will bring up a Timer window for that program (you can also reach this window by pressing [Red/ZOOM] in a program’s Information window in the EPG). In the Timer Settings menu, you can change currently scheduled timers, as well as create new timers manually (up to 8 timers total are supported). For how to configure timer settings, look in III. Advanced Functions under 4.5 Timer Settings. 4.1. Dual Tuning Capabilities Your STB has two ATSC tuners, allowing you to watch one program live while simultaneously recording another program. 11 | P a g e Basic Operations Because your service provider is providing subscription-based services, and the STB must always be authorized to receive these services, at least one tuner must be tuned to a channel that is provided directly from your service provider at all times. Therefore, you cannot simultaneously watch and record two programs that are not from your service provider. 5. Watching Recorded Video via the PVR To play and modify recorded programs, press [PVR] on the remote or navigate to the Main Menu > Media Player > PVR. Highlight a program with [CH ▲/▼] and select with [OK] to begin playback. Details on how to operate other functions of the PVR can be found in III. Advanced Operations under 1.1. PVR. While playing a recorded program, press [PLAY/PAUSE ►II] to pause the program. Press again to continue playback. To navigate forward and backward, use [REW ◄◄] and [FFW ►►]. While controlling playback, the Video navigation window will appear and display program information as well as your current progress (indicated by a green vertical marker) and the speed of the recorded media. While this window is visible, you can use [VOL ◄/►] to navigate along the progress bar. An orange vertical marker will appear and move horizontally in the interval set for the Jump setting under Main Menu > PVR Setting. Press [OK] to jump to the point indicated by the orange marker. To return to the PVR menu, play the recording until it ends or press [STOP ■] to stop playback. Figure 7: The PVR menu 12 | P a g e Basic Operations Figure 8: Recorded video with the video navigation window 13 | P a g e Advanced Operations III. Advanced Operations In the Main Menu, you can configure the unit and perform advanced operations. To access the Main Menu: 1. Press [MENU] during video playback to enter the Main Menu 2. Press [VOL ◄/►] to switch between tabs. 3. Press [CH ▲/▼] to select the menu item. 4. Press [OK] to open the menu screen for the selected item. 1. Media Player Figure 9: The Media Player menu In this menu, you can choose between the following menu items: PVR, Video, Music, and Image. 1.1. PVR In this menu, you can browse through and play previously recorded content from the USB storage device provided by your service provider. Also, you can perform the following file operations: • Rename: select a recording and press [Red/ZOOM] to bring up the rename text box. Input the desired name using the number keys on the remote, and press [Yellow/AUDIO] to confirm the new name. 14 | P a g e Advanced Operations • Lock: select a recording and press [Green/GUIDE] bring up the password box. Input your password to lock or unlock the recording (the lock status will be indicated by a lock icon to the right of the line) • Delete: select a recording and press [Yellow/AUDIO] to mark or unmark it for deletion (this will be indicated by an X icon to the right of the line.) Press [BACK] on the remote to save your changes and return to the main menu. 1.2. Video In this menu, you can browse through and play video files on an attached USB storage media provided by your service provider, and perform basic file operations. 1.3. Music In this menu, you can browse through and play music files on an attached USB storage media provided by your service provider, and perform basic file operations. 1.4. Image In this menu, you can browse through and view image files on an attached USB storage media provided by your service provider, and perform basic file operations. 2. Edit Channels In this menu, you can choose between the following menu items: TV Channel List, and Delete All. 2.1. TV Channel List In this menu, you can edit the channels which have been scanned by the STB (see Figure 4). 1. Highlight a channel with [CH ▲/▼] and press [OK] to preview the highlighted channel in the preview window. 2. Press [VOL ◄/►] to switch between All TV and your various Favorite groups. 3. Press the [Menu] or [BACK] buttons to enter TV mode. 4. The colored function buttons offer additional functions for managing the channel list. 15 | P a g e Advanced Operations Figure 10: The Edit Channels menu 2.2. Delete All To delete all channels: 1. Enter your password. The default password is 0000. 2. You will see a prompt asking whether you would like to delete all channels. Select OK to delete all channels or Cancel to cancel the operation. 3. Pressing [Menu] at any time before selecting OK to delete all channels will bring you back to the Menu screen without saving. 3. Installation In this menu, select ATSC Installation with [OK] to display the following menu items: ATSC Channel Scan, and ATSC Auto Scan. 3.1. ATSC Channel Scan In this menu, you can manually scan channels into the STB by setting the following parameters: 16 | P a g e Advanced Operations Figure 11: The Installation menu Figure 12: The ATSC Channel Scan menu 17 | P a g e Advanced Operations • Scan Mode: Use [VOL ◄/►] to choose between the following scan methods: o By Channel: This option will allow you to edit the Channel No. option in this menu. Once you’ve highlighted the Channel No. option, use [VOL ◄/►] to cycle through the each channel detected by the STB. o This option will allow you to edit the Frequency option in this menu. Once you’ve highlighted the Channel No. option, use [VOL ◄/►] to cycle through frequencies in 1 KHz increments. Highlight Search and select with [OK] to begin scanning. 3.2. ATSC Auto Scan Refer to the information in II. Basic Operations under 2. Adding Channels to Your STB on how to operate this menu. 4. System Setup Figure 13: The System Setup menu In this menu, you can choose between the following menu items: Language, TV System, Timer Setting, OSD Setting, Parental Lock, Power Setting, TCP/IP Setting and MAC Setting. 18 | P a g e Advanced Operations 4.1. Language In this menu, you can change the following settings: 1. Menu Language: Use [VOL ◄/►] to choose between English and Spanish for the language of system menus. 2. First Audio: Use [VOL ◄/►] to choose between the following languages for the default language of program audio: English, French, German, Italian, Spanish, Portuguese, Russian, Turkish, Polish, Arabic, and Persian. 3. Second Audio: Use [VOL ◄/►] to choose the fallback language for program audio if the First Audio language is not offered (the options are the same for First Audio). If the channel does not offer the First Audio language, the STB will play the Second Audio language by default if available. If the channel does not offer a language which corresponds with either setting, then the default language of the current channel will be played. 4.2. TV System In this menu, you can change the following settings: 1. Video Resolution: In SD Mode, you can choose between: Auto, PAL, PAL-M, PAL-N and NTSC. In HD Mode, you can choose between: Auto / 720P_60 / 1080I_30. Press [VOL ◄/►] to switch to the desired mode. 2. Aspect Mode: You can choose between Auto / 4:3 PS / 4:3 LB / 16:9 using [VOL ◄/►]. 3. RF Channel: You can set the output channel for the TV modulator output to either 3 or 4 using [VOL ◄/►]. 4. Digital Audio Output: You can choose between LPCM (Linear Pulse Code Modulation) or BS (Bitstream) output using [VOL ◄/►]. 4.3. Display Settings In this menu, you can change the following settings: Brightness, Contrast, Saturation, Hue, and Sharpness. 4.4. Local Time In this menu, you can change the following settings: 1. Time Zone: Use [VOL ◄/►] to switch between the following US time zones: Eastern, Central, Mountain, Pacific, Alaska, and Hawaii. 2. GMT Usage: Use [VOL ◄/►] to switch between On and Off. When set to On, time is determined automatically through your ATSC connection. When set to Off, time must be entered manually in Date and Time settings in this menu. 3. GMT Offset: Use [VOL ◄/►] to manually set the time zone offset. When GMT Usage is set to On, this 19 | P a g e Advanced Operations setting is determined automatically from the Time Zone setting, though it can still be adjusted manually. 4. Date: Use [VOL ◄/►] and the numeric keypad on the remote to manually set the date if GMT Usage is set to Off. 5. Time: Use [VOL ◄/►] and the numeric keypad on the remote to manually set the time if GMT Usage is set to Off. 6. Daylight Savings Time: Use [VOL ◄/►] to switch between On and Off. Figure 14: The Local Time menu 4.5. Timer Settings In this menu, you can set up to 8 independent timers for either playing a channel or recording a program. Select a timer with [OK] to open the Timer Setting window for that timer. 1. Timer Mode: Choose with [VOL ◄/►] whether the timer runs Once or Daily, or switch the timer Off. 2. Timer Function: Choose with [VOL ◄/►] whether the STB will Switch to the specified Channel at the Wakeup Date and Time, or Record it. 20 | P a g e Advanced Operations Figure 15: The Timer Settings menu 3. Wakeup Channel: Press [OK] to enter the channel list, and highlight the channel you want to activate with the timer with [CH ▲/▼]. Select with [OK] to confirm. 4. Wakeup Date: Use the numeric keypad on your remote to input the date on which the timer will activate. 5. On Time: Use the numeric keypad on your remote to input the time at which the timer will activate. At the specified date and time, the STB will begin to play or record the channel selected for Wakeup Channel. 6. Duration: This is the length of time which the unit will play or record the set channel when the timer is activated. The minimum duration unit is one minute. Once you are finished, navigate to [Save] and select with [OK] to confirm your settings. Press [Cancel] to leave the Time Setting menu without saving your settings. 4.6. Parental Lock In this menu, you can set a password for anyone who wishes to operate the Installation menu. You can also set a password to lock channels. Before opening this menu, you must input the current password for the STB using the numeric keypad on the remote. The default password is 0000. Once the correct password is entered, the menu will open and you will be able to change the following settings: 1. Menu Lock: If Menu Lock is set to Yes, then you will need to enter a password every time you open the Main Menu. If set to No, then you will not need a password to access the Main Menu. 21 | P a g e Advanced Operations 2. U.S. TV Rating (V-Chip): Select with [OK] to open the U.S. TV Rating (V-Chip) menu. Here, you can set which V-Chip ratings will trigger the STB’s lock function, requiring the viewer to enter the current STB password to continue playback. You will see a table which shows the settings which are currently locked, as indicated by the Lock symbol. You can toggle the lock for a cell by navigating to that cell using the navigation buttons and selecting with [OK]. Figure 16: The U.S. TV Rating (V-Chip) menu The table has the following rows for each TV rating: TV-Y, TV-Y7, TV-G, TV-PG, TV-14, and TV-MA. Visit http://www.tvguidelines.org/ for more information on these ratings. The columns of this table are for six types of settings which the STB can lock if the current program has a particular TV rating, and are labeled as such: • Age: When set to Lock, the STB will lock whenever any content with that row’s TV rating or greater (i.e. more mature) is detected. Selecting this box with [OK] will automatically toggle the Lock for the current row and every row beneath. • FV: When set to Lock, the STB will lock whenever content with Fantasy Violence is detected during programs with that row’s TV rating. • V: When set to Lock, the STB will lock whenever content with Violence is detected during programs with that row’s TV rating. • S: When set to Lock, the STB will lock whenever content with Sex is detected during programs with that row’s TV rating. • L: When set to Lock, the STB will lock whenever content with Language is detected during programs 22 | P a g e Advanced Operations with that row’s TV rating. • D: When set to Lock, the STB will lock whenever content with suggestive Dialogue is detected during programs with that row’s TV rating. Press [MENU] or [BACK] to return to the Parental Lock menu, 3. MPAA: Select with [OK] to open the MPAA menu. You will see a table which shows the MPAA ratings which are currently locked. Navigate between cells using [CH ▲/▼] and toggle the Lock using [OK]. The MPAA ratings available are G, PG, PG13, R, NC17, X, and NR. Visit http://www.mpaa.org/ for more information on these ratings. 4. New Password: Here, you can change the existing password. To change the password, input the desired password into the New Password and the Confirm Password fields using the numeric keypad on the remote. When you have inputted an identical password into both fields, a window will open confirming that the change was successful. Pressing [OK] will return you to the Main Menu. 4.7. OSD Settings In this menu, you can change the following settings: 1. OSD Timeout: This setting determines the duration the info window is displayed on the screen when you change channels. Press [VOL ◄/►] to set the time between 1 to 10 seconds. 2. OSD Transparency: This setting determines the transparency of the menus above currently playing content. Press [VOL ◄/►] to cycle between 10%, 20%, 30%, 40% and Off. 3. Press [BACK] button to leave the OSD Setting menu. 4.8. Favorite Groups In this menu, you can rename the Favorite Groups on the STB. Use [CH ▲/▼] / [VOL ◄/►] or the numeric keypad on the remote to select and input characters, and press [OK] to confirm the changes. Once you have inputted the desired name, click the [OK] button to confirm. Press [BACK] on the remote to exit without saving a new name. 4.9. PVR Storage In this menu, you can view information and perform operations on the attached USB storage device. • Press [VOL ◄/►] to switch between partitions to view. • Format: press [Yellow/AUDIO] to open the Format window. Select OK to format the selected partition, completely erasing all existing data. 23 | P a g e Advanced Operations • DVR Set: press [Blue/CC] button to open the DVR Set window. For DVR Type, choose between Record, Timeshift, and REC & TMS (Record & Timeshift) using [VOL ◄/►]. Select the OK button to confirm. Figure 17: The PVR Storage menu 4.10. PVR Settings In this menu, you can change the following settings: Timeshift: Use [VOL ◄/►] to switch between ON or OFF. Jump: Use [VOL ◄/►] to switch between 1 min, 5 min, 10 min, 30 min, and 30 sec for the jump interval when using [VOL ◄/►] while the Video navigation window is visible. 4.11. Other In this menu, you can change the following settings: • Channel Play Type: Switch between All, Free and Scrambled using [VOL ◄/►]. • Beeper: Switch between On or Off using [VOL ◄/►]. • Auto Standby: Switch between On or Off using [VOL ◄/►]. 24 | P a g e Advanced Operations 5. Tools Figure 18: The Tools menu In this menu, you can choose between the following menu items: Information, Factory Setting, S/W Upgrade by OTA, Upgrade By USB, and Remove USB Device Safely. 5.1. Information In this menu, you can view information about the STB. 5.2. Factory Settings In this menu, you can restore all settings on your STB to their factory defaults. After entering your password (the default password is 0000), answer Yes for the next prompt to factory reset the STB. 25 | P a g e Advanced Operations 5.3. Software Upgrade by OTA Figure 19: The Software Upgrade by OTA menu In this menu, you can upgrade your STB via ATSC over the air (OTA). To do so: 1. Select ATSC OTA with [OK]. This will open the ATSC OTA window. 2. Set the Frequency provided by the manufacturer using [VOL ◄/►] or the numeric keypad. 3. Set the Download PID provided by the manufacturer using [VOL ◄/►] or the numeric keypad. 4. Highlight to the Start option and select with [OK] to begin download. 5.4. Remove USB device safely In this menu, can safely eject attached USB devices from the STB so they can be removed without the risk of corrupting storage data. To safely remove your USB device: 1. Select the partition of the device you would like to eject with [VOL ◄/►]. 2. Select OK to eject the device. Select Cancel or press [MENU] or [BACK] to leave the menu without ejecting the device. 3. Physically remove the USB device from the STB. 26 | P a g e Advanced Operations 6. Conditional Access Figure 20: The Conditional Access menu In this menu, you can choose between the following menu items: Token Status, and About CA. If the smartcard is not being read properly, these menu items will be greyed out 6.1. Token Status In this menu, you can find information about current tokens status. This information may assist a technician while troubleshooting. 6.2. About CA In this menu, you can find information about the currently inserted smartcard. This information may assist a technician while troubleshooting. 27 | P a g e Troubleshooting IV. Troubleshooting If you run into problems with the STB, use the procedures described below to troubleshoot your unit. If you can’t solve your problem after following these procedures, please contact the dealer. Under any circumstances, do not open the STB cover, as it will void the warranty and could cause electrical shock. Problem Possible Cause Solution The front panel doesn’t display any numbers or text The power cord is not plugged in and/or the Power switch on rear panel is set to Off. Check that the power cable is plugged in to the wall outlet and the STB and that the Power switch on rear panel is set to On. No picture or sound Wrong connection of the audio/video output of the STB to TV. Reconnect the audio/video output of the STB to TV using the proper connection. No signal/bad signal message appears. Check other devices connected between the cable connection and the STB. Audio is muted Press the MUTE button. TV power is off Turn your TV on Wrong TV input Make sure the TV has been set to the correct video input. For example, if you have connected the unit to the Video 1 input of the TV, then you need to select the corresponding input of the TV. Usually this is done using the AV or Input button of the TV’s remote. The STB can’t receive the signal. Check the cable, replace the cable or connect the cable to the STB tightly. Incorrect values of some tuner parameters. Set the values of tuner parameters correctly. Refer to the installation menu. The signal of current TV channel is too weak. Try other channels with stronger signals. If the problems still exist, please consult your local dealer or installer for technical service. The batteries of the remote control are depleted, or have not been inserted properly. Check whether the batteries are inserted correctly in your remote control. No picture The remote control does not work Check and replace the batteries of the remote control. 28 | P a g e Troubleshooting Recording does not work. The smartcard is not inserted properly. Remove and insert the smartcard with the chip side facing up. No USB storage device is detected. Open the Remove USB Device Safely menu (under the Main Menu > Tools). If the USB device is listed, select OK to safely eject the device, unplug it from the USB port, and plug it back it. The USB storage device is full. Delete media from the USB device via the Media Player menu (PVR, Video, Music, Image). 29 | P a g e Technical Specifications V. Technical Specifications DECODING Video Decoder: MPEG4 compliant support SP@L3 to ASP@L5, MPEG2 MP@HL,MPEG1 Decoding Format: NTSC/PAL Aspect Ratio: 4:3, 16:9, AUTO Resolution (CVBS): 720x480 (NTSC), 720x576 (PAL) Resolution (HDMI): SD: 720x480 @ 30fps; 720x576 @ 25fps HD: 480p, 576p, 720i, 720p, 1080i Audio Decoding: MPEG 1, Layer 2, and AC3 Audio Modes: Mono / Left / Right / Stereo TUNER RF Input Range: 54 MHz ~ 864 MHz Sensitivity: -5 dBm ~ -83 dBm Input Connector: F-type, female, 75 Ohm Demodulation: 8/16-VSB, ITU-T J.83 Annex B 64/256 QAM Payload Data Rate: 19.4 Mbps (6 MHz) RF MODULATOR Output Channel: CH 3 - 4 TV Standards: NTSC-M RF Connector: F-type, female, 75 Ohm FRONT PANEL Display: 4-digit LED display Buttons: 7: Standby, CH+, CH-, VOL+, VOL-, MENU, OK PHYSICAL CONNECTIONS RCA: 1 RCA for VIDEO: CVBS 2 RCA for AUDIO (L/R) HDMI: A Type, compliant HDMI 1.3 OPTICAL: S/PDIF 30 | P a g e Technical Specifications USB: A Type, USB2.0 Smartcard: Verimatrix POWER SUPPLY Type Switching Mode Input Voltage 100 to 240V, 50/60Hz Consumption Max. 15W Protection Internal Fuse PHYSICAL SPECIFICATIONS Size: (W x H x D) 10.8” x 8.6” x 2.1” Net weight: 3 lbs. Operation Temp.: 32° - 104° F Storage Temp.: -4° - 140° F 31 | P a g e