1
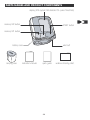
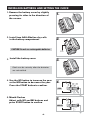
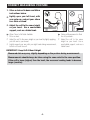
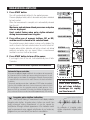
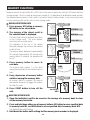
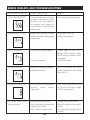
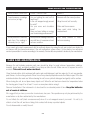
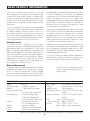
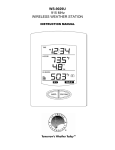
Model WS-820
WRIST BLOOD PRESSURE MONITOR
INSTRUCTIONS
CONTENTS
ENGLISH
Page
Page
PARTS NAMES AND PRODUCT COMPONENTS . . . 2
MEASURING METHOD . . . . . . . . . . . . . . . . . . . . . 8
PRECAUTIONS FOR USE . . . . . . . . . . . . . . . . . . . 3
MEMORY FUNCTION . . . . . . . . . . . . . . . . . . . . . . 9
INSTALLING BATTERIES AND SETTING THE
CLOCK . . . . . . . . . . . . . . . . . . . . . . . . . . . . . . . 4-5
ERROR DISPLAYS AND TROUBLESHOOTING 10-11
WRAPPING THE CUFF AROUND YOUR WRIST . . . 6
BASIC PRODUCT INFORMATION . . . . . . . . . . . . 12
WARRANTY. . . . . . . . . . . . . . . . . . . . . . . . . . . 13
CORRECT MEASURING POSTURE . . . . . . . . . . . . 7
INSTRUCTIONNES
CONTENIDO
CARE AND MAINTENANCE . . . . . . . . . . . . . . . . 11
ESPANÍL
P‡gina
P‡gina
PARTES Y COMPONENTES DEL PRODUCTO . . . 13
MƒTODO DE MEDICIîN . . . . . . . . . . . . . . . . . . . 16
PRECAUCIONES DE USO . . . . . . . . . . . . . . . . . . 13
FUNCIONES DE LA MEMORIA . . . . . . . . . . . . . . 18
INSTALACIîN DE LAS BA TERÍAS Y P
ROGRAMACIîN DEL RELOJ . . . . . . . . . . . . . . 14
PANTALLAS DE ERROR Y RESOLUCIîN DE
PROBLEMAS . . . . . . . . . . . . . . . . . . . . . . . . . . . 19
COLOCACIîN DEL MANGUIT O ALREDEDOR DE
LA MU„ECA . . . . . . . . . . . . . . . . . . . . . . . . . . . . 15
CUIDADO Y MANTENIMIENTO . . . . . . . . . . . . . . 20
POSICIîN CORRECT A PARA LA MEDICIîN . . . 15
INSTRUCTIONS
TABLE DES MATIéRES
INFORMACIîN BçSICA DEL PRODUCT O . . . . . 21
FRENCH
Page
Page
NOMS DES ƒLƒMENTS ET COMPOSANTS DU
PRODUIT . . . . . . . . . . . . . . . . . . . . . . . . . . . . . . 23
MƒTHODE DE MESURE . . . . . . . . . . . . . . . . . . . . 26
PRƒCAUTIONS D'USAGE . . . . . . . . . . . . . . . . . . 23
AFFICHAGES ERREUR ET DƒPANNAGE . . . . . . . 29
INSTALLER LES PILES ET RƒGLER L'HORLOGE ... 24
FIXER LE BRASSARD AUTOUR DE VOTRE POIGNET
. . . . . . . . . . . . . . . . . . . . . . . . . . . . . . . . . . . . . . . 25
POSTURE DE MESURE CORRECTE . . . . . . . . . . . 25
Prevention® is a registered trademark of
RODALE INC.
© 2005 RODALE INC.
All Rights Reserved
Produced under license by Mark of Fitness, Inc .
FONCTION MƒMOIRE . . . . . . . . . . . . . . . . . . . . . 28
ENTRETIEN ET MAINTENANCE . . . . . . . . . . . . . 30
INFORMATIONS GƒNƒRALES SUR LE PRODUIT
. . . . . . . . . . . . . . . . . . . . . . . . . . . . . . . . . . . . . . . 31
PARTS NAMES AND PRODUCT COMPONENTS
display (SYS:systolic DIA:diastolic PUL:pulse Time/Date)
memory M2 button
START button
memory M1 button
battery cover
carrying case
instruction manual
wrist cuff
quick guide
-2-
wellness tracking chart
PRECAUTIONS FOR USE
Do not use this instrument without your doctor's consultation if
you are under dialysis therapy or on anticoagulants, antiplatelets or
steroids. Use of this instrument under such conditions could cause
internal bleeding.
For specific information on your blood pressure, contact your
doctor. Never make any judgement on your own regarding
measurment results.
Use of this device in areas near portable phones, microwave
ovens or other devices with strong electromagnetic fields may
cause malfunctions.
Do not execute repeated measurements. This will cause
engorgement of the wrist, and correct values will not be obtained.
-3-
INSTALLING BATTERIES AND SETTING THE CLOCK
1. Remove the battery cover by slightly
pressing its sides in the direction of
the arrows.
1.
2. Install two AAA Alkaline dry cells
in the battery compartment.
2.
CAUTION! Do not use rechargeable batteries.
3. Install the battery cover.
AAA
3.
Clock can be set only after the batteries
are reinstalled.
4. Use the M1 button to increase the year
or the M2 button to decrease the year.
Press the START button to confirm.
4.
YEAR
5. Month Flashes
Adjust with M1 and M2 buttons and
press START button to confirm.
5.
MONTH
-4-
INSTALLING BATTERIES AND SETTING THE CLOCK
6. Day flashes.
Adjust with M1 and M2 buttons and press START
button to confirm.
6.
DAY
7. Hour flashes.
The clock operates in 24-hour mode.
Adjust with M1 and M2 buttons and press START
button to confirm.
7.
8. Minute flashes.
Adjust with M1 and M2 buttons and press START
button to confirm.
The clock is set and the unit is turned off.
8.
Since neither the device nor
batteries are household waste,
follow your national/local recycling
rules and dispose of them at
appropriate collection sites.
HOUR
MINUTE
Battery replacement indication
Replace all the batteries when the battery replacement
indication appears on the display or nothing is
displayed when START button is depressed.
Fresh AAA alkaline dry cells will last for approximately 300
measurements.
-5-
WRAPPING THE CUFF AROUND YOUR WRIST
1. With the palm of your left hand up, put the cuff
on your wrist so that the display screen is on
the same side as your palm.
If it is impossible to put the cuff on your left wrist, use your
right wrist for measurement.
1/4"~1/2"
(5mm~10mm)
2. Adjust the cuff, with your palm up, until its top
edge is positioned 1/4" to 1/2" (5 mm to 10 mm)
from the bottom of your palm. Place the unit at
the center of your wrist.
3. Fasten the cuff around your wrist so that there is
no space between the cuff and your wrist. The
cuff should fit snugly. Press the surface of the cuff
to make sure the hook and loop attach securely.
Position the cuff directly the skin. Take care that your clothes
are not caught by the cuff.
-6-
√
CORRECT MEASURING POSTURE
1. Sit on a chair or lie down and follow
instructions below.
√
2. Lightly open your left hand, with
your palm up, and put your elbow
on a table or stand.
3. Adjust the cuff to the same height
as your heart. Use a comfortable
support, such as a folded towel.
When There Is No Table Available
Taking a Measurement in Bed
1. Sit on a chair.
1. Lie on your back.
.
2. Adjust the cuff to the same height as your heart by lightly applying 2. Adjust the cuff to the same
your left arm to your breast.
height as your heart. Use a
3. Lightly support your arm with your right hand during measurement,
comfortable support, such as a
but do not touch the cuff.
folded towel.
IMPORTANT! Keep Cuff At Heart Height
Measured data may vary slightly depending on the posture during measurement.
Measurements should always be taken using the same wrist in the same position.
If the cuff is lower (higher) than the heart, the measured reading tends to become
larger (smaller).
-7-
MEASURING METHOD
1. Press START button.
The cuff is automatically inflated to the applied pressure.
Pressure (displayed value) starts to decrease and pulse is indicated
by heart symbol.
When the measurement is complete, air is automatically released
from the cuff.
Maximum and minimum blood pressures and pulse
rate are displayed.
Heart symbol flashes when pulse rhythm detected
during measurement was irregular.
2. Press either one of memory buttons, M1 or M2,
and the result is stored in the selected bank.
The selected memory bank number is shown on the display. The
result is stored in the bank selected when the unit is turned off.
Irregular pulse rhythm indication will not be stored, only blood
pressure and pulse rate are stored. When a measurement
resulted in an error, it will not be stored.
3. Press START button to turn off the power.
If you forget to turn off the unit, it will automatically turn off after
3 minutes.
DEFLATION MARK
INFLATION MARK
PULSE RATE MARK
SYSTOLIC mmHg
DIASTOLIC mmHg
PULSE RATE BPM
IRREGULAR
PULSE RHYTHM
Wait 2 -3 minutes between repeated measurements.
Automatic Repressurization
If the pressure applied is judged insufficient in the early phase of measurement
or if movement of the hand or wrist occurs during measurement, the unit
will inflate again to a level about 40 mmHg higher. Automatic Repressurization
is repeated until a measurement is made. However, this does not indicate
a problem.
To manually control pressurization, hold down START button immediately
after the start of inflation and release it when the pressure reaches the level
50 mmHg higher than the expected maximum systolic pressure. If the
pressure value has exceeded 180 mmHg, the inflation will stop when the
key is released. Pressure can be increased to approximately 300 mmHg.
Irregular pulse rhythm indication
Heart symbol flashing in measurement result display indicates
irregular pulse rhythm. Irregular pulse rhythm can result from
body movement during measurement or can be caused by
arrhythmias. Although constant appearance of the indication under
quiet measurements may suggest arrhythmias, do not make any
judgment on your own before your doctor's consultation.
-8-
MEMORY
BANK
NUMBER
To stop measurement
Press START button and
the unit stops inflation,
discharges air rapidly,
and then turns off.
regular pulse rhythm
An example of irregular pulse
ryhthm compared to regular pulse
rhythm
MEMORY FUNCTION
Measured result is stored in either M1 or M2. Each of two memory banks can hold up to 30 results and their
running average. When the number of measurements exceeds 30, the oldest data will be deleted to record new data.
Use separate memory banks to track results of you and a friend or family member, or use one memory bank
to store morning results and the other to store evening results.
.
RECALLING STORED DATA
1. Press memory M1 button or memory
M2 button to see stored data.
2. The average of the stored result in
the selected bank is displayed.
The latest result stored is displayed when there
is only a single result. The clock displays
when there are no results stored.
The indication at the top of the display
alternately changes from memory data number
to date to time .
The memory data is displayed for approximately
30 seconds. Approximately 30 seconds after
memory button is released, the apparatus will
turn off.
3. Press memory button to move to
next data.
The memory data number 1 is the latest
among the stored data in the selected memory
bank.
SYSTOLIC mmHg
DIASTOLIC mmHg
AVERAGE
NUMBER OF
STORED DATA
PULSE RATE BPM
MEMORY DATA
NUMBER
LATEST DATA
DATE month/day
TIME
4. Every depression of memory button
switches among the memory data.
As memory button is pressed, the memory
data number increases; the bigger the number,
the older the result.
5. Press START button to turn off the
unit.
OLDEST DATA
2nd LATEST
DATA
DELETING STORED DATA
1. Show the individual result to be erased or the average of a memory bank to clear
all the memory bank data.
2. Press and hold down either one of memory buttons: M1 button to erase specified data
in memory bank M1, and M2 button to erase specified data in memory bank M2.
The displayed data starts flashing.
3. Hold down the button until nothing but the memory bank number is displayed.
-9-
ERROR DISPLAYS AND TROUBLESHOOTING
ERROR SYMOL / SYMPTOM
CAUSE / CHECK POINT
REMEDY
OVER-PRESSURIZATION
The pressurization was not enough
to make a measurement even
though the cuff was inflated to
the maximum value because of
wrist movement or talking during
measurement.
Do not move during measurement.
MEASUREMENT ERROR
Measurement could not be made
because of moving or talking during
measurement.
Being quiet and still
during measurement.
INFLATION ERROR
The cuff is not properly applied.
Properly apply the cuff. If Err-2
appears after re-trying to apply
the cuff properly, assume the cuff
is damaged.
Contact your dealer.
The cuff is damaged.
DEFLATION ERROR
Movement or talking was detected
during measurement.
Turn off the power and make
another measurement while being
quiet and still.
IMPROPER OPERATION
START button was accidentally
pressed
during
battery
replacement.
Press START button once to turn
off the power and press it again
to start a measurement.
No display when START
button is pressed.
Have the batteries run down?
Have the batteries polarities been
positioned incorrectly?
Are the battery terminals clean?
Replace them with new ones.
Reinsert the batteries in the correct
position.
Clean the battery terminals with a
dry cloth.
-10-
ERROR DISPLAYS AND TROUBLESHOOTING
ERROR SYMOL / SYMPTOM
CAUSE / CHECK POINT
REMEDY
Cannot measure or readings
are too low (or high).
Are you holding the wrist cuff at
heart level?
Is the cuff wrapped snugly around
the wrist?
Are your arms and shoulders
tense?
Have you been talking or moving
your hands during measurement?
Measure with the correct posture.
Blood pressure readings constantly
vary with time of measurement and
nervous condition.
Take deep breaths to relax
before measuring.
Blood pressure is different
each time. The reading is
extremely low (or high).
Wrap the wrist cuff correctly.
Relax and then measure.
Keep quiet while taking the
measurement.
If you cannot get correct measurement with the methods above, stop using the unit and contact your dealer. Do
not tamper with the internal mechanism. If the unit malfunctions, please return it to the dealer or an authorized
service representative for service according to the warranty. Service data are provided to dealers by the manufacturer.
CARE AND MAINTENANCE
Because the unit includes precision parts, care should be taken to avoid extreme temperature variations,
humidity, shock, dust, and direct sunlight. Do not drop or strike the unit. Make sure not to expose the unit to
moisture. This unit is not water resistant.
Clean the body with a cloth moistened with water and a mild detergent, and then wipe dry. Do not use gasoline,
paint thinner, or other strong solvents. Since the cuff may absorb perspiration and other fluids, inspect it for stain
and discoloration after each use. When cleaning the cuff, use a synthetic detergent and gently rub the surface.
When storing the unit, do not place heavy objects on it. When the unit has been stored at a temperature below
the freezing point, keep it for at least 1 hour in a warm place before using it.
Remove the batteries if the instrument is to be stored for an extended period of time. Keep the batteries
out of reach of children.
We suggest that you have your monitor checked every two years. This operation may only be performed by the
manufacturer or by firms authorized by the manufacturer.
Do not inflate the cuff (start a measurement) when it is not wrapped around your wrist. Do not try to
stretch or twist the cuff, and do not bring it into contact with sharp or pointed objects.
Do not disassemble or modify the unit.
-11-
BASIC PRODUCT INFORMATION
This manual is intended to assist the user in the safe and
efficient operation of the Model WS-820 Automatic Digital
Electronic Wrist Blood Pressure Monitor. The product must
be used in accordance with the procedures contained in this
manual and must not be used for purposes other than those
described herein. It is important to read and understand the
entire manual.
cuff produced by the expansion and contraction of the arteries
in the wrist in response to each heart beat. The amplitude of
each pressure wave is measured, converted to millimeters of
mercury, and displayed on the LCD as a digital value.
Responding to heart beats, the electromagnetic deflation control
valve maintains the constant deflation rate irrespective of
differences in wrist size. A memory circuit stores the 30 most
recent measurements for comparison.
The user is cautioned that the system may fail to yield specified
measurement accuracy if operated or stored in temperature
or humidity conditions outside the limits stated in the
specifications section of this manual. To insure that accuracy
is maintained, compare readings obtained with the WS-820
system with values measured by a trained observer using a
manual sphygmomanometer at least every two years .
Indications for Use
The WS-820 system is intended for the non-invasive
measurement of systolic and diastolic blood pressure and
determination of pulse rate in adult patients, i.e., ages 15 and
above. The product is recommended for use by patients with
labile (unstable) blood pressure or known hypertension in a
home care environment as an adjunct to medical management.
The cuff will accommodate a wrist circumference range of
approximately 4.9 to 8.5 inches (125 to 215 mm). Pressure
is measured over a range of 0 to 300 mmHg and pulse rate
over a range of 40 to 160 beats/minute.
Method of Measurement
This product employs the oscillometric method for measurement
of blood pressure and pulse rate. The entire system, including
the cuff, is a single wrist-mounted unit. The cuff is wrapped
around the wrist and automatically pressurized. Circuits within
the cuff sense the small oscillations in pressure against the
Accuracy was evaluated during clinical studies in which results
with the WS-820 system were compared with simultaneous
auscultatory measurements obtained with a standard
sphygmomanometer. In these studies, the onset of the fourth
Korotkoff sound was taken as the diastolic pressure for the
purpose of determining overall efficacy. A copy of this study
is available from the manufacturer on request.
Blood pressure measurements determined with this device
are equivalent to those obtained by a trained observer using
the cuff stethoscope auscultation method, within the limits
prescribed by the American National Standard, Electronic or
Automated Sphygmomanometers.
The WS-820 system has the ability to function according to its
specifications in the presence of common arrhythmias such
as atrial or ventricular premature beats or atrial fibrillation.
WS-820 meets the stringent requirements
of German Hypertension League to carry its
quality marking.
SPECIFICATIONS
Model
: WS-820
Operating Principle : Oscillometric method
Indicator
: 12 digit Liquid Crystal Display
Pressure Indication Range
: 0 to 300 mmHg (cuff pressure)
Measuring Range
: 50 to 250 mmHg (systolic)
: 40 to 180 mmHg (diastolic)
: 40 to 160 pulses/min (pulse rate)
Accuracy
: ±3 mmHg (cuff pressure)
: ±5 % of reading (pulse rate)
Inflation
: Automatic (air pump)
Deflation
: Automatic (electric control valve)
Exhaust
: Automatic quick exhaust valve
Power Supply
:
Memory
:
Applied Pressure
:
Operating Environment :
Storage Environment :
Cuff
Type
Wrist circumference
Main Unit
Size
Weight
:
:
:
:
2 AAA alkaline (LR03) dry cells
30 measurements x2 and averages
190 mmHg (fixed)
+50-F to+104-F, 15 to 90% relative
humidity
4-F to+122-F, 15 to 95% relative
humidity
Pre-formed type cuff
Approx. 4.9 to 8.5 in.
2.5(W) x 2.8(H) x 1.3(D) in.
Approx. 3.6 oz. without batteries
Specifications are subject to change without prior notice due to improvements in performance and quality.
-12-
LIMITED LIFETIME WARRANTY
-U.S. Customers Only-
This limited warranty does not apply for use in any clinical or commercial application.
Mark of Fitness, Inc. warrants this product to be free of defects in material and
w orkmanship for the life of the original user under normal use, except cuff which has a one
year warranty; we make no other express warrantees.
Should any operating defects be discovered, Mark of Fitness, Inc. will repair or replace the
defective product or parts at no charge for labor or materials provided:
Said unit is returned postage paid to the factory for servicing, marked Attn: Service
Department.
Proof of purchase is included with the product.
A letter accompanies the product and indicates the complaint or defect to be remedied.
A check or money order in the amount of $7.95 is included to cover the shipping and
handling costs.
In the event the defect may be remedied without returning the unit, contact the firm by
phone or mail first, and every effort will be made to supply the replacement parts quickly
and at no charge.
This warranty does not apply to any unit that has been tampered with, abused, accidentally
damaged or to damage incurred through improper packing and mishandling in transit to or
from the factory.
Mark of Fitness shall in no event be liable to the purchaser for any amount in excess of the
cost of repair and/or replacement of the device.
This warranty gives you specific legal rights, and you may have other rights which vary from
state to state.
Prevention® is a registered trademark of
RODALE INC.
© 2005 RODALE INC.
All Rights Reserved
Produced under license by Mark of Fitness, Inc.
Mark of Fitness, Inc.
621 Shrewsbury Avenue
Shrewsbury, New Jersey 07702
Phone (732) 842-7200
Fax (732) 842-0558
Customer Service (888) 343-1558
e-mail [email protected]
web site www.markoffitness.com
-13-