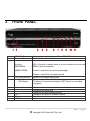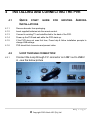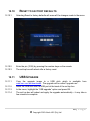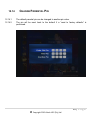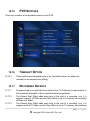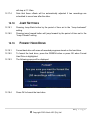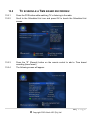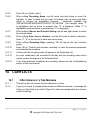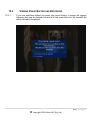
1
VAST DSR4639
USER MANUAL
1|Page
© Copyright 2012 Altech UEC (Pty) Ltd
Warranty Details:
Our goods come with guarantees that cannot be excluded under the
Australian Consumer Law. You are entitled to a replacement or refund
for a major failure and for compensation for any other reasonably
foreseeable loss or damage. You are also entitled to have the goods
repaired or replaced if the goods fail to be of acceptable quality and the
failure does not amount to a major failure.
2|Page
© Copyright 2012 Altech UEC (Pty) Ltd
TABLE OF CONTENTS
1
INTRODUCTION ............................................................................. 8
1.1
CONTENTS ...................................................................................................... 8
2
FRONT PANEL ............................................................................... 9
3
BACK PANEL ................................................................................ 10
4
INSTALLING AND CONNECTING THE PVR ............................... 11
4.1
4.2
4.3
4.4
QUICK START GUIDE FOR EXISTING AURORA INSTALLATIONS ............................. 11
LOOP THROUGH CONNECTION ......................................................................... 11
OPTION A: AV CONNECTOR (STANDARD DEFINITION TV) ................................. 12
OPTION C: HDMI CONNECTOR (HIGH DEFINITION TV) ..................................... 12
5
SMART CARD ............................................................................... 13
6
RESTORING TO FACTORY DEFAULTS ..................................... 13
6.1
7
PIN NUMBER........................................................................................................13
REMOTE CONTROL..................................................................... 14
7.1
PVR REMOTE CONTROL BUTTON FUNCTIONS ................................................... 15
NOTE: WHEN KEYS ARE PRESSED IT IS ASSUMED THEY WILL BE PRESSED
ON THE REMOTE UNLESS OTHERWISE STATED. ............................................................... 15
8
DSD4121 DECODER FEATURES AND MENU ............................ 16
8.1
8.2
8.3
8.4
8.5
8.6
8.7
8.8
I-PLATE ........................................................................................................ 16
CHANGING CHANNELS ................................................................................... 16
I-PLATE EXTENDED MODE ............................................................................. 17
REMINDER POPUPS ....................................................................................... 17
HOW TO SET A REMINDER............................................................................... 17
HOW TO DELETE A REMINDER ......................................................................... 18
EXAMPLE OF A BANNER REMINDER ................................................................. 18
EXAMPLE OF AN AUTOTUNE REMINDER ........................................................... 18
3|Page
© Copyright 2012 Altech UEC (Pty) Ltd
9
VOLUME AND MUTE.................................................................... 19
9.1
9.2
10
SUBTITLES AND CLOSED CAPTIONS ....................................... 19
10.1
10.2
11
8 DAYS OF INFORMATION ................................................................................ 20
DATA LOADING .............................................................................................. 21
MOVING AROUND THE EPG ............................................................................ 21
MENU ............................................................................................ 22
12.1
12.2
12.3
12.4
12.5
12.6
12.7
12.8
12.9
12.10
12.11
12.12
12.13
12.14
12.15
12.16
12.17
12.18
12.19
12.20
13
TURNING ON SUBTITLES/CLOSED CAPTIONS .................................................... 19
TURNING OFF SUBTITLES OR CLOSED CAPTIONS .............................................. 20
TV GUIDE ...................................................................................... 20
11.1
11.2
11.3
12
VOLUME UP AND DOWN .................................................................................. 19
VOLUME MUTE .............................................................................................. 19
LAUNCHING THE MENU .................................................................................. 22
MOVING AROUND THE MENU .......................................................................... 22
CHANGE MENU SETTINGS .............................................................................. 22
DISH INSTALLATION MENU ............................................................................. 23
TO CONFIGURE THE LNB ............................................................................... 23
TO RESCAN .................................................................................................. 24
TV INSTALLATION .......................................................................................... 24
USER SETTINGS ............................................................................................ 25
TIME ZONE .................................................................................................... 25
RESET TO FACTORY DEFAULTS ....................................................................... 26
USB UPGRADE ............................................................................................. 26
INFORMATION ................................................................................................ 27
PARENTAL CONTROL ..................................................................................... 28
CHANGE PARENTAL PIN ................................................................................. 29
PVR SETTINGS ............................................................................................. 30
TIMESHIFT OPTION ........................................................................................ 30
RECORDING OFFSETS ................................................................................... 30
JUMP SETTINGS ............................................................................................ 31
FORMAT HARD DRIVE .................................................................................... 31
HARD DRIVE INFORMATION ............................................................................ 32
RECORDING ................................................................................. 33
13.1
INSTANT RECORD .......................................................................................... 33
4|Page
© Copyright 2012 Altech UEC (Pty) Ltd
13.2
13.3
13.4
13.5
14
CONFLICTS .................................................................................. 37
14.1
15
PLAYBACK .................................................................................................... 40
DELETE EVENT ............................................................................................. 41
SORTING ...................................................................................................... 41
GROUPING .................................................................................................... 41
SCHEDULED LIST ........................................................................ 42
17.1
17.2
17.3
17.4
17.5
18
ON PAUSE .................................................................................................... 38
ALWAYS ON .................................................................................................. 38
VIEWING PAUSE BUFFER AND RECORDING ...................................................... 39
PLAYLIST ...................................................................................... 40
16.1
16.2
16.3
16.4
17
2 RECORDINGS AT A TIME MAXIMUM ............................................................... 37
TIMESHIFTING ............................................................................. 37
15.1
15.2
15.3
16
TV GUIDE (EPG) RECORD ............................................................................. 34
CHAIN RECORD ............................................................................................. 34
TIMEBASED RECORD ...................................................................................... 35
TO SCHEDULE A TIMEBASED RECORDING: ....................................................... 36
VIEWING ....................................................................................................... 42
DELETE EVENT ............................................................................................. 42
SORTING ...................................................................................................... 42
GROUPING .................................................................................................... 43
TIMEBASED RECORDING ................................................................................ 43
TIMESHIFT LIST ........................................................................... 43
18.1
18.2
18.3
18.4
18.5
VIEWING ....................................................................................................... 43
SAVING TIMESHIFT PROGRAMS ...................................................................... 43
DELETE EVENT ............................................................................................. 43
SORTING ...................................................................................................... 43
GROUPING .................................................................................................... 44
19
MEDIA PLAYER ............................................................................ 44
20
ETHERNET ................................................................................... 44
21
MHEG ............................................................................................ 44
5|Page
© Copyright 2012 Altech UEC (Pty) Ltd
22
TROUBLESHOOTING .................................................................. 45
22.1
HARD DRIVE IS FULL...................................................................................... 45
22.2
TIMEBASED RECORDING WON’T SCHEDULE BECAUSE OF
INVALID VALUES .......................................................................................................... 45
22.3
MY CHAIN RECORDING DOESN’T RECORD....................................................... 45
23
FREQUENTLY ASKED QUESTIONS ........................................... 46
23.1
23.2
23.3
HOW MANY HOURS CAN I RECORD?............................................................... 46
HOW DO I ERASE ALL THE PROGRAMS IN THE PLAYLIST? ................................ 46
CAN I VIEW SUBTITLES ON A PLAYBACK? ....................................................... 46
6|Page
© Copyright 2012 Altech UEC (Pty) Ltd
7|Page
© Copyright 2012 Altech UEC (Pty) Ltd
1
INTRODUCTION
Congratulations on your purchase of the VAST PVR4639.
1.1
CONTENTS
1.1.1
An Altech UEC remote control.
1.1.2
2 x AA batteries.
1.1.3
12 v Power supply adapter with fig 8 power lead.
1.1.4
AV cable
1.1.5
Component video (YPbPr) cable
1.1.6
F-F loop through cable.
1.1.7
User manual
8|Page
© Copyright 2012 Altech UEC (Pty) Ltd
2
FRONT PANEL
1 2
1
2
3
3
STANDBY Button
Smartcard Slot
LEDs
4
5
6
7
8
9 10 11
Switches the decoder between ON and STANDBY modes.
Behind the Front Panel Cover.
Indicates response to remote control commands and/or error mode
Bi-colour
RED/GREEN
RED = Decoder in standby mode or an error condition has occurred.
GREEN = Normal operations.
AMBER GREEN
Flashes = when there are incoming messages
Flashes = when RCU command received.
4
5
6
67
8
89
10
11
Front Panel Release
Front Panel
LED Display
Opens the front panel when pulled.
Displays the time (Standby Mode) or displays the selected
TV channel. Front panel with display “REC” if there is a recording
in progress
VOL<
VOL˃
CH˃
CH˃
OK
RESET
Decreases the volume level.
Increases the volume level.
Changes to the next available channel.
Changes to the previous available channel.
Accepts the selection.
Reboots the decoder, i.e. if decoder freezes etc.
9|Page
© Copyright 2012 Altech UEC (Pty) Ltd
3
BACK PANEL
1 2 3
9
2 4
5 6
7 8 9
10
11
1
Power Input connector
Connect to your home AC mains outlet
2
LNB IN
Connect to the LNB on dish
3
LNB Out
Connect to second LNB IN
4
R J45
Connects to Ethernet (currently disabled in this version)
5
S/PDIF (Coaxial
connector)
Connects to the Digital Audio coaxial input on TV or AV Home Theater System
6
Connects to the Digital Audio optical input on TV or AV Home Theater System
7
TOSLINK (Optical
connector)
USB
8
HDMI
Connects to the high definition (HDMI) input on TV or AV home theatre
system
9
Audio = Left & Right
Connects to the analog audio inputs on TV
10
Video =YPbPr
Connects to the YPbPr inputs on TV
11
Composite Video
Connects to the video inputs on TV
Connects to USB device (for software upgrade)
10 | P a g e
© Copyright 2012 Altech UEC (Pty) Ltd
4
INSTALLING AND CONNECTING THE PVR
4.1
QUICK START
INSTALLATIONS
GUIDE
FOR
EXISTING
AURORA
4.1.1
Remove decoder from packaging.
4.1.2
Insert supplied batteries into the remote control.
4.1.3
Connect to existing TV and satellite dish to the back of the PVR.
4.1.4
Power up the PVR and wait while the PVR starts up.
4.1.5
If the PVR does not scan first time, Press help & follow installation prompts to
change LNB settings.
4.1.6
PVR should lock to service and present video.
4.2
4.2.1
LOOP THROUGH CONNECTION:
Connect the Loop through F-F connector on LNB1 out to LNB 2
in –see the below picture
11 | P a g e
© Copyright 2012 Altech UEC (Pty) Ltd
4.3
OPTION A: AV CONNECTORS (STANDARD DEFINITION
TV)
4.3.1
Connect the satellite feed to the LNB IN input (#2) on the decoder
4.3.2
Connect the Loop through F-F connector on LNB1 out to LNB 2 in
4.3.3
Connect the Audio / Video cables to the audio (#9) and video (#11) outputs on
the decoder and then to the audio and video inputs on the TV or home theatre
system.
4.4
OPTION B: HDMI CONNECTOR (HIGH DEFINITION TV)
4.4.1
Connect the satellite feed to the LNB input (#2) on the decoder
4.4.2
Connect the Loop through F-F connector on LNB1 out to LNB 2 in
4.4.3
Connect a High Definition cable to the HDMI connector (#8), and then connect
the other end of the cable to the HDMI connector on the TV.
4.5
OPTION C: HDMI CONNECTOR (AV HOME THEATRE
SYSTEM AND A HIGH DEFINITION TV)
4.5.1
Connect the satellite feed to the LNB IN input (#2) on the decoder
4.5.2
Connect the Loop through F-F connector on LNB1 out to LNB 2 in
4.5.3
Connect a High Definition cable to the HDMI connector (#8), and then connect
the other end of the cable to the HDMI input connector of the AV home theatre
system.
4.5.4
Then connect the output HDMI of the AV home theatre system to the TV.
12 | P a g e
© Copyright 2012 Altech UEC (Pty) Ltd
5
SMART CARD
The smart card is paired to this PVR which means that this smart card cannot be used in any
other PVR. The smart card is owned & controlled by the network operator. Activation of a
smart card is at the network operator is discression.
6
RESTORING TO FACTORY DEFAULTS
Resetting to factory defaults can be useful if you have changed some settings and lost some
functions. Resetting will restore the decoder back to its original configuration and all
personalised settings will be reversed. The only setting that is not reset is the LNB setting.
Please manually edit this setting to the desired value.
6.1
6.1.1
PIN NUMBER
The default menu pin is 1234.
13 | P a g e
© Copyright 2012 Altech UEC (Pty) Ltd
7
REMOTE CONTROL
Standby
Playlist hot key
Media hot key
Scheduled list hot key
Timeshift list hot key
TV/Radio
Closed captions/
Subtitles
PVR menu
Play
Stop
Record
Pause
Rewind
Fast forward
Jump back
Jump forward
14 | P a g e
© Copyright 2012 Altech UEC (Pty) Ltd
7.1
PVR REMOTE CONTROL BUTTON FUNCTIONS
NOTE: WHEN KEYS ARE PRESSED IT IS ASSUMED THEY WILL BE PRESSED ON
THE REMOTE UNLESS OTHERWISE STATED.
BUTTON
PVR
RECORD
FAST FORWARD
REWIND
JUMP BACKWARDS
JUMP FORWARD
STOP
PLAY
PAUSE
CLOSED CAPTIONS
TV/RADIO
FUNCTION
Launches the PVR Menu. From here you can access the
Playlist, Scheduled List and Timeshift list.
Pressing the record button when watching live TV will record
the current program. The recording will automatically stop
when the program finishes.
Use this button to fast forward a recorded program or when
viewing behind live.
Pressing the button repeatedly will increase the speed to a
maximum of 30x speed.
Use this button to rewind a recorded program or when
viewing behind live.
Pressing the button repeatedly will increase the speed to a
maximum of 30x speed.
Use this button to jump backwards when watching a
recorded program or viewing behind live.
The jump settings are configurable in the PVR Setup menu.
Use this button to jump forward when watching a recorded
program or viewing behind live.
The jump settings are configurable in the PVR Setup menu.
STOP will end the viewing of a recorded program and return
you to the playlist.
STOP can also be used to jump back to live if you are
viewing behind live.
Press the button to resume playing back behind live.
Pressing this button will pause live TV. This button is also
used to pause while watching a recorded program.
This button turns on subtitles. Subtitles will be displayed on
programs that contain subtitle information.
Press this button once to switch between TV and radio
services. Hold the button down to launch the bouquet popup
(if available)
15 | P a g e
© Copyright 2012 Altech UEC (Pty) Ltd
8
DSD4121 DECODER FEATURES AND MENU
8.1
I-PLATE
The information plate (I-Plate) displays information about the current and next event at the
bottom of the screen.
The i-Plate can be launched by pressing the ”i” button on the remote.
8.2
CHANGING CHANNELS
8.2.1
To change to a different channel either:
8.2.2
Press the “CH+” or “CH-” buttons on the remote to change the channel to the
next/previous channel respectively, or
8.2.3
When the i-Plate is open, press the “LEFT/RIGHT” arrow buttons on the remote.
This allows you to browse the program information of the other channels without
changing the channel you are presently viewing. Press OK to switch to that
channel
NOTE: The i-Plate will only timeout when changing channels from the “CH+” or “CH-” button. If
you have manually opened the i-Plate, the “EXIT” button must be pressed to remove it.
16 | P a g e
© Copyright 2012 Altech UEC (Pty) Ltd
8.3
I-PLATE EXTENDED MODE
The extended i-Plate displays a short description about the currently selected i-Plate
programme, see screen below
8.4
REMINDER POPUPS
There are two types of reminders, a banner reminder and an Autotune reminder. Reminders
are used to notify you when a program is about to start.
8.5
HOW TO SET A REMINDER
8.5.1
To set a reminder, highlight the program you want to be reminded about using
either the iplate or the TV Guide. Press the “OK” button.
8.5.2
A “B” will appear next to the program name. This indicates a banner reminder
has been set.
8.5.3
Pressing the “OK’ button again will change the “B” to an “A” next to the program
name. This indicates an Auto tune reminder has been set.
17 | P a g e
© Copyright 2012 Altech UEC (Pty) Ltd
8.6
8.6.1
8.7
HOW TO DELETE A REMINDER
Pressing the “OK’ a third time on the program will remove the “A” next to the
program name. The reminder has been deleted.
EXAMPLE OF A BANNER REMINDER
8.7.1
A banner reminder will display a pop-up 30 seconds before the start of the
programme for which the reminder is set.
8.7.2
Pressing OK when this message is on the screen will change the channel to the
reminder program.
Pressing EXIT will remove the message
8.8
EXAMPLE OF AN AUTOTUNE REMINDER
8.8.1
An autotune reminder tunes the decoder to the reminder channel when the
programme starts.
8.8.2
There is a 5 second alert before changing channel so that you can cancel the
reminder if you are watching something else.
8.8.3
Cancel the reminder by pressing the “EXIT” button.
8.8.4
Tune immediately to the selected programme by pressing the “OK” button, if you
do nothing, the decoder will automatically tune to the reminder channel.
18 | P a g e
© Copyright 2012 Altech UEC (Pty) Ltd
9
VOLUME AND MUTE
9.1
9.1.1
9.2
9.2.1
VOLUME UP AND DOWN
Volume can be controlled by the VOL+ and VOL- buttons on the remote or on
the front of the PVR unit.
VOLUME MUTE
Press the mute button to mute the sound and press it again to un-mute.
10 SUBTITLES AND CLOSED CAPTIONS
10.1
10.1.1
TURNING ON SUBTITLES/CLOSED CAPTIONS
There is a menu option to enable subtitles. This can be found in the settings
19 | P a g e
© Copyright 2012 Altech UEC (Pty) Ltd
menu.
10.1.2
10.2
Also it can be enabled using the remote by pressing the “CC” (Closed captions)
button on the remote
TURNING OFF SUBTITLES OR CLOSED CAPTIONS
10.2.1
Or change the setting in the menu
10.2.2
Press the “CC” button again to turn off subtitles
11 TV GUIDE
11.1
8 DAYS OF INFORMATION
11.1.1
The TV Guide offers program information for up to 8 days (if it is available)
11.1.2
To access the TV Guide, press the “TV Guide” button on the remote control.
11.1.3
All information in the TV guide is controlled and populated by the broadcaster.
20 | P a g e
© Copyright 2012 Altech UEC (Pty) Ltd
11.2
11.2.1
11.3
DATA LOADING
While the TV Guide is loading data, the box can feel slow to respond. There is a
loading data text that appears near the date and time. When this stops flashing,
all data has been retrieved and the TV Guide data can be browsed.
MOVING AROUND THE EPG
11.3.1
Use the up/down/left/right buttons to scroll though the event grid.
11.3.2
Use the CH+ and CH- buttons to move the grid by 24 hours.
21 | P a g e
© Copyright 2012 Altech UEC (Pty) Ltd
11.3.3
Press the green button to provide more information on the different icons that
can be found in the TV Guide.
11.3.4
Press the “i” button to show more information about the highlighted program.
12 MENU
The menu is used to set up the decoder depending on the environment and preference.
12.1
12.1.1
12.2
LAUNCHING THE MENU
To display, press the MENU button while watching TV or listening to the radio.
The screen contains main menu (i.e. on the left hand side) and sub menu (i.e. on
the right hand side). Press EXIT to return to watching TV or listening to the radio
MOVING AROUND THE MENU
12.2.1
Press the right arrow to move the highlight to the sub menu.
12.2.2
Press the left arrow to move the highlight back to the main menu section.
12.3
CHANGE MENU SETTINGS
12.3.1
Up the up down keys to move the highlight to the different options
12.3.2
Press the right arrow to move to the sub menu
12.3.3
Use the up and down arrow keys to move through the sub menu
12.3.4
Highlight the correct option and press OK to edit it
12.3.5
Use the left and right keys to select options, or if required, use the number keys
to type in new values.
22 | P a g e
© Copyright 2012 Altech UEC (Pty) Ltd
12.4
DISH INSTALLATION MENU
This is where the set top box is configured according to your satellite options. In most cases,
no changes are required to this menu. However, if an old LNB is used then most likely the
LNB frequency value should be set to 11300. (11300 is the most common alternate
frequency, but this frequency value is dependent on the LNB used)
12.5
TO CONFIGURE THE LNB
12.5.1
Launch the menu
12.5.2
Press the right button to move to the sub menu
12.5.3
Press the down button to move to the LNB Frequency option
12.5.4
Press OK to edit the number
12.5.5
Type in the new LNB frequency
12.5.6
Press OK to save the change setting.
12.5.7
To return to the main menu press left arrow or EXIT of the remote.
23 | P a g e
© Copyright 2012 Altech UEC (Pty) Ltd
12.6
12.6.1
12.7
TO RESCAN
When the “Dish Installation” menu is on screen, you can press the green button
as a hot key to rescan the set top box.
TV INSTALLATION
This is where the set top box is configured to work with your television or home theater
system.
12.7.1
The aspect Ratio settings may also be changed by pressing the 16:9/4:3 button
while watching TV. Changing the aspect ratio using the remote key will not
change the setting in the menu, and will not remain if the decoder requires a
reboot. For a permanent setting, change the aspect ratio in the menu.
12.7.2
Digital audio should only be changed to Dolby when used in conjunction with a
Dolby decoder.
24 | P a g e
© Copyright 2012 Altech UEC (Pty) Ltd
12.8
USER SETTINGS
The User settings menu contains customizable settings to configure the set top box.
12.9
TIME ZONE
12.9.1
Move the highlight onto the Time Zone setting by pressing right
12.9.2
Press OK to edit the Time Zone
12.9.3
Use the left and right arrow keys to select the correct time zone
12.9.4
Press OK when the correct one has been selected
12.9.5
Press EXIT or right arrow to return to the main menu section.
25 | P a g e
© Copyright 2012 Altech UEC (Pty) Ltd
12.10
RESET TO FACTORY DEFAULTS
12.10.1
Selecting Reset to factory defaults will erase all the changes made to the menu.
12.10.2
Enter the pin (1234) by pressing the number keys on the remote.
12.10.3
The set top box will reboot after a factory reset.
12.11
USB UPGRADE
12.11.1
Copy the upgrade image to a USB stick which is available from
www.uec.com.au/downloads. The upgrade will be called “upgrade.uec”.
12.11.2
Insert the USB stick into the USB port at the back of the set top box
12.11.3
In the menu, highlight the “USB upgrade” option and press OK.
12.11.4
The set top box will reboot and apply the upgrade automatically – it may take a
few minutes to complete.
26 | P a g e
© Copyright 2012 Altech UEC (Pty) Ltd
12.12
INFORMATION
The information section contains the information for the set top box and smart card.
27 | P a g e
© Copyright 2012 Altech UEC (Pty) Ltd
12.13
PARENTAL CONTROL
The parental control menu is used to block certain age programs from being viewed without
first entering a pin.
12.13.1
To make changes to this menu, press right to navigate to the Parental Level
option.
12.13.2
The set top box will request the parental pin. The default parental pin is 1234.
28 | P a g e
© Copyright 2012 Altech UEC (Pty) Ltd
12.14
CHANGE PARENTAL PIN
12.14.1
The default parental pin can be changed to another pin value.
12.14.2
The pin will be reset back to the default if a “reset to factory defaults” is
performed.
29 | P a g e
© Copyright 2012 Altech UEC (Pty) Ltd
12.15
PVR SETTINGS
There are a number of configurable options on the PVR.
12.16
12.16.1
12.17
TIMESHIFT OPTION
These options are discussed more in the Timeshift section, but allows for
constant on on demand time shifting
RECORDING OFFSETS
12.17.1
Programs tend to run past the times listed in the TV Guide due to inaccuracies in
the broadcast information, this is controlled by the broadcaster.
12.17.2
The Record Start Offset adds extra time to the start of a recording. (e.g. if a
program starts at 10:00am and the Start Offset is set to 5 minutes, the recording
will start at 9:55am)
12.17.3
The Record Stop Offset adds extra time to the end of a recording. (e.g. if a
program ends at 11:00am and the Stop Offset is set to 10 minutes, the recording
30 | P a g e
© Copyright 2012 Altech UEC (Pty) Ltd
will stop at 11:10am
12.17.4
12.18
Note that these offsets will be automatically adjusted if two recordings are
scheduled to record one after the other.
JUMP SETTINGS
12.18.1
Pressing Jump Back button by the period of time set in the “Jump backward”
setting.
12.18.2
Pressing jump forward button will jump forward by the period of time set in the
“Jump Forward” setting.
12.19
FORMAT HARD DRIVE
12.19.1
Format hard drive will erase all recorded programs stored on the hard drive.
12.19.2
To format the hard drive, press the GREEN button or press OK when Format
Hard Drive is highlighted.
12.19.3
The following popup will be displayed.
12.19.4
Press OK to format the hard drive.
31 | P a g e
© Copyright 2012 Altech UEC (Pty) Ltd
12.20
HARD DRIVE INFORMATION
12.20.1
Hard drive information provides statistics on the hard drive recordings and
amount of space available.
12.20.2
Press YELLOW button or OK when Hard Drive Information is highlighted to
display hard drive information. A similar screen will be displayed.
32 | P a g e
© Copyright 2012 Altech UEC (Pty) Ltd
13 RECORDING
There are a number of ways to schedule a recording:
13.1
INSTANT RECORD
13.1.1
If you want to record the program you are currently watching, press the record
button on the remote control.
13.1.2
A record start icon will appear, a red dot will appear in the iplate and a small
recording information popup is displayed above the iplate on the right hand side
of the screen indicating the details of the event that is recording.
13.1.3
A maximum of two events may be recorded at any time hence there may be two
recording information popups displayed over the iplate.
33 | P a g e
© Copyright 2012 Altech UEC (Pty) Ltd
13.2
TV GUIDE (EPG) RECORD
13.2.1
Scroll in the TV Guide to highlight the program you would like to record, then
press the record button.
13.2.2
A red dot will appear in front of the highlighted program and in the event
information screen indicating that recording is scheduled.
13.2.3
A maximum of two events may be recorded at any time. In the event a third
concurrent recording is attempted a recording conflict screen is displayed.
13.3
CHAIN RECORD
13.3.1
If you would like to record more programs of the same name, a chain recording
can be set.
13.3.2
Press the yellow button on the program in the TV guide to make the yellow chain
icon appear.
13.3.3
These chain events are only recorded if there is a spare tuner available and no
conflicts checking is done on other chain events.
34 | P a g e
© Copyright 2012 Altech UEC (Pty) Ltd
13.3.4
13.4
NOTE : Chain recordings are not checked for conflicts. The program will be
recorded if there is a tuner free. If you want to make sure that a recording
happens, schedule a normal single recording by pressing the record
button.
TIMEBASED RECORD
13.4.1
A Timebased recording can be scheduled, where you manually set the recording
name, channel, start date, start time, duration, recording days and parental
guidance setting.
13.4.2
A Timebased recording will appear as a single recording in the playlist, even if
the duration spans multiple programs, and the individual program information
within the recording cannot be accessed.
13.4.3
Because individual program information cannot be accessed, an overall parental
block setting for the recording can be set. Choosing Parental Setting “ON” means
the Parental guidance pin will need to be entered before the playback can start.
13.4.4
The maximum duration of a time based recording is 24 hours.
35 | P a g e
© Copyright 2012 Altech UEC (Pty) Ltd
13.5
TO SCHEDULE A TIME BASED RECORDING:
13.5.1
Press the PVR button while watching TV or listening to the radio.
13.5.2
Scroll to the Scheduled List icon and press OK to launch the Scheduled List
screen.
13.5.3
Press the “R” (Record) button on the remote control to add a Time based
recording (timed event)
13.5.4
The following screen will appear:
36 | P a g e
© Copyright 2012 Altech UEC (Pty) Ltd
13.5.5
Press OK on a field to edit it.
13.5.6
When editing Recording Name, use left arrow and right arrow to move the
highlight to letter in name that you want to change. Use up arrow and down
arrow to change the highlighted character.
Characters available are
“ABCDEFGHIJKLMNOPQRSTUVWXYZ 0123456789”. (For example, when “T”
is highlighted and up arrow is pressed then “S” is displayed. When “T” is
highlighted and down arrow is pressed then “U” is displayed.)
13.5.7
When editing Channel and Parental Setting use left and right arrows to select
the desired values.
13.5.8
When editing Date, time or duration, use the left arrow to delete characters.
Press “0”..”9” on the remote to enter new time values.
When editing Recording Days, pressing “OK will launch the day selection
popup.
13.5.9
13.5.10
Press OK on “Confirm and schedule recording” to save the entered parameters
and schedule the recording.
13.5.11
A chain with the recording name will appear in the Scheduled List.
13.5.12
An event scheduled to be recorded for the day with the recording name and a
unique number will appear in the Scheduled List.
13.5.13
If you have problems scheduling the recording, please see the troubleshooting
section of this user manual.
14 CONFLICTS
14.1
2 RECORDINGS AT A TIME MAXIMUM
14.1.1
This set top box can record only two channels at a time.
14.1.2
If you try to record 3 programs that overlap on different channels, a message will
inform you that there is a conflict. (Expect for chain recordings which do not have
conflict checking)
37 | P a g e
© Copyright 2012 Altech UEC (Pty) Ltd
15 TIME SHIFTING
The timeshift options can be configured in the menu.
15.1
ON PAUSE
15.1.1
If you press pause while watching live TV, the program will pause until a later
time when you can resume viewing.
15.1.2
To resume viewing, press the play/pause button again.
15.1.3
As soon as the set top box is paused, programs are added to the timeshift list.
15.1.4
The pause buffer will be reset after 24 hours
15.2
ALWAYS ON
15.2.1
The set top box will continually record the program that is currently on live to the
hard drive when “always on” is selected.
15.2.2
The programs can be viewed in the timeshift list. All programs in the timeshift list
will be deleted as the drive gets full.
15.2.3
To save the program to the playlist (so it won’t be automatically deleted), press
the green button to “copy to the playlist” in the timeshift list screen.
38 | P a g e
© Copyright 2012 Altech UEC (Pty) Ltd
15.3
15.3.1
VIEWING PAUSE BUFFER AND RECORDING
If you are watching behind live press the record button, a popup will appear
informing that you are behind live and all of the event that is in the timeshift list
will be moved to the playlist.
39 | P a g e
© Copyright 2012 Altech UEC (Pty) Ltd
16 PLAYLIST
16.1
PLAYBACK
16.1.1
The playlist contains a list of recorded programs
16.1.2
The maximum of 1000 recorded programs are allowed in the playlist.
16.1.3
To display the playlist press PVR while watching TV or listening to the radio.
16.1.4
Select Playlist and press OK.
16.1.5
Use the up and down arrow keys to move through the recorded programs.
16.1.6
Press OK on a program to start it playing back.
40 | P a g e
© Copyright 2012 Altech UEC (Pty) Ltd
16.2
16.2.1
16.3
DELETE EVENT
Programs can be deleted from the playlist by pressing the red button on the
selected program.
SORTING
16.3.1
The playlist is sorted with the newest recorded programs at the beginning of the
list.
16.3.2
To sort the list in alphabetical order, press the yellow button.
16.3.3
To sort the list according to start time, press the yellow button again.
16.4
GROUPING
16.4.1
The playlist can be grouped according to name or per month.
16.4.2
Press the blue button to group the items and another time to ungroup them.
16.4.3
When the playlist is in the grouped mode, it can still be sorted by name or date
by pressing the yellow button.
41 | P a g e
© Copyright 2012 Altech UEC (Pty) Ltd
17 SCHEDULED LIST
17.1
VIEWING
17.1.1
The scheduled list contains a list of programs that will be recorded in the future.
17.1.2
A maximum of 200 programs can be scheduled for recording at one time.
17.1.3
To display the playlist press PVR while watching TV or listening to the radio.
17.1.4
Select Scheduled and press OK.
17.1.5
Use the up and down arrow keys to move through the list.
17.2
17.2.1
17.3
DELETE EVENT
Programs can be deleted by pressing the red button on the selected program.
SORTING
17.3.1
To sort the list in alphabetical order, press the yellow button.
17.3.2
To sort the list according to recording start time, press the yellow button again.
42 | P a g e
© Copyright 2012 Altech UEC (Pty) Ltd
17.4
GROUPING
17.4.1
The scheduled list can be grouped according to name or per month.
17.4.2
Press the blue button to group the items and another time to ungroup them.
17.4.3
When the scheduled list is in the grouped mode, it can still be sorted by name or
date by pressing the yellow button.
17.5
17.5.1
TIMEBASED RECORDING
Timebased recordings can be set up from this screen. Please see the
“Timebased record” section of this manual for more info.
18 TIMESHIFT LIST
18.1
VIEWING
18.1.1
The timeshift list contains a list of programs that have been automatically
recorded
18.1.2
These items will be automatically deleted as the hard drive gets full.
18.2
18.2.1
18.3
18.3.1
18.4
SAVING TIMESHIFT PROGRAMS
To save the program to the playlist (so it won’t be automatically deleted), press
the green button to “copy to the playlist” in the time shift list screen
DELETE EVENT
Programs can be deleted by pressing the red button on the selected program.
SORTING
18.4.1
To sort the list in alphabetical order, press the yellow button.
18.4.2
To sort the list according to recording start time, press the yellow button again.
43 | P a g e
© Copyright 2012 Altech UEC (Pty) Ltd
18.5
GROUPING
18.5.1
The timeshift list can be grouped according to name or per month.
18.5.2
Press the blue button to group the items and another time to ungroup them.
18.5.3
When the timeshift list is in the grouped mode, it can still be sorted by name or
date by pressing the yellow button.
19 MEDIA PLAYER
A media player is planned for future support. New user manuals will be available on the
website when this feature becomes available
20 ETHERNET
Ethernet functionality is planned for future support. New user manuals will be available on the
website when this feature becomes available.
21 MHEG
The ability to run MHEG application will be supported by this PVR. More information will be
available one this feature is enabled.
NOTE: MHEG applications will only launch when the STB is viewing live AV. (ie : If the STB is
viewing behind live, or performing a playback, the MHEG app will not launch)
44 | P a g e
© Copyright 2012 Altech UEC (Pty) Ltd
22
TROUBLESHOOTING
Note: A comprehensive troubleshooting help screen can be viewed at any time by
pressing the “HELP” button on the remote control.
22.1
HARD DRIVE IS FULL
22.1.1
There is no more space on the hard drive for new recordings; you will need to
delete some recordings.
22.1.2
To delete recorded programs: Press the PVR button
22.1.3
Press OK on the Playlist icon to launch the playlist.
22.1.4
Scroll to a program you wish to delete.
22.1.5
Press the red button to delete, and then OK to confirm .
22.2
TIMEBASED RECORDING WON’T SCHEDULE BECAUSE OF INVALID
VALUES
22.2.1
Please check that the date you have entered is in YYYY-MM-DD format, and the
time/duration is in the HH:MM format.
22.2.2
Please check that the date and time are not in the past.
22.2.3
The maximum recording duration for Time based recordings is 24 hours, please
ensure that the duration is shorter than “24:00”
22.3
22.3.1
MY CHAIN RECORDING DOESN’T RECORD
If a chain recording didn’t record then there were probably already 2 recordings
in progress. To make sure a program records, set up the recording as a normal
single recording.
45 | P a g e
© Copyright 2012 Altech UEC (Pty) Ltd
23 FREQUENTLY ASKED QUESTIONS
23.1
HOW M ANY HOURS CAN I RECORD?
23.1.1
The PVR Info screen shows the approximate number of hours of recording space
remaining on the connected hard drive.
23.1.2
These estimates are not exact. The actual recording time will depend on the
broadcast quality of the programs being recorded.
23.2
HOW DO I ERASE ALL THE PROGRAMS IN THE PLAYLIST?
23.2.1
It is possible to erase all programs by formatting the hard drive.
23.2.2
Launch the PVR Setup menu and press OK on Hard drive format.
23.2.3
Press OK to confirm the format.
23.2.4
The format will take a few minutes to complete.
23.2.5
When the format is complete, the HDD status on the screen should say
“Connected and working”, and the Playlist will be empty.
23.3
23.3.1
CAN I VIEW SUBTITLES ON A PLAYBACK?
To turn on subtitles, press the “CC” closed caption button on the remote.
46 | P a g e
© Copyright 2012 Altech UEC (Pty) Ltd
47 | P a g e
© Copyright 2012 Altech UEC (Pty) Ltd
LEGAL MATTERS
Important NOTICE to all purchasers of a DSR4639 Decoder.
INTRODUCTION
The DSR4639 decoder is designed, manufactured and sold to receive selected network services only. It will therefore
not be fully functional unless it is used with the network operator's enabled Smartcard supplied with the DSR4639
decoder, deployed within the Australian broadcast footprint, and installed so as to receive the network specific signal.
The network operator is entitled to amend the software incorporated in the DSR4639 Decoder from time to time by
means of software downloads for a number of reasons, including preventing the DSR4639 Decoder from being used
to receive services other than the network operator services.
DIY INSTALLATIONS DISCLAIMER
Due to the many potential configurations in each home and the variety of equipment available, it is not possible to
cover every potential installation scenario in this Viewer's Guide. An Accredited Installer or the supplier /
manufacturer of the specific equipment should be consulted if any doubt exists when doing an installation.
MACROVISION
This product incorporates copyright protection technology that is protected by U. S. patents and other intellectual
property rights. Use of this copyright protection technology must be authorised by Macrovision Corporation, and is
intended for home and other limited viewing uses only unless otherwise authorised by Macrovision.
Reverse engineering or disassembly is prohibited.
ALTECH UEC
Altech UEC and their logo are trademarks and / or registered trademarks of Altech UEC.
DOLBY
Manufactured under license from Dolby Laboratories. Dolby and the double-D symbol are trademarks of
Dolby Laboratories.
DVB (DIGITAL VIDEO BROADCASTING)
DVB is a registered trademark of the DVB Project.
INTELLECTUAL PROPERTY
The whole of the DSR4639 Instruction Manual, including the graphics, menus and information contained herein
are the subject of intellectual property rights, including copyright, under domestic law and international conventions.
All rights are reserved.
All intellectual property rights of the DSR4639 Decoder are owned by Altech UEC.
Hacking of the conditional access system or facilitating anyone else doing so is STRICTLY PROHIBITED. Failure to
adhere to this prohibition is a criminal offence.
Some components are licensed under GPL and LGPL licenses. For further information regarding the licenses and
which components are licensed under these licenses please visit http://www.uec.com.au.
The source code for these components can be obtained by written request to:
The UEC DSR4639 OPT team,
Altech UEC (PTY) LTD
UEC House
1 Montgomery Drive
Mount Edgecombe
4300
South Africa
Please note that there is a fee associated with the written request to cover shipping, handling, processing and the
cost of media. Altech UEC reserves the right to exclude or include GPL/LGPL components from its products as it
sees fit.
48 | P a g e
© Copyright 2012 Altech UEC (Pty) Ltd
INSTALLATION INDEMNITY
Installation procedures for satellite dishes are outside the scope of this manual. Please refer to the manuals provided
with your satellite dish and associated equipment if you decide to do the installation yourself. For the DSD 4639
Decoder to operate, it is required to correctly install and align a satellite dish and a Low Noise Block (LNB) converter.
Each and every installer acts as an independent contractor and is not an employee, subcontractor or agent of the
Manufacturer.. The manufacturer is therefore not liable for any loss or damage of any nature whatsoever caused by the
conduct of the installer, including, but not limited to:
Any direct, indirect or consequential damages of any nature or any loss of profit or other special damages of
any nature which the user may suffer as a result of any breach by the installer of any of its obligations to the
user.
Any loss or damage to the property of the user or any third party, situated on the user's premises, as a result
of an act or omission on the part of the installer.
The manufacturer does not directly or indirectly warrant or guarantee or make any representations whatsoever with
regards to any equipment, including, but not limited to, any dish, LNB, or cabling used by the installer.
Subject to any express warranty or guarantee given by the manufacturer in writing, the manufacturer does not :
Give any warranty or guarantee or make any representation whatsoever in respect of any work carried out by
the installer.
Accept any liability for any latent or other defect in any work carried out by the installer.
The smartcard is unique to each decoder and cannot be replaced or changed with another decoder.
The network operator is entitled to upgrade the software by downloads to your decoder, to ensure that only approved
services are being received, and that the decoder remains compatible with the networks platform.
PRODUCT WARRANTY
The manufacturer warrant that the DSR4639 Decoder will be free from defects in design, materials and workmanship
for a period of 12 months from the date of sale of the new DSR4639 Decoder to the consumer.
This warranty will not apply in the event of :
the DSR4639 Decoder being tampered with or being opened, worked on, repaired or modified, save by an
authorised Altech UEC Agent;
the DSR4639 Decoder not being installed or used in accordance with the manufacturer's specifications;
the DSR4639 Decoder not being used with the supplied power supply;
malfunctioning or damage caused by the use of the DSR4639 Decoder in conjunction with equipment or
smartcards not supplied by the manufacturer;
In the event of the DSR4639 Decoder not functioning, the Agent will return the DSR4639 Decoder to the Altech UEC
nominated Repair Centre. The manufacturer, at their sole discretion, will repair or replace the DSR4639 Decoder
which is not functioning and which is returned within 12 months from the date of sale of the new DSR4639 Decoder
to the consumer.
Any repairs made in these first 12 months must be made by the Altech UEC Repair Centre in order to rely on this
warranty certificate. This certificate, plus the original purchase receipt showing the date of purchase of the new
DSR4639 Decoder, must be provided when returning the DSR4639 Decoder for warrantee purposes.
In addition to your rights under this warranty, Altech UEC’s products come with guarantees that cannot be excluded
under the Australian Consumer Law. You are entitled to a replacement or refund for a major failure and for
compensation for any other reasonably foreseeable loss or damage. You are also entitled to have the goods repaired or
replaced if the goods fail to be of acceptable quality and the failure does not amount to a major failure.
49 | P a g e
© Copyright 2012 Altech UEC (Pty) Ltd
OBSOLESCENCE DISCLAIMER
Digital Satellite Technology is rapidly evolving. As a result of this, it is not possible to predict what the requirements
will be in a few years' time. The manufacturer cannot guarantee that this DSR4639 Decoder will be able to run all
available services in future.
DISCLAIMER
Altech UEC makes no warranties, either expressed or implied, and including, but not limited to, implied warranties of
merchant ability and fitness of the DSR4639 Decoder for a particular purpose. This extends to the hardware,
software, the DSR4639 Basic Viewer's Guide and any other written materials accompanying the DSR4639 Decoder
at the time of its sale. The manufacturer specifically make no warranties, expressed or implied, that the DSR4639
decoder is capable, or in the future, will be capable, of receiving services other than VAST services.
Despite anything to the contrary, and save for the above-mentioned remedy in relation to the DSR4639 Decoder
which does not function during the period covered by this warranty certificate, the manufacturer will bear no liability
whatsoever, whether in contracts, delict or otherwise, for injury, loss or damage, including any loss of business profits
or any other consequential damages arising out of the installation, use or operation of the DSR4639 Decoder or any
defect therein. Altech UEC will not be held responsible for any damage resulting from installations, whether by its
agents, Accredited Installers, through do-it-yourself or through incorrect usage of equipment.
By using your smartcard and Set Top Box you agree that Optus Networks Pty Ltd may write software to that card and
or Set Top Box from time to time.
FOR YOUR RECORDS
We recommend you complete the following information for your records :
Product Model:____________________________________
Serial Number:____________________________________
Purchaser's Name:__________________________________
Purchaser's Address:________________________________
_________________________________________________
Authorised Dealer's Name:___________________________
Date of Purchase:_________________________________
HELP AND INFORMATION
WEBSITES
Digital TV from Satellite www.mysattv.com.au – Coverage and activations
Manufacturer (Altech UEC) www.uec.com.au
Information on VAST www.vastdigital.com.au
TELEPHONE
Altech UEC Austrailia +61 2 94255777
VAST 1300 99 3376 (Card Activations)
50 | P a g e
© Copyright 2012 Altech UEC (Pty) Ltd
Altech UEC Pty Ltd
Level 2, 27 Sirius Rd
Lane Cove West NSW 2066
Sydney Australia
The latest version
of this user manual
can be downloaded at
www.uec.com.au
51 | P a g e
© Copyright 2012 Altech UEC (Pty) Ltd