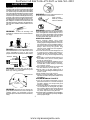
1
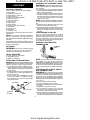
For Parts Call K&T 606-678-9623 or 606-561-4983
ENGLISH
R Trademark
Operator’s Manual
Manual del Operador
Manuel de L’utilisateur
ESPAÑOL
BC2400
For Occasional Use Only
DANGER:
Read and follow all Safety Rules and Operating Instructions
before using this product. Failure to do so can result in serious injury.
ADVERTENCIA:
Lea el manual del operador y siga todas las advertencias e
instrucciones de seguridad. El no hacerlo puede resultar en
lesiones graves.
respecter tous les avertissements et toutes les instructions de
sécurité. Tout défaut de le faire pourrait entraîner des blessures
graves.
Frigidaire Home Products, Augusta, GA 30907
WCI Outdoor Products, Inc.
530087638
2/22/00
www.mymowerparts.com
FRANÇAIS
AVERTISSEMENT: Lire le manuel de l’utilisateur et bien
For Parts Call K&T 606-678-9623 or 606-561-4983
SAFETY RULES
DANGER: This power toolcan bedanger-
ous!Thisunitcancauseseriousinjuryincluding
amputationorblindnesstotheoperatorandothers.Thewarningsandsafetyinstructionsinthis
manualmustbefollowedtoprovidereasonable
safety andefficiency inusingtheunit.Theoperatorisresponsibleforfollowingthewarnings
andinstructions inthismanualandontheunit.
ReadtheentireOperator’sManualbeforeassemblingandusingtheunit!Restricttheuseof
thisunittopersonswhoread,understand,and
followthewarningsandinstructionsinthismanualandontheunit.Never allowchildrentouse
this unit.
WARNING: Do not use trimmer head as a
fastening device for the blade.
Stop coasting
blade by contact
with cut material
WARNING: Thebladecontinues tospinaf-
terthethrottleisreleasedor,engineisturnedoff.
Thecoastingbladecanthrowobjects orseriously cutyouifaccidentallytouched.Stopthe
blade by contacting the left hand side of the
coasting blade with material already cut.
WARNING:
Follow all warnings and
instructions.Failuretodosocanresultinserious injury.
OPERATOR SAFETY
S Dress properly. Always wear safety
glasses or similar eyeprotection whenoperating,orperformingmaintenanceonyour
unit.(Safetyglassesareavailable.)Always
wear faceor dustmask ifoperationisdusty.
Always wear heavy, long pants, long
sleeves,boots,andgloves.Donotgobarefoot or wear sandals.
S Securehair aboveshoulder length.Secure
or remove loose clothing and jewelry or
clothing with loosely hanging ties, straps,
tassels,etc.They canbecaughtinmoving
parts.
S Being fully covered alsohelps protectyou
from debris and pieces of toxic plants
thrown by spinning line.
S Stay Alert.Donotoperateunitwhenyouare
tired,ill,or under influenceofalcohol,drugs,
or medication. Watch whatyou aredoing;
use common sense.
S Wear hearing protectionif youuse theunit
for more than 1-1/2 hours per day.
S Never start or run the engine inside a
closedroomorbuilding.Breathingexhaust
fumes can kill.
S Keep handles free of oil and fuel.
S Always use the handlebar and a properly
adjusted shoulder strap with a blade. See
ASSEMBLY.
DANGER: Blade canthrust violently away
frommaterialitdoes notcut.Blade thrustcan
cause amputation of arms or legs. Keep
peopleandanimals 50feet(15meters)away.
ALWAYS WEAR:
Eye
Protection
Thrown
Objects
Leg Guards
Boots
WARNING: Trimmer line can throw ob-
jects violently. You can be blinded or injured.
Wear eye and leg protection.
Hazard Zone
UNIT/MAINTENANCE SAFETY
S Look for and replace damaged or loose
parts before eachuse. Look for andrepair
fuel leaks before use. Keep unit in good
working condition.
S Throwaway blades thatare bent,warped,
cracked,broken,or damagedin any other
way. Replace trimmer head parts that are
cracked, chipped, broken, or damaged in
any other way before using the unit.
S Maintainunitaccordingtorecommendedprocedures.Keepbladesharp.Keepcuttingline
at the proper length.
50 Feet
(15 Meters)
WARNING: Hazard zone for thrown ob-
jects. Blade/Trimmer line can throw objects
violently. Others can be blinded or injured.
Keeppeopleandanimals 50feet (15meters)
away.
2
www.mymowerparts.com
For Parts Call K&T 606-678-9623 or 606-561-4983
S Useonly .080” (2mm) diameter WeedEater Rbrandline.Never usewire,rope,string,
etc.
S Installrequiredshieldproperly beforeusing
the unit. Use the metal shield for all metal
blade use. Use the plastic shieldfor allline
trimmer use.
S Use only specified blade or trimmer head;
make sure it is properly installed and securely fastened.
S Never start engine with clutch shroud removed.Theclutchcanfly offandcauseserious injury.
S Besurebladeor trimmerheadstopsturning
when engine idles.
S Disconnectthesparkplugbeforeperformingmaintenance(exceptcarburetoradjustments).
S Makecarburetor adjustmentswiththelower end supported to prevent blade or trimmer line from contacting any object. Hold
unitby hand; donot usethe shoulder strap
for support.
S Keepothersawaywhenmakingcarburetor
adjustments.
S Use only recommended Weed Eater accessories and replacement parts.
S Have all maintenance and service notexplainedinthismanualperformedbyyourAuthorized Service Dealer.
S Hold the unit firmly with both hands.
S Keepfirmfootingandbalance.Donotoverreach.
S Keep blade or trimmer head below waist
level.
S Do not raise engine above your waist.
S Keep all parts of your body away from
blade,trimmer head, andmuffler whenengine is running.
S Cut from your right to your left.
S Use only for jobs explainedin this manual.
TRANSPORTING AND STORAGE
S Stop the unit before carrying.
S Keep muffler away from your body.
S Allowtheenginetocoolandsecure theunit
beforestoringor transportingitinavehicle.
S Empty thefueltank beforestoringor transportingtheunit.Useupfuelleftinthecarburetor by startingtheengineandletting itrun
until it stops.
S Storeunitandfuelinan areawhere fuelvapors cannot reach sparks or openflames
from water heaters, electric motors or
switches, furnaces, etc.
S Storeunitso theblade or line limiter cannot
accidentally cause injury. The unit can be
hung by the tube.
S Store unit out of reach of children.
SPECIAL NOTICE: Exposure to vibrations throughprolongeduseofgasolinepowered hand tools could causeblood vesselor
nerve damage in the fingers, hands, and
joints ofpeoplepronetocirculationdisorders
or abnormalswellings.Prolongeduse incold
weatherhas beenlinkedtobloodvesseldamageinotherwisehealthypeople.Ifsymptoms
occur such as numbness, pain, loss of
strength, change in skin color or texture, or
loss of feeling in the fingers,hands, or joints,
discontinuetheuseofthis toolandseekmedical attention. An anti-vibration systemdoes
not guarantee the avoidance of these problems. Users who operate power tools on a
continual and regular basis must monitor
closely theirphysicalconditionandthecondition of this tool.
SPECIAL NOTICE: This unit is not
equipped with a temperature limiting muffler
andspark arresting screenwhich meets the
requirements of California Codes 4442 and
4443. All U.S. forest land and the states of
California, Idaho, Maine, Minnesota, New
Jersey,Oregon, andWashington requireby
lawthatmany internalcombustionenginesto
be equipped with a spark arrestor screen.If
you operate in a locale where such regulations exist, you are legally responsible for
installing and maintaining the operatingconditionoftheseparts.Failuretodosois aviolation of the law.
FUEL SAFETY
S
S
S
S
S
S
S
S
S
Mix and pour fuel outdoors.
Keep away from sparks or flames.
Use a container approved for fuel.
Donotsmokeor allowsmokingnear fuelor
the unit or while using the unit.
Wipeupallfuelspillsbeforestartingengine.
Moveatleast10feet(3meters)awayfromfueling site before starting engine.
Stop engine and allow it to cool before removing fuel cap.
Empty the fueltank beforestoring theunit.
Useupfuelleftinthecarburetor by starting
the engine and letting it run until it stops.
Storeunitandfuelinareawherefuelvapors
cannot reach sparks or open flames from
waterheaters,electricmotors orswitches,
furnaces, etc.
CUTTING SAFETY
S Inspecttheareatobecutbefore eachuse.
Remove objects (rocks, broken glass,
nails,wire,string,etc.) whichcanbethrown
or become entangled in the blade or trimmer head.
S Keepothersincludingchildren,animals,bystanders,andhelpersatleast50feet(15meters)away.Stopengineimmediatelyify ouare
approached.
S Always keepengineontheright-- handside
of your body.
3
www.mymowerparts.com
For Parts Call K&T 606-678-9623 or 606-561-4983
ASSEMBLY OF SHOULDER STRAP
ASSEMBLY
WARNING:Propershoulderstrapandhandlebaradjustmentsbeforestartingtheengine
are required.
S Try onshoulder strapand adjustfor fitand
balancebeforestartingtheengineorbeginning a cutting operation.
S Insertyour rightarm andhead throughthe
shoulder strap and allow it to rest on your
leftshoulder. Makesure thedanger signis
on your back and the hook is to the right
side of your waist.
NOTE: Aone-halftwistis builtintheshoulder
straptoallowthestraptorestflatontheshoulder.
S Adjust the strap, allowing the hook to be
about 6 inches below the waist.
S Fastenthestraphook tothe clamplocated
betweenthetrigger handleand themounting block and lift the tool to the operating
position.
CARTON CONTENTS
Check carton contents for the following:
S brushcutter
S handlebar screws (2)
S blade shield screws (4)
S cupped washer
S large nut for installing blade
S long hex wrench
S short hex wrench
S bracket cover
S metal shield
S plastic shield
S shoulder strap with warning
S weed blade
S trimmer head
S handlebar
S container of oil
Examineparts for damage. Donot usedamaged parts.
CONFIGURING YOUR UNIT
You can configure your unit using a cutting
head for grass and light weeds, or a weed
bladefor cuttinggrass, weeds,and brushup
to1/2inchindiameter.Toassembleyourunit,
gotothesectionfor thedesiredconfiguration
and follow the instructions.
NOTE: If you need assistance or find parts
missing or damaged, call 1-800-554-6723.
Itis normalfor thefuelfiltertorattleintheempty
fuel tank.
Findingfuelor oilresidue onmuffler is normal
duetocarburetoradjustmentsandtestingdone
by the manufacturer.
ASSEMBLY INFORMATION TRIMMER HEAD
TRIMMER
HEAD
ASSEMBLY
WARNING: Ifreceivedassembled,repeat
all steps to ensure your unit is properly assembled and all fasteners are secure.
TOOLS REQUIRED
S 2 hex wrenches (provided)
S adjustable wrench
S phillips screwdriver.
NOTE: If your unit has been assembled for
ATTACHING THE HANDLEBAR
weed blade use, refer to the section ASSEMBLYINFORMATIONFORUSINGYOUR
UNIT WITHAWEEDBLADEandreversethe
stepstoremovethemetalshieldandbladebeforeyoumounttheplastic shield andtrimmer
head.
DANGER:Thebarrierportionofthehandlebar
mustbeinstalledasshowntoprovideabarrier
between operator and the spinning blade.
S Locatethedecalonthehandlebar.Thisdecal includes two arrows. Position thehandlebar with themounting bracketbetween
these arrows.
S Positionthebracketcoverover thehandlebar. Again make sure the handlebar is between the arrows.
S Insert screws and hand tighten only. Be
sure the handlebar is installed correctly;
then,tighteneach screwsecurely withthe
short hex wrench.
Handlebar
ATTACHING THE PLASTIC SHIELD
AND TRIMMER HEAD
WARNING: The shield must be properly
installed.Theshieldprovidespartialprotection
fromtherisk ofthrownobjects totheoperator
and others and is equipped with a line limiter
whichcutsexcesslinetotheproperlength.The
linelimiter(onundersideofshield)is sharpand
can cut you.
S Remove wing nut from shield.
S Insert bracket into slot on shield.
S Pivotshielduntilboltpassesthroughholein
bracket.
S Tighten the wing nut securely.
S If your unit has a plastic cover over the
threads onthe threadedshaft, removethe
covering to expose the threads.
S Before installing the trimmer head, make
surethedustcupandretainingwasher are
positionedonthegearboxas shownbelow.
Screw
BracketCover
Mounting
Bracket
4
www.mymowerparts.com
For Parts Call K&T 606-678-9623 or 606-561-4983
ofbladethrustwhichcancauseseriousinjury
such as amputation to the operator or bystanders. Failure to install the shield in the
position shown canresult inserious injury to
theoperator.Thelengthof theshield mustbe
aligned with the length of thetube. Theblade
is sharp and can cut you. Be sure to wear
gloves while working with blades.
S If your unit has a plastic cover over the
threads onthe shaft,remove thecovering
to expose the threads.
S Turnunitover (threads onshaftfacingup),
place the metal shield over the gearbox,
and align the screw holes.
Bracket
Slot
Shield
Wing Nut
Gearbox
Dust Cup
Retaining Washer
Metal shield
NOTE: Make sure all parts are properly
installedas illustratedintheillustrationbefore
installing the trimmer head.
S Alignholeinthedustcupwith thehole inthe
sideofthegearboxby rotatingthedustcup.
S Insert a small screwdriver into aligned
holes. This will keep theshaft fromturning
while tightening trimmer head.
Gearbox
Screwdriver
S Insert the 4 mounting screws through the
bottom of the shield. Thread them into the
gearbox.Tightenevenly andsecurelywith
one of the hex wrenches provided.
S While holding the screwdriver in position,
thread trimmer head onto the shaft in the
direction shown on thedecal. Tightenuntil
secure.
NOTE: The retaining washer must bepositionedwiththeraisedsectionfacingtowardthe
gearbox.
ASSEMBLY OF THE METAL BLADE
WARNING: Do notuse any blades, or fas-
teninghardwareother thanthe washers and
nuts illustrated in the following illustrations.
Thesepartsmustbeprovidedby WeedEater,
and installed as shown below. Failure touse
proper parts cancausethebladetofly offand
seriously hurt you or others.
NOTE:Thedustcupandretainingwasherare
locatedonthegearboxandnotinthepartsbag.
S Removetheretainer washerfromthegearbox,andleavethedustcuponthegearbox.
NOTE: It may be necessary to remove a
plastic protective covering from the
threadedshaftbeforeremovingtheretaining washer.
ASSEMBLY INFORMATION - WEED
BLADE
WEED
BLADE
NOTE: If your unit has been assembled for
trimmerheaduse,refertothesectionATTACHING THEPLASTICSHIELDANDTRIMMER
HEAD and reverse the steps to remove the
plastic shield and trimmer head before you
mountthemetalshieldandblade.Storethese
partsforfutureuse.Neverusethetrimmerhead
with the metal blade installed.
Dust Cup
Retaining
Washer
S Installthebladeover thethreadedshaftextendingfromthegearbox betweenthedust
cup and the retaining washer. Make sure
the raised part of the retaining washer is
facingthegearbox,andtheraised areafits
into the hole in the center of the blade.
ASSEMBLY OF THE METAL SHIELD
DANGER: The metal shieldmust beprop-
erly installed on the tool anytime the tool is
used with the blade. The forward top of the
metal shield helps toreduce theoccurrence
5
www.mymowerparts.com
For Parts Call K&T 606-678-9623 or 606-561-4983
S Slide the blade and retaining washer onto
the shaft of the gearbox.
S Now place the cupped washer onto the
shaft. Make sure the cupped side of the
washer is toward the blade.
S Install the blade nut by threading onto the
shaft counterclockwise.
Shield
Dust Cup
Retaining
Washer
Cupped
Washer
FUEL YOUR UNIT
Thisengineiscertifiedtooperateonunleaded
gasoline.Gasolinemustbemixedwithagood
quality2-cycleair-cooledengineoildesignedto
bemixedataratioof40:1.Poulan/WeedEater
brandoilis recommended.(A40:1ratiois obtainedbymixing3.2ouncesofoilwith1gallonof
unleadedgasoline).Whenmixingfuelfollowthe
instructions printedonthe container.Always
read and follow the safety rules under FUEL
SAFETY.
ThreadedShaft
STARTING
Blade
STOPPING YOUR ENGINE
S Move the ON/STOP switch to STOP.
S If engine does not stop, move choke to
the FULL CHOKE position.
Nut
STARTING YOUR ENGINE
WARNING: The trimmer head will turn
while starting the engine. Avoid any contact
withthemuffler.Ahot muffler can causeserious burns.
S Restengineandshieldonground,supporting trimmer head off ground.
WARNING: Do notuse any blades, or fas-
tening hardware other than the
washersandnutsillustrated.Thesepartsmust
be provided by Weed Eater, and installedas
shownbelow.Failuretouseproper parts can
causethebladetoflyoffandseriously hurtyou
or others.
COLD ENGINE OR WARM ENGINE
AFTER RUNNING OUT OF FUEL
S Move the switch to the ON position.
S Slowly press the primer bulb 6 times.
S Move choke lever to FULL CHOKE position.
Primer Bulb
Starter
Handle
NOTE:Makesureallpartsareinplaceasillustrated,andthebladeis sandwichedbetween
thedustcupand theretaining washer.There
shouldbenospacebetweenthebladeandthe
dust cup or the retaining washer.
S Align hole in dust cup with hole in side of
gearbox by rotating the blade.
S Insert a small screwdriver into aligned
holes. This will keep theshaft fromturning
while tightening the blade nut.
Choke
Lever
Screwdriver
Muffler
S Squeeze the throttle trigger fully and hold
through all remaining steps.
S Pull starter rope handle sharply 6 times.
S Move choke lever to HALF CHOKE position.
S Pull starter rope handle no more than 6
pulls, until engine runs.
S Allowenginetorun10seconds,thenmove
choke lever to OFF CHOKE position.
S Tightenbladenutfirmly withawrenchwhile
holding screwdriver in position.
S Remove the screwdriver.
S Turn blade by hand. If the blade binds
againsttheshield,or appearstobeuneven,
thebladeis notcentered, andyou mustreinstall.
NOTE: Toremoveblade,insertscrewdriver
into aligned holes. Un-thread the nut andremoveparts.Besuretostorepartsandinstructions for future use.
RESTARTING A WARM ENGINE
S Movechokelever toOFF CHOKEposition.
S Pull starter rope handle until engine runs.
S If engine does not start in 5 pulls, followinstructionsinSTARTINGACOLDENGINE.
6
www.mymowerparts.com
For Parts Call K&T 606-678-9623 or 606-561-4983
blade on the shield will cut the line to the
correct length.
USING YOUR UNIT
OPERATING POSITION
Alwaystapthetrimmerheadonagrassyarea.
Tappingonsurfaces suchas concreteorasphaltcancauseexcessiveweartothetrimmer
head.
Iflineis worndownto2in.(5cm) or less,more
thanonetapwillberequiredtoobtainthemost
efficient line length.
WARNING: Useonly .080” (2 mm) diameter line. Other sizes of line will not advance
properly andcancauseseriousinjury.Donot
useother materialssuchaswire,string,rope,
etc.Wirecanbreak off duringcutting andbecomeadangerousmissilethatcancauseserious injury.
S Left arm extended with hand holding the
handlebar grip.
S Right hand holding throttle grip with finger
on throttle trigger.
S Engine below waist level.
S Shoulder strappad centeredon leftshoulder.
S Danger sign centered on your back.
S Full weight of tool on left shoulder.
S Withoutoperator bendingover,thebladeor
trimmer head is near and parallel to the
ground and easily contacts material to be
cut.
OPERATING INSTRUCTIONS FOR
USE WITH WEED BLADE
S BladeThrust is a reactionthat only occurs
whenusingabladedunit.This reactioncan
cause serious injury such as amputation.
Carefullystudythissection.Itisimportantthat
youunderstandwhatcauses bladethrust,
howyoucanreducethechanceofitsoccurring,andhowyoucanremainincontrolofunit
if blade thrust occurs.
S WHAT CAUSESBLADETHRUST - Blade
Thrust canoccur whenthe spinningblade
contacts anobjectthatit does not cut.This
contactcausesthebladetostopforaninstant
and then suddenly move or “thrust” away
fromtheobjectthatwashit.The“thrusting”reactioncanbeviolentenoughtocausetheoperatortobepropelledinanydirectionandlose
controloftheunit.Theuncontrolledunitcan
causeseriousinjuryifthebladecontactsthe
operator or others.
S WHEN BLADE THRUST OCCURS Blade thrust can occur without warning if
the blade snags, stalls, or binds. This is
morelikely tooccur inareas whereitis difficult to see the material beingcut. By using
the unit properly, the occurrence of blade
thrust will be reduced andthe operator will
be less likely to lose control.
OPERATING INSTRUCTIONS FOR
USE WITH TRIMMER HEAD
Beforetrimming,bringenginetoaspeedsufficient to cut material to be trimmed.
Donotrunengineatahigherspeedthannecessary.Thecuttinglinewillcutefficientlywhenthe
engineis runat less than fullthrottle. Atlower
speeds,thereislessenginenoiseandvibration.
Thecuttinglinewill lastlonger andwill beless
likely to “weld” onto the spool.
Iftrimmerheaddoesnotturnwhentheengineis
in operation, make sure the tube is properly
seated in engine shroud.
Always release the throttle trigger and allow
the engine to return to idle speed when not
cutting.
To stop engine:
S Move the switch to STOP.
S If engine does not stop, move choke to
the FULL CHOKE position.
ADVANCING THE TRIMMER LINE
Trimmerlinewilladvanceapproximately2in.( 5
cm)eachtimethebottomofthetrimmerheadis
tappedonthegroundwiththeenginerunningat
full throttle.
Themostefficientline lengthis themaximum
length allowed by line limiter.
Always keeptheshieldin placewhen thetool
is being operated.
To Advance Line:
S Operate the engine at full throttle.
S Holdthetrimmer headparalleltoandabove
the grassy area.
S Tap bottom of trimmer head lightly on the
groundonetime.Approximately 2in.(5cm)
of line will be advanced with each tap. A
S Cutonlygrass,weeds,andwoody brushup
to1/2inch indiameter withthe weedblade.
Do notlet theblade contactmaterial itcannot cut such as stumps, rocks, fences,
metal,etc.,orclustersofhard,woodybrush
having a diameter greater than 1/2 inch.
7
www.mymowerparts.com
For Parts Call K&T 606-678-9623 or 606-561-4983
S Keep the blade sharp. A dull blade is more
likely to snag and thrust.
S Cut only at full throttle. The blade will have
maximumcuttingpower andis less likelyto
bind or stall.
S “Feed” the blade deliberately and not too
rapidly.Thebladecanthrustaway ifit is fed
too rapidly.
S Cutonly from your right toyour left.Swinging the unit in the same direction as the
blade spins increases the cutting action.
S Usetheshoulder strapandkeepafirmgrip
on the unit with both hands.A properly adjusted shoulder strap will support the
weight of the unit, freeing your arms and
hands to control and guidethe cuttingmotion.
S Keep feet comfortably spread apart and
bracedforapossiblesudden,rapidthrustof
unit.Donotoverreach.Keepfirmfootingand
balance.
S Keep bladebelow waistlevel; itwill beeasier to maintain control of unit.
S Donotraisetheengineaboveyour waistas
the blade can come dangerously close to
your body.
S Do not swing unit with such force that you
are in danger of losing your balance.
Bring the engine to cutting speed before entering the material to be cut.
If the blade does not turnwhen yousqueeze
the throttle trigger, make sure tubeis fully inserted into the engine.
Always release the throttle trigger and allow
engine to return to idle speed when not cutting. The blade should not turn while the engineis runningatidle.Ifthe bladeturns atidle,
do not use your unit. Refer to theCarburetor
adjustment section or contact your Authorized Service Dealer.
S Maintain good firm footing while using the
unit.Dothis by plantingfeet firmly in acomfortable apart position.
S Cut while swinging the upper part of your
body from right to left.
S As youmoveforwardtothenextareatocut,
be sure tomaintain your balance andfooting.
REPLACING THE LINE
S Pushandholdtheenginestopswitch inthe
stop/off position until the unit has fully
stopped.
S Disconnect the spark plug lead wire.
S Remove the spool by firmly pulling on the
tap button.
S Clean entire surface of hub and spool.
S Replacewithapre-woundspool,or cuttwo
lengths of12-1/2feetof.080” (2mm) diameterWeedEaterbrandline.Never usewire,
rope, string, etc., which can break off and
become a dangerous missile.
S Insertends oflineabout1/2inch(1cm) into
the small hole inside spool.
Spool
Small
Holes
Line exit holes
Line in Notch
Line in Notch
S
S
S
S
S
S
Hub
Wind the line evenly and tightly onto the
spool. Wind in the direction of the arrows
found on the spool.
Pushthelineintothenotches,leaving3to5
inches (7 - 12 cm) unwound.
Insert the line into the the exit holes in the
hub as shown in the illustration.
Align notches with the line exit holes.
Push the spool into the hub until it snaps
into place.
Pull the line extendingoutside ofthe hubto
release it from the notch.
SERVICE
Werecommend allservice andadjustments
not listed in this manual be performed by an
Authorized Service Dealer.
10 o’clock
Cut using the 8 o’clock
to 10 o’clock position of
the blade
8 o’clock
CARBURETOR ADJUSTMENT
Your carburetor is equippedwithlimitercaps.
Damage willoccur ifyouturnthe needles beyondthelimitercaps.Adjustingthecarburetoris
acomplicatedtask. Werecommendthatyou
takeyourunittoanAuthorizedServiceDealer.
WARNING: The operator or others must
SPARK PLUG
not try toclear away cut materialwith theenginerunningor thebladeturningtoavoidserious injury. Stop engine and blade before removing materials wrapped around blade or
tube.
Replace spark plug yearly with a Champion
RCJ-8Y plug. Spark plug gap is .025 in.
IGNITION TIMING
Ignition timing is fixed, non-adjustable.
8
www.mymowerparts.com
For Parts Call K&T 606-678-9623 or 606-561-4983
tatingheadparts thatwillwear andrequirereplacementwithreasonableuseduringthewarranty period. This warranty does not cover
predelivery setupor normaladjustments explained in the operator’s manual.
THIS WARRANTY GIVES YOU SPECIFIC
LEGAL RIGHTS, AND YOU MAY HAVE
OTHER RIGHTS WHICH VARY FROM
STATE TO STATE.
NO CLAIMS FOR CONSEQUENTIAL OR
OTHER DAMAGES WILL BE ALLOWED,
AND THERE ARE NO OTHER EXPRESS
WARRANTIES EXCEPT THOSE EXPRESSLY STIPULATED HEREIN.
SOME STATES DO NOT ALLOW LIMITATIONSONHOWLONG AN IMPLIEDWARRANTY LASTS OR THE EXCLUSION OR
LIMITATIONSOFINCIDENTALORCONSEQUENTIAL DAMAGES, SO THE ABOVE
LIMITATIONS OR EXCLUSION MAY NOT
APPLY TO YOU.
FRIGIDAIREHOMEPRODUCTSpolicyisto
continuouslyimproveitsproducts.Therefore,
FRIGIDAIREHOMEPRODUCTSreserves
therighttochange,modify,ordiscontinuemodels,designs,specifications,andaccessoriesof
allproductsatanytimewithoutnoticeorobligation to any purchaser.
TROUBLESHOOTING
Engine will not start.
S Fuel tank empty.
S Engine flooded.
S Spark plug not firing.
S Fuel not reaching carburetor.
S Carburetor requires adjustment.
Engine will not idle properly.
S Carburetor requires adjustment.
S Throttle trigger screw too tight.
Engine will not accelerate, lacks power,
or dies under a load.
S Air filter dirty.
S Spark plug fouled.
S Carburetor requires adjustment.
Engine smokes excessively.
S Air filter dirty.
S Too much oil mixed with gasoline.
S Carburetor requires adjustment.
Line does not advance or breaks while
cutting.
S Line improperly routed in head.
S Line improperly wound on spool.
S Line size incorrect.
Line welds onto spool.
S Line size incorrect
S Line improperly wound on spool.
S Crowding line on material being cut.
Line pulls back into head
S Too little line outside of head.
S Line size incorrect.
U.S. EPA
EMISSION CONTROL
WARRANTY STATEMENT
YOUR WARRANTY RIGHTS AND OBLIGATIONS: The U. S. Environmental
Protection Agency and POULAN/WEED
EATER, DIVISION OF WCI OUTDOOR
PRODUCTS are pleased to explain the
emissions control system warranty onyour
lawn and garden equipment engine. All new
utility and lawn and garden equipment engines must be designed, built, andequipped
to meet the stringent anti-- smog standards.
POULAN/WEED EATER must warrant the
emission control system on your lawn and
garden equipment engine for the periods of
timelisted belowprovided therehas beenno
abuse, neglect, or improper maintenanceof
your lawn and garden equipment engine.
Your emissioncontrolsystemincludes parts
such as the carburetor and the ignition system. Where a warrantable condition exits,
POULAN/WEED EATER will repair your
lawn and garden equipment engine at no
cost to you. Expenses covered under warranty include diagnosis, parts and labor.
MANUFACTURER’S WARRANTY COVERAGE: If any emissions related part on
your engine(as listedunder Emissions Control Warranty Parts List) is defectiveor adefect in the materials or workmanship of the
engine causes the failure of such an emission related part, the part will be repaired or
replaced by POULAN/WEED EATER.
OWNER’S WARRANTY RESPONSIBILITIES: As thelawnandgarden equipmentengine owner, you are responsible for the per-
NEED ASSISTANCE?
Call 1-800-554-6723.
NEED SERVICE PART?
Contact your dealer.
LIMITED WARRANTY
FRIGIDAIREHOMEPRODUCTSwarrantsto
theoriginalpurchaserthateachnewWeedEat er or Poulan PRO brand gasolinetool or attachmentis freefrom defects in materialand
workmanshipandagrees torepair orreplace
underthiswarrantyanydefectivegasolineproductor attachmentas follows from theoriginal
date of purchase.
2 YEARS-- Parts and Labor, when used for
household purposes.
60 DAYS - Parts and Labor, when used for
commercial,professional,orincomeproducing
purposes.
30 DAYS - Parts andLabor, ifused for rental
purposes.
Thiswarrantyisnottransferableanddoesnot
cover damageor liability causedbyimproper
handling,impropermaintenance,ortheuseof
accessoriesand/orattachmentsnots pecifically
recommendedbyFRIGIDAIREHOMEPRODUCTSfor this tool.Additionally, this warranty
does notcover tune-ups,spark plugs,filters,
starterropes,startersprings,cuttingline,orro-
9
www.mymowerparts.com
For Parts Call K&T 606-678-9623 or 606-561-4983
formanceof therequired maintenancelisted
in your Owner’s Manual. POULAN/WEED
EATER recommends that you retain all receipts covering maintenance on your lawn
andgardenequipmentengine,butPOULAN/
WEED EATER cannot deny warranty solely
for the lack of receipts or for your failure to
ensure the performance of all scheduled
maintenance.
As the lawn and garden
equipment engine owner, you should be
aware that POULAN/WEED EATER may
deny youwarranty coverageifyour lawnand
garden equipment engine or a part of it has
failed due to abuse, neglect, improper maintenance, unapproved modifications, or the
use of parts not made or approved by the
original equipment manufacturer. You are
responsible for presenting your lawn and
garden equipment engine to a POULAN/
WEED EATER authorized repair center as
soon as a problem exists. Warranty repairs
shouldbecompletedinareasonableamount
of time, not to exceed 30 days. If you have
anyquestionsregardingyour warrantyrights
andresponsibilities,youshouldcontactyour
nearest authorized service center or call
POULAN/WEED
EATER
at
1-- 800-- 554-- 6723. WARRANTY COMMENCEMENT DATE: The warranty period
begins on the date the lawn and garden
equipment engine is purchased. LENGTH
OF COVERAGE: This warranty shall befor
a period of two years from the initial date of
purchase. WHAT IS COVERED: REPAIR
ORREPLACEMENT OF PARTS. Repair or
replacement of any warranted part will be
performed at no charge to the owner at an
approved POULAN/WEED EATER servicingcenter.Ifyouhaveany questions regardingyour warranty rights andresponsibilities,
you should contactyour nearestauthorized
servicecenter or call POULAN/WEEDEATER at 1-- 800-- 554-- 6723 WARRANTY PERIOD: Any warranted part which is not
scheduled for replacement as required
maintenance, or which is scheduled only for
regular inspection to the effect of “repair or
replaceas necessary” shallbewarrantedfor
2years. Any warranted partwhich is scheduled for replacement as required maintenance shall be warranted for the period of
time up to the first scheduled replacement
point for that part. DIAGNOSIS: Theowner
shall not be charged for diagnostic labor
which leads to the determination that a warrantedpartis defective ifthe diagnostic work
is performed at an approved POULAN/
WEED EATER servicing center. CONSEQUENTIAL DAMAGES: POULAN/WEED
EATER may be liable for damages to other
engine components caused by the failureof
a warranted part stillunder warranty.WHAT
IS NOT COVERED: All failures caused by
abuse, neglect, or improper maintenance
are not covered. ADD-- ON OR MODIFIED
PARTS: Theuseofadd-- onor modifiedparts
can be grounds for disallowing a warranty
claim. POULAN/WEED EATER is not liable
to cover failures of warranted parts caused
by the use of add-- on or modified parts.
HOW TO FILE A CLAIM: If you have any
questionsregardingyourwarranty rightsand
responsibilities, you should contact your
nearest authorized service center or call
POULAN/WEED
EATER
at
1-- 800-- 554-- 6723. WHERE TO GET WARRANTYSERVICE: Warranty services orrepairs shall be provided at all POULAN/
WEED EATER service centers. call:
1-- 800-- 554-- 6723 MAINTENANCE, REPLACEMENT ANDREPAIROFEMISSION
RELATED PARTS: Any POULAN/WEED
EATER approved replacement part used in
the performance of any warranty maintenanceor repair on emissionrelated parts will
be provided without charge to the owner if
thepartis under warranty. EMISSIONCONTROL WARRANTYPARTSLIST:Carburetor, IgnitionSystem: Spark Plug (coveredup
to maintenance schedule), Ignition Module.
MAINTENANCE STATEMENT: The owner
is responsible for the performance of all required maintenance as defined in the owner’s manual.
10
www.mymowerparts.com