1
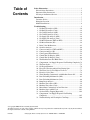
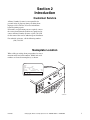
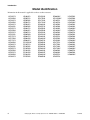
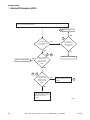
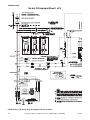
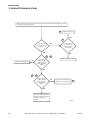
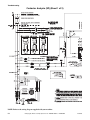
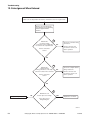
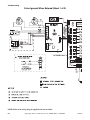
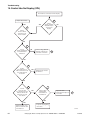
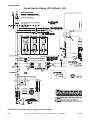
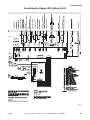
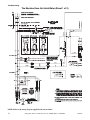
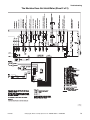
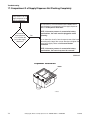
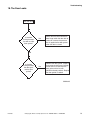
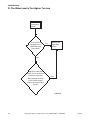
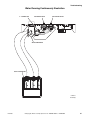
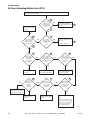
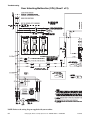
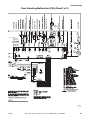
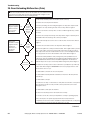
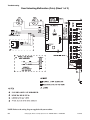
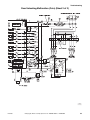
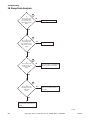
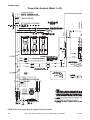
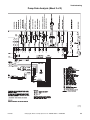
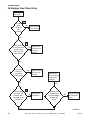
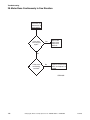
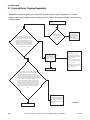
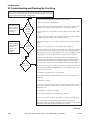
Troubleshooting
Washer-Extractor
Cabinet Hardmount
P, S and V Computer
Refer to Page 8 for Model Numbers
CHM1323C
www.comlaundry.com
Part No. F232203R2
December 2006
Table of
Contents
Safety Information...................................................................................3
General Safety Precautions....................................................................3
Important Safety Instructions ................................................................4
Locating an Authorized Servicer...........................................................5
Introduction..............................................................................................7
Customer Service...................................................................................7
Nameplate Location...............................................................................7
Model Identification ..............................................................................8
Troubleshooting .......................................................................................9
1. No Hot Fill Analysis (OPL) ........................................................10
2. No Hot Fill Analysis (Coin)........................................................14
3. No Cold Fill Analysis (OPL) ......................................................18
4. No Cold Fill Analysis (Coin) ......................................................22
5. No Supply Fill Analysis (OPL)...................................................26
6. No Supply Fill Analysis (Coin) ..................................................30
7. No Motor Function (FWD or REV)............................................34
8. No Motor Function (SP) .............................................................38
9. Drain Valve Malfunction ............................................................42
10. Overflow Analysis ......................................................................46
11. Contactor Analysis (FWD and REV)..........................................50
12. Contactor Analysis (SP)..............................................................54
13. Coins Ignored When Entered......................................................58
14. Control Has No Display (OPL)...................................................62
15. Control Has No Display (Coin) ..................................................66
16. The Machine Does Not Hold Water ...........................................70
17. Compartment 2 of Supply Dispenser Not Flushing Completely 74
18. The Door Leaks...........................................................................75
19. No Keypad Function ...................................................................76
20. Excessive Vibration and/or Noise During Spin ..........................77
21. The Water Level is Too High or Too Low .................................78
22. Excessive Cycle Time.................................................................79
23. Water Running Continuously with Machine Power Off.............80
24. Door Unlocking Malfunction (OPL)...........................................82
25. Door Unlocking Malfunction (Coin) ..........................................86
26. Pump Drain Analysis ..................................................................90
27. Machine Won't Start (OPL) ........................................................94
28. Machine Won't Start (Coin) ........................................................98
29. Motor Runs Continuously in One Direction .............................102
30. Machine Stops in Mid-Cycle ....................................................103
31. Overload Relay Tripping Repeatedly .......................................104
32. Compartment 2 of Supply Dispenser Not Flushing
Completely ................................................................................105
33. Troubleshooting and Cleaning the Coin Drop ..........................106
© Copyright 2006, Alliance Laundry Systems LLC
All rights reserved. No part of the contents of this book may be reproduced or transmitted in any form or by any means without
the expressed written consent of the publisher.
F232203
© Copyright, Alliance Laundry Systems LLC – DO NOT COPY or TRANSMIT
1
Notes
2
© Copyright, Alliance Laundry Systems LLC – DO NOT COPY or TRANSMIT
F232203
Section 1
Safety Information
Throughout this manual and on machine decals, you will find precautionary statements (“CAUTION,”
“WARNING,” and “DANGER”) followed by specific instructions. These precautions are intended for the personal
safety of the operator, user, servicer and those maintaining the machine.
a DANGER
Danger indicates the presence of a hazard that will cause severe personal injury, death or substantial property
damage if the danger is ignored.
a WARNING
Warning indicates the presence of a hazard that can cause severe personal injury, death or substantial property
damage if the warning is ignored.
a CAUTION
Caution indicates the presence of a hazard that will or can cause minor personal injury or property damage if the
caution is ignored.
Additional precautionary statements (“IMPORTANT” and “NOTE”) are followed by specific instructions.
IMPORTANT
The word “IMPORTANT” is used to inform the reader of specific procedures where minor machine damage will
occur if the procedure is not followed.
NOTE
The word “NOTE” is used to communicate installation, operation, maintenance or servicing information that is
important but not hazard related.
General Safety Precautions
In the interest of safety, some general precautions relating to the operation of this machine follow.
WARNING
• Failure to install, maintain and/or operate this product according to the manufacturer’s
instructions may result in conditions which can produce serious injury, death and/or property
damage.
• Do not repair or replace any part of the product or attempt any servicing unless specifically
recommended or published in this Service Manual and unless you understand and have the
skills to carry out the servicing.
• Whenever ground wires are removed during servicing, these ground wires must be
reconnected to ensure that the product is properly grounded and to reduce the risk of fire,
electric shock, serious injury or death.
W006R2
F232203
© Copyright, Alliance Laundry Systems LLC – DO NOT COPY or TRANSMIT
3
Safety Information
WARNING
To reduce the risk of electric shock, fire, explosion, serious injury or death:
• Disconnect electric power to the washer-extractor before servicing.
• Never start the washer-extractor with any guards/panels removed.
• Whenever ground wires are removed during servicing, these ground wires must be
reconnected to ensure that the washer-extractor is properly grounded.
W460
WARNING
Repairs that are made to your products by unqualified persons can result in hazards due to
improper assembly or adjustments subjecting you or the inexperienced person making such
repairs to the risk of serious injury, electrical shock or death.
W007
WARNING
If you or an unqualified person perform service on your product, you must assume the
responsibility for any personal injury or property damage which may result. The manufacturer
will not be responsible for any injury or property damage arising from improper service and/or
service procedures.
W008
Always contact your dealer, distributor, service agent or the manufacturer about any problems or conditions you do
not understand.
Important Safety Instructions
WARNING
To reduce the risk of fire, electric shock, serious injury or death to persons when using your
washer, follow these basic precautions:
W023E
1. Read all instructions before using the washerextractor.
2. Refer to the GROUNDING INSTRUCTIONS in
the INSTALLATION manual (supplied with your
washer-extractor) for the proper grounding of the
washer-extractor.
3. Do not wash textiles that have been previously
cleaned in, washed in, soaked in or spotted with
gasoline, dry-cleaning solvents or other
flammable or explosive substances. They give off
vapors that could ignite or explode.
4
4. Do not add gasoline, dry-cleaning solvents or
other flammable or explosive substances to the
wash water. These substances give off vapors that
could ignite or explode.
5. Under certain conditions, hydrogen gas may be
produced in a hot water system that has not been
used for two weeks or more. HYDROGEN GAS
IS EXPLOSIVE. If the hot water system has not
been used for such a period, before using a
washer-extractor, turn on all hot water faucets and
let the water flow from each for several minutes.
This will release any accumulated hydrogen gas.
The gas is flammable. Do not smoke or use an
open flame during this time.
© Copyright, Alliance Laundry Systems LLC – DO NOT COPY or TRANSMIT
F232203
Safety Information
6. Do not allow children to play on or in a washerextractor. Close supervision of children is
necessary when the washer-extractor is used near
children.
7. Before the washer-extractor is removed from
service or discarded, remove the door to the
washing compartment.
8. Do not reach into the washer-extractor if the wash
basket is moving.
9. Do not install or store the washer-extractor where
it will be exposed to water and/or weather.
10. Do not tamper with the washer-extractor’s
controls.
11. Do not repair or replace any part of the washerextractor or attempt any servicing unless
specifically recommended in the usermaintenance instructions or in published userrepair instructions that the user understands and
has the skills to carry out.
12. To reduce the risk of an electrical shock or fire,
DO NOT use an extension cord or an adapter to
connect the washer-extractor to an electrical
power source.
13. Use the washer-extractor only for its intended
purpose, washing clothes.
14. ALWAYS disconnect the washer-extractor from
its electrical supply before attempting any
service.
15. Install the washer-extractor according to the
INSTALLATION INSTRUCTIONS. All
connections for water, drain, electrical power and
grounding must comply with local codes and,
when required, be made by licensed personnel.
16. To reduce the risk of fire, textiles which have
traces of any flammable substances such as
vegetable oil, cooking oil, machine oil,
flammable chemicals, thinner, etc. or anything
containing wax or chemicals such as in mops or
cleaning cloths, must not be put into the washerextractor. These flammable substances may cause
the fabric to ignite.
17. Do not use fabric softeners or products to
eliminate static unless recommended by the
manufacturer of the fabric softener or product.
18. Keep the washer-extractor in good condition.
Bumping or dropping the washer-extractor can
damage its safety features. If this occurs, have the
washer-extractor checked by a qualified service
person.
19. Replace worn power cords and/or loose plugs.
F232203
20. Be sure that water connections have a shut-off
valve and that fill hose connections are tight.
CLOSE the shut-off valves at the end of each
wash day.
21. The loading door MUST BE CLOSED any time
the washer-extractor is to fill, tumble or spin. DO
NOT by-pass the loading door switch and permit
the washer-extractor to operate with the loading
door open.
22. Always read and follow the manufacturer’s
instructions on packages of laundry and cleaning
aids. Heed all warnings and precautions. To
reduce the risk of poisoning or chemical burns,
keep them out of the reach of children at all times
(preferably in a locked cabinet).
23. Always follow the fabric care instructions
supplied by the textile manufacturer.
24. Never operate the washer-extractor with any
guards and/or panels removed.
25. DO NOT operate the washer-extractor with
missing or broken parts.
26. DO NOT by-pass any safety devices.
27. Failure to install, maintain and/or operate this
washer-extractor according to the manufacturer's
instructions may result in conditions that can
produce bodily injury and/or property damage.
NOTE: The WARNING and IMPORTANT
SAFETY INSTRUCTIONS appearing in this
manual are not meant to cover all possible
conditions and situations that may occur. Common
sense, caution and care must be exercised when
installing, maintaining and operating the washerextractor.
Any problems or conditions not understood should be
reported to the dealer, distributor, service agent or the
manufacturer.
Locating an Authorized Servicer
Alliance Laundry Systems is not responsible for
personal injury or property damage resulting from
improper service. Review all service information
before beginning repairs.
Warranty service must be performed by an authorized
technician, using authorized factory parts. If service is
required after the warranty expires, Alliance Laundry
Systems also recommends contacting an authorized
technician and using authorized factory parts.
© Copyright, Alliance Laundry Systems LLC – DO NOT COPY or TRANSMIT
5
Notes
6
© Copyright, Alliance Laundry Systems LLC – DO NOT COPY or TRANSMIT
F232203
Section 2
Introduction
Customer Service
Alliance Laundry Systems is not responsible for
personal injury or property damage resulting from
improper service. Review all service information
before beginning repairs.
If literature or replacement parts are required, contact
the source from whom the machine was purchased or
contact Alliance Laundry Systems at (920) 748-3950
for the name of the nearest authorized parts distributor.
For technical assistance, call the following number:
(920) 748-3121
Nameplate Location
When calling or writing about your product, be sure to
mention model and serial numbers. Model and serial
numbers are located on nameplate(s) as shown.
Model No.
Serial No.
Voltage
Amps
Required Circuit Breaker Amps.
Hz
Wire
Max. Load
Elec. Heating
Product No.
LB
Phase
KG
Max. Speed
KW Steam Press
PSI
Date Code
RPM
BAR
ps
Am
d
.
.
ee
ps
e
Sp PSI
l No
x.
Am Phas
de
er
Ma
Mo l No.
ak
ria
KG Press
it Brere
Se ge
cu
am
Wi
lta
Cir
Ste
Vo ired
de
LB KW
qu
Co
Re
te
Da
Hz Load
ng
x.
Ma Heati
c.
Ele
M
RP R
BA
.
uc
t No
od
Pr
CHM2411P
F232203
© Copyright, Alliance Laundry Systems LLC – DO NOT COPY or TRANSMIT
7
Introduction
Model Identification
Information in this manual is applicable to these washer-extractors.
HC18PC2
HC18SN2
HC18VC2
HC20SN2
HC20VC2
HC20VX2
HC25PC2
HC25SN2
HC25VC2
HC25VX2
HC27PC2
HC27SN2
HC27VC2
HC30SN2
HC30VC2
HC30VX2
HC35PC2
HC35SN2
HC35VC2
HC40SN2
HC40VC2
8
HC40VX2
HC50PC2
HC50SN2
HC50VC2
HC50VX2
HC60SN2
HC60VC2
HC60VX2
HC80PC3
HC80SN3
HC80VCV
HC80VNV
HC80VXV
SC125VNV
SC18PC3
SC18SN2
SC18SN3
SC18VN2
SC18VNV
SC20VN2
SC25SN2
SC25VN2
SC27SN2
SC27VN2
SC27VNV
SC30VN2
SC35PC3
SC35SN2
SC35SN3
SC35VN2
SC35VNV
SC40VN2
SC40VNV
SC50PC3
SC50SN2
SC50SN3
SC50VN2
SC50VNV
SC60VN2
SC60VNF
SC60VNV
SC80SN3
SC80VNV
UC125VNV
UC18PC2
UC18PC3
UC18PN2
UC18PN3
UC18VN2
UC18VNV
UC20PN2
UC20VN2
UC25PC2
UC25PN2
UC25VN2
UC27PC2
UC27PN2
UC27VN2
UC27VNV
UC30PN2
UC30VN2
UC35PC2
UC35PC3
© Copyright, Alliance Laundry Systems LLC – DO NOT COPY or TRANSMIT
UC35PN2
UC35PN3
UC35VN2
UC35VNV
UC40PN2
UC40VN2
UC40VNV
UC50PC2
UC50PC3
UC50PN2
UC50PN3
UC50VN2
UC50VNV
UC60PN2
UC60VN2
UC60VNF
UC60VNV
UC80PC3
UC80PN3
UC80VNV
F232203
Section 3
Troubleshooting
WARNING
To reduce the risk of electrical shock, fire, explosion, serious injury or death:
• Disconnect electrical power to the washer-extractor before servicing it.
• Close the gas shut-off valve to the washer-extractor (when applicable) before servicing it.
• Never start the washer-extractor with any guards/panels removed.
• Whenever ground wires are removed during servicing, these ground wires must be
reconnected to ensure that the washer-extractor is properly grounded.
W461R1
F232203
© Copyright, Alliance Laundry Systems LLC – DO NOT COPY or TRANSMIT
9
Troubleshooting
1. No Hot Fill Analysis (OPL)
No Hot Fill Analysis (OPL)
With the water turned on to the machine, during a cycle that has been programmed for a hot fill,
no hot water is filling the machine.
1A
Replace the HF fuse.
YES
1A
Is the HF light
on the output board
turned on?
NO
Test the HF
fuse with an ohm
meter. Is the HF
fuse blown?
YES
NO
2A
3A
Replace the output board.
Is there voltage
(120 Volts AC)
between the HF
terminal and the
ACN?
NO
Replace the output board.
YES
4A
3A
Is there voltage
(120 Volts AC)
between the V1
terminal and the
ACN?
NO
Inspect wire HF TS16 and
repair or replace the wire as
needed.
5A
YES
Inspect the water inlet valve
and hoses. Repair or replace
the water inlet valve as
needed.
CHM388S
10
© Copyright, Alliance Laundry Systems LLC – DO NOT COPY or TRANSMIT
F232203
Troubleshooting
Please refer to the following 2 pages for wiring diagram information.
F232203
© Copyright, Alliance Laundry Systems LLC – DO NOT COPY or TRANSMIT
11
Troubleshooting
No Hot Fill Analysis (Sheet 1 of 2)
NOTE: Refer to the wiring diagram supplied with your machine.
12
© Copyright, Alliance Laundry Systems LLC – DO NOT COPY or TRANSMIT
F232203
Troubleshooting
No Hot Fill Analysis (Sheet 2 of 2)
4A
5A
3A
2A
1A
CHM389S
607072(P)
F232203
© Copyright, Alliance Laundry Systems LLC – DO NOT COPY or TRANSMIT
13
Troubleshooting
2. No Hot Fill Analysis (Coin)
No Hot Fill Analysis (Coin)
With the water turned on to the machine, during a cycle that has been programmed for a hot fill,
no hot water is filling the machine.
1A
Replace the HF fuse.
YES
1A
Is the HF light
on the output board
turned on?
NO
Test the HF
fuse with an ohm
meter. Is the HF
fuse blown?
YES
NO
2A
3A
Replace the output board.
Is there voltage
(120 Volts AC)
between the HF
terminal and the
ACN?
NO
Replace the output board.
YES
4A
3A
Is there voltage
(120 Volts AC)
between the V1
terminal and the
ACN?
NO
Inspect wire 16 and repair or
replace the wire as needed.
5A
YES
Inspect the water inlet valve
and hoses. Repair or replace
the water inlet valve as
needed.
CHM390S
14
© Copyright, Alliance Laundry Systems LLC – DO NOT COPY or TRANSMIT
F232203
Troubleshooting
Please refer to the following 2 pages for wiring diagram information.
F232203
© Copyright, Alliance Laundry Systems LLC – DO NOT COPY or TRANSMIT
15
Troubleshooting
No Hot Fill Analysis (Sheet 1 of 2)
NOTE: Refer to the wiring diagram supplied with your machine.
16
© Copyright, Alliance Laundry Systems LLC – DO NOT COPY or TRANSMIT
F232203
Troubleshooting
No Hot Fill Analysis (Sheet 2 of 2)
5A
4A
2A
1A
3A
CHM391S
606909(F)
F232203
© Copyright, Alliance Laundry Systems LLC – DO NOT COPY or TRANSMIT
17
Troubleshooting
3. No Cold Fill Analysis (OPL)
No Cold Fill Analysis (OPL)
With the water turned on to the machine, during a cycle that has been programmed for a cold fill,
no cold water is filling the machine.
1A
Replace the CF fuse.
YES
1A
Is the CF light
on the output board
turned on?
NO
Test the CF
fuse with an ohm
meter. Is the CF
fuse blown?
YES
NO
2A
3A
Replace the output board.
Is there voltage
(120 Volts AC)
between the CF
terminal and the
ACN?
NO
Replace the output board.
YES
4A
3A
Is there voltage
(120 Volts AC)
between the V2
terminal and the
ACN?
NO
Inspect wire CF TS15 and
repair or replace the wire
as needed.
5A
YES
Inspect the water inlet valve
and hoses. Repair or replace
the water inlet valve as
needed.
CHM392S
18
© Copyright, Alliance Laundry Systems LLC – DO NOT COPY or TRANSMIT
F232203
Troubleshooting
Please refer to the following 2 pages for wiring diagram information.
F232203
© Copyright, Alliance Laundry Systems LLC – DO NOT COPY or TRANSMIT
19
Troubleshooting
No Cold Fill Analysis (Sheet 1 of 2)
NOTE: Refer to the wiring diagram supplied with your machine.
20
© Copyright, Alliance Laundry Systems LLC – DO NOT COPY or TRANSMIT
F232203
Troubleshooting
No Cold Fill Analysis (Sheet 2 of 2)
5A
4A
3A
1A
2A
CHM393S
607072(P)
F232203
© Copyright, Alliance Laundry Systems LLC – DO NOT COPY or TRANSMIT
21
Troubleshooting
4. No Cold Fill Analysis (Coin)
No Cold Fill Analysis (Coin)
With the water turned on to the machine, during a cycle that has been programmed for a cold fill,
no cold water is filling the machine.
1A
Replace the CF fuse.
YES
1A
Is the CF light
on the output board
turned on?
NO
Test the CF
fuse with an ohm
meter. Is the CF
fuse blown?
YES
NO
2A
3A
Replace the output board.
Is there voltage
(120 Volts AC)
between the CF
terminal and the
ACN?
NO
Replace the output board.
YES
4A
3A
Is there voltage
(120 Volts AC)
between the V2
terminal and the
ACN?
NO
Inspect wire 15 and repair or
replace the wire as needed.
5A
YES
Inspect the water inlet valve
and hoses. Repair or replace
the water inlet valve as
needed.
CHM394S
22
© Copyright, Alliance Laundry Systems LLC – DO NOT COPY or TRANSMIT
F232203
Troubleshooting
Please refer to the following 2 pages for wiring diagram information.
F232203
© Copyright, Alliance Laundry Systems LLC – DO NOT COPY or TRANSMIT
23
Troubleshooting
No Cold Fill Analysis (Sheet 1 of 2)
NOTE: Refer to the wiring diagram supplied with your machine.
24
© Copyright, Alliance Laundry Systems LLC – DO NOT COPY or TRANSMIT
F232203
Troubleshooting
No Cold Fill Analysis (Sheet 2 of 2)
4A
2A
1A
5A
3A
CHM395S
606909(F)
F232203
© Copyright, Alliance Laundry Systems LLC – DO NOT COPY or TRANSMIT
25
Troubleshooting
5. No Supply Fill Analysis (OPL)
No Supply Fill Analysis (OPL)
With the machine beginning
a wash step that has been
programmed with a supply,
no water is coming into a
supply compartment.
Replace the supply fuse.
YES
3A
1A
Is there voltage
(120 Volts AC) between
the supply terminal
(i.e., S1, S2 or S3)
and the ACN?
YES
Is there voltage
(120 Volts AC) between
the output side of the supply
fuse (i.e., S1, S2 or S3)
and the ACN?
Is there voltage
(120 Volts AC) between
the input side of the supply
fuse (i.e., S1, S2 or S3)
and the ACN?
YES
2A
2A
2A
3A
NO
NO
NO
Replace the output board.
CHM396S
26
© Copyright, Alliance Laundry Systems LLC – DO NOT COPY or TRANSMIT
F232203
Troubleshooting
Please refer to the following 2 pages for wiring diagram information.
F232203
© Copyright, Alliance Laundry Systems LLC – DO NOT COPY or TRANSMIT
27
Troubleshooting
No Supply Fill Analysis (OPL) (Sheet 1 of 2)
NOTE: Refer to the wiring diagram supplied with your machine.
28
© Copyright, Alliance Laundry Systems LLC – DO NOT COPY or TRANSMIT
F232203
Troubleshooting
No Hot Supply 1 Fill Analysis (OPL) (Sheet 2 of 2)
2A
1A
3A
1A
1A
3A
CHM397S
607072(P)
F232203
© Copyright, Alliance Laundry Systems LLC – DO NOT COPY or TRANSMIT
29
Troubleshooting
6. No Supply Fill Analysis (Coin)
No Supply Fill Analysis (Coin)
With the machine beginning
a wash step that has been
programmed with a supply,
no water is coming into a
supply compartment.
Replace the supply fuse.
YES
3A
1A
Is there
voltage (120 Volts AC)
between the supply terminal
(i.e., S1 or S2) and
the ACN?
2A
YES
Is there
voltage (120 Volts AC)
between the output side
of the supply fuse (i.e.,
S1 or S2) and the
ACN?
2A
YES
2A
3A
Is there
voltage (120 Volts AC)
between the input side of
the supply fuse (i.e.,
S1 or S2) and the
ACN?
NO
NO
NO
Replace the output board.
CHM398S
30
© Copyright, Alliance Laundry Systems LLC – DO NOT COPY or TRANSMIT
F232203
Troubleshooting
Please refer to the following 2 pages for wiring diagram information.
F232203
© Copyright, Alliance Laundry Systems LLC – DO NOT COPY or TRANSMIT
31
Troubleshooting
No Supply Fill Analysis (Coin) (Sheet 1 of 2)
NOTE: Refer to the wiring diagram supplied with your machine.
32
© Copyright, Alliance Laundry Systems LLC – DO NOT COPY or TRANSMIT
F232203
Troubleshooting
No Hot Supply 1 Fill Analysis (Coin) (Sheet 2 of 2)
3A
1A
2A
CHM399S
606909(F)
F232203
© Copyright, Alliance Laundry Systems LLC – DO NOT COPY or TRANSMIT
33
Troubleshooting
7. No Motor Function (FWD or REV)
No Motor Function (FWD or REV)
With the machine running, the water
valves on and the machine holding
water (i.e., filling up), the basket has
no wash function (i.e., FWD or REV).
2A
1A
YES
Is there voltage
(120 Volts AC)
between wire FWD on the
output board and the ACN?
2A
NO
Is there voltage
(120 Volts AC)
between the input side of
the FWD fuse and the ACN?
3A
NO
Replace the output board.
Is there voltage (120 Volts AC)
between wire REV on the
output board and
the ACN?
Is there voltage (120 Volts AC)
between the input side
of the REV fuse and
the ACN?
YES
Inspect the motor.
Repair/replace the motor
as needed.
2A
YES
3A
4A
Is there voltage
(120 Volts AC) across
the coil of the KM3 and
the KM4 contactors?
YES
Is there voltage
(120 Volts AC) between the
output side of the FWD fuse and
the ACN?
NO
Replace the FWD and/or
the REV fuse as needed.
Is there voltage (120 Volts AC)
between the output side
of the REV fuse and
the ACN?
NO
Inspect the contactors'
wiring connections.
CHM400S
34
© Copyright, Alliance Laundry Systems LLC – DO NOT COPY or TRANSMIT
F232203
Troubleshooting
Please refer to the following 2 pages for wiring diagram information.
F232203
© Copyright, Alliance Laundry Systems LLC – DO NOT COPY or TRANSMIT
35
Troubleshooting
No Motor Function (FWD or REV) (Sheet 1 of 2)
4A
1A
NOTE: Refer to the wiring diagram supplied with your machine.
36
© Copyright, Alliance Laundry Systems LLC – DO NOT COPY or TRANSMIT
F232203
Troubleshooting
No Motor Function (FWD or REV) (Sheet 2 of 2)
4A
2A
1A
3A
CHM401S
607072(P)
F232203
© Copyright, Alliance Laundry Systems LLC – DO NOT COPY or TRANSMIT
37
Troubleshooting
8. No Motor Function (SP)
No Motor Function (SP)
With the machine running, the water
valves on and the machine holding
water (i.e., filling up), the basket has
no extract function (i.e., SP).
2A
1A
3A
2A
YES
Is there voltage
(120 Volts AC) between
wire SPIN on the output
board and the ACN?
NO
Is there voltage
(120 Volts AC) between the
input side of the SP fuse
and the ACN?
NO
Replace the output board.
YES
Inspect the motor.
Repair/replace the motor
as needed.
2A
YES
3A
4A
Is there voltage
(120 Volts AC) across
the coil of the KM5 and
the KM4 contactors?
YES
Is there voltage
(120 Volts AC) between the
output side of the SP fuse
and the ACN?
NO
Replace the SP fuse.
NO
Inspect the contactors'
wiring connections.
CHM402S
38
© Copyright, Alliance Laundry Systems LLC – DO NOT COPY or TRANSMIT
F232203
Troubleshooting
Please refer to the following 2 pages for wiring diagram information.
F232203
© Copyright, Alliance Laundry Systems LLC – DO NOT COPY or TRANSMIT
39
Troubleshooting
No Motor Function (SP) (Sheet 1 of 2)
NOTE: Refer to the wiring diagram supplied with your machine.
40
© Copyright, Alliance Laundry Systems LLC – DO NOT COPY or TRANSMIT
F232203
Troubleshooting
No Motor Function (SP) (Sheet 2 of 2)
4A
2A
1A
3A
CHM403S
607072(P)
F232203
© Copyright, Alliance Laundry Systems LLC – DO NOT COPY or TRANSMIT
41
Troubleshooting
9. Drain Valve Malfunction
Drain Valve Malfunction
With the machine running, the basket moving and the water valves on, the machine does not
hold water (i.e., the machine does not fill).
Replace the DN fuse.
YES
Is the
DN light on
the output board
turned on?
NO
2A
Test the
DN fuse with an
ohm meter. Is the
DN fuse blown?
YES
NO
1A
NO
Replace the output board.
3A
Is there voltage
(120 Volts AC)
between the DN
terminal and
the ACN?
Replace the output board.
YES
4A
3A
Is there voltage
(120 Volts AC)
between the TS11
terminal and
the ACN?
NO
Inspect wire DN TS11 and
repair or replace the wire
as needed.
YES
6A
Inspect the drain valve.
Repair/replace the drain
valve as needed.
YES
Is there voltage
(120 Volts AC)
Across the drain
valve motor?
NO
Inspect wiring between the drain
valve and the output board and
repair or replace the wiring as
needed.
CHM404S
42
© Copyright, Alliance Laundry Systems LLC – DO NOT COPY or TRANSMIT
F232203
Troubleshooting
Please refer to the following 2 pages for wiring diagram information.
F232203
© Copyright, Alliance Laundry Systems LLC – DO NOT COPY or TRANSMIT
43
Troubleshooting
Drain Valve Malfunction (Sheet 1 of 2)
NOTE: Refer to the wiring diagram supplied with your machine.
44
© Copyright, Alliance Laundry Systems LLC – DO NOT COPY or TRANSMIT
F232203
Troubleshooting
Drain Valve Malfunction (Sheet 2 of 2)
6A
4A
5A
3A
1A
2A
CHM405S
607072(P)
F232203
© Copyright, Alliance Laundry Systems LLC – DO NOT COPY or TRANSMIT
45
Troubleshooting
10. Overflow Analysis
y
Water is running continuously into the machine.
Disconnect
power to the
machine. Does the
machine continue
to fill with
water?
YES
Repair/replace the water inlet valve that is
allowing water to enter the machine when
power is disconnected.
NO
Reconnect
power to the machine.
Is the drain valve
closed tightly?
NO
Refer to the "Drain Valve
Malfunction" flowchart.
YES
1A
Make sure that the
water level switch is open.
Replace the output board.
Perform an ohms test
across terminals 21 and 24 on the
water level switch.
Is it opened or closed?
YES
Perform an ohms test
across terminals 31 and 34
on the water level switch.
Is it opened or
closed?
2A
3A
Is there voltage
from the terminal for the
water inlet valve that is allowing
water to fill the machine (i.e., CF,
HF, S1, S2 and S3) and
the ACN?
NO
NO
YES
Examine the water inlet valve
wiring. Repair/replace the wiring
as needed.
YES
Examine the water
level switch and the air
trap hose. Repair or replace
either as needed.
Does the machine continue
to fill with water?
CHM406S
46
© Copyright, Alliance Laundry Systems LLC – DO NOT COPY or TRANSMIT
F232203
Troubleshooting
Please refer to the following 2 pages for wiring diagram information.
F232203
© Copyright, Alliance Laundry Systems LLC – DO NOT COPY or TRANSMIT
47
Troubleshooting
Overflow Analysis (Sheet 1 of 2)
NOTE: Refer to the wiring diagram supplied with your machine.
48
© Copyright, Alliance Laundry Systems LLC – DO NOT COPY or TRANSMIT
F232203
Troubleshooting
Overflow Analysis (Sheet 2 of 2)
3A
2A
1A
2A
2A
2A
2A
1A
CHM407S
607072(P)
F232203
© Copyright, Alliance Laundry Systems LLC – DO NOT COPY or TRANSMIT
49
Troubleshooting
11. Contactor Analysis (FWD and REV)
Contactor Analysis (FWD and REV)
The contactor is not energizing.
3A
Examine the wiring to terminal
strip 27. Repair and/or replace
the wiring as needed.
1A
Replace the KM3 and/or the KM4
contactor(s) as needed.
Is there voltage
(120 Volts AC) between the
FWD wire and the ACN?
NO
Is there voltage (120 Volts AC)
between the REV wire and
the ACN?
YES
Manually operate
the KM3 and/or the KM4
contactor(s). Does the
motor function?
YES
2A
NO
Inspect the motor wiring and repair
or replace it as needed.
Inspect the motor and replace it
as needed.
Disconnect
power to the machine.
YES
Using an ohm meter, is there continuity
between the coils on the KM3
contactor and the coils on
the KM4 contactor?
NO
Replace the KM3 and/or the KM4
contactor(s) as needed.
CHM408S
50
© Copyright, Alliance Laundry Systems LLC – DO NOT COPY or TRANSMIT
F232203
Troubleshooting
Please refer to the following 2 pages for wiring diagram information.
F232203
© Copyright, Alliance Laundry Systems LLC – DO NOT COPY or TRANSMIT
51
Troubleshooting
Contactor Analysis (FWD and REV) (Sheet 1 of 2)
3A
2A
1A
NOTE: Refer to the wiring diagram supplied with your machine.
52
© Copyright, Alliance Laundry Systems LLC – DO NOT COPY or TRANSMIT
F232203
Troubleshooting
Contactor Analysis (FWD and REV) (Sheet 2 of 2)
3A
2A
1A
1A
CHM409S
607072(P)
F232203
© Copyright, Alliance Laundry Systems LLC – DO NOT COPY or TRANSMIT
53
Troubleshooting
12. Contactor Analysis (SP)
Contactor Analysis (SP)
The contactor is not energizing.
3A
Examine the wiring to terminal
strip 27. Repair and/or replace
the wiring as needed.
1A
Replace the KM5 contactor.
Is there voltage (120 Volts
AC) between the SPIN wire
and the ACN?
NO
YES
Manually operate the
KM5 contactor. Does
the motor function?
YES
2A
NO
Inspect the motor wiring and repair
or replace it as needed.
Inspect the motor and replace it as
needed.
YES
Disconnect
power to the machine.
Using an ohm meter, is there
continuity between the coils
on the KM5 contactor?
NO
Replace the KM5 contactor.
CHM410S
54
© Copyright, Alliance Laundry Systems LLC – DO NOT COPY or TRANSMIT
F232203
Troubleshooting
Please refer to the following 2 pages for wiring diagram information.
F232203
© Copyright, Alliance Laundry Systems LLC – DO NOT COPY or TRANSMIT
55
Troubleshooting
Contactor Analysis (SP) (Sheet 1 of 2)
3A
NOTE: Refer to the wiring diagram supplied with your machine.
56
© Copyright, Alliance Laundry Systems LLC – DO NOT COPY or TRANSMIT
F232203
Troubleshooting
Contactor Analysis (SP) (Sheet 2 of 2)
3A
2A
1A
1A
CHM411S
607072(P)
F232203
© Copyright, Alliance Laundry Systems LLC – DO NOT COPY or TRANSMIT
57
Troubleshooting
13. Coins Ignored When Entered
Coins Ignored When Entered
When coins are deposited in the machine, the machine does not recognize them.
Run the coin meter diagnostic
test outlined in the programming
manual supplied with the
machine.
1A
Examine the
coin meter's wiring
connections on the J3 plug that
is located on the computer board.
NO
Secure the coin meter wiring
connections.
Run the coin meter test
procedure to test the coin
meter's operation.
Are the connections
secure?
YES
2A
Examine the
computer board's
wiring connections on the 3-pin
connector located on the coin meter.
NO
Secure the computer board's
wiring connections.
Run the coin meter test
procedure to test the coin
meter's operation.
Are the connections
secure?
YES
3A
NO
Examine the coin
meter's optic sensor wiring.
Replace the optic sensor.
YES
Replace the coin meter.
Is the optic sensor's
wiring damaged?
CHM412S
58
© Copyright, Alliance Laundry Systems LLC – DO NOT COPY or TRANSMIT
F232203
Troubleshooting
Please refer to the following 2 pages for wiring diagram information.
F232203
© Copyright, Alliance Laundry Systems LLC – DO NOT COPY or TRANSMIT
59
Troubleshooting
Coins Ignored When Entered (Sheet 1 of 2)
3A
1A
2A
NOTE: Refer to the wiring diagram supplied with your machine.
60
© Copyright, Alliance Laundry Systems LLC – DO NOT COPY or TRANSMIT
F232203
Troubleshooting
Coins Ignored When Entered (Sheet 2 of 2)
2A
CHM413S
606909(F)
F232203
© Copyright, Alliance Laundry Systems LLC – DO NOT COPY or TRANSMIT
61
Troubleshooting
y
14. Control Has No Display (OPL)
The machine's control doesn't show a display.
Replace the FU7 fuse.
1A
YES
YES
2A
Is there
voltage (120 Volts
AC) between pins
1 and 4 of the
J9 plug?
NO
Test the
FU7 fuse with an
ohm meter. Is the
FU7 fuse blown?
NO
3A
Is there
voltage (120 Volts AC)
from terminal 30 to
terminal 31?
NO
Is there voltage (200-240
Volts AC) at input power
connections L1 and L2?
4A
YES
5A
Test the
FU1 and FU2 fuses
with an ohm meter. Is the
FU1 and/or the FU2
fuse blown?
YES
Replace the FU1 and/or
the FU2 fuse.
NO
6A
Test the
FU3 or the FU5
fuse and the FU4 or the
FU6 fuse with an ohm
meter. Are any of the
fuses blown?
7A
YES
Is there voltage
(120 Volts AC)
from terminal 18
to terminal 27?
Inspect the main
transformer and replace it
as needed.
8A
YES
YES
Replace the FU3 or the
FU5 fuse and/or the FU4
or the FU6 fuse .
62
Inspect the J9 plug wiring
connections.
© Copyright, Alliance Laundry Systems LLC – DO NOT COPY or TRANSMIT
CHM414S
F232203
Troubleshooting
Please refer to the following 2 pages for wiring diagram information.
F232203
© Copyright, Alliance Laundry Systems LLC – DO NOT COPY or TRANSMIT
63
Troubleshooting
Control Has No Display (OPL) (Sheet 1 of 2)
4A
7A
7A
1A
6A
3A
5A
8A
NOTE: Refer to the wiring diagram supplied with your machine.
64
© Copyright, Alliance Laundry Systems LLC – DO NOT COPY or TRANSMIT
F232203
Troubleshooting
Control Has No Display (OPL) (Sheet 2 of 2)
2A
1A
CHM415S
607072(P)
F232203
© Copyright, Alliance Laundry Systems LLC – DO NOT COPY or TRANSMIT
65
Troubleshooting
15. Control Has No Display (Coin)
The machine's control doesn't show a display.
1A
NO
Is there
voltage (120 Volts
AC) between pins 1
and 4 of the
J9 plug?
YES
2A
Test the
1/8 Amp fuse on
the fuse board with an
ohm meter. Is the
1/8 Amp fuse
blown?
YES
Replace the 1/8 Amp fuse.
NO
3A
Is there voltage
(120 Volts AC)
from terminal 28
to terminal 25?
Is there voltage (200-240 Volts
AC) between input power
connections L1 and the ACN?
NO
4A
YES
5A
Test the
F1 and F2 fuses
with an ohm meter.
Is the F1 and/or
the F2 fuse
blown?
YES
Replace the F1 and/or the
F2 fuse.
NO
Is there voltage (120 Volts AC)
from terminal 28 to terminal 26?
6A
CHM416S
66
© Copyright, Alliance Laundry Systems LLC – DO NOT COPY or TRANSMIT
F232203
Troubleshooting
Please refer to the following 2 pages for wiring diagram information.
F232203
© Copyright, Alliance Laundry Systems LLC – DO NOT COPY or TRANSMIT
67
Troubleshooting
Control Has No Display (Coin) (Sheet 1 of 2)
2A
NOTE: Refer to the wiring diagram supplied with your machine.
68
© Copyright, Alliance Laundry Systems LLC – DO NOT COPY or TRANSMIT
F232203
Troubleshooting
Control Has No Display (Coin) (Sheet 2 of 2)
4A
3A
2A
6A
6A
5A
1A
3A
4A
CHM417S
606909(F)
F232203
© Copyright, Alliance Laundry Systems LLC – DO NOT COPY or TRANSMIT
69
Troubleshooting
16. The Machine Does Not Hold Water
The Machine Does Not Hold Water
Water drains from the machine when the machine has not been programmed to
do so.
1A
Test the
DN fuse with an
ohm meter. Is the DN
fuse blown?
YES
Replace the DN fuse.
NO
2A
Is there voltage
(120 Volts AC) at
the drain valve
motor?
NO
Replace the drain valve motor.
YES
Is there
foreign material
inside of the drain
valve that is preventing
it from closing?
YES
Remove the foreign material
from the drain valve motor.
NO
Inspect the drain valve wiring
connections.
CHM418S
70
© Copyright, Alliance Laundry Systems LLC – DO NOT COPY or TRANSMIT
F232203
Troubleshooting
Please refer to the following 2 pages for wiring diagram information.
F232203
© Copyright, Alliance Laundry Systems LLC – DO NOT COPY or TRANSMIT
71
Troubleshooting
The Machine Does Not Hold Water (Sheet 1 of 2)
NOTE: Refer to the wiring diagram supplied with your machine.
72
© Copyright, Alliance Laundry Systems LLC – DO NOT COPY or TRANSMIT
F232203
Troubleshooting
The Machine Does Not Hold Water (Sheet 2 of 2)
2A
1A
CHM419S
607072(P)
F232203
© Copyright, Alliance Laundry Systems LLC – DO NOT COPY or TRANSMIT
73
Troubleshooting
17. Compartment 2 of Supply Dispenser Not Flushing Completely
Compartment 2 of the
supply dispenser is not
flushing completely.
Cut a 3/4-inch by 1/2 inch notch out of the bottom of the
water deflector in compartment 2 of the supply dispenser.
.
Refer to the Dispenser Illustration
Is there low
water pressure
(i.e., less than 30
psi) to the supply
dispenser?
Yes
NOTE: If the water pressure is corrected to factory
specifications, the notch must be plugged to avoid
splashing.
As an alternative, install a hose clamp onto one of the hoses
connecting to the top of the vacuum breaker and tighten the
hose clamp slightly. Refer to the Vacuum Breaker
Illustration.
NOTE: If the water pressure is corrected to factory
specifications, the hose clamp must be removed.
CHM433S
Dispenser Illustration
Notch
CHM366S
74
© Copyright, Alliance Laundry Systems LLC – DO NOT COPY or TRANSMIT
F232203
Troubleshooting
18. The Door Leaks
The door leaks.
Is the door
leaking between
the door and the
door gasket?
Yes
Add or remove shims behind the
door hinge and/or the door lock to
reduce or increase the pressure
that is applied to the door gasket
when the door is closed.
No
Is the door
leaking between
the door glass
and the door
gasket?
Yes
Remove the door gasket. Inspect it
for damage and remove all foreign
matter from it. Do not clean the
door gasket with oil or with
petroleum-based products. Replace
the door gasket if needed.
CHM434S
F232203
© Copyright, Alliance Laundry Systems LLC – DO NOT COPY or TRANSMIT
75
Troubleshooting
19. No Keypad Function
The keypad does
not function.
Does the
keypad
show a
display?
Yes
Press each of
the keypad's
keys. Does a
beep tone sound
as each key is
pressed?
No
No
Inspect the ribbon cable from
the keypad to the computer
board.
Is the ribbon cable connected
to the computer board?
Is the ribbon cable damaged?
Yes
Replace the
keypad.
CHM435S
76
© Copyright, Alliance Laundry Systems LLC – DO NOT COPY or TRANSMIT
F232203
Troubleshooting
20. Excessive Vibration and/or Noise During Spin
There is excessive
vibration and/or
noise during a spin
cycle.
Always make sure that full loads are used. Never wash partial
loads.
Has the
machine been
loaded
improperly?
Yes
Do not mix various laundry items together in the same wash
(e.g., do not wash towels and sheets together).
Avoid using laundry bags.
No
Make sure that the washer-extractor is anchored to a flat, level
surface with the proper depth of concrete.
Has the machine
been installed
improperly?
No
Tighten all anchor bolts and nuts. Make sure that they are of
the correct size and grade.
Make sure that the washer-extractor is grouted properly.
Refer the installation manual that was supplied with the machine
for exact installation specifications.
Yes
Check the bearings' noise factor.
Do the
bearings
require
replacement?
Yes
Lift up on the basket at the front of the tub. Check for any up
and down play that would indicate bearing wear.
Replace the bearings as needed.
CHM431S
F232203
© Copyright, Alliance Laundry Systems LLC – DO NOT COPY or TRANSMIT
77
Troubleshooting
21. The Water Level is Too High or Too Low
The water level
is too high or
too low.
Is the machine
equipped with an
adjustable water
level switch?
No
Replace the
water level
switch.
Yes
Adjust the water level
switch to raise or lower the
machine's water level.
Yes
After adjusting the water
level, is the machine's
water level still too high or
too low?
CHM436S
78
© Copyright, Alliance Laundry Systems LLC – DO NOT COPY or TRANSMIT
F232203
Troubleshooting
22. Excessive Cycle Time
One or more cycles
is excessively long.
Are any of the cycles' fill
times excessively long?
Yes
NOTE: All fill times should
not exceed 4-5 minutes.
Any fill times should easily
complete during this time.
Refer to the
"No Fill
Analysis"
flowchart.
No
Are any of the
drain times
excessively long?
NOTE: Any drain
time should not
exceed 30-40
seconds.
Yes
Check all internal and
external plumbing
entering and exiting the
machine.
CHM432S
F232203
© Copyright, Alliance Laundry Systems LLC – DO NOT COPY or TRANSMIT
79
Troubleshooting
23. Water Running Continuously with Machine Power Off
Water Running Continuously With Machine Power Off
With electrical power removed
from the machine, water is
running continuously into
compartment 1 of the supply
dispenser.
Using the “Water Running
Continuously” schematic, follow
the hose from compartment 1 of
the supply dispenser back
through the vacuum breaker and
the Y-connector to the hot water
valve at V9 and the cold water
valve at V10.
To determine which of the
valves is leaking, turn off the
water supply to each of the
valves, one valve at a time.
When the water supply is
removed from the leaking valve,
the water running into
compartment 1 of the supply
dispenser will stop.
With electrical power removed
from the machine, water is
running continuously into
compartment 2 of the supply
dispenser.
With electrical power removed
from the machine, water is
running continuously into
compartment 3 of the supply
dispenser.
With electrical power removed
from the machine, water is
running continuously into the
bottom of the washer-extractor.
Using the “Water Running
Continuously” schematic, follow
the hose from compartment 2 of
the supply dispenser back
through the vacuum breaker to
the cold water valve at V4.
Using the “Water Running
Continuously” schematic, follow
the hose from compartment 3 of
the supply dispenser back
through the vacuum breaker to
the cold water valve at V5.
To determine which of the
valves is leaking, turn off the
water supply to each of the
valves, one valve at a time.
When the water supply is
removed from the leaking valve,
the water running into the
bottom of the washer-extractor
will stop.
Install a valve repair kit onto the
cold water valve or replace the
valve. Refer to the Parts manual
for your washer-extractor for
valve and valve repair kit part
numbers.
Install a valve repair kit onto the
hot water valve or replace the
valve. Refer to the Parts manual
for your washer-extractor for
valve and valve repair kit part
numbers.
For example, if water is running
into compartment 1 of the supply
dispenser continuously, when
the water supply is removed
from the hot water valve, the
water continues to run into
compartment 1. However,
when the water supply is
removed from the cold water
valve, the water running into
compartment 1 stops.
Therefore, the cold water valve
is the leaking valve.
For example, when the water
supply is removed from the hot
water valve at V1, the water
continues to run into the bottom
of the washer-extractor.
However, when the water supply
is removed from the cold water
valve at V2, the water running
into the bottom of the washerextractor stops. Therefore, the
cold water valve at V2 is the
leaking valve.
Once the leaking valve(s) has
been determined, install a valve
repair kit onto the leaking valve
or replace the leaking valve.
Refer to the Parts manual for
your washer-extractor for valve
and valve repair kit part numbers.
Once the leaking valve(s) has
been determined, install a valve
repair kit onto the leaking valve
port or replace the entire leaking
valve. Refer to the Parts manual
for your washer-extractor for
valve and valve repair kit part
numbers.
CHM263S
80
© Copyright, Alliance Laundry Systems LLC – DO NOT COPY or TRANSMIT
F232203
Troubleshooting
Water Running Continuously Illustration
Y – CONNECTOR
HOT WATER VALVE
COLD WATER VALVE
VACUUM BREAKER
SUPPLY DISPENSER
CHM264S
0635860(G)
F232203
© Copyright, Alliance Laundry Systems LLC – DO NOT COPY or TRANSMIT
81
Troubleshooting
24. Door Unlocking Malfunction (OPL)
The machine runs a complete cycle and all functions act normally, but the machine will not
unlock at the end of the cycle.
1A
Is
there voltage
(120 Volts AC)
between the DU
terminal and the
ACN?
Check to make sure
that the magnetic switch
is in place.
NO
Test the DU fuse with an
ohm meter and replace it as
needed.
3A
2A
YES
NO
6A
Is there voltage
(120 Volts AC)
between terminal
5 and the ACN?
4A
YES
Is
there voltage
(120 Volts AC)
between the ACN
and the
ACH?
Inspect the KA1 door safety
relay coil.
NO
5A
Test the on/off switch.
2A
YES
7A
Is
there voltage
(120 Volts AC)
at the KM5
extract speed
contactor?
8A
YES
NO
Is
there voltage
(120 Volts AC) at
the input side of
the door unlock
switch?
Test
the door
solenoid with an
ohm meter.
Is there
continuity?
NO
Replace the door
solenoid.
Test the door unlock switch
with an ohm meter and
replace it as needed.
10A
YES
YES
NO
Inspect the door unlock
switch wiring connections.
11A
Test the door locking arm to
make sure that it is moving
freely. Adjust it as needed.
YES
NO
Inspect the nc wiring
connections.
YES
8A
Is
there voltage
(120 Volts AC) at
the output side of
the door unlock
switch?
Is
there DC
voltage at outputs
+ and - on the
door bridge
rectifier?
9A
YES
Is
there voltage
(120 Volts AC) at
the input side of
the door bridge
rectifier?
NO
Replace the door bridge
rectifier.
NO
Press the door unlock
switch.
If there is not voltage on the
output side of the door bridge
rectifier when the door unlock
switch is pressed, replace
the door bridge rectifier.
CHM420S
82
© Copyright, Alliance Laundry Systems LLC – DO NOT COPY or TRANSMIT
F232203
Troubleshooting
Please refer to the following 2 pages for wiring diagram information.
F232203
© Copyright, Alliance Laundry Systems LLC – DO NOT COPY or TRANSMIT
83
Troubleshooting
Door Unlocking Malfunction (OPL) (Sheet 1 of 2)
NOTE: Refer to the wiring diagram supplied with your machine.
84
© Copyright, Alliance Laundry Systems LLC – DO NOT COPY or TRANSMIT
F232203
Troubleshooting
Door Unlocking Malfunction (OPL) (Sheet 2 of 2)
11A
10A
9A
7A
8A
2A
6A
1A
3A
5A
4A
CHM421S
607072(P)
F232203
© Copyright, Alliance Laundry Systems LLC – DO NOT COPY or TRANSMIT
85
Troubleshooting
25. Door Unlocking Malfunction (Coin)
When coins are placed into the coin slot, do they fall into the coin vault and does the
coin drop sensor register that coins have been entered? Refer toFigure 1 for the
path that coins follow when the drop is working properly.
No
1. Disconnect electrical power to the machine and the coin drop.
2. Remove the coin drop from the machine.
Refer to the wiring
diagram supplied
with the machine
for connection
information.
No
Is proper
electrical
power
supplied to
the coin
drop?
3. If lint is preventing coins from rolling through the coin drop, blow compressed air
through the coin entry and along the side of the coin drop. Refer to Figure 2.
4. Insert a coin into the coin drop. If the coin does not fall through the drop, continue
to step 5.
5. Remove the cotter pin from the top of the drop. Refer to Figure 2. Save the pin for
reinstallation when the cleaning of the coin drop is complete.
Yes
Refer to the
installation manual
supplied with the
machine for
instructions on
leveling the
machine.
6. Move the metal clip closer to the sensor so that it comes off of the frame. Refer to
Figure 2.
No
Is the
machine
level?
7. Remove the coin return from the coin drop frame. Refer to Figure 3.
8. Check the path in the coin drop for lint and residue. If lint or light residue is present,
use a cotton swab to remove it. If heavy residue is present, it may be necessary to
first scrape off the excessive residue and then to use a cotton swab dipped in water
or isopropyl alcohol to remove the remainder of the residue. Refer to Figure 4.
Yes
Is the coin
drop clean?
No
9. Check the return pendulum to verify it swings freely. If the pendulum does not
swing freely, spray the pendulum pivot point with Teflon-based lubricant and move
the pendulum back and forth 3 times. An additional application of Teflon-based
lubricant may be necessary to ensure the pendulum swings freely. Refer toFigure 5.
10. Check the coin drop sensor for dust or dirt on the eyes. Wipe the eyes with a dry
cotton swab. Refer toFigure 6. IMPORTANT: Do not use isopropyl alcohol to clean
the electronic sensor or eyes.
11. Reinstall the coin return onto the coin drop frame.
12. Reinstall the metal clip and slide toward the coin insert slot. All cotter pin holes
must line up.
13. Reinstall the cotter pin.
14. Place the coin drop on a level surface to verify that coins follow the correct path to
the coin drop. It may be necessary to lift the coin drop to allow the coin to follow
through the sensor.
15. Reinstall the coin drop into the machine.
16. Reconnect electrical power to the machine and coin drop.
17. Insert a coin into the coin drop to verify that the coin drop is operating properly.
If the coin drop does not operate properly after the above steps have been
completed, corrosion of the metal or vandalized components within the coin drop may
be preventing it from functioning properly. Replace the coin drop.
CHM442S
86
© Copyright, Alliance Laundry Systems LLC – DO NOT COPY or TRANSMIT
F232203
Troubleshooting
Please refer to the following 2 pages for wiring diagram information.
F232203
© Copyright, Alliance Laundry Systems LLC – DO NOT COPY or TRANSMIT
87
Troubleshooting
Door Unlocking Malfunction (Coin) (Sheet 1 of 2)
NOTE: Refer to the wiring diagram supplied with your machine.
88
© Copyright, Alliance Laundry Systems LLC – DO NOT COPY or TRANSMIT
F232203
Troubleshooting
Door Unlocking Malfunction (Coin) (Sheet 2 of 2)
2A
2A
2A
3A
5A
4A
6A
7A
1A
CHM423S
606909(F)
F232203
© Copyright, Alliance Laundry Systems LLC – DO NOT COPY or TRANSMIT
89
Troubleshooting
26. Pump Drain Analysis
1A
Is
there voltage (120
Volts AC) between
the input side of the
DN terminal and the
ACN?
NO
Replace the output board.
YES
1A
Is
there voltage (120
Volts AC) between
the output side of the
DN terminal and the
ACN?
NO
Replace the DN fuse.
YES
2A
Is
there voltage (120
Volts AC) across the
coil of the KM2
relay?
NO
Inspect the wiring to the KM2 relay
and repair/replace it as needed.
YES
3A
Is
there voltage (120
Volts AC) across the
drain pump
motor?
NO
Inspect the wiring to the drain
pump motor and repair/replace it
as needed.
YES
Inspect the mechanical operation
of the drain pump and replace it as
needed.
CHM428S
90
© Copyright, Alliance Laundry Systems LLC – DO NOT COPY or TRANSMIT
F232203
Troubleshooting
Please refer to the following 2 pages for wiring diagram information.
F232203
© Copyright, Alliance Laundry Systems LLC – DO NOT COPY or TRANSMIT
91
Troubleshooting
Pump Drain Analysis (Sheet 1 of 2)
2A
NOTE: Refer to the wiring diagram supplied with your machine.
92
© Copyright, Alliance Laundry Systems LLC – DO NOT COPY or TRANSMIT
F232203
Troubleshooting
Pump Drain Analysis (Sheet 2 of 2)
2A
3A
1A
1A
CHM429S
607072(P)
F232203
© Copyright, Alliance Laundry Systems LLC – DO NOT COPY or TRANSMIT
93
Troubleshooting
27. Machine Won't Start (OPL)
The machine
won't start.
1A
Is there
input
voltage to
the
machine?
No
Connect power
to the machine.
Refer to the
Door Unlocking
Malfunction
flowchart.
Yes
Yes
2A
Test the contol
circuit fuses with
an ohm meter.
Are any of the
fuses blown?
Replace the
Yes control circuit
fuse(s) as
needed.
Does the door
handle switch
lever completely
depress the
switch?
Adjust the door
handle switch
lever.
No
No
Yes
Is any of the
machine's
wiring loose
or damaged?
Yes
Repair/replace
the wiring as
needed.
5A
No
Replace the
on/off switch
No
No
4A
3A
Is there voltage
(120 Volts AC)
between ACH
and ACN on the
fuse board?
Is the
on/off
switch
intact?
No
Replace the
fuse board.
Test the FU3,
FU4, FU5 and
FU6 fuses with
an ohm meter.
Are any of the
fuses blown?
Yes
Yes
94
Replace the
FU3, FU4, FU5
and FU6 fuses
as needed.
CHM437S
© Copyright, Alliance Laundry Systems LLC – DO NOT COPY or TRANSMIT
F232203
Troubleshooting
Please refer to the following 2 pages for wiring diagram information.
F232203
© Copyright, Alliance Laundry Systems LLC – DO NOT COPY or TRANSMIT
95
Troubleshooting
Machine Won’t Start (OPL) (Sheet 1 of 2)
1A
4A
5A
2A
NOTE: Refer to the wiring diagram supplied with your machine.
96
© Copyright, Alliance Laundry Systems LLC – DO NOT COPY or TRANSMIT
F232203
Troubleshooting
Machine Won’t Start (OPL) (Sheet 2 of 2)
3A
CHM425S
607072(P)
F232203
© Copyright, Alliance Laundry Systems LLC – DO NOT COPY or TRANSMIT
97
Troubleshooting
28. Machine Won't Start (Coin)
The machine
won't start.
1A
Is there
input
voltage to
the
machine?
No
Connect power
to the machine.
Yes
2A
Test the contol
circuit fuses with
an ohm meter.
Are any of the
fuses blown?
Replace the
Yes control circuit
fuse(s) as
needed.
No
Is any of the
machine's
wiring loose
or damaged?
Yes
Repair/replace
the wiring as
needed.
No
Refer to the
Door Unlocking
Malfunction
flowchart.
Yes
3A
Is there voltage
(120 Volts AC)
between ACH
and ACN on the
fuse board?
No
Replace the
fuse board.
Does the door
handle switch
lever completely
depress the
switch?
No
Yes
98
Adjust the door
handle switch
lever.
CHM438S
© Copyright, Alliance Laundry Systems LLC – DO NOT COPY or TRANSMIT
F232203
Troubleshooting
Please refer to the following 2 pages for wiring diagram information.
F232203
© Copyright, Alliance Laundry Systems LLC – DO NOT COPY or TRANSMIT
99
Troubleshooting
Machine Won’t Start (Coin) (Sheet 1 of 2)
3A
NOTE: Refer to the wiring diagram supplied with your machine.
100
© Copyright, Alliance Laundry Systems LLC – DO NOT COPY or TRANSMIT
F232203
Troubleshooting
Machine Won’t Start (Coin) (Sheet 2 of 2)
1A
2A
3A
CHM427S
606909(F)
F232203
© Copyright, Alliance Laundry Systems LLC – DO NOT COPY or TRANSMIT
101
Troubleshooting
29. Motor Runs Continuously in One Direction
The motor runs
continuously in
one direction.
Is the drain
valve staying
open?
Yes
Refer to the
Drain Valve
Malfunction
flowchart.
No
Is the water
level being
reached?
No
Inspect the water level
switch and replace it as
needed.
CHM439S
102
© Copyright, Alliance Laundry Systems LLC – DO NOT COPY or TRANSMIT
F232203
Troubleshooting
30. Machine Stops in Mid-Cycle
The machine stops
in mid-cycle.
Inspect the wiring
connections at the
terminal strips, fuse
board and computer
board. Are any of the
wiring connections
loose?
Yes
Secure any loose
connections.
No
Does the door lock
microswitch have
continuity? Does it
have any loose
connections?
No
Secure any loose
connections.
Replace the door
lock microswitch as
needed.
Yes
Is the door lock
microswitch
closed when the
door is closed?
No
Adjust or replace the
door lock microswitch
as needed.
F232203
Yes
Is the wiring
harness
connected
securely to the
computer board?
No
Secure the wiring
harness's connection to
the computer board.
© Copyright, Alliance Laundry Systems LLC – DO NOT COPY or TRANSMIT
CHM440S
103
Troubleshooting
31. Overload Relay Tripping Repeatedly
Repeated overload tripping may result from a failed sinpac switch. Symptoms of a failed
sinpac switch may include motor humming without rotation during spin or high current during
running speed.
The overload relay is tripping
repeatedly.
Yes
Disconnect the power from the machine.
Remove the SS2 and SS3 wires from the
sinpac switch. Connect the two wires
together using a jumper wire. Re-connect
power to the machine. Make sure that the
machine's basket is fully loaded. Manually
engage the spin contactor. CAUTION: Do
not run the motor for more than 5 to 7
seconds. Does the motor spin?
Is the input voltage to
the machine between
208 and 240 Volts?
Consult the power
company in getting the
power turned down or
consult an electrician
about installing a
buckboost transformer.
No
Inspect the spin
Yes
contactor. While manually
pressing the contactor, do
all of the contacts
engage?
Yes
No
No
One or more of the start
capacitors may have failed or
the wiring to the start capacitors
may be incorrect.
Perform a capacitance test on
the start capacitors and replace
them as needed.
Inspect the start capacitor wiring
and repair and/or replace the
wiring as needed.
Replace the contactor.
Perform current measurements of the incoming power
leads as follows (measure both L1 and L2 at the same
time). Manually engage the spin contactor for 5 to 7
seconds to get the motor spinning. The current should
range from about 15 to 60 Amps, depending on the
machine's size and load conditions. Quickly remove the
connection between SS2 and SS3 while the motor is
still spinning at a high rate and then re-engage the spin
contactor. The motor should continue to spin at a high
speed and the current should drop down to between 3
and 8 Amps, depending on the machine's size and load
conditions. Does the motor maintain high speed and/or
does the current drop after disconnecting SS2 and
SS3?
Yes
No
Check the capacitor values and
the spin circuit wiring. Replace
the capacitors as needed.
Repair and/or replace the wiring
as needed.
CHM430S
Replace the sinpac switch.
104
© Copyright, Alliance Laundry Systems LLC – DO NOT COPY or TRANSMIT
F232203
Troubleshooting
32. Compartment 2 of Supply Dispenser Not Flushing Completely
Compartment 2 of the
supply dispenser is not
flushing completely.
Install a hose clamp onto one of the hoses connecting to the
top of the vacuum breaker and tighten the hose clamp slightly.
Refer to the Vacuum Breaker Illustration.
Is there low
water pressure
(i.e., less than 30
psi) to the supply
dispenser?
NOTE: If the water pressure is corrected to factory
specifications, the hose clamp may have to be removed.
Yes
As an alternative, cut a 3/4-inch by 1/2 inch notch out of the
bottom of the water deflector in compartment 2 of the supply
dispenser. Refer to theDispenser Illustration
.
NOTE: If the water pressure is corrected to factory
specifications, the notch must be plugged to avoid
splashing.
CHM443S
Dispenser Illustration
Vacuum Breaker Illustration
Notch
CHM366S
F232203
© Copyright, Alliance Laundry Systems LLC – DO NOT COPY or TRANSMIT
Hose
Clamp
CHM441S
105
Troubleshooting
33. Troubleshooting and Cleaning the Coin Drop
When coins are placed into the coin slot, do they fall into the coin vault and does the
coin drop sensor register that coins have been entered? Refer toFigure 1 for the path
that coins follow when the drop is working properly.
No
1. Disconnect electrical power to the machine and the coin drop.
2. Remove the coin drop from the machine.
Refer to the wiring
diagram supplied
with the machine
for connection
information.
No
Is proper
electrical
power
supplied to
the coin
drop?
3. If lint is preventing coins from rolling through the coin drop, blow compressed air
through the coin entry and along the side of the coin drop. Refer to Figure 2.
4. Insert a coin into the coin drop. If the coin does not fall through the drop, continue
to step 5.
5. Remove the cotter pin from the top of the drop. Refer to Figure 2. Save the pin for
reinstallation when the cleaning of the coin drop is complete.
Yes
Refer to the
installation manual
supplied with the
machine for
instructions on
leveling the
machine.
6. Move the metal clip closer to the sensor so that it comes off of the frame. Refer to
Figure 2.
No
Is the
machine
level?
7. Remove the coin return from the coin drop frame. Refer to Figure 3.
8. Check the path in the coin drop for lint and residue. If lint or light residue is present,
use a cotton swab to remove it. If heavy residue is present, it may be necessary to
first scrape off the excessive residue and then to use a cotton swab dipped in water
or isopropyl alcohol to remove the remainder of the residue. Refer to Figure 4.
Yes
Is the coin
drop clean?
No
9. Check the return pendulum to verify it swings freely. If the pendulum does not
swing freely, spray the pendulum pivot point with Teflon-based lubricant and move
the pendulum back and forth 3 times. An additional application of Teflon-based
lubricant may be necessary to ensure the pendulum swings freely. Refer toFigure 5.
10. Check the coin drop sensor for dust or dirt on the eyes. Wipe the eyes with a dry
cotton swab. Refer toFigure 6. IMPORTANT: Do not use isopropyl alcohol to clean
the electronic sensor or eyes.
11. Reinstall the coin return onto the coin drop frame.
12. Reinstall the metal clip and slide toward the coin insert slot. All cotter pin holes
must line up.
13. Reinstall the cotter pin.
14. Place the coin drop on a level surface to verify that coins follow the correct path to
the coin drop. It may be necessary to lift the coin drop to allow the coin to follow
through the sensor.
15. Reinstall the coin drop into the machine.
16. Reconnect electrical power to the machine and coin drop.
17. Insert a coin into the coin drop to verify that the coin drop is operating properly.
If the coin drop does not operate properly after the above steps have been
completed, corrosion of the metal or vandalized components within the coin drop may
be preventing it from functioning properly. Replace the coin drop.
CHM442S
106
© Copyright, Alliance Laundry Systems LLC – DO NOT COPY or TRANSMIT
F232203
Troubleshooting
Coin in
Coin Slot
Coins Following
Path to Sensor
Coin Drop
Sensor
Cotton
Swab
DRY5B
DRY2B
Figure 4
Figure 1
Compressed
Air
Cotter
Pin
Pivot
Point
Metal
Clip
Pendulum
DRY3B
DRY6B
Figure 2
Figure 5
Coin
Drop
Frame
Coin
Return
Eyes
Dry
Cotton
Swab
DRY7B
DRY4B
Figure 3
F232203
Figure 6
© Copyright, Alliance Laundry Systems LLC – DO NOT COPY or TRANSMIT
107
Troubleshooting
Notes
108
© Copyright, Alliance Laundry Systems LLC – DO NOT COPY or TRANSMIT
F232203