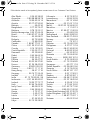
1
Ontario.fm Seite 1 Freitag, 28. November 2003 2:35 14
s
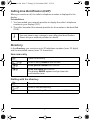
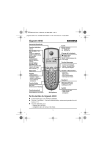
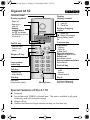
Gigaset A110
Coloured label
Display
(display screen)
Display symbols
- Ringer off
- New entry in
caller list
- Entering
numbers/letters:
the f key deletes
the character to the left
of the cursor
Set/OK key
Special characters:
n Hash (#)
R Recall key
Battery charging
status
Ú
U
0123456789
Û
ß
= Battery flat
U Battery fully charged
flashing: Battery almost
flat
Function key
In idle status:
- Directory
- Caller list
In lists: Scroll
When the telephone is
ringing: Set ringer volume
During a call:
Set handset volume
Entering numbers and letters:
Delete function
- Enter the menu
- Confirm input
(save)
Ringer off key
Activate/deactivate ringer
Last number
redial key
End call key
- Answer a call
- Initiate dialling
- Hold down:
on/off
- End call
- Cancel function
Star key
Key 0
Talk key
Hold down:
R key function (flash)
Microphone
Hold down: Temporarily
switch to DTMF dialling
Special features of the A 110
◆ Notepad
◆ Pen holder with STABILO rollerball pen. The pen is available in all good
stationery and office supplies shops
◆ Ringer off key
◆ Handset volume and ringer volume setting via function key
1
Ontario.fm Seite 2 Freitag, 28. November 2003 2:35 14
Version: 28.11.2003
A3 1 0 0 8 - A1 1 0 - J 1 0 0 - 1 - 7 6 1 9
Issued by
Information and Communication mobile
Schlavenhorst 88
D-46395 Bocholt
© Siemens AG 2003
All rights reserved. Subject to availability.
Right of modification reserved.
Printed in Germany
Siemens Aktiengesellschaft
http://www.my-siemens.com
Order No.: A31008-A110-J100-1-7619
Version: 28.11.2003
2
Ontario.fm Seite 3 Freitag, 28. November 2003 2:35 14
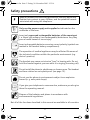
Safety precautions
W
$
!
Read this manual and the safety precautions carefully before use.
Explain their content to your children, and the potential hazards
associated with using the telephone.
Only use the power supply unit supplied as indicated on the
underside of the base.
Insert only approved rechargeable batteries of the same type!
i. e. Never use ordinary (non-rechargeable) batteries as they may
pose a health hazard or cause injury.
‹
Insert rechargeable batteries ensuring correct polarity (symbols are
marked in the handset battery compartment).
The operation of medical appliances may be affected. Be aware of
the technical conditions within the particular environment (e.g.
doctor's practice).
The handset may cause an intrusive "hum" in hearing aids. Do not
hold the handset against your ear while it is ringing (incoming call).
Do not install the phone in a bathroom or shower room. The handset
and base station are not splash proof (see page 13).
Do not use the phone in environments subject to an explosion
hazard (e. g. auto paint shops).
ƒ
If you give your telephone to someone else, make sure you also give
them the operating manual.
Dispose of the batteries and phone in accordance with
environmental regulations.
Not all of the functions described in this manual are available in all countries.
3
Ontario.fm Seite 4 Freitag, 28. November 2003 2:35 14
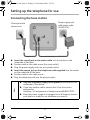
Setting up the telephone for use
Connecting the base station
Power supply unit
with mains cable
(220/230 V)
Phone jack with
phone cord
◆ Insert the round jack on the mains cable into the socket on the
underside of the base.
◆ Position cable in the cable recess (for strain relief).
◆ Plug the power supply unit into your power outlet.
◆ Insert the square jack on the telephone cable supplied into the socket
on the underside of the base.
◆ Position cable in the cable recess.
◆ Plug the telephone jack into the phone socket.
◆ Only use the power supply unit supplied as indicated on the
underside of the device.
i
◆ If you buy another cable, ensure that it has the correct
assignment.
Germany: 3-4 assignment of telephone lead/EURO CTR37.
◆ Keep the power supply unit plugged in at all times to ensure
your phone is ready for use whenever you need it.
4
Ontario.fm Seite 5 Freitag, 28. November 2003 2:35 14
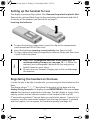
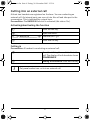
Setting up the handset for use
The display is protected by a plastic film. Remove the protective plastic film!
Remove the coloured label from the bag containing the batteries and stick it
to the top of the handset (see illustration on page 1).
Inserting the batteries
◆ To open the battery compartment, press the clip on the compartment
cover inwards and lift off the cover.
◆ Insert the batteries ensuring correct polarity (see figure on left).
◆ To close, replace the battery compartment cover as shown and then close
it until it locks into place.
◆ Only insert rechargeable batteries of the same type, as
i
recommended by Siemens on see page 14, i. e. Never use
ordinary (non-rechargeable) batteries as they may pose a
health hazard or cause injury.
◆ Do not use a non-Siemens charging unit as this could damage
the batteries.
Registering the handset on the base
In order for you to be able to make calls, you must register the handset on the
base.
The display shows "*--*--*". Now place the handset on the base with the
display facing forwards, the display shows REGISTER HS. After around one
minute the handset is registered on the base. The idle display is shown (only
battery symbol and the internal number of the handset in the top left).
If "automatic registration" has not been successful after approx. 1 minute, it is
necessary to either remove the handset from the base for approx. 5 seconds
and then replace it or to register the handset manually (see page 10).
5
Ontario.fm Seite 6 Freitag, 28. November 2003 2:35 14
Charging batteries
Leave the handset in the base for approx. five hours to charge the batteries.
Your unit is now ready to use and you can make calls.
After initial charging, you can return your handset to the base after every call.
Charging is controlled electronically. This ensures optimum battery charging
without overloading. The batteries heat up during charging. This is normal
and not dangerous. The battery charging status is correctly displayed only
after uninterrupted charging/discharging. You should therefore avoid opening
the battery compartment unnecessarily. The battery charge capacity
decreases after a few years for technical reasons some time.
Making calls
Calling and ending calls
~ (Enter the number), press c (talk key).
To end the call: Press a (end call key).
You can also press the talk key c first and then enter the number – each
digit is dialled immediately.
You can use the end call key a to cancel dialling.
Answering a call
Your telephone rings (ringer) and the talk key flashes.
c Press the (talk key).
Last number redial
Your handset automatically saves the last five telephone numbers dialled. If
names have been saved for these numbers in the directory, then these names
will be displayed.
j
s
c
Open the last number redial list.
Select the desired entry.
Press the talk key – the telephone number is dialled.
6
Ontario.fm Seite 7 Freitag, 28. November 2003 2:35 14
Calling Line Identification (CLIP)
When you receive a call, the caller's telephone number is displayed in the
display.
Preconditions:
1. You have asked your network provider to display the caller’s telephone
number in your display (CLIP).
2. The caller has asked the network provider for his number to be identified
(CLIR).
i
You may have to pay a charge to use calling line identification.
Please ask your network provider for details.
Directory
In the directory, you can store up to 20 telephone numbers (max. 22 digits)
and the associated names (max. 12 characters).
Save new entry
h
sg
~g
~g
Open the directory.
Scroll to entry <NEW?> and confirm.
Enter phone number and confirm.
Enter the name and confirm.
The display SAVED appears and you hear the
confirmation tone.
Dialling with the directory
h
s
c
Open the directory.
Scroll to the desired entry.
Press the talk key. The phone number is dialled.
7
Ontario.fm Seite 8 Freitag, 28. November 2003 2:35 14
Editing an entry
h
sg
~
g
~
g
Open the directory.
Select desired entry and confirm.
Edit the telephone number as required.
Confirm entry.
Edit the telephone number as required.
Confirm the entry, the display SAVED appears and you
hear the confirmation tone.
Deleting an entry
h
s
g
g
Open the directory.
Select the desired entry.
Hold down the key, DELETE? is displayed.
Confirm the entry, DELETED is displayed and you hear
the confirmation tone.
Caller list
The caller list contains the last 10 missed calls. If it includes new entries
the Û symbol flashes in idle status.
Dialling from caller list or deleting an entry
f
s
c
Open caller list.
Select the desired entry.
Dial the number.
or ...
g
Hold down. The entry is deleted.
or ...
a
Exit the caller list.
New entries in the caller list are indicated by the j symbol in the top left of the
display. At the end of the list, "----ESC----" is displayed.
8
Ontario.fm Seite 9 Freitag, 28. November 2003 2:35 14
Cutting into an external call
At least two handsets are registered on the base. You are conducting an
external call. An internal party can can cut into this call and take part in the
conversation. This is indicated by a signal tone.
Precondition: The BARGE IN function is activated (idle status: On).
Activating/deactivating the function
c
g
s
a
Press the talk key.
Open the menu.
[______________________________________________]
BARGE IN
g Confirm (On = ´).
Press end call key.
Cutting in
Precondition: A handset is conducting an external call.
c
a
i
Press the talk key. You are linked into the
call. The display of both handsets shows
CONFERENCE.
Ending a conference: Press end call key.
Only one handset can cut into an external call.
9
Ontario.fm Seite 10 Freitag, 28. November 2003 2:35 14
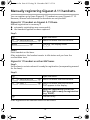
Manually registering Gigaset A 11 handsets.
You can register up to three Gigaset A 11 handsets on your Gigaset A 110.
However, internal calls between the handsets are not possible.
Gigaset A 11 handset on Gigaset A 110 base
Manual registration is necessary if
◆ automatic registration was unsuccessful,
◆ the handset supplied has been replaced.
Step 1:
g
s
Open the menu.
[______________________________________________]
REGISTER HS
g Select the menu item and confirm.
[______________________________________________]
BASE
g
Confirm. The display shows
"*--*--*".
Step 2:
Place handset on the base.
After registration, the handset reverts to idle status and you hear the
confirmation tone.
Gigaset A 11 handset on other GAP bases
Step 1:
Set the base to a status where it is ready for registration (see operating manual
for the base).
Step 2:
g
s
s
g
Open the menu.
[______________________________________________]
REGISTER HS
g Select the menu item and confirm.
[______________________________________________]
GAP 1
g Select the menu item and confirm.
"PIN" appears in the display.
Enter the registration PIN for the
GAP base that is ready for registration
(e.g. "0000").
Confirm entry.
After registration the handset reverts to idle status.
10
Ontario.fm Seite 11 Freitag, 28. November 2003 2:35 14
Handset settings
Setting the handset volume
The loudspeaker volume can be set during a call or after pressing the talk key
and the ringer volume can be set during ringing using the s key.
Setting ringer volume and ringer melodies using the menu
g
Open the menu.
either ...
s
s
[______________________________________________]
SET LEVEL 3
g Select the desired level (1–5) and
confirm.
or ...
s
s
Setting the ringer volume:
[______________________________________________]
RINGER VOL
g Select the menu item and confirm.
Setting the ringer melody:
[______________________________________________]
MELODY
g Select the menu item and confirm.
[______________________________________________]
MELODIE 4
g Select desired melody (1-10) and
confirm.
The ringer volume can also be set while the phone is ringing using the
s key.
Display language
g
s
s
Open the menu.
[______________________________________________]
LANGUAGE
g Select the menu item and confirm.
[______________________________________________]
ENGLISH
g Select the desired language and confirm.
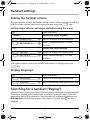
Searching for a handset ("Paging")
If you have mislaid your handset you can page it using the base. Press the
paging key below the notepad on the base and all registered handsets ring.
End paging:Press the paging key on the base or the talk key c on the
handset.
11
Ontario.fm Seite 12 Freitag, 28. November 2003 2:35 14
Operation on a PABX
The following settings are only necessary if your PABX requires them, please
refer to the operating instructions for your PABX.
c
Press the talk key.
g
Open the menu.
either ...
s
s
[______________________________________________]
PULSE
g Select the required dialling mode and
confirm.
or ...
s
s
Change pulse pause ratio:
[______________________________________________]
PULSE PAUSE
g Select the menu item and confirm.
[______________________________________________]
2-1
g Select the desired pulse pause ratio and
confirm (1.5:1 or 2:1).
or ...
s
s
a
Changing the dialling mode:
[______________________________________________]
DIAL MODE
g Confirm.
Setting flash times:
[______________________________________________]
TBR
g Select the menu item and confirm.
[______________________________________________]
180 MS
g Select the desired flash time and
confirm.
Press end call key.
Restoring the unit to the factory settings
Handset
g
s
s
Open the menu.
[______________________________________________]
HS RESET
g Select the menu item and confirm.
[______________________________________________]
RESET YES?
g Select the menu item and confirm. The
default settings of the handset are
restored.
12
Ontario.fm Seite 13 Freitag, 28. November 2003 2:35 14
or ...
[______________________________________________]
RESET NO?
g
i
Select the menu item and confirm.
In order to be able to use the handset again, you must register it
on your base again (see page 5).
Base
When resetting, all registered handsets are deregistered and have to be reregistered manually (see page 10).
c
g
s
s
Press the talk key.
Open the menu.
[______________________________________________]
BASE RESET
g Select the menu item and confirm.
[______________________________________________]
RESET YES?
g Select the menu item and confirm.
The display SAVED appears and you hear
the confirmation tone.
The default settings of the handset are
restored.
or ...
[______________________________________________]
RESET NO?
g
a
Select the menu item and confirm.
Press end call key.
Appendix
Care
Wipe the base station and handset with a damp cloth or an antistatic wipe.
Never use a dry cloth! This can cause static!
13
Ontario.fm Seite 14 Freitag, 28. November 2003 2:35 14
Contact with liquid
!
If the handset should come into contact with liquid, on no account switch
the device on. Remove all batteries immediately.
Allow the liquid to drain out of the device, and then pat all parts of the device
dry. Keep the handset with the batteries removed in a warm, dry place for at
least 72 hours. You will normally then be able to use it again.
Range
The range is up to 300 m in the open. In buildings, ranges of up to 50 m can be
achieved. If you go outside the range, "*--*--* " appears in the display.
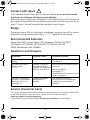
Recommended batteries
Sanyo Twicell 650; Sanyo Twicell 700; Panasonic 700mAh ’for DECT’;
GP 550mAh; GP 700mAh; YDT AAA 600; YDT AAA Phone 700;
VARTA PhonePower AAA 700MAh.
Questions and Answers
Question
Possible Cause
Possible solution
Nothing appears in the
display.
No radio link to base –
display shows
"*--*--*".
The batteries are flat.
Charge or replace the batteries
(see page 5).
Reduce distance between handset
and base.
The caller’s telephone
number is not displayed
although CLIP is set
(see page 7).
Handset outside the
base station range.
Handset not registered.
Base not switched on. Register handset
(see page 10).
Check the mains connector on the
base (see page 4).
Telephone number
The caller must request
identification is
identification of his telephone
blocked.
number from his network
provider.
Service (Customer Care)
You can get assistance easily when you have technical questions or questions about how
to use your device by using our online support service on the Internet at:
www.my-siemens.com/customercare
or by referring to the section entitled Questions and answers in this manual.
14
Ontario.fm Seite 15 Freitag, 28. November 2003 2:35 14
If the device needs to be repaired, please contact one of our Customer Care Centers:
Lithuania . . . . . . . . . 8 22 74 20 10
Luxembourg . . . . . . . 43 84 33 99
Macedonia . . . . . . . . . 02 13 14 84
Malaysia . . . . . . . . 03 21 63 11 18
Malta . . . . . . 00 35 32 14 94 06 32
Mauritius. . . . . . . . . . . . 2 11 62 13
Mexico . . . . . . 01 80 07 11 00 03
Morocco . . . . . . . . . . . 22 66 92 09
Netherlands . . . . . 0900-3333102
New Zealand. . . . . 08 00 27 43 63
Norway . . . . . . . . . . . . 22 70 84 00
Oman . . . . . . . . . . . . . . . 79 10 12
Pakistan. . . . . . . . . 02 15 66 22 00
Philippines. . . . . . . . 0 27 57 11 18
Poland . . . . . . . . . . 08 01 30 00 30
Portugal . . . . . . . . . 8 00 85 32 04
Qatar . . . . . . . . . . . . . . 04 32 20 10
Romania . . . . . . . . 02 12 04 60 00
Russia . . . . . . . . . (800) 200 10 10
Saudi Arabia . . . . . . 0 22 26 00 43
Serbia . . . . . . . . . . 01 13 22 84 85
Singapore . . . . . . . . . . 62 27 11 18
Slovak Republic . . . 02 59 68 22 66
Slovenia . . . . . . . . . 0 14 74 63 36
South Africa . . . . . 08 60 10 11 57
Spain . . . . . . . . . . . . 9 02 11 50 61
Sweden . . . . . . . . . . 0 87 50 99 11
Switzerland . . . . . . 08 48 21 20 00
Taiwan. . . . . . . . . . 02 25 18 65 04
Thailand . . . . . . . . . 0 22 68 11 18
Tunisia. . . . . . . . . . . 0 71 86 19 02
Turkey . . . . . . . . .0 21 65 79 71 00
Ukraine . . . . . . . .8 80 05 01 00 00
United Arab Emirates0 43 31 95 78
United Kingdom .0 87 05 33 44 11
USA . . . . . . . . . . .1 88 87 77 02 11
Vietnam . . . . . . . . . . . 45 63 22 44
Abu Dhabi. . . . . . . . 0 26 42 38 00
Argentina . . . . . . 0 80 08 88 98 78
Australia . . . . . . . . 18 00 62 24 14
Austria . . . . . . . . . 05 17 07 50 04
Bahrain . . . . . . . . . . . . . . 40 42 34
Bangladesh . . . . . . . 0 17 52 74 47
Belgium . . . . . . . . . 0 78 15 22 21
Bosnia Herzegovina 0 33 27 66 49
Brazil . . . . . . . . . . 0 80 07 07 12 48
Brunei . . . . . . . . . . . . . 02 43 08 01
Bulgaria. . . . . . . . . . . . 02 73 94 88
Cambodia . . . . . . . . . . 12 80 05 00
Canada . . . . . . . . 1 88 87 77 02 11
China . . . . . . . . . 0 21 50 31 81 49
Croatia . . . . . . . . . . 0 16 10 53 81
Czech Republic . . . . 2 33 03 27 27
Denmark . . . . . . . . . . . 35 25 86 00
Dubai . . . . . . . . . . . 0 43 96 64 33
Egypt. . . . . . . . . . . . 0 23 33 41 11
Estonia . . . . . . . . . . . . 06 30 47 97
Finland . . . . . . . . . 09 22 94 37 00
France . . . . . . . . . . 01 56 38 42 00
Germany . . . . . . . . 01805 333 222
Greece . . . . . . . . 0 80 11 11 11 16
Hong Kong . . . . . . . . . 28 61 11 18
Hungary . . . . . . . . 06 14 71 24 44
Iceland . . . . . . . . . . . . . 5 11 30 00
India . . . . . . . .01 13 73 85 89 - 98
Indonesia . . . . . . 0 21 46 82 60 81
Ireland. . . . . . . . . . 18 50 77 72 77
Italy. . . . . . . . . . . . 02 66 76 44 00
Ivory Coast . . . . . . . . . 80 00 03 33
Jordan . . . . . . . . . . . 0 64 39 86 42
Kenya . . . . . . . . . . . . . . 2 72 37 17
Kuwait. . . . . . . . . . . . . . 2 45 41 78
Latvia . . . . . . . . . . . . . . 7 50 11 14
Lebanon . . . . . . . . . . . 01 44 30 43
Libya . . . . . . . . . . . 02 13 50 28 82
15
Ontario.fm Seite 16 Freitag, 28. November 2003 2:35 14
In some countries repair and replace services are impossible where the products are not
sold through our authorised dealers.
Your Gigaset is designed for operation in your country, as indicated on the packaging and
on the device itself. Country-specific conditions have been taken into account. If you have
any questions about the differences between the public phone networks, please contact
your specialist dealer or network provider.
The CE mark attests to the phone's compliance with the essential requirements of the
R&TTE directive.
Excerpt from the original declaration:
"We, Siemens AG, declare that the above mentioned product is manufactured according
to our Full Quality Assurance System certified by CETECOM ICT Services GmbH in
compliance with ANNEX V of the R&TTE-Directive 99/05/EC. The presumption of
conformity with the essential requirements regarding Council Directive 99/05/EC is
ensured."
Senior Approvals Manager
The Declaration of Conformity (DoC) has been signed. If required, a copy of the original
DoC can be made available via the company hotline.
16