1
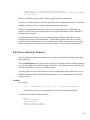
Oracle® JDBC for Rdb
User Guide
June 2008
Release 7.2.5.3
Oracle JDBC for Rdb User Guide, Release 7.2.5.3
Copyright © 2005, 2008 Oracle Corporation. All rights reserved.
The Programs (which include both the software and documentation) contain proprietary
information of Oracle Corporation; they are provided under a license agreement containing
restrictions on use and disclosure and are also protected by copyright, patent, and other
intellectual and industrial property laws. Reverse engineering, disassembly, or decompilation
of the Programs is prohibited.
The information contained in this document is subject to change without notice. If you find
any problems in the documentation, please report them to us in writing. Oracle Corporation
does not warrant that this document is error free. Except as may be expressly permitted in
your license agreement for these Programs, no part of these Programs may be reproduced or
transmitted in any form or by any means, electronic or mechanical, for any purpose, without
the express written permission of Oracle Corporation.
If the Programs are delivered to the U.S. Government or anyone licensing or using the
Programs on behalf of the U.S. Government, the following notice is applicable:
U.S. GOVERNMENT RIGHTS Programs, software, databases, and related documentation
and technical data delivered to U.S. Government customers are "commercial technical data"
pursuant to the applicable Federal Acquisition Regulation and agency-specific supplemental
regulations. As such, use, duplication, disclosure, modification, and adaptation of the
Programs, including documentation and technical data, shall be subject to the licensing
restrictions set forth in the applicable Oracle license agreement, and, to the extent applicable,
the additional rights set forth in FAR 52.227-19, Commercial Computer Software Restricted Rights (June, 1987). Oracle Corporation, 500 Oracle Parkway, Redwood City, CA
94065.
The Programs are not intended for use in any nuclear, aviation, mass transit, medical, or
other inherently dangerous applications. It shall be the licensee's responsibility to take all
appropriate fail-safe, back up, redundancy and other measures to ensure the safe use of such
1
applications if the Programs are used for such purposes, and Oracle Corporation disclaims
liability for any damages caused by such use of the Programs.
Oracle is a registered trademark of Oracle Corporation. All other company or product names
mentioned are used for identification purposes only and may be trademarks of their
respective owners.
The Programs may provide links to Web sites and access to content, products, and services
from third parties. Oracle is not responsible for the availability of, or any content provided
on, third-party Web sites. You bear all risks associated with the use of such content. If you
choose to purchase any products or services from a third party, the relationship is directly
between you and the third party. Oracle is not responsible for: (a) the quality of third-party
products or services; or (b) fulfilling any of the terms of the agreement with the third party,
including delivery of products or services and warranty obligations related to purchased
products or services. Oracle is not responsible for any loss or damage of any sort that you
may incur from dealing with any third party.
2
Contents
Preface .................................................................................................................................................................................7
Purpose of This Manual.....................................................................................................................................................7
Intended Audience..............................................................................................................................................................7
Document Structure ...........................................................................................................................................................7
Conventions.........................................................................................................................................................................7
Chapter 1
Introduction ................................................................................................................................................9
Chapter 2
Oracle JDBC for Rdb...............................................................................................................................11
2.1
Oracle JDBC for Rdb Native Driver ................................................................................... 11
2.1.1
Oracle Rdb Database URL Specification Used with the Oracle JDBC for Rdb native
driver
11
2.1.2
Class Used with the Oracle JDBC for Rdb native driver............................................ 12
2.2
Oracle JDBC for Rdb Thin Driver....................................................................................... 12
2.2.1
Oracle Rdb Database URL Specification Used with the Oracle Rdb thin driver ....... 13
2.2.2
Class Used with the Oracle JDBC for Rdb thin driver ............................................... 14
2.3
Connection Options ............................................................................................................. 14
2.4
Oracle JDBC for Rdb System Properties............................................................................. 17
Chapter 3
Oracle JDBC for Rdb Servers .................................................................................................................19
3.1
Oracle JDBC for Rdb Thin Server....................................................................................... 19
3.1.1
Starting a Thin Server ................................................................................................. 20
3.2
Oracle JDBC for Rdb Multi-process Server........................................................................ 21
3.2.1
Starting a Multi-process Server .................................................................................. 22
3.2.2
Shared Memory Usage................................................................................................ 24
3.2.3
Prestarted Executors.................................................................................................... 24
3.2.4
Executor Naming ........................................................................................................ 25
3.2.5
Executor Process Startup ............................................................................................ 26
3.3
Oracle JDBC for Rdb Pool Server....................................................................................... 28
3.3.1
Starting a Pool Server ................................................................................................. 29
3.3.2
Pool Server Operation................................................................................................. 30
Chapter 4
Server Configuration................................................................................................................................32
4.1
Server Configuration Options.............................................................................................. 32
4.2
Pool Server Configuration Options ..................................................................................... 40
4.3
Configuration Files.............................................................................................................. 43
4.3.1
Standard Properties File.............................................................................................. 43
4.3.2
XML-Formatted Configuration File ........................................................................... 44
Chapter 5
Using SSL ..................................................................................................................................................56
5.1
SSL Configuration................................................................................................................ 56
5.1.1
Client SSL Configuration ........................................................................................... 56
5.1.2
Server SSL Configuration........................................................................................... 58
3
5.2
SSL and the Controller......................................................................................................... 59
5.3
SSL Configuration Options .................................................................................................. 60
5.4
Using Self-Signed Certificates for Testing........................................................................... 61
Chapter 6
Oracle JDBC for Rdb Controller ............................................................................................................63
6.1
Running the Controller ........................................................................................................ 66
6.1.2
Controller Command Line .......................................................................................... 69
6.2
Connecting to Servers .......................................................................................................... 74
6.2.1
Connect Command...................................................................................................... 75
6.2.2
Implicit Connection .................................................................................................... 76
6.3
Control Password ................................................................................................................ 76
6.4
Server Operations ................................................................................................................ 77
6.4.1
Closing Servers ........................................................................................................... 78
6.4.2
Opening Servers.......................................................................................................... 79
6.4.3
Showing Servers ......................................................................................................... 81
6.4.4
Starting Servers........................................................................................................... 83
6.4.5
Stopping Servers ......................................................................................................... 85
6.4.6
Watching Servers ........................................................................................................ 87
6.4.7
Polling Servers ............................................................................................................ 88
6.5
Client Operations................................................................................................................. 90
6.5.1
Showing Clients .......................................................................................................... 90
6.5.2
Stopping Clients.......................................................................................................... 91
Chapter 7
Oracle SQL/Services and Oracle JDBC for Rdb Servers .....................................................................95
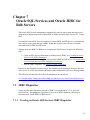
7.1
JDBC Dispatcher ................................................................................................................. 95
7.1.1
Creating an Oracle SQL/Services JDBC Dispatcher .................................................. 95
7.1.2
Associating an Oracle SQL/Services JDBC Dispatcher to a Server........................... 96
7.1.3
Starting a JDBC Dispatcher ...................................................................................... 102
7.1.4
Stopping a JDBC Dispatcher .................................................................................... 103
7.2
Command Procedures used by Oracle SQL/Services........................................................ 103
7.2.1
JDBC Dispatcher Setup Procedure ........................................................................... 104
7.3
Chapter 8
8.1
Using Pool Servers ............................................................................................................ 105
Other Features ........................................................................................................................................ 108
Anonymous Usernames...................................................................................................... 108
8.2
BYPASS Privilege .............................................................................................................. 108
8.2.1
BYPASS and Multi-Process servers......................................................................... 109
8.3
Persona .............................................................................................................................. 110
8.3.1
Persona and Server Operations ................................................................................. 110
8.4
Default Transaction ........................................................................................................... 111
8.5
Executor Sub-process used with the Rdb Native driver..................................................... 112
8.5.1
Setting Maximum Handshake Tries and Wait Duration........................................... 112
8.6
FetchSize ............................................................................................................................ 113
4
8.7
Ignoring Statement.cancel() Method Calls ........................................................................ 113
8.8
Inactivity timeouts.............................................................................................................. 114
8.8.1
Client connection timeout ......................................................................................... 114
8.8.2
Server Inactivity Timeout ......................................................................................... 115
8.9
JDBC Hint Methods........................................................................................................... 116
8.10 Lockwait and Maxtries...................................................................................................... 116
8.10.1
Lockwait precedence ................................................................................................ 117
8.11
Logging ............................................................................................................................. 119
8.12
Name ................................................................................................................................. 119
8.13
Named Databases ............................................................................................................. 121
8.14 On Start Commands.......................................................................................................... 122
8.14.1
srv.onStartCmd ......................................................................................................... 122
8.14.2
srv.onExecStartCmd ................................................................................................. 124
8.15
Password Obfuscation in Server Configuration Files ...................................................... 124
8.16 Restricting Server and Database Access .......................................................................... 126
8.16.1
Restricting Database Access ..................................................................................... 126
8.16.2
Restricting User Access ............................................................................................ 127
8.16.3
Further server access protection................................................................................ 128
8.17
Scope of CONNECTION.setReadOnly()........................................................................... 129
8.18 Server Command Procedures ........................................................................................... 129
8.18.1
Server Startup Command Procedure......................................................................... 130
8.18.2
Executor Startup Command Procedure..................................................................... 131
8.19
Server/Client Protocol Checking ...................................................................................... 132
8.20
Using OpenVMS FailSAFE IP.......................................................................................... 132
8.21
SET Statements.................................................................................................................. 133
8.22
SQL Statement Cache ....................................................................................................... 134
8.23 Trace ................................................................................................................................. 136
8.23.1
Setting tracelevel....................................................................................................... 136
8.23.2
Abbreviated form of tracelevel ................................................................................. 138
8.23.3
Trace Values ............................................................................................................. 138
8.24
File and Directory access Requirements .......................................................................... 139
Chapter 9
JDBC Extensions for Oracle Rdb.......................................................................................................... 141
9.1
Enhanced Blob Handling................................................................................................... 141
9.2
ResultSet.getBytes() ........................................................................................................... 142
Chapter 10
Other Information ............................................................................................................................. 143
10.1
Disallowed Dynamic SQL Statements .............................................................................. 143
10.2
Sample Setup, Starting and Using an Oracle JDBC for Rdb thin server. ........................ 143
5
10.3
Sample Setup, Starting an Oracle JDBC for Rdb thin server from Oracle SQL/Services.152
10.4
Sample configuration file MY_SERVERS.XML ................................................................ 158
10.5
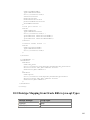
Datatype Mapping from Oracle Rdb to java.sql.Types .................................................... 160
10.6
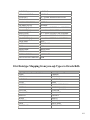
Datatype Mapping from java.sql.Types to Oracle Rdb .................................................... 161
10.7
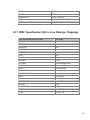
JDBC Specification SQL to Java Datatype Mappings ..................................................... 162
10.8
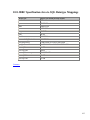
JDBC Specification Java to SQL Datatype Mappings ..................................................... 163
6
Preface
Purpose of This Manual
The Oracle JDBC for Rdb 7.2.5.3 User Guide describes concepts, features and usage of the
Oracle JDBC for Rdb drivers and servers. This user guide covers Oracle JDBC for Rdb for
OpenVMS on both Alpha and Integrity Servers.
Intended Audience
This document is intended for users responsible for:
System management
Database administration
Application programming
Document Structure
This document consists of nine chapters and one appendix:
Chapter 1
Introduction
Chapter 2
Describes the Oracle JDBC for Rdb drivers
Chapter 3
Describes the Oracle JDBC for Rdb servers
Chapter 4
Describes details on how to configure Oracle JDBC for Rdb servers
Chapter 5
Describes details on how to use SSL with Oracle JDBC for Rdb.
Chapter 6
Describes how to use the Oracle JDBC for Rdb controller
Chapter 7
Describes how to use Oracle JDBC for Rdb with Oracle SQL/Services
Chapter 8
Describes other features that are available
Chapter 9
Describes the JDBC extensions amiable for use with Oracle Rdb
Appendix 1
Show general examples and datatype compatibilities
Conventions
Oracle JDBC for Rdb is often referred to as JDBC.
7
Hewlett-Packard Company is often referred to as HP.
The following conventions are used in this document:
word
A lowercase word in a format example indicates a syntax element that
you supply.
[]
Brackets enclose optional clauses from which you can
choose one or none.
{}
Braces enclose clauses from which you must choose one alternative.
...
A horizontal ellipsis means you can repeat the previous item.
.
.
.
A vertical ellipsis in an example means that information not directly
related to the example has been omitted.
Contents
8
Chapter 1
Introduction
Oracle provides the following Oracle JDBC for Rdb drivers:
Oracle JDBC for Rdb native driver for client-side use with an Oracle Rdb installation
Oracle JDBC for Rdb thin driver, a 100 percent pure Java driver for client-side use
without an Oracle Rdb installation. This is particularly useful with applets.
The Oracle JDBC for Rdb drivers provide the same basic functionality. They both support
the following standards and features:
JDK 1.4 / JDBC 3.0
Same syntax and APIs
The Oracle JDBC for Rdb drivers implement standard Sun Microsystems java.sql
interfaces. It is assumed that the reader of these notes is already familiar with Java and
JDBC.
General information on Java may be found at
http://java.sun.com/reference
General information on JDBC may be found at
http://java.sun.com/products/jdbc/index.html.
Documentation for HP's Java for OpenVMS system may be found at the following web
sites:
http://www.compaq.com/java/documentation/index.html - Java 2.
http://h18012.www1.hp.com/java/documentation/index.html
In conjunction with the Oracle JDBC for Rdb thin driver, Oracle provides the following
Oracle JDBC for Rdb servers:
Oracle Rdb thin server
Oracle Rdb thin multi-process server
Oracle Rdb thin pool server
The Oracle JDBC for Rdb servers carry out remote database access operations on behalf of
the Oracle JDBC for Rdb thin driver.
9
Management of the Oracle JDBC for Rdb servers may be carried out using the Oracle
JDBC for Rdb controller or by using the Oracle SQL/Services manager.
Contents
10
Chapter 2
Oracle JDBC for Rdb
There are two types of Oracle JDBC for Rdb drivers:
Oracle JDBC for Rdb native driver
Oracle JDBC for Rdb thin driver
2.1 Oracle JDBC for Rdb Native Driver
The Oracle JDBC for Rdb native driver is a Type II driver intended for use with clientserver Java applications.
The native driver, written in a combination of Java and C, converts JDBC invocations to
calls to SQLMOD modules, using native methods to call C-entry points.
When you use the native driver, the driver connects directly to the Oracle Rdb database
system using SQLMOD. If you are not using Rdb Remote Access then there are no
network connections involved. This means that the native driver is potentially the fastest
JDBC access method available within the Oracle JDBC for Rdb drivers.
Because the driver uses SQLMOD libraries to carry out Oracle Rdb access, the driver can
only be used on a client machine if
Oracle Rdb Client libraries are also available on that same machine. In addition, it is
necessary for the driver to dynamically load a shared image to use with its Java JNI
interface. Thus this driver is not suitable for use with applications that require Java applets.
2.1.1
Oracle Rdb Database URL Specification Used with the Oracle
JDBC for Rdb native driver
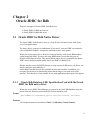
When you use the JDBC DriverManager to connect to an Oracle Rdb database using the
native driver the following connection URL format should be used:
Format
jdbc:RdbNative:<database_specification><connect_switches>
Elements
The format elements are described in Table 2–1 RdbNative Format Elements
11
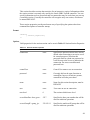
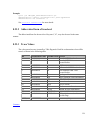
Table 2-1
RdbNative Format Elements
Element
<database_specification>
Description
Is the full file specification of the Rdb
database that you wish to connect to.
<connect_switches>
These optional switches may be used to
specify certain settings that should be
established when the database connection is
made.
See Connection Options for more details.
Example
To connect to MY_DB_DIR:PERSONNEL:
Connection conn = DriverManager.getConnection(
"jdbc:RdbNative:my_db_dir:personnel",user, pass);
Note:
The <database_specification> should be a valid OpenVMS-style file specification or
logical name.
my_disk:[my_directory]my_database
2.1.2
Class Used with the Oracle JDBC for Rdb native driver
The Rdb native driver can be found in the following class:
oracle.rdb.jdbc.rdbNative.Driver
2.2 Oracle JDBC for Rdb Thin Driver
The Oracle JDBC for Rdb thin driver is a 100 percent pure Java, Type IV driver. Because it
is written entirely in Java, this driver is platform-independent. It does not require any
additional Oracle software on the client side.
For use with applets, the thin driver can be downloaded into a browser along with the Java
applet being run. The HTTP protocol is stateless, but the thin driver is not. The initial HTTP
request to download the applet and the thin driver is stateless. Once the thin driver establishes
the database connection, the communication between the browser and the database is stateful
and in a two-tier configuration.
12
The thin driver allows a direct connection to any Oracle Rdb database via an Oracle JDBC
for Rdb server using TCP/IP on Java sockets.
Note:
When the thin driver is used with an applet, the client browser must have the capability to
support Java sockets.
2.2.1
Oracle Rdb Database URL Specification Used with the Oracle
Rdb thin driver
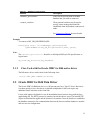
When you use the JDBC DriverManager to connect to an Oracle Rdb database using the thin
driver the following connection URL format should be used:
Format
jdbc:rdbThin://<node>:<port>/<database_specification><connect_switches>
Elements
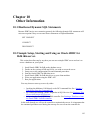
The format elements are described in Table 2–2 RdbThin Format Elements
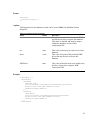
Table 2-2
RdbThin Format Elements
Element
Description
<node>
Is the node name or IP address of the node
that the Rdb JDBC server you wish to
connect to is running on.
<port>
Is the port the Rdb thin server you wish to
connect to is listening on.
<database_specification>
Is the full file specification of the Rdb
database that you wish to connect to.
<connect_switches>
These optional switches may be used to
specify certain settings that should be
established when the database connection is
made.
See Connection Options for more details.
Example
To connect using the thin driver via an Oracle Rdb thin server to
MY_DB_DIR:PERSONNEL on node BRAVO using port 1701:
13
Connection conn = DriverManager.getConnection(
"jdbc:rdbThin://bravo:1701/my_db_dir:personnel",user, pass);
Note:
The <database_specification> should be a valid OpenVMS-style file specification or
logical name, for example:
my_disk:[my_directory]my_database
When you use an Oracle Rdb thin driver connection, any logical names and relative
directory specifications used in the database specification must be valid for the account and
directory from which the Oracle Rdb thin server was started.
2.2.2
Class Used with the Oracle JDBC for Rdb thin driver
The Rdb thin driver can be found in the following class:
oracle.rdb.jdbc.rdbThin.Driver
Contents
2.3 Connection Options
The Oracle JDBC for Rdb drivers recognize a number of options that may be added to the
connection string to specify certain default behavior and settings to be established when the
connection is made.
Connection options may be either added directly to a connection URL using the @
character as a separator, or as property values in the properties block that may be passed to
the DriverManager.GetConnection() method .
Format In connection URL
@<option_name>=<value>
Options
The connections options that may be used are described in Table 2–3 Connection Options
Table 2-3 Connection Options
<option_name>
<value>
cli.idleTimeout
Decimal or
hex integer
Default
0
Description
Sets the maximum time (in milliseconds) this
client connection may be idle. If no operation
is carried out using this connection within the
time specified, the connection will be forcibly
disconnected.
14
<option_name>
<value>
Default
Description
The value 0 means unlimited idle time allowed.
See Client connection timeout for more details
handshakeTries
Decimal or
hex integer
500
Sets the maximum number of times the main
process will attempt to establish handshake
with its associated executor sub-process.
This option is only valid on connections using
rdbNative driver and when multiprocess is
enabled on the native connection.
This option may only be used in conjunction
with the multiprocess option.
See Executor Sub-process used with the Rdb
Native driver for more details.
handshakeWait
Decimal or
hex integer
10
Sets the time (in milliseconds) between
handshake tries attempted between the main
process and its associated executor subprocess.
This option is only valid on connections using
rdbNative driver and when multiprocess is
enabled on the native connection.
This option may only be used in conjunction
with the multiprocess option.
See Executor Sub-process used with the Rdb
Native driver for more details.
lockwait
Decimal or
hex integer
-1
Sets the lockwait (in seconds) for transactions.
The value –1 means that the server will wait
indefinitely for the lock.
See Lockwait and Maxtries for more details.
multiProcess
true or false
false
If true a new executor process will be created
for this connection.
This option is only valid when used with an
Rdb Native driver connection and will be
ignored by the Rdb Thin driver.
See Executor Sub-process used with the Rdb
Native driver for more details.
networkKeepalive true or false
false
If true the socket used to connect the client to
the server will have SoKeepAlive enabled
See your socket documentation for more
information on SoKeepAlive.
networkTimeout Decimal or
0
Sets the maximum time (in milliseconds) this
15
<option_name>
<value>
Default
hex integer
Description
client connection will wait on the completion
of a read or write on the network. If the read or
write does not complete within the designated
time an exception will be raised.
The value 0 means unlimited time allowed.
This timeout is only applicable to the thin
driver and is only placed on the client-side
socket operations.
sqlcache
Decimal or
hex integer
0
Specifies the number of statements that may be
maintained in the SQL cache.
If less than or equal to 0, SQL statement cache
is disabled. Positive values specify the size of
the SQL statement cache.
srv.password
string value
NONE
Specifies the server password to be used for the
connection. See Further server access
protection for more details.
ssl*
various
NONE
Sets one or more SSL characteristics, see
Using SSL for more details on these
characteristics.
tracelevel or
tl
Decimal or
hex integer
0
Specifies the default tracelevel for the
connection.
transaction
readonly or automatic Specifies the default transaction for this
connection.
readwrite or
See Default Transaction and
automatic or
oracle or
Scope of CONNECTION.setReadOnly() for
manual
more details
usehints
true or false
true
If true, the optional JDBC hint methods will be
observed.
If false, the optional JDBC hint methods will
be silently ignored.
See JDBC Hint Methods for more details.
16
Example
To connect using the thin driver via an Oracle JDBC for Rdb server to
MY_DB_DIR:PERS on node BRAVO using port 1755 and enabling full trace logging for
this connection:
Connection conn = DriverManager.getConnection(
"jdbc:rdbThin://bravo:1755/my_db_dir:pers@tracelevel=-1",
user, pass);
Alternatively , these options may be placed in a properties block:
Properties info = new Properties();
info.put("user", user);
info.put("password", password);
info.put("tracelevel", traceLevel);
Connection conn = DriverManager.getConnection(
"jdbc:rdbThin://bravo:1755/my_db_dir:pers", info);
2.4 Oracle JDBC for Rdb System Properties
The Oracle JDBC for Rdb drivers and servers can recognize configuration or connection
properties passed in as Java System Properties from the operating system command line
during application invocation.
When used in conjunction with an application invoking the Rdb native or Rdb thin driver,
the drivers will recognize system properties with an <option_name> similar to a valid
Connection option, see Connection Options for more details of these options.
If the same configuration option is specified as both an Rdb system property and within the
connection URL, then the value within the connection URL will take precedence.
When used in conjunction with an Rdb server invocation the server will recognize system
properties with any <option_name> that may be used as a server configuration option, see
Server Configuration Options and Pool Server Configuration Options for more details of
these options.
Any Rdb system property specified during the invocation of a server will take precedence
over the same property specified on the command line as a standard configuration option or
in a configuration file.
Format
-Doracle.rdb.jdbc.<option_name>=<value>
17
Example
To set trace level to trace everything for your application that utilizes either the Rdb native
or Rdb thin driver:
$java –Doracle.rdb.jdbc.tracelevel=-1 my_application
Contents
18
Chapter 3
Oracle JDBC for Rdb Servers
Oracle JDBC for Rdb servers are the server-side components that services JDBC requests
issued by applications using the Oracle Rdb thin driver.
There are three types of Oracle JDBC for Rdb servers:
Oracle JDBC for Rdb thin server
Oracle JDBC for Rdb multi-process server
Oracle JDBC for Rdb pool server
Each server is multi-threaded, able to handle multiple client requests at the same time.
Oracle JDBC for Rdb servers should be installed and invoked on each node from which
you wish to serve Oracle Rdb databases.
The Oracle JDBC for Rdb thin driver communicates with the Oracle JDBC for Rdb servers
using Java sockets over TCP/IP.
The following sections provide information about each of the server types and the various
ways you may start-up a server on your system.
Note:
In order to start Oracle JDBC for Rdb servers you will require certain access to the Oracle
JDBC for Rdb directories and files. See File and Directory access Requirements for more
details.
3.1 Oracle JDBC for Rdb Thin Server
The Oracle JDBC for Rdb thin server is a server-side component that services JDBC
requests issued by applications using the Oracle Rdb thin driver.
The standard thin server is multi-threaded, able to handle multiple client requests at the
same time. Because the server is maintained as a single OpenVMS process, database access
for each of the threads is synchronized.
A thin server is installed and invoked on each node from which you wish to serve Oracle
Rdb databases. Oracle Rdb must be already installed and running on these nodes.
The server communicates with the Oracle Rdb thin driver using Java sockets over TCP/IP
with the default Port ID 1701.
19
3.1.1 Starting a Thin Server
A thin server may be started by using the appropriate start statement within the controller,
as an Oracle SQL/Services JDBC dispatcher or directly from the operating system
command line.
3.1.1.1 Starting a Thin Server from the Oracle JDBC for Rdb controller
A thin server may be started from the controller by referencing a thin server definition in an
XML-formatted configuration file. See Starting Servers within Oracle JDBC for Rdb
Controller for more details.
Example
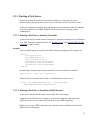
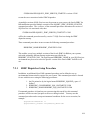
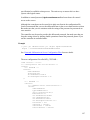
Given the following server section in the XML-formatted configuration file mycfg.xml:
<server
name="serv1"
type="RdbThinSrv"
url="//localhost:1707/"
logfile="myLogs:serv1.log"
/>
the following command may be used to start this server from within the controller:
rdbthincontrol> start server serv1
Alternatively the controller may be used in command mode to start a server
$ java –jar rdbthincontrol.jar –cfg mycfg.xml –
–name serv1 –startserver
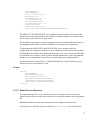
3.1.1.2 Starting a Thin Server from Oracle SQL/Services
A thin server may be started from the Oracle SQL/Services manager.
Using the Oracle SQL/Services manager, you must first establish a connection to the
SQL/Service server. Once connected you may then start a JDBC dispatcher.
Before you can start a JDBC dispatcher, you must first create its definition in the Oracle
SQL/Services environment.
See Oracle SQL/Services and Oracle JDBC for Rdb Servers for more details.
Example
$run sys$system:SQLSRV_MANAGE71
SQLSRV> connect server;
Connecting to server
Connected
SQLSRV> start disp JDBC_MPDISP;
20
SQLSRV>
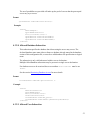
3.1.1.3 Starting a Thin Server from the Command Line
You may invoke a thin server from the OpenVMS command line.
Instead of placing a number of options on the command line, you may wish to create a
server definition within an XML-formatted configuration file and then start the server using
its server name. The server type for this server definition must be set to RdbThinSrv for a
standard thin server.
Format
$ java –jar rdbthinsrv.jar [-option ]
See Server Configuration Options for a list of valid options. Remember that on the DCL
command line, each configuration option must have a hyphen (-) prepended to it.
By default, the server is assumed to be of type RdbThinSrv, a standard thin server.
Example
$ java –jar rdbthinsrv.jar -port 1707
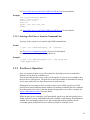
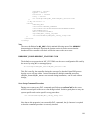
Alternatively, given the following server section in the XML-formatted configuration file
mycfg.xml:
<server
name="serv1"
type="RdbThinSrv"
url="//localhost:1707/"
logfile="myLogs:serv1.log"
/>
the following method may be used to start this thin server:
$ java –jar rdbthinsrv.jar –cfg mycfg.xml –name serv1
See XML formatted Configuration File for more details on server definitions within
configuration files.
3.2 Oracle JDBC for Rdb Multi-process Server
The Oracle JDBC for Rdb multi-process server is a server-side component that processes
requests from the Oracle JDBC for Rdb thin driver using small memory footprint
subprocesses to carry out the requested operations on the Oracle Rdb database.
21
A multi-process server is multi-threaded and may handle multiple concurrent clients
allocating each client its own subprocess for database access, thus allowing better
concurrency and availability.
The majority of the multi-process server operations are carried out in a client thread context
within the main server process, handing off control to the clients allocated subprocess only
when direct Oracle Rdb database operations are required. Each client has its own
OpenVMS subprocess, thus concurrency is improved, as the server does not need to
synchronize database operations.
By default, the allocated subprocess is terminated on client disconnect. Executors may also
be retained for re-use after client disconnect, see Prestarted Executors for details.
A multi-process server is installed and invoked on each node from which you wish to serve
Oracle Rdb databases. Oracle Rdb must be already installed and running on these nodes.
The server communicates with the thin driver using Java sockets over TCP/IP with the
default Port ID 1701.
3.2.1 Starting a Multi-process Server
A multi-process server may be invoked by using the appropriate start statement within the
controller, as an Oracle SQL/Services JDBC dispatcher, or directly from the operating
system command line.
3.2.1.1 Starting a Multi-process Server from the Controller
A multi-process server may be started from the controller by referencing a multi-process
server definition in an XML-formatted configuration file. See Starting Servers within
Oracle JDBC for Rdb Controller for more details.
Example
Given the following server section in the XML-formatted configuration file mycfg.xml:
<server
name="Mpserv1"
type="RdbThinSrvMP"
url="//localhost:1799/"
logfile="myLogs:serv1.log"
/>
the following command may be used to start this server from within the controller:
rdbthincontrol> start server Mpserv1
22
Alternatively the controller may be used in command mode to start a server
$ java –jar rdbthincontrol.jar –cfg mycfg.xml –
–name Mpserv1 –startserver
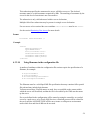
3.2.1.2 Starting a Multi-process Server from Oracle SQL/Services
A multi-process server may be started from Oracle SQL/Services manager.
Using the Oracle SQL/Services manager, you must first establish a connection to the
SQL/Service server. Once connected you may then start a JDBC dispatcher.
Before you can start a JDBC dispatcher, you must first create its definition in the Oracle
SQL/Services environment.
See Oracle SQL/Services and Oracle JDBC for Rdb Servers for more details.
Example
$run sys$system:SQLSRV_MANAGE71
SQLSRV> connect server;
Connecting to server
Connected
SQLSRV> start disp JDBC_MPDISP;
SQLSRV>
See Oracle SQL/Services and Oracle JDBC for Rdb Servers for more details.
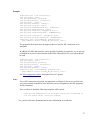
3.2.1.3 Starting a Multi-process Server from the Command Line
You may invoke a multi-process server from the OpenVMS command line.
Format
$ java –jar rdbthinsrv.jar [-option]
See Server Configuration Options for a list of valid options. Remember that on the DCL
command line, each configuration option must have a hyphen (-) prepended to it.
Both the thin server and multi-process server are started using the same rdbthinsrv.jar file.
It is the server type that determines the style of server that will be started.
By default, the server is assumed to be of type RdbThinSrv, a standard thin server. To start
a multi-process server, the server type must be set to RdbThinSrvMP.
Example
$ java –jar rdbthinsrv.jar –port 1755 –type "RdbThinSrvMP"
Note that on the DCL command line you must use double quotes to preserve the casesensitive type name.
23
Alternatively, you may wish to create a server definition within an XML-formatted
configuration file and then start the server using its server name. Again the server type
must be set to RdbThinSrvMP.
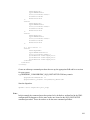
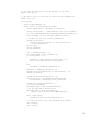
Given the following server section in the XML-formatted configuration file mycfg.xml:
<server
name="Mpserv1"
type="RdbThinSrvMP"
url="//localhost:1799/"
sharedmem="102400"
logfile="myLogs:serv1.log"
/>
the following method may be used to start this multi-process server:
$ java –jar rdbthinsrv.jar –cfg mycfg.xml –name Mpserv1
3.2.2 Shared Memory Usage
The multi-process server needs to allocate shared global memory for communication with
its executors, which you may specify using the sharedmem server configuration option.
The default allocation for shared memory is 1024 KB and is only adequate for one or two
executors.
A rule of thumb that can be used is to allow 1024 KB for each concurrent executor you
expect to be running in conjunction with the server, but this will depend on the complexity
of the queries, the number of columns involved and the size of the data area that will have
to be created to hold the data returned to the executor by Rdb.
3.2.3 Prestarted Executors
With a multi-process server you may also specify the number of executor process that may
be prestarted when the server starts running.
In addition you can also specify the maximum number of free executor process that may be
kept around while the server is running. This is particularly useful if your system takes a
while to start OpenVMS processes and sub-processes due to system load.
By prestarting executor processes you may reduce the overall elapsed time it takes for a
client to make its initial database connection.
24
3.2.4 Executor Naming
Each executor started up on a single system requires a unique process name on that system.
By default a name will be created for the executor based on the name of the server that
started it and a hexadecimal value that represents the instance of the executor process with
relation to the server.
The executor naming format may be changed by using the srv.execPrefix configuration
option.
If the srv.execPrefix configuration option is specified for a Multi-process server, all
executors for that server will have this name prefix. The server will try to provide a unique
name for each executor instance by appending to the given prefix as many characters of the
hexadecimal numeric id of the executor that will still keep the executor name within the
Process name sized expected by OpenVMS.
Names of executors are not case-sensitive.
See XML Formatted Configuration File for more details on server definitions.
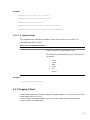
By default the name of the executor subprocess has the following format:
Format
First seven (7) characters of server name + eight (8) character hexadecimal id.
Example
RDBTHNS00000220
Thus the first seven (7) characters of the names of multi-process servers started up within
the same system should be unique irrespective of character casing, otherwise, executor
process names may class
If specified the srv.execPrefix will override this default naming format.
Given the srv.execPrefix of "MY_EXECUTOR_" the fourth executor will be named:
MY_EXECUTOR_004
Note:
The longer the prefix, the smaller the number of characters that may be used to provide
uniqueness, so consideration should be given to the number of concurrent executors that
you expect a server to maintain when specify a customized executor name prefix.
25
3.2.5
Executor Process Startup
The multi-process server will create a subprocess for each executor it allocates and starts.
OpenVMS command procedures are used during this subprocess creation. Information
about these command procedures may found in the Server Command Procedures and On
Start Commands sections of this document.
If a persona is specified for the server (see Persona for more information ) the server will
use the OpenVMS CREPRC system service to start the process. If persona is not used then
the JAVA System.exec() method will be used instead.
If the environment for running your servers or your JDBC directories are not appropriately
setup, errors may occur during the startup of the executor process.
See File and Directory access Requirements for more details on JDBC directories
access requirements.
The steps taken during the startup of an executor process depend on whether or not persona
is used with the server.
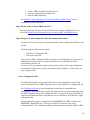
3.2.5.1 Executor Start-up Steps
Without Persona
If persona is not used the following steps are carried out by the server to start an executor
1. An executor name based on the server name is generated for the new process, see
Executor Naming for more details.
2. An attached process is created using the System.exec() method
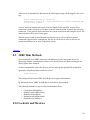
3. The command procedure designated by the srv.execStartup option for the multiprocess server is executed. If this option has not been specified for the server nor
for the DEFAULT server in the configuration file, then
RDB$JDBC_HOME:RDBJDBC_STARTEXEC.COM is used. See Server
Startup Command Procedure.
4. If the srv.onExecStartCmd option is present for this server or for the DEFAULT
server then this command is executed. This is generally used to setup server and
site specific environments. See srv.onExecStartCmd.
5. The executor image pointed to by the logical name RDBJDBCEXEC is executed.
6. The executor and server establish communications channels.
With Persona
If persona is used:
26
1. An executor name based on the server name is generated for the new process, see
Executor Naming for more details.
2. Process quotas are determined for the executor process based on the current quotas
of the executing server.
3. A termination mailbox is setup for the executor process and read issued.
4. CREPRC is used to create a process and SYS$SYSTEM:LOGINOUT.EXE is
executed
5. Steps 3 thru 6 as described in the previous list above.
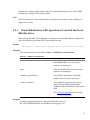
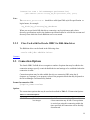
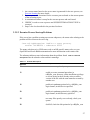
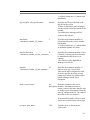
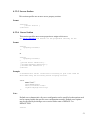
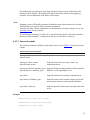
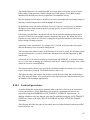
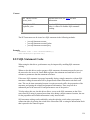
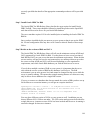
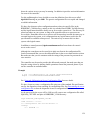
3.2.5.2 Executor Process Start-up Problems
If the server has a problem creating an executor subprocess, the status codes relating to the
problem will be written to the server log.
Java.sql.SQLException: Unable to start process,
status: 0x56EC03C : substatus 65535
The status code shown is a VMS status code or an Rdb specific status code, see your
OpenVMS and Oracle Rdb documentation for more information on this status code.
The substatus indicates more information about the problem found.
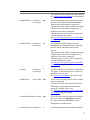
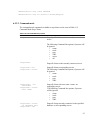
Descriptions lists the subcode values and their meanings.
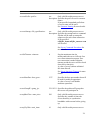
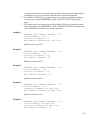
Table 3-1
Table 3–1 Subcode
Subcode Descriptions
Subcode
Description
12
no more memory, check your quotas
13
unable to create command procedure in
rdb$jdbc_com: directory, either insufficient privilege
or access denied or there already exists an earlier
version of the file with the same name but created by
another user
19
problem in pathname pointed to by rdb$jdbc_com
logical name, invalid device specified
20
problem in pathname pointed to by rdb$jdbc_com
logical name, invalid directory specified
24
too many files open by server already, check your
quotas
28
disk full, check the disk pointed to by rdb$jdbc_com
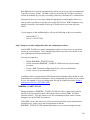
27
Subcode
Description
30
65530
disk or directory is write protected , check the
disk/directory pointed to by rdb$jdbc_com
process terminated prematurely
65531
problem reading termination mailbox
65532
problem during call to CREPRC
65533
problem getting information about termination
mailbox
65534
problem creating termination mailbox
Note:
It is important that the server process has appropriate access rights to the directories specified
by JDBC$RDB_HOME, RDB$JDBC_COM and RDB$JDBC_LOGS logical names, see File
and Directory access Requirements for more details.
Contents
3.3 Oracle JDBC for Rdb Pool Server
The Oracle JDBC for Rdb pool server is a server-side component that accepts connection
requests from the thin driver and redirects the requests to the next available Oracle JDBC
for Rdb server for processing,
Using the pool server you can designate a single Port ID that can be used by your client
side applications to connect to the next available server. The pool server selects the next
available server from a table of candidate servers in a round-robin fashion.
Once the connection request has been redirected, the thin driver and the designated server
communicate directly with each other.
A pool server is installed and invoked on each node from which you wish to direct the
access to Oracle JDBC for Rdb servers. Oracle Rdb need not be present on these nodes as
the pool server does not communicate directly with Oracle Rdb. The pool server and its
pooled servers do not need to be on the same node.
The pool server communicates with the thin driver using Java sockets over TCP/IP with the
default Port ID 1702.
Note:
The thin pool server carries out server pooling NOT connection pooling. Connections are
created in each connection request and are not reusable.
28
3.3.1 Starting a Pool Server
A pool server must be invoked on each node on which you wish to provide server
redirection. The pool server does not need to be on the same node as its pooled servers.
A pool server may be invoked by using the appropriate start statement within the controller,
as an Oracle SQL/Services JDBC dispatcher or directly from the operating system
command line.
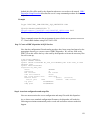
3.3.1.1 Starting a Pool Server from the Controller
A pool server may be started from the controller by referencing a thin pool server definition
in an XML-formatted configuration file. See Starting Servers within Oracle JDBC for Rdb
Controller for more details.
Example
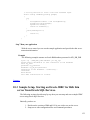
Given the following server section in the XML-formatted configuration file mycfg.xml :
<server
name="mypoolserver"
type="RdbThinSrvPool"
url="//localhost:1702/" >
<pooledServer name="srv1forRdb"/>
<pooledServer name="srv2forRdb"/>
<pooledServer name="srvMPforRdb"/>
</server>
the following command may be used to start this server from within the controller
rdbthincontrol> start server mypoolserver
Alternatively the controller may be used in command mode to start a server
$ java –jar rdbthincontrol.jar –cfg mycfg.xml –
–name mypoolserver –startserver
3.3.1.2 Starting a Pool Server from Oracle SQL/Services
A pool server may be started from the Oracle SQL/Services manager:
Using the Oracle SQL/Services manager, you must first establish a connection to the
SQL/Service server. Once connected you may then start a JDBC dispatcher.
Before you can start a JDBC dispatcher, you must first create its definition in the Oracle
SQL/Services environment.
29
See Oracle SQL/Services and Oracle JDBC for Rdb Servers for more details.
Example
$run sys$system:SQLSRV_MANAGE71
SQLSRV> connect server ;
Connecting to server
Connected
SQLSRV> start disp JDBC_DISP;
SQLSRV>
See Oracle SQL/Services and Oracle JDBC for Rdb Servers for more details.
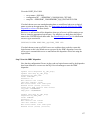
3.3.1.3 Starting a Pool Server from the Command Line
You may invoke a pool server from the OpenVMS command line.
Format
$ java –jar rdbthinsrvpool.jar [-option ]
See Pool Server Configuration Options for a list of valid options.
Each option must have a hyphen – prepended to it.
Example
$ java –jar rdbthinsrvpool.jar –cfg mycfg.xml –
–name mypoolserver
3.3.2 Pool Server Operation
Once it is started, the pool server will scan the list of pooled servers in a round-robin
fashion to select the next available server.
You can start and stop the servers in the pool at anytime. If a server is not available, then
the pool server will bypass it. The pool server also has the ability to automatically start up
one or more pooled servers when the pool server itself starts up.
During pool server startup, a check is made on each server within its pool to see if the
pooled server has the autoStart option enabled. If autoStart is enabled, then the command
procedure pointed to by the srv.startup option of that pooled server will be executed. See
Server Command Procedures for more details.
While the pool server is running, it will periodically check to see that each pooled server
within its pool of servers with autoRestart option enabled is still running. If autoRestart is
enabled for a non-running pooled server, the command procedure pointed to by the
srv.startup option of that pooled server will be executed to restart the server.
30
You can use the srv.keepAliveTimer option on pool server start-up to specify the time
between checks for non-running autoRestart servers. See Pool Server Configuration
Options for more details.
If the pool server is shutdown using the controller or the Oracle SQL/Services manager,
then during server shutdown all pooled servers within the pool that have autoStart enabled
will also be shut down.
3.3.2.1 Pool Server redirection and failSAFE IP
During connection redirection by the pool server, the IP of the chosen pooled server will be
returned to the thin driver so that it may redirect the client's connection request to that
chosen server. As the DNS node name conversions may differ on the client and server
node, the pool server will implicitly convert any named nodes to IP addresses before
returning the resultant IP to the thin driver.
The conversion to IP addresses may limit the failover to a standby address carried out by
failSAFE IP.
failSAFE IP is an optional service provided by TCP/IP Services on OpenVMS to allow IP
addresses to fail over when nodes fail.
You may specify that the pool server does not translate named nodes to IP addresses during
the connection redirection, maintaining the "logical" nature of the named IP and thus
allowing failSAFE IP to correctly redirect to a standby node.
See –srv.useLogicalIps in Pool Server Configuration Options for more details.
Contents
31
Chapter 4
Server Configuration
There are a number of configuration options that apply to Oracle JDBC for Rdb servers that
may be used as command line options or as server options inside a configuration file.
See Configuration Files for more details on how to use these options within a configuration
file.
The following sections detail the available configuration options.
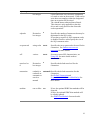
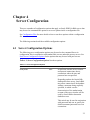
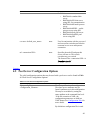
4.1 Server Configuration Options
The following server configuration options may be used on the command line or in
configuration files in conjunction with standard thin servers and multi-process servers. See
Pool Server Configuration Options for the options that may be used with pool servers.
Table 4–1 Server Configuration Options lists these options.
Table 4-1 Server Configuration Options
Option
Default
Description
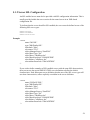
anonymous
false
If specified, tells the server to allow
anonymous connections, that is,
connections where the user and
password are not specified.
Depending on how the Oracle Rdb
database has been set up, Oracle Rdb
may allow connection to the database
without a username being explicitly
specified, in which case the
characteristics of the authorization
account of the server invoker will be
used by Oracle Rdb to determine
database access.
This switch may be used in conjunction
with password and user to specify the
default username/password to use on
connections.
32
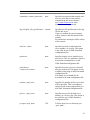
Option
Default
Description
By default, anonymous connections are
disabled and the client must specify a
valid username and password
combination to access the Rdb
database.
allowDatabase
<name=database-name>
none
Specifies the name of a database this
server will allow access to. This is used
in conjunction with the restrictAccess
option.
This option should only be used within
an XML formatted configuration file.
The named database should also be
described in the same configuration
file.
A separate allowDatabase option
should be used for each database this
server will allow access to.
See Restricting Database Access for
more details.
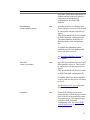
allowUser
<name=user-name>
none
Specifies the usernames this server will
allow database access to. This is used
in conjunction with the restrictAccess
option.
This option should only be used within
an XML formatted configuration file.
A separate allowUser option should be
used for each user this server will allow
access to.
See Restricting User Access for more
details.
autorestart
false
If specified, indicates to any pool
server that may include this server in its
pool of servers to automatically restart
this pooled server. This option is only
valid in an XML formatted
Configuration File. See Oracle JDBC
for Rdb Pool Server for more details.
33
Option
Default
Description
autostart
false
If specified, indicates to any pool
server that may include this server in its
pool of servers to automatically start up
this pooled server. This option is only
valid in an XML formatted
Configuration File. See Pool Server
Operation for more details.
b or buffersize <send_buffer_size>
see
Provides a hint to the server on sizing
description of the underlying network I/O buffers.
Increasing buffer size can increase the
performance of network I/O for highvolume connection, while decreasing it
can help reduce the backlog of
incoming data.
The default buffer size is the current
default network buffer size for TCP/IP
set on the server system.
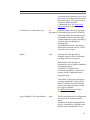
bypass
false
Specifies that if the privilege is
available, bypass will be an allowable
privilege for the server process.
Rdb checks for this privilege to
determine the access rights to databases
and database objects.
If enabled, all validated users
connected to databases via this server
instance will be considered to have
bypass privilege.
The default is false where the bypass
privilege is disabled for the server by
default. Validated users who already
possess the bypass privilege will still
have bypass available.
See BYPASS Privileges for more
details.
cfg or configfile < file_specification>
none
The file specification of a configuration
file where server attributes may be
found.
Attributes set in this configuration file
may be overridden by setting the same
attribute at the command line level.
34
Option
Default
Description
If the file extension is XML the
configuration parameters are held in a
XML format. See Configuration Files
for more details.
By default no configuration file is used.
cli.idleTimeout <timeout>
0
Sets the maximum time ( in
milliseconds) a client connection may
be idle. If no operation is carried out
using this connection within the time
specified, the connection will be
forcibly disconnected.
A value of zero (0) means unlimited
idle time allowed.
See Client connection timeout for more
details.
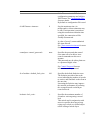
controlpass <control_password>
none
Specifies the password that control
users must use to be able to issue
control commands on this server
instance.
This password may be either plain text
or a password digest value.
See Control Password for more
information on this password.
fs or fetchsize <default_fetch_size>
100
Specifies the default fetchsize to use.
The fetchsize provides a hint to the
server indicating the number of records
to retrieve and send back to the client at
the one time.
Increasing the fetchsize may improve
the network performance by reducing
the average network overhead per
record retrieved.
lockwait <lock_wait>
-1
Specifies the maximum number of
seconds to wait on getting a record
lock.
This switch used in conjunction with
maxtries specifies how long to keep
trying to get a lock on a locked object
before issuing a locked object
35
Option
Default
Description
Exception.
A value of minus one (-1) means wait
indefinitely.
log or logfile <file_specification>
console
Specifies the file specification of the
log file for this server.
If trace is enabled the trace messages
will be written to this file instead of the
console.
By default trace messages will be
written to the console.
maxclients
<maximum_number_of_clients>
-1
Specifies the maximum number of
concurrent clients this server instance
may handle.
A value of minus one (-1) means allow
an unlimited number of clients.
0
maxFreeExecutors
<maximum_number_of_free_executors>
Specifies the maximum number of free
( unused ) executor processes that may
be maintained while the server is
running.
This feature is only applicable to
Multi-process servers
maxtries
10
<maximum_number_of_lock_attempts>
Specifies the maximum number of
times to try to get a record lock.
This switch used in conjunction with
lockwait specifies how long to keep
trying to get a lock on a locked object
before issuing a locked object
Exception.
name <server name >
see
Specifies a name for this server
description instance. This name need not be
unique, however the name may be used
to lookup server information within the
start-up configuration file. The value of
this name is not case-sensitive.
If not specified a name will be created
for the server based on the server type.
p or port <port_num>
1701
Tells the server to listen on port
<port_num>
36
Option
Default
Description
pw or password
<default_user_password>
none
Used in conjunction with the user and
anonymous switches provides the
password to use on an anonymous
connection
persona <username>
none
Specifies the Operating system
username, which the process running
the server will assume. If not specified
persona will not be used. See Persona
for more details.
prestartedExecutors
<number_of_prestarted_executors>
0
Specifies the number of executor
process to start up when the Multiprocess server starts.
This feature is only applicable to Multiprocess servers.
relay
false
If specified designates that this server
should relay poll requests to all active
servers in its network community
This feature is currently unavailable.
restrictAccess
false
Used in conjunction with the
allowDatabase option to restrict access
to designated databases.
This option should only be used within
an XML formatted configuration file.
See Restricting Database Access for
more details.
sharedMem <size_in_KB>
1024
Specifies the amount of global shared
memory (in KB) that should be
allocated by the server.
This feature is only applicable to Multiprocess servers.
srv.bindTimeout <timeout>
0
Sets the timeout (in milliseconds) on
waiting for a database connection to
complete. If the database fails to
connect within this time an exception
will be raised.
A value of zero (0) means unlimited
timeout.
37
Option
Default
Description
srv.execPrefix <prefix>
see
Only valid for multi-process servers.
description Specifies the prefix to use for executor
names.
If not specified a standard prefix base
of server name will be used.
See Executor Naming for more details.
srv.execStartup <file_specification>
see
Only valid for multi-process servers.
description Specifies the startup batch or command
file that will be used to startup the
subprocess for each client connection.
If not specified
rdb$jdbc_home:rdbjdbc_startexec.com
will be used.
See Server Command Procedures for
more details.
srv.idleTimeout <timeout>
0
Sets the maximum time (in
milliseconds) the server will wait for a
new client connection request. If no
new connection is made within the
timeout period the server will be closed
down due to inactivity.
A value of zero (0) means unlimited
idle time allowed.
See Server Inactivity Timeout for more
details.
srv.mcBasePort <base_port>
5517
Specifies the base port number that will
be used for multicast operations.
A value of zero (0) will disable
multicast operations.
srv.mcGroupIP <group_ip>
239.192.1.1 Specifies the multicast IP group that
this server will participate in.
srv.mpMaxTries <max_tries>
500
Only valid for multi-process servers.
Specifies the number of times the
server should try to synchronize
handshake with executor before giving
up.
srv.mpTryWait <wait_time>
10
Only valid for multi-process servers.
38
Option
Default
Description
Specifies the time in milliseconds to
wait between server/executor
handshake synchronization tries.
srv.onExecStartCmd <command>
none
Specifies a DCL command statement
that should be executed prior to starting
up an executor.
See On Start Commands for more
details.
srv.onStartCmd <command>
none
Specifies a DCL command statement
that should be executed prior to starting
up a server
The specified command will only be
executed if a pool server starts up using
the controller or the server.
See On Start Commands for more
details.
srv.password <server_password>
none
Specifies an additional password that
clients need to provide before they may
use the server for database connections.
See Further server access protection for
more details.
srv.startup <file_specification>
see
Specifies the startup batch or command
description file that will be used by the controller
to startup the process for this server. If
not specified
rdb$jdbc_home:rdbjdbc_startsrv.com
will be used.
See Server Command Procedures for
more details.
tl or tracelevel <trace_level>
0
Sets the trace level for debugging
purposes.
See Trace for further information
tracelocal
false
Specifies that only local server base
tracing should be enabled. Tracelevel
values specified by a client connection
will not affect the trace level of the
server components if this option is set.
type <server_type>
RdbThinSrvSpecifies the server type of this server.
39
Option
Default
Description
Valid values are:
• RdbThinSrv standard thin
server
• RdbThinSrvSSL thin server
using SSL for communication
• RdbThinSrvMP multi-process
server
• RdbThinSrvMPSSL – multiprocess server using SSL
• RdbThinSrvPool pool server
• RdbThinSrvPoolSSL pool
server using SSL
u or user <default_user_name>
none
Used in conjunction with the password
and anonymous switches provides the
username to use on an anonymous
connection
url <connection URL>
none
Specifies the node IP and port this
server will run on. This switch
overrides any port switch.
The format of the <connection URL> is
//<node>:<port>/
Contents
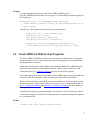
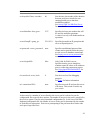
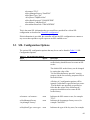
4.2 Pool Server Configuration Options
The valid configuration options that may be used with a pool server can be found in Table
4–2 Pool Server Configuration Options.
Table 4-2 Pool Server Configuration Options
Option
Default
Description
cfg or configfile
<configuration_filename>
none
The file specification of a configuration
file where server attributes may be
found. Attributes set in this configuration
file may be overridden by setting the
same attribute at the command line level.
If the file extension is XML, the
configuration parameters are held in a
XML format. See Configuration Files for
more details.
By default no configuration file is used.
40
Option
Default
Description
controlpass <control_password>
none
Specifies the password that control users
must use to be able to issue control
commands on this server instance.
See Control Password for more
information on this password.
log or logfile <file_specification> console
Specifies the file specification of the log
file for this server.
If trace is enabled, the trace messages
will be written to this file instead of the
console.
By default trace messages will be written
to the console.
node<n> <node>
none
Specifies the node on which the thin
server number <n> resides. This option
is not valid for use in XML-formatted
configuration files.
poolserver
none
Specifies that the server should act as a
pool server. This is a mandatory option if
used on the command line or a nonXML formatted configuration file
pooledserver
<name=server-name>
none
Specifies the name of a server that will
take part in the pool. This option is only
available when using an XML-formatted
configuration file.
The named server should also be
described in the same configuration file.
poolsize <pool_size>
none
Specifies the number of thin servers that
will be specified. This is a mandatory
option if used on the command line or a
non-XML formatted configuration file
port<n> <port_num>
none
Specifies the port for the thin server
number <n> in server list. This option is
not valid for use in XML-formatted
configuration files.
p or port <port_num>
1701
Tells the pool server to listen on port
<port_num>.
41
Option
Default
Description
srv.keepAliveTimer <seconds>
60
Sets the time (in seconds) of the duration
between pool server checks for nonrunning pooled servers that have
autoRestart enabled.
See Oracle JDBC for Rdb Pool Server
for more details.
srv.mcBasePort <base_port>
5517
Specifies the base port number that will
be used for multicast operations.
A value of zero (0) will disable multicast
operations.
srv.mcGroupIP <group_ip>
239.192.1.1
Specifies the multicast IP group that this
server will participate in.
srv.password <server_password> none
Specifies an additional password that
clients need to provide before they may
use the server for database connections.
See Further server access protection for
more details.
srv.useLogicalIPs
false
Only Valid for POOL servers.
Specifies that the server should not
translate named IP values to IP addresses
prior to redirecting connection request.
See Using OpenVMS FailSAFE IP. for
more details.
tl or tracelevel <trace_level>
0
Sets the trace level for debugging
purposes.
See Trace for further information
url <connection URL>
none
Specifies the node IP and port this server
will run on. This switch overrides any
port switch
As there may be a number of servers listed in the server pool it is advised to use the
configuration file to specify these options. The number of servers in the pool is specified by
the poolsize option if you are using a standard configuration file. In the case of an XMLformatted configuration file, the number of servers in the pool is determined by the number
of PooledServer subsections. Each server participating in the pool must have both a node
and a port id specified for it.
42
See Configuration Files for examples of configuring a pool server.
Contents
4.3 Configuration Files
Instead of setting the switches on the command line, you can specify a configuration file
that details the settings.
Two formats of configuration files are recognized:
Standard Java Properties load file
XML-formatted file
4.3.1
Standard Properties File
The following section describes the use of configuration file formatted as a standard Java
Properties load file. See XML Formatted Configuration File for details on using an XMLformatted configuration file.
The same server configuration options as specified in Server Configuration Options and
Pool Server Configuration Options can be used but with the following changes:
1. Each keyword requires a value, even those that do not have values on the command
line, these options are considered Booleans and thus should have the appropriate
‘TRUE’ value.
2. Each keyword must be separated from its value by an equals sign (=)
The –cfg switch on the command line allows you to specify the file specification of this
configuration file:
Format
$java –jar rdb$jdbc_home:rdbthinsrv.jar –cfg thinsrv.cfg
Example
Java style comments and empty lines may be included in the file, for example:
//
// configuration file for our thin server
//
// the default port for the thin server is 1701 but we
// want it to listen on another port
port=1708
// allow anonymous connections
43
anonymous=true
// enable password display
showpass=true
// limit the number of clients
maxclients=10
// set the locking keywords
lockwait=2
maxtries=20
// end of config file
In addition, the configuration file for a thin pool server should contain information about
the list of thin servers to which it may delegate connection requests, for example:
//
// configuration file for pool server
//
// the default port for the pool server is 1702
port=1702
// show is a pool server and the poolsize ( number of subservient
servers)
poolserver=true
poolsize=4
// now add the servers
node1=MYNODE1
port1=1704
node2=MYNODE1
port2=1705
node3=MYNODE1
port3=1706
node4=MYNODE2
port4=1704
// end of config file
Contents
4.3.2
XML-Formatted Configuration File
Instead of setting the switches on the command line, you can specify an XML-formatted
configuration file that details the settings of these switches. The XML-formatted
configuration file allows a greater number of configuration options to be specified than the
standard CFG file and is the recommended configuration file format.
44
The XML-formatted configuration file differs from the standard CFG file in that it may
contain information about multiple servers in the same configuration file.
Each server is specified within a separate server section and must be given a unique name.
This name is used to get default configuration information about the server on server startup, as well as how a server may be identified on your system and within the controller
interface.
The –cfg switch on the command line allows you to specify the file specification of this
file.
The same server configuration options as specified in Server Configuration Options and
Pool Server Configuration Options can be used but with the following changes:
•
•
•
Each keyword requires a value, even those that do not have values on the command
line. These options are considered Boolean values and thus should have the
appropriate ‘TRUE’ value.
Each keyword must be separated from its value by an equals sign (=)
All option values must be enclosed in double quotation marks.
The configuration document is a hierarchical XML object. Each keyword must be placed
within its appropriate section or subsection. Multiple servers may be specified within the
same configuration file. Each server must have a unique name.
The format of the contents of the configuration file is XML V1.0.
Format
$java –jar rdb$jdbc_home:rdbthinsrv.jar –cfg rdbjdbccfg.xml
Example
<?xml version = ‘1.0’?>
<!—Configuration file for Rdb Thin JDBC Drivers and Servers -->
<config>
<!—SERVERS -->
<servers>
<!—DEFAULT server characteristics-->
<server
name="DEFAULT"
type="RdbThinSrv"
url="//localhost:1701/"
maxClients="-1"
srv.bindTimeout="1000"
srv.idleTimeout="0"
srv.mcBasePort="5517"
srv.mcGroupIP="239.192.1.1"
tracelevel = "0"
autostart = "false"
autorestart = "false"
45
restrictAccess = "false"
anonymous = "false"
bypass = "false"
tracelocal = "false"
relay = "false"
controlUser="control_user"
controlPass="0x18E007C81F6B2E2EA02065F78A587BD3"
cfg="rdb$jdbc_com:rdbjdbccfg.xml"
srv.execStartup="rdb$jdbc_home:rdbjdbc_startexec.com"
srv.startup="rdb$jdbc_home:rdbjdbc_startsrv.com"
sharedmem = "0"
/>
<!—DEFAULT Secure socket server -->
<server
name="DEFAULTSSL"
type="RdbThinSrvSSL"
ssl.default="false"
ssl.context="TLS"
ssl.keyManagerFactory="SunX509"
ssl.keyStoreType="jks"
ssl.keyStore="rdbjdbcsrv.kst"
ssl.keyStorePassword="CHANGETHIS"
ssl.trustStore="rdbjdbcsrv.kst"
ssl.trustStorePassword="CHANGETHIS"
/>
<!—now specific servers that will be started up by pool server -->
<server
name="srv1forRdb"
type="RdbThinSrv"
url="//localhost:1701/"
autoStart="true"
autoRestart="true"
logfile="rdb$jdbc_logs:srv1forRdb.log"
tracelevel="-1"
maxClients=1
/>
<server
name="srv2forRdb"
type="RdbThinSrv"
url="//localhost:1708/"
autoStart="true"
logfile="rdb$jdbc_logs:srv2forRdb.log"
/>
<!—MP server -->
<!—sharedmem is in KB default = 1024 -->
<server
name="srvMPforRdb"
type="RdbThinSrvMP"
url="//localhost:1705/"
autoStart="true"
maxClients="10"
maxFreeExecutors="10"
prestartedExecutors="10"
sharedMem="10240"
/>
<!—the pool server -->
46
<server
name="rdbpool"
type="RdbThinSrvPool"
url="//localhost:1702/" >
<pooledServer name="srv1forRdb"/>
<pooledServer name="srv2forRdb"/>
<pooledServer name="srvMPforRdb"/>
</server>
<!—Secure socket server -->
<server
name="srvssl1forRdb"
type="RdbThinSrvSSL"
url="//localhost:1709/"
/>
</servers>
<!—database -->
<databases>
<database
name="mf_pers"
url="//localhost:1701/mydisk:[databases]mf_personnel"
driver="oracle.rdb.jdbc.rdbThin.Driver"
URLPrefix="jdbc:rdbThin:"
/>
<database
name="pers"
url="//localhost:1702/mydisk:[databases]personnel"
driver="oracle.rdb.jdbc.rdbThin.Driver"
URLPrefix="jdbc:rdbThin:"
/>
</databases>
</config>
Description of the various sections within an XML-formatted configuration file follows.
4.3.2.1 Config Section
This section covers the entire configuration settings and contains the specific configuration
sections as described below.
Format
<config>
[ session section ]
[ databases section ]
[ servers section ]
</config>
4.3.2.2 Session Section
47
This section describes session characteristics for an interactive session. Information within
the session section is currently only used by the Oracle JDBC for Rdb controller. You can
specify information such as passwords and user names that may be used when you start up
a controller session. Currently the controller will recognize only one session, which must
be named DEFAULT.
These session properties provide an alternate way of specifying the options other than
command line options at controller startup.
Format
<session
[ session properties ]
/>
Options
Valid properties for the session section can be seen in Table 4-3 Session Section Properties.
Table 4-3
Session Section Properties
Option
Default
Description
controlPass
none
Specifies the password that will be used by
default when connecting to an active server
for control purposes. Note that this
password must be a plain text password as
it will be sent to the server to authorize the
connection. Do not use an obfuscated
password here.
controlUser
none
Control User name to use on connection
password
none
Currently this has the same function as
controlPass, however if both are present,
controlPass will take precedence.
name
none
Name for this session description; must be
DEFAULT
user
none
User name to use on connection
tracelevel
0
The sessions default trace level
srv.mcBasePort <base_port>
5517
Specifies the base port number that will be
used for multicast operations
srv.mcGroupIP <group_ip>
239.192.1.1
Specifies the multicast IP group that will be
used for multicast operations
48
Option
Default
Description
ssl.*
none
Specifies SSL configuration information for
the session that may be used to connect to
SSL-enabled thin servers. See Using SSL
for more information
Example
<session
name="DEFAULT"
controlPass="jdbc_control"
user="jdcb_user"
password="jdbc_control"
tracelevel="0"
srv.mcBasePort="5517"
srv.mcGroupIP="239.192.1.1"
/>
Note:
1. The session properties srv.mcBasePort and srv.mcGroupIP specify the multicast
attributes that should be used for polling servers. Only those servers participating in
the specified multicast group will respond to any poll requests issued by the
controller.
2. Although the user and control passwords may be stored in plain text format in the
session section of the configuration file as shown in the example above, this may be
contrary to your organization's security policy. Oracle recommends not to store plain
text passwords in your configuration files, instead the appropriate command line
switches should be used to provide the appropriate password. Control passwords
associated with servers may also be specified in the server section of the
configuration file in obfuscated form.
4.3.2.3 Databases Section
This section specifies one or more database sections.
Format
<databases>
[ database section ]
</databases>
4.3.2.4 Database Section
This section specifies a named database with the given properties.
49
Format
<database>
[ database property
/>
]
Options
Valid properties for the database section can be seen in Table 4–4 Database Section
Properties.
Table 4-4 Database Section Properties
Option
Default
Description
name
none
This is the name by which the Oracle JDBC
for Rdb drivers may recognize this database.
This name is required and must be unique
within the databases section of this
configuration file.
url
none
driver
none
This is the url that may be used to access this
database.
This is the class path of the preferred JDBC
driver that may be used to access this
database.
URLPrefix
none
This is the prefix that needs to be added to the
url above to provide a complete JDBC
Connection URL
Example
<!—database -->
<databases>
<database
name="mf_pers"
url="//localhost:1701/mydisk:[databases]mf_personnel"
driver="oracle.rdb.jdbc.rdbThin.Driver"
URLPrefix="jdbc:rdbThin:"
/>
<database
name="pers"
url="//localhost:1702/mydisk:[databases]personnel"
driver="oracle.rdb.jdbc.rdbThin.Driver"
URLPrefix="jdbc:rdbThin:"
/>
</databases>
50
4.3.2.5 Servers Section
This section specifies one or more server property sections.
Format
<servers>
[ server section ]
</servers>
4.3.2.6 Server Section
This section specifies one or more properties to assign to this server.
See Server Configuration for details on the properties that may be set.
Format
<server
<property="value"/>
/>
or
<server
<property="value"/>
>
[ pooled server subsection ]…
[ allowed database subsection ]…
[ allowed user subsection ]…
</server>
Example
A standard thin server called serv1 listening on port 1799 could be
described using the following Server Property section:
<server
name="serv1"
/>
type="RdbThinSrv"
url="//localhost:1799/"
logfile="myLogs:serv1.log"
Note:
Default server characteristics for server configuration can be specified so that options need
not be repeated within the specific server configuration sections. Default server options
may be specified by declaring a server section with a name of DEFAULT or
DEFAULTSSL.
<server
51
/>
name="DEFAULT"
type="RdbThinSrv"
url="//localhost:1701/"
maxClients="-1"
srv.bindTimeout="0"
srv.idleTimeout="0"
srv.mcBasePort="5517"
srv.mcGroupIP="239.1.1.1"
autoStart="false"
controlUser="jdbc_user"
controlPass="0x811B15F866179583EB3C96751585B843"
The DEFAULT and DEFAULTSSL server definitions should only be used to define the
default server characteristics and are not intended to represent actual server instances that
can be started by the controller or pool servers.
These default server properties will be assigned to each server found defined after them in
the configuration file unless explicitly overridden in the specific server subsection.
The placement of the DEFAULT and DEFAULTSSL server sections within the
configuration file is important. Only those servers defined in sections that occur after these
default definitions will have these default characteristics. Any server section specified prior
to the default server sections will not get these default characteristics. Oracle recommends
that these two sections be the first two server sections within your configuration file.
If subsections such as Pooled Server or Allowed Database are required, then the second
format for a server section must be used.
Example
<server
name="rdbpool"
type="RdbThinSrvPool"
url="//localhost:1702/" >
<pooledServer name="srv1forRdb"/>
<pooledServer name="srv2forRdb"/>
<pooledServer name="srvMPforRdb"/>
</server>
4.3.2.7 Pooled Server Subsection
This subsection specifies a server that will take part in the parent server's server pool,
where the declared server name must reference a server already named in this configuration
file.
Multiple PooledServer subsections may be present in a single server declaration.
The subsection is valid only when used within an RdbThinSrvPool server declaration.
52
The set of pooledServers provided will make up the pool of servers that the parent pool
server may try to access.
Format
<pooledServer name="declared server"/>
Example
<server
name="rdbpool"
type="RdbThinSrvPool"
url="//localhost:1702/" >
<pooledServer name="srv1forRdb"/>
<pooledServer name="srv2forRdb"/>
<pooledServer name="srvMPforRdb"/>
</server>
4.3.2.8 Allowed Database Subsection
This subsection specifies the database that clients using the server may access. The
declared database name must either reference a database already named in the database
section of this configuration file, or must be a valid database file specification or logical
name.
The subsection is only valid when used within a server declaration.
Multiple AllowDatabase subsections may be present in a single server declaration.
For database access to be restricted the server attribute restrictAccess must be set
"true".
See the section Restricting Database Access for more details
Format
<allowDatabase name="db specification" />
Example
<server
name="srv2restrict"
type="RdbThinSrv"
url="//localhost:1701/"
restrictAccess="true">
<allowDatabase name="mf_pers"/>
<allowDatabase name="disk1:[databases]customers"/>
</server>
4.3.2.9 Allowed User Subsection
53
This subsection specifies the usernames the server will allow access to. The declared
username must be a valid username recognized by Rdb. The matching of usernames by the
server for this level of restriction is not case-sensitive.
The subsection is only valid when used within a server declaration.
Multiple AllowUser subsections may be present in a single server declaration.
For user access to be restricted the server attribute restrictAccess must be set "true".
See the section Restricting User Access for more details
Format
<allowUser name="username" />
Example
<server
name="srv2restrict"
type="RdbThinSrv"
url="//localhost:1701/"
restrictAccess="true">
<allowUser name="smith"/>
<allowUser name="jones"/>
</server>
4.3.2.10
Using filenames in the configuration file
A number of attributes within the configuration file sections require the specification of a
filename, for example:
cfg="<filename>"
log="<filename>"
srv.execStartup="<filename>"
srv.startup="<filename>"
The filename must be a valid OpenVMS file specification that may contain a full or partial
file path and may include logical names.
You must ensure that, if logical names are used, they are available to the context within
which the server will be started, and that the file is accessible by the VMS user that starts
up the server.
If a server defined in the configuration will be started up using the controller, as a pooled
server by a pool server, or by Oracle SQL/Services, a detached process will be created for
the server and the LOGINOUT.EXE will be run to ensure a valid process environment
under which Java and Oracle Rdb can be accessed.
54
Because the LOGINOUT.EXE program is run, any file specification using relative file
paths must be relative to the login directory of the invoker, otherwise a full file
specification must be used.
Contents
55
Chapter 5
Using SSL
Secure Sockets Layer (SSL) was developed to provide security for Web traffic. Including
confidentiality, message integrity, and authentication. SSL achieves this through the use of
cryptography, digital signatures, and certificates.
Oracle JDBC for Rdb servers and thin clients may use SSL for communication over
TCP/IP. SSL allows an SSL-enabled server to authenticate itself to an SSL-enabled client,
allows the client to authenticate itself to the server, and allows both machines to establish
an encrypted connection.
Before trying to use SSL with the thin driver, you should familiarize yourself with general
Java security and SSL concepts. Please refer to your Java documentation for general
information on SSL and Java Security.
The following sections provide SSL information specific to using SSL with the thin driver
and assume a basic understanding of Java Security and SSL.
5.1 SSL Configuration
Information about SSL connection characteristics must be provided to both the client and
server, and in order for a communication channel to be established, both the server and
client must agree on the SSL security characteristics.
In addition, it is important that both the client and the server have the same security
certificate for authorization. The following sections detail how to provide SSL
characteristics in a client connection request and to an SSL-enabled Oracle JDBC for Rdb
server
5.1.1
Client SSL Configuration
The client application must specify its SSL characteristics during its connection request to
the thin driver. The simplest way of doing this is by providing extra SSL information in the
properties block that is passed to the DriverManager.getConnection() method.
The SSL information provides information such as where to find the appropriate certificate
for SSL connections and what context and protocols should be used to carry out the SSL
handshake during connection set-up.
56
Example
Properties info = new Properties();
info.put("user", user);
info.put("password", password);
info.put("tracelevel", traceLevel);
info.put("ssl", "true");
info.put("ssl.default", "false");
info.put("ssl.context", "TLS");
info.put("ssl.keyManagerFactory", "SunX509");
info.put("ssl.keyStoreType", "jks");
info.put("ssl.keyStore", "rdbjdbccli.kst");
info.put("ssl.keyStorePassword", "CHANGETHIS");
info.put("ssl.trustStore", "rdbjdbccli.kst");
info.put("ssl.trustStorePassword", "CHANGETHIS");
Connection conn = DriverManager.getConnection(
"jdbc:rdbThin://bravo:1755/my_db_dir:pers", info);
The properties block must have the property ssl set to true for SSL connections to be
attempted.
In addition, the SSL characteristics can be specified explicitly as properties, or you may use
ssl.default set to true to request that the default SSL characteristics for your system should
be used.
Properties info = new Properties();
info.put("user", user);
info.put("password", password);
info.put("tracelevel", traceLevel);
info.put("ssl", "true");
info.put("ssl.default", "true");
Connection conn = DriverManager.getConnection(
"jdbc:rdbThin://bravo:1755/my_db_dir:pers", info);
See SSL configuration options for details of the ssl.* options.
Note:
For an SSL connection to be made, the appropriate certificate for the server to which you
are trying to attach to should be in the keystore you have designated in the SSL properties
for the connection.
If no certificate is found the following exception will be raised:
javax.net.ssl.SSLException: No available certificate corresponds to
the SSL cipher suites, which are enabled.
See your Java Security documentation for more information on certificates.
57
5.1.2 Server SSL Configuration
An SSL-enabled server must also be provided with SSL configuration information. This is
usually provided within the server section for the named server in an XML-based
configuration file.
To indicate that the server should be SSL-enabled, the server must be defined as one of the
following SSL server types:
RdbThinSrvSSL
RdbThinSrvMPSSL
RdbThinSrvPoolSSL
Example
<server
name="MYSSL"
type="RdbThinSrvSSL"
ssl.default="false"
ssl.context="TLS"
ssl.keyManagerFactory="SunX509"
ssl.keyStoreType="jks"
ssl.keyStore="rdbjdbcsrv.kst"
ssl.keyStorePassword="CHANGETHIS"
ssl.trustStore="rdbjdbcsrv.kst"
ssl.trustStorePassword="CHANGETHIS"
/>
If you wish to define a number of SSL-enabled servers with the same SSL characteristics,
then you can use the special DEFAULTSSL server definition to define the default
characteristics. Each subsequent server definition that has one of the SSL server types will
use these characteristics, unless explicitly overridden in the server definition.
<server
name="DEFAULTSSL"
type="RdbThinSrvSSL"
ssl.default="false"
ssl.context="TLS"
ssl.keyManagerFactory="SunX509"
ssl.keyStoreType="jks"
ssl.keyStore="rdbjdbcsrv.kst"
ssl.keyStorePassword="CHANGETHIS"
ssl.trustStore="rdbjdbcsrv.kst"
ssl.trustStorePassword="CHANGETHIS"
/>
58
<server
name="SSLsrv1"
type="RdbThinSrvSSL"
url="//localhost:1707/"
/>
<server
name="SSLsrv2"
type="RdbThinSrvMPSSL"
url="//localhost:1708/"
sharedMem="10000"
/>
See SSL Configuration Options for details of these options.
Note:
If a pool server is SSL-enabled, for security reasons it will only communicate with pooled
servers within its pool that are also SSL-enabled. Non-SSL-enabled pooled servers within
the pool will be ignored and will not be considered candidates for redirection of connection
requests.
5.2 SSL and the Controller
All connections made to SSL-enabled servers must be made using SSL connections. This
also includes the controller.
If the controller will be used to manage SSL-enabled servers, then the controller session
must also have the correct SSL information to make the secure connection to the server.
You can specify the SSL information that the controller uses for connecting to SSL-enabled
thin servers by starting the controller using a XML-formatted configuration file that has the
appropriate SSL information in its SESSION section.
Example
<session
name="DEFAULT"
controlPass="jdbc_user"
user="cts1"
password="jdbc_user"
tracelevel="0"
srv.mcBasePort="5518"
srv.mcGroupIP="239.192.1.2"
ssl.default="false"
59
ssl.context="TLS"
ssl.keyManagerFactory="SunX509"
ssl.keyStoreType="jks"
ssl.keyStore="rdbjdbccli.kst"
ssl.keyStorePassword="CHANGETHIS"
ssl.trustStore="rdbjdbccli.kst"
ssl.trustStorePassword="CHANGETHIS"
/>
This is the same SSL information that you would have provided for a client SSL
configuration as described in Client SSL configuration.
If this information is provided, the controller will use the SSL configuration to connect to
any server that responds to a poll request as an SSL-enabled server.
5.3 SSL Configuration Options
The various SSL configuration options that may be set can be found in Table 5–1 SSL
Configuration Options.
Table 5-1
SSL Configuration Options
Option
Default
Description
ssl.default
false
If specified, indicates that the default SSL
socket factory should be used to create an SSL
socket.
The default SSL socket factory can be changed
by setting the value of the
"ssl.ServerSocketFactory.provider" security
property (in the Java security properties file) to
the desired class.
All other ssl.* configuration options will be
ignored if ssl.default is specified and set to true.
If ssl.default is not specified or specified as
false then the values of the following ssl.*
properties should be used to create an SSL
socket factory.
ssl.context <ssl context>
none
ssl.keyManagerFactory
<keymanager factory>
none
ssl.keyStoreType <store type> none
Indicates the SSL context to use, for example
"TLS".
Indicates the keymanager factory to use, for
example "SunX509".
Indicates the type of the key store, for example
60
Option
Default
Description
"jks".
ssl.keyStore <store filename>
none
Indicates the filename of the keystore.
ssl.keyStorePassword
<password>
none
Indicates the password for the keystore.
ssl.trustStore
<trust store filename>
none
Indicates the filename of the trust store.
ssl.trustStorePassword
<password>
none
Indicates the password of the trust store.
5.4 Using Self-Signed Certificates for Testing
The following code is an example that may be used to build and copy certificates that may
be used for SSL communications where the client and server are on OpenVMS nodes that
have Java environments already set up.
Information such as the keystore and password should be changed appropriately for your
own situation.
$! The following should be done on the Server node
$ write sys$output "Generating the Server KeyStore in file rdbjdbcsrv.kst
$ keytool –genkey –alias rdbjdbc-sv
-dname "CN=Jim Murray, OU=Rdb Engineering, O=Oracle, c=US"
-keypass "CHANGETHIS" –storepass "CHANGETHIS" –KeyStore rdbjdbcsrv.kst
$!
$write sys$output "Exporting the certificate from keystore to external
file server.cer
$ keytool –export –alias rdbjdbc-sv –storepass "CHANGETHIS" –
-file server.cer –keystore rdbjdbcsrv.kst
$!
$!---------------------------------------------------------------------$!
$! The following should be done on the client node
$!
$write sys$output "Generating the Client KeyStore in file rdbjdbccli.kst
$ keytool –genkey –alias rdbjdbc-cl –
-dname "CN=Rdbjdbc Client, OU=X, O=Y, L=Z, S=XY, C=YZ"
-keyalg RSA –keypass "CHANGETHIS" –storepass "CHANGETHIS" –keystore
rdbjdbccli.kst
$!
$write sys$output "Exporting the certificate from keystore to external
file client.cer
$ keytool –export –alias rdbjdbc-cl –storepass "CHANGETHIS"
61
-file client.cer –keystore rdbjdbccli.kst
$!
$!---------------------------------------------------------------------$!
$! Exchange the certificates by copying the client certificate file
(client.cer) to
$! The server node, and the server certificate file (server.cer) to the
client node
$!
$!---------------------------------------------------------------------$!
$! Now on the server node
$write sys$output "Importing Client’s certificate into Server’s keystore
$ keytool –import –v –trustcacerts –alias rdbjdbc –file client.cer
-keystore rdbjdbcsrv.kst –keypass "CHANGETHIS" –storepass "CHANGETHIS"
yes
$!
$!---------------------------------------------------------------------$!
$! Now on the client node
$write sys$output "Importing Server’s certificate into Client’s keystore
$ keytool –import –v –trustcacerts –alias rdbjdbc –file server.cer
-keystore rdbjdbccli.kst –keypass "CHANGETHIS" –storepass "CHANGETHIS"
yes
The keytool command should work as shown above on most operating systems that have
Java installed.
Note the use of double quotes to maintain values such as passwords exactly as you specify
them in the server or client SSL connection configuration properties.
Once the keystores have been set up, as long as you have setup the SSL properties correctly
for the client and the server as shown in previous sections, you can use SSL for
client/server communication within the thin driver.
Contents
62
Chapter 6
Oracle JDBC for Rdb Controller
The Oracle JDBC for Rdb controller (here-on referred to as the controller) allows basic
management of Oracle JDBC for Rdb servers.
Contained in the rdbthincontrol.jar file, this application allows local and remote passwordprotected server management operations to be carried out on a thin server or pool server.
These operations can include showing the clients that are currently connected, stopping
client threads, and starting and stopping thin servers.
The controller can be run either in interactive mode or single command mode. In
interactive mode you typically connect to the server you wish to manage and then issue the
management requests. When you are finished using the controller you can issue the exit
command to terminate the image.
In single command mode you provide command line switches to tell the controller what
action has to be performed. When the action is complete the controller image will
terminate.
The controller is typically used in conjunction with a XML-formatted configuration file
that provides information about the Oracle JDBC for Rdb servers can be run on your
system. In addition the configuration file may provide session information such as the
broadcast port information to use when doing poll operations. See Configuration Files for
more information about configuration files.
The controller may be used to start and stop servers as well as other operations pertaining
to servers and connected clients. In addition the controller may be used to show the current
status of Oracle JDBC for Rdb servers running throughout your network.
Below is a sample session using the controller in interactive mode:
Example
rdbthincontrol> show stored servers
Stored server info
RDB$NODE
RDB$PORT
RDB$STATUS
RDB$SERVER_NAME
RDB$SERVER_TYPE
RDB$SERVER_VERSION
RDB$SERVER_SHR_VERSION
RDB$SERVER_PID
:
:
:
:
:
:
:
:
localhost
1702
not available
SRV2
RdbThinSrv
not available
not available
not available
63
RDB$ALLOWS_ANON
RDB$ALLOWS_BYPASS
RDB$NUMBER_OF_CLIENTS
RDB$MAX_CLIENTS
:
:
:
:
false
false
0
-1
RDB$NODE
RDB$PORT
RDB$STATUS
RDB$SERVER_NAME
RDB$SERVER_TYPE
RDB$SERVER_VERSION
RDB$SERVER_SHR_VERSION
RDB$SERVER_PID
RDB$ALLOWS_ANON
RDB$ALLOWS_BYPASS
RDB$NUMBER_OF_CLIENTS
RDB$MAX_CLIENTS
:
:
:
:
:
:
:
:
:
:
:
:
localhost
1701
not available
SRV1
RdbThinSrv
not available
not available
not available
false
false
0
-1
RDB$NODE
: localhost
RDB$PORT
: 1701
RDB$STATUS
: not available
RDB$SERVER_NAME
: DEFAULT
RDB$SERVER_TYPE
: RdbThinSrv
RDB$SERVER_VERSION
: not available
RDB$SERVER_SHR_VERSION : not available
RDB$SERVER_PID
: not available
RDB$ALLOWS_ANON
: false
RDB$ALLOWS_BYPASS
: false
RDB$NUMBER_OF_CLIENTS : 0
RDB$MAX_CLIENTS
: -1
rdbthincontrol> start server srv1
Starting server ...
.
RDB$NODE
: 138.1.14.91
RDB$PORT
: 1701
RDB$STATUS
: Idle
RDB$SERVER_NAME
: srv1
RDB$SERVER_TYPE
: RdbThinSrv
RDB$SERVER_VERSION
: T7.2-510 20070109 B719
RDB$SERVER_SHR_VERSION : T7.2-510 20061221 B6CL
RDB$SERVER_PID
: 0x20238378(539198328)
RDB$ALLOWS_ANON
: false
RDB$ALLOWS_BYPASS
: false
RDB$NUMBER_OF_CLIENTS : 0
RDB$MAX_CLIENTS
: -1
RDB$TRACE_LEVEL
: 0
RDB$LOG_FILE
: rdbjdbclog
RDB$RESTRICT_ACCESS
: false
rdbthincontrol> poll
Polling servers ...
srv1(0) //138.1.14.91:1701/ (0x20238378<539198328>)
rdbthincontrol> start server srv2
Starting server ...
.
64
RDB$NODE
: 138.1.14.91
RDB$PORT
: 1702
RDB$STATUS
: Idle
RDB$SERVER_NAME
: srv2
RDB$SERVER_TYPE
: RdbThinSrv
RDB$SERVER_VERSION
: T7.2-510 20070109 B719
RDB$SERVER_SHR_VERSION : T7.2-510 20061221 B6CL
RDB$SERVER_PID
: 0x2033137C(540218236)
RDB$ALLOWS_ANON
: false
RDB$ALLOWS_BYPASS
: false
RDB$NUMBER_OF_CLIENTS : 0
RDB$MAX_CLIENTS
: -1
RDB$TRACE_LEVEL
: 0
RDB$LOG_FILE
: rdbjdbclog
RDB$RESTRICT_ACCESS
: false
rdbthincontrol> poll
Polling servers ...
srv2(0) //138.1.14.91:1702/ (0x2033137C<540218236>)
srv1(0) //138.1.14.91:1701/ (0x20238378<539198328>)
rdbthincontrol> show active servers
Active server info
RDB$NODE
RDB$PORT
RDB$STATUS
RDB$SERVER_NAME
RDB$SERVER_TYPE
RDB$SERVER_VERSION
RDB$SERVER_SHR_VERSION
RDB$SERVER_PID
RDB$ALLOWS_ANON
RDB$ALLOWS_BYPASS
RDB$NUMBER_OF_CLIENTS
RDB$MAX_CLIENTS
RDB$TRACE_LEVEL
RDB$LOG_FILE
RDB$RESTRICT_ACCESS
:
:
:
:
:
:
:
:
:
:
:
:
:
:
:
138.1.14.91
1702
Idle
srv2
RdbThinSrv
T7.2-510 20070109 B719
T7.2-510 20061221 B6CL
0x2033137C(540218236)
false
false
0
-1
0
rdbjdbclog
false
RDB$NODE
: 138.1.14.91
RDB$PORT
: 1701
RDB$STATUS
: Idle
RDB$SERVER_NAME
: srv1
RDB$SERVER_TYPE
: RdbThinSrv
RDB$SERVER_VERSION
: T7.2-510 20070109 B719
RDB$SERVER_SHR_VERSION : T7.2-510 20061221 B6CL
RDB$SERVER_PID
: 0x20238378(539198328)
RDB$ALLOWS_ANON
: false
RDB$ALLOWS_BYPASS
: false
RDB$NUMBER_OF_CLIENTS : 0
RDB$MAX_CLIENTS
: -1
RDB$TRACE_LEVEL
: 0
RDB$LOG_FILE
: rdbjdbclog
RDB$RESTRICT_ACCESS
: false
rdbthincontrol> stop all servers
Successfully stopped Thin Server : srv1 (//138.1.14.91:1701/)
Successfully stopped Thin Server : srv2 (//138.1.14.91:1702/)
65
rdbthincontrol> poll
Polling servers ...
rdbthincontrol> exit
6.1 Running the Controller
The controller allows basic management of Oracle JDBC for Rdb servers.
The controller can be run from the OpenVMS DCL command line either in single
command mode or as a command line interface:
Format
$java –jar rdb$jdbc_home:rdbthincontrol.jar [<option> |
<command_keyword>]
Valid options can be found in Table 6–1 Controller Options.
Valid command_keywords can be found in Table 6–2 Controller Command Keywords.
Note:
For the controller to be able to manage an Oracle JDBC for Rdb server the server must
have a control password.
See Server Configuration Options for more details on specifying the control password.
Table 6-1 Controller Options
Option
Default
Description
-active
false
Used in conjunction with a
command_keyword to specify that the
action applies to all the designated
entities
-all
n/a
Used in conjunction with a
command_keyword to specify that the
action applies to only active designated
entities
-cfg or –configfile
<configuration_filename>
none
The file specification of a configuration
file where session and server attributes
may be found.
Attributes set in this configuration file
may be overridden by setting the same
attribute at the command line level.
See Configuration Files for more details.
By default no configuration file is used.
66
-controlpass <control
password>
none
Specifies the control password to use
when connecting to servers. This
password takes precedence over any
password option provided on the same
command line
-n or –node <node>
none
Specifies the node where the server to
be connected to is running.
-name <server name >
none
Specifies a name for the server. The
name is used to lookup server
information within the start-up
configuration file. The value of this
name is not case-sensitive.
-oem
n/a
Used by OEM to indicate that the return
status and messages should be formatted
for OEM usage.
-p or –port <port_num>
none
Specifies the port on which the server to
be connected to is listening.
-pw or –password <password>
none
Specifies the password to send to the
thin server when requesting a control
connection. If a controlpass option is
also found on the same command line
the controlpass option will take
precedence.
-srvargs <server_arguments>
none
Additional arguments to be passed on
the connection URL when connecting to
the server. For Example @tracelevel=-1
-srv.mcBasePort <base_port>
.5517
Specifies the base port number that will
be used for multicast operations.
-srv.mcGroupIP <group_ip>
239.192.1.1
-stored
n/a
Specifies the multicast IP group that this
server will participate in
Used in conjunction with a
command_keyword to specify that the
action applies to the stored designated
entities as found in the XML
configuration file
-tl or –tracelevel
<trace_level>
0
Specifies the default tracelevel for the
session
67
session
The value zero (0) means no tracing.
-u or –user <user_name>
.none
-url <connection URL>
none
Specifies the username to use for
connection to the server
Specifies the node IP and port of the
server to connect to. This switch
overrides any port and node switch
specified The format of the <connection
URL> is //<node>:<port>/
Note:
A number of these options may also be specified in a session section of the
XML-formatted configuration file used to start an interactive controller
session. See Session Section within XML Formatted Configuration File for
more details.
Table 6-2 Controller Command Keywords
Option
Description
-poll
Sends a pool request out to locate active servers. See
Polling Servers for more information.
-startserver
Starts the server as specified by the other options
given on the command line. See Starting Servers for
more information.
-openserver
Opens the server as specified by the other options
given on the command line. See Opening Servers for
more information.
-closeserver
Closes the server as specified by the other options
given on the command line. See Closing Servers for
more information
-showserver
Issues the Show Server command that gets server
information from the connected server. See Showing
Servers for more information
-showclients
Issues the Show Clients command, which gets client
information from the connected server. See Showing
Clients for more information
-stopserver
Stops the server as specified by the other options
given on the command line See Stopping Servers for
68
given on the command line See Stopping Servers for
more information
-stopclient <client_id>
Issues the Stop Client command which requests the
connected server to terminate the specified client
thread.
The <client_id> is an id of a client as displayed by
the Show Clients command See Stopping Clients for
more information. There is no default value for
<client_id>
If the controller is invoked with the appropriate connect information and one of command
keywords, the controller will issue the desired request to the server, optionally display the
results, and terminate immediately.
If more than one command keyword is present, only one will be issued using the
precedence as shown in the preceding table.
Example
An example of issuing command keyword to the controller:
$java -jar rdb$jdbc_home:rdbthincontrol.jar -u jan –
-controlpass mpass -node nd1 -port 1701 –stopserver
6.1.2 Controller Command Line
If no command keyword is used on the controller invocation, the application will go into
command line prompt mode allowing multiple commands to be issued.
If valid connection information is provided at the controller invocation (node, port, user
and password), the controller will automatically attempt to connect to the specified server.
If a connection has not been established or a different server connection is required, then
the Connect command can be issued at the control command line. See Connecting to
Servers for more information.
If username and password are not provided on the connect command line, then the values
of the configuration options when the controller was invoked will be used. If a
configuration file is specified, the configuration file session characteristics will be used.
See Session Section within XML formatted Configuration File for more information on
session characteristics.
Commands may be issued at the control command line either within the context of a server
connection or outside the context of a specific server connection.
69
The commands that may be issued once a connection has been established to a server are
discussed in Commands requiring server connection.
The commands that do not require a server connection are discussed in Commands Not
requiring a server connection.
Format
$java -jar rdb$jdbc_home:rdbthincontrol.jar –cfg my_servers.xml
6.1.2.1 Commands requiring a server connection
Once a valid server connection has been established the commands shown in Table 6–3
Controller Command Line Commands Within Connection may be issued.
Table 6-3 Controller Command Line Commands Within Connection
Command
Description
close server
Closes the currently connected server. See Closing
Servers for more details
disconnect
Disconnects from the currently connected server
open server
Opens the currently connected server. See Opening
Servers for more details
set logfile [<filename>]
Sets the logfile for the currently connected active
server. This may be used to redirect trace log
message to a different log file, which will close the
current log file. If <filename> is missing of is equal
to the value OFF the current logfile is still closed and
log messages will no longer be sent to the log file.
set default tracelevel <int>
Sets the default tracelevel on the currently connected
active server. This does not affect currently
connected clients. Only clients connecting after the
set default tracelevel is issued will be affected.
set tracelevel <int>
Sets the tracelevel on the currently connected active
server. This will set the trace level for all clients that
are currently connected to the server.
Clients connecting after the set is issued will not be
affected.
show clients
Show all clients on the currently connected server.
See Showing Clients for more details.
70
stop client <client_id>
Stops the client matching the specified <client_id> on
the currently connected server. See Stopping Clients
for more details.
stop clients
Stops all clients on the currently connected server.
See Stopping Clients for more details.
stop server
Stops the currently connected server
watch [server]
Send trace logging from connected server to the
current console. See Watching Servers for more
details
Example
$java -jar rdb$jdbc_home:rdbthincontrol.jar
rdbthincontrol> connect //localhost:1701/ jones mypassword
rdbthincontrol> show server
RDB$NODE : localhost
RDB$PORT : 1701
RDB$STATUS : Idle
RDB$SERVER_NAME : rdbthnsrv1
RDB$SERVER_TYPE : RdbThinSrv
RDB$SERVER_VERSION : V7.1-300 20040624 B46N
RDB$SERVER_SHR_VERSION : V7.1-300 20040624 B46N
RDB$SERVER_PID : 0x0B24(2852)
RDB$ALLOWS_ANON : false
RDB$ALLOWS_BYPASS : false
RDB$NUMBER_OF_CLIENTS : 0
RDB$MAX_CLIENTS : -1
rdbthincontrol>
rdbthincontrol> stop server
Successfully stopped Rdb Thin Server : //localhost:1701/
rdbthincontrol> exit
$
6.1.2.2 Commands Not requiring a server connection
A number of commands may be issued that do not require you to have a connection
established, however, for all commands other than poll and quit you will have to provide a
username and control password which will be used to connect to the servers to obtain the
required information. These command are listed in table: Table 6–4 Controller Command
Line Commands Without Connection
Table 6-4 Controller Command Line Commands Without Connection
Command
Description
poll
Multicast Poll for responding servers. See Polling
71
Servers for more details.
set session controlpass <pwd>
Sets the sessions control password. See Control
Password for more information.
set default tracelevel <int>
<server_ident>
Sets the default tracelevel on the identified active
server. This does not affect currently connected
clients. Only clients connecting after the set default
tracelevel is issued will be affected.
set logfile <filename>
<server_ident>
Sets the logfile for the identified active server. This
may be used to redirect trace log message to a
different log file, which will close the current log file.
If <filename> is the value OFF then the current
logfile will be closed and log messages will no longer
be sent to the log file.
set tracelevel <int> <server_ident>
Sets the tracelevel on the identified active server.
This will set the trace level for all clients that are
currently connected to the server.
Clients connecting after the set is issued will not be
affected.
show active servers
show all servers
show server <server_ident>
Show information about servers. See Showing
Servers for more details.
show active clients
show all clients
Shows information about clients on all responding
servers See Showing Clients for more details.
show active clients <name>
show all clients <name>
Shows information about clients with username
<name> on all responding servers. See Showing
Clients for more details.
stop active clients
stop all clients
Stops all clients on all responding servers.
See Stopping Clients for more details.
stop active clients <name>
stop all clients <name>
Stops all clients with username <name> on all
responding servers. See Stopping Clients for more
details.
stop active clients in <database spec> Stops all clients on all responding servers if the client
is currently connected to the specified database. See
stop all clients in <database spec>
Stopping Clients for more details.
72
stop active servers
stop all servers
stop server <server_ident>
Stops active servers. See Stopping Servers for more
details.
open active servers
open all servers
open server <server_ident>
Opens active servers. See Opening Servers for more
details.
close active servers
close all servers
close server <server_ident>
Closes active servers. See Closing Servers for more
details.
watch [server] <server_ident>
Watches active servers. See Watching Servers for
more details.
quit or exit
Exits the controller application
Example
$java -jar rdb$jdbc_home:rdbthincontrol.jar -user jones –
-controlpass jdbc_user
rdbthincontrol> show active servers
RDB$NODE : localhost
RDB$PORT : 1701
RDB$STATUS : Idle
RDB$SERVER_NAME : rdbthnsrv1
RDB$SERVER_TYPE : RdbThinSrv
RDB$SERVER_VERSION : V7.1-300 20040624 B46N
RDB$SERVER_SHR_VERSION : V7.1-300 20040624 B46N
RDB$SERVER_PID : 0x0B30(2864)
RDB$ALLOWS_ANON : false
RDB$ALLOWS_BYPASS : false
RDB$NUMBER_OF_CLIENTS : 0
RDB$MAX_CLIENTS : -1
RDB$NODE : localhost
RDB$PORT : 1711
RDB$STATUS : Idle
RDB$SERVER_NAME : myserver
RDB$SERVER_TYPE : RdbThinSrv
RDB$SERVER_VERSION : V7.1-300 20040624 B46N
RDB$SERVER_SHR_VERSION : V7.1-300 20040624 B46N
RDB$SERVER_PID : 0x0B88(2952)
RDB$ALLOWS_ANON : false
RDB$ALLOWS_BYPASS : false
RDB$NUMBER_OF_CLIENTS : 0
RDB$MAX_CLIENTS : -1
rdbthincontrol>
73
If a server does not recognize the provided control password, it will respond with a failure
message:
rdbthincontrol> show active servers
Failed to connect <CONTROL>
No Rdb Thin Server connection has been established
Unable to connect to server //localhost:1701/
Failed to connect <CONTROL>
No Rdb Thin Server connection has been established
Unable to connect to server //localhost:1711/
rdbthincontrol>
Contents
6.2 Connecting to Servers
The majority of commands that can be issued from the controller require a valid control
connection to be established with a server. If valid connection information is provided at
the controller invocation (node, port, user and password), the controller will automatically
attempt to connect to the specified server when the controller starts up.
If user and password are provided at the controller invocation, this information will be
maintained for the entire controller session and will be used in subsequent connection
request unless explicitly overridden on the command statement.
Commands will only be carried out on a server if a control connection has been established,
which requires the correct control password to be provided during the connect request. See
Control Password for more information of this password.
This control connection may be an explicit connection established for the session by using
the Connect command or may be implicitly established if a command is issued to a server
that requires control access to execute successfully. Many controller commands allow
server connection information to be specified, indicating which server to apply the
command. In addition, the connection information may provide a username and password
to use for that server.
Format
<command> <server_connection>
The <server_connection> information is comprised of a server identification string and
optional connection username and control password:
Format
74
<server_ident> [<server_uid>]
The <server_ident> string can be one of the following:
•
•
•
Port ID - this is the same as issuing //localhost:<port>/
full URL with the format: //<node>:<port>/
name of server as found in the configuration used to start the controller
The <server_uid> is:
<username> [<password>]
The <password> must match the control password of the server for the control connection
to be carried out successfully.
If a username or password is not provided on the command line then the current session
information is used.
This connection, once established, will be maintained until either an explicit Disconnect is
issued, or a new connection is established to another server or the controller exits.
If an attempt is made to issue a controller command without a connection being
established, then an error condition will be raised.
Example
rdbthincontrol> watch
No Rdb Thin Server connection has been established
If username and password are not provided on the connect command line, then the values
of the appropriate configuration options set when the controller was invoked will be used,
or if a configuration file is specified, the configuration file session characteristics will be
used. See Session Section within XML formatted Configuration File for more information
on session characteristics.
6.2.1 Connect Command
If a connection has not been established or the current connection has been disconnected or
a different server connection is required, then the Connect command can be issued at the
control command line.
Format
connect [server] <server_connection>
75
This command connects to the server specified by the <server_connection> information.
Example
The following examples use the Connect command:
rdbthincontrol> connect //localhost:1701/ jones mypassword
rdbthincontrol> connect server 1701
rdbthincontrol> connect myServer jim xxxxx
Note:
If username and password are not provided on the Connect command line, then the values
entered in the configuration options when the controller was invoked will be used, or if a
configuration file is specified, the configuration file session characteristics will be used.
See Session Section within XML formatted Configuration File for more information on
session characteristics.
6.2.2
Implicit Connection
A number of the control commands require a control connection to be established with the
target server. If the target server is not currently connected then both explicitly provided
connection information and session connection information may be used to attempt to
establish a control connection.
Connection information may be provided on the command line along with the command,
for example:
Example
rdbthincontrol> stop server //localhost:1701/ jones mypassword
Once an implicit connection is made, this connection will be established as the current
session connection until overridden by another implicit or explicit connection.
6.3 Control Password
To carry out any operations on active servers or clients you are required to provide a
control password.
This password must match the control password for that active server, otherwise, an
exception will be raised and the operation will fail.
When you start up the controller you may provide a password as a command line option or
in the session section of an XML-formatted Configuration file. If you provide both a
password and a controlPass the controlPass will take precedence.
76
Example
rdbthincontrol> stop server myMPServer
Failed to connect <CONTROL>
No Rdb Thin Server connection has been established
Unable to connect to server //localhost:1788/
In addition the control password may be set for a session by using the Set Session
Controlpass statement at the controller command line prompt.
rdbthincontrol> set session controlpass badpassword
rdbthincontrol> show server 1701
Failed to connect <CONTROL>
No Rdb Thin Server connection has been established
rdbthincontrol> set session controlpass mypassword
rdbthincontrol> show server 1701
RDB$NODE : 192.168.1.100
RDB$PORT : 1701
RDB$STATUS : Idle
RDB$SERVER_NAME : jiserv
RDB$SERVER_TYPE : RdbThinSrv
RDB$SERVER_VERSION : X7.1-301 20040713 B47C
RDB$SERVER_SHR_VERSION : X7.1-301 20040712 B47C
RDB$SERVER_PID : 0x1728(5928)
RDB$ALLOWS_ANON : false
RDB$ALLOWS_BYPASS : false
RDB$NUMBER_OF_CLIENTS : 0
RDB$MAX_CLIENTS : -1
Contents
6.4 Server Operations
This section details the operations you may carry out on servers using the controller both
interactively and in command mode.
Note:
The examples in this section assume that JAVA has been set up and the following DCL
symbol has been set in the environment.
$ thincontrol :== 'java' -jar rdb$jdbc_home:rdbthincontrol.jar –
–cfg my_servers.xml –controlpass "MySecretPassword"
77
The configuration file contents used for these examples may be seen in Sample
configuration file MY_SERVERS.XML
6.4.1
Closing Servers
Active servers may be closed using the controller. You must provide a valid control
password for the server.
Closing a server sets its maxClients attribute to zero (0) thus preventing any further
connections to be made. Already established connections are not affected. You may issue
an open command later to re-open a closed server, which will reestablish the maxClients
value for the server back to the value it was prior to closing. See Opening Servers for more
details.
Only those servers where the control password matches the control session control
password will be closed.
6.4.1.1 Interactive mode
The interactive control commands available to close servers can be seen in Table 6–5
Interactive Close Server.
Table 6-5
Interactive Close Server
Command
Description
close active servers
close all servers
Closes all responding servers.
close server
Closes the currently connected server
close server <server_connection>
Closes the active server specified by the server
connection information. See Connecting to Servers
for more information
Example
rdbthincontrol> close server myserver
rdbthincontrol> close server //prod_node:1766/
rdbthincontrol> close server 1701
rdbthincontrol> close active servers
rdbthincontrol> close server myserver george MySecretPassword
78
6.4.1.2 Command mode
The command mode commands available to close servers can be seen in Table 6–6
Command Mode Close Server.
Table 6-6 Command Mode Close Server
Command
Description
-closeServer-active
-closeServer -all
Closes all responding servers. The following
Command line options, if present will be ignored:
•
•
•
•
-name
-node
-port
-URL
-all and –active in this context are considered
synonyms.
-closeServer
Closes the server as specified by other command line
options
Example
$ thincontrol –closeServer –url //prod_node:1766/
$ thincontrol –closeServer –port 1701 –node localhost
$ thincontrol –closeServer –active
$ thincontrol –closeServer –name myserver
6.4.2 Opening Servers
Active servers may be opened using the controller. You must provide a valid control
password for the server.
Opening a server allows new client connections to be made using that server.
You may issue a open command to re-open a closed server, which will reestablish the
maxClients value for the server back to the value it was prior to closing.
Only those servers where the control password matches the control session control
password will be opened.
6.4.2.1 Interactive mode
79
The control commands available to open servers can be seen in Table 6–7 Interactive Open
Server.
Table 6-7
Interactive Open Server
Command
Description
open active servers
open all servers
Opens all responding servers.
open server
Opens the currently connected server
open server <server_connection>
Opens the active server specified by the server
connection information. See Connecting to Servers
for more information
Example
rdbthincontrol> open server
rdbthincontrol> open server myserv
rdbthincontrol> open server //prod_node:1766/
rdbthincontrol> open server 1701
rdbthincontrol> open all servers
rdbthincontrol> open server //prod_node:1766/ fred mypass
6.4.2.2 Command mode
The command mode commands available to open servers can be seen in Table 6–8
Command Mode Open Server.
Table 6-8 Command Mode Open Server
Command
Description
-openServer -active
-openServer -all
Opens all responding servers. The following
Command line options, if present will be ignored:
•
•
•
•
-name
-node
-port
-URL
-all and –active in this context are considered
synonyms.
80
Command
Description
-openServer
Opens the server as specified by other command line
options
Example
$ thincontrol –openServer –url //prod_node:1766/
$ thincontrol –openServer –port 1701 –node localhost
$ thincontrol –openServer –active
$ thincontrol –openServer –name myserver
6.4.3 Showing Servers
Information about active and known servers may be displayed using the controller. You
must provide a valid control password for the server before information will be displayed.
If showing all or active servers only those servers where the control password matches the
control session control password will have information displayed.
All server definitions as stored in the configuration file will be displayed when showing
stored or all servers irrespective of the control password.
6.4.3.1 Interactive mode
The control commands available to show servers can be seen in Table 6–9 Interactive
Show Server.
Table 6-9
Interactive Show Server
Command
Description
show active servers
Show all servers that are responding to the multicast
poll request
show all servers
Shows active servers as well as the server definitions
as found in the configuration file used to start the
controller
show stored servers
Shows the server definitions as found in the
configuration file used to start the controller
show server
Shows information about the currently connected
server
show server <server_connection>
Shows information about the active server specified
81
Command
Description
by the server connection information. See
Connecting to servers for more information
Example
rdbthincontrol> show server
rdbthincontrol> show server myserv
rdbthincontrol> show server //prod_node:1766/
rdbthincontrol> show server 1701
rdbthincontrol> show active servers
rdbthincontrol> show server //prod_node:1766/ fred mypass
6.4.3.2 Command mode
The command mode commands available to show servers can be seen in Table 6–10
Command Mode Show Server.
Table 6-10 Command Mode Show Server
Command
Description
-showServer -active
-showServer -all
Shows active servers as well as the server definitions
as found in the configuration file used to start the
controller
The following Command line options, if present will
be ignored:
•
•
•
•
-name
-node
-port
-URL
-all and –active in this context are considered
synonyms.
-showServer -stored
Shows the server definitions as found in the
configuration file used to start the controller
-showServer
Shows the server as specified by other command line
options
82
Note:
If multiple conflicting keywords are found on the one command line only one action will
be taken and the following precedence is used
•
•
•
•
-all
-active
-stored
specified server
Example
$ thincontrol –showServer –url //prod_node:1766/
$ thincontrol –showServer –port 1701 –node localhost
$ thincontrol –showServer –active
$ thincontrol –showServer –all
$ thincontrol –showServer –stored
$ thincontrol –showServer –name myserver
6.4.4 Starting Servers
Servers may be started using the controller.
If the server specifies a node or URL that is not the same as the node the controller is running
on an exception will be raised.
Note:
Currently a server can only be started if its configuration specifies the same node as the node
the controller is running on.
Starting remote servers is not currently available.
6.4.4.1 Interactive mode
The control commands available to start servers can be seen in Table 6–11 Interactive Start
Server.
Table 6-11 Interactive Start Server
Command
Description
start all servers
Starts all autostart servers found in the XMLformatted configuration file used when invoking the
controller.
83
Only those servers that have the autostart attribute and
are for the local host will be started.
start server
Starts a server of type RdbThinSrv on the local host
with all default characteristics.
start server <port id>
Starts a server of type RdbThinSrv listening on the
designated port on the local host with default
remaining characteristics
start server <name>
Starts the server that matches the name provided. See
XML formatted Configuration File for more
information on named server definitions.
Example
rdbthincontrol> start server myserver
rdbthincontrol> start server 1799
rdbthincontrol> start server all
6.4.4.2 Command mode
The command mode commands available to start servers can be seen in Table 6–12
Command Mode Start Server.
Table 6-12 Command Mode Start Server
Command
Description
-startServer –all
Starts all autostart servers found in the XMLformatted configuration file used when invoking the
controller.
Only those servers that have the autostart attribute
and are for the local host will be started. The
following Command line options, if present will be
ignored:
•
•
•
•
•
-name
-node
-port
-URL
-active
84
-startServer
Starts the server as specified by other command line
options
Example
$ thincontrol –startServer –port 1701 –node localhost
$ thincontrol –startServer –name myserver
$ thincontrol –startServer –all
6.4.5 Stopping Servers
Active servers may be stopped using the controller. You must provide a valid control
password for the server.
Only those servers where the control password matches the control session control
password will be stopped.
Note:
Stopping a server will forcibly terminate all database connections on that server and does
not wait for client transaction completion. Consider using the Close Server command first,
to stop further client connections and then use the Stop Server command later when no
clients are bound. See Closing Servers for more details.
You may use Show Server or Show Clients command to see if any clients are currently
using the server. See Showing Servers for more details.
6.4.5.1 Interactive mode
The control commands available to stop servers can be seen in Table 6–13 Interactive Stop
Server.
Table 6-13 Interactive Stop Server
Command
Description
stop active servers
stop all servers
Stops all responding servers.
stop server
Stops the currently connected server
stop server <server_connection>
Stops the active server specified by the server
connection information. See Connecting to servers
for more information
85
Example
rdbthincontrol> stop server
rdbthincontrol> stop server myserv
rdbthincontrol> stop server //prod_node:1766/
rdbthincontrol> stop server 1701
rdbthincontrol> stop active servers
rdbthincontrol> stop server //prod_node:1766/ fred mypass
6.4.5.2 Command mode
The command mode commands available to stop servers can be seen in Table 6–14
Command Mode Stop Server.
Table 6-14 Command Mode Stop Server
Command
Description
-stopServer -active
-stopServer -all
Stops all responding servers. The following
Command line options, if present will be ignored:
•
•
•
•
-name
-node
-port
-URL
-all and –active in this context are considered
synonyms.
-stopServer
Stops the server as specified by other command line
options
Example
$ thincontrol –stopServer –url //prod_node:1766/
$ thincontrol –stopServer –port 1701 –node localhost
$ thincontrol –stopServer –active
$ thincontrol –stopServer –name myserver
86
6.4.6 Watching Servers
The trace output for an active server may be displayed on the controller console. You must
provide a valid control password for the server to be able to watch its trace. Only those
servers where the control password matches the control session control password will be
watched.
When you watch a server, all trace output from that server will also be sent to the current
console running the controller.
The display of trace output messages occurs asynchronously with the command line
interface. The same trace information will also be sent to the servers log file.
Watch is only available in interactive mode.
Note:
Because the server uses Java logger to log trace message to remote consoles such as the
controller, the output from the server will be buffered prior to being sent across the network
to the console. This means that the trace output may be displayed sporadically on the
console as the buffer is first filled and then flushed.
6.4.6.1 Interactive mode
The control commands available to watch servers can be seen in Table 6–15 Interactive
Watch Server.
Table 6-15 Interactive Watch Server
Command
Description
watch [server]
Watch the currently connected server
watch server <server_connection>
Watch the active server specified by the server
connection information. See Connecting to servers
for more information
Example
rdbthincontrol> watch server myserv
rdbthincontrol> watch server //prod_node:1766/
rdbthincontrol> watch server 1701 jack password1
rdbthincontrol> watch
87
6.4.7 Polling Servers
The poll command uses the multicast information to poll responding Oracle JDBC for Rdb
servers:
Each available server will respond with information about which node and port it is
listening on. In addition the poll response identifies the Process ID the server is using on
that node.
A control password is not required to use the poll command.
6.4.7.1 Interactive mode
The control commands available to start servers can be seen in Table 6–16 Interactive Poll
Server.
Table 6-16 Interactive Poll Server
Command
Description
poll
Poll active servers
Example
rdbthincontrol> poll
Polling servers ...
myserver(0) //localhost:1711/ (0x0B88<2952>)
rdbthnsrv1(0) //localhost:1701/ (0x0B30<2864>)
rdbthincontrol>
6.4.7.2 Command mode
The command mode commands available to poll servers can be seen in Table 6–17
Command Mode Poll Server.
Table 6-17 Command Mode Poll Server
Command
Description
-poll
Poll active servers. The following Command line
options, if present will be ignored:
•
•
•
•
-name
-node
-port
-URL
88
Example
$ thincontrol –poll
6.4.7.3 Multicast Polling
The controller uses multicast polling to discover Oracle JDBC for Rdb servers that may be
available on the network.
Multicasting is a style of efficiently broadcasting data over a network connection to
many connected servers. Any server listening in to the multicast IP address will
receive the data packets that are broadcast, such as poll requests.
Oracle JDBC for Rdb servers use the Administrative Scoping range of addresses that allow
easy limiting of multicast transmission to well defined boundaries within your network.
Administrative Scoping is the restriction of multicast transport based on the address range
of the multicast group. It is defined by RFC 2365 "Administratively Scoped IP Multicast." and is
restricted to the address range:
239.0.0.0 to 239.255.255.255
The IP address for server multicast polling should be chosen from within the following
range:
239.192.0.0 to 239.192.255.255
This range is known as the IPv4 Organization Local Scope and has a subnet mask of
255.252.0.0 It is intended for use by an entire organization setting multicast scopes
privately for its own internal or organizational use and allows up to 262,144 group
addresses.
By default, Rdb servers use the multicast IP 239.192.1.1 with a base port of 5517.
Multicast Group IP addresses can be assigned to a server using the srv.mcGroupIP option
within a server configuration file or the server start-up command line.
The srv.mcBasePort option allows you to change the Multicast Base port.
Note:
When a server participates in a multicast group, as part of the standard multicast protocol
its presence in the group will be broadcast at regular intervals. This may conflict with the
network policy and procedures of your network administration.
89
Please consult your network manager to ensure that multicast polling is allowed on your
system. Your network manager may also allocate a specific IP address and Port range that
may be used by the Rdb Native Drivers, and you should change your server and session
configuration files to reflect these allocated addresses.
Setting the Multicast Base port to zero (0) will effectively disable multicast broadcast and
receipt for that server. This also means that the server will not respond to any POLL
requests issued by the Controller.
Contents
6.5 Client Operations
6.5.1 Showing Clients
Information about clients within active servers may be displayed using the controller.
You must provide a valid control password for the server.
Clients will only be displayed for those servers where the control password matches the
control session control password.
6.5.1.1 Interactive mode
The control commands available to show clients can be seen in Table 6–18 Interactive
Show Clients.
Table 6-18 Interactive Show Clients
Command
Description
show active clients
show all clients
Shows all clients on responding servers.
show active clients <name>
show all clients <name>
Shows all clients with username <name> on
responding servers
Shows all clients currently connected to the specified
show active clients in
database on all responding servers
<database_spec>
show all clients in <database_spec>
show clients
Shows all clients in the currently connected server
show clients in <database_spec>
Shows all clients currently connected to the specified
database on the currently connected server
90
Example
rdbthincontrol> show active clients
rdbthincontrol> show all clients fred
rdbthincontrol> show clients
rdbthincontrol> show clients in disk1:[dbc]pers
rdbthincontrol> show all clients in disk1:[dbc]pers
6.5.1.2 Command mode
The command mode commands available to show clients can be seen in Table 6–19
Command Mode Show Clients.
Table 6-19 Command Mode Show Clients
Command
Description
-showclients
Shows all clients on responding servers.
The following Command line options, if present will
be ignored:
•
•
•
•
•
•
-name
-node
-port
-URL
-all
-active
Example
$ thincontrol –showclients
6.5.2 Stopping Clients
Clients within active servers may be stopped using the controller. You must provide a valid
control password for the server.
Clients will only be stopped in those servers where the control password matches the
control session control password.
91
If a database file specification is used, then only those clients current connected to that
database will be stopped. The database file specification must match exactly (ignoring
character case) to that shown in the Show Client output.
Note:
Stopping a client will forcibly terminate all database connections on that server for that
client and does not wait for client transaction completion.
You may use Show Clients command to see clients that are currently using the server. See
Showing Clients for more details.
In the following command, if <client_id> is provided it must match a client id returned by
the show clients command. Leading zeroes (0) may be left off the <client_id>.
6.5.2.1 Interactive mode
The control commands available to stop clients can be seen in Table 6–20 Interactive Stop
Clients.
Table 6-20 Interactive Stop Clients
Command
Description
stop active clients
stop all clients
Stops all clients on responding servers.
stop active clients <name>
stop all clients <name>
Stops all clients with user name <name> on
responding servers.
stop active clients in<database_spec> Stops all clients currently connected to the specified
database. on all responding servers
stop all clients in <database_spec>
stop clients
Stops all clients in the currently connected server
stop clients in<database_spec>
Stops all clients on the currently connect server that
are currently connected to the specified database.
stop client <client_id>
Stops the specified client on the currently connected
server
Example
rdbthincontrol> stop active clients
rdbthincontrol> stop all clients fred
rdbthincontrol> stop clients
92
rdbthincontrol> stop client 0000000A
rdbthincontrol> stop all clients in disk1:[dbs]pers
6.5.2.2 Command mode
The command mode commands available to stop clients can be seen in Table 6–21
Command Mode Stop Clients.
Table 6-21 Command Mode Stop Clients
Command
Description
-stopClient <client id>
Stops specified client on the currently connected
server.
The following Command line options, if present will
be ignored:
• -name
• -node
• -port
• -URL
• -active
• -all
-stopClients
Stops all clients on the currently connected server
-stopClients -all
-stopClients -active
Stops all clients on responding servers.
The following Command line options, if present will
be ignored:
• -name
• -node
• -port
• -URL
-stopClients -all
–user<name>
-stopClients –active
–user <name>
Stops all clients with user name <name> on
responding servers.
The following Command line options, if present
will be ignored:
• -name
• -node
• -port
• -URL
-stopClients –active
-in <database_spec>
-stopClients –all
Stops all clients currently connected to the specified
database. on all responding servers
93
-in <database_spec>
-stopClients –in
<database_spec>
The following Command line options, if present will
be ignored:
• -name
• -node
• -port
• -URL
Stops all clients on the currently connect server that
are currently connected to the specified database
Example
$ thincontrol –stopClient 0000000A
$ thincontrol –stopClients –all
$ thincontrol –stopClients –active –in db_dir:mf_personnel
$ thincontrol –stopClients
Contents
94
Chapter 7
Oracle SQL/Services and Oracle JDBC for
Rdb Servers
The Oracle SQL/Services management command line may be used to start and stop servers
using the new dispatcher protocol called JDBC available in Oracle SQL/Services V7.1.6 and
later.
Currently the Oracle SQL/Services interface to Oracle JDBC for Rdb Servers is minimal and
may only be used to start and stop a JDBC dispatcher which in turn will start or stop the
associated Oracle JDBC for Rdb server.
Starting an Oracle JDBC for Rdb server using Oracle SQL/Services involves the following
steps:
1. Create an SQL/Services Dispatcher with the protocol JDBC. See Creating an Oracle
SQL/Services JDBC Dispatcher.
2. Associate the JDBC Dispatcher with an Oracle JDBC for Rdb server. See Associating
an Oracle SQL/Services JDBC Dispatcher to a Server
3. Start the JDBC dispatcher. See Starting a JDBC Dispatcher
In order for the dispatcher to start a server, the dispatcher must determine the name and type
of the server as well as the command procedures and configuration files to use during startup.
The following sections show how these determinations are carried out.
A1.3 Sample Setup, Starting an Oracle JDBC for Rdb thin server from Oracle SQL/Services.
provides a working example on creating a JDBC dispatcher and its server associations.
7.1 JDBC Dispatcher
A new SQL/Services dispatcher protocol of JDBC was introduced in V7.1.6 of Oracle
SQL/Services. This dispatcher type allows you to create JDBC dispatchers that may be
associated with Oracle JDBC for Rdb servers.
7.1.1 Creating an Oracle SQL/Services JDBC Dispatcher
95
To be able to start and stop Oracle JDBC for Rdb servers using Oracle SQL/Services, a
dispatcher with protocol JDBC must be defined using the Oracle SQL/Services management
console.
You must provide the new dispatcher with a unique name and network_port. It is important
to ensure that the use of the POR_ID is unique as the port provided will be used by the
associated Oracle JDBC for Rdb server and only one server at a time may listen on a single
TCPIP port.
Format
CREATE DISPATCHER <dispatcher name> NETWORK_PORT TCPIP PORT_ID <port>
PROTOCOL JDBC;
Where:
<dispatcher name> is a unique name for this dispatcher instance
<port> is the port number the associated server will listen on
Example
$ MCR SQLSRV_MANAGE71
SQLSRV> CONNECT SERVER;
SQLSRV> CREATE DISPATCHER JDBC_DISP NETWORK_PORT TCPIP PORT_ID 1880
PROTOCOL JDBC;
SQLSRV> SHOW DISPATCHER;
Dispatcher JDBC_DISP
State:
UNKNOWN
Autostart:
on
Max connects:
100 clients
Idle User Timeout:
<none>
Max client buffer size:
5000 bytes
Network Ports:
(State)
(Protocol)
TCP/IP port
1880
Unknown
JDBC clients
Log path:
SYS$MANAGER:
Dump path:
SYS$MANAGER:
Caution:
The existing version of the Oracle SQL/Services Management GUI does not recognize
dispatchers of the type JDBC.
This means that you will no longer be able to use the GUI once a JDBC dispatcher has been
defined.
7.1.2 Associating an Oracle SQL/Services JDBC Dispatcher to a Server
96
Each Oracle SQL/Services JDBC dispatcher must be associated with an Oracle JDBC for
Rdb server. The PORT_ID specified in the dispatcher creation is the key to this relationship.
The PORT_ID specifies the TCPIP port that will be used by the Oracle JDBC for Rdb server
and is used by the dispatcher start up procedures to determine information about the
associated server.
In addition to which port the server will listen on, the PORT_ID may be used by the
dispatcher to determine:
•
•
•
•
What type of Oracle JDBC for Rdb server to start
The name that will be given to this server
What configuration file to use for this server
Any DCL command to run during the server startup procedure
The overloading of the use of the PORT_ID by the JDBC dispatcher is necessary as the
amount of information stored for a JDBC dispatcher is minimal keeping it in line with the
information stored for other SQL/Services Dispatcher types.
In the process of determining the server attributes the dispatcher may try to translate the
following logical names:
•
•
•
•
RDB$JDBC_SQSNAM_<port>
RDB$JDBC_SQSCFG_<port>
RDB$JDBC_SQSCMD_<port>
RDB$JDBC_SQSTYPE_<port>
In the above logical names the <port> will be substituted by the PORT_ID of the JDBC
dispatcher prior to logical name translation
If no such logical names exist, the dispatcher will then use alternate methods to provide the
server with a name and will to try to locate a suitable command procedure and configuration
file. The following sections detail how these determinations are carried out.
When determining the server information required to correctly start the associated Oracle
JDBC for Rdb server, the dispatcher will carry out the following steps in the order specified:
1. First the dispatcher will create a name for the server
2. Any DCL command required to be executed during server start up is then determined
3. The file specification of the configuration file to provide to the server is then
determine
4. The server type for the server is then determined.
7.1.2.1 Determining the server name
97
A server name is required as it may be used by the server start up procedure to locate
properties from its configuration file. The name used will determine various characteristics of
the started server.
In addition the server name will be used as the OpenVMS process name and will determine
the naming of any associated executors if the server is a Multi-Process server.
The server name is also used in creating log and temporary files during the running of the
server.
The PORT_ID is used to determine the name of the Oracle JDBC for Rdb server using the
following precedence:
1. If the logical name RDB$JDBC_SQSNAM_<port> exists then it is translated to
provide the server name
2. If the logical name does not exist the server name will be SQS<port>
Example 1
Logical name not defined:
$ show log RDB$JDBC_SQSNAM_1888
%SHOW-S-NOTRAN, no translation for logical name RDB$JDBC_SQSNAM_1888
$ MCR SQLSRV_MANAGE71
SQLSRV> CONNECT SERVER;
SQLSRV> CREATE DISPATCHER JDBC_DISP NETWORK_PORT TCPIP PORT_ID 1888
PROTOCOL JDBC;
This will create a server named SQS1888.
Example 2
Logical name defined:
$ DEFINE/SYSTEM RDB$JDBC_SQSNAM_1888 MY_POOL_SRV
$ MCR SQLSRV_MANAGE71
SQLSRV> CONNECT SERVER;
SQLSRV> CREATE DISPATCHER JDBC_DISP NETWORK_PORT TCPIP PORT_ID 1888
PROTOCOL JDBC;
This will create a server named MY_POOL_SRV.
7.1.2.2 Determining extra DCL commands for use during start-up
During the invocation of a JDBC server, the following DCL command procedure is executed:
RDB$JDBC_HOME:RDBJDBC_STARTSRV.COM
This is the standard startup command procedure used by Oracle JDBC for Rdb and was
created for you during the installation of the Oracle JDBC for Rdb product.
98
This command procedure will setup some environmental elements and then execute a JAVA
command to start the server. A discrete dispatcher process will be set up by the
SQL/Services START DISPATCHER command and the JAVA command will be run under
this process context.
The RDBJDBC_STARTSRV command procedure will try to locate and execute any specific
setup command procedures you may have designated for its use. This is done prior to the
procedure executing the JAVA command that will ultimately start the server instance.
The PORT_ID is used to determine the name of an Open VMS DCL command procedure
that may be invoked containing your system and environmental setup procedures. The file
specification of the command procedure is determined using the following precedence:
1. If the logical name RDB$JDBC_SQSCMD_<port> exists then it is translated to
provide the command procedure file specification
2. If the logical name does not exist the dispatcher will try to locate and execute the
file rdb$jdbc_com:rdbjdbc_sqs_onStartup.com.
3. If this file does not exists the dispatcher will try to locate and execute the file
rdb$jdbc_home:rdbjdbc_sqs_onStartup.com
Example 1
Logical name not defined and file rdb$jdbc_com:rdbjdbc_sqs_onStartup.com does exist:
$ show log RDB$JDBC_SQSCMD_1888
%SHOW-S-NOTRAN, no translation for logical name RDB$JDBC_SQSCMD_1888
$ MCR SQLSRV_MANAGE71
SQLSRV> CONNECT SERVER;
SQLSRV> CREATE DISPATCHER JDBC_DISP NETWORK_PORT TCPIP PORT_ID 1888
PROTOCOL JDBC;
The file RDB$JDBC_COM:RDBJDBC_SQS_ONSTARTUP.COM will be executed.
Example 2
Logical name defined:
$ DEFINE/SYSTEM RDB$JDBC_SQSCMD_1888 RDB$JDBC_COM:MY_SRV1888_ONSTART.COM
$ MCR SQLSRV_MANAGE71
SQLSRV> CONNECT SERVER;
SQLSRV> CREATE DISPATCHER JDBC_DISP NETWORK_PORT TCPIP PORT_ID 1888
PROTOCOL JDBC;
The file RDB$JDBC_COM:MY_SRV1888_ONSTART.COM will be executed.
7.1.2.3 Determining the server configuration file
99
The PORT_ID is also used to determine the configuration file to use on server startup. This
file can be a CFG or an XML-formatted configuration file and is used to provide information
to the server about what characteristics it should use when running. See Configuration Files
for more details on the use of configuration files.
You may choose to provide a separate configuration file for the server associated with each
JDBC dispatcher, or you may choose to use a single XML-formatted configuration file
containing the server attributes for all your servers.
The appropriate configuration file is determined by the dispatcher by trying to translate the
logical name RDB$JDBC_SQSCFG_<port> where PORT_ID is substituted for <port> prior
to logical name translation. If the logical name is not there then the dispatcher will try use a
configuration file from the JDBC system directories.
The following is the precedence for this file search
1. The file pointed to by the RDB$JDBC_SQSCFG_<port> if it exists.
2. RDB$JDBC_COM:<server name>_CFG.XML where the server name as
determined in previous steps is substituted for <server_name>
3. RDB$JDBC_COM:SQLSRV_JDBC_SERVER_CFG.XML
4. RDB$JDBC_COM:RDBJDBCCFG.XML
Example 1
Logical name not defined and file
RDB$JDBC_COM:SQLSRV_JDBC_SERVER_CFG.XML does exist:
$ show log RDB$JDBC_SQSCFG_1888
%SHOW-S-NOTRAN, no translation for logical name RDB$JDBC_SQSCFG_1888
$ MCR SQLSRV_MANAGE71
SQLSRV> CONNECT SERVER;
SQLSRV> CREATE DISPATCHER JDBC_DISP NETWORK_PORT TCPIP PORT_ID 1888
PROTOCOL JDBC;
The file RDB$JDBC_COM:SQLSRV_JDBC_SERVER_CFG.XML will be used.
Example 2
Logical name defined:
$ DEFINE/SYSTEM RDB$JDBC_SQSCFG_1888 RDB$JDBC_COM:MY_SRV1888_CFG.XML
$ MCR SQLSRV_MANAGE71
SQLSRV> CONNECT SERVER;
SQLSRV> CREATE DISPATCHER JDBC_DISP NETWORK_PORT TCPIP PORT_ID 1888
PROTOCOL JDBC;
The file RDB$JDBC_COM:MY_SRV1888_CFG.XML will be used.
100
7.1.2.4 Determining Server Type
During the startup of the server associated with the Oracle SQL/Services JDBC dispatcher,
the type of the server to startup also needs to be determined.
The server type will be used by the dispatcher to determine the appropriate JDBC JAR file to
use when invoking the server. The server type will also used to determine other server
attributes that have to be set for a successful instantiation of a server process.
The dispatcher will use the PORT_ID to try to identify the appropriate JDBC server type to
start.
There are three types of Oracle JDBC for Rdb servers recognized by Oracle SQL/Services:
•
•
•
POOL - a pool server i.e. type="RdbThinSrvPool"
MP - a multi-process server i.e. type="RdbThinSrvMP"
STD - a standard thin server i.e. type="RdbThinSrv"
When the dispatcher determines the server type, the following steps are used :
1. If the logical name RDB$JDBC_SQSTYPE_<port> exists, it is translated to provide
the server type. The translated logical name must be one of the valid server types as
shown above.
2. If the logical name does not exist the server type will be POOL
Note:
As the dispatcher cannot currently use the server name to determine the server type, it is
important that this logical name be correctly setup if the type of the server to start is not a
POOL server i.e. type="RdbThinSrvPool:. If this is not correctly set the wrong JDBC JAR
file may be used and the server may fail to start correctly. The log files associated with the
server, usually written to the directory RDB$JDBC_LOGS will show the start-up failure and
the reason for the failure.
Example 1
Logical name not defined:
$ show log RDB$JDBC_SQSTYPE_1888
%SHOW-S-NOTRAN, no translation for logical name RDB$JDBC_SQSTYPE_1888
$ MCR SQLSRV_MANAGE71
SQLSRV> CONNECT SERVER;
SQLSRV> CREATE DISPATCHER JDBC_DISP NETWORK_PORT TCPIP
PORT_ID 1888 PROTOCOL JDBC;
This will create a server with type RdbThinSrvPool.
Example 2
Logical name defined:
101
$ DEFINE/SYSTEM RDB$JDBC_SQSTYPE_1888 MP
$ MCR SQLSRV_MANAGE71
SQLSRV> CONNECT SERVER;
SQLSRV> CREATE DISPATCHER JDBC_DISP NETWORK_PORT TCPIP PORT_ID 1888
PROTOCOL JDBC;
This will create a server with type RdbThinSrvMP.
7.1.3 Starting a JDBC Dispatcher
Once you have defined a JDBC dispatcher, it can be started like any other Oracle SQL/Services
dispatcher:
Example
SQLSRV> start dispatcher jdbc_disp;
SQLSRV> show disp jdbc_disp;
Dispatcher JDBC_DISP
State: STARTING
Autostart: on
Max connects: 100 clients
Idle User Timeout: <none>
Max client buffer size: 5000 bytes
Network Ports: (State) (Protocol)
TCP/IP port 1880 Inactive JDBC clients
Log path: SYS$MANAGER:
Dump path: SYS$MANAGER:
SQLSRV> show disp jdbc_disp;
Dispatcher JDBC_DISP
State: RUNNING
Autostart: on
Max connects: 100 clients
Idle User Timeout: <none>
Max client buffer size: 5000 bytes
Network Ports: (State) (Protocol)
TCP/IP port 1880 Inactive JDBC clients
Log path: SYS$MANAGER:
Dump path: SYS$MANAGER:
Log File: SYS$SYSROOT:[SYSMGR]SQS_DECRDB_JDBC_DISP06O71.LOG;
Dump File: SYS$SYSROOT:[SYSMGR]SQS_DECRDB_JDBC_DISP06O.DMP;
The Oracle SQL/Services monitor will attempt to start the server associated this dispatcher and
create a log of the dispatcher events in the SYS$MANAGER directory in a log file named:
SYS$MANAGER:SQS_<nodename>_JDBC_DISP<nnnnn>.LOG
The <nodename> depends on the node the dispatcher is started up on.
The <nnnnn> is the unique id given to this dispatcher instance by Oracle SQL/Services
102
For example:
SQS_MALIBU_SQLSRV_DIS06010.LOG
This log can be useful in determining why a dispatcher did not start up properly. For example
if appropriate logical names have not been setup as specified in the installation of Oracle
JDBC Drivers for Rdb then a message similar to the following may be found at the end of the
log file:
.
.
.
$ @rdb$jdbc_home:rdbjdbc_startsrv SQS1880 "SQS"
%DCL-E-OPENIN, error opening RDB$JDBC_HOME:[SYSMGR]RDBJDBC_STARTSRV.COM;
as input
-RMS-F-DEV, error in device name or inappropriate device type for
operation
SYSTEM job terminated at 21-JUL-2004 21:52:07.56
Accounting information:
Buffered I/O count: 37 Peak working set size: 2272
Direct I/O count: 14 Peak virtual size: 173072
Page faults: 192 Mounted volumes: 0
Charged CPU time: 0 00:00:00.04 Elapsed time: 0 00:00:00.21
7.1.4
Stopping a JDBC Dispatcher
The STOP DISPATCHER statement may be used to stop a running JDBC dispatcher.
Example
SQLSRV> STOP DISPATCHER JDBC_DISP
This will also stop the associated Oracle JDBC for Rdb server.
If you have associated the dispatcher with a pool server, and the pooled servers have
autoStart enabled, then these pooled servers will also be shut down at this time.
See your Oracle SQL/Services documentation for more information on the Oracle
SQL/Services management console.
Contents
7.2 Command Procedures used by Oracle SQL/Services
When a JDBC dispatcher is started, Oracle SQL/Services will use the OpenVMS command
procedure
103
SYS$MANAGER:SQLSRV_JDBC_SERVER_STARTUP<version>.COM
to start the server associated with a JDBC dispatcher.
As multiple versions of SQL/Services may be present on your system, the Oracle JDBC for
Rdb installation provides multiple versions of the SQLSRV_JDBC_SERVER_STARTUP
command procedure. The <version> of the command procedure determines the version of
SQL/Services it is associated with, thus:
SYS$MANAGER:SQLSRV_JDBC_SERVER_STARTUP71.COM
will be the command procedure used by version 7.1 SQL/Services during the JDBC
dispatcher startup.
These command procedures in turn execute the following command procedure:
RDB$JDBC_HOME:RDBJDBC_STARTSRV.COM
This enables you to have multiple versions of the Oracle JDBC for Rdb on your systems,
each with potentially different startup requirements specified in the
RDBJDBC_STARTUP.COM. The logical name RDB$JDBC_HOME in your SQL/Services
environment may be used to select the specific version of the Oracle JDBC for Rdb it will
use.
7.2.1
JDBC Dispatcher Setup Procedure
In addition, an additional OpenVMS command procedure can be defined to set up
environmental characteristics required for your system. This command procedure is located
for use with this server using the following precedence:
1. the file pointed to by the logical name RDB$JDBC_SQSCMD_<port> if
defined
2. RDB$JDBC_COM:RDBJDBC_SQS_ONSTARTUP.COM
3. RDB$JDBC_HOME:RDBJDBC_SQS_ONSTARTUP.COM
If command procedure is found on your system using this search list, this command
procedure will be executed just prior to the server being invoked. You may use this
command procedure and to setup environmental conditions for the server execution, for
example:
$@sys$share:rdb$setver 71
$@sys$common:[java$141.com]JAVA$141_SETUP.COM
104
7.3 Using Pool Servers
Each JDBC dispatcher defined is related only to a single server. Use a pool server if you
require more than one server to be started for a single dispatcher.
By defining a pool of servers that the pool server can use and enabling autoStart on each of
these servers, a whole pool of servers can be started by starting a single dispatcher. See
Pool Server Operation for more information on pool servers.
The following example shows how you can define a dispatcher to start up a pool server that
will automatically start up three standard thin servers as part of its pool:
Note:
This example uses the default server naming, default server type of POOL and a standard
SQS_ONSTARTUP command procedure. No RDB$JDBC_SQS* logical names need be set
up.
Define an Oracle SQL/Services dispatcher
$ MCR SQLSRV_MANAGE71
SQLSRV> CONNECT SERVER;
SQLSRV> CREATE DISPATCHER POOL_DISP NETWORK_PORT TCPIP PORT_ID 1880
PROTOCOL JDBC;
Create a configuration file for this server in RDB$JDBC_COM:SQS1880_CFG.XML
<?xml version = '1.0'?>
<!-- Configuration file for Rdb Thin JDBC Drivers and Servers -->
<config>
<!-- SERVERS -->
<servers>
<!-- DEFAULT server characteristics-->
<server
name="DEFAULT"
type="RdbThinSrv"
url="//localhost:1880/"
maxClients="-1"
srv.bindTimeout="0"
srv.idleTimeout="0"
srv.mcBasePort="5520"
srv.mcGroupIP="239.192.1.10"
autoStart="false"
controlUser="jdbc_user"
controlPass="0x811B15F866179583EB3C96751585B843"
cfg="rdb$jdbc_com:sqlsrv_jdbc_server_cfg.xml"
srv.startup="rdb$jdbc_home:rdbjdbc_startsrv.com"
srv.onStartCmd="@rdb$jdbc_com:rdbjdbc_sqs_onstartup.com"
/>
<!-- now the servers that will be started up by pool server -->
<server
105
name="SQSrjs1"
type="RdbThinSrv"
url="//localhost:1891/"
autoStart="true"
maxClients="10"
/>
<server
name="SQSrjs2"
type="RdbThinSrv"
url="//localhost:1892/"
autoStart="true"
maxClients="10"
/>
<server
name="SQSrjs3"
type="RdbThinSrv"
url="//localhost:1893/"
autoStart="true"
maxClients="10"
/>
<!-- Pool Server -->
<server
name="SQS1880"
type="RdbThinSrvPool"
url="//localhost:1880/" >
<pooledServer name="SQSrjs1"/>
<pooledServer name="SQSrjs2"/>
<pooledServer name="SQSrjs3"/>
</server>
</servers>
</config>
Create an onStartup command procedure that sets up the appropriate Rdb and Java versions
for your system
e.g. RDB$JDBC_COM:RDBJDBC_SQS_ONSTARTUP.COM may contain
$@sys$share:rdb$setver 71
$@sys$common:[java$141.com]JAVA$141_SETUP.COM
Start the dispatcher
SQLSRV> start dispatcher pool_disp;
Note:
In this example the command procedure pointed to by default srv.onStartCmd in the XML
configuration file happens to be the same as the one created as the SQS_ONSTARTUP
command procedure. These do not have to be the same command procedure.
106
The Oracle SQL/Services JDBC dispatcher SQS_ONSTARTUP command procedure is used
during the startup of the associated pool server. Those servers that the pool server starts up
use the command procedure pointed to by the srv.onStartCmd switch.
The Oracle SQL/Services JDBC dispatcher does not directly use any information from the
JDBC XML configuration file.
Contents
107
Chapter 8
Other Features
8.1 Anonymous Usernames
By default, the thin driver disallows blank usernames to be passed to it during database
connection. A valid username for that database must be used. If the client attempts to connect
to the database using a blank username the following exception will be raised:
rdb.RdbException: Io exception : Io exception :
in <rdbjdbcsrv:connect>
%RDB-E-AUTH_FAIL, authentication failed for user .Anonymous.
The following server configuration option can be used to change this behavior:
anonymous
Use this option tells to allow anonymous connections (that is, where the username is blank)
to the Oracle JDBC for Rdb thin server, for example:
$ java -jar rdbthinsrv.jar -anonymous
In addition, if anonymous connections are allowed, you can specify the default username and
password to use on an anonymous connection by using the following options:
username <username>
password <password>
Example
For example:
$ java -jar rdbthinsrv.jar -anonymous –
-username fred -password "jones"
8.2 BYPASS Privilege
Privilege checking on Oracle Rdb uses the layered method. Sometimes it is not obvious how
privilege checking obtains its results.
108
The first pass at privilege checking occurs at an object identifier level, asking if this
entity has the right to do this action to this object. If access is denied at this level a
series of cascading attempts are made to try to get the privilege.
After the object protection is checked, the entity's privilege at the database is checked.
If the entity has been granted DBADM it will be allowed to carry out the operation
even if it does not have the explicit privilege such as CREATE. This privilege is a
kind of catch all much like BYPASS on OpenVMS
If the entity still has not been granted the privilege at the database level, the
OpenVMS privileges for the OpenVMS user that the application is running under are
checked.
If that user has the appropriate level of privilege, they are then granted the action on
the object.
This means that privilege checking within Oracle JDBC for Rdb server not only depends on
the privilege assigned to the connection user within the database, but also on the privilege of
the OpenVMS user that started the server application (the Executor).
NOTE:
The Executor is the standard term used for the OpenVMS user under which the
application is executing. This should not be confused with the "executor" processes
used in conjunction with Multi-process servers.
This allows you to set up a privileged server that has access to data that the user may not
have. In other words, you can restrict users access to data in the database if and only if they
come through the Oracle JDBC for Rdb server; they do not have access directly.
If you wish restricted access, grant restricted access only to the Executor and set minimum
privileges. Then grant the appropriate rights to connection users so that they will have the
required access. If they do not have the rights and the Executor does not have the rights,
access is denied. If the user does have the right even though the Executor does not, access is
allowed.
Within the thin server the BYPASS and SYSPRV privileges are disabled by default. The
user will only get the privileges he has been granted and will not inherit privileges from the
Executor.
If the server must run is required to run with BYPASS privilege, thus allowing less
privileged users access to the database objects, use the -bypass option
8.2.1
BYPASS and Multi-Process servers
109
When you use a Multi-process server a separate executor process is used to carry out the
database operations. This executor process inherits the privileges and authorization
characteristics from the server process that started it.
Thus the information as described above applies to the executor processes in exactly the
same manner as described for the server process.
8.3 Persona
When an Oracle JDBC for Rdb thin server is running, it assumes the default privileges and
identifiers of the user that started the server process. Similarly, when a SQL Services JDBC
Dispatcher starts a server, the server will inherit the privileges and identifiers of the
SQL/Services dispatcher process.
You can change this behaviour by specifying a persona value in the server definition for the
server in the XML-formatted configuration file, or by using the persona switch on the
command line when starting up the server.
When started with a persona, the server process will inherit its privileges and identifiers from
the named persona.
BYPASS and SYSPRV privileges are still disabled by default, see BYPASS Privilege for
more details.
To start a server with a specific persona, you will need to be logged into an account that has
IMPERSONATE privilege and read access to the system authorization database.
The persona value associated with the server must be a valid OpenVMS persona on the
system you are running the server on.
See Server Configuration Options for the format of the Persona option.
8.3.1
Persona and Server Operations
When persona is used with a server, you should ensure that the persona used has appropriate
access to the JDBC command procedures and JDBC log directories.
This is especially important if you use persona with a pool server or a multi-process server.
Before a server carries out any other operation it will assume the persona provided and then
by default disable BYPASS (see BYPASS Privilege). So from that time on the server is
operating under the persona supplied and will be restricted to the rights and authorization
given to that persona.
110
When persona is used both the multi-process server and the pool server will need to have
read/execute/write access to the RDB$JDBC_COM directory and read/write access to the
RDB$JDBC_LOG directory.
By default the installation of the JDBC drivers will create these directories on your
installation destination directory and set the access to both these directories to world
READ/EXECUTE. You will have to alter the file protection on these directories and grant
WRITE access to the persona.
If you have redirected these logical names to another directory you must ensure that the
persona has the read/write access to these directories.
See File and Directory access Requirements for more details.
8.4 Default Transaction
The type of transaction the Oracle JDBC for Rdb drivers start up when a transaction is
required depends on a number of conditions
•
•
•
•
Whether autoCommit is enabled
The verb of the SQL statement to be executed
The default transaction type specified on connection using the connection switch
transaction
The setting of the transaction types in the connection if changed by methods such as
Connection.setReadOnly() and Connection.setTransactionIsolation().
If no specific behaviour has been specified, by default the Oracle JDBC for Rdb drivers will
start in AUTOCOMMIT mode and will start up a READ_WRITE SERIALIZABLE
transaction if the SQL statement requires a read-write transaction, for example, INSERT or
UPDATE. If the statement does not require a read-write transaction, a READ_ONLY
transaction is started.
When AUTOCOMMIT is disabled, the type of transaction started will depend on whether the
connection has been set read-only and is a default transaction type has been specified on the
connection. By default, a READ_WRITE SERIALIZABLE transaction will be started if
autoCommit is turned off and no other method has been called to change the default
transaction type.
If the setting of the transaction type in the connection is MANUAL this default behaviour
changes. Setting transactions to MANUAL indicates that the client will take responsibility
for the starting of transactions. The drivers will no longer start transactions, however, if
autoCommit is enabled, the driver will still commit transactions appropriately.
When transactions are set to MANUAL, and the first operation after a connection or after a
transaction termination is not SET TRANSACTION, Oracle Rdb will start a transaction on
111
behalf of the client. Please see the Oracle Rdb documentation for information on the default
transaction mechanism provided by SQL.
8.5 Executor Sub-process used with the Rdb Native driver
To improve multi-threaded concurrent access to the database while using the Rdb Native
driver, you may specify that separate sub-process executors should be started for each
connection request.
By default all database operations within a standard Rdb Native driver instance are carried
out synchronously, within a single OpenVMS process. This synchronization is required as
Rdb will only let one thread carry out a database operation at a time. This may limit the
general concurrency that may be seen if you are using the Rdb Native driver within a multithreaded environment.
To improve concurrency in a multi-threaded environment you can request the Rdb Native
driver to start-up a separate executor for the database connection.
To start a separate executor for the connection you need to specify the multiprocess switch
on connection URL you use for your database connection.
Connection conn = DriverManager.getConnection(
"jdbc:rdbNative:my_db_dir:pers@multiprocess=true",
user, pass);
Note that this switch is only available when you use the Rdb Native driver.
As a separate sub-process is created for each connection made, output written by the executor
process to SYS$OUTPUT and SYS$ERROR will be redirected to log files specific to that
sub-process. You should ensure that your process has write access to the log directory
RDB$JDBC_LOGS.
8.5.1 Setting Maximum Handshake Tries and Wait Duration
When the main process starts an executor process a handshake protocol is established
between the two processes to allow them to carry out subsequent inter-process
communication.
The main process will attempt 100 times in quick succession to establish the handshake, and
then, by default, will try 500 more times with a delay of 10 ms between each try.
112
On some systems where the workload is heavy and particularly on single-cpu systems it is
possible that after the sub-process is created the main process may attempt to establish the
communication unsuccessfully. Depending on process and thread scheduling it is possible
that the maximum number of attempts to establish handshake may occur before the subprocess is scheduled for execution.
On these systems you may wish to increase the number of attempts at handshake or the
duration to wait between handshake attempts to prevent the premature aborting of the driverexecutor connection. You may use the handshakeTries and handshakeWait options on the
connection string to change these values.
See Connection Options for more details.
Contents
8.6 FetchSize
The SetFetchSize methods in Statement and ResultSet allow you to set the record fetch size
for server record retrieval. The FetchSize gives a hint to the server as to how many records to
batch up and send over the network at one time.
Network I/O is very expensive, so the more data you can send in a single I/O the better the
performance. If you do not explicitly change the default FetchSize by using the FetchSize
option, the default is 100.
8.7 Ignoring Statement.cancel() Method Calls
Currently the method Statement.cancel() is not supported in the Oracle JDBC for Rdb
drivers. If an application calls this method the driver will raise the following Exception:
oracle.rdb.jdbc.common.RdbException: Unsupported feature
<Statement.cancel>
In applications and application servers that expect this feature to be present, the raising of
this exception may cause problems with the application functionality or may lead to
excessive messages being written to the application log file.
If your application does not depend on the statement cancellation to actually take effect, and
that failure to cancel can be safely ignored, you may specify the ignoreStatementCancel
switch of the connection URL:
Connection conn = DriverManager.getConnection(
113
"jdbc:rdbNative:my_db_dir:pers@ignoreStatementCancel=true",
user, pass);
8.8 Inactivity timeouts
The amount of time either a client connection or a server may remain inactive before being
forcibly terminated may be set using server and connection switches.
8.8.1 Client connection timeout
The –cli.idleTimeout switch may be used to specify the amount of time in milliseconds that
a connection may remain inactive before being closed down. The default value of 0 specifies
that the time is indefinite, i.e. the connection will not timeout.
You may specify the client idle timeout as a server configuration option either in the server
definition within an XML-formatted configuration file or as a command-line switch when
starting a server.
Example
For example:
$ java -jar rdbthinsrv.jar –port 1701 –cli.idleTimeout 3600000
specifies that any client connection may remain idle for 1 hour before being terminated
or in the Xml-formatted configuration file :
<server
name="srv2forRdb"
type="RdbThinSrv"
url="//localhost:1708/"
cli.idleTimeout="3600000"
/>
When a client is forcibly terminated by this timeout the following message will be logged in
the server log:
oracle.rdb.jdbc.common.RdbException: Client terminated
due to inactivity
When specified as a server switch, the timeout will apply to all clients connected using that
server.
You may also specify the client timeout as a qualifier on the connection string on the clientside application.
114
Connection conn = DriverManager.getConnection(
"jdbc:rdbthin://bravo:1701/my_db_dir:[email protected]=36000
00",user, pass);
When specified this way the timeout will only apply to this one connection.
If a non-zero cli.idleTimeout is specified in both the server configuration and as a connection
qualifier, the lesser of the two values will be used for that connection.
Inactivity is determined by the lack of activity on the socket the server is listening to the
client on, if no request is sent from the client for the specified amount of time, a timeout is
deemed to have occurred.
If a client inactivity timeout occurs on a connection that is using a Multi-Process server
executor, that executor will be terminated. Even though the connection will be correctly
closed down after the timeout event, as it is unknown why there was no activity seen on the
connection, the executor sub-process is deemed "unsafe" and consequently is terminated.
8.8.2 Server Inactivity Timeout
You can specify the amount of time that a server may remain idle before being closed down
due to inactivity.
The –srv.idleTimeout switch may be used to specify the amount of time in milliseconds that
a server may remain inactive before being closed down. The default value of 0 specifies that
the time is indefinite, i.e. the server will not timeout.
You may specify the server idle timeout as a server configuration option either in the server
definition within an XML-formatted configuration file or as a command-line switch when
starting a server.
Example
For example:
$ java -jar rdbthinsrv.jar –port 1701 –srv.idleTimeout 3600000
specifies that the server may remain idle for 1 hour before being terminated
Or in the Xml-formatted configuration file :
<server
name="srv2forRdb"
type="RdbThinSrv"
url="//localhost:1708/"
srv.idleTimeout="3600000"
/>
115
When server is terminated by this timeout the following message will be logged in the server
log:
Server terminated due to inactivity
2006-02-08 12:28:03.578 : Forced disconnect by Server terminated due
to inactivity @ LOCAL
A server inactivity timeout will occur if, for the length of time specified, no new client
connection is made to that server. In other words the timeout period is started after each new
connection. If the timeout expires and there are current connections still using the server, the
timeout period will be reset to start again.
Thus the timeout value is the minimum time that the server will accept between new
connection requests before closing down, but due to current server activity this may be
extended until there are no more connections current.
Contents
8.9 JDBC Hint Methods
Several methods in the JDBC classes are considered to provide hints to the drivers or
underlying database system and do not have to be strictly observed. Many existing drivers
silently ignore these methods.
To allow compatibility with other drivers, you may specify that optional hint methods be
ignored by using the usehints connection switch:
@usehints=false
This setting tells the Oracle JDBC for Rdb drivers to ignore hint methods.
By default the Oracle JDBC for Rdb drivers will observe hint methods.
The following methods are perceived as non-mandatory hints:
•
•
•
•
•
Connection.setReadOnly()
ResultSet.setFetchDirection()
ResultSet.setFetchSize()
Statement.setFetchDirection()
Statement.setFetchSize()
8.10 Lockwait and Maxtries
116
The standard thin server is a multi-threaded server that allows concurrent access to Oracle
Rdb by many client processes. Within a single OpenVMS process, Oracle Rdb is singlethreaded, thus the thin server has to synchronize client database activity.
Because database actions must be serialized, any action that might take a prolonged length of
time may seriously impact the overall throughput of the server.
By default the server will wait indefinitely for a lock, however, in order to try to minimize
the impact of one client thread on another you may specify the period of time the server
should wait for a lock.
If this wait is not indefinite, any thread will wait for the specified amount of time trying to
get a lock. If the lock is not granted control is returned to the server. By default, the server
will then try to get a lock ten (10) times, waiting for the specified amount of time each time,
before raising a locking exception.
Specifying a short wait duration, for example one (1) second, may help reduce the impact
that one thread may have on another sibling thread.
The lockwait switch allows control of the duration of the wait for a lock, the minimum actual
wait period being one (1) second, which is the minimum lock wait time supported by Rdb
transactions.
A lockwait of 0 is the same as starting up a transaction with NOWAIT. A lockwait of minus
one (-1) is the same as starting up a transaction with WAIT without specifying a value, which
causes the server to wait indefinitely,
The maxtries switch allows you to specify the maximum number of times the server will try
to get a lock before giving up. The default maxtries value is 10.
The higher the value you assign to the lockwait switch, the more likely that a locked object
may slow down all clients, so it is preferable to keep the lockwait at a minimum but increase
the number of lock attempts appropriately.
8.10.1 Lockwait precedence
As well as being able to specify the lockwait either at the server level or at the connection
level as shown above, Oracle Rdb allows you to specify a maximum lock wait for the
process by using the RDM$BIND_LOCK_TIMEOUT_INTERVAL logical name. In
addition a database-wide lock timeout value may be established using the LOCK TIMEOUT
INTERVAL clause of the SQL CREATE DATABASE and SQL ALTER DATABASE
statements.
The following describes the order of precedence observed when lockwait has been specified
in more than one way.
117
1. A connection lockwait value as specified explicitly on the connection string will take
precedence over the server lockwait value but only for that one connection.
2. An explicit LOCKWAIT set on either the server or connection will take precedence
over the value set by the RDM$BIND_LOCK_TIMEOUT_INTERVAL logical
name.
3. The database-wide lock timeout interval if specified will place an upper limit on the
interval specified by the RDM$BIND_LOCK_TIMEOUT_INTERVAL logical name
or the LOCKWAIT on both the server and connection.
Example 1
RDM$BIND_LOCK_TIMEOUT_INTERVAL = 10
server LOCKWAIT = 20
connection LOCKWAIT = 30
LOCK TIMEOUT INTERVAL not specified
Results in a lockwait of 30.
Example 2
RDM$BIND_LOCK_TIMEOUT_INTERVAL = 10
server LOCKWAIT = 20
connection LOCKWAIT = 30
LOCK TIMEOUT INTERVAL = 25
Results in a lockwait of 25.
Example 3
RDM$BIND_LOCK_TIMEOUT_INTERVAL = 10
server LOCKWAIT = 20
connection LOCKWAIT = 30
LOCK TIMEOUT INTERVAL = 35
Results in a lockwait of 30.
Example 4
RDM$BIND_LOCK_TIMEOUT_INTERVAL = 10
server LOCKWAIT = 20
connection LOCKWAIT not specified
LOCK TIMEOUT INTERVAL not specified
Results in a lockwait of 20.
Example 5
RDM$BIND_LOCK_TIMEOUT_INTERVAL = 10
server LOCKWAIT not specified
connection LOCKWAIT not specified
LOCK TIMEOUT INTERVAL = 25
118
Results in a lockwait of 10.
See your Oracle Rdb Documentation for more information on the use of the
RDM$BIND_LOCK_TIMEOUT_INTERVAL logical name and the LOCK TIMEOUT
INTERVAL clause.
8.11 Logging
Oracle JDBC for Rdb drivers and servers can now use the Java Logging utilities to log error
messages and trace information.
By default Java Logging is turned off.
See your Java JDK 1.4.1 for information on the Java Logger.
8.12 Name
Each server may be given its own name that may be used to identify a server within the
controller and to look up configuration information. The name of a server may be used to
identify configuration setting within an XML-formatted configuration file on server start up.
Example 1
For example given the following entry in MY_CFG.XML file:
<servers>
<server
name="myMPServer"
type="RdbThinSrvMP"
url="//localhost:1788/"
/>
</servers>
and the following command line statement:
$ java -jar rdbthinsrv.jar -cfg MY_CFG.XML -name myMPServer
A multi-process server with the name myMPServer will be started up on localhost listening to
port 1788.
Names of servers within an XML-formatted configuration file must be unique as it is by
name alone that server characteristics are searched for within the configuration file. Note that
on OpenVMS character case is not significant in name matching.
119
The following two special server names may be used, DEFAULT and DEFAULTSSL,
within the XML-formatted configuration file.
The server characteristics defined in the DEFAULT server will be used to provide the base
configuration information for all servers, but any of these characteristics can be over-ridden
either by command line switches or by characteristics defined within the specified named
server in the configuration file.
Example 2
For example given the following server entry in MY_CFG.XML file:
<servers>
<server
name = DEFAULT
type = "RdbThinSrv"
url = "//localhost:1755/"
maxClients="-1"
/>
<server
name="myServer"
maxClients="10"
/>
</servers>
and the following command line statement:
$ java -jar rdbthinsrv.jar -cfg MY_CFG.XML -name "myServer"
A thin server with the name myServer will be started up on localhost listening to port 1755
with maxClients =10.
The server characteristics within the DEFAULTSSL server will be used to provide base SSL
information for RdbThinSrvSSL type servers.
Example 3
If an XML-formatted configuration file is used, a server is not found that matches the name
provided on the command line, and a DEFAULT server definition is provided, then the
DEFAULT server characteristics will be used for that server.
For example given the following server entry in MY_CFG.XML file:
<servers
<server
name = "DEFAULT"
type = "RdbThinSrv"
url = "//localhost:1799/"
maxClients=-1
/>
</servers>
120
and the following command line statement:
$ java -jar rdbthinsrv.jar -cfg MY_CFG.XML -name "myServer"
A thin server with the name myServer will be started up on localhost listening to port 1799
with unlimited maxClients.
Contents
8.13 Named Databases
The XML-formatted configuration file allows the specification of known named databases,
allowing the Oracle JDBC for Rdb servers the ability to recognize alternate names for
databases served on the node the server is running on.
Similar to logical names and JNDI name spaces, the use of alternate names allows the
separation of the name the client uses for the database and the actual file specification of the
database.
Before requesting Oracle Rdb connect to a database, the thin server will check its list of
known databases for a match against the file specification portion on the given Connection
URL. If one matches, then the file specification portion of the URL property of the named
database will be used to provide the connection database specification.
Example
For example, given the following named database:
<database
name="mf_pers"
url="//localhost:1701/disk1:[databases]mf_personnel"
driver="oracle.rdb.jdbc.rdbThin.Driver"
URLPrefix="jdbc:rdbThin:"
/>
And the following connection statement:
Connection conn = DriverManager.getConnection(
"jdbc:rdbThin://bravo:1701/mf_pers",user, pass);
The client will be connected to the Oracle Rdb database
disk1:[databases]mf_personnel.rdb .
During the translation of the named database, the node and port part of the URL within the
named database definition is discarded.
Named database may also be used to restrict database access within the server. See
Restricting Database Access for more information on this feature.
121
8.14 On Start Commands
There are two startup command attributes that may be specified in the XML-formatted
configuration file server section: srv.onStartCmd and srv.onExecStartCmd.
These options allow the specification of DCL command that should be executed just prior to
the start up of a server or executor.
Note:
The srv.onStartCmd and the srv.onExecStartCmd point to a command that will be execute on
start up of the server or executor. If the command is to invoke a DCL command procedure
you must also include the DCL invocation symbol @ in the command line.
8.14.1 srv.onStartCmd
This option specifies a DCL command to be executed prior to the invocation of the specified
thin server. It must be a valid OpenVMS DCL command and must be valid within the
context of the server process created by the controller or pool server.
If multiple DCL commands are required then they should be placed within a DCL command
procedure, which in turn should be made available to the environment under which the
controller or pool server runs. Oracle recommends that these command procedures be placed
within the rdb$jdbc_com directory and the file protection set to allow the controller or pool
server execute access.
Example 1
For example, if your system requires a specific setup to be run to set your Java environment
and Oracle Rdb environment, you may create a command procedure similar to the following
example.
Create rdb$jdbc_com:our_setup.com containing
$@sys$share:rdb$setver 71
$@sys$common:[java$141.com]JAVA$141_SETUP.COM
and provide a pointer to this command procedure in the srv.onStartCmd option
<server
name="srv2forRdb"
type="RdbThinSrv"
url="//localhost:1708/"
122
/>
srv.onStartCmd="@rdb$jdbc_com:our_setup.com"
Care should be taken when providing commands for the server process to execute using this
property. These commands will be executed prior to the invocation of the Java statement that
starts the actual server instance. As detached OpenVMS processes will be used to run the
server you must ensure that all the necessary symbols and logical names are available for the
server's use within the detached process.
In particular if you redefine the standard RDB$JDBC_* logical names within your set-up to
use a private version of Oracle JDBC for Rdb, you must ensure that appropriate
JAR file and images are available and executable within the detached process server
environment.
Example 2
For example, care should be taken in how the logical names are specified. The following
redefinition may appear to point the logical name to the current default directory:
$define rdb$jdbc_home []
However this logical name will be translated during the creation of the temporary command
procedure that will be used to start the server, which in this case as only the directory has
been specified, the disk or device will default to the current device of the login directory of
the detached process, which might not be the same device as you expected. This may
prevent the server process form correctly starting.
If you need to redefine a logical name to the current default directory you can use the
f$environment DCL lexical function:
$define rdb$jdbc_home 'f$environment("DEFAULT")
This will set both the default device and directory.
If problems are found with starting a server process you can look for new log files in the
RDB$JDBC_LOGS directory which may provide some information on any errors found.
Caution:
Do not use the SET VERIFY command within these command procedures. As the method
Runtime.exec() may be used by the servers to create processes, the use of the SET VERIFY
command within the command procedure may hang the server. This is a documented
limitation of using Runtime.exec() on Open VMS Java. The logical name
JAVA$EXEC_TRACE is available to help debug Runtime.exec() calls on OpenVMS. Refer
to the OpenVMS Java documentation for more details.
Note:
The srv.onStartCmd command is only used by the controller or pool server to start a server.
If the server is started by any other means, neither the server startup command procedure nor
any commands in the srv.onStartCmd server attribute will be executed.
123
8.14.2 srv.onExecStartCmd
This option specifies a DCL command to be executed prior to the invocation of an executor
by a multi-process server. It must be a valid OpenVMS DCL command and must be valid
within the context of the multi-process server process.
If multiple DCL commands are required, then they should be placed within a DCL command
procedure, which in turn should be made available to the environment under which the server
runs. It is recommended that these command procedures should be place within the
rdb$jdbc_com directory and the file protection set so that the server can access them.
Example
For example, if your system requires a specific setup to be run to set your Oracle Rdb
environment, you may create a command procedure similar to the following example.
Create rdb$jdbc_com:our_exec_setup.com containing
$@sys$share:rdb$setver 7.1
and provide a pointer to this command procedure in the srv.onExecStartCmd option
<server
name="MPsrv2forRdb"
type="RdbThinSrvMP"
url="//localhost:1788/"
srv.onExecStartCmd="@rdb$jdbc_com:our_exec_setup.com"
/>
Caution:
Do not use the SET VERIFY command within these command procedures. As the method
Runtime.exec() may be used by the servers to create processes, the use of the SET VERIFY
command within the command procedure may hang the server. This is a documented
limitation of using Runtime.exec() on Open VMS Java. The logical name
JAVA$EXEC_TRACE is available to help debug Runtime.exec() calls on OpenVMS. Refer
to the OpenVMS Java documentation for more details.
Contents
8.15 Password Obfuscation in Server Configuration Files
To prevent an unauthorized user from controlling server operations such as closing down a
running server, a control password should be assigned to each server on startup.
This password must be used whenever server control operations are carried out using the
Oracle JDBC for Rdb Controller interface.
124
To ensure better security of these passwords, the server configuration file may contain the
server control password in an obfuscated form.
Example 1
For example, in an XML-formatted server configuration file:
<server
name="RdbThinSrv1707"
type="RdbThinSrvMP"
url="//localhost:1707/"
srv.execStartup="mystartup"
controlUser="jdbc_user"
controlPass="0x811B15F866179583EB3C96751585B843"
/>
You can obtain an obfuscated password by using the Digest statement in the Rdb Thin Server
Controller.
Example 2
rdbthincontrol> digest thisismypassword
digest : 0x31435008693CE6976F45DEDC5532E2C1
The value can then be used in the configuration file where you would have normally
provided a plain text control password.
This value must be copied exactly as returned by the digest statement.
The plain text password conversion to its obfuscated form is case-sensitive, so the same word
or phrase but with different character casing will produce a different digested form.
Passwords are case sensitive so you must ensure that the value of the password used in plain
text and in it digested form match exactly character by character including case.
This is particularly important if a password is used on the DCL command line. If double
quotation characters are not used to surround the plain text password DCL may, depending
on your environment, force the value to all lower case or all uppercase which may differ
from the original.
Example 3
For example when -digest is used in command mode make sure the value is enclosed in
double quotations:
$ java -jar rdbthincontrol.jar -digest "MySecretPassword"
digest : 0x7315A012ECAD1059A3634F8BE1347846
$ java -jar rdbthincontrol.jar -digest MySecretPassword
digest : 0x4CAB2A2DB6A3C31B01D804DEF28276E6
Note:
125
Obfuscated passwords are only valid when used in conjunction with a server definition in a
configuration file or as a server start up command line configuration option. To connect to
the server as a control user to carry out operations on it using the controller, the control
password you use in the connect request must still be in plain text. You cannot use the
obfuscated value as a password on connection.
Contents
8.16 Restricting Server and Database Access
In addition to the standard Rdb authorization checking that is carried out during the
connection to a database using a thin server, the databases accessed and the usernames
allowed may be restricted at the server level.
The following sub-sections detail how access to a thin server and its served databases may be
intentionally restricted.
8.16.1 Restricting Database Access
You may restrict connections made via a server to only those databases specified as allowed
databases.
This may be done by setting the restrictAccess property for the server in the configuration
file and then providing a list of databases that may be accessed using allowDatabase
subsections.
Example
<server
name="srv2restrict"
type="RdbThinSrv"
url="//localhost:1701/"
restrictAccess="true">
<allowDatabase name="mf_pers"/>
<allowDatabase name="disk1:[databases]customers"/>
</server>
The name value of an allowDatabase subsection may be either the name of a database
already declared within the same configuration file, or the database file specification portion
of a connection URL
If a client is using a server with restricted access, then the file specification portion of the
JDBC Connection URL used must match one of the names within the allowed database
subsections. No file expansions or logical name translations are done on the Connection URL
before the server checks these names against the allowed databases, so it is important that,
apart from the variations in case, the names be exactly as specified in the allowed database
subsections.
If the server restrictAccess property is true and there is at least one allowDatabase
subsection specified then the server will allow access to only those databases specified.
126
If the server restrictAccess property is false or not specified or if no allowDatabase
subsection is specified for the server then no database restrictions will be applied.
Example 1
For example given the above server description of a server running on the node bravo :
Connection conn = DriverManager.getConnection(
"jdbc:rdbThin://bravo:1701/mf_pers",user, pass);
will be allowed.
Example 2
Connection conn = DriverManager.getConnection(
"jdbc:rdbThin://bravo:1701/MF_Pers",user, pass);
will be allowed because character case in the database specification is not significant.
Example 3
Connection conn = DriverManager.getConnection(
"jdbc:rdbThin://bravo:1701/disk1:[databases]customers",user, pass);
will be allowed.
Example 4
Connection conn = DriverManager.getConnection(
"jdbc:rdbThin://bravo:1701/disk1:[databases]customers.rdb",user,
pass);
will NOT be allowed due to the extra ".rdb".
Example 5
Connection conn = DriverManager.getConnection(
"jdbc:rdbThin://bravo:1701/cust ",user, pass);
will NOT be allowed even though cust may be a logical name that translates to
disk1:[databases]customers
8.16.2 Restricting User Access
When using a thin server, Rdb authorization checking is carried out during the connection to
the database. Rdb will check the username and password provided to determine the
authorization access for the given user.
In addition you may further restrict which users may use the server by setting the
restrictAccess property for the server in the configuration file and then providing a list of
usernames that will be allowed using allowUser subsections.
127
Example
<server
name="srv2restrict"
type="RdbThinSrv"
url="//localhost:1701/"
restrictAccess="true">
<allowUser name="jdbc_user"/>
<allowUser name="smith"/>
<allowUser name="jones"/>
</server>
The name value of an allowUser subsection must be a valid Rdb username.
If a client intends to use a server with restricted user access, then the username used for the
connection must match one of the names within the allowed user subsections. The username
match is not case-sensitive.
If the server restrictAccess property is true and there is at least one allowUser subsection
specified then the server will restrict access to only those users specified.
If the server restrictAccess property is false or not specified or if no allowUser
subsection is specified for the server then no user restrictions will be applied to the server.
8.16.3 Further server access protection
In addition to restricting the databases accessed and the users allowed to use the server, a
server may also be protected using a server password.
This may be done by setting the srv.password property for the server in the configuration
file. This password may be either a plain text password or an obfuscated password value.
Oracle recommends the use of obfuscated passwords in the configuration files. You may use
the DIGEST function within the Controller application to generate an obfuscated password.
See Password Obfuscation in Server Configuration Files for more details.
To make a successful connection to a database using a password-protected server the client
connection properties must also provide the plain text value of the password on the client
connection request.
Example
<server
name="srv2restrict"
type="RdbThinSrv"
url="//localhost:1701/"
srv.password="0x811B15F866179583EB3C96751585B843"
/>
128
In this example, an obfuscated password is used which matches the plain text password
"jdbc_user"
To connect to a database using this server the client must provide a @srv.password value on
the connection request and the password must be a plain text password that matched the one
specified for the server.
Connection conn = DriverManager.getConnection(
"jdbc:rdbThin://bravo:1755/my_db_dir:[email protected]=jdbc_user",
user, pass);
8.17 Scope of CONNECTION.setReadOnly()
By default, the scope of the CONNECTION.setReadOnly() method is session, that is, if the
method CONNECTION.setReadOnly(true) is called, the default transactions for the rest of
the connected session will be READ_ONLY unless changed by another call to
CONNECTION.setReadOnly().
However, the standard Oracle JDBC Drivers have a different scope for
CONNECTION.setReadOnly(). If the method CONNECTION.setReadOnly(true) is called,
only the next transaction will be READ ONLY; once that transaction has ended, the default
transaction will resort back to READ WRITE.
To provide consistent semantics with the standard Oracle JDBC Drivers, a value of
ORACLE may be specified within the TRANSACTION connection switch.
Format
@transaction=oracle
The default transaction will be READ_WRITE when this switch is used, but this transaction
type may be changed by issuing the CONNECTION.setReadOnly(true) method call. This
will set only the next transaction to READ_ONLY.
8.18 Server Command Procedures
OpenVMS DCL command procedures are used in the creation of processes in which a thin
server is started using the controller and when a multi-process server starts up an executor
process.
These command procedures may be tailored for your system environment so that operation
such as software version setup and re-direction of output may be customized.
There are two command procedures used for startup, the server startup command procedure:
129
rdb$jdbc_home:rdbjdbc_startsrv.com
and the executor startup command procedure:
rdb$jdbc_home:rdbjdbc_startexec.com
Caution:
Do not use the SET VERIFY command within these command procedures. As the method
Runtime.exec() may be used by the servers to create processes, the use of the SET VERIFY
command within the command procedure may hang the server. This is a documented
limitation of using Runtime.exec() on Open VMS Java. The logical name
JAVA$EXEC_TRACE is available to help debug Runtime.exec() calls on OpenVMS. Refer
to the OpenVMS Java documentation for more details.
Note:
If the only changes required are environmental setup, Oracle recommends that instead of
altering the start-up command procedures, the server attribute srv.onStartCmd or
srv.onExecStartCmd should be considered. See On Start Commands for more details.
8.18.1 Server Startup Command Procedure
The controller uses the server startup command procedure to start a thin server.
The srv.startup option within the server section of an XML-formatted configuration file
may be used to specify the file specification of the command procedure that should be used
to start that server.
Example
For example:
<server
name="srv2forRdb"
type="RdbThinSrv"
url="//localhost:1708/"
autoStart="true"
logfile=rdb$jdbc_logs:srv2forRdb.log"
srv.startup="rdb$jdbc_com:our_customized_startsrv.com"
/>
During the driver kit installation the command procedure rdbjdbc_startsrv.com is placed
in the rdb$jdbc_home directory. This file will be used by default for server start up using the
controller and pool servers.
The DEFAULT server provided in the default configuration file rdbjdbccfg.xml specifies this
command procedure.
130
srv.startup=rdb$jdbc_home:rdbjdbc_startsrv.com
You can choose to change this default command procedure to customize for your system
settings, or you can create a new customized procedure and change the configuration file so
that servers use this new file. However Oracle recommends that you use the srv.onStartCmd
server attribute instead. See srv.onStartCmd for more information on using the
srv.onStartCmd attribute.
Caution:
Do not use the SET VERIFY command within these command procedures. As the method
Runtime.exec() may be used by the servers to create processes, the use of the SET VERIFY
command within the command procedure may hang the server. This is a documented
limitation of using Runtime.exec() on Open VMS Java. The logical name
JAVA$EXEC_TRACE is available to help debug Runtime.exec() calls on OpenVMS. Refer
to the OpenVMS Java documentation for more details.
Note:
The server startup command procedure is only used by the controller or pool server to start a
thin server, if the server is started by any other means neither the server startup command
procedure nor any commands in the srv.onStartCmd server attribute will be executed.
8.18.2 Executor Startup Command Procedure
The thin multi-process server uses the executor startup command procedure to start an
executor process for a client connection.
You can use the srv.execStartup option to specify the file specification of the command
procedure that should be used to start executors by a multi-process server.
Example
For example:
<server
name=MPsrv2forRdb
type=RdbThinSrvMP
url=//localhost:1788/
srv.execStartup=rdb$jdbc_com:our_customized_startexec.com
/>
You can choose to change this default command procedure to customize for your system
settings, or you can create a new customized procedure and change the configuration file so
that servers use this new file. However Oracle recommends that you use the
srv.onExecStartCmd server attribute instead. See srv.onExecStartCmd for more information
on using the srv.onExecStartCmd attribute.
131
Caution:
Do not use the SET VERIFY command within these command procedures. As the method
Runtime.exec() may be used by the servers to create processes, the use of the SET VERIFY
command within the command procedure may hang the server. This is a documented
limitation of using Runtime.exec() on Open VMS Java. The logical name
JAVA$EXEC_TRACE is available to help debug Runtime.exec() calls on OpenVMS. Refer
to the OpenVMS Java documentation for more details.
The srv.execStartup and srv.onExecStartCmd options are only valid within the XMLFormatted configuration file server section for a multi-process server.
Contents
8.19 Server/Client Protocol Checking
To ensure that the protocol between the Oracle JDBC for Rdb thin driver and servers
correctly align, the Oracle JDBC for Rdb servers check versioning information transmitted
by the client. This allows the quick trapping of problems that may occur because of a
mismatch between the server instance and the thin driver.
Example
The following is an example of the type of error message that will be seen if the client and
server mismatch:
oracle.rdb.jdbc.common.RdbException: Io exception :
Io exception : Server Protocol error : received 1 : expected 2
@rdb.Client.FetchBlobSeg
To prevent these protocol errors, all the Oracle JDBC for Rdb driver JAR files should be
replaced at the same time whenever a new kit is installed.
To check that the server/clients instances match enable @tracelevel=-1 on the connection
URL for your client application. See Trace for more details.
Near the start of the log there will be messages indicating the instance values for both the
client and the server. If these two numbers do not match then protocol errors are likely.
An example of the log messages showing Instance information:
>> main [email protected] msg : Rdb nativeInstance=20030508
>> main [email protected] msg : Rdb serverInstance=20030508
Contents
8.20 Using OpenVMS FailSAFE IP.
132
OpenVMS FailSAFE IP may be using in conjunction with Oracle JDBC for Rdb thin driver
and servers. During failover, FailSAFE IP will redirect the existing Oracle JDBC for Rdb
client/server IP connections to the standby service.
If the failover service exists on the same node as the failed service the connections should
continue to be viable transparently.
If however, the failover service is on another node, then as Rdb connections cannot be
transferred between processes, the failover will not be transparent. The thin driver should
receive a socket exception on the failed TCP/IP port as the original service is no longer
available.
Note that server socket exceptions will only be raised on a connection if there is a network
read or write outstanding. If the driver is currently idle and not carrying out a read or write
on the socket to the server, no exception will be raised. Subsequent operations on that
connection by the driver will however raise the socket exception.
The socket exception will be passed through to the application wrapped in an SQLException.
It is then up to the application catch the exception and to cleanup its environment and if
applicable establish a new Connection to the driver
Depending on where the client is running it is possible that the client operating system may
not raise a SocketException even if a read or write is pending. On these systems it is
possible for the client connection to be held in limbo waiting for a read or write to complete.
To help reduce the impact of possible hangs due to the failure of the socket subsystem to
raise the correct socket exception, a timeout may be placed on network read/writes. If the
read/write does not complete within the designated time an exception will be raised.
Care should be taken in setting this timeout value as longer-duration database operations
such as statement compilation may delay the server sending back its results.
The client-side will have a socket read waiting on the return of the results, which could
timeout if this duration is set too short in relation to the performance of your system and
database software. Oracle recommends that if used, this timeout value should be set to a large
value (in the order of several minutes) if you suspect that query operations on the server side
may take some time.
See networkTimeout in Connection Options for more details on network read and write
timeout.
Contents
8.21 SET Statements
In addition to the standard SQL SET statements allowable in dynamic SQL, the Oracle JDBC
for Rdb drivers will recognize driver specific SET statements as specified below.
133
Format
SET TRACELEVEL
<trace_level>
Sets the trace level, see Trace for more
information.
SET SQLCACHE
<sqlcache_size>
Sets the SQL Statement cache size to the specified
value. A value of 0 disables SQL statement
caching.
The SET statements can be issued as a SQL statement in the following methods:
•
•
•
java.sql.Statement.execute
java.sql.Statement.executeUpdate
java.sql.Statement.executeQuery
Example
Statement stmt = conn.createStatement();
stmt.execute(set sqlcache 10);
8.22 SQL Statement Cache
When using the thin driver, performance may be improved by enabling SQL statement
caching.
Whenever the thin driver need to prepare a SQL statement, the statement must be sent over
the network to the server for Oracle Rdb to prepare the statement and send back a list of
columns or parameters that the statement references.
If the same SQL statement is prepared repeatedly during a single connection, without SQL
statement caching the statement will be prepared and column information sent back each
time. This can be time consuming because it requires network traffic, the preparation of the
statement, and getting the column and parameter information. These steps can be a
substantial part of the network I/O and performance cost of the queries.
To help reduce this cost, the thin driver allows you to cache SQL statements so that if the
exact same SQL string is prepared more than once during a single connected session, the cost
for the preparation and column information is only incurred once.
SQL statement caching can be enabled by using the sqlcache switch when you request a
connection either by placing the switch in the connection URL or using the information block
that is passed in the connect request.
134
Example
•
Set the sqlcache property of the Properties passed to the
DriverManager.getConnection method:
Properties info = new Properties();
info.put("user", user);
info.put("password", pw);
info.put("sqlcache", 100);
conn = DriverManager.getConnection (connStr, info);
•
Append @sqlcache to the database specification part of the connect URL:
Connection conn = DriverManager.getConnection(
jdbc:rdbthin://bravo:1701/my_db_dir:personnel@sqlcache=100,user,
pass);
In addition a SET SQLCACHE statement can be executed.
Stmt.executeUpdate(set sqlcache 100);
The value specified with the sqlcache switch tells the thin driver how many SQL statements
it can hold concurrently in its cache. A value of 0 (the default) specifies that SQL statement
caching be disabled.
Once the SQL statement cache is full for a given connection, the storing of a new statement
will remove the least commonly used statement from the cache.
Because SQL statements may be held in cache even after the user has closed the containing
java.sql.Statement, the query will still be registered as current by Oracle Rdb and may
prevent actions such as DROP TABLE from being done. In addition each concurrent
statement that is held in cache may take up memory on both the server and client side of the
connection.
You can clean out the connection SQL cache by issuing a SET SQLCACHE statement with
value 0 and then issuing another SET SQLCACHE statement to reset the cache to the desired
size.
Currently you cannot specify the removal of a specific SQL statement from cache.
Note:
SQL statement caching is a client-side action and is disabled by default. This feature is only
applicable to the thin driver. Using the SQL Statement cache property or using the set
sqlcache statement will be silently ignored by the native driver.
Contents
135
8.23 Trace
Trace provides tracing of method calls and other debug information within the Oracle JDBC
for Rdb drivers and servers. See Trace Values for valid trace level values.
The trace level value may be a signed decimal or a Java-style hexadecimal literal.
By default, trace output is written to the normal JDBC DriverManager PrintWriter. You can
override the default by using one of the following settings:
•
•
rdb.Debug.setLogStream(PrintStream ps)
rdb.Debug.setLogWriter(PrintWriter pw)
Example
The following example shows how to override the default:
rdb.Debug.setLogStream(new PrintStream(
new FileOutputStream("mylog.log")));
If trace is enabled and the DriverManager PrintWriter is not currently defined a PrintWriter
for System.out is defined for you.
8.23.1 Setting tracelevel
Trace of JDBC operations may be enabled using one of the following methods:
•
•
•
•
•
tracelevel property
tracelevel switch
tracelevel option
Doracle.rdb.jdbc.tracelevel system option
Set tracelevel
Details of these methods can be found in the following sections.
8.23.1.1 Tracelevel Property
Tracing can be enabled by setting the tracelevel property of the Properties passed to the
DriverManager.getConnection method to the appropriate value:
Example
Properties info = new Properties();
info.put("user", user);
info.put("password", pw);
info.put("tracelevel", -1);
conn = DriverManager.getConnection (connStr, info);
136
See Connection Options for more details.
8.23.1.2 Tracelevel Switch
Using the tracelevel switch when starting a server can enable tracing:
Example
$java -jar rdb$jdbc_home:rdbthinsrv.jar -cfg thinsrv.cfg -tracelevel -1
See Starting a Thin Server from the Command Line, Starting a Multi-process Server from the
Command Line and Starting a Pool Server from the Command Line for more details.
8.23.1.3 Tracelevel Option
Placing the tracelevel option in the server definition within an XML-Formatted configuration
file can enable tracing.
Example
<server
</server>
name="mypoolserver"
type="RdbThinSrvPool"
traceLevel="-1"
url="//localhost:1702/" >
<pooledServer name="srv1forRdb"/>
<pooledServer name="srv2forRdb"/>
<pooledServer name="srvMPforRdb"/>
See Server Configuration for more details.
8.23.1.4 Tracelevel System Property
Using the Rdb system property Doracle.rdb.jdbc.tracelevel when invoking your application
or Rdb server can enable tracing
Example
$java Doracle.rdb.jdbc.tracelevel=-1 my_application
See Oracle JDBC for Rdb System Properties for more details.
8.23.1.5 Set Tracelevel statement
Using the SET TRACELEVEL command in the controller can enable tracing.
137
Example
$java -jar rdb$jdbc_home:rdbthincontrol.jar
rdbthincontrol> connect //localhost:1701/ jones mypassword
rdbthincontrol> set tracelevel -1
See Controller Command Line for more details.
8.23.2 Abbreviated form of tracelevel
The abbreviated form for the traceLevel keyword , "tl", may also be used in the same
manner.
8.23.3 Trace Values
The value passed to trace is actually a 32bit flag mask. Each bit set determines what will be
traced, as shown in the following table.
Bit
0
1
2
4
5
6
7
8
9
10
11
14
29
30
(ALL)
Hexadecimal Value Decimal Value Traces
0x00000001
1
standard JDBC methods
0x00000002
2
standard JDBC class
create/finalize
0x00000004
4
SQL statements
0x00000010
16
non-standard JDBC methods
0x00000020
32
non-standard JDBC class
create/finalize
0x00000040
64
garbage collection
0x00000080
128
SQL statement cache information
0x00000100
256
Rdb JNI calls
0x00000200
512
network sends
0x00000400
1024
server actions
0x00000800
2048
Performance information
0x00004000
16384
Dump SQLDA information
0x20000000
536870912
memory information
0x40000000
1073741824
full provides more details on
certain flags
0xFFFFFFFF
-1
trace everything
Contents
138
8.24 File and Directory access Requirements
There are certain file and directory access requirements that must be met to successfully use
Oracle JDBC for Rdb servers, drivers and the controller.
The controller and servers require access to the directories pointed to by the following logical
names
•
•
•
RDB$JDBC_HOME
RDB$JDBC_COM
RDB$JDBC_LOGS
During installation a command procedure will be created for you that you can use to set up
these logical names for your system pointing to the installation directory. It is your decision
whether to add these logical names to your startup command procedure or require some other
mechanism such as a login setup command procedure to set these up for JDBC users.
The logical names may be placed in any of your logical name tables, the normal OpenVMS
logical translation precedence will be followed when any of the JDBC components try to
access files using these logical names. This allows you to have system-wide, group level or
private copies of the JDBC kits each using their own set of directories.
It is important that the appropriate access be granted to users that require to startup servers or
use the JDBC jar files.
During installation the three directories will be created under the installation directory, and
be given the following protection.
(S:RWE, O:RWE, G:RE, W:RE)
This allows the world read/execute access to all the directories and contents. If this does not
comply with your organizational requirements then you should alter these protections
appropriately.
Users of the controller, or those that startup servers manually will also require WRITE access
to both the RDB$JDBC_COM and RDB$JDBC_LOGS directory to successfully startup
servers, as the server process needs to be able to write log and temporary files to these
directories.
If a server is started up using the SQL/Services JDBC dispatcher then the account under
which the dispatcher runs needs WRITE access to these directories.
If you redirect these logical names to other directories you must ensure that the file and
directory protections comply with the above requirements.
139
If persona is used with servers then you must ensure that the persona has the appropriate
access rights as described above.
Contents
140
Chapter 9
JDBC Extensions for Oracle Rdb
The following sections provide information on features that are extensions to the JDBC
standard provided by Oracle JDBC for Rdb.
9.1 Enhanced Blob Handling
The maximum size of a blob segment supported by Oracle Rdb today is 65535. The Oracle
JDBC for Rdb drivers will correctly handle segments up to this maximum size.
There is no limit on the number of segments that can be stored for a single Blob, however, as
the drivers materialize the blob into internal byte arrays. The correct handling of very large
blobs in this version of the Oracle JDBC for Rdb drivers is limited to the free memory that is
available to the Java environment.
To enable limited formatting of data returned from Oracle Rdb segmented strings, a new
public method has been added to oracle.jdbc.rdb.common.Blob that allows the specification
of a separator string value to be inserted between segments when the segmented string is
converted to a JDBC blob object.
Format
public void oracle.jdbc.rdb.common.Blob.setSegSeparator(java.lang.String
separator)
Specify the separator string to use between segmented string segments:
Parameters:
separator - separator string to use
Returns:
Void
Example
The following code segment shows how to add a newline break between segments.
ResultSet rs = s.executeQuery(
"select resume from resumes where employee_id = '00164'");
rs.next();
oracle.jdbc.rdb.common.Blob bl =
(oracle.jdbc.rdb.common.Blob)rs.getBlob(1);
bl.setSegSeparator("\n");
141
byte[] bytes = bl.getBytes(1,9999);
String st1 = new String(bytes);
System.out.println("resume : " + st1 );
The separator can be cleared by passing either a null object or empty String as the parameter
to oracle.jdbc.rdb.common.Blob.setSegSeparator().
9.2 ResultSet.getBytes()
The JDBC standard limits the use of the ResultSet.getBytes() methods for access to
BINARY, VARBINARY and LONGVARBINARY data. The Oracle JDBC for Rdb drivers
relax this limitation and will attempt to return byte arrays for all valid SQL data types using
these methods.
Using getBytes() on:
•
•
•
CHAR and VARCHAR columns will return the raw data as returned by Rdb to the
driver.
Numeric, columns will be returned in their Rdb Native format as a big-endian array
of bytes.
Date, and time will be returned as 64 bit big-endian array of bytes.
Contents
142
Chapter 10
Other Information
10.1 Disallowed Dynamic SQL Statements
Because JDBC has its own connection protocol, the following dynamic SQL statements will
raise an exception if they are executed from a Statement or PreparedStatement
SET CONNECT
CONNECT
DISCONNECT
10.2 Sample Setup, Starting and Using an Oracle JDBC for
Rdb thin server.
This section describes step by step how you can start a simple JDBC server and use it to
access a database on your system
1.
2.
3.
4.
5.
6.
7.
Install Oracle JDBC for Rdb on the database server
Decide on the versions of Rdb and JAVA you wish to use on the server
Setup server-side configuration files and command procedures
Start the Oracle JDBC for Rdb thin server
Install Oracle JDBC for Rdb thin driver on your client machine
Write you application using the JDBC API
Run your applications
You may choose to start-up a server by either:
•
•
•
Invoking the rdbthinsrv JAR directly at the DCL command line. See Starting a
Thin Server from the Command Line
By creating and starting a JDBC Dispatcher in SQL/Services. See Starting a Thin
Server from Oracle SQL/Services
Or by using the Oracle JDBC for Rdb controller. See Starting a Thin Server from
the Oracle JDBC for Rdb controller
In this walk-through we will use the controller to maintain the servers. It is important that
the command procedures used during the start-up of a server from the controller be
143
correctly specified thus details of the appropriate command procedures will be provided
below.
Step 1 Install Oracle JDBC for Rdb
The Oracle JDBC for Rdb Release Notes describe the steps required to install Oracle
JDBC for Rdb. These steps should be followed to install the product on the OpenVMS
node that will be used as server for you Oracle Rdb database.
The server machine requires JAVA to be installed prior to installing the Oracle JDBC for
Rdb kit.
Once you have installed the kit you must set up your system so that it can use the JDBC
kit. Several configuration files may have to be created or altered. Details of these steps
follow.
Step 2 Decide on the versions of Rdb and JAVA
The Oracle JDBC for Rdb Release Notes will tell you the minimum versions of Rdb and
JAVA supported by Oracle JDBC for Rdb. You may however have several versions of
both Rdb and JAVA on your server that meet the minimum requirements. When the thin
servers run they will need to have the environment they are running within set up so that
the correct version of Rdb and JAVA will be used depending on your organization
requirements, and which Oracle Rdb databases you wish the thin servers to access.
If you do have multiple versions of Rdb on your system, it is important that the server
runs within the correct version of Rdb for the databases it will access. The Rdb
environment is set up at the process level and cannot be changed for that server while the
server is actually running. This means that a single running instance of a thin server may
only be able to access databases for a single Rdb version.
If you try to connect to a database that does not match the version of Rdb you have set up
for the thin server execution instance you will get an exception similar to:
SQLException: Failed to connect : in <rdbjdbcsrv:connect failure>
%RDB-F-WRONG_ODS, the on-disk structure of the database file is not
supported by this version
-RDMS-F-ROOTMAJVER, database format 71.0 is not compatible with
software version 72.1:S1000
You may have different version of JAVA on your system as well. In addition you can
choose different JAVA VMs to run under. The VM version and type must be decided for
a single thin server instances as once JAVA has been invoked and the server is running it
cannot be changed for that server instance.
144
Both Rdb and JAVA provide mechanisms by which you can set up your environment for
a specific version or variant. The Rdb version set up and the JAVA VM set up may be
carried out manually by you prior to invoking a thin server from the DCL command line.
Alternatively there are ways of providing the appropriate set up during the thin server
start-up when you choose to start the server using SQL/Services JDBC Dispatcher or by
using the controller. An example of this type of set up can be seen in the steps that
follow.
For the purpose of this walkthrough we will use the following on the server machine:
•
•
Oracle Rdb V7.2
JAVA 1.4.2 FAST VM
Step 3 Setup server-side configuration files and command procedures
Oracle JDBC for Rdb uses various command procedures to carry out server operations
and set up its environment. These command procedures may have to be altered to suit
your organizational and operational needs.
You may be required to:
•
•
•
•
Modify RDBJDBC_STARTUP.COM
Add an invocation RDBJDBC_STARTUP.COM from your system startup
procedure
Create a XML-formatted configuration file for your server definitions
Create a server set up command procedure
In addition Oracle recommends that XML-Formatted configuration files should be used
to maintain server and other information. These configuration file will have to be created
by you. An example of a server configuration file may be found below and in Sample
configuration file MY_SERVERS.XML.
RDBJDBC_STARTUP.COM
During installation a RDBJDBC_STARTUP.COM file will be created which may be
used to set up the required system wide logical names for Oracle JDBC for Rdb to
function correctly. You may choose to use this command procedure with or without
changes to set up the JDBC environment.
If the JDBC servers and drivers are to be used system wide then system logical names
should be used. In this case it may be appropriate to add the
RDBJDBC_STARTUP.COM command procedure to your system startup procedure.
145
If you only require private use then JOB level logical names should be used, in which
case the RDBJDBC_STARTUP.COM may be copied and/or modified to change the
logicals to JOB level. Each user of the Oracle JDBC for Rdb on your server system will
then need to invoke this startup procedure prior to carrying out operations such as
controller actions, starting or stopping or accessing the thin servers.
The RDBJDBC_STARTUP.COM file provides logical names that will be used by the
Oracle JDBC for Rdb components to locate JARS, images and command procedures and
where to write log and temporary files. See the Oracle JDBC for Rdb Release Notes for
more information on this command procedure and the JDBC specific logical names.
The steps that follow assume that the appropriate logical names have been set up and are
available for use by you and Oracle JDBC for Rdb.
Server Configuration File
Server, session and connection options may be added individually on the DCL command
line when you invoke a server or the controller, but it may be more convenient to place
these options in a configuration file and then use this configuration file when you carry
out server operations.
See Configuration Files for more information on what may be contained in the
configurations files and the format of the data within the file. Oracle recommends using
the XML-formatted form of the configuration files as it does allow greater flexibility of
option specification and allows more than one server definition to be defined in a single
configuration file.
During installation a generic configuration file RDBJDBCCFG.XML is copied to the
RDB$JDBC_HOME directory. You may use this file as a basis of your server
configuration file. The configuration file provides information to Oracle JDBC for Rdb
about the various servers you may be running. In addition it provides session information
for users of the controller.
For this walkthrough we have decided to create the definition for a thin server called
MY_SRV listening on port 1888. The generic configuration file was copied and changed
to add this information.
We have also chosen to place configuration and any other site specific files in the
RDB$JDBC_COM directory, mainly as this is a standard Oracle JDBC for Rdb directory
and the logical name should be already set up for us at the system level. The files may be
placed anywhere on your system, as long as the controller and server processes can
access them. Remember that a server process will be started up in much the same way as
a normal login to the system, so it is important that any logical names used in the file
146
specification be available to that process. The easiest way to ensure this is to have
system wide logical names.
In addition a control password, MySecretPassword has been chosen for control
access to the servers.
Although the controlpass can be stored in its plain text form in the configuration file,
Oracle recommends that you use the obfuscated form in the server characteristics section.
But make sure that you are consistent with the casing of the password as passwords are
case-sensitive
The controller may be used to provide this obfuscated password, but make sure that you
keep the casing correct by placing double quotations around the password phrase if you
use the controller in command mode.
Example
$ java -jar rdbthincontrol.jar -digest "MySecretPassword"
digest : 0x7315A012ECAD1059A3634F8BE1347846
See Password Obfuscation in Server Configuration Files for more details.
The new configuration file called MY_CFG.XML :
<?xml version = '1.0'?>
<!-- Configuration file for MY servers -->
<config>
<!-- SESSION -->
<session
name="DEFAULT"
tracelevel="0"
srv.mcBasePort="5517"
srv.mcGroupIP="239.192.1.1"
/>
<!-- SERVERS -->
<servers>
<!-- DEFAULT server characteristics-->
<server
name="DEFAULT"
type="RdbThinSrv"
url="//localhost:1701/"
maxClients="-1"
srv.bindTimeout="1000"
srv.idleTimeout="0"
srv.mcBasePort="5517"
srv.mcGroupIP="239.192.1.1"
tracelevel = "0"
autostart = "false"
autorestart = "false"
restrictAccess = "false"
147
anonymous = "false"
bypass = "false"
tracelocal = "false"
relay = "false"
srv.startup="rdb$jdbc_home:rdbjdbc_startsrv.com"
/>
<!—My new server -->
<server
name="MY_SRV"
controlUser="GROUND_CONTROL"
controlPass="0x7315A012ECAD1059A3634F8BE1347846"
type="RdbThinSrv"
url="//localhost:1888/"
cfg="rdb$jdbc_com:my_cfg.xml"
srv.onStartCmd="@rdb$jdbc_com:my_setup.com"
/>
</servers>
</config>
Note
The server definition for MY_SRV is fairly minimal allowing most of the DEFAULT
characteristics to inherited. Also that the session section is used to ensure that the
broadcast IP the controller will check will be the same as the server uses.
RDB$JDBC_HOME:RDBJDBC_STARTSRV.COM
The default server properties in MY_CFG.XML sets the server configuration file used by
the server by using the srv.startup property:
srv.startup="rdb$jdbc_home:rdbjdbc_startsrv.com"
This file is used by the controller during the start-up of a detached OpenVMS process
that the server will run within. In most situations the default command procedure,
rdb$jdbc_home:rdbjdbc_startsrv.com created during installation, can be used without
change,.
Sever Setup Command Procedure
During server start-up any DCL command specified on srv.onStartCmd for the server,
will be executed prior to the server class being invoked. So this a good place to carry out
system specific and version specific set up procedures.
srv.onStartCmd="@rdb$jdbc_com:my_setup.com"
Note that as this properties is an executable DCL command, the @ character is required
so that the command procedure is correctly invoked.
148
Example
my_setup.com
$@SYS$LIBRARY:RDB$SETVER 72
$@sys$common:[java$142.com]JAVA$142_SETUP.COM FAST
$define/job MY_DB_DIR sys$common:[DBS]
These commands ensure that the environment is correct for the server process to access a
V7.2 Oracle Rdb database using the FAST JAVA VM.
Step 4 Start the Oracle JDBC for Rdb thin server
Now that set up and configuration files are created in place the controller may be used to
start the server. The configuration file containing the server definitions is used as a
parameter to the DCL command line invoking the controller. In the example we use
command mode –startServer to start the server
Example
$ JAVA -JAR RDBTHINCONTROL.JAR –CFG RDB$JDBC_COM:MY_CFG.XML –
CONTROLPASS "MySecretPassword" –STARTSERVER –NAME MY_SRV
.
RDB$NODE
RDB$PORT
RDB$STATUS
RDB$SERVER_NAME
RDB$SERVER_TYPE
RDB$SERVER_VERSION
RDB$SERVER_SHR_VERSION
RDB$SERVER_PID
RDB$ALLOWS_ANON
RDB$ALLOWS_BYPASS
RDB$NUMBER_OF_CLIENTS
RDB$MAX_CLIENTS
RDB$TRACE_LEVEL
RDB$RESTRICT_ACCESS
:
:
:
:
:
:
:
:
:
:
:
:
:
:
138.1.14.91
1888
Idle
srv1
RdbThinSrv
T7.2-510 20070109 B719
T7.2-510 20061221 B6CL
0x2030DA4D(540072525)
false
false
0
-1
0
false
In the example we provided both the configuration file to use and the control password.
The controlpass could have been set in plain text in the configuration session section, but
Oracle does not recommend placing plain text passwords in plain text files. Note also that
the password is enclosed in double quotation marks to prevent case changing.
Step 5 Install the Oracle JDBC for Rdb thin driver on your client machine.
149
Once the Oracle JDBC for Rdb kit is installed on you OpenVMS server machine you
must copy the thin driver component to the machine on which you will be running your
application. This machine will also need to have JAVA installed.
The client-side components of the thin driver are contained in the RDBTHIN.JAR file.
A file transfer program such as FTP may be used to copy this JAR file to your client
machine. Remember to ensure that a binary mode transfer is done as JARs are binary
files.
You should place the JAR in an appropriate directory on your client machine. This may
depend on how you will ultimately use the JDBC drivers and on the application and
development systems you will be using on your client machine. See your application or
development environment documentation on where JDBC drivers should be placed.
You should ensure that the RDBTHIN.JAR is part of your CLASSPATH so that JAVA
will be able to load it when your application requests it.
Depending on the client system there will be methods by which you can include the
driver JAR as part of the JAVA command when running your application, in which case
the JAR does not have to placed in the CLASSPATH environmental variable.
Example
For example, in MSDOS. JAVA allows the use of –cp switch to specify classpath
elements
dos> java –cp .;rdbThin.jar my_app
Note:
JAR files are binary files so you should ensure that the transfer utility copies the JAR file
in binary mode.
Step 6 Write your application using the JDBC API
The following is a simple application that tests that you have installed JDBC and carried
out any set up correctly. This example is based on RdbJdbcCheckup.java from the
installation and assumes that the Rdb server node has an IP of 555.1.14.91 and that the
thin server we will use, the one we started earlier, is listening on port 1888.
Example
/*
* This sample can be used to check the JDBC installation.
* Just run it and provide the connect information. It will select
* "Hello World" from the database.
*/
150
// You need to import the java.sql package to use JDBC
import java.sql.*;
// We import java.io to be able to read from the command line
import java.io.*;
class my_app
{
static BufferedReader in;
public static void main(String args[])
throws SQLException, IOException, Exception
{
String driverConStr = "jdbc:rdbThin://555.1.14.91:1888/";
in = new BufferedReader(new InputStreamReader(System.in));
Class.forName ("oracle.rdb.jdbc.rdbThin.Driver");
// Prompt the user for connect information
System.out.println(
"Please enter information to test connection"+
" to the database");
String user;
String password;
String database;
user = readEntry("user: ");
int slash_index = user.indexOf('/');
if (slash_index != -1)
{
password = user.substring(slash_index + 1);
user = user.substring(0, slash_index);
}
else
password = readEntry("password: ");
database = readEntry("database: ");
System.out.print("Connecting to the database...");
System.out.flush();
System.out.println("Connecting...");
Connection conn = DriverManager.getConnection(
driverConStr + database, user, password);
System.out.println("connected.");
// Create a statement
Statement stmt = conn.createStatement();
// Do the SQL "Hello World" thing
ResultSet rset = stmt.executeQuery(
"select 'Hello World' from rdb$database");
while (rset.next())
System.out.println(rset.getString(1));
}
// close the result set, the statement and connect
rset.close();
stmt.close();
conn.close();
151
}
// Utility function to read a line from standard input
static String readEntry(String prompt)
{
try
{
StringBuffer buffer = new StringBuffer();
System.out.print(prompt);
System.out.flush();
return in.readLine();
}
catch(IOException e)
{
return "";
}
}
Step 7 Run your application
With the server started you can run the sample application and provide the thin server
connection information
Example
The following example assumes an Oracle Rdb database personnel in MY_DB_DIR
$java –cp .;rdb$jdbc_home:rdbThin.jar "my_ap"
Please enter information to test connection to the database
user: my_name
password: my_password
database: my_db_dir:personnel
Connecting to the database...Connecting...
connected.
Hello World
Your JDBC installation is correct.
Contents
10.3 Sample Setup, Starting an Oracle JDBC for Rdb thin
server from Oracle SQL/Services.
The following sections describe step by step how you can setup and start a simple JDBC
server using Oracle SQL/Services.
Basically you have to:
1. Decide on the versions of Rdb and JAVA you wish to use on the server
2. Setup server-side configuration files and command procedures
152
3. Create a JDBC dispatcher in SQL/Services
4. Associate configuration and setup files
5. Start the JDBC dispatcher
See Chapter 7 Oracle SQL/Services and Oracle JDBC for Rdb Servers for more
information on these operations.
Step 1 Decide on the versions of Rdb and JAVA
This step is basically the same as Step 2 Decide on the versions of Rdb and JAVA, as
covered in Sample Setup, Starting and Using an Oracle JDBC for Rdb thin server.
Step 2 Setup server-side configuration files and command procedures
For the server to start correctly a command procedure and a configuration file have to be
created.
The following two files must be created:
•
•
The Server Configuration file
The Server Setup file
You may use a XML configuration file to store the server definitions for you server. In
addition you should provide a command procedure to set up the Rdb and JAVA
environments correctly for
this server. This environment setup may also be done as part of the setup of dispatcher
environment in SQL/Services, but for the purpose of this example, we shall create our
own setup procedure.
Server Configuration File
As limited information can be passed to the server at the command line, most of the
server characteristics for a JDBC Dispatcher server can be placed in a configuration file.
See Configuration Files for more information on what may be contained in the
configurations files and the format of the data within the file. Oracle recommends using
the XML-formatted form of the configuration files as it does allow greater flexibility of
option specification and allows more than one server definition to be defined in a single
configuration file.
During installation a generic configuration file RDBJDBCCFG.XML is copied to the
RDB$JDBC_HOME directory. You may use this file as a basis of your server
configuration file. The configuration file provides information to Oracle JDBC for Rdb
153
about the various servers you may be running. In addition it provides session information
for users of the controller.
For this walkthrough we have decided to create the definition for a thin server called
SQS1888 listening on port 1888. The generic configuration file was copied and changed
to add this information.
We have also chosen to place configuration and any other site specific files in the
RDB$JDBC_COM directory, mainly as this is a standard Oracle JDBC for Rdb directory
and the logical name should be already set up for us at the system level. The files may be
placed anywhere on your system, as long as the controller and server processes can
access them. Remember that a server process will be started up in much the same way as
a normal login to the system, so it is important that any logical names used in the file
specification be available to that process. The easiest way to ensure this is to have
system wide logical names.
In addition a control password, MySecretPassword has been chosen for control
access to the servers.
Although the controlpass can be stored in its plain text form in the configuration file,
Oracle recommends that you use the obfuscated form in the server characteristics section.
But make sure that you are consistent with the casing of the password as passwords are
case-sensitive
The controller may be used to provide this obfuscated password, but make sure that you
keep the casing correct by placing double quotations around the password phrase if you
use the controller in command mode.
Example
$ java -jar rdbthincontrol.jar -digest "MySecretPassword"
digest : 0x7315A012ECAD1059A3634F8BE1347846
See Password Obfuscation in Server Configuration Files for more details.
We have chosen to create a configuration file using one of the standard file specification
used by the dispatcher when searching for configuration files. See Determining the server
configuration file on how the dispatcher locates a configuration file to use.
As the port used by the server will be 1888 we will create a new configuration file called
SQS1888_CFG.XML and place it RDB$JDBC_COM directory:
$type RDB$JDBC_COM:SQS1888_CFG.XML
<?xml version = '1.0'?>
<!-- Configuration file for MY servers -->
<config>
<!-- SESSION -->
154
<session
name="DEFAULT"
tracelevel="0"
srv.mcBasePort="5517"
srv.mcGroupIP="239.192.1.1"
/>
<!-- SERVERS -->
<servers>
<!-- DEFAULT server characteristics-->
<server
name="DEFAULT"
type="RdbThinSrv"
url="//localhost:1701/"
maxClients="-1"
srv.bindTimeout="1000"
srv.idleTimeout="0"
srv.mcBasePort="5517"
srv.mcGroupIP="239.192.1.1"
tracelevel = "0"
autostart = "false"
autorestart = "false"
restrictAccess = "false"
anonymous = "false"
bypass = "false"
tracelocal = "false"
relay = "false"
srv.startup="rdb$jdbc_home:rdbjdbc_startsrv.com"
/>
<!—My new server -->
<server
name="SQS1888 "
controlUser="SQS_CONTROL"
controlPass="0x7315A012ECAD1059A3634F8BE1347846"
type="RdbThinSrv"
url="//localhost:1888/"
/>
</servers>
</config>
Note
The server definition for SQS1888 is fairly minimal allowing most of the DEFAULT
characteristics to inherited. Also that the session section is used to ensure that the
broadcast IP the controller will check will be the same as the server uses.
Server Setup File
The JDBC dispatcher may require environmental setup for JAVA and the correct Oracle
Rdb version to run. This setup can be done in a command procedure that will be
executed just prior to starting the
actual server image.
As the setup is fairly generic we have decided to create the file
RDBJDBC_SQS_ONSTARTUP.COM and place it RDB$JDBC_COM directory. By
155
default, this file will be used by the dispatcher whenever a server has to be started. JDBC
Dispatcher Setup Procedure describes the use of a setup command procedure for the
dispatcher.
Example
$type RDB$JDBC_COM:RDBJDBC_SQS_ONSTARTUP.COM
$@SYS$LIBRARY:RDB$SETVER 72
$@sys$common:[java$142.com]JAVA$142_SETUP.COM FAST
$define/job MY_DB_DIR sys$common:[DBS]
These commands ensure that the environment is correct for the server process to access a
V7.2 Oracle Rdb database using FAST JAVA VM.
Step 3. Create a JDBC dispatcher in SQL/Services
Now that the configuration file and setu0p procedure have been created and moved to the
appropriate directory we can now create a JDBC Dispatcher. We will use 1888 as the
PORT_ID as this will be the key value used by the dispatcher to locate the necessary files
for server start-up.
$ MCR SQLSRV_MANAGE71
SQLSRV> CONNECT SERVER;
SQLSRV> CREATE DISPATCHER MY_JDBC_DISP NETWORK_PORT TCPIP PORT_ID 1888
PROTOCOL JDBC;
SQLSRV> SHOW DISPATCHER;
Dispatcher MY_JDBC_DISP
State:
UNKNOWN
Autostart:
on
Max connects:
100 clients
Idle User Timeout:
<none>
Max client buffer size:
5000 bytes
Network Ports:
(State)
(Protocol)
TCP/IP port
1888
Unknown
JDBC clients
Log path:
SYS$MANAGER:
Dump path:
SYS$MANAGER:
Step 4. Associate configuration and setup files
Next we must associate the server configuration and setup files with this dispatcher.
As we chose to use standard configuration file names, the dispatcher will make the
following associations automatically and we need take no further action to make this
happen.
156
Given the PORT_ID of 1888:
•
•
•
server name = SQS1888
configuration file = RDB$JDBC_COM:SQS1888_CFG.XML
setup file = RDB$JDBC_COM:RDBJDBC_SQS_ONSTARTUP.COM
If we had chosen not to use standard naming then we would have had to set up logical
names to point to the appropriate files. See Associating an Oracle SQL/Services JDBC
Dispatcher to a Server for more details.
However, we still need to tell the dispatcher what type of server it will be starting so we
have to create the appropriate logical name. For simplicity we shall place this logical
name in the SYSTEM logical name table. See Determining Server Type for information
on server type associations.
$DEFINE/SYSTEM RDB$JDBC_SQSTYPE_1888 STD
If we had chosen to start up a POOL server we would not have needed to create this
logical name as this is the default server type used by the JDBC dispatcher, but as the
server type is a normal thin server we must inform the dispatcher of this fact using the
logical name.
Step 5 Start the JDBC dispatcher
Now that the configuration files are in place and any logical names used by the dispatcher
have been defined we can now use the SQL/Services manager to start the JDBC
dispatcher.
SQLSRV> start dispatcher my_jdbc_disp;
SQLSRV> show disp my_jdbc_disp;
Dispatcher MY_JDBC_DISP
State: STARTING
Autostart: on
Max connects: 100 clients
Idle User Timeout: <none>
Max client buffer size: 5000 bytes
Network Ports: (State) (Protocol)
TCP/IP port 1888 Inactive JDBC clients
Log path: SYS$MANAGER:
Dump path: SYS$MANAGER:
SQLSRV> show disp my_jdbc_disp;
Dispatcher MY_JDBC_DISP
State: RUNNING
Autostart: on
Max connects: 100 clients
Idle User Timeout: <none>
Max client buffer size: 5000 bytes
Network Ports: (State) (Protocol)
157
TCP/IP port 1888 Inactive JDBC clients
Log path: SYS$MANAGER:
Dump path: SYS$MANAGER:
Log File: SYS$SYSROOT:[SYSMGR]SQS_DECRDB_JDBC_DISP08O91.LOG;
Dump File: SYS$SYSROOT:[SYSMGR]SQS_DECRDB_JDBC_DISP08O.DMP;
See your Oracle SQL/Services documentation and Starting a JDBC Dispatcher for more
details on starting a dispatcher.
If the server starts up correctly you should be able to use the server from any JDBC client
using the Oracle JDBC for Rdb thin driver.
You may also use the controller to check that the server is actually running:
$ java -jar rdb$jdbc_home:rdbthincontrol.jar –cfg
RDB$JDBC_COM:SQS1888_CFG.XML –controlpass "MySecretPassword" –name
SQS1888 –showServer
10.4 Sample configuration file MY_SERVERS.XML
<?xml version = ‘1.0’?>
<!—Configuration file for Rdb Thin JDBC Drivers and Servers -->
<config>
<!—SESSION -->
<session
name="fred"
user="jdcb_user"
tracelevel="0"
srv.mcBasePort="5517"
srv.mcGroupIP="239.192.1.1"
/>
<!—SERVERS -->
<servers>
<!—DEFAULT server characteristics.-->
<!-NOTE that the control password is the obfuscated form of
"MySecretPassword".-->
<server
name="DEFAULT"
type="RdbThinSrv"
url="//localhost:1701/"
maxClients="-1"
srv.bindTimeout="1000"
srv.idleTimeout="0"
srv.mcBasePort="5517"
srv.mcGroupIP="239.192.1.1"
158
tracelevel = "0"
autostart = "false"
autorestart = "false"
restrictAccess = "false"
anonymous = "false"
bypass = "false"
tracelocal = "false"
relay = "false"
controlUser="control_user"
controlPass="0x7315A012ECAD1059A3634F8BE1347846"
cfg="rdb$jdbc_com:rdbjdbccfg.xml"
srv.execStartup="rdb$jdbc_home:rdbjdbc_startexec.com"
srv.startup="rdb$jdbc_home:rdbjdbc_startsrv.com"
sharedmem = "0"
ssl.default="true"
/>
<!—DEFAULT Secure socket server -->
<server
name="DEFAULTSSL"
type="RdbThinSrvSSL"
ssl.default="false"
ssl.context="TLS"
ssl.keyManagerFactory="SunX509"
ssl.keyStoreType="jks"
ssl.keyStore="rdbjdbcsrv.kst"
ssl.keyStorePassword="CHANGETHIS"
ssl.trustStore="rdbjdbcsrv.kst"
ssl.trustStorePassword="CHANGETHIS"
/>
<!—now specific servers that will be started up by pool server -->
<server
name="srv1forRdb"
type="RdbThinSrv"
url="//localhost:1701/"
autoStart="true"
autoRestart="true"
logfile="rdb$jdbc_logs:srv1forRdb.log"
tracelevel="-1"
maxClients=1
/>
<server
name="srv2forRdb"
type="RdbThinSrv"
url="//localhost:1708/"
autoStart="true"
logfile="rdb$jdbc_logs:srv2forRdb.log"
/>
<server
name="myserver"
type="RdbThinSrv"
url="//localhost:1788/"
/>
<!—MP server -->
<!—sharedmem is in KB default = 1024 -->
<server
159
name="srvMPforRdb"
type="RdbThinSrvMP"
url="//localhost:1705/"
autoStart="true"
maxClients="10"
maxFreeExecutors="10"
prestartedExecutors="10"
sharedMem="10240"
/>
<!—the pool server -->
<server
name="rdbpool"
type="RdbThinSrvPool"
url="//localhost:1702/" >
<pooledServer name="srv1forRdb"/>
<pooledServer name="srv2forRdb"/>
<pooledServer name="srvMPforRdb"/>
</server>
<!—Secure socket server -->
<server
name="srvssl1forRdb"
type="RdbThinSrvSSL"
url="//localhost:1709/"
/>
</servers>
<!-DATABASES -->
<databases>
<database
name="mf_pers"
url="//localhost:1701/mydisk:[databases]mf_personnel"
driver="oracle.rdb.jdbc.rdbThin.Driver"
URLPrefix="jdbc:rdbThin:"
/>
<database
name="pers"
url="//localhost:1702/mydisk:[databases]personnel"
driver="oracle.rdb.jdbc.rdbThin.Driver"
URLPrefix="jdbc:rdbThin:"
/>
</databases>
</config>
10.5 Datatype Mapping from Oracle Rdb to java.sql.Types
Rdb SQL datatype
CHAR(n)
NCHAR(n)
java.sql.Types
CHAR
CHAR
160
VARCHAR(n)
NCHAR VARYING
FLOAT[(n)]
REAL
DOUBLE PRECISION
DECIMAL[(n[,n])]
INTEGER[(n)]
SMALLINT[(n)]
TINYINT[(n)]
BIGINT[(n)]
QUADWORD[(n)]
DATE ANSI
DATE VMS
TIME
TIMESTAMP
INTERVAL
BYTE VARYING
LIST OF BYTE VARYING
VARCHAR
VARCHAR
If n > 24 then DOUBLE else FLOAT
FLOAT
DOUBLE
DECIMAL
If n == 0 then INTEGER else NUMERIC
If n == 0 then SMALLINT else NUMERIC
If n == 0 then TINYINT else NUMERIC
If n == 0 then BIGINT else NUMERIC
If n == 0 then BIGINT else NUMERIC
DATE
TIMESTAMP
TIME
TIMESTAMP
BIGINT
VARBINARY
BLOB
10.6 Datatype Mapping from java.sql.Types to Oracle Rdb
SQL Type (from java.sql.Types)
CHAR
NCHAR
VARCHAR
FLOAT
DOUBLE
DECIMAL
INTEGER
SMALLINT
TINYINT
BIGINT
NUMERIC
DATE
TIMESTAMP
Rdb SQL datatype
CHAR(n)
NCHAR(n)
VARCHAR(n)
REAL
DOUBLE PRECISION
DECIMAL[(n[,n])]
INTEGER
SMALLINT
TINYINT
BIGINT
BIGINT(n)
DATE ANSI
TIMESTAMP
161
TIME
BIGINT
VARBINARY
BLOB
CLOB
TIME
INTERVAL
BYTE VARYING
LIST OF BYTE VARYING
LIST OF BYTE VARYING
10.7 JDBC Specification SQL to Java Datatype Mappings
SQL Type (from java.sql.Types)
BIT
TINYINT
SMALLINT
INTEGER
BIGINT
REAL
FLOAT
DOUBLE
DECIMAL
NUMERIC
CHAR
VARCHAR
LONGVARCHAR
DATE
TIME
TIMESTAMP
BINARY
VARBINARY
BLOB
CLOB
Java Type
boolean
byte
short
int
long
float
double
double
java.math.BigDecimal
java.math.BigDecimal
java.lang.String
java.lang.String
java.lang.String
java.sql.Date
java.sql.Time
java.sql.Timestamp
byte[]
byte[]
java.sql.Blob
java.sql.Clob
162
10.8 JDBC Specification Java to SQL Datatype Mappings
Java Type
boolean
byte
short
int
long
float
double
java.math.BigDecimal
java.lang.String
byte[]
java.sql.Date
java.sql.Time
java.sql.Timestamp
java.sql.Blob
java.sql.Clob
SQL Type (from java.sql.Types)
BIT
TINYINT
SMALLINT
INTEGER
BIGINT
REAL
DOUBLE
NUMERIC
VARCHAR or LONGVARCHAR
VARBINARY or LONGVARBINARY
DATE
TIME
TIMESTAMP
BLOB
CLOB
Contents
163