1
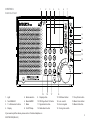
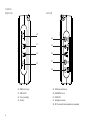
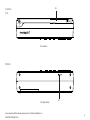
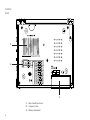
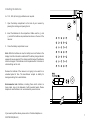
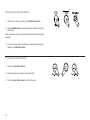
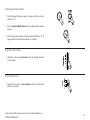
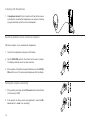
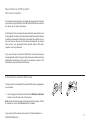
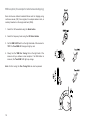
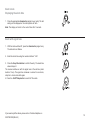
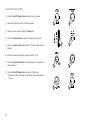
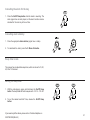
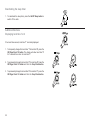
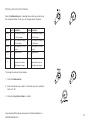
Sound for Generations
ROBERTS
R9969
PLL Synthesised World Radio
Please read this manual before use
Contents
Contents ............................................................................ 2
Setting the reception sensitivity ..................................... 16
Controls .......................................................................... 3-6
Special features of SW reception .................................. 17
Installing the batteries ...................................................... 7
Connecting the external SW antenna ............................ 17
Switching on and setting the clock .................................. 8
SSB reception ................................................................. 18
Setting local time 1 ........................................................... 8
Alarm mode - displaying the alarm time ........................ 19
Setting local time 2 ........................................................... 9
Alarm with signal tone ..................................................... 19
Setting and storing radio stations .................................. 10
Alarm with radio station .................................................. 20
Tuning radio stations directly .......................................... 10
Cancelling the alarm for the day ..................................... 21
Tuning radio stations manually (1) ................................. 10
Cancelling alarm stand-by .............................................. 21
Tuning radio stations manually (2) ................................. 11
Sleep timer mode ............................................................ 21
Saving radio stations at preset positions ....................... 11
Setting the sleep timer ................................................... 21
Storing shortwave (SW) stations .................................... 12
Deactivating the sleep timer ........................................... 22
Automatic station search ................................................ 12
Additional functions - displaying local time 1 or 2 ......... 22
Deleting preset stations .................................................. 13
Setting various function modes ...................................... 23
Calling up stored radio stations ...................................... 14
Switching on the back lighting for the display ............... 24
Checking stored radio stations ...................................... 14
Disabling and enabling the buttons ............................... 24
Changing preset positions .............................................. 15
Disabling and enabling the fine tuning dial .................... 24
Adjusting the volume ....................................................... 15
Deleting all settings ........................................................ 25
Adjusting the tone ........................................................... 15
Specifications .................................................................. 26
Listening with headphones .............................................. 16
Guarantee ........................................................................ 27
Switch between stereo and mono reception .................. 16
2
CONTROLS
Controls - Front
1
2
3
4
5
6
7
8
9
10
11
12
13
14
15
1. Light
5. Band selection
19
18
9. Display button
2. Tune/SSB LED
6. Memo AM/PM
3. 1 to 9 Numerical buttons
4. Display
16
13. SW Select button
17. Freq./Clock button
10. SW Page Clock 1/2 button
14. Lock switch
18. Memo Scan button
7. Mode
11. Signal Alarm button
15. Fine tuning dial
19. Memo Del button
8. On/Off Sleep
12. Radio Alarm button
16. Tuning lock switch
If you need any further advice, please call our Technical Helpline on :020 8758 0338 (Mon-Fri)
17
3
Controls
Right side
Left side
20
24
21
25
22
26
23
27
28
20. SSB Fine Tuning
24. SW External Antenna
21. SSB On/Off
25. FM/SW DX./Local
22. Tone (low/high)
26. FM St./FM
23. Volume
27. Headphone socket
28. DC 6 V socket for mains adapter (not supplied)
4
29
Controls
Top
29. Antenna
Bottom
30
30. Reset button
If you need any further advice, please call our Technical Helpline on :020 8758 0338 (Mon-Fri)
5
Controls
Back
31
32
33
31.
6
Map of world time zones
32.
Frequency scale
33.
Battery compartment
Installing the batteries
4 x 1.5V, LR6 (AA size) type batteries are required.
1. Open the battery compartment on the back of your receiver by
pressing the marking and opening the lid.
2. Insert the batteries into the compartment. Make sure the (+) and
(-) ends of the batteries are positioned as shown on the rear of the
receiver.
3. Close the battery compartment cover.
Note: When the batteries are low, the battery level icon flashes in the
display. Each time the radio is switched off the battery charge indicator
appears for seven seconds. If the charge level falls below 2 the batteries
must be changed. If the batteries are not replaced within 3 minutes all
stored settings will be lost.
Remove the batteries if the reciever is not going to be used for an
extended period of time. The manufacturer accepts no liability for
damage resulting from used batteries.
Environmental note: Batteries, including those which contain no
heavy metal, may not be disposed of with household waste. Please
dispose of used batteries in an environmentally sound manner.
1
If you need any further advice, please call our Technical Helpline on :020 8758 0338 (Mon-Fri)
7
Switching on and setting the clock
Before setting the clock make sure that the local time zone is known.
There are 24 time zones based on a standard time zone called the UTC
(Universal Time Co-ordinated), previously known as GMT (Greenwich
Mean Time), as shown in the diagram on the back of the receiver.
Two different local times can be set, local time '1' and local time '2'.
Setting local time 1
When the receiver is first switched on the display indicates that the clock
has to be set. The digital display will show '0:00' and the local time '1'
symbol will be shown.
Note: If you are operating the receiver in the 12-hour format, AM and
PM can be set by pressing the Memo AM/PM button.
1. Place the receiver on a flat surface. Make sure that the batteries
have been inserted correctly, or if using mains power, plug the mains
lead into a wall socket and switch on at the wall socket.
2. Press down and hold the Freq./Clock button until the display
indicates the time can be set. The digital display will show '-:--'
and the local time '1' symbol will flash.
2
2
Note: If the radio is switched on, press the Display button to switch
the display to the clock.
3. Enter the time using the numerical buttons '1 ..... 0' in the correct
sequence.
3
Note: If the digits are entered incorrectly, a signal sounds and 'Err'
flashes briefly in the display. The time will have to be entered again.
4
4.
Press the Freq./Clock button to confirm the entry.
Setting local time 2
1. Press the SW Page Clock 1/2 button. The display flashes for local
time '2'.
1
2. To set the display to local time '2' press the Freq./Clock button.
3. Press down and hold the Freq./Clock button until the display
indicates the time can be set. The digital display will show '-:--'
and the local time '2' symbol will flash.
2
4. Enter the time using the numerical buttons '1 ..... 0' in the correct
sequence.
3
4
Setting and storing radio stations
1. Switch on the radio by pressing the On/Off Sleep button.
1
2
3
2. Press the Band button to select the required waveband (FM, SW,
MW or LW).
There are various ways to set radio stations and store them at preset
positions.
3. If short wave is selected, the frequency band can be selected by
pressing the SW select button.
Tuning radio stations directly
1. Press the Freq./Clock button.
2. Enter the frequency using the numerical buttons.
3. Press the Freq./Clock button to confirm the entry.
10
1
2
3
Tuning radio stations manually (1)
1. Tune in to the desired station by turning the Fine tuning dial. The
display will show the frequency in 100 or 200 kHz increments (FM),
in 9 or 10 kHz increments (MW), in 3 kHz increments (LW) or in 5 kHz
increments (SW).
2. To fine tune to the station, briefly push in and turn the Fine tuning
dial. The display will show frequency changes in 50 kHz increments
(FM) or 1 kHz increments (MW, LW and SW).
1
Note: The word STEP is displayed whilst in fine tune mode.
3. To return to the original mode, push the Fine tuning dial again.
Note: The word STEP is removed from the display.
Tuning radio stations manually (2)
1. Press the arrow buttons until you reach the desired station
or
Hold down one of the arrow buttons until the frequency changes
to a rapid run-through.
1
The automatic search stops at the next station with a strong signal.
If you need any further advice, please call our Technical Helpline on :020 8758 0338 (Mon-Fri)
11
Saving radio stations at preset positions
You can store up to 45 radio stations; 18 on two memory levels for short
wave frequencies, and nine each on FM, MW and LW frequencies.
1
1. Select the frequency band and the radio station.
2. Press the Memo AM/PM button.
2
3. Press the Freq./Clock button to store the radio station. The station
is then stored on preset position 1.
Repeat the process for additional stations.
3
Storing short wave (SW) stations
The short wave band is divided into frequency bands of different
lengths. Therefore up to 18 SW stations can be stored on two memory
levels.
2
1. Save short wave stations as previously described.
2. Once nine stations are stored on one memory level M1, press SW
Page Clock 1/2 button to switch to the second memory level.
3. Store the remaining nine stations as described above.
Note: If you try to store more than 18 stations and press Memo AM/
PM button, 'FULL' appears in the display.
12
3
Automatic station search
This function allows an automatic search and store of nine stations in
each of the FM, MW and LW bands (not SW). The search starts at the
lowest frequency in the selected wave band, and stores the nine
stations with the strongest signals. After the search has finished, a
signal sounds.
1
1. To start the search, press both Arrow buttons at the same time and
hold them down until a signal is heard. The display indicates the
stored number.
Note: When you start the search, all the previously stored stations are
deleted. During the search, the display shows the progress, but not the
stations found.
2
2. The search can be stopped by pressing the On/Off button.
You can reorganise the preset stations using 'MODE 50 or 51'
(see page 23).
Deleting preset stations
1. Enter the preset station using the numerical buttons '1 to 0'. The
frequency and the preset number will be displayed.
1
2
2. Press the Memo AM/PM button. The selected preset station
flashes.
3. Press the C Memo Del button to delete the station.
3
If you need any further advice, please call our Technical Helpline on :020 8758 0338 (Mon-Fri)
13
Calling up stored radio stations
1. Select the station using the numerical buttons '1...0' for the preset
number.
1
2. To call up preset numbers 10 to 18 in the SW band, press the SW
Page Clock 1/2 button to switch to the second memory level.
Note: For FM reception, pull out the telescopic antenna and tilt it until the
best signal is recieved. For short wave reception (SW), the antenna
should be upright. For medium wave and long wave reception, align the
internal antenna by turning the receiver.
2
Checking stored radio stations
All the stored radio stations in a wave band can be called up automatically
for seven seconds (memory scan).
1. With the radio playing, press the Memo Scan button. The device
starts with the current preset station and then changes to the next
one. When you reach the desired station, press the Memo Scan
button to stop the function.
14
1
Changing preset positions
1. Enter the preset station you want to change using the numerical
buttons '1...0'.
1
2
2. Press the Memo AM/PM button and the selected preset position
flashes.
3. Enter the new preset position using the numerical buttons '1...0'. A
signal sounds and the preset positions are changed.
3
Adjusting the volume
1. Adjust the volume using the Volume control on the right hand side
of the receiver.
1
Adjusting the tone
1. Adjust the tone using the Tone low/high switch on the right hand
side of the receiver.
If you need any further advice, please call our Technical Helpline on :020 8758 0338 (Mon-Fri)
1
15
Listening with Headphones
1. A Headphone Socket (3.5mm) located on left side of the receiver
is provided for use with either headphones or an earpiece. Inserting
a plug automatically mutes the internal loudspeaker.
1
Switching between stereo and mono reception
FM stereo reception is only available with headphones.
1. Connect the headphones and select an FM station.
2
2. Set the FM St./FM switch on the left side of the device to stereo.
The display indicates stereo has been selected.
3. If the reception of the station is weak in FM stereo, move the FM St./
FM switch to mono. The stereo symbol disappears from the display.
3
Setting the reception sensitivity
1. If the sensitivity is too high, set the DX./Local switch (on the left hand
of the receiver) to DX.
1
2. If the signal is too strong, and is causing distortion, move the DX./
Local switch to Local (low sensitivity).
2
16
Special features of SW reception
Short wave reception
Your radio can receive signals in a number of frequency bands. It is easy
to get used to tuning to stations in the FM, MW and LW bands, since they
are always on the same frequencies.
Unfortunately, this is not always the case with short wave stations. Due
to atmospheric conditions, short wave stations must frequently broadcast
on different wavelengths. Most short wave bands are available all over
the world and can be used by international broadcasters. At present
these are the only wavelengths which provide listeners with direct
reception over long distances.
If you want to listen to a particular SW station, the precise frequency
and wavelength need to be known. Many short wave stations will send
broadcasting schedules which give the information required. This
information is also available on the Internet.
Connecting the external SW antenna
To improve short wave reception the external SW antenna supplied can
be connected.
1
1
1. Insert the plug of the antenna cable into the SW External Antenna
socket on the left hand side of the receiver.
Note: Unroll and align the antenna to achieve the best reception. If there
is interference, move the DX./Local switch to Local.
If you need any further advice, please call our Technical Helpline on :020 8758 0338 (Mon-Fri)
17
SSB reception (for example for radio hams and shipping)
Some short wave stations broadcast Morse code for shipping using
continuous waves (CW). Voice signals, for example amateur radio, is
normally broadcast on the single side band (SSB).
1
1. Select the SW waveband using the Band button.
2. Select the frequency band using the SW Select button.
2
3. Set the SSB On/Off switch on the right hand side of the receiver to
'ON'. The Tune/SSB LED changes to light up red.
4. Slowly turn the 'SSB Fine Tuning' dial on the right hand of the
receiver until you achieve a clear reception. If an SSB station is
received, the 'Tune/SSB' LED lights up orange.
3
3
Note: For fine tuning, the Fine Tuning Dial can also be pressed.
4
4
4
18
Alarm mode
Displaying the alarm time
1. Press the appropriate Alarm button (signal tone or radio). The last
setting will be displayed or the radio symbol will flash.
1
Note: The display will return to the current time after 7 seconds.
Alarm with signal tone
1. With the radio switched off, press the Alarm button (signal tone).
The last alarm set flashes.
1
2. Enter the alarm time using the numerical buttons '1...0'.
3. Press the Freq./Clock button to confirm the entry. The alarm time
entered stays lit.
The receiver switches on with the signal tone at the set time (alarm
duration 1 hour). The signal tone increases in volume for one minute,
stops for a minute and starts again.
2
4. Press the On/Off Stop button to switch off the alarm.
3
If you need any further advice, please call our Technical Helpline on :020 8758 0338 (Mon-Fri)
19
Alarm with radio station
1. Press the On/Off Sleep button to switch on the receiver.
1
2
2. Select the frequency band and the radio station.
3. Adjust the alarm volume using the Volume dial.
4. Press the Display button to switch the display to the clock.
3
4
5. Press the Alarm button (radio station). The last alarm time set
flashes.
6. Enter the alarm time using the numerical buttons '1....0'.
7. Press the Freq./Clock button to confirm the entry. The alarm time
entered stays lit.
5
6
7
8
8. Press the On/Off Sleep button to switch off the alarm.
- The device switches the radio on at the set time (alarm duration
1 hour).
20
Cancelling the alarm for the day
1. Press the On/Off Sleep button while the alarm is sounding. The
alarm (signal tone or radio) stops, but the alarm function remains
activated for the next day at the set time.
1
Cancelling alarm stand-by
1. Press the appropriate Alarm button (signal tone or radio).
2. To deactivate the alarm, press the C Memo Del button.
1
2
1
2
Sleep timer mode
The receiver has an adjustable sleep-timer, which can be set to 15, 30,
60, 90 or 120 minutes.
Setting the sleep timer
1. With the radio playing, press and hold down the On/Off Sleep
button. The sleep times will flash in sequence 60...30...15...120...90.
2. To set the desired switch-off time, release the On/Off Sleep
button.
If you need any further advice, please call our Technical Helpline on :020 8758 0338 (Mon-Fri)
21
Deactivating the sleep timer
1. To deactivate the sleep timer, press the On/Off Sleep button to
switch off the radio.
1
Additional functions
Displaying local time 1 or 2
If two local times are set, local time '1' is normally displayed.
1
1. To temporarily change from local time '1' to local time '2', press the
SW Page Clock 1/2 button. The display will show local time '2'
for 7 seconds then return to local time '1'.
2. To permanently change from local time '1' to local time '2', press the
SW Page Clock 1/2 button and then the Freq./Clock button.
2
2
3
3
3. To permanently change from local time '2' to local time '1', press the
SW Page Clock 1/2 button and then the Freq./Clock button.
22
Setting various function modes
Using the Mode button and a two-digit code, which you enter using
the numerical buttons '1---0', you can change various functions:
Code Function
MODE
10
*
MODE
20
11
MW frequency change
30
21
MW frequency change in
31
Time display in 24 hour
Signal tone off
41
Signal tone on
Arrange stations in
51
Arrange stations in
Time display in 12 hour
10 kHz steps
format
40
FM frequency change in
200 kHz steps
in 9 kHz steps
*
MODE
Code Function
in 100 kHz steps
*
MODE
FM frequency change
format
*
MODE
*
50
sequence from low to
sequence from low to
high frequency range
high frequency range
To change the various function modes.
1. Press the Mode button.
1
2
2. Enter the desired code, shown in the table using the numbered
buttons '1---0'.
3. Press the Freq./Clock button to confirm.
If you need any further advice, please call our Technical Helpline on :020 8758 0338 (Mon-Fri)
3
23
Switching on the back lighting for the display
1. Press the Light button to switch on the display lighting for 7
seconds.
1
2
2. Press the Light button to switch off the display lighting.
Disabling and enabling the buttons
1. To disable the buttons, move the Lock button to the red dot.
1
2
2. To enable the buttons, move the Lock button to the opposite
position.
Disabling and enabling the fine tuning dial
To prevent the frequency being changed accidentally, the 'Fine tuning
dial' can be disabled.
1. To disable the dial, move the Tuning Lock button to the red dot.
2. To enable the dial, move Tuning Lock button to the opposite
position.
1
24
2
Deleting all settings
The receiver can be reset to its original state. All settings are lost when
you do this.
1. Press the Reset button on the bottom of the device using a suitable
implement such as a paper clip. All settings are deleted.
If you need any further advice, please call our Technical Helpline on :020 8758 0338 (Mon-Fri)
1
25
Specifications
Frequency bands
Power supply
Battery operation
4 x 1.5V LR6 (AA size)
FM
87.5 - 108 MHz
Mains operation
6V (200 mA) mains adapter, DC
MW
520 - 1710 kHz or 522 - 1710 kHz
Output
300 mW 10% THD
LW
153 - 283 kHz
SW 1 - 14
Antennas
Telescopic antenna
FM and SW
Ferrite rod antenna
MW and LW
Sockets
DC socket
Dia. 4.0 mm, 6V (200 mA) centre pin
negative
Headphone jack
Dia. 3.5 mm stereo, 2 x 32 impedance
SW antenna socket
Dia. 3.5 mm mono
Dimensions and weight
26
WxHxD
184 mm x 120 mm x 40 mm
Weight
510 g
120 m
90 m
75 m
60 m
49 m
41 m
31 m
25 m
21 m
19 m
16 m
15 m
13 m
11 m
2.3 - 2,495 MHz
3.2 - 3.4 MHz
3.85 - 4.0 MHz
4.75 - 5.06 MHz
5.9 - 6.2 MHz
7.1 - 7.35 MHz
9.4 - 9.99 MHz
11.6 - 12.1 MHz
13.5 - 13.87 MHz
15.1 - 15.8 MHz
17.48 - 17.9 MHz
18.9 - 19.02 MHz
21.45 - 21.75 MHz
25.6 - 26.1 MHz
Guarantee
This receiver is guaranteed for twelve months from the date of delivery to the original owner against failure due to faulty workmanship or component
breakdown, subject to the procedure stated below. Should any component or part fail during this guarantee period, it will be repaired or replaced
free of charge.
The guarantee does not cover:
1. Damage resulting from incorrect use.
2. Consequential damage.
3. Receivers with removed or defaced serial numbers.
4. Telescopic aerials.
Procedure:
Any claim under this guarantee should be made through the dealer from whom the receiver was purchased. It is likely that your Roberts' dealer
will be able to attend to any defect quickly and efficiently, but should it be necessary the dealer will return the instrument to the company’s service
department for attention. In the event that it is not possible to return the instrument to the Roberts' dealer from whom it was purchased, please
contact Roberts Radio Technical Services department at the address shown on the rear of this manual before taking further action.
These statements do not affect the statutory rights of a consumer.
If you need any further advice, please call our Technical Helpline on :020 8758 0338 (Mon-Fri)
27
ROBERTS RADIO TECHNICAL SERVICES
97-99 Worton Road
Isleworth Middlesex
TW7 6EG
Issue 1
Technical Helpline:- 020 8758 0338 (Mon-Fri)