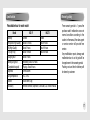
1
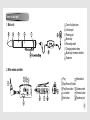
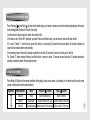
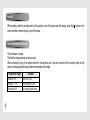
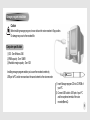
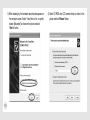
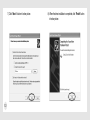
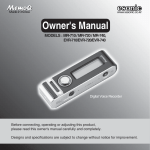
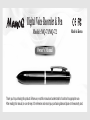
Digital Voice Recorder & Pen
Model : MQ-71/MQ-72
Made in Korea
Owner’s Manual
Thank you for purchasing this product. Before use, read this manual and understand its functions for appropriate use.
After reading this manual, be sure to keep it for reference and record your purchasing date and place on the warranty card.
Table of contents
Name of each part......................................3
Caution .......................................................4
Before use (Charging) ................................4
Record........................................................5
Stop recording ............................................5
Play ............................................................6
File auto search..........................................6
Move and play first/last recorded file..........6
Delete file ...................................................6
Move and play for each search mode ........7
Setting Search Mode..................................7
Power off ....................................................8
Check the remainder of the charger...........8
Manager program installation...............9~13
Use as a ball point pen.............................14
How to use manager program............14~16
Specification .............................................17
Warranty policy.........................................17
FCC Caution.............................................18
FCC Note .................................................18
Warranty card...........................................19
Name of each part
1. Main unit
Core of ball point pen
Ink tube part
Rotating part
Main body
Recording switch
Charging indicator lamp
Main body of remote controller
Earphone
2. Wire remote controller
Plug
Stop(Power off) button
Play/Pause button
Lock switch
Next button
Mode button
Volume control
Previous button
Earphone jack
3
Caution
1)
2)
3)
4)
We don’t take any responsibility for loss of recording due to use of this product, after sales service and others.
We don’t take any responsibility for any claim raised due to use of this product or a third party.
Disassembly, modification, impact or use of this product in low or high temperature or humid place may cause malfunction.
Save important recording in PC immediately.
Before use (Charging)
This product includes a battery charger. Be sure to charge the product that you purchased before use. Connect USB plug to USB port
on PC, and ø2.5 plug to the earphone jack on the main body to start charging. At this time, PC must be on.
Charging will take about 3 hours (if completely discharged), and if completely charged, about 12 hours available for recording and
about 8 hours available for playing and charging indicator lamp is on during charging and when charging is completed, the lamp is
flickering. While using, if the charger is discharged, it sounds ‘beep’ and the power is off.
In this case, recharge it. Charging status can be checked by the charger indicator icon on the manager window.
4
** If the charging indicator lamp isn’t on, check if USB cable is properly connected and remove USB cable from the recorder and
reconnect it.
** When not using the product for a long time, the life of the battery will be extended if it is completely charged before keeping.
Record
Move the recording switch ( ) to arrow indicated direction to start recording. Recording
status can be checked while recording by monitoring with earphone. Voice recording can
be set from PC manager to various modes and the recordable time for each model and
mode is as indicated in below table. If the number of recorded file is high, total recording
time will decrease since the memory is used for file management. If the memory is not
sufficient or the number of files is 99, the warning sound (beep sound) rings for 3 seconds
and stop.
Recordable hour for each model (For Recording Mode Installation, see p.16)
Model
Memory
XHQ(Extra High Quality)
HQ(High Quality)
LP(Long Play)
MQ-71
128MB
Approx. 4.5 hours
Approx. 9 hours
Approx. 18 hours
MQ-72
256MB
Approx. 9 hours
Approx. 18 hours
Approx. 36 hours
Stop recording
If you want to stop recording, move the recording switch ( ) to Stop (Power Off)
position to stop recording. Then, power is off and becomes standby mode.
5
Play
Deactivate the lock switch of the remote controller and adjust the volume adjuster to Max..
Set the recording switch ( ) to Stop position, and connect the wire remote controller plug to the earphone terminal of the main body
and press Play/Pause [ ] button on the remote controller to play.
Press the button [ ] again to pause and press Stop [ ] button to stop playing.
Record Stop
Play/Pause
Use the volume adjuster on the remote controller to adjust the volume.
File auto search
This is a function that introduces the recorded contents in the file and if you press Play button for 3 seconds in Stop position, first 5
seconds of each file from No. 1 to last file will be played. When the contents you want to listen are played, press Play button shortly to
continue to play the file.
Move and play first/last recorded file
Press Previous [
] and Next [
] button for 3 seconds while playing, to move and play first and last recorded file.
Delete file
6
Press Stop [ ] button for over 3 seconds in Stop mode, and it sounds beep and the contents to check will be played.
If the content is what you want to delete, shortly press Stop [ ] button to delete it and if not, press other buttons to cancel.
Move and play for each search mode
Press Previous[
] and Next[
] button shortly while playing, and move to previous and next recording depending on the search
mode setting(Move file/Search 1/Search 2) and play.
Use the search function properly to search the content of file.
If the mode is set to “Move file”, whenever you press Previous and Next button, you can move to previous file and next file.
If it is set to “Search 1”, each time you press Next button, it move about 20 seconds forward and about 20 seconds backward to
search the recorded contents more precisely.
If the remaining time on the end of currently moving file is less than 20 seconds, it moves to the first part of next file.
For “Search 2”, when pressing Previous and Next button, it moves to about 10 minutes forward and about 10 minutes backward,
enabling to randomly search the recorded contents.
Setting Search Mode
Press Mode (M) button on the remote controller while playing, beep sound comes out according to the mode and the search mode
rotates in below order and becomes switched.
Operation
Mode selection
Move file
Search 1
Search 2
Beep
Beep
Beep beep
Beep beep beep
Previous (
) button
Next (
) button
Move to previous file
Move to next file
Move to about 20 sec. ago
Move to about 20 sec. later
Move to about 10 minutes ago Move to about 10 min. later
7
Power off
While recording, switch the recording switch to Stop position to turn off the power and while playing, press Stop[
remote controller or remove the plug to turn off the power.
] button on the
Check the remainder of the charger
This unit contains a charger.
The life of the charger depends on how you use it.
When connecting the plug of the remote controller to the earphone jack of the voice recorder with the recording switch in Stop
position, the charging indicator lamp indicates the remainder of the charger.
Remainder of charger
About over 70%
About 30% ~ 70%
About below 30%
8
Indication
LED on for 5 sec.
LED flickering for 5 sec.
No charging indicator lamp
Manager program installation
Caution
Before installing manager program, be sure to leave the voice recorder in Stop position.
Or damage may occur to the recorded file.
Computer specification
(1)OS : Over Windows 2000
(2)RAM capacity : Over 128MB
(3)Hard disk margin capacity : Over 1GB
Installing manager program enables you to save the recorded contents by
USB port to PC and to move and save the saved contents to the voice recorder.
1) Insert Manager program CD into CD-ROM of
your PC.
2) Connect USB cable to USB port of your PC
and the earphone terminal of the voice
recorder(MemoQ)
9
3) When standing by, the hardware wizard window appears on
the computer screen. Select “Install from a list or specific
location [Advanced]” as shown in the picture and click
“Next >” button.
10
4) Select CD-ROM drive (CD inserted drive) as shown in the
picture and click “Browse” button.
5) If the window appears as shown in the picture, click “CDROM” <CD inserted drive>.
6) As shown in below picture, click driver directory and click
“OK” button.
If PC OS is Win98SE, select D:\Driver\Win98 folder.
11
7) Click “Next >” button in below picture.
12
8) When the drive installation is completed, click “Finish” button
in below picture.
9) Copy the manager exe file in the CD in CD-ROM to the
background screen of your PC.
10) Double click and execute the voice manager program on
the background screen.
11) Manager program is executed and the window appears.
12) Disconnect USB cable of the voice recorder and reconnect
it.
13
Use as a ball point pen
How to use manager program
• Hold the body ( ) of the main body and turn the rotating
part( ) to left/right and the tip of balls pen comes out or in.
• As for replacement of the ink tube, hold the rotating part( )
and keep turning the ink tube part( ) to left until it is
detached, and then, putt the tube to detach and replace it
with new one into the hole by tightly insert it.
14
Caution
Stop the voice recorder before using the manager program.
The recorded file may be damaged.
• Specification of the ink tube
BR-8A-4C (Producer : ZEBRA, Made in Japan)
Length : 67mm
Record
Warning
Do not disconnect USB cable while deleting file, saving into
computer or a voice recorder and formatting. File data may be
broken.
Caution
Stop
If the voice recorder folder isn’t created (connected to) in the
manager window, close the window and disconnect USB cable
from the voice recorder and reconnect it and execute the
manager.
1. Description of button and indicated function.
Find folder
Upper folder
Select View folder and file
View window again
VOS(Auto Voice Recording) ON/OFF
Select recording mode
Initialize the memory of the voice recorder
Indicate the remaining time of the voice recorder
Folder window of PC
Charging status indicator
Folder window of the voice recorder
Copy from the voice recorder folder to PC
Copy from PC to the voice recorder folder
Delete the selected file from the voice recorder folder
2. Save (Copy) the file of the voice recorder in PC
• Click “ ” button (Find folder) on the picture and select the
folder in PC to save.
• Select the file in the folder of the voice recorder to save in PC.
• In the picture, click “ ”(copy to PC) button, to save the
selected file of the voice recorder in PC.
3. Save (Copy) the file of PC in the voice recorder
Caution
Only the file recorded by this voice recorder can be saved from
PC to the voice recorder folder. Other files cannot be played in
this voice recorder.
• Open Find folder window in PC to select the saved folder.
• Select the file in the folder of PC to save.
• In the picture, click “ ”(copy to the voice recorder
folder) button to save in the folder of the voice recorder.
15
4. Play the file from PC
Double click the voice recording file saved in PC to play.
5. Format (initialize) the memory of the voice
recorder
Click “ ” button (Initialize the memory) in the previous page,
and “OK” icon appears in the window, then click “Yes” button
to start formatting. By formatting the memory, all the
contents in the memory will be deleted.
Therefore, be sure to save important file contents in
you PC.
6. Delete the file saved in the voice recorder
Select the file to delete from the folder of the voice recorder
and click Delete button “ ” in previous page to delete.
7. Change the file name
16
Extension “.wav” should be added when changing the file
name in PC. If the file saved in PC isn’t played, add “.wav” to
the name. ex) lecture.wav
8. Recording mode setting
Recording mode is a function selecting the sound quality
depending on user’s taste. Click XHQ(Extra High Quality)/
HQ(High Quality)/LP(Long Play) in Mode of the manager
to select.
window “
9. VOS (Auto Voice Recording)
VOS function is a function that the recorder detects sound
while recording and when it doesn’t sound anything, it
automatically pauses recording and when it sounds, it
resumes recording to use the memory efficiently enabling
long time recording. Click
in manager window “ ”, to set
:ON, :OFF.
10. Check the charging status
When charging is completed, the charging indicator lamp on
the main body is flickering.
For the charging status, check the charging status indicator
in the manager window “ ”.
Specification
Warranty policy
Recordable hour for each model
Model
Memory
XHQ(Extra High Quality)
HQ(High Quality)
LP(Long Play)
Charging hour
Battery using hour
(Completed charged)
Earphone
Using temperature
Exterior
Accessory
MQ-71
MQ-72
128MB
256MB
About 4.5 hours
About 9 hours
About 9 hours
About 18 hours
About 18 hours
About 36 hours
About 3 hours
Recording : About 12 hours
Playing : About 8 hours
10mW/32ohm
0°C ~ 40°C
ø12x150mm, 26g
Remote controller, Earphone, USB cable, CD, Owner’s manual
Free warranty period is 1 year after
purchase and if malfunction occurs in
normal condition according to the
caution in the manual, the sales agent
or service center will provide free
service.
Any modification, repair, damage and
malfunction due to act of god will be
charged even in the warranty period.
Packing cost and fee for delivery will
be borne by customer.
17
FCC Caution
Any changes or modifications in construction of this device which are not expressly approved by the party responsible for compliance
could void the user's authority to operate the equipment.
FCC Note
This equipment has been tested and found to comply with the limits for a Class B digital device, pursuant to Part 15 of the FCC Rules.
These limits are designd to provide reasonable protection against harmful interference in a residential installation. This equipment
generates, uses and can radiate radio frequency energy and, if not installed and used in accordance with the instructions, any, cause
harmful interference to radio communications. However, there is no guarantee that interference will not occur in a particular
installation. If this equipment does cause harmful interference to radio or television reception, which can be determined by turning the
equipment off and on, the user is encouraged to correct the interference by one or more of the following measures ;
-
18
Reorient or relocate the receiving antenna.
Increase the separation between the equipment and receiver.
Connect the equipment into an outlet on a circuit different from that to which the receiver is connected.
Consult the dealer or an experienced radio/TV technician for help.
Warranty card
Product name
Digital voice recorder(
)
Model name
Date of purchase
Place of purchase
Purchasing price
Telephone number
Others
Customer
Warranty period
Charged service
- Malfunction caused by careless
handling when using
- Malfunction caused by user’s
modification of the product
- Malfunction caused by act of god,
such as fire, salt, flood, earthquake
and etc.
- In case that the warranty period has
been expired
Name
Address
Telephone number
19
Digital Voice Recorder & Pen
Model : MQ-71/MQ-72
Made in Korea