1
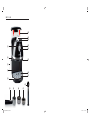
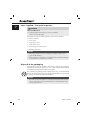
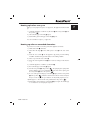
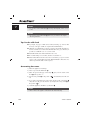
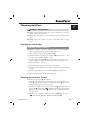
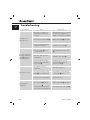
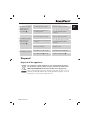
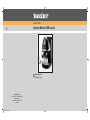
KITCHEN TOOLS
Espresso Machine SEM 1100 A2
6
Espresso Machine
Operating instructions
KOMPERNASS GMBH
BURGSTRASSE 21 · D-44867 BOCHUM
www.kompernass.com
ID-Nr.: SEM 1100 A2-06/11-V2
IAN: 66926
CV_66926_SEM1100A2_LB6.indd 1-3
22.07.2011 11:07:40 Uhr
SEM 1100 A2
1
2
3
4
5
i
u
6
z
t
7
8
r
9
e
CV_66926_SEM1100A2_LB6.indd 4-6
w
q
0
22.07.2011 11:07:41 Uhr
Index
GB
IE
Introduction . . . . . . . . . . . . . . . . . . . . . . . . . . . . . . . . . . . . . . . . . . . . . .2
Preface . . . . . . . . . . . . . . . . . . . . . . . . . . . . . . . . . . . . . . . . . . . . . . . . . . . . . . . . . . . . 2
Information for these operating instructions . . . . . . . . . . . . . . . . . . . . . . . . . . . . . . . . 2
Copyright . . . . . . . . . . . . . . . . . . . . . . . . . . . . . . . . . . . . . . . . . . . . . . . . . . . . . . . . . . 2
Limited liability . . . . . . . . . . . . . . . . . . . . . . . . . . . . . . . . . . . . . . . . . . . . . . . . . . . . . . 3
Warnings . . . . . . . . . . . . . . . . . . . . . . . . . . . . . . . . . . . . . . . . . . . . . . . . . . . . . . . . . . 3
Intended use . . . . . . . . . . . . . . . . . . . . . . . . . . . . . . . . . . . . . . . . . . . . . . . . . . . . . . . . 4
Safety . . . . . . . . . . . . . . . . . . . . . . . . . . . . . . . . . . . . . . . . . . . . . . . . . . . . . . . . . . . . . 4
Safety instructions . . . . . . . . . . . . . . . . . . . . . . . . . . . . . . . . . . . . . . . . . . . . . . . . . . . . 4
Items supplied / Transport inspection . . . . . . . . . . . . . . . . . . . . . . . . . . . . . . . . . . . . . 6
Disposal of the packaging . . . . . . . . . . . . . . . . . . . . . . . . . . . . . . . . . . . . . . . . . . . . . 6
Operating componentse . . . . . . . . . . . . . . . . . . . . . . . . . . . . . . . . . . . .7
Technical data . . . . . . . . . . . . . . . . . . . . . . . . . . . . . . . . . . . . . . . . . . . . .7
Commissioning . . . . . . . . . . . . . . . . . . . . . . . . . . . . . . . . . . . . . . . . . . . .8
Operation . . . . . . . . . . . . . . . . . . . . . . . . . . . . . . . . . . . . . . . . . . . . . . . .8
Filling the water tank. . . . . . . . . . . . . . . . . . . . . . . . . . . . . . . . . . . . . . . . . . . . . . . . . . 8
Heating up before every use . . . . . . . . . . . . . . . . . . . . . . . . . . . . . . . . . . . . . . . . . . . 9
Heating up after an extended downtime . . . . . . . . . . . . . . . . . . . . . . . . . . . . . . . . . . 9
Preparing Espresso . . . . . . . . . . . . . . . . . . . . . . . . . . . . . . . . . . . . . . . . . . . . . . . . . .10
Preparing Cappuccino . . . . . . . . . . . . . . . . . . . . . . . . . . . . . . . . . . . . . . . . . . . . . . .12
Tips for the milk froth . . . . . . . . . . . . . . . . . . . . . . . . . . . . . . . . . . . . . . . . . . . . . . . .14
Generating hot water . . . . . . . . . . . . . . . . . . . . . . . . . . . . . . . . . . . . . . . . . . . . . . . .14
Cleaning and Care . . . . . . . . . . . . . . . . . . . . . . . . . . . . . . . . . . . . . . . .15
Cleaning the milk frother . . . . . . . . . . . . . . . . . . . . . . . . . . . . . . . . . . . . . . . . . . . . .15
Cleaning the hot water shower . . . . . . . . . . . . . . . . . . . . . . . . . . . . . . . . . . . . . . . .15
Cleaning accessories . . . . . . . . . . . . . . . . . . . . . . . . . . . . . . . . . . . . . . . . . . . . . . . .16
Cleaning the appliance . . . . . . . . . . . . . . . . . . . . . . . . . . . . . . . . . . . . . . . . . . . . . .16
Descaling the appliance . . . . . . . . . . . . . . . . . . . . . . . . . . . . . . . . . . . . . . . . . . . . . .16
Troubleshooting . . . . . . . . . . . . . . . . . . . . . . . . . . . . . . . . . . . . . . . . . .18
Disposal . . . . . . . . . . . . . . . . . . . . . . . . . . . . . . . . . . . . . . . . . . . . . . . . .19
Disposal of the appliance. . . . . . . . . . . . . . . . . . . . . . . . . . . . . . . . . . . . . . . . . . . . .19
Warranty and Service . . . . . . . . . . . . . . . . . . . . . . . . . . . . . . . . . . . . .20
Importer . . . . . . . . . . . . . . . . . . . . . . . . . . . . . . . . . . . . . . . . . . . . . . . .20
SEM 1100 A2
1
Introduction
GB
IE
Preface
Dear customer,
with the purchase of this appliance you have decided on a quality product from
SilverCrest, which, in terms of technology and functionality, meets the most
up-to-date development standards.
Read the information included here so that you can quickly familiarize yourself
with your appliance and thus make full use of its functions.
We wish you a great deal of enjoyable use.
Information for these operating instructions
These operating instructions are a component of the Espresso Machine SEM 1100 A2
(henceforth designated as the appliance) and they supply you with important
information about the intended use, safety, installation and connection as well as
operation of the appliance.
The operating instructions must be constantly kept available close to the appliance.
They are to be read and applied by every person charged with the operation of
the appliance.
Keep these operating instructions and hand them over with the appliance to any
future owners.
Copyright
This documentation is copyright protected.
All rights, including those of photographic reproduction, duplication and distribution
by means of particular methods (for example data processing, data carriers and
data networks), wholly or partially, as well as substantive and technical changes,
are reserved.
2
SEM 1100 A2
Limited liability
GB
IE
All technical information, data and information for installation and operation contained in these operating instructions corresponds to the latest available at the
time of printing and, to the best of our knowledge, take into account our previous
experience and know-how.
No claims can be derived from the details, illustrations and descriptions in these
instructions.
The manufacturer assumes no responsibility for damage caused by failure to observe these instructions, improper use, inappropriate repairs, making unauthorized
modifications or for using unapproved replacement parts.
Warnings
In the extant operation instructions the following warnings are used:
WARNING
A warning of this risk level signifies a potentially dangerous
situation.
If the risk situation is not avoided it can lead to injuries.
► The directives in this warning are there to avoid personal injuries.
IMPORTANT
A warning of this risk level signifies potentially property
damage.
If the situation is not avoided it can lead to property damage.
► The directives in this warning are there to avoid property damage.
NOTICE
► A notice signifying additional information that assists in the operation of
this appliance.
SEM 1100 A2
3
Intended use
GB
IE
This appliance serves exclusively for the preparation of espresso/cappuccino and
the heating of water. It is intended solely for use in domestic households. Do not
use it for commercial applications.
This appliance is not intended for any other use or for uses beyond those detailed
here.
WARNING
Risk from unintended use!
Risks can come from the appliance if it is used for unintended purposes and/
or other types of use.
► Use this appliance exclusively for its intended purposes.
► Observe the procedures described in these operating instructions.
Claims of any kind for damage resulting from unintended use will not be accepted.
The operator alone bears liability.
Safety
In the chapter “Safety Notices” you will receive important safety information
regarding the handling of the appliance.
This appliance complies with the statutory safety regulations. Incorrect usage can,
however, lead to personal injury and property damage.
Safety instructions
For safe handling of the appliance observe the following safety information:
WARNING - RISK OF INJURY!
■ Before use check the appliance for visible external damage. Do not put into
operation an appliance that is damaged or has been dropped.
■ This appliance is not intended for use by individuals (including children) with
restricted physical, physiological or intellectual abilities or deficiences in experience and/or knowledge unless they are supervised by a person responsible
for their safety or receive from this person instruction in how the appliance is
to be used.
■ Children should be supervised to ensure that they do not play with the appliance.
4
SEM 1100 A2
■ Repairs should only be carried out by authorized specialist companies or
by the Customer Service Department. Incorrect repairs can result in significant
risks for the user. In addition warranty claims become void.
GB
IE
■ NEVER submerse the appliance in water or other liquids. Risk of electric
shock!
■ Never touch the appliance with wet or moist hands.
■ To avoid risks, arrange for defective plugs and/or cables to be replaced at
once by qualified technicians or our Customer Service Department.
■ Risk of Burns! During use, some parts become very hot!
■ Hot vapour plumes are formed when the product is in use. Take care to ensure
that you do not scald yourself! Keep a safe distance away from the steam.
■ Connect the appliance only to correctly installed and earthed mains power
sockets.
ATTENTION - PROPERTY DAMAGE
■ Defective components may only be replaced with original replacement parts.
Compliance with the safety requirements can only be assured by using original
replacement parts.
■ Protect the appliance from moisture and liquid penetration.
■ Protect the appliance against shock, moisture, dust, chemicals, extremes of
temperature and from being too close to sources of heat (ovens, radiators).
■ NEVER submerse the appliance in water or other liquids.
■ Always pull the plug from the mains power socket; never pull on the cable.
■ Never leave the appliance unsupervised whilst in use.
■ Do not use an external timing switch or a separate remote control system to
operate the appliance.
■ Do not operate the appliance in rooms where the temperatures are below
or around 0° C. Should the water in the pipes or the water tank freeze, the
appliance could be damaged.
■ Never operate the appliance outdoors. This appliance is intended only for
indoor use.
NOTICE
► A repair to the appliance during the warranty period may only be carried
out by a cutomer service department authorized by the manufacturer
otherwise no additional warranty claims can be considered for subsequent
damages.
SEM 1100 A2
5
Items supplied / Transport inspection
GB
IE
WARNING
Risk of suffocation!
► Packaging material should not be used as a play thing.
There is a risk of suffocation!
The appliance is delivered with the following components as standard:
▯ Espresso Machine
▯ Sieve carrier
▯ large espresso sieve
▯ small espresso sieve
▯ Measuring spoon with compactor
▯ Operating Instructions
NOTICE
► Check the contents to make sure everything is available and there are no
signs of visible damage.
► If the contents are not complete, or are damaged due to defective packaging
or transportation, contact the service hotline.
Disposal of the packaging
The packaging protects the appliance from transport damage. The packaging
materials are selected from the point of view of their environmental friendliness
and disposal technology and are therefore recyclable.
The recirculation of packaging into the material circuit saves on raw material and
reduces generated waste. Dispose of packaging material that is no longer needed
according to the regionally established regulations.
NOTICE
► If possible preserve the appliance's original packaging during the warranty
period so that in the case of a warranty claim you can package the appliance properly for return.
6
SEM 1100 A2
Operating componentse
GB
IE
1 Water tank
2 Steam regulation knob
3 On/Off switch
4 Green heating-up control lamp
5 Rotary switch
6 Compactor
7 Recess for the red float
8 Drip grill
9 Measuring spoon with compactor
0 small espresso sieve
q large espresso sieve
w Sieve carrier
e Sieve blocker
r Drip tray
t Hot water shower
z Milk foamer
u Grip
i Red heating-up control lamp
Technical data
Voltage
Nominal performance
Pump pressure
Water tank (Max)
SEM 1100 A2
220 - 240 V ˜ 50 Hz
1100 W
approx. 1.5 MPa (15 bar)
1.5 Litres
Energy consumption in standby
mode until automatic switch-off
approx. 31.3 Wh
Energy consumption in off-mode
0 Wh
7
Commissioning
GB
IE
1) Clean the sieve holder w, the measuring spoon 9, the espresso sieve 0 q,
the drip grill 8 and the water tank 1 as described in the chapter “Cleaning
and Care”.
2) Place the appliance on a level and heat-resistant surface. Ensure that a mains
power socket is in the vicinity.
3) Insert the drip grill 8 so that the red float can protrude through the recess 7
in the drip grill 8.
4) Insert the plug into a mains power socket.
5) Proceed as follows before the first use, so as to clean the internal pipelines:
6) Allow sufficient water for about 5 cups of coffee to flow through the appliance. Refer to the chapter “Operation”.
7) Let steam generate for about 30 seconds. Refer to the chapter “Operation”.
NOTICE
► On the first use it may be that the pump is already audibly working, noises
occur, but still no water is coming out of the appliance. In this case, turn
the steam control switch 2 in the direction “+” so that air can escape from
the pipelines of the appliance (the function rotary switch 5 stands at the
“). After approx. 20 seconds the air will have escaped, the
position „
noises disappear and water flows from the appliance.
Operation
Filling the water tank
NOTICE
► Use only fresh drinking water for making espresso/cappuccino.
1) Pull the water tank 1 upward and out, open the lid and fill it with water:
Fill it with water to at least the Min. marking.
Never fill it with more water than up to the Max marking.
2) Push the water tank 1 back into the appliance so that it slides into the appliance on the rails and sits firmly.
■ You can also fill the water tank 1 without having to remove it from the appliance. Simply open the water tank lid and fill it with water from a bottle etc.
Ensure that no water runs beside the water tank 1.
8
SEM 1100 A2
Heating up before every use
GB
IE
Before you can prepare an espresso or cappuccino, the appliance must be heated
up.
1) Switch the appliance on with the on/off switch 3. The rotary switch 5 is at
the position „
“.
2) The red heating-up control lamp i glows.
3) Wait until the green heating-up control lamp 4 glows.
You can now make an espresso / cappuccino.
Heating up after an extended downtime
If you have not used it for some time, preheat the appliance as follows:
1) Fill the water tank 1 with water.
2) Place either the large q or the small espresso sieve 0 in the sieve carrier
w.
3) Insert the sieve carrier w into the appliance by placing it at the marking
“INSERT” and then turning it anticlockwise to the marking “LOCK”.
4) Place a cup under the sieve carrier w.
5) Close the steam regulation knob 2 (turn it as far as it will go in the direction
“ - “).
6) Switch the appliance on with the on/off switch 3.
7) The red heating-up control lamp i glows.
8) Turn the rotary switch 5 to the position “
”. The pump begins to pump water
into the appliance. As soon as water flows from the sieve carrier opening, turn
”.
the rotary switch 5 back to the position “
9) As soon as the green heating-up control lamp 4 glows, turn the rotary switch
5 to the position “
”. Allow the water to flow for about 1 minute. It may be
that you need to empty the cup in between. For this, briefly stop the process.
10) After approx. 1 minute turn the rotary switch back to the position “
”.
11) Wait until the green heating-up control lamp 4 glows again. The warming-up
is concluded. You can now prepare espresso.
SEM 1100 A2
9
Preparing Espresso
GB
IE
NOTICE
► If, before starting to make the espresso, you have taken hot steam from the
machine, we recommend you draw a little hot water before commencing
with the espresso preparation. If you do not, it may be that the coffee tastes
burnt. Hold an empty cup under the milk frother z. Turn the steam control
knob 2 in the direction "+". Turn the function rotary knob 5 to the position
" so that hot water flows out of the nozzle. Wait a few seconds before
"
turning the function rotary knob 5 back to to the position "
". Then turn
the steam control knob 2 back to closed (in the direction "-").
NOTICE
► Always ensure that the espresso sieve 0 q is clean and free of coffee
powder residues.
1) When the appliance is heated-up:
To prepare an espresso, place the small espresso sieve 0 in the sieve carrier
w. To prepare two espressos, place the large espresso sieve q in the sieve
carrier w.
2) Fill the small espresso sieve 0 to the max marking with espresso powder.
This equates to approx. 7g of powder or a levelled measuring spoon 9.
or...
Fill the large espresso sieve q to the max marking with espresso powder. This
equates to about 7g + 7g of powder or two levelled measuring spoons 9.
3) Compress the espresso powder using the tamper on the appliance 6. Then,
if necessary, fill it with more espresso powder, until the espresso sieb 0 q is
full up to the Max marking. Tamp the coffee powder down once again.
NOTICE
► Compaction of the coffee powder is an essential process for the preparation of an espresso. If the espresso powder is compacted very strongly, the
espresso runs through more slowly and there is more crema. If the espresso
powder is not so strongly compacted, the espresso runs through more
quickly and it creates very little crema.
10
SEM 1100 A2
4) Insert the sieve carrier w into the appliance by placing it at the marking “INSERT” and then turning it anticlockwise to the marking “LOCK”.
GB
IE
5) Place one (or two) cup(s) under the sieve carrier openings. We recommend
that you rinse the cups out with hot water beforehand, so that the espresso
does not cool so quickly.
6) As soon as the green heating-up control lamp 4 glows, you can turn the rotary switch 5 to the position “
”. The espresso flows into the cup(s).
WARNING
Never remove the sieve carrier w during the espresso output!
The resulting spray of hot espresso would lead to injury!!
► Always ensure that the rotary switch 5 stands at "
the sieve carrier w.
" before you remove
NOTICE
► This appliance is fitted with a pre-brew function. This means that the hot
water, before it is pressed through the espresso powder, stands for a short
time in the filter holder. This refines the aroma of the espresso.
7) When the cup(s) are filled to the desired quantity (about 20 ml), turn the
rotary switch 5 back to the position “
”.
You can now drink the espresso.
8) Switch the appliance off with the on/off switch 3.
NOTICE
► After 3 minutes the appliance will switch itself off automatically.
9) After every use remove the espresso powder from the espresso sieve 0 q.
Remove the sieve holder w from the appliance. Flip the sieve blocker e
upwards so that the espresso sieve 0 q cannot fall out of the sieve holder
w. Now empty the espresso sieve 0 q. Always dispose of the espresso
powder or espresso pads in an environmentally friendly manner, for example,
with the organic waste.
NOTICE
► Absolutely clean the hot water shower t after every use. Refer to the
chapter "Cleaning and Care".
SEM 1100 A2
11
GB
IE
NOTICE
► Regularly empty the drip tray r, at the latest when the red float in the
recess 7 of the drip grill 8 is visible.
NOTICE
► You can also use espresso pads for the preparation of espresso. Use only
espresso pads that correspond to the ESE standard. The ESE standard is
a system accepted by the leading manufacturers of espresso pads, which
makes possible the simple and clean preparation of espresso.
Preparing Cappuccino
WARNING
Be careful when working with steam for the milk foam production!
The hot steam or hot splashes can lead to injuries!
► Always operate the steam regulation knob 2 slowly.
1) Fill a container for frothing (preferably made of stainless steel) to third with
cold milk.
2) Ensure that the steam regulation knob 2 is closed (turn it as far as it will go
in the direction “-”).
3) Push the milk foamer z out to the side. Thereby, take hold of it only by the
grip u.
4) Turn the rotary switch 5 to the position “
control lamp 4 glows.
”. Wait until the green heating-up
5) Hold an empty container under the milk frother z. Slowly turn the steam
control knob 2 in the direction “+”. Condensed water/spray comes from
the nozzle. Thus, the nozzle and the water circulation inside the appliance is
cleaned.
12
SEM 1100 A2
6) When only steam comes out of the nozzle, turn the steam control knob 2 in
the direction “-” until no more steam comes out of the nozzle. Pour the water
in the container away.
GB
IE
7) Now hold the frothing container in your hand, so as to feel the milk temperature, and guide the nozzle of the milk frother z lightly into the milk. Thereby,
hold the frothing container at a slight angle.
8) Slowly turn the steam control knob 2 in the direction “+”.
9) Rotate the container for frothing in a circular motion and hold the tip of the
nozzle just below the surface of the milk: deep enough so that the milk does
not spray in all directions and high enough so that a thick foam is produced.
Done properly, a deep buzzing sound is audible.
10) As the milk froth rises place the nozzle deeper in the milk, to froth up the next
“layer” and to avoid a burnt taste in the foam.
11) Finally, insert the nozzle completely and close the steam control knob 2
a little, so that the milk is heated. Hold the frothing container at a slight angle,
so that the milk gently spins around while it is being stirred with the nozzle.
12) When the milk foam has the desired consistency and temperature, switch the
steam control knob 2 off (up to the stop in the “-” direction).
13) First then remove the nozzle from the milk.
14) Turn the rotary switch 5 to the position “
”.
NOTICE
► For the preparation of cappuccino always use bigger cups than for espresso,
because foamed milk will be added.
15) For the preparation of a cappuccino, proceed exactly as you would for an
espresso (see chapter “Preparing espresso“/ the heating up is no longer necessary). Allow the water to pass through only for about twice as long as an
espresso (about 40 ml).
16) Switch the appliance off with the on/off switch 3.
NOTICE
► After 3 minutes the appliance will switch itself off automatically.
17) Now add the frothed milk into the previously prepared espresso. The cappuccino is now ready. According to taste, you can add sugar or sprinkle it with
cocoa powder.
SEM 1100 A2
13
GB
IE
NOTICE
► You can also use the milk frother z to heat up other liquids, such as cocoa
or tea.
NOTICE
► Absolutely clean the milk frother z after every use. Refer to the chapter
"Cleaning and Care".
Tips for the milk froth
■ In principle, any type of milk can be frothed, including soy and rice milk.
However, some types of milk can only be frothed with limitations.
■ Skimmed or low-fat milk does not burn as easily as whole milk, but with a too
low fat content there is a risk that the milk froth will not be good. Therefore, if
possible use a milk with 3.5% or 1.5% fat content.
■ Well chilled milk can be frothed better than less cold.
■ Do not froth milk up a second time, otherwise it could burn on.
■ Allow frothed milk to stand for about 30 seconds before you pour it onto the
espresso. Thus, larger bubbles burst and still fluid milk falls to the bottom. You
can then pour the fine froth onto the espresso.
Generating hot water
1) When the appliance is heated-up:
2) Place a cup under the milk frother z.
3) When the green heating-up control lamp 4 glows, turn the steam control
knob 2 to the position “+”.
4) Turn the rotary switch 5 to the position “
zle.
”. Hot water flows from the noz-
5) If you wish to interrupt the hot water supply, turn the steam control knob 2
off (as far as it will go in the direction “-”) and place the rotary switch 5 at
the position “
”.
6) Switch the appliance off with the on/off switch 3.
NOTICE
► After 3 minutes the appliance will switch itself off automatically.
14
SEM 1100 A2
Cleaning and Care
GB
IE
WARNING - RISK OF INJURY!
■ Always remove the plug from the mains power socket before you clean the
appliance. Risk of electric shock!
■ Always allow the appliance to cool down before you start to clean it. Risk of
Burns!
■ NEVER submerse the appliance in water or other liquids. Risk of electric
shock!
Cleaning the milk frother
ATTENTION - PROPERTY DAMAGE
■ NEVER use abrasive, corrosive or chemical agents to clean the appliance.
These could damage the upper surfaces of the appliance.
1) Place an empty container under the milk frother z.
2) Immediately after use turn the steam control knob 2 to the position “+ “ and,
for a few seconds, allow the steam to escape.
3) Turn the steam control knob 2 off (as far as it will go in the direction “-”),
switch the appliance off and remove the plug from the mains power socket.
4) Allow the nozzle to cool down.
5) Remove the nozzle and clean it thoroughly in warm water.
6) Check to see if the small hole in the nozzle is clogged and, if so, clear it with
a needle.
7) Clean the steam delivery tube of the milk frother z with a damp cloth.
8) Replace the nozzle back onto the steam supply pipe.
Cleaning the hot water shower
Clean the hot water shower t after each use:
1) After you have prepared the espresso/cappuccino and removed the sieve
holder w, wipe the entire surface of the hot water shower t with a moist
cloth so that all powder residues are removed.
2) Then place an empty cup under the hot water shower t and turn the function
rotary knob 5 to the position „
“. Water flows from the hot water shower
t and it flushes the last remaining powder residues out. With this, the water
can spray a little.
3) After about 20 seconds place the function rotary knob 5 back to the position
„
“ and switch the appliance off with the On/Off switch 3.
SEM 1100 A2
15
Cleaning accessories
GB
IE
1) Clean the filter holder w, the two coffee filters 0 q, the water tank 1, the
measuring scoop 9 and the drip tray 8 in warm water.
NOTICE
► If you put detergent into the water, it may have a negative effect on the taste
of the espresso. If the stains can only be removed with detergent, always
rinse the items afterwards with lots of clean water.
2) Dry all parts well.
3) The drip tray r is suitable for cleaning in the dishwasher.
Cleaning the appliance
Clean the housing with a moist cloth. If necessary, use a little detergent on the
cloth.
Descaling the appliance
Regularly descale the appliance. The appliance should be descaled after about
200 espresso preparations. Depending on the hardness of the water in your area,
this figure may differ.
For descaling, use commercial available descaler for espresso machines. Proceed
as described in the instructions for usage of the descaler.
If you do not have a descaler, you can proceed as follows:
1) Fill the water tank 1 to the marking MAX.
2) Dissolve 2 tablespoons (about 30 grams) of citric acid (available in drugstores or chemists) into the water.
3) Replace the water tank 1 into the appliance.
4) Switch the appliance on with the on/off switch 3. The rotary switch 5 must
be in the position “
”. The steam control knob 2 is closed.
16
SEM 1100 A2
5) Insert the sieve carrier w, WITHOUT espresso powder, into the appliance
and place a cup under the sieve carrier w. As soon as the green heating-up
”.
control lamp 4 glows, turn the rotary switch 5 to the position “
GB
IE
6) Let about 2 cups (coffee cups) of water pass through and then stop the process.
7) Hold a container under the milk frother z.
8) Place the rotary switch 5 at the position “ ” and wait until the green heating-up control lamp 4 glows. Slowly turn the steam control knob 2 to the
position “+ “. Allow the appliance to create steam for about 2 minutes.
9) After 2 minutes close the steam control knob 2, set the rotary switch 5 to the
position “
” and switch the appliance off.
10) Let the scaling agent take effect for about 15 minutes.
11) Repeat the steps 4 - 10 three times.
12) Then place the rotary switch 5 at the position “
through until the water tank 1 is empty.
” and let the solution flow
13) Rinse the water tank 1 with clean water and then fill it with clean water up
to the Max marking.
14) Turn the rotary switch 5 to the position “
up control lamp 4 glows.
” as soon as the green heating-
15) Allow the water to run through.
16) Repeat the steps 13 - 15 three times.
17) Fill the water tank 1 with water once again.
18) Turn the rotary switch 5 to the position “
”.
19) Hold a container under the milk frother z and slowly rotate the steam control
knob 2 to the position “+” as soon as the green heating-up control lamp 4
glows.
20) After about 1 minute close the steam control knob 2, set the rotary switch 5
to the position “
” and switch the appliance off.
NOTICE
► After 3 minutes the appliance will switch itself off automatically.
SEM 1100 A2
17
Troubleshooting
GB
IE
Problem
The espresso no
longer flows out
the espresso drips over
the edges of the sieve
carrier w instead of
from the openings.
The espresso is cold.
Noisy operation
of the pump.
18
Cause
Remedy
• The espresso powder is too
moist and/or compressed
too tight.
• Reprepare the espresso, however,
this time do not compress it so
tightly, or exchange it completely.
• No water in the water tank 1.
• Fill the water tank 1 with water.
• The holes in the sieve carrier
openings are blocked.
• Clean the sieve carrier w.
• The sieve carrier w is not
correctly inserted.
• Correctly insert the sieve carrier
w.
• The sieve carrier openings
are blocked.
• Clean the sieve carrier w.
• There are espresso powder
residues on the edges of the
sieve carrier w.
• Clean the espresso powder
residues from the edges of
the sieve carrier w.
• The appliance was not
preheated.
• Preheat the appliance.
• The green heating-up control
lamp 4 has not yet glowed.
• Wait until the green heating-up
control lamp 4 glows.
• The cups were not prewarmed.
• Prewarm the cups.
• The water tank 1 is empty.
• Fill the water tank 1 with water.
• The water tank 1 is not properly
inserted, meaning that water
• Correctly insert the water tank 1.
cannot enter into the appliance.
SEM 1100 A2
The crema is too light
(the espresso runs
quickly out of the
sieve carrier w)
The crema is too dark
(the espresso runs
slowly out of the
sieve carrier w)
• too little espresso powder.
• Use more espresso powder.
• The espresso powder is too
coarsely ground.
• Use only the espresso powder
specially manufactured for
espresso.
• too much espresso powder.
• Use less espresso powder.
• The powder is too finely ground
or moist.
• Use only the espresso powder
specially manufactured for
espresso.
• The sieve is blocked.
• Clean the sieve.
• The milk is not cold enough.
• Use milk from the refrigerator.
• The milk foamer z is dirty.
• Clean the milk foamer z.
GB
IE
The milk does not foam.
Disposal
Disposal of the appliance
Do not dispose of this appliance in your normal domestic waste.
This product is subject to the provisions of the European Directive
2002/96/EC-WEEE (Waste Electrical and Electronic Equipment).
Dispose of this appliance through an approved waste disposal centre or at your
community waste facility. Observe the currently applicable regulations. In case of
doubt, please contact your waste disposal centre.
SEM 1100 A2
19
Warranty and Service
GB
IE
The warranty for this appliance is for 3 years from the date of purchase. The
appliance has been manufactured with care and meticulously examined before
delivery.
Please retain your receipt as proof of purchase. In the case of a warranty claim,
please make contact by telephone with our Customer Service Department. Only
in this way can a post-free despatch for your goods be assured.
NOTICE
► The warranty covers only claims for material and manufacturing defects,
but not for transport damage, wearing parts or for damage to fragile
components, e.g. buttons or batteries.
This product is for domestic use only and is not intended for commercial use. The
warranty is void in the case of abusive and improper handling, use of force and
internal tampering not carried out by our authorised service branch.
Your statutory rights are not restricted in any way by this warranty. The warranty
period is not extended by repairs made under the warranty. This applies also to
replaced and repaired parts.
Damages and defects extant at the time of purchase must be reported immediately
after unpacking, resp. no later than two days after the date of purchase.
Repairs made after the lapse of the warranty period are subject to charge.
Service Great Britain
Tel.: 0871 5000 720 (£ 0.10/Min.)
E-Mail: [email protected]
IAN 66926
Service Ireland
Tel.: 1890 930 034
(0,08 EUR/Min., (peak))
(0,06 EUR/Min., (off peak))
E-Mail: [email protected]
IAN 66926
Importer
KOMPERNASS GMBH
BURGSTRASSE 21
44867 BOCHUM, GERMANY
www.kompernass.com
20
IB_66926_SEM1100A2_GB6.indd Abs3:20
SEM 1100 A2
22.07.2011 12:24:41 Uhr