1
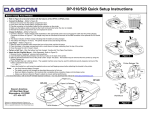
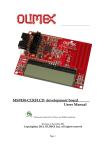
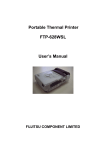
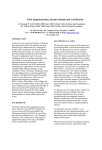
LCM20 and LCM25 Quick Setup Instructions
Before Using Your Printer:
• Refer to Figure A to become familiar with the features of the LCM20 or LCM25 printer.
• Connect the Battery – (Refer to Figure B)
1. Remove the screw from the battery compartment door.
2. Push down and slide off the battery compartment door.
3. Plug the connector on the battery cable into the connector on the printer.
4. Make sure the battery cable is routed so that it will not be pinched when the door is installed.
5. Reinstall the battery compartment door and replace the screw.
• Charge the Battery – (Refer to Figure A)
™
1. Connect a PrintekMobile trickle charger (sold separately) to the appropriate power source and plug the cable into the printer’s Power
Connector as shown in Figure A. The charger may also be connected at the back of the DB9 connector of the optional RS-232 Serial
Cable.
2. The Status Indicator will flash orange indicating that the battery is being charged.
3. The battery will charge in 15 hours. The printer should not be used during this time.
• Load Paper – (Refer to Figure C)
1. Slide the paper lid release button toward the front of the printer until the lid opens.
2. Place the paper in the paper compartment with a small amount of paper extending from the top of the printer.
3. Close the paper lid until it “snaps” closed.
• Perform a Self Test – After the battery has fully charged, “double-click” the Paper Feed button.
• Attach the Belt Clip/Wall Mount – (Sold Separately, Refer to Figure D):
1. Remove the two “breakouts” using a small screwdriver.
2. Insert the Belt Clip/Wall Mount Bracket into the four holes on the back of the printer.
3. Slide the bracket toward the front of the printer until it “snaps” into place. The bracket may be removed from the printer by using the
Printer Release tab.
4. Place the Belt Clip over a belt as shown. The supplied machine screw may be used for additional security (requires removal of the
battery compartment door screw).
––– OR –––
Fasten the bracket to a wall using the supplied anchors and self tapping screws before attaching the bracket to the printer.
Notes: • Use Only Printek Battery Chargers.
• The battery must be fully charged as described above prior to first use.
• Maximum Battery Capacity is first reached after completing three complete charge and discharge cycles.
• Always use Genuine Printek Paper & Labels to ensure optimal performance.
For more information, refer to the LCM20/LCM25 Operator’s Manual. You may download this manual at www.printek.com.
Paper Lid
LCM20
Figure C
Printer Release Tab
2
3
Belt
1
LCM25
Paper Lid Release
Status
Indicator
Printek, Inc.
1517 Townline Road
Benton Harbor, MI 49022
800-368-4636
Printek is a registered trademark of Printek, Inc.
Bluetooth is a registered trademark of Bluetooth SIG, Inc.
IrDA is a registered trademark of the Infrared Data Assoc.
Figure B
Wall Mount
Figure D
IrDA Window
Paper Feed Button
Figure A
Operating Modes
Interfacing
The LCM20 and LCM25 printers have three operating modes, when not actually printing:
• "Idle Mode": ready to accept data, but no data are in the buffer awaiting printing;
• “Sleep Mode": awaiting a press of the paper feed button, connection of an external charger, or
receipt of external;
• "Spooling Mode": active, but storing data for later printing.
RS-232 SERIAL INTERFACE (All Models)
All LCM model printers have an industry standard RS-232
interface. The default parameters are 9600 baud, 8 data
bits, 1 stop bit and no parity. Other baud rates may be
programmed by control codes, or by using a printer setup
utility.
Idle Mode
In idle mode, the printer is ready to receive data, which will be printed as soon as complete lines or
graphics patterns are decoded. It responds to the paper feed button in the normal way, and can also
produce a demonstration print (see below). Power consumption is such that a fully-charged battery
pack would last over 10 hours, but the printer will normally switch from idle mode into sleep mode
when there is no activity, extending battery life.
Sleep Mode
Power control is automatic or by command from the host. To save power, the printer enters sleep
mode after a period of inactivity (this period is factory-set to 4 minutes in Bluetooth printers, and 30
seconds in non-Bluetooth printers). The printer can also be programmed to stay awake indefinitely or
to go to sleep on command. Alternatively these functions may be controlled directly via the Wake Up
control signal of the RS-232 data connection.
In sleep mode, power consumption is negligible, but data stored in the buffer are lost. Special
routines allow for data to be printed out automatically before going to sleep. User programmable
settings such as Baud rate and operational preferences are retained during sleep mode or battery
replacement. The Status Indicator is off in sleep mode. The system designer can maximize battery
life by arranging that the printer is generally in sleep mode, except when printing.
The printer enters sleep mode as follows by command from the host or at the end of a programmable
period of inactivity (this period is extended in spooling mode).
The printer will never enter sleep mode when data is being received, the RS-232 “Wake Up” control
line is active, an IrDA connection is present, or a charger is connected.
The printer may be awakened from sleep mode by pressing the paper feed button, by the RS-232
"Wake-up" control line becoming 'active', by receipt of RS-232 data from the host (typically a string of
50 NUL characters), by IrDA interface activity, or by connecting the external battery charger.
Spooling Mode
In spooling mode, data is received and stored, but not printed. This is useful when printing needs to
be suppressed during data transfer (for example in mobile radio systems); or when the printer is
unable to print because the paper has run out or the lid is open.
The printer will automatically enter spooling mode when the paper is out, when the paper lid is open, if
some other error condition occurs, or by command from the host. Spooling mode may be exited by
clearing the error condition, “double-clicking” the paper feed button, or by host command.
Some host equipment uses a constant space condition
(+12V) to indicate a reset condition or wait state. Some
battery powered host equipment presents the same
output signal when they go to sleep.
Power Connector
Serial I/O Connector
Pin
1
2
3
4
5
6
Direction
To Printer
To Printer
To Printer
To Host
To Host
–––
Description
Opt. Charger Input
Wake-up Input
RS-232 Rx Data
RS-232 Tx Data
RS-232 Busy
Common
The LCM20/LCM25 can be set to ignore this condition as detailed in the Programmer’s Manual,
but even then this type of host behavior may result in one or more spurious characters being
received and printed by the printer, or the printer may be prevented from going to sleep.
IrDA INTERFACE (IrDA Models Only)
IrDA models feature an Infra-Red window on the front of the body. It includes special hardware
which wakes the printer when any Infra-Red activity is detected. In order to reduce the occurrence
of 'false triggers', the sensitivity of this wake-up sensor is reduced. It may be necessary to bring
the host IrDA device fairly close to the front of the printer before it will wake up.
Once awake, the printer will respond to communications from an IrDA compliant primary device.
The printer supports 'point-to-point' applications (i.e. one primary device and one secondary
device). It operates only as a secondary device, and cannot initiate a link between devices.
Once a link is established then the printer lights a red indicator through the Infra-Red window. The
link will continue as long as the devices are maintained in line-of-sight and within operating range.
While a link is maintained, data may be exchanged freely between the two devices.
The protocols supported by the LCM series printers are as follows: IrPHY V1.0, IrLAP, IrLMP, IAS,
TinyTP and IrCOMM 9-wire.
BLUETOOTH INTERFACE (Bluetooth Models Only)
Bluetooth models includes a class 2 implementation of the Panasonic PAN1440 module, which is
Bluetooth 1.1 compliant, and is certified to EN 300 328. The protocols and profiles supported are
as follows: LM, L2CAP, RFCOMM, SDP, TCS, SPP (Serial Port Profile).
The details of how to establish a Bluetooth link and transfer data will vary greatly depending on the
primary host device. However, the process will generally involve the following stages:
Status Indications
The Status Indicator on the front of the printer uses a number of color combinations and flashing
patterns to provide status information as described below.
Pattern
Constant Green
Fast Flashing Green
Long Green - Short Red
Short Green - Short Red
Short Green - Long Orange
Long Orange Flashing
Fast Flashing Red
No light
The printer transmits XON/XOFF and status information
to the host. The hardware busy line is true (nominal -12V)
when busy. Serial output lines relax to approximately 0V
when the printer is in Sleep Mode, and the user’s system
must allow a short period after awakening from Sleep
Mode before relying on the values of these signals.
1
Battery Status
Buffer Mode
Running
Normal
Running
Spooling
Battery Low
Normal
Battery Low
Spooling
Trickle Charging
Normal
Trickle Charging
Spooling
Error Condition
Spooling (Printing prohibited)
Sleep Mode or Battery Completely Discharged
1.
2.
3.
4.
5.
Discovery of Bluetooth devices;
Discovery of the printer’s services;
Selection of the Serial Port Profile;
It may be necessary to Pair with the printer;
Connecting to the printer.
Note: The PIN for making a secure Bluetooth connection is pre-set to “1234”.
Usually the Bluetooth link is maintained for as long as the devices are within operating range.
While the link is active, data may be exchanged freely between the two devices. Occasionally the
link may be lost, in which case the user should re-initiate the link from the primary host as
described above.
There is no facility to wake the printer over the Bluetooth link. The printer must be awake before a
Bluetooth link may be established and any data can be transferred. Because of this, the default
Sleep Period for Bluetooth models is extended to 4 minutes.
Part Number 6785 Rev A