1
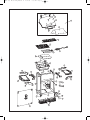
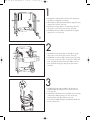
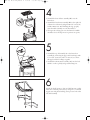
[WPE 039] E20101 BBQ Manual E
12/22/04
2:05 AM
Page 14
[WPE 039] E20101 BBQ Manual E
12/22/04
2:05 AM
Page i
Electric Barbecue
S A F E U S E , C A R E A N D A S S E M B LY M A N U A L
WA R N I N G
Improper installation, adjustment,
alteration, service or maintenance
can cause injury or property damage.
Read the installation instructions
thoroughly before installing or
servicing this equipment. Failure to
follow these instructions could
cause property damage, personal
injury, or death.
DANGER
DO NOT use electric barbecue for
indoor cooking or heating. DO NOT use
for indoor heating. NOT to be
used in boats or recreational vehicles.
WA R N I N G
Failure to follow all of the
Manufacturer’s instructions could result
in hazardous fires, explosions,
property damage, or serious personal
injury or even death.
E20101
85-1027-0
Read and save this manual for future reference. If pre-assembled,
leave this manual with unit for consumer’s future reference.
For product inquires, parts, and warranty and troubleshooting support,
please call 1-877-707-5463.
WA R N I N G
Follow the instructions carefully prior
to operation of barbecue.
DO NOT try to use this barbecue
without reading this manual.
THIS BARBECUE IS FOR
O U T D O O R U S E O N LY
[WPE 039] E20101 BBQ Manual E
TABLE
12/22/04
OF
CONTENTS
Warranty . . . . . . . . . . . . . . . ii
2:05 AM
Page ii
WA R R A N T Y
Please call toll-free 1-877-707-5463 for warranty and service. Have
your serial number and sales receipt handy. DO NOT return unit to
the store.
Installation . . . . . . . . . . . . . 1
Additional Warnings . . . . . . 1
Important Safeguards . . . . . 1
Safety First . . . . . . . . . . . . . 2
Danger, Warning, . . . . . . . . 2
Caution
Cleaning and Care. . . . . . . . 4
Operating Your Barbecue . . 5
Better Service . . . . . . . . . . . 5
Parts List and. . . . . . . . . . . . 6
Parts Diagram
Assembly Instructions . . . . . 8
Serial number is required for warranty; please keep proof of purchase with
manual. Please mail in warranty card provided to ensure registration of
your unit.
This MasterChef ™ product carries a one-year limited warranty against
defects in manufacturing workmanship for all upper and lower castings,
shelves, cooking grates, lid, heating element. Paint is covered for one-year.
This Limited Warranty shall be limited to the repair or replacement of
parts that prove defective under normal use and service and which on
examination shall indicate, to Trileaf Distribution’s satisfaction, they are
defective. Trileaf Distribution reserves the right to request the return of
defective parts. Before returning any parts, contact the toll-free hotline
1-877-707-5463.
If Trileaf Distribution confirms the defect and approves the claim, Trileaf
Distribution will elect to replace such parts without charge. The foregoing
warranty does not apply to defects resulting from faulty installation, operation, disassembly, alterations or remodeling, or misuse, misapplication,
neglect, abuse, accident, tornado, hurricane, and earthquake; or lack of
proper maintenance, cleaning and care.
Warranty will not apply if this product is used for commercial or rental
purposes. This warranty shall not extend to anyone other than the original purchaser of this product. Should this product become defective
within the stated warranty period, do not return to store, but call
1-877-707-5463. Have the serial number and sales receipt handy.
Note: Without the serial number, the warranty cannot be honoured.
Purchaser: By accepting delivery of this barbecue, the purchaser hereby
accepts the foregoing and expressly waives any other remedy and damages,
direct, indirect, and consequential.
ii
[WPE 039] E20101 BBQ Manual E
12/22/04
2:05 AM
Page 1
INSTALLATION
The installation of this appliance must be in accordance with all local codes, or in
the absence of local codes:
• Canadian installation must conform to the current national standards.
ADDITIONAL
Minimum clearance to adjacent combustible materials:
• 76 cm (30”) from furthest protruding edge on side of barbecue.
• 76 cm (30”) from furthest protruding edge on back of barbecue.
WA R N I N G S
See Drawing A
Always keep the area around this barbecue clean and clear of any and all
combustible material such as gasoline or other inflammable liquids, paper or
oily rags. Do not operate this barbecue under any overhanging or unprotected
construction. Remember this barbecue is for outdoor use only and is not
for use on any boat or recreational vehicle. Use this barbecue outdoors in a
well-ventilated area and at least 3 m (10”) from any dwelling or other building.
• Do not use in garages, or any other enclosed area.
• Do not leave your barbecue unattended while in operation.
• Do not obstruct the flow of combustion and ventilation to the barbecue.
• Do not use while under the influence of drugs or alcohol.
• Do not allow children to play anywhere near the barbecue.
•
30”
Minimum clearance of 76 cm (30”)
on both sides and back of the barbeque.
Drawing A
IMPORTANT
SAFEGUARDS
1) Read all instructions.
2) Do not touch hot surfaces. Use handles or knobs.
3) To protect against electrical shock, do not immerse cord, plugs, or heating
element in water or liquid.
4) Close supervision is necessary when any appliance is in use by or near children.
5) Unplug from outlet when not in use and before cleaning. Allow to cool before
putting on or taking off parts.
6) Do not operate any appliance with a damaged cord or plug or after the appliance
malfunctions or has been damaged in any manner. Call our customer service for a
replacement controller. This controller is made specifically for this barbecue.
7) The use of accessories not recommended by the manufacturer may cause injuries.
8) Fuel, such as charcoal briquettes, is not to be used with barbecue.
9) Use only properly grounded outlet.
10) Do not let cord hang over edge of table or counter, or touch hot surface.
11) Do not place on or near a hot gas or electric burner, or in a heated oven.
Extreme caution must be used when moving an appliance containing hot oil
or other hot liquids.
12) Always attach to barbecue first, then plug the cord into the wall outlet. To disconnect, turn any control to OFF, and remove plug from wall outlet.
13) Do not use barbecue for anything other than intended use.
14) Save these instructions.
1
[WPE 039] E20101 BBQ Manual E
12/22/04
2:05 AM
Page 2
WA R N I N G
FOR YOUR SAFETY
1. DO NOT store or use gasoline or other flammable vapours and
liquids within 25’ of this or any other appliance.
2. When cooking with oil/grease, DO NOT allow the oil/ grease
to exceed 350˚F (177˚C). DO NOT store extra cooking oil in the
vicinity of this or any other appliance.
3. DO NOT leave oil/grease unattended.
SAFETY FIRST
Read and understand all warnings and precautions prior to operating your barbecue.
For outdoor use only. This barbecue is not intended for commercial use. Do not use
this barbecue for anything other than intended use.
DANGER
Electric shock can kill or result in serious injury. To prevent electrical shock:
1) Use only with GFI (Ground Fault Interrupter) protected circuit.
2) Do not use barbecue when raining.
3) To prevent barbecue from being splashed by water, or falling into water, do not
use barbecue within 10’ of pool, pond, or other body of water.
4) Keep barbecue and electric controller dry and out of rain at all time.
5) Do not operate barbecue with an electric controller that has a damaged cord,
plug or metal probe. Call our customer service for replacement controller.
This controller is made specifically for this barbecue.
6) Never remove ground plug, or use with an adaptor that has two prongs.
7) Keep electric plugs off ground, and dry.
8) In case of fire, turn controller OFF, unplug barbecue from outlet, and allow fire
to burn out. Do not use water to put a fire out in this or any electrical appliance.
9) Do not use water or other liquid spray to clean barbecue without first unplugging
electric controller and removing heating element.
WA R N I N G
DO NOT use 16-guage extension cords. Damage to household
wiring and/or fire could result.
Never use charcoal or lighter fluid. A charcoal fire will
result, and the barbecue is not designed for charcoal. The fire will
create an unsafe condition and damage the barbecue.
DO NOT overload the wall outlet/extension cords.
2
[WPE 039] E20101 BBQ Manual E
12/22/04
2:05 AM
Page 3
WA R N I N G
1) This barbecue is for outside use only, and shall not be used in a building,
garage, or any other enclosed area.
2) The use of alcohol, or prescription or non-prescription drugs may impair your
ability to properly assemble or safety operate the barbecue.
3) Do not use gasoline, kerosene or alcohol for lighting.
4) Always open barbecue lid carefully and slowly as heat and steam trapped
within barbecue can severely burn you.
5) Always place your barbecue on a hard, level surface, away from combustibles.
6) Always keep children away from grill while unit is in use.
7) Do not use the barbecue unless it is completely assembled and all parts are
securely fastened and tightened.
8) Keep all combustible items and surfaces at 30’ away from the barbecue at all times.
CAUTION
1) When cooking, use utensils long enough to avoid personal injury.
2) Do not touch the metal parts of barbecue until it has completely cooled (about
45min.) to avoid burns, unless you are wearing protective gear (potholder,
gloves, BBQ mittens, etc.) Touch only knobs and handles.
3) Do not use in an explosive atmosphere. Keep barbecue area clear and free from
combustible materials, gasoline and other flammable vapours and liquids.
5) When not in use, store barbecue in protected area.
WA R N I N G
If the above instructions are not completely adhered to,
it could cause a fire/electric shock, resulting in death or serious
Injury, or property damage.
3
[WPE 039] E20101 BBQ Manual E
12/22/04
2:05 AM
Page 4
CLEANING
Cleaning
AND CARE
Burning-off the barbecue after every use (approx. 15 minutes) will prevent food
residue from building up on your grates.
Recommended cleaning materials:
Mild liquid dishwashing detergent
Nylon cleaning pad
• Putty knife/scraper
• Hot water
• Wire brush
•
•
Do not use cleaners that contain acid, mineral spirits or xylene.
Outside Surfaces: The porcelain-enamel finish on your barbecue lid has a glasslike composition that should be handled with care to prevent chipping. Use mild
liquid dishwashing detergent, or baking soda and hot water solution. For stubborn
stains, try using a non-abrasive scouring powder, then rinse off with water.
If the inside surface of the grid has the appearance of peeling paint, it is baked on
grease buildup that has turned to carbon and is flaking off. The lid is porcelainenameled, so it is not peeling paint. Clean with a strong soap detergent and hot
water solution. Rinse with water and allow to completely dry. Never use oven
cleaner here, or anywhere on your barbecue.
Interior of Barbecue Body: Remove residue and buildup by using brush, scraper
and/or cleaning pad, then wash with dishwashing detergent and hot water solution.
Rinse with water and let dry completely.
Plastic Surfaces: Wash with a soft cloth and dishwashing detergent and hot water
solution. Rinse with water. Do not use abrasive cleaners, degreasers, or concentrated
barbecue cleaners on plastic parts.
Cooking Grates: Use mild dishwashing detergent and hot water solution. Nonabrasive scouring powders can be used on stubborn stains, then rinsed with water.
Never use oven cleaner.
Heat Plate: Clean residue with wire brush and wash with soapy water. Rinse
with water.
Cleaning the heating element assembly:
Make sure barbecue is unplugged from power outlet.
Unplug electric controller from heating element.
• Remove cooking grate.
• Remove heating element by unscrewing the screws and nuts
securing the heating element at the connection. Keep the
screws and nuts in clear sight so you do not lose them.
• Lift heating element up and away from side of barbecue.
•
•
Clean heating element with a soft, mild brush or cloth. Be careful not to damage
the heating element surface. Do not submerse heating element or electric controller in water.
Reinstall heating element and plug electric controller back to heating element. Inspect
electric controller and power cord for any damage. If damaged, call our customer service for a replacement controller. This controller is made specifically for this barbecue.
4
[WPE 039] E20101 BBQ Manual E
12/22/04
OPERATING
YOUR BARBECUE
2:05 AM
Page 5
Make sure that the controller knob is turned fully to the “OFF” position before
plugging the controller into outlet. Settings on controller knob are indicated by
triangular mark on electric controller. Use only properly grounded outlet.
Before cooking on this barbecue for the first time, operate the barbecue for about
15 minutes with the lid closed and the barbecue turned on “HIGH”. This will
burn off any factory finish, clean the internal parts and dissipate odour from the
painted finish.
Choose desired heating setting for the type of food you are cooking. Adjust control
knob higher or lower as needed to achieve desired heating output. Heating element
will heat entire cooking surface evenly.
Always open barbecue lid carefully and slowly as heat and steam accumulating
within barbecue can severely burn you.
Burning-off the barbecue after every use (approx. 15 minutes) will prevent food
residue from building up on your grates. Clean your barbecue after each use. Do
not use abrasive or flammable cleaners, as it will damage the parts of this product
and may start a fire.
Always turn off and unplug barbecue when not in use.
Never use charcoal or lighter fluid. A charcoal fire will result, and the barbecue
is not designed for charcoal. The fire will create an unsafe condition and damage
the barbecue.
BETTER
Missing a part?
SERVICE
No need to go back to the store!
The store where you made your purchase does not stock parts for this item. If you
need parts, whether they are missing or damaged, call the customer service toll-free
help line.
Call us and we will gladly ship the part you need, free of charge. Call our
help line: 1-877-707-5463
5
[WPE 039] E20101 BBQ Manual E
12/22/04
ELECTRONIC GRILL
PARTS LISTING
6
2:05 AM
Page 6
Item No.
Quantity
Description
A
1
Top lid assembly
Part No.
AA
1
Top lid
G205-0001-01
AB
2
Upper hinge
G206-0002-01
AC
1
Top lid handle
G205-0002-01
AD
2
Handle fiber washer
G205-0016-01
G205-0019-01
AF
1
Handle inner heat shield
AG
1
Thermometer
G205-0003-01
AH
1
Top lid reflection plate
E201-0021-01
B
1
Burnerbox assembly
BA
1
Burnerbox Weldment
E201-0200-01
BB
2
Firebox hinge
G206-0010-01
BC
1
Thermo control
E201-0003-01
BD
1
Heat element assembly
E201-0014-01
BE
1
Heat reflector assembly
E201-0100-01
BF
1
Cooking grate
E201-0015-01
BG
1
Warming rack
G206-0046-01
C
1
Side shelf assembly
CA
1
Cart mount-1
C423-0013-01
CB
1
Cart mount-2
G205-0100-01
CC
1
Side shelf
E201-0009-01
D
1
Cart assembly
DA
1
Front panel
E201-0023-01
DB
1
Burner box brace
E201-0022-02
DC
1
Cart leg, left
G205-0009-01
DD
1
Cart leg, right
G205-0020-01
DE
2
End cap
C423-0033-01
DF
1
Bottom shelf
E201-0008-01
DG
2
Wheel
G206-0025-01
DH
2
Wheel axle
C423-0045-01
DI
2
Wheel cap
G205-0013-01
DJ
2
Washer
G301-0028-01
DK
1
Rear brace
E201-0010-01
DL
1
Grease cup
G401-0066-01
DM
1
Grease cup hook
G401-0067-01
DN
1
Front brace
G205-0017-01
DO
2
Front basket
G205-0015-01
DP
1
Skirt
G205-0014-01
[WPE 039] E20101 BBQ Manual E
12/22/04
2:05 AM
Page 7
AB
AG
AA
AF
A
AD
AH
AD
AC
BG
BF
BC
BD
BE
BB
BA
CA
DA
CB
CC
DK
DB
DB
CB
CC
DD
DL
DC
DN
CA
DM
DJ
DG
DF
DE
DH
DI
DO
DP
7
[WPE 039] E20101 BBQ Manual E
12/22/04
2:05 AM
Page 8
A S S E M B LY
Tools needed for assembly are shown below.
INSTRUCTIONS
Before assembling the barbecue, please ensure that you have all the hardware needed.
Before assembling the barbecue, read these instructions carefully. Assemble the
barbecue on a flat, clean surface.
Note: Do not fully tighten all the nuts during initial stage.
Grill is heavy. You should have two people assemble the barbecue together.
Please refer to part numbers under the name of the tools for warranty tools ordering.
8
1/4 x 2 3/8” Screw (x10)
1/4 x 1/2” Screw (x12)
No.10 x 3/8” Screw (x2)
20120 - 13060 - 250
20120 - 13013 - 250
20124 - 10010 - 250
1/4 x 1 3/8” Screw (x12)
ST 4.2 x 10 Self Tapped Screw (x8)
1/4” Nut (x32)
20120 - 13035 - 250
22500 - 42010 - 250
31220 - 13000 - 032
Washer (for wheel bolt) (x2)
Bolt (for wheel) (x2)
No.10 Nut (x2)
G301 - 0028 - 9084
C423 - 0045 - 9084
31224 - 10000 - 032
Ø7 Flat Washer (x4)
Fiber Washer (for burner) (x4)
Metal bushing (x8)
Plastic bushing (x8)
40300 - 07000 - 250
G416 - 0027 - 9000
G301 - 0021 - 9082
A006 - 0006 - 9000
[WPE 039] E20101 BBQ Manual E
12/22/04
2:05 AM
Page 9
1
1. Assemble two wheels (DG) to the bottom of right cart
leg (DD) in configuration as shown.
2. Then attach to the bottom shelf (DF) by using bolts (x2),
washers (x2), and 1/4” nuts (x2).
3. Attach two end caps (DE) to the left cart leg (DC) by
using 1/4 x 1 3/8” screws (x2) and 1/4” nuts (x2).
4. Assemble front brace (DN) to attach both cart legs by
using 1/4 x 1/2” screws (x4).
2
1. Assemble the front panel (DA) to the L/R cart leg by
using 1/4 x 2 3/8” screws (x6) and 1/4” nuts (x6).
2. Assemble the rear brace (DK) to both cart legs by using
1/4 x 2 3/8” screws (x4) and 1/4” nuts (x4). At the same
time, assemble the burner box braces (DB) to the rear
brace and both cart legs by using above same screws
and nuts.
3
1. Assemble the firebox hinges (BB) to the burner box
weldment (BA) by using 1/4 x 1/2” screws (x4) and
1/4” nuts (x4).
2. Assemble the whole burner box assembly onto two braces
of burner box (DB) by using 1/4 x 1/2” screws (x4) ,
Ø7 flat washers (x4), fiber washers (x4), and
1/4” nuts (x4) which should be assembled under the two
braces of burner box.
9
[WPE 039] E20101 BBQ Manual E
12/22/04
2:05 AM
Page 10
4
1. Assemble the heat reflector assembly (BE) onto the
burner box.
2. Assemble the heat element assembly (BD) to the right side
of burner box as shown by using No.10 x 3/8” screws (x2)
and No.10 nuts (x2). After finishing this step, properly
insert the whole assembly on to the heat reflector.
3. Then put the cooking grate onto the burner box which
should be above all components in previous two points.
5
1. Assemble the top lid assembly (A) to the burner box
assembly by connecting the upper and lower hinges with
1/4 x 1 3/8” screws (x2) and 1/4” nuts (x2) to connect
the upper and fire box hinges together.
2. Assemble the thermometer assembly (AG) into the hole
which is on the top lid by using attached wing nut.
6
Attach the shelf mount-1 (CA) and shelf mount-2 (CB)
inside the side shelf panel (CC) by using ST 4.2 x 10 self
tapped screw and plastic bushing. Same process for the other
side shelf assembly.
10
[WPE 039] E20101 BBQ Manual E
12/22/04
2:05 AM
Page 11
7
Attach both side shelves to the burner box braces (DB) by
1/4 x 1 3/8” screws (x8), 1/4” nuts, and metal bushing.
8
1. Insert the legs of the warming rack (BG) into the
appropriate holes of top insert and burner box.
2. Connect the thermo control (BC) with the heat element
assembly (BD).
3. Attach the fabric with MasterChef ™ logo (DP) at the
front two cart legs with velcro. Make sure the top two
velcros are on top of the front brace.
4. Insert two front baskets (DO) into the holes of the front
brace (DN).
11
[WPE 039] E20101 BBQ Manual E
12
12/22/04
2:05 AM
Page 12
[WPE 039] E20101 BBQ Manual E
DISTRIBUTOR
12/22/04
2:05 AM
Page 13
Trileaf Distribution Trifeuil
Toronto, Canada
M4S 2B8
13


![[MAS 014] G10601 BBQ Manual F](http://vs1.manualzilla.com/store/data/006311820_1-7d1d18183064467851c215a7ff576cdd-150x150.png)

![[MAS 010] G30505 BBQ Manual F](http://vs1.manualzilla.com/store/data/006315885_1-7931826f9e191de9865bd3eb444d7265-150x150.png)
![[MAS 013] G20901 BBQ Manual F](http://vs1.manualzilla.com/store/data/006315834_1-2a7493d2e7dd237965708f5eb02f0454-150x150.png)

![[CEN 040] G50212 BBQ Manual F](http://vs1.manualzilla.com/store/data/006313768_1-36e108243556cfa65cf217876325cea0-150x150.png)