1
Operating instructions
Commercial dishwasher
G 8072
To avoid the risk of accidents or
damage to the machine it is
essential to read these operating instructions
before it is installed, commissioned and used for the
first time.
G
M.-Nr. 05 905 900
Contents
Description of the machine . . . . . . . . . . . . . . . . . . . . . . . . . . . . . . . . . . . . . . . . . . 4
Areas of application . . . . . . . . . . . . . . . . . . . . . . . . . . . . . . . . . . . . . . . . . . . . . . . . . 4
How the dishwasher works . . . . . . . . . . . . . . . . . . . . . . . . . . . . . . . . . . . . . . . . . . . 4
Optional features . . . . . . . . . . . . . . . . . . . . . . . . . . . . . . . . . . . . . . . . . . . . . . . . . . . 4
Information for the user . . . . . . . . . . . . . . . . . . . . . . . . . . . . . . . . . . . . . . . . . . . . . . 5
Finding your way around the machine. . . . . . . . . . . . . . . . . . . . . . . . . . . . . . . . . 6
Controls . . . . . . . . . . . . . . . . . . . . . . . . . . . . . . . . . . . . . . . . . . . . . . . . . . . . . . . . . . 6
Description of the machine . . . . . . . . . . . . . . . . . . . . . . . . . . . . . . . . . . . . . . . . . . . 8
Warning and Safety instructions . . . . . . . . . . . . . . . . . . . . . . . . . . . . . . . . . . . . 10
Caring for the environment . . . . . . . . . . . . . . . . . . . . . . . . . . . . . . . . . . . . . . . . . 14
Before using for the first time . . . . . . . . . . . . . . . . . . . . . . . . . . . . . . . . . . . . . . . 15
Water softener . . . . . . . . . . . . . . . . . . . . . . . . . . . . . . . . . . . . . . . . . . . . . . . . . . . 16
Everything you need to know about the water softener. . . . . . . . . . . . . . . . . . . . . 16
Programming the water softener . . . . . . . . . . . . . . . . . . . . . . . . . . . . . . . . . . . . . . 18
Adding reactivation salt . . . . . . . . . . . . . . . . . . . . . . . . . . . . . . . . . . . . . . . . . . . . . 19
Salt indicator light . . . . . . . . . . . . . . . . . . . . . . . . . . . . . . . . . . . . . . . . . . . . . . . . . 20
Crockery and baskets . . . . . . . . . . . . . . . . . . . . . . . . . . . . . . . . . . . . . . . . . . . . . 21
Preparing the load for washing, and loading the machine . . . . . . . . . . . . . . . . . . 21
Items which are unsuitable for the dishwasher . . . . . . . . . . . . . . . . . . . . . . . . . . . 21
Loading examples . . . . . . . . . . . . . . . . . . . . . . . . . . . . . . . . . . . . . . . . . . . . . . . . . 22
Fitting the basket carrier . . . . . . . . . . . . . . . . . . . . . . . . . . . . . . . . . . . . . . . . . . . . 23
Adding cleaning agent and rinsing agent . . . . . . . . . . . . . . . . . . . . . . . . . . . . . 24
Adding powder cleaning agents manually . . . . . . . . . . . . . . . . . . . . . . . . . . . . . . 24
Adding rinsing agent . . . . . . . . . . . . . . . . . . . . . . . . . . . . . . . . . . . . . . . . . . . . . . . 24
Venting and programming the dispensing system. . . . . . . . . . . . . . . . . . . . . . 25
Venting the liquid dispensing system . . . . . . . . . . . . . . . . . . . . . . . . . . . . . . . . . . 25
Programming the dosage for liquid cleaning agent . . . . . . . . . . . . . . . . . . . . . . . 25
Measuring the cleaning agent . . . . . . . . . . . . . . . . . . . . . . . . . . . . . . . . . . . . . . . 26
Changing the brand of liquid cleaning agent . . . . . . . . . . . . . . . . . . . . . . . . . . . . 26
Venting the rinsing agent dispensing system . . . . . . . . . . . . . . . . . . . . . . . . . . . . 27
Programming the rinsing agent dispensing system . . . . . . . . . . . . . . . . . . . . . . . 28
Monitoring the rinsing agent dosage . . . . . . . . . . . . . . . . . . . . . . . . . . . . . . . . . . . 28
If you are using an external dispensing system . . . . . . . . . . . . . . . . . . . . . . . . . . 28
Programme chart . . . . . . . . . . . . . . . . . . . . . . . . . . . . . . . . . . . . . . . . . . . . . . . . . 29
Preparation . . . . . . . . . . . . . . . . . . . . . . . . . . . . . . . . . . . . . . . . . . . . . . . . . . . . . . 30
Using the Universal programme. . . . . . . . . . . . . . . . . . . . . . . . . . . . . . . . . . . . . 31
2
Contents
Using special programmes . . . . . . . . . . . . . . . . . . . . . . . . . . . . . . . . . . . . . . . . . 32
Short programme for lightly soiled loads . . . . . . . . . . . . . . . . . . . . . . . . . . . . . . . . 32
Intensive programme for heavily soiled loads . . . . . . . . . . . . . . . . . . . . . . . . . . . . 32
Programmes with reduced final rinse temperature . . . . . . . . . . . . . . . . . . . . . . . . 32
Universal programme with reduced final rinse temperature . . . . . . . . . . . . . . 32
Short programme with reduced final rinse temperature . . . . . . . . . . . . . . . . . . 33
Intensive programme with reduced final rinse temperature . . . . . . . . . . . . . . . 33
Changing programme . . . . . . . . . . . . . . . . . . . . . . . . . . . . . . . . . . . . . . . . . . . . . 34
Changing a Special programme . . . . . . . . . . . . . . . . . . . . . . . . . . . . . . . . . . . 34
Changing from a Special programme to the Universal programme. . . . . . . . . 34
Cancelling a programme . . . . . . . . . . . . . . . . . . . . . . . . . . . . . . . . . . . . . . . . . 34
Changing the setting for the automatic start mechanism on the hood . . . . . . . . . 35
Self-cleaning programme . . . . . . . . . . . . . . . . . . . . . . . . . . . . . . . . . . . . . . . . . . 36
Switching the dishwasher off . . . . . . . . . . . . . . . . . . . . . . . . . . . . . . . . . . . . . . . 37
Cleaning and care . . . . . . . . . . . . . . . . . . . . . . . . . . . . . . . . . . . . . . . . . . . . . . . . 38
Cleaning the filters and cabinet . . . . . . . . . . . . . . . . . . . . . . . . . . . . . . . . . . . . . . . 38
Correcting minor faults . . . . . . . . . . . . . . . . . . . . . . . . . . . . . . . . . . . . . . . . . . . . 39
Faults without "Err" in the display . . . . . . . . . . . . . . . . . . . . . . . . . . . . . . . . . . . . . . 40
Faults with "Err" in the display, without the dishwasher switching off automatically . 41
Faults with "Err" in the display, and dishwasher switches off automatically. . . . . . 42
Error message indicated by the X control . . . . . . . . . . . . . . . . . . . . . . . . . . . . . . 43
Fault indications on dishwashers with special features. . . . . . . . . . . . . . . . . . . . . 44
Installation . . . . . . . . . . . . . . . . . . . . . . . . . . . . . . . . . . . . . . . . . . . . . . . . . . . . . . 45
Electrical connection UK. . . . . . . . . . . . . . . . . . . . . . . . . . . . . . . . . . . . . . . . . . . 46
Plumbing. . . . . . . . . . . . . . . . . . . . . . . . . . . . . . . . . . . . . . . . . . . . . . . . . . . . . . . . 47
Technical data . . . . . . . . . . . . . . . . . . . . . . . . . . . . . . . . . . . . . . . . . . . . . . . . . . . 49
Customer contact . . . . . . . . . . . . . . . . . . . . . . . . . . . . . . . . . . . . . . . . . . . . . . . . 50
3
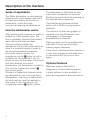
Description of the machine
Areas of application
This Miele dishwasher is a commercial
machine with a tank system and hood
for washing crockery and cutlery in
restaurants, hotels and other
commercial catering establishments.
How the dishwasher works
After switching the machine on, water is
heated up in the integral boiler. The
tank is gradually filled with the heated
water during the heat-up phase.
The tank system enables the
dishwasher to be used continuously, as
there is a constant supply of water at
the correct temperature available.
During the heat-up phase, the
programme control X lights up red to
indicate that the machine is not yet
ready. As soon as the water in the boiler
and tank reaches the correct
temperature, the dishwasher is ready to
use, and the programme control X
then shows green.
Crockery is loaded into baskets which
are designed for use in through-feed
dishwashers. The hood is lowered into
the shut position, and the machine is
now ready to use. During use, the
programme control X lights up blue.
4
The dishwasher is fitted with an automatic start mechanism on the hood.
Shutting the hood starts the machine on
the last selected programme.
The selected programme remains
active until a different programme is
selected.
The reservoir for the rinsing agent is
separate from the dishwasher, and
rinsing agent is dispensed
automatically as required.
Cleaning agent has to be added either
manually or via an optional liquid
cleaning agent dispenser.
If the hood is lifted whilst the machine is
in use, the programme and water flow
is interrupted until the hood is shut
again.
Optional features
Machines may be fitted with a
dispenser for liquid cleaning agents.
A water softener is also available, in
either an integrated or external version.
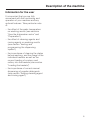
Description of the machine
Information for the user
It is important that you are fully
conversant with the functioning and
operation of your machine and any
optional features. Take particular note
of:
– the effect of the water temperature
on washing results (see sections
"How the dishwasher works" and
"Preparation")
– the effect of cleaning agents and
rinsing agents on washing results
(see section "Venting and
programming the dispensing
system")
– the importance of clearing the plates
before washing, and the usage of the
individual baskets as well as the
correct loading of crockery and
cutlery into the baskets (see section
"Loading the baskets")
– the importance of correct manual
dispensing of powder detergents
(see section "Adding cleaning agent
and rinsing agent")
5
Finding your way around the machine
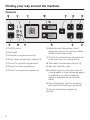
Controls
a On/Off control
b Fault light
c Universal programme control
h Miele Service Technician’s fault
diagnosis control (for use by a Miele
Service Technician only)
d Boiler water temperature display *)
i Control to activate lower temperature
in the final rinse of a programme
e Control for special programmes
j Tank water temperature display *)
f Control for short programme
k Salt refill indicator light
g Control for intensive programme
l Indicator light to show low levels of
rinsing agent or liquid cleaning agent
(a dispenser for liquid cleaning
agent is available as an optional
extra)
m Control/indicator light for emptying
tank and self-cleaning programme
*) only by operating programme
controls
6
7
Finding your way around the machine
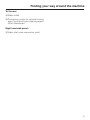
Description of the machine
a Hood
h Basket carrier with adjustable rails
b Top spray arm for rinse
i Water tank with heating element (on
right side wall).
Be careful Danger of burning!
See "Warning and Safety
instructions".
c Top spray arm for main wash
d Control panel
e Bottom spray arm for rinse
f Reactivation salt reservoir
with optional water softener to the
right at the bottom of the dishwasher
cavity
g Bottom spray arm for the main wash
8
Filter combination
j Basket filter
k Wide surface area filter
Finding your way around the machine
To the rear:
l Water outlet
m Connection points for optional rinsing
agent (red) and liquid cleaning agent
(blue) dispensers
Right hand side panel:
n Water inlet hose connection point
9
Warning and Safety instructions
This machine complies with all
relevant local and national safety
requirements. Incorrect use can,
however, lead to personal injury and
damage to property.
Read the operating instructions
carefully before starting to use this
machine. This way you will avoid the
risk of accidents and damage to the
machine.
Keep these instructions in a safe
place for reference, and pass them
on to any future user.
Correct use
This machine is designed for
commercial use only, as described
in these Operating Instructions.
Alterations to the machine, or using it
for purposes other than those for which
it was designed, are unauthorised and
could cause harm.
The manufacturer cannot be held liable
for damage caused by improper or
incorrect use of the machine.
This equipment is not designed for
maritime use or for use in mobile
installations such as caravans, aircraft
etc. However it may be suitable for
such usage subject to a risk
assessment of the installation being
carried out by a suitably qualified
engineer.
10
Please pay attention to the following
notes to avoid injury and damage.
This machine should be
commissioned and then maintained
only by a Miele authorised and trained
Service Technician or other suitably
qualified and competent approved
person. Repairs and other work by
unqualified persons could be
dangerous.
Do not install the machine in an
area where there is any danger of
explosion or of freezing conditions.
The electrical safety of this
machine can only be guaranteed if
connected to a correctly installed
earthing system on site. It is most
important that this basic safety
requirement is tested regularly, and
where there is any doubt, the on-site
wiring should be checked by an
electrician.
The manufacturer cannot be held liable
for the consequences of an inadequate
earthing system (e.g. electric shock).
A damaged machine is dangerous.
Switch off at the mains immediately
and call the Miele Service Department
or an authorised and trained Miele Service Dealer or other suitably qualified
and competent approved person.
Warning and Safety instructions
Personnel operating the machine
should be trained regularly.
Untrained personnel should not be
allowed access to the machine or its
controls.
This machine is not a toy! Do not
allow children to play in or around it
or to operate it. There is a danger that
they could injure themselves or get into
the machine and lock themselves in.
Take care when handling liquid
agents and additives. These may
contain irritant or corrosive ingredients.
Do not use organic solvents as these
could cause an explosion.
Follow all relevant safety procedures
carefully. Wear protective gloves and
goggles. With all chemical agents the
manufacturer’s safety conditions must
be observed.
Avoid inhalation of powder
cleaners. They can cause burning
in the mouth and throat if swallowed, or
inhibit breathing.
The water in the machine must not
be used as drinking water.
Be careful when sorting items with
sharp pointed ends and
positioning them in the machine that
you do not hurt yourself or create a
danger for others operators. Sharp
knives etc. should be placed in baskets
with the pointed ends facing
downwards.
When using this machine in the
higher temperature ranges be
especially careful not to scald or burn
yourself when opening the hood.
Baskets and inserts must be allowed to
cool down before they are unloaded.
Any water remaining in containers
could still be very hot. Empty them into
the wash cabinet before taking them
out.
Do not touch the heating elements
if you open the hood during or
directly after the end of a programme
as you could burn yourself. The
elements remain hot for some time after
the end of the programme.
Never clean the machine or near
vicinity with a water hose or a high
pressure hose.
Before any maintenance or repair
work is carried out, the machine
must be disconnected from the mains
supply by switching off at the mains
isolator or withdrawing the mains fuse.
The following points should be
observed to assist in maintaining
quality standards, to protect users,
and to avoid damage to items being
cleaned.
Only use Miele approved cleaning
agents in this machine. Use of
unsuitable cleaning agents could
adversely affect the components of the
machine as well as items being
cleaned.
11
Warning and Safety instructions
Only use low-foaming cleaning
agents which have been approved
by Miele. Foam can have an adverse
effect on the cleaning process.
Where a chemical additive is
recommended on technical
application grounds (e.g. a cleaning
agent), this does not imply that the
manufacturer of the machine takes
liability for the effect of the chemical on
the items being cleaned.
Please be aware that changes in
formulation, storage conditions etc.
which may not be publicised by the
chemical manufacturer, can have a
negative effect on the cleaning result.
When using cleaning agents and
specialised products it is essential
that the manufacturer’s instructions are
followed. They must only be used for
the purpose for which they are
designed to avoid such dangers as
chemical reactions and material
damage.
The machine is designed only for
operation with water and cleaning
agents. Organic solvents must not be
used in the machine, as there is the
danger under certain circumstances of
explosion. (Although this is not the case
with all organic solvents, other
problems could arise with their use, for
example damage to rubber and
synthetic materials).
12
In critical applications where very
stringent requirements have to be
met, it is strongly recommended that all
the relevant factors for the process,
such as cleaning agent, water quality
etc., are discussed with the Miele
Application Technology specialists.
The special inserts should only be
used for their specific application.
Empty any containers or utensils
before arranging them in the
machine.
Do not allow any remains of acids
or solvents, and in particular
hydrochloric acid or chloride solutions,
to get into the wash cabinet. Similarly
avoid any materials with a corrosive
effect.
The presence in compounds of any
solvents should be minimal (especially
those in hazard class A1).
To avoid any corrosion damage,
ensure that solutions or steam
containing hydrochloric acid do not
come into contact with the steel outer
casing of the machine.
Please follow the advice on
installation in these instructions
and the separate Installation
Instructions.
Warning and Safety instructions
Using accessories
Only use genuine Miele
accessories with this machine.
Consult Miele on the type and
application of such equipment.
Disposing of your old machine
Before disposing of your old
machine first make it unusable.
Disconnect from the mains, cut off the
cable near the machine and any plug
from the cable.
For environmental and safety reasons
ensure the machine is completely
drained of any residual water and
cleaning agent. (Observe safety
regulations and wear safety goggles
and gloves).
Make the door lock inoperative, so that
children cannot accidentally shut
themselves in. Then make appropriate
arrangements for the safe disposal of
the machine.
The manufacturer cannot be held
liable for damage caused by
non-compliance with these Warning
and Safety instructions.
13
Caring for the environment
Disposal of the packing
material
The transport and protective packing
has been selected from materials which
are environmentally friendly for disposal
and can normally be recycled.
Ensure that any plastic wrappings,
bags etc. are disposed of safely and
kept out of the reach of babies and
young children. Danger of suffocation!
Rather than just throwing these
materials away, please ensure that they
are recycled.
14
Disposal of your old machine
Old machines contain materials which
can be reclaimed or recycled. Please
contact your dealer, your waste
collection centre or scrap merchant
about potential recycling schemes.
Ensure that the machine presents no
danger to children while being stored
for disposal.
See the appropriate section in the
Warning and Safety instructions.
Before using for the first time
Before using for the first time please
pay special attention to the following
points. Detailed information on these
points can be found in the relevant
sections of these Operating
Instructions.
Water softener
For machines without an integral water
softener, a separate water softener is
recommended in areas with a water
hardness ü 3 °d (0.5 mmol/l).
Only use cleaning and rinsing agents
formulated for use in this type of
machine.
Dispense these according to the
manufacturer’s instructions. Using less
than advised can adversely affect the
cleaning result.
Load the machine carefully.
Arrange the load so that water will
come into contact with all surfaces.
Concealed surfaces will not be
cleaned.
The spray arms must not be blocked by
any items.
The filter combination at the base of
the wash cabinet and the spray arms
must be kept clean.
Regular checking and cleaning is
essential.
15
Water softener
Everything you need to know
about the water softener
The water needs to be softened to
avoid calcium deposits building up on
utensils and in the machine itself.
To ensure a steady supply of soft water
the water softener unit must always be:
1. correctly programmed and
2. the salt reservoir must be filled.
If the water hardness level is below
3 °d - German scale (0.5 mmol/l) the
reservoir does not need to be filled
with reactivation salt.
The machine is set at the factory for a
water hardness level of 25 °d (4.5
mmol/l).
If the water supply is harder or softer
than this (including below 3 °d or 0.5
mmol/l) the factory setting will need
to be changed following the
instructions in "Setting the water
softener". See chart on the next
page for settings.
Your local water authority will advise
you on the water hardness in your area.
For future servicing it is useful to make
a note of your water hardness level.
Enter your water hardness level here:
mmol/l /
°d
For fluctuating levels e.g. 8 - 17 °d (1.4
- 3.1 mmol/l) set the water softener to
the highest setting. In this example to
17 °d (3.1 mmol/l).
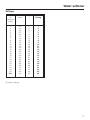
Important
The built-in water softener has settings
from 1 °d - 25 °d (0.2 - 4.5 mmol/l).
16
Water softener
Settings
°d
(German
scale)
mmol/l
°f
Setting
1
2
3
4
5
6
7
8
9
10
11
12
13
14
15
16
17
18
19
20
21
22
23
24
25*)
0.2
0.4
0.5
0.7
0.9
1.1
1.3
1.4
1.6
1.8
2.0
2.2
2.3
2.5
2.7
2.9
3.1
3.2
3.4
3.6
3.8
4.0
4.1
4.3
4.5
2
4
5
7
9
11
13
14
16
18
20
22
23
25
27
29
31
32
34
36
38
40
41
43
45
1
2
3
4
5
6
7
8
9
10
11
12
13
14
15
16
17
18
19
20
21
22
23
24
25
*) factory setting
17
Water softener
Programming the water
softener
On machines with integral water
softeners, programme the water
softener as follows.
^ Press the [ control to switch the
machine off.
^ Press and hold controls 4, { and
§, and whilst doing so press [ to
switch the machine on.
P 19 will appear in the top display
and the total water hardness level will
appear in the bottom display in °d
(25 in the display equates to 25°d or
4.5 mmol/l).
^ Press § or ° until the required
hardness level shows in the bottom
display.
^ Save the reading by pressing the 4
control.
^ Press control [ to switch the
machine off.
If the water hardness level changes,
enter the new level following the above
instructions.
If the mains water hardness level is
over 25 °d (4.5 mmol/l), please
contact the Miele Professional
Department about an on-site water
softening system.
18
Water softener
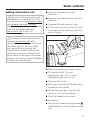
Adding reactivation salt
,Only put reactivation salt in the
salt dispenser. Inadvertently filling
the salt reservoir with cleaning agent
will damage the water softener.
Before filling the salt reservoir make
sure that you have selected
reactivation salt to put in it!
^ Remove the basket from the
machine.
^ Remove the basket carrier from the
machine.
^ Unscrew the salt reservoir cap.
^ Fill the salt reservoir to the brim with
fresh water (only necessary the first
time of using).
,Please only use special coarse
grained reactivation salt with
granules of approx. 1-4 mm. Do not
use other types of salt, e.g. table
salt, agricultural or gritting salt.
These could contain components
which are insoluble in water which
could result in damage to the water
softener. If in doubt consult the Miele
Professional Department.
^ Place the funnel provided in place.
^ Fill carefully with 1.5 kg of
reactivation salt. As it is filled
displaced water will run out.
^ Remove the funnel.
^ Wipe any residual salt off the screw
threads on the socket.
^ Screw the cap back onto the salt
reservoir - do not overtighten.
^ Re-fit the basket carrier and
^ the basket.
^ Run the self-cleaning programme Ä
immediately to rinse out any residual
salt.
19
Water softener
Salt indicator light
When the k indicator lights up in the
display, the reactivation salt will need to
be replenished. See "Adding
reactivation salt".
The water woftener runs automatically
during a programme.
20
Crockery and baskets
Preparing the load for
washing, and loading the
machine
Preparing the load
^ Empty all containers and scrape
residual food from crockery before
loading into the machine.
Inadequate pre-cleaning will block
the filters and reduce the washing
efficiency of the machine.
Please note:
^ Load items so that water will come
into contact with all surfaces. This
ensures that they will be properly
cleaned.
Select baskets and inserts which are
appropriate for the application.
Items which are unsuitable for
the dishwasher
– Cutlery with wooden or horn handles.
– Wooden or plastic cutting boards.
– Heat sensitive plastic items (see
"Programmes with reduced final rinse
temperature")
Please note:
– Silver and aluminium items can
become discoloured.
– Clouding may occur on glasses after
frequent washing.
^ Do not place items to be cleaned
inside other pieces where they may
be concealed.
^ Hollow vessels such as cups,
glasses, pots etc. should be inverted
and placed in the correct inserts. The
water must be able to access them
unhindered.
See examples on the following
pages.
^ Deep based items should be placed
at an angle to make sure water runs
off them freely.
^ Tall, narrow pieces should be placed
in the centre of the baskets to ensure
better water coverage.
^ The spray arms must not be blocked
by items which are too tall or which
hang down in their path. If necessary,
manually rotate the arms to test.
^ Cutlery should be placed in the
cutlery holders with the handles
facing downwards.
21
Crockery and baskets
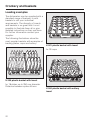
Loading examples
The dishwasher can be supplied with a
standard range of baskets, or with
baskets to suit your individual
requirements. The diversity of inserts
and baskets is so great that it is not
possible to illustrate them all or give
detailed instructions on their use here.
For further information contact your
supplier.
The following illustrations show the
most popular baskets with examples of
loading plates, cups and cutlery.
U 201 plastic basket with insert
for 30 cups
U 200 plastic basket with insert
for 18 plates up to 250 mm diameter
Distance between spikes 45 mm
22
U 204 plastic basket with cutlery
insert
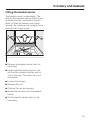
Crockery and baskets
Fitting the basket carrier
The basket carrier is adjustable. The
rails for the baskets can be fitted to the
optional console, universal or feed-in
table, so that the baskets can travel
through the machine in a straight line or
through it at a right angle.
^ Remove the basket carrier from its
mounting.
^ Underneath the basket carrier you
will find two screws at either end of
one of the rails. The other rail is not
removable.
^ Loosen the screws.
^ Remove the rail.
^ Position the rail as required.
^ Screw the rail back onto the basket
carrier.
^ Put the basket carrier back on its
mounting.
23
Adding cleaning agent and rinsing agent
Only use cleaning agents formulated
for use in this type of machine. Do
not use detergents formulated for
domestic dishwashers.
Cleaning agent can be dispensed in
powder form using the filter basket, or
in liquid form using an optional DOS
module dispensing unit.
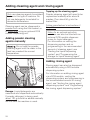
Adding powder cleaning
agents manually
Do not add the powder
cleaning agent until the water in the
tank has reached the correct
temperature.
Topping up the cleaning agent:
Powder cleaning agent will need to be
replenished manually after about 5
washes. Pour about 50 g into the
basket filter.
Follow manufacturer’s instructions if
they differ.
Note: As an optional extra this
machine can also be fitted with an
external DOS module dispenser
pump for liquid detergent.
For information on venting the
dispensing system and on
programming in the recommended
amount of cleaning agent, see
"Venting the liquid dispensing
system" and "Programming the
dosage for liquid cleaning agent".
Adding rinsing agent
Rinsing agent can also be dispensed
automatically using a DOS module
dispensing system.
For information on adding rinsing agent
via a DOS module, venting the
dispensing system and programming in
the recommended amount of rinsing
agent, see "Venting the rinsing agent
dispensing system" and "Programming
the rinsing agent dispensing system."
Dosage: Liquid detergents are
measured and dispensed automatically.
If powder detergent is being used,
about 120 g should be added manually
the first time the machine is used.
24
Venting and programming the dispensing system
Venting the liquid dispensing
system
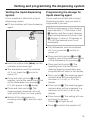
Programming the dosage for
liquid cleaning agent
If your machine is fitted with a liquid
dispensing system:
If your machine is fitted with a liquid
dispensing system, and you want to
programme it yourself:
^ Fill the container with liquid cleaning
agent.
Whilst programming in the cleaning
agent amount, P11 will show in the
} display, and the current cleaning
agent concentration will show in the
~ display. A value of 10 equates to
1.0 ml/l (the decimal point is not
displayed).
^ The dishwasher must be switched
off; if not, press the [ control to
switch off.
^ Press and hold controls Ä and X
together, and at the same time switch
on the dishwasher by pressing [.
^ Insert the siphon tube (blue) into the
container and screw tight.
^ The dishwasher must be switched
off; if not, press the [ control to
switch off.
^ Press and hold controls Ä and X
together, and at the same time switch
on the dishwasher by pressing [.
P11 will appear in the } display.
^ Press and hold control X. The
operating hour that the current
cleaning agent concentration was
programmed will show in the display.
^ Press control §. The cleaning agent
concentration will be reduced to a
minimum of 1.0 ml/l, or 10 in the
display.
^ Press and hold control Ä. The
cleaning agent dispenser will vent
itself, and will then run more quietly.
^ Press control °. The cleaning agent
concentration will be increased to a
maximum of 5.0 ml/l, or 50 in the
display.
^ Switch off the dishwasher by
pressing control [ to exit from input
mode.
^ Press control 4. The setting will now
be stored in memory.
Control X will light up red.
^ Press [ to switch the machine off.
25
Venting and programming the dispensing system
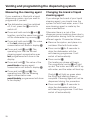
Measuring the cleaning agent
If your machine is fitted with a liquid
dispensing system, and you want to
programme it yourself:
^ The dishwasher must be switched
off; if not, press the [ control to
switch off.
^ Press and hold controls Ä and X
together, and at the same time switch
on the dishwasher by pressing [.
^ Press and hold control {. The value
of the last cleaning agent
concentration will show in display ~.
^ Press and hold { and X. The
operating hour that the current
cleaning agent concentration was
last programmed will show in the
display.
^ Press and hold |. The value of the
penultimate cleaning agent
concentration will show in display ~.
^ Press and hold | and X. The
operating hour that the cleaning
agent concentration was
penultimately programmed will show
in the display.
Changing the brand of liquid
cleaning agent
If you change the brand of your liquid
cleaning agent, you should rinse the
system out with fresh water, even if the
new cleaning agent is made by the
same manufacturer.
Otherwise there is a risk of the
dispenser pump breaking down due to
crystallisation arising from the mixing of
different agents. Proceed as follows:
^ Remove the siphon, and place in a
container filled with fresh water.
^ Press control Ä for 3 seconds to
drain the dishwasher with the
self-cleaning programme. It will
switch off automatically.
^ Press control [.
The heating up phase will begin.
The programme control X will light
up red. The boiler and tank will fill up
with water, and the water will heat up.
Control X will light up green when
the filling and heating phase is
complete. Cleaning agent will not be
dispensed during this procedure.
^ Press control Ä for 3 seconds to
drain the dishwasher with the
self-cleaning programme. It will then
switch off automatically.
26
Venting and programming the dispensing system
^ Refit the siphon into the new cleaning
agent container.
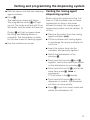
Venting the rinsing agent
dispensing system
^ Press [.
The heating up phase will begin.
The programme control X will light
up red. The boiler and tank will fill up
with water, and the water will heat up.
Before using the machine for the first
time, or if the container has not been
replenished on time or has been
allowed to empty, the rinsing agent
dispensing system must be vented. To
do this:
Control X will light up green when
the filling and heating phase is
complete. The dishwasher is ready
for the new brand of cleaning agent.
^ Use the machine as normal.
^ Remove the siphon from the rinsing
agent container (red).
^ Fill the container with rinsing agent,
or exchange the empty container for
a full one.
^ Insert the siphon tube into the
container and securely tighten it.
^ Switch the dishwasher off by
pressing [.
^ Press and hold controls X and Ä
together, and at the same time switch
on the dishwasher by pressing [.
^ Press and hold control X, and at the
same time press Ä twice in
succession.
P10 will show in the } display.
^ Press and hold control Ä until the
dispenser is vented - the dispenser
will then run more quietly.
^ Press [ to exit from input mode and
switch the dishwasher off.
27
Venting and programming the dispensing system
Programming the rinsing agent
dispensing system
Whilst programming in the amount of
rinsing agent, P10 will show in the }
display, and the current rinsing
agent concentration will show in the
~ display. A value of 10 equates to
0.1 ml/l (the decimal point is not
displayed).
^ The dishwasher must be switched
off; if it is not, press [ to switch it off.
^ Press and hold X and Ä and at the
same time switch on the dishwasher
by pressing [ .
^ Press and hold control X, and at the
same time press Ä twice in
succession.
^ Press control §. The rinsing agent
concentration will be reduced to a
minimum of 0.1 ml/l, or 10 in display
~.
^ Press control °. The rinsing agent
concentration will be increased to a
maximum of 0.5 ml/l, or 50 in display
~.
^ Press control 4 to save the new
value.
The X control will light up red.
^ Press [ to switch the machine off.
28
Monitoring the rinsing agent
dosage
^ Check for any drying stains on
washed items, and adjust the dosage
if necessary.
– The dosage is correct if items dry
evenly without marks.
– You are using too much rinsing agent
if washed items are marked after
drying.
– You are using too little rinsing agent if
there are drops of water on items
after drying.
If you are using an external
dispensing system
You will require external dispensing
pumps to be fitted; please contact
Miele Professional for advice.
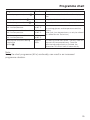
Programme chart
Programme
Duration
When to use
Universal programme (control (X)
120 s
for normal everyday loads with medium drying
time
Short programme (control {)
60 s
for lightly soiled loads with short or no drying time
Intensive programme (control |)
180 s
for heavily soiled loads with long drying time
Universal programme with reduced
final rinse temperature
120 s
at 65 °C
Short programme with reduced
final rinse temperature
60 s
at 65 °C
Intensive programme with reduced
final rinse temperature
180 s
at 65 °C
Emptying the tank/self-cleaning
programme
(control Ä)
Approx
200 s
for washing glasses and temperature sensitive
plastics
(other final rinse temperatures can only be altered
by a Miele Service Technician)
for cleaning inside the cabinet. The dirty water will
automatically be pumped away. Once the
self-cleaning programme has finished, the
dishwasher will switch itself off automatically.
Note:
Using the short programme (60 s) continually, can result in an increased
programme duration.
29
Preparation
^ Open the stopcock to the water
supply.
^ Switch on the electricity at the mains.
^ Check that automatic cleaning agent
and rinsing agent dispensers are full,
if applicable (see indicator lights on
control panel).
,Be careful not to splash cleaning
agent or rinsing agent on your skin,
as they can cause irritation. Follow
safety advice given on the
packaging. Wear protective gloves
and safety goggles.
^ If the dispensers are not full: Re-fill
the container, or exchange the empty
one for a full one.
For machines with an external
dispensing system (optional
feature), please follow the
appropriate instructions.
Only use cleaning agents formulated
for this machine.
^ Check that all the filters are in place.
^ Do not load the machine yet.
^ Shut the hood and leave it shut
during the heat-up phase.
^ Press the On/Off switch ([).
The heating up phase will begin.
The programme control X will light
up red. The boiler and tank will fill up
with water, and the water will heat up.
Control X will light up green when
the filling and heating phase is
complete.
^ Lift the hood.
30
Using the Universal programme
^ If powder cleaning agent is being
dispensed manually:
add approx. 120 g powder cleaning
agent into the basket filter (see
section "Adding powder detergent
manually").
^ Put one loaded basket only into the
dishwasher.
^ Close the hood.
^ To select the Universal programme,
press X.
Whilst the programme is running,
control X will light up blue.
When the programme is finished,
control X will light up green.
^ Lift the hood.
^ Remove the basket.
^ Check the basket filter for coarse
soiling, and clean if necessary. The
basket filter can be removed without
emptying the tank.
,Caution: danger of scalding with
hot water. Only lift the filter from the
tank by the handle; otherwise you
may get scalded by the hot water in
the tank.
After the first cycle, the machine
will start automatically when the
hood is shut.
31
Using special programmes
Short programme for lightly
soiled loads
Programmes with reduced final
rinse temperature
^ Place the basket into the machine.
,Caution: danger of scalding with
^ Close the hood.
^ Press control 4.
^ Press control {.
^ Press control X.
The short programme starts. The
machine starts automatically when
the hood is shut.
Intensive programme for
heavily soiled loads
^ Place the basket into the machine.
hot water. After selecting a reduced
final rinse temperature, the next
wash programme will still use the
previous higher final rinse
temperature.
Control § will keep flashing until a
different programme is selected.
After a special programme has been
started for the first time, every time it
is used again it will start
automatically when the hood is shut.
^ Close the hood.
^ Press control 4.
^ Press control |.
^ Press control X.
The intensive programme will begin.
The machine starts automatically
when the hood is shut.
Universal programme with reduced
final rinse temperature
^ Place the basket into the machine.
^ Close the hood.
^ Press control 4.
^ Press control §.
^ Press control X.
The programme will begin.
The machine starts automatically
when the hood is shut.
32
Using special programmes
Short programme with reduced final
rinse temperature
^ Place the basket into the machine.
^ Close the hood.
^ Press control 4.
^ Press control §.
^ Press control {.
^ Press control X.
The programme starts.
The machine starts automatically
when the hood is shut.
Intensive programme with reduced
final rinse temperature
^ Place the basket into the machine.
^ Close the hood.
^ Press control 4.
^ Press control §.
^ Press control |.
^ Press control X.
The programme will start.
The machine starts automatically
when the hood is shut.
33
Changing programme
The Universal and Special
programmes can be changed whilst
the hood is either open or closed.
Changing a Special programme
^ Select the programme you want, e.g.
the Short programme {.
The previous programme is then
cancelled.
^ Close the hood.
^ Press control X.
The new programme will start.
Changing from a Special programme
to the Universal programme
^ Press control 4.
The controls for the Special
programmes are deactivated and do
not light up.
^ Close the hood.
^ Press control X.
The Universal programme will start.
Cancelling a programme
^ Press control 4.
^ Close the hood.
34
Changing programme
Changing the setting for the
automatic start mechanism on
the hood
The dishwasher is fitted with an automatic start mechanism on the hood.
To deactivate or reactivate the automatic start mechanism, please contact the
Miele Service Department.
35
Self-cleaning programme
This programme cleans the inside of
the dishwasher, and pumps the dirty
water out of the tank. The
dishwasher will switch off
automatically once the Self-cleaning
programme has finished.
^ Do not load the dishwasher.
^ Close the hood.
^ Press control Ä for 3 seconds.
The programme begins.
Control Ä will flash until the
Self-cleaning programme has
finished.
^ Lift the hood.
^ Leave the hood open to allow the
cabinet to dry out.
The hood can be left ajar in its
"airing" position. It rests in this
position just above the fully-closed
position. This is to ensure that the
inside of the dishwasher dries
thoroughly, and to avoid a build-up
of unpleasant smells.
36
Switching the dishwasher off
,When the Self-cleaning
programme has finished, the
dishwasher switches itself off.
However, please be aware that the
machine is still connected both to
the electricity mains and to the water
supply.
^ Close the stopcock to the water
supply.
^ Switch the dishwasher off at the
mains.
,In areas where there is a risk of
frost, if the machine is not going to
be used for a while, it is important to
drain it completely to avoid the
waterpipes freezing.
^ Run the Self-cleaning programme.
^ Disconnect the machine from the
electricity mains and from the water
supply.
^ Drain the water hoses and reconnect
them to the machine.
When you wish to use the machine
again, reconnect it to the water supply,
turn the electricity on again at the
mains, and switch the machine back
on.
The boiler will vent itself automatically.
The boiler and tank will then fill up, and
the water will heat to the correct
temperature.
37
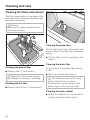
Cleaning and care
Cleaning the filters and cabinet
The filter combination in the base of the
tank should be inspected regularly and
cleaned if necessary.
,Caution.
Watch out for glass splinters which
could cause injury.
Cleaning the pump filter
On the right hand wall of the water tank,
there is a filter to protect the circulation
pump.
^ Pull the filter out of its mounting, and
clean it.
Cleaning the drain filter
Cleaning the basket filter
^ Remove filter a and clean it.
,Take care. The handle may be
hot. Danger of burning or scalding.
Cleaning the flat filter
^ Remove the flat filter b and clean it.
At the bottom of the water tank there is
a filter.
^ Remove the filter and clean it.
,The machine must not be used
without all the filters in place.
Replace filters by carrying out the
above steps in the reverse order.
Cleaning the wash cabinet
^ Check the cabinet for any residue or
soiling, and clean with a brush.
38
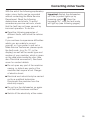
Correcting minor faults
With the aid of the following explanatory
notes, minor faults can be corrected
without contacting the Miele Service
Department. Read the following
descriptions and charts. To avoid
unnecessary service call-outs, check
that the fault has not been caused by
incorrect operation. To do this:
Important: Switch the dishwasher
off if the y symbol lights up by
pressing control [. Then the
message "Err", with the fault code,
will light up (see following pages).
^ Read the following examples of
different faults, and follow the advice
given.
If you continue to experience difficulties
which you are unable to correct
yourself, or if you prefer to call out a
Miele Service Technician, please quote
the fault code (e.g. Err 12 - in the
display) as well as the model type and
number of your machine, which is given
on the data plate inside the door (see
also "Electrical connection"). See back
cover for contact details.
^ Do not open any part of the machine
casing, or disturb any parts of the
machine that require a tool. Danger
of electric shock.
^ Electrical work should only be carried
out by a qualified technician.
Disconnect the machine from the
electricity supply.
^ Do not turn the dishwasher on again
until the fault has been rectified.
^ Switch off the electricity at the mains.
39
Correcting minor faults
Faults without "Err" in the display
Display
Problem
Cause/Effect
–
You cannot switch
the appliance on
– The machine is not
switched on at the
mains
– Fuse defective or
tripped
^ Switch the
machine on at the
mains
– Hood is not shut
correctly
– Correct temperature
has not yet been
reached
^ Shut the hood
–
–
Programme does
not start
The dishes are not
clean
Remedy
^ Test the fuse and
change if
necessary, and
switch back on
^ Wait until control
X lights up green.
^ Fill up the
– Not enough cleaning
cleaning agent
agent, or cleaning
container or add
agent container is
more powder
empty
detergent
– Basket filter and/or flat
filter dirty
^ Clean the basket
– Spray arm jets blocked
filter and/or flat
filter
^ Clean the spray
arm jets
40
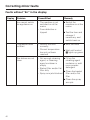
Correcting minor faults
Faults with "Err" in the display, without the dishwasher
switching off automatically
Display
Problem
Cause/Effect
Err 5, 13, 15
– Stopcock
shut
– Function
failure
– The dishwasher is not
ready for use
Remedy
^ Check whether the
stopcock is open.
Then switch the
dishwasher back
on.
^ If the fault persists,
take a note of the
fault code and
contact the Miele
Service
Department.
Err 2, 3, 4, 6,
7, 8, 9, 10
– The dishwasher is not
ready for use
^ Call the Miele Service Department.
41
Correcting minor faults
Faults with "Err" in the display, and dishwasher switches off
automatically
,If the machine completely breaks down and becomes unusable, it will
switch off automatically and display a fault code.
Display
Dishwasher switches
itself off and displays
fault code
Err 1; 11; 12
Dishwasher switches
itself off, but has no
fault displayed
42
Possible cause
Mechanical fault
Remedy
^ Call the Miele Service
Department.
Mechanical fault
^ Call the Miele Service
Department.
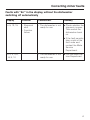
Correcting minor faults
Error message indicated by the X control
,Control X flashes red: Caution: danger of scalding. Press the [ control to
switch the dishwasher off.
The water temperature in the boiler or tank has risen above 95°C
Symbol y lights up, and fault code Err 2 or Err 3 shows in the display. Contact
the Miele Service Department. Do not switch the dishwasher on.
Control X lights up red:
The water in the boiler or tank is below the required temperature (when the
dishwasher is first switched on). As soon as the required temperature is reached,
the control lights up green and the wash programme can be started.
Control X flashes blue:
Inadequate pre-cleaning of load will block the filters and reduce the washing
efficiency of the machine. The circulation pump switches off and the control
flashes blue.
Remedy:
^ Switch the dishwasher off using the [ button. The control continues to flash.
^ Remove the filters, clean them, and replace. The light will stop flashing after 5
minutes.
^ Press control [ to switch the dishwasher on again and continue the
programme.
^ Make sure you pre-clean utensils properly before loading in future.
43
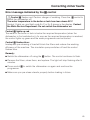
Correcting minor faults
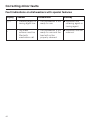
Fault indications on dishwashers with special features
Display
Problem
m/H
– Cleaning agent or – The dishwasher is not
rinsing agent low
ready for use
^ Replenish the
cleaning agent or
rinsing agent.
k
– The water
softener must be
filled with
reactivation salt.
– The dishwasher is not
ready for use and the
load will not be
properly cleaned.
^ Replenish the salt
reservoir
44
Cause/Effect
Remedy
Installation
Please refer to the installation
diagram supplied with the machine.
,Furniture and fittings installed
near the machine must be of a
commercial standard able to
withstand the effects of steam and
condensation.
Dishwashers fitted with additional
accessories, such as water
softeners, pressure pumps etc, need
to be installed with these in mind.
This dishwasher must not be used in
areas where there is a risk of
explosion.
The machine may only be installed
and commissioned by a suitably
qualified and competent person.
^ The machine must be installed on a
firm surface and levelled correctly.
Any unevenness in the floor level can
be compensated for and the height
of the machine raised or lowered by
adjusting the screw feet.
The machine can be installed in the
following ways:
^ With feed in and out tables
positioned at a very slight angle so
that any water from the utensils can
drain back into the tank.
^ In a corner, in which case the basket
carriers will need to be adapted for
the corresponding feed-through
direction.
^ The dishwasher must be accessible
for servicing and maintenance work
from the right hand side or from the
front.
45
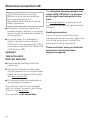
Electrical connection UK
,All electrical work must be
carried out by a suitably qualified
and competent person in
accordance with local and national
safety regulations.
^ Connection should be made via a
suitable isolator, with an on-off switch
which should be easily accessible for
servicing work.
^ For extra safety it is advisable to
install a residual current device
(RCD) with a trip current of 30 mA (in
accordance with DIN VDE 0664, VDE
0100 Section 739).
WARNING
THIS APPLIANCE
MUST BE EARTHED
^ Equipotential bonding should be
carried out.
^ The mains connection cable may
only be replaced by an original Miele
spare part or an apppropriate cable
with wire end ferrule.
^ For technical data see data plate or
wiring diagram supplied.
The machine must only be operated
with the voltage, frequency and fusing
shown on the data plate.
The machine is not convertible .
46
The data plate showing relevant test
marks (VDE, DVGW etc.) is situated
on the right hand side panel at the
back.
The wiring diagram is secured to the
inner side of the service panel beneath
the tank.
Bonding connection
There is a screw connection point
marked with the earth symbol (8) in the
front of the sump area, to which the
earth lead must be connected.
There are further notes on electrical
connection in the Installation
diagrams supplied.
Plumbing
Connection to the water inlet
,Water in the machine must not
be used as drinking water.
^ The machine must be connected to
the water supply in accordance with
local and national water authority
regulations.
^ The machine is constructed to
comply with DVGW regulations in
Germany, and may be connected to
a suitable supply without an extra
non-return valve provided that
national regulations allow this.
^ The DN 10 inlet hose is approx. 1.7 m
long terminating in a 3/4 inch female
thread.
^ The large surface area filter (supplied
with the machine) must be installed
between the stopcock and the inlet
hose.
,The water inlet hose must not be
shortened or damaged in any way.
See also the installation diagram
supplied.
^ The water pressure (flow rate) must
be a minimum of 0.8 bar (80 kPa).
If the water pressure (flow rate) is
below 2 bar (200 kPa) the fill time is
automatically extended.
The max. permitted static pressure is
6 bar (600 kPa).
If the water pressure is not between
0.8 and 6 bar (80 - 600 kPa), please
contact the Miele Service Department
for advice.
^ The machine is supplied as standard
for connection to a hot water supply
up to a max. temperature of 60 °C.
The inlet hose must be connected to
the hot water stopcock.
If a hot water supply is not available
the inlet hose must be connected to
the cold water stopcock.
^ A stopcock with 3/4 inch male thread
must be provided on site. It should
be easily accessible so that the water
supply can be turned off when the
machine is not in use.
47
Plumbing
Drainage
Please refer to the installation
diagram supplied with the machine.
^ The dishwasher drainage system is
fitted with a non-return valve which
prevents dirty water from flowing
back into the machine via the drain
hose.
^ The dishwasher is supplied with a
flexible drain hose, approx. 1.5 m
long (internal diameter DN 40 / DN
50), for connection to the on-site
drainage system.
The drain hose must not be
shortened.
A hose clip is supplied for
connecting it.
48
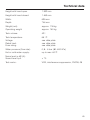
Technical data
Height with hood open
1.932 mm
Height with hood closed
1.469 mm
Width:
635 mm
Depth:
746 mm
Weight (net):
approx. 118 kg
Operating weight
approx. 160 kg
Tank volume:
42 l
Tank temperature:
65 °C
Voltage:
Rated load:
Fuse rating:
see data plate
see data plate
see data plate
Water pressure (flow rate):
0,8 - 6 bar (80 -600 kPa)
Hot or cold water supply:
up to max. 60°C
Noise level in dB (A):
Sound level LpA
< 70
Test marks:
VDE, interference suppression, DVGW, !
49
Customer contact
Should you have any difficulties please
contact your authorised Service Dealer
or the Miele Service Department.
– See back cover for contact details.
Please quote the model and serial
number of your machine. This
information can be found on the data
plate (see also “Electrical
connection”).
Please note that telephone calls may
be monitored and recorded to
improve our service.
50
51
Alteration rights reserved / 2803
M.-Nr. 05 905 900 / 00
This paper consists of cellulose which has been bleached without the use of chlorine.