1
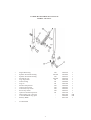
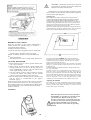
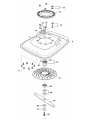
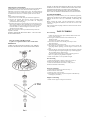
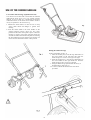
GUARANTEE
If there is any component, or components, manufactured by ALLEN
POWER EQUIPMENT LTD that are found to be defective within 12
months from the date of purchase (or in the case of a machine used
for hire purposes, 45 days), ALLEN POWER EQUIPMENT LTD
undertake to replace the faulty component/ components free of
charge through their authorised dealers.
The following are NOT covered by this Guarantee.
1. ENGINES - which are guaranteed separately by their
respective manufacturers.
2. A NEW MACHINE - which has been subject to operation in
excess of recommended capacities, misuse, negligence or
accident, or has been altered or modified in a manner not
authorised by ALLEN POWER EQUIPMENT LTD.
3. TRANSPORTATION CHARGES - to and from an authorised
dealer.
ALLEN POWER EQUIPMENT LTD operate a policy of continual
improvement and reserve the right to alter product specification
without giving prior notice.
After each season, we recommend that you have your machine
serviced by your dealer, preferably between October and January,
to avoid delay at the start of the following season.
Purchased from
Date:
Manufactured by:
Allen Power Equipment Limited,
The Broadway, Didcot,
Oxon OX11 8ES, England
Telephone 01235 515400
Fax 01235 515401
Email [email protected]
12
Serial No.
petrol
hover mowers
& trimmers
Operating instructions
£3.00
KEEP THIS BOOKLET IN A SAFE PLACE
Sept 2003
CERTIFICATE OF CONFORMITY
I, the undersigned, Mr A. F. Mears of Allen Power Equipment Ltd., The Broadway, Didcot, Oxon OX11 8ES certify that the machines
described below:
Category:
Make:
Type:
Models:
Cutter:
Lawnmower
ALLEN
Petrol Hover
400 Series
Metal Bar Blade
comply with the following Directives.
2000/14/EC
89/392/EEC
84/538/EEC as amended by 88/180/EEC and
88/181/EEC.
I also certify that the above machines have been tested in accordance with Directive 81/1051/EEC and with ISO 5349.
Date: January 2002
450
ENGINE
MANUFACTURER
MAX PERMISSIBLE (KW)
ENGINE SPEED (RPM)
SOUND POWER LEVEL db(A)
SOUND PRESSURE LEVEL db(A)
GCV160
HONDA
4.1KW
3600
99
78
2
Key
1.
Description
Handle upper
Model
all
2.
2.
2.
3.
4.
Cable Assy
Cable Assy (non OPC)
Cable Assy (OPC)
Kit Cable Securing
Handle lower
Handle lower
U Bolt
Handwheel
Hook-handle to u/carriage
Spacer-handle to u/carriage
Footstop
Footstop
Kit-nut, bolt & spacer
Undercarriage
Kit-axle securing bolts
Axle
Kit-axle spacers
Wheel
SPARE
Kit handle location
Kit handle location
Kit-engine securing
Kit-engine securing
Kit Engine frame
Kit Engine frame
Kit plate blanking
Kit engine frame to deck
Kit engine frame to deck
Kit deck assy
Kit deck assy
Kit deck assy
Spare
Drive
Kit Drive
Trim Disc securing bolt
Trim Disc securing bolt
Blade securing bolt
Key engine shaft sq.
Key engine shaft woodruff
Impeller
Impeller
Spacer large
Spacer disc/blade
Trim disc 40cm
Trim disc 46cm
Blade 51cm (20”)
Spigot blade/disc retaining
Operator Presence Control
Grip
Bracket upstop/footstop
Set Screw pack 5
Kit stop switch
Plastic blade pack 3
Plastic blade pack 60
Kit plastic blade retaining
Kit- Trim Disc complete
Kit- Trim Disc complete
Kit- Trim Disc complete
440
446-Hovertrim
446-Contractor/450
All
440
446/450
All
All
All
All
440
446/450
446/450
446/450
All
446/450
446/450
All
H292316
H292328
H292315
H190139
H292254
H290238
H292026
H192204
H192282
H192281
H192181
H290286
H290097
H192284
H190235
H192286
H290032
H292033
1
1
1
1
1
1
2
2
2
2
1
1
1
1
1
1
1
2
440
446/450
440
446/450
446/450
440
440
440
446/450
440
446
450
H190158
H290265
H290297
H290267
H290003
H292320
H290274
H290268
H290004
H290269
H290270
H290271
1
1
1
1
1
1
1
1
1
1
1
1
440
446/450
440
446
450
440
446/450
440
446/450
All
All
440
446
450
All
450
All
446/450
446/450
440
440/446
440/446
440/446
440
446
450
H292376
H290011
H292372
H292018
H292018
H292336
H292329
H296001
H192268
H192270
H192025
H292378
H292340
H292351
H192272
H290239
H292276
H292269
H292279
H290275
H292318
H292318-60
H290276
H290296
H290279
H290280
1
1
1
1
1
1
1
1
1
1
3
1
1
1
1
1
2
1
1
1
1
A/R
1
1
1
1
5.
6.
7.
8.
9.
9.
10.
11.
12.
13.
14.
15.
16.
17.
17.
18.
18.
19.
19.
20.
21.
21.
22.
22.
22.
23.
24.
24.
25.
25.
25.
26.
26.
27.
27.
28.
29.
30.
30.
30.
31.
32.
33.
34.
35.
36.
37.
37.
38.
*
*
*
11
Part No.
H290237
Quantity
1
LOWER HANDLEBAR & FOOTSTOP
MODEL 440 ONLY
*
Engine Riser Ring
*
*
*
*
*
*
*
*
*
*
*
*
*
*
Spanner disc/blade retaining
Spanner disc/blade retaining
Wrench hex 1/4”
Logo large Allen
Label warning
Logo “a”
Insulator Stop Switch
Contact Stop Switch
Lead earth, stop switch
Screw Stop switch
Operators manual & parts list
4mm Cutting Line 1 lb spool
3.5mm Flexiblade 2 kg spool
Safeway Blade
*
Not illustrated
10
440
H292374
1
446/450
440
440/446
All
All
All
440
440
440
440
All
-
H190210
H292373
H292343
H295128
H295089
H295129
H292322
H292321
H292323
H292337
H295142
SB13182
H292384
SB13166
1
1
1
1
1
1
1
1
1
1
1
A/R
A/R
1
IMPORTANT
SAFETY PRECAUTIONS
This product must only be used for cutting grass.
adjusting the height of the cut.
Blades continue to rotate after the operator presence control has been
released.
Instructions
Read the instructions carefully. Familiarise yourself with the controls
and with the correct operation of the equipment. Never allow the
mower to be used by children or by persons who are unfamiliar with
these instructions.
Never mow when people, and in particular children or animals are in
the vicinity. Always remember that it is the operator who is
responsible for accidents or injuries caused to other persons on his
property.
MAINTENANCE AND STORAGE
Ensure that all nuts, bolts and screws are kept tight in order to be
certain that the machine is in sound working order. The machine must
never be stored with petrol in the tank inside any building in which a
flame or a spark could be reached by the vapours. The engine must be
allowed to cool down before being placed inside any kind of
container.
In order to reduce the risk of fire, the engine and the silencer should
be kept free of any grass, leaves or grease. Use a funnel when filling
the fuel tank to avoid spillage on to the mower.
Any parts which are worn or damaged should be replaced in the
interests of safety.
Preparation
Strong footwear and long trousers must always be worn when
mowing.
Do not use a mower when barefoot or wearing sandals.
Fully inspect the area to be mown and remove all stones, metal wire,
bones and any other foreign bodies.
DANGER: Petrol is highly inflammable - see engine manufacturer’s
instructions for fuel recommendations. a. Keep the fuel in containers
which are specially intended for
that purpose.
b. Always fill the fuel tank out of doors. Never smoke when filling
the tank.
c. Fuel should be added before starting the machine. Never remove
the lid from the tank or add petrol when the engine is running or
when it is still hot.
d. If petrol has overflowed from the tank, do not attempt to start the
engine but remove the machine from the area where petrol is present
and avoid creating a source of ignition until the petrol vapour has
dissipated.
Any silencers which are in poor condition must be replaced. Before
starting, always check the machine to ensure that the blades and the
fixing bolts for the blades are not worn or damaged. Any worn or
damaged blades must be replaced using standard bolts in order to
maintain their state of balance.
Routine Maintenance
A few minutes spent after every mowing session will ensure that your
hover mower is in a good state of repair. Please ensure that the
engine maintenance is carried out as recommended by the
manufacturer, paying particular attention to the air cleaner system.
FAILURE TO DO THIS MAY RESULT IN PREMATURE ENGINE
FAILURE AND WILL RENDER THE GUARANTEE VOID. Ensure
the engine cooling fins, carburettor and impeller air vents are clear.
Always keep the underneath deck clean, this will ensure that the
mower operates efficiently.
Check that the blade is tight and the spacers are correctly fitted and
that no damage has been sustained by the blade or the impeller. An
out of balance blade causes severe vibration and may damage the
engine.
In the event of your mower hitting an obstruction and damaging
either the blade or the impeller, or both, please replace before further
use. DO NOT OPERATE THE MOWER WITH AN OUT OF
BALANCE BLADE OR IMPELLER. Check all nuts and bolts
occasionally and tighten when necessary.
Use
To stop the engine release the operator presence control when fitted.
Where operator presence control is not fitted stop the engine by
setting the throttle control to the stop position. Do not run the engine
in an enclosed space in which carbon monoxide fumes could
accumulate.
Mowing should take place only in daylight or under good artificial
lighting.
The use of the equipment on grass which is wet should be avoided
wherever possible.
Always ensure that your feet have a good grip on slopes.
WINTER STORAGE
We recommend that your mower is serviced after the last cut of the
season before storage.
Drain the petrol from the tank and run the engine till it stops. Close
the fuel tap (if fitted) and the vent screw (if fitted). Stale fuel is a
major cause of non starting at the beginning of the season.
Disconnect the spark plug lead and plug.
WALK - DO NOT RUN
Mow across slopes, never up and down.
Exercise great care when changing direction on slopes.
Use the mower with the greatest of care, when pushing it. Never pull
it when cutting grass.
The cutters must be stopped if the mower is to be transported over
areas without grass and when it is being brought to the area which is
to be mown.
Never vary the settings of the engine speed regulator or run the
engine at an excessive speed.
Exercise care when starting the engine, keeping the feet well away
from the blades.
When starting the engine do not tilt the mower more than necessary
and raise only that part which is furthest from the operator. Do not
put the hands and feet near or beneath the rotating components.
NEVER lift or carry a mower when the engine is running.
Stop the engine and disconnect the sparking plug lead: a.
before cleaning out any obstructions; b. before checking,
cleaning or repairing the mower;
c. after having collided with a foreign body (inspect the mower
for any damage, which must be repaired before the mower is
restarted and used again);
d. if the mower begins to vibrate in an abnormal manner
(a check must be made immediately).
Stop the engine and disconnect the sparking plug lead:
a. before leaving the mower unattended; b.
before refilling the fuel tank; c. before
3
REMEMBER - THE BLADE CONTINUES TO ROTATE
FOR SEVERAL SECONDS AFTER THE OPERATOR
PRESENCE CONTROL IS RELEASED.
Tilt the mower, as in Fig.6, and release the operator presence
control if fitted, or place throttle control to the stop position.
Disconnect the spark plug lead.
Cutting grass
Please read the following instructions before using the mower.
ALWAYS MAKE SURE THE GRASS IS CLEAR OF STONES,
STICKS AND SIMILAR OBJECTS BEFORE MOWING. We
recommend the method of operation as shown in Fig.7 to obtain the
maximum cutting performance from your mower. It is better to cut
round your lawn from the outside to the inside, rather than straight
up and down as you may have done up till now.
Start at the outside border of the lawn and go round the borders in a
clockwise direction, working towards the centre. Always control the
mower with two hands and keep the mower flat on the grass.
It is
BEFORE CUTTING GRASS
Study the procedure on the engine manufacturer’s
leaflet carefully but remember they are related to a
conventional wheeled mower.
In addition check the following:
a. That the fuel tank is full. (If this mower is fitted with
a
4-stroke engine, check the oil level see engine
manual. b. That the operator has read and understood
the
instruction manual.
c. That the operator is aware of all the Safety Instructions.
normally recommended never to cut more than one third of the
length of the grass at one time. Never allow the mower to struggle
continuously in difficult conditions. This will only occur in long
tough grass with the blade set too low.
When mowing long tough grass, always have the blade at its highest
setting, use a gentle ‘pecking’ motion and do not force the mower
through the grass.
If used on undulating ground set the blade at a height so that it does
not ‘scalp’ the ground.
If cutting wet grass for a prolonged period ensure that there is not a
build up of grass on the underside of the deck. If the build up
becomes too great SWITCH OFF AND WAIT FOR THE BLADE
TO STOP ROTATING, disconnect the spark plug lead, then tip the
mower on it’s side, keeping the carburettor uppermost, and scrape
away the damp grass. Try to avoid using the mower in these
conditions as it can be detrimental to the condition of your lawn.
TO START THE MOWER
a. Ensure that the fuel tap is in the on position and the tank
vent is open (if fitted).
b. Before pulling the starter handle, release handles from
parking position, put your foot on the deck and tilt the
mower TOWARDS you (Fig.6). This will take the load
off the engine making it easier to start.
c. Close the operator presence control if fitted by bringing
it towards the handle and holding both the operator
presence control and handlebar in the same hand.
d. Place the choke control to the start position, if necessary, and
pull the starter as recommended in the engine’s
handbook. (fig 6a)
When the engine starts, move the choke control to the RUN
position and lower the deck slowly. For long tough grass
the maximum height of cut should be selected. When cutting
short, well kept grass, a low or intermediate height setting
should be selected.
Adjusting the Handles
The handles on your mower automatically lock when placed upright,
this is a stationary or parking position.The handles must be released
from this position when starting the engine. To release from any
limit position, depress the footstop.
STOPPING
When the Operator Presence Control is held to
the handlebar, it is possible to start and operate
your lawnmower. Release of the Operator
Presence Control in the event of and emergency,
or if the user leaves the operating position, will
stop the engine and blade. Never fasten the
Operator Presence Control into the operating
position.
4
8
ENGINE TO FRAME AND FRAME TO DECK OR ANY FIXING
COMING INTO CONTACT WITH PLASTIC PARTS. THE ONLY
EXCEPTION IS THE DRY LOCTITE PATCH APPLIED TO
HANDLE TO DECK FIXING BOLTS. FAILURE TO OBSERVE
WILL LEAD TO SERIOUS WEAKENING OF PLASTIC PARTS.
Adjusting the Cutting Height
All adjustments must be carried out with the engine stopped and the
spark lead disconnected. If the machine has been used prior to
adjustment, wait for the rotating cutter to stop. The cutting height of
your mower has been set at the highest setting. If you prefer a lower
cut follow these instruction: a. Shut the petrol vent screw where
fitted
b. Disconnect the spark plug lead.
c. Tilt the mower on its side. (Keep the carburettor uppermost.)
d. Remove the retaining bolt with the spanner provided whilst
holding the blade. Make sure your hands are adequately
protected from the cutting edge.
e. Reposition the spacers as required (Fig.8). For the lowest cut all
three spacers should be above the blade. For an intermediate cut
there should be one or two small spacers above and two or one
below the blade. To obtain the highest cut, all three spacers
should be below the blade.
NOTE: The large spacer must be positioned directly below the
impeller at all times.
TIGHTEN THE BLADE RETAINING BOLT - USE ONLY THE
SPANNER PROVIDED.
PLEASE REMEMBER
When tilting a 4-stroke machine, have the carburettor uppermost,
otherwise oil will drain from the breather pipe.This will make re-starting
difficult and the loss of the oil, if unchecked, could damage the
engine.
Before starting the engine, read the manufacturer’s instructions
carefully, paying particular attention to the notes on oil levels in the
crank case.
If in any doubt about anything contained in these instructions check
with your dealer.
FAULT FINDING
Poor Starting
1. Make sure the petrol tap is open (if fitted). Make sure the vent
screw is open (if fitted),
2. If the engine is cold the throttle control should be in the
START position.
If warm, in the normal running position.
3. If the mower has been out of use the petrol may be stale.
Drain and replace.
4. Check the air filter for excessive oil.
5. The engine may be flooded, in which case, remove and dry the
spark plug. Before replacing, crank the engine to remove excess
fuel.
6. Check the plug for spark by placing the end of the plug (with lead
connected) against the engine casing & away from the plug hole.
Do not hold the plug or lead by hand.
Crank the engine and watch for a spark at the plug points. If
there is no spark, the plug should be replaced.
7. Make sure the blade is correctly fitted and tight.
Note for 440 & 446-Hovertrim:
1 spacer is required above disc at all times
IMPORTANT
UNDER NO CIRCUMSTANCES SHOULD ANY THREADLOCKING MATERIAL BE USED ON FIXINGS HOLDING
Poor hovering
1. Check that the engine is running at the correct speed. 2.
Check that the impeller air vents are not blocked.
3. Check that the underside of the deck is really clean. 4.
Check that the blade is fitted firmly.
Excessive vibration
1. Check blade and spacers are fitted correctly. 2.
Check the balance of the blade.
3. Check for loose screws or bolts.
4. If the blade has hit a heavy object the impeller crankshaft may
be damaged. (See dealer.)
Engine Overheating
1. Make sure the engine cooling fins are dirt free
5
Use of the Undercarriage (Optional not 216)
Your mower can be fitted with a removable two-wheeled
undercarriage which gives you a very versatile mowing
machine. It can be used as a conventional hovermower
without the wheels, or the wheels can be fitted to enable a
variety of operations to be carried out: e.g.
a. Without the wheels fitted it is ideal for use on steep
slopes, under shrubs and hedges or general lawn
mowing.
b. With the wheels fitted to the lower handles in the
general transport position (Fig.2) for easy transportation of the mower from place to place or ideal for
mowing in rough or long grass using the wheels for
assisted movement and as a fulcrum point for attacking
the most stubborn growth. General lawn mowing can
also be carried out with the wheels in this position.
Fitting the Undercarriage
To the lower handle (see Fig. 4)
1. Enter the smooth pin (x) into the large dished hole in
the lower handle on the left hand side. Push the
undercarriage over as far as it will go to the right.
2. Insert the stepped pin (y) into the large dished hole in
the lower handle on the right hand side. Push the
undercarriage as far as it will go to the left.
3. Swing the undercarriage upwards until the bar (z) is
hooked firmly in place (Fig. 5).
4 To remove, unhook the bar and reverse the above
procedure.
NOTE:
Never change the position of the
undercarriage when the engine is
running.
440 / 446-Hovertrim Only
28
7
29
25