1
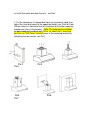
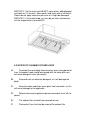
READ AND SAVE THESE INSTRUCTIONS
Range Hood User Guide
Imported by:
Euro Kitchen Appliances Inc.
Delta, BC Canada
www.KitchenHoods.ca
tel.604 8360517
Model - PS101-30, 36
The manufacturer disclaims all liability for any damage or injury
caused as a result of not following instructions for installation
contained in the following text.
The range hood is used on 120V/60Hz.
CONTENT
1…………………………IMPORTANT SAFETY INSTRUCTION
2………………………………INSTALLATION INSTRUCTION
3…………………………………….…….…………….. FEATURE
4…………………………………….………………..…………USE
5……………………………………….…………MAINTENANCE
6………………………………ABNORMITY AND SOLUTION
7. ……………………………………………..WARRANTY CARD
(1) IMPORTANT SAFETY INSTRUCTION
WARNING – TO REDUCE THE RISK OF FIRE, ELECTRIC SHOCK,
OR INJURY TO PERSONS, OBSERVE THE FOLLOWING:
a) Use this unit only in the manner intended by the manufacturer. If
you have questions, contact the manufacturer.
b) Before servicing or cleaning unit, switch power off at service panel
and lock the service disconnecting means to prevent power from
being switched on accidentally. When the service disconnecting
means cannot be locked, securely fasten a prominent warning
device, such as a tag, to the service panel.
CAUTION - For General Ventilating Use Only. Do Not Use To
Exhaust Hazardous Or Explosive Materials And Vapours.
WARNING – TO REDUCE THE RISK OF A RANGE TOP GREASE
FIRE:
a) Never leave surface units unattended at high settings. Boil over
cause smoking and greasy spillages that may ignite. Heat oils slowly
on low or medium settings.
b) Always turn hood ON when cooking at high heat or when
flambéing food (i.e. Crepes Suzette, Cherries Jubilee, Peppercorn
Beef Flambé’).
c) Clean ventilating fans frequently. Grease should not be allowed to
accumulate on fan or filter.
d) Use proper pan size. Always use cookware appropriate for the
size of the surface element.
WARNING – TO REDUCE THE RISK OF INJURY TO PERSONS IN
THE EVENT OF A RANGE TOP GREASE FIRE, OBSERVE THE
FOLLOWING a:
a) SMOTHER FLAMES with a close-fitting lid, cookie sheet, or metal
tray, then turn off the burner. BE CAREFUL TO PREVENT BURNS.
If the flames do not go out immediately, EVACUATE AND CALL THE
FIRE DEPARTMENT.
b) NEVER PICK UP A FLAMING PAN – You may be burned.
c) DO NOT USE WATER, including wet dishcloths or towels – a
violent steam explosion will result.
d) Use an extinguisher ONLY if:
1) You know you have a Class ABC extinguisher, and you already
know how to operate it.
2) The fire is small and contained in the area where it started.
3) The fire department is being called.
4) You can fight the fire with your back to an exit.
(2) INSTALLATION
WARNING – TO REDUCE THE RISK OF FIRE, ELECTRIC SHOCK,
OR INJURY TO PERSONS, OBSERVE THE FOLLOWING:
a) Installation work and electrical wiring must be done by qualified
person(s) in accordance with all applicable codes and standards,
including fire-rated construction.
b) Sufficient air is needed for proper combustion and exhausting of
gases through the flue(chimney) of fuel burning equipment to prevent
back drafting. Follow the heating equipment manufacturer’s guideline
and safety standards such as those published by the National Fire
Protection Association (NFPA), and the American Society for
Heating, Refrigeration and Air Conditioning Engineers (ASHRAE),
and the local code authorities.
c) When cutting or drilling into wall or ceiling, do not damage
electrical wiring and other hidden utilities.
d) Ducted fans must always be vented to the outdoors.
WARNING - TO REDUCE THE RISK OF FIRE, USE ONLY METAL
DUCTWORK.
CAUTION - To reduce the risk of fire and to properly exhaust air, be
sure to duct air outside - Do not vent exhaust air into spaces within
walls or ceilings or into attics, crawl spaces, or garages.
(3) GROUNDING INSTRUCTIONS
This appliance must be grounded. In the event of an electrical short
circuit, grounding reduces the risk of electric shock by providing an
escape wire for the electric current. This appliance is equipped with a
cord having a grounding wire with a grounding plug. The plug must
be plugged into an outlet that is properly installed and grounded.
WARNING – Improper grounding can result in a risk of electric
shock.
Consult a qualified electrician if the grounding instructions are not
completely understood, or if doubt exists as to whether the appliance
is properly grounded.
Do not use an extension cord. If the power supply cord is too short,
have a qualified electrician install an outlet near the appliance.
(4) INSTALLATION PROCESS
a) The cooker hoods shall be placed at a distance
of 77-85cm from the cooking surface for best
performance. See Pic1.
b) Drill three Ø8 mm holes in a horizontal line at
the appropriate height for installation of the
mounting bracket.
77c m
85c m
Pi c 1
c) Insert expansion bolts into the holes , fix the mounting bracket on
the wall, then secure the cooker hood to it see Pic 2.
d)Install the vent into the duct connector of the cooker hood with 4
screws(4x8mm).see Pic3.
e) Install the metal duct onto the vent, see Pic4.
f) Put the two-pieces U-shaped duct cover on the cooker hood, then
adjust the inner duct cover to the appointed height, see Pic5; drill two
Ø8 mm holes in a horizontal line for installation of the other mounting
bracket and then fix the bracket . (Note: The hood can be installed
on both wood wall and brick wall) Raise the hood into its mounting
position see Pic6.Secure the duct cover to the mounting bracket by
tightening the two screws, see Pic7.
Screw
Pic 2
Pic4
Pic5
Pic7
Pic3
Pic6
(5) FEATURES
1. The cooker hood uses high quality materials, and is made with a
streamlined design.
2. Equipped with large power low noise electric motor, centrifugal
leaf which produces strong suction with low noise, and non sticky
grease filter. Easy for cleaning.
3. Equipped with the isolated low voltage circuit board control,
12VAC input, the lights are therefore safe.
4. Special wind tunnel construction and oil collector design, free
dirt will be absorbed in a second.
4
A
USE
FB/FC
1 Power: When power-on ,the output is off ,and the machine is
standby.
2 “light” key Press the key once, the lamp is lit. Once more, the
lamp put out, and this operation is a circulation.
3 The Add key
,also the switch that control power-on .The
motor has three speed : low medium high.
.Press the
key once, the motor start working, with its low
speed(that the switch control the power-on, and the speed indicator
is lit.
.At the low speed, Press the
key again to shift up to medium
speed. Then the position indicator is lit.
.Press the
key when the motor at its medium speed. It will be
shift up to high speed. Then the
position indicator is lit, the
position indicator is put out.
.when the motor at its high speed, press the
key again, the
motor will work at its normal condition. Of course, working at its high
speed.
4 The Dec key
,also the switch that control the power-off.
.Press the
key once, the motor will shift down one level,
Continually press the Dec key till the machine at no speed, then the
switch control power-off.(the motor stop working),the speed indicator
is put out.
5 The Timer key :
The timer key is used for timing setting, when the motor or lamps are
working.10min delay, the motor will be off work.
6 Temperature control protection: There are two type of the cooker
hood, it’s temperature control protection or not. When the machine
connect to the probe, it will inspect automatically. When the surface
temperature of the cooker hood is up to 61 ,It will shift to high speed
automatically, no matter the cooker hood is working or not. When
key flash, it means the surface temperature of the cooker hood is
less then 52 ,then the cooker hood will be back to the work status
automatically, and then pressing the
key is back to initial status.
B
HD
1.Power on: Switch on the power supply, and the backlight is lit,
displaying “24-hour system”. The output is then blocked up, and the
soot machine enters standby status. The backlight disappear
automatically 30 seconds later under the condition of none operation.
2. Press “Lamp” key: Press the indicator key once, the indicator is lit,
and on the LCD screen is lit. Press it for a second time, of the
indicator and the LCD screen will distinguish and it will be repeated
again and again. The Lamp work independently, not controlled by
Timer and Power.
3. Power on key
, the motor is provided with three positions, i.e.
low, medium and high.
A. Press key
,the
is displayed on the display screen, and the
motor start work, it is the low position (power on position),and the key
also lit.
B. Press
key once more at the low position, and it transfer to
medium position.
key keep lit and work.
C. Press
key once more at the medium position, and it transfer
to high position,
key keep lit and work.
D. It could be chose “low position-medium position-high position-low
key under working position..
position-medium position……”by
4.Press key
,the motor is adjusted., press key
once more,
the motor is stopped.
icon and
power off on display.
5.Timer key : it has been set on 12:00, when power off, it also
show 12:00.Customer need to set the time again.
1.The timer key is the timer setting key if the speed and lamp don’t
work at both position.
Long press timer key for 2-5 seconds, time segment
,and
the first two hour bit segment flash, use key
for the digit
increase, use
key for the digit decrease. Namely: The variable is
01 each time it is pressed; the hour segment is with the largest digit
of 23. If it exceeds 23,
key is null and void. If it is equal to 00,
then the
key is null and void.
Press the timer key for the 2nd time , time segment
, and
the last two minute bit segment flash, se key
for the digit
increase, use
key for the digit decrease. Namely: The variable is
01 each time it is pressed; the hour segment is with the largest digit
of 59. If it exceeds 59,
key is null and void. If it is equal to 00,
then the
key is null and void.
Press the timer key
and confirm key.
for the 3rd time, and it is the time setting exit
Long press timer key
for 2-3 seconds under this operation
mode, and it is for the hour setting; Press it for the 2nd time: Setting
for the minute; Press it for the 3rd time: For the time setting exit and
confirm, and it will be repeated again and again (if the 1st time
pressing doesn't exceed 2 seconds, then it can't run this operating
procedure.)
2.The timer key is the timer setting key when the motor is working.
When only press Lamp key, the timer key is null and void.
Press timer key, enter the setting display. 1st time setting is 5 min.
Use speed key for increase gradually, use lamp key for decrease
gradually, the time should be set 1:00—60:00 min. Finish setting,
press timer key to confirm.
Example: Let the setting time be 5min, the display is 5:00, 4:59,
…00:1, with 0:00 displays per minute, and once “00: 00” appears,
the motor position and the indicator power supply will be cut off
automatically, (the display screen displays “24-hour system”, the
output is blocked up, and the soot machine enters standby status,
and the backlight will be put out automatically 30 seconds later.)
When use time setting next time, press timer key and not change
timer setting, the soot machine will keep the time automatically . 5
min later, it starts to decrease gradually. If reset the time, it will work
for new time.
6.Temperature control protection: When soot machine connect to
probe, it will inspect automatically. When the surface temperature of
cooker hood up to 61 ,whatever it is under off working, it will transfer
to high position automatically.
key flash, means that the surface
temperature of cooker hood less than 52 , cooker hood will be back
to initial state automatically, press
key to initial status.
(6) MAINTENANCE
6.1 THE CLEANING OF THE CARBON GREASE FILTER MESH
The filter mesh is made of high-density stainless steel. Please do not
use the corrosive detergent on it. Keeping this filter clean will keep
the appliance running correctly. Please strictly follow the guidelines
below.
METHOD 1: Put the mesh into 40-50°C clean water, add detergent
and soak for 2-3 minutes. Wear gloves and clean with a soft brush.
Please do not apply excessive pressure or it might be damaged.
METHOD 2: If instructed to do so, it can be put into a dishwasher,
set the temperature at around 60°C.
6.2 NOTICE OF CLEANING COOKER HOOD
A.
To protect the main body from corrosion over a long period of
time, the cooker hood should be cleaned with hot water plus noncorrosive detergent every two months.
Please do not use abrasive detergent as it will damage the
B.
body.
C.
Keep the motor and other spare parts free from water, as this
will cause damage to the appliance.
D.
Before cleaning the appliance please remember to cut off the
power.
E.
The carbon filter shouldn’t be exposed to heat.
F.
Please don’t tear the fixed bar around the carbon filter
G.
If the plug or cord is damaged, please replace it with special
soft cord.
(7) TROUBLESHOOTING
Fault
Cause
The leaf blocked
Light on, but motor
does not work
Light does not
work, motor does
not work
Oil leakage
Shake of the body
Insufficient suction
The machine
inclines
The capacitor damaged
Solution
Get rid of the
blocking
Replace capacitor
The motor jammed bearing
Replace motor
damaged
The internal with of motor off Replace motor
or a bad smell from the
motor
Beside the above mentioned, check the following:
Light damaged
Replace lights
Power cord looses
Connect the wires as
per the electric
diagram
Take down the
Damper and seal with
glue
Take U-shaped
section down and seal
with soap or paint
Replace the leaf
Damper and the air
ventilation entrance are
not tightly sealed
Leakage from the
connection of U-shaped
section and cover
The leaf damaged and
causes shaking
The motor is not tightly
hanged
The body is not tightly
hanged
The distance between the
body and the gas top too
long
Too much ventilation from
open doors or windows
The fixing screw not tight
enough
Lock the motor tightly
Fixed the body tightly
Readjust the distance
Choose a new place
and resemble the
machine
Tighten the fixing
screw and make it
horizontal
The mounting screw not
tight enough
Tighten the mounting
screw and make it
horizontal
(8)WARRANTY
We will warrant this product free from defects in material and quality
for one year from date of purchase. If any problems occur from
correct usage, please contact the service department for under
warranty service.
This warranty does not cover the following:
The filter mesh and bulb.
Commercial use.
Amendment of the manufacture date on the rating plate.
After 12 months from date of purchase.
Damaged caused to the body by usage of detergent sprayer.
Pollution made to the led parts, glass parts and S/S parts.
Incorrect installation, misuse, abuse or neglect.
Incorrectly fitted to insufficient or unsuitable power.
Damage caused by foreign object.
Taken apart or serviced by unauthorized service engineers or
replaced with other manufacture’s components.
For commercial use the maintenance and free service should be
discussed with our authorized agent.
Beyond the 12 months warranty period, the purchaser should pay for
charge of components and call out.
In the event of a service call, please provide the warranty card and
receipt of date of purchase.
Euro Kitchen Appliances Inc.
---------------------------------------------------------------------#111-590 Ebury Place
Delta, BC
V3M6K7 , Canada
www.KitchenHoods.ca