1
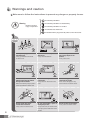
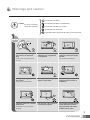
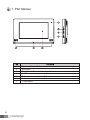
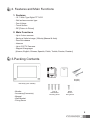
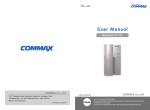
User Manual
Video Doorphone CDV-1020AE
513-11, Sangdaewon-dong, Jungwon-gu, Seongnam-si, Gyeonggi-do, Korea
Int’l Business Dept. Tel. : +82-31-7393-540~550 Fax. : +82-31-745-2133
Web site : www.commax.com
PM071020AE10
Printed In Korea / 2011.10.104
•
• Thank
Thank you
you for
for purchasing
purchasing COMMAX
COMMAXproducts.
products.
•
• Please
Please carefully
carefully read
read this
this User’s
User’sGuide
Guide(in
(inparticular,
particular,precautions
precautionsfor
forsafety)
safety)before
beforeusing
usingaaproduct
productand
andfollow
follow
instructions
instructions to
to use
use aa product
productexactly.
exactly.
•
• The
The company
company isis not
not responsible
responsiblefor
forany
anysafety
safetyaccidents
accidentscaused
causedby
byabnormal
abnormaloperation
operationof
ofthe
theproduct.
product.
Table of Contents
Warning and Caution ...............................................................................2
1. Part Names .........................................................................................4
2. Features and Main Functions .............................................................5
3. Packing Contents ................................................................................5
4. Operation ............................................................................................6
5. Play and Delete of Saved Images. .....................................................8
6. Setting ................................................................................................8
7. Installation and Wiring .......................................................................10
8. Specification .....................................................................................12
1
Warnings and caution
Make sure to follow the instructions to prevent any danger or property losses.
Warning
It indicates prohibition.
Death or serious
injury is expected.
It indicates prohibition of disassembly.
It indicates prohibition of contact.
It indicates dos and don’ts.
It indicates that the plug should be pulled out from the socket.
2
Do not put the plug in the socket
simultaneously.
It may generate abnormal heat
or cause a fire.
Do not connect to other products
while in use.
It may cause breakdown.
Do not forcibly bend the cord or
put a heavy object on the
product.
It may cause a fire.
Do not use water, thinner or a
detergent used to wash oil products
when you wash the exterior.
Make sure to wash it by using a dry cloth to
prevent any breakdown or electric shock.
Do not install the product in a
humid place.
It may cause an electric shock or
a fire.
Do not forcibly pull out the
cord from the socket.
If the cord is damaged, it may
cause a fire or an electric shock.
Do not put the plug in the
socket with a wet hand.
It may cause an electric shock.
Do not disassemble, repair or
modify the product.
It may cause a fire, an electric shock
or an injury due to malfunction of the
product.
Do not use AC circuit breaker.
It may cause an electric shock.
Warnings and caution
Caution
It indicates prohibition.
An injury or property
losses are expected
It indicates prohibition of disassembly.
It indicates prohibition of contact.
It indicates dos and don’ts.
It indicates that the plug should be pulled out from the socket.
If the socket holes are larger
than normal, do not put the
plug.
It may cause an electric shock
or a fire.
Make sure that dust or foreign
substances are not gathered
on the product.
Make sure to prevent foreign
substances from entering the
product.
It may cause a breakdown.
Do not put a heavy object on
the product.
It may cause a breakdown.
Do not disassemble or give an
impact to the product.
Avoid direct rays of the sun or
heating devices at a time of
installation.
Install the product in a flat and
stable place.
Otherwise, it may not function
properly.
Pull the plug if the product is
not used for a long time.
If the product generates strange
sound, make sure to pull the
plug immediately and contact
Commax service center.
3
1. Part Names
1
2
3
4
5
6
7
4
Speaker : Talk and Call sound
Mood LED
Touch Panel : Touch it to start operation
C-MIC
Talk volume control : Control Talk volume
Call volume control : Control Call volume
Power switch
2. Features and Main Functions
1. Features
- 10.1” Wide Type Digital TFT-LCD
- Wall surface mounted type
- Free Voltage
- Touch Screen
- PIP [Picture In Picture]
2. Main Functions
- Up to 2 door cameras
- Saving a Visitor’s image (128cuts) (Manual & Auto)
- Door lock release
- Intercom
- Up to 2 CCTV Cameras
- Support 8 languages
[Korean, English, Chinese, Spanish, Polish, Turkish, Persian, Russian]
3.Packing Contents
Wall Bracket
Main Body (CDV-1020AE)
- Monitor
- Accessory(Connector)
- Manual
- Wall Bracket
- Fixing Screw
T4 X 18
Wall Bracket
Mounting Screw
Manual
Connector
4P(3EA)
2P(2EA)
M3X 6
Monitor
Fixing Screw
5
4. Operation
This model is a cutting-edge Videophone with PIP-Based touch screen feature.
4-1. Operation / Standby mode
After the wiring, the videophone should operate as follows,
- Once the power is on, the LED at the bottom will be turned on and GUI will
be displayed. (Main Screen)
- After some time from the power is on, LCD will be turned off and LED(Blue)
at the bottom will be turned on.
- Click touch panel to start GUI for use
- While it is saving the images, buttons will not work. Button will work when
image saving is complete.
4-2. Talk to the visitors at the front door
6
- The visitor image will be displayed with Sol Mi Do sound when the visitor
clicks call button on the camera. If additional monitors or interphones are
installed, all screens will be turned on with call sound at the same time.
- The monitor will be turned on for 30±5sec. During the conversation, it will be
turned on for 60±5sec.
- The conversation will begin when you click the Talk button at the above
screen.
- If you click the center of screen in above status, the screen will come up full
screen. If you touch it once again, the size of screen will return to normal.
(Touch PIP screen to maximize PIP screen)
- Click “Save image icon” to save a visitor’s image manually during the talk.
[Refer to image save feature]
- Click “Door open” to open the door during the talk
[Camera with door lock release function should be installed]
- Click “Talk” once again to end the talk
- After not being used for a while, LCD will be turned off automatically
4-3. Interphone functions
* Call from Interphone
- Interphone icon will be displayed with call sound.
- Click “Talk” icon to start conversation.
- Click “Talk” icon once again to end conversation.
* How to call an interphone on main screen
- Click interphone icon in the main menu and touch small interphone icon to
call interphone.
- When you receive the call, the conversation begins.
- Click “Talk” icon once again to end conversation.
* How to call an interphone during the conversation with door camera.
- If you click small interphone icon on the right side during the talk with door
camera, interphone call will ring.
- When the call is received by interphone, the talk among videophone, door
camera and interphone will be available.
- Click “Talk” icon once again to end conversation.
* Click “X” icon to return to the start-up screen.
- If more than one camera is installed [Door camera up to 2, CCTV up to 2]
click switch camera icon to move to next camera image in order.
4-4. Monitoring
- On standby mode, touch the screen and click Door icon for monitoring.
(Click “Talk” to make conversation with camera)
- Click “Switch camera” on the right side to convert monitoring.
(The following scenario is the example that 2cameras and 2 CCTV are
installed. If they are not installed like the example, the monitoring function of
relevant camera will not work)
1) CAMERA #1 (Full) + CCTV1 (PIP)
(When there is no CCTV1 signal, only CAMERA #1 (Full) is displayed)
2) CAMERA #2 (Full) + CCTV2 (PIP)
(When there is no CCTV2 signal, only CAMERA #2 (Full) is displayed.)
* Touch the camera screen to see it in full-screen mode. In same way touch
the CCTV screen to see it in full-screen mode.
7
5. Play and Delete of Saved Images.
* Pictures from door camera are saved up to 128 cuts.
- You can see the 4 images at once when you touch the icon ‘check the saved
images’, and move to next page by touching the arrows.
- When you select one picture, the picture will be displayed in full-screen
mode.
- Press ‘Delete’ icon to delete the picture.
- On quad display mode, press ‘Delete page’ icon to delete the 4 images at
once which are shown on the screen.
6. Setting
6-1 Setting of date and time.
- Touch icon ‘Time setup’ to set the year, month, date and time.
- Press ‘OK’ after setting, and press ‘X’ to quit the setting page.
8
6-2 Display setup
- Touch icon ‘Display setup’ to enter display setting mode.
- Touch the required item and touch right or left arrow to adjust. Touch the
‘OK’ icon to confirm and ‘X’ to quit.
6-3 Setting of image save and deletion of all saved images.
- Touch icon ‘Save/Delete’ to enter the setup mode of image save or deletion
of all saved images.
- When the ‘Auto Save’ item is checked, every image from the door camera is
saved automatically, when there is calling from the door. When the ‘Manual
Save’ item is checked, images are not saved automatically.
- Icon ‘Delete all’ will delete all the images which are saved.
- Images from only door cameras will be saved only. Images from CCTV
cameras are not saved.
9
6-4. Language Setting
- Touch icon ‘Language’ to enter language setting mode.
- Total 8 languages are supported. (Korean, English, Russian, Spanish,
Persian,Turkish, Polish, Chinese(simplified).
- Select required language and touch ‘OK’ to confirm. Touch ‘X’ to return to
main page.
- Touch icon ‘Default’ to return all the settings of the monitor back to initial
status. Default language is English.
** Settings, which are returned to default upon ‘Default’ order.
1. Language : returned to English.
2. Color setting.
(Saves images are not deleted. You can delete all the images only in
‘Save/Delete’ menu.)
7. Installation and Wiring
Installation method of monitor
SCREW(PHM 3X6 ZnY) : 1EA
SCREW(PH1T 4X18 ZnY) : 2EA
10
Cautions on installation
① Please avoid the places with strong magnetism, humidity, direct sunlight, near the
heating devices, as these can affect the product.
② Recommended height of installation is 1,450mm ~ 1,500mm from the floor.
③ Finish the installation before you turn on the monitor.
Connected devices.
Door camera : Max. 2 x door cameras. Max. 2 x CCTV cameras. Interphone.
① Please have the button above select switch in below connecting digram right to
activate Camera1 and Camera2.
(Please have the button above select swich left to activate Camera1 only)
② For use of NTSC type camera, please have the button below select switch in
connecting diagram right.
(For use of PAL type camera, please have the button below select swich left)
③ Please turn power switch off and on for the setting of select switch.
④ Every connected door camera and CCTV camera should be under the same video
format (PAL/NTSC) to secure proper video quality.
⑤ In case of using 2 monitors, 2 cameras and 2 interphones in one system
configuration could slightly lower video quality.
11
How to connect CCTV Camera.
Power of CCTV Camera should be supplied separately.
Select the proper type of coaxial cable as per the distance from monitor to camera.
8. Specification
Item
Wiring
Power
Power consumption
(in operation)
Display
Calling sound
Display time
No. of saved images
Working Distance
Working temperature
Dimension
Weight
12
Descriptions (CDV-1020AE)
Door Camera : 4-wires, polarity
CCTV Camera : 2-wires, polarity
Interphone : 4-wires, polarity
100-240V~, 50/60Hz
17W (Max.)
25.65Cm(10.1”) Digital TFT-LCD
From Door Camera : Electronic melody (Sol-mi-do, 2 times)
60 sec. (60 sec. upon talking)
128 cuts
From monitor to door camera : 30M(at Ø0.5) /
50M(at Ø0.65) / 70M(at Ø0.8)
0°C~+40°C (32°F~104°F)
318(W)x215(H)x35(D)
1.7kg