1
3760/4220/6850/6860
SERIES
3
15
J
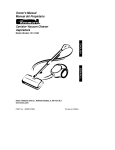
We'regaa yout:urcnaseaa BBSELLVacuum Everythingwe knowabout
floorcarewent imo-medesignand constructionat this powerful,high-tech
namevacuumingsys[em
YourBISSELLVa(_
Jm _s_el ]]aae ana we back it with a limited
comprenensveone-ye]r warram, Weab( standbehindit with a
_now_eageaD_e,
aealcateaConsumerSewicesdepartment,so, shouldyou
evernavea pr@_em,you'll receivefast considerateassistance_
My great-grandfatherin entedthefloor sweeperin 1876_Today,BBSELL
ts a g o[}al eaderin the deSg_ manufacture,and serviceof high quality
nomecareproducts KeyourBISSELL
Vacuum
Thanksac_in,from au of us at BiSSELL
sresidentand ChiefExecutiveOfficer
@
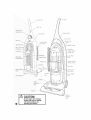
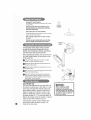
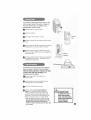
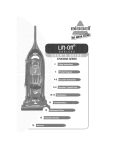
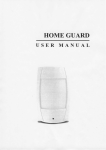
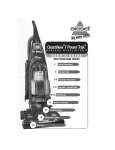
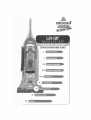
Bu_on
BrushOn/Off
Switch
/DetachableCanister
Filter
Indicator(Select
ModelsOnly)
- Louvers/Filter
Frarne
Upper
_nk Filter
insideLouvers)
DustChamber
withScreens
Lever
Furniture
Protection
Guard
@
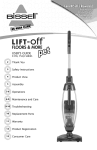
This User'sGuidehas been designedto heip
you get the most satbtaction trom your BBSELL
Vacuum.You'llfind assemNy and operating
instructions, satety precautions,as well as
maintenanceand troubbshooting instructions.
Phase read this GuidethorougNy before
assemNing your vacuum cbaner.
Pay partbuBr attention to the product diagram,
assemNy instructions,and part names.Locate
and organizeall parts before assemNy.Familiarize
yourselt with the parts and where they tit.
Followingthis User'sGuile will greatly enhance
your ability to get the most pertormancetrom your
BBSELLVacuumtot many years.
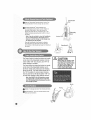
Theonlytool you'llneedto assembbyourvacuum
cleaneris a screwdriver.
Locate the vacuum Handle and emove me scre',a
packet taped to the base of the Handle.
Stand the vacuum upright and slide the base of
the Handle firmly into the grooves at the top of the
vacuum body.
Check to be sure the Handle is titted to the vacuum
body. If there is a gap in front, continue to push firmly
until the Handle is flush.
Insert the two screws from the screw packet n_o_ne
existing holes.Tighten securely with a screwqriver.
Position the Twist 'n Snap HoseT" assembly on one
vacuum and line up the tabs on the base of the hose
with the corresponding notches. Turn the Twist n Shad
Hose to the right to lock into place.
Slide the end of the Hose Grip onto the Hose Gri] Base
Pbce the Hose into the HoseClip.
K
NOTE: The Power/oot will not operate effectivemy
unbss the Hose is firmly attached to the base.
@
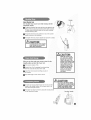
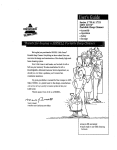
,, Combination
OSnap the Telescoping ExtensionWand, Crevice Tool,
and Combination Tool into storage cliPSas shown
On Board TurboBrushce Select Models Ony)
The TurboBrush Bracket slides onto the Hanger on
the front of the Hanme. Attach the Bracket by
a!igmng the slots With the rectangu,ar uar[ on me
Hanger as ShOWnaria pumng down until it is locked
nw place.
Nots: If you do not wish to store the TurhoBrash
on your Lift-Off vacuum, the flrackst lay be
hwlg on a wall for storage aed the llaegsr may
he removed from the vacaam.
CreviceTool//'
Place the TurboBrush in the Bracket by m_gning
the small holes near the brUShroll Wlm me lads
at me bottom of the Bracket arts snaE the TurboBrush
Into
place.
I_
"
_
r
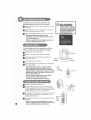
ThePowerSwitchis locatedjust belowthe handle
on the front of the DetachableCanister,Pushthe
rockerswitch "ON==
(I)to vacuum,and"OFF"(0)
TheBrushSwitch is locatedjust belowthe handle
on the front of the DetachableCanisternextto
the PowerSwitch.This switch turnsthe Rotating
Brushon and off. TI_eBrushSwitchshouldbe in
the "ON" (I)positionfor normalcarpetcleaning.
Youmaywant to turn the BrushSwitch"OFF"(0)
for bare floorcleaningor otherdelicatesurfaces,
CAUTION:
Before using yoar vacuum, make
sure that the Dirt Ooetaiesr and
Upper Tankate in locked position
and that all filters (tlppsr Tank,
Prs=Mator and Post=Motor) ate
ie place, Do not operate yaar
vacuum without thsss filters.
Nots: Your BISSELLLift-Off I/svolution vacuam
is sqaippsd with a special intsmal switch that
turns the !lotating 13rushoff whenevst the anit is
in the Upright position.
Brush
Power
Upright- Forstoragearia abovefloor cleaningwith tools.
Normal Cleaning - Press me Hanme Release Pedal
with your foot to recline
0
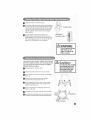
ThePoweffooton yourvacuumcan be
adjustedto dean severaU
toastsurfaces.
NOTE:For optimal slsanieg pstformaeos, adjust to
the _swsst praotiea_ setting, mfyour oleaesr is
difficult to push, adjust to the es×t hiqhsr ssttieg.
Place Handle in Upright Position.
Turn Height Adiustment Knob to desired setting.
Lowest Setting
- For bare floors.
MsdiumSstUegs
-
Forshortandmedium
pile carpets.
Nighest Settieg
-
Forplush pile carpet.
z.Jb .. AJ.
NOTE:Youmay' also adjust the setting while in the Normal
Cleaning Position.
Yourvacuumis notonlya powerfulfloor
vacuumcleaner,it'salsoa vematilestaim
andabove
floorvacuumwhenyouselectoned the specialtools,
Nots: The too_s cae be ossd with the
vacoom in the Upright Position or with the
Detachable Canister.
0
Detach the Vacuum Hoseby grasping the Hose(;rid anu
lifting to separate from the HoseGrip Base.
Attach tools by firmly pushing onto Vacuum Moseor
Telescoping ExtensionWand.
Csmbieatise Dustieg Brash/Upholstery Tash
Two typesof cleaningtools are cmaeu m one aoa( smen[
rotate for desiredtool.
Im UseBrush side to dust furniture _llnns,bOOKS_mn_
shelves,arid baseboalds,
Im UseUpholsteryside tar curtains,draperies,cusmons
fabrics,
Crevice Teem:
Use in tight narrow spaces.
TsmsssspiegExtension Wand:
Usewith desired attachmentfor a longer reacn.
To extend the Wand, twist the collar to "Unlock" ._os_son
and push away from you. Twist tl_e collar to the "Lock"
position to lock into place. To retract, twist to umocK _u
toward you and twist to relock.
Stair OIsaeieg Too_{Select Medals):
Usefor stairs, area rugs, and other small carpstea areas
This tool can also be used for bars fleers.
Nots: The Stair O_eaeieg Tos_does eat
store oe board.
Always pBaosvasoom creaser oe
f_osr in its folly Upright Position
and make sure it is laoksd into
p_aos before removing Caeistsr
or whse osieg tssRs. P_aoiegthe
Lift=Offie its foil Upright PasNioe
autsmatioaHv stops the
rotating brush.
TurboBrosh_) ISs[sst Modems}:
Usero-_a-_m
_ uruse aseon for small areassuch as stairs
anu up_]ols[ery.
Nots: P_essgsrlBy wbse using TorheBrosh
to gain
maximum cleaning. Tse much pressurecould cause
the brashto stop rota_ng,
Deluxe Bars FRostTool (Select Models):
Use for bare floors. Swivel iqeadturns _oget into tight
spaces and fits unser caD_nels.
Nots: The BemaxsBars Freer Too_does not store
on board,
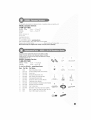
ANB
items may not be includedwith yoor model Mere
teemsare avaimabme:
to orderpmeass
r_er to page15.
TheDetachable
Canisterfeaturemakesit possible
to easilytakethepowerfulcleaningactiond your
BISSELL
Uft-OffRevolution
to stair_¢ays,
autointeriors,
andotherhard4o-reachareasd yourhome.
Beforedetachingthe Canister,yourvacuummust be
in its fully UprightPosition.Youdo not needto turn
off the cowerfirst.
0
Press the Release Button at the to_.of tl_e Canister
Handle and lift the Canister to remove.
Detachthe
VacuumHose
the back ofthe
Canister.from the noseGrip Baseat
Attach the ses_reo[ool/s_to the HoseGr par the end of
the Vacuum Hose.
When you're done, remove me too_
Hose to the HoseGrip Base.
and reconnect the
Return the Canister to the Powerfoot by augmng the
feet on tbe front witb tbe bumps on the foot of the
Upright Vacuum. Push tbe Canister towara the vacuum
frame until it dicks into place.
@
Select IVledelsOnly
TheCleanFilter Indicatortells youwhen airflow in
the vacuum is reduceddue to dirty tilters or a clog
in the hose.TheCleanFilter Indicatorwill remain
green until the aidlow is reduced_At that time, it
beginsto changeto red.Whenit is tully red,the
airflow is significantlyreducedor blocked.Follow
the steps on pages10 11 to cleanyourtilters. All
filters n the vacuum shouldbe cleanedor replaced
when the CleanFilter Indicatorturns red.
If the indicatorremains red after all tilters have
been cleaned tollow the stepson page 13 to
checkfor and clearclogs.
White vaoooming, certain
carpets and tow hamidNy
conditions may generate small
static discharges. The discharges
are entirely harmless and are not
associated in any way with the
main power sopp_y.
BuckHe
_lect ModelsOnly
TheShouHder
Strapmaybe usedwhilecHeanUng
with the
DetachabHe
CanUster,
To attachthe ShoulderStrap,wra_ me vetcro ends mracnedcome
bottom of the strap securelyaroundthe Canisterhandleasshown
To obtain maximumstrength,overlapthe looseenas comp_em_y
and press securelyin place.
The plastic Buckle must be positioned on top of onecamsler
handle as shown in the illustration.
The lengthof the strap may be adjusted as requ_reufor caroleR.
CAUTiON:
Whenyouam doneusUng
yourvacuum,mtumit tothe
Uprightpositionand stemthe PowerCord,
@ Turn vacuum cleaner off (0).
Unplug Power Cord by grasping the polanze(_plug
(NOTthe cord) and disconnect from outlet.
O
Loop Power Cord around Cord Wraps on side of
the Canister.
While the vacuum is in
_se. warm air is emitted
threogh the Pest=Meter
Filter on the back of the
Canister. The bettom of the
Canister may also become
warm. When osing the
shoolder strap, to avoid
discomfort, position the
Canister se that these
parts are not directed
towards or teaching
year body.
Clip molded plug to Power Cord to secure.
CAUTiON:
_To
"_
move your vacuum cleaner from room re room our me
Handle in the Upright Position, tilt the cleaner back on its
rear wheels and push forward,
The cleaner can also be moved by using the Carrying danme
on the Detachable Canister.
v_arrying
Handme
te |
transporl the vacuum.meaner.
The
Car_eoM
detach causing
the rest of the vacoom to fall.
CarryingHandHe
@
Tomaintainmaximumdenningperformance,the
foflowingmaintenancestepsmustbe performed:
i_
Empty me Dirt Container when me tort reaches the "Full" line
on the front.
0
Check the upper Tank and Pre-Motor Filters at least once a
month and clean and reulace as neeoed.
0
Replacethe HEPAMedia Post-Motor Filter every six months.
NOTE:More frequent fimterc_eaning may be
necessary if you are vacuuminfl new carpet, fine dast,
or have aHergy concerns.
Follow the instructions on the following pages to per=
form these simpb maintenance steps,
TheDirt Containerneedsto be emptiedwhenthe dirt
reachesthe 'Full" line on the front of the Container,
@
anp_ugc_eanerfrom electrlca! outlet.
-Full Line
Slide the Lock 'n Seal Lever to the "Unlock" position.
i_
Grasp Ilandle and gull rne Dirt Container straght out to
remove
from
vacuum
Lock
Position
Unlock-Position
Put the Dirt Container back in me vacuum and slide the lever
to the '*Lock" position.
Note: The Screens may also be removed from the
side £ust Chambers when you empty or cban the
Dirt Container. The Screens are made to fit each Unsl
Chamber. if they do riot slide down eompbte_y, try in the
opposite Dust Chamber. The Screens will also net fit if
there is debris in the track.
The #irt Container and Screens may be washed in
warm water with a mild detergent. Make
sure they are completely dry before replacing.
l_
unpaugthe cleaner from e_ec-mcaou_lm
The UpperTank Filter can De eacnee Dy emowng the Dirt
Container reaching underneath the UDoerTank and turning the
rim ol me :ilter Frame to unlock. Pull straight down to remove.
Brush the dirt off tne Louvers ana unner Tan Filter.
The foam Upper Tank Filter may Deremovenand hand washed
in cold water wgh mild detergent. Rinse well then air dry
tlsoroughly before replacing
The Upper Tank and LOUVerSmay rose Dewiped dean with a
damp cloth
@
Note: For easier access, the entire Upper Tank may be
removed by turning the knob errthe hack of the cmeanerto
nn_nck and pnHing the entire tank straight out.
Upper_
Tank
Knob
if"
q
•
Unplug the cleaner from electrical outlet.
@The Re-Motor Filter protects the motor from air[ par!_cles._t
is located in the slide out tray underneath the Dirt Container.
If the filter becomes dirty, pull out the tray, lift out the filter
and clean.This filter may be hand washed n co_awa[er
with mild detergent. Rinse well and air ary [norougmy
before replacing.
@The HEPAMedia Post-Motor Filter assists in the
filtration process to return c_eana_rto the room. r[ _s
located behind the door on the back of the cleaner. If the
HEPAMedUa
Post-Motor
filter becomes dirty, open the door, remove the filter and
replace. The HEPAMedia Filter is not washable.
Checkyourvacuumcleaner'sRotatingRoorBrushand
DriveBelt regularlyfor debris,wearor dama% Debris
canwrap aroundthe brushand hamperits abilityto
effectivelycleanyourcarpel
Unplug cleaner from electrical outlet.
To reduce the risk of injury
frum muviug parts,turn
uff vacuumcleaner and
discuuuect Puwer Plug
frum eiecb'ical uuSeto
Remove Detachable Canister from vacuum cleaner.
Recline Handle and turn vacuum cleaner over so colion_
side is up.
EJ "
Remove the six screws as shown with a Phillins
head screwdriver. Lift the Brush Cover off.
Lift the Rotating Floor Brush to remove. Clean strings,
hair and other debris from the Brush, paying specia
attention to the brush ends.
Check Air Passagewayfor obstructions. Remove an_
debris from this area.
Clean debris from the Motor Pulley and Drive Belt areas
Check DriveBelt carefully for wear, cuts or stressed areas.If
any damage is present, discard old Drive Belt and renlace
__1
M°!or/tl rd
Air
u/) ) /Passageway
@PBce oneena of the new DriveBelt overMotor Pulleyand the
other md overthe Brush inthe spacebetweenme bristles.
@Pull the Brush firmly lo s_re[cnthe Drive Belt and place ends
_f Brush down nto s_otson sines as shown. Turn Brush
se/erat _LmesD! nana _ocen_er_ne Drive Belt.
_tRepositian Brush Cover ana screws. Tigmer
screws secureB_.
_
Unplug cleaner from electrical outlet
@ Remove Detachable Canister and "ecune Handle of vacuum.
@ Using a screwdrive_ remove me one screw as snown anc
lift off the lens.
Removethe bulb from the socket by grasping DU_D
ana pu_Hng
straight out, Jnstatlthe new bulb by pushing it gently into the
socket until me DU_D
snaps Imo pface.
Reposition lens ane secure with the one screw
Sel_t NledelsOnly
The TurboBrushshould be checked regularlyfor clogs
or debris wrapping aroundthe brush rol
unDhu_vacuum from e_ecmcaOUTle_
f a dog is }resent or aeons _wsIDle 1screw_nebJvoscrews
o the back of the lurbc 3rushto removethe tacephte and
:lear a ObStructions.
om me afire r)elt _rlaclean eDns
Reposmonme anve bel_c the brush roll. Placeends of
brushroll in slots
sides as sho,4 RenosNonbell cove
ana secure with shorter screw. F/_Doen facepBte and
secure wire _vwionc _r screws.
@
Low suctbn or poor pUckup
may be due to a dog
Unthe vacuumcleaner.UfyounotUce
a changein
the soundof the motoror a reductbn Unthe
spUnnUng
actbn, checkfor dogs,
Unplug cleaner from electrical outlet.
@Empty
Dirt Container.
@
Check Upper Tank for build up or clogs.
v
Remove the Upper Tank and check the suction inlet for
a clog.
_"
Grasp the HoseGrip and lift to separate from the suction
opening. Check for a clog in the Base or the Hose
Releasethe Twist n' Snap hose from the vacuum Dy
turning to the left. Straighten the hose and unclog w_[na
long, narrow obiect.
If the clog persists, follow the instructions tot Checking
the Rotating Brush on page 11 and inspect the A[[
Passageway for obstructions.
___Suction
,_
OperHng
Air Passagew
An internalthermaUprotectorhas beendesUgned
Untoyourcleanerto protectit from overheating.
Whenthe thermal protectoractivates, the main
vacuummotor will stop operating. Ufthus
happens,proceedasfollows:
OTurn the cleaner OFF (0) and unplug from
electrical outlet.
@Check the Upper Tank area, Pre-Motor Filter and
Post-Motor Filter for dirt accumulation.
Refer to the "Clearing Clogs" section.
When the motor cools 1orapproximately 30
minutes, the thermal protector automatically
resets and cleaning may continue. It the therma
protector continues to activate after following _ne
above steps, your cleaner may need servicing. Call
BISSELLConsumer Services, or vis_