1
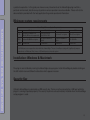
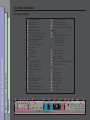
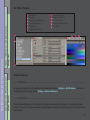
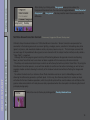
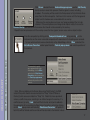
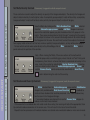
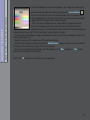
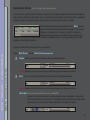
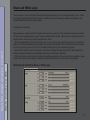
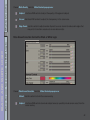
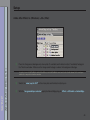
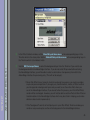
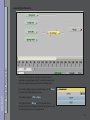
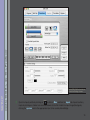
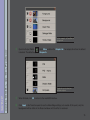
v 1.6.2
USER GUIDE
© 2002-2006 Ultimatte Corporation • All Rights Reserved
Introduction
5
TABLE OF CONTENTS
Minimum system requirements
6
Installation: Windows & Macintosh
Security Key
6
6
Customer Support and Feedback
Technical Support
7
7
Product Registration
7
Ultimatte Corporation Software License Agreement
8
1
Interface Overview
The “Less” Interface
11
The “More” Interface
12
Common Features
––––– Saving Views
––––– View Selectors
––––– View Pop-up
––––– Snapshot
Short Cut Keys:
TABLE OF CONTENTS
Quick Start
11
12
12
12
13
14
14
15
Sample the Backing Area
15
(FOREGROUND VIEW)
Matte Correction (default ENABLED)
15
Enable Video Correction (if applicable)
15
Set Roto-Screen Correction Controls (if necessary) (suggested: Screen Overlay view)
Set Matte Density Controls (if necessary)
Set Spill Controls (if necessary)
19
(suggested: matte & composite views)
Set Shadow and Clean Up Controls (if necessary)
16
(suggested: foreground, matte, & composite views)
19
20
Set Color Conformance Controls (if necessary)
(suggested: composite view)
20
2
THE “MORE” CONTROLS
22
Matte Density Controls for Print-Through, Dark & Glowing Edges
Spill Controls for excessive spill & miscolored subject matter
Shadow Controls for independent control over shadows
23
24
27
Clean Up Controls for unwanted anomalies retained as foreground detail
28
Color Conformance Controls for matching foreground colors to background colors
Video Correction Controls
for reducing the artifacts caused by color compression
30
32
TABLE OF CONTENTS
Roto-Screen Correction Controls for uneven blue (green) screens and to allow shadow separation
Film Correction Controls
to reduce the effects of cyan undercutting
Choose Your Output Mode (if necessary)
Black and White Logic
37
39
41
Matte Density Controls for Black or White Logic:
41
Roto-Screen Correction Controls for Black or White Logic
Setup
34
42
44
Adobe After Effects 5+ (Windows)
• 5.5+ (Mac):
44
3
Adobe Photoshop 5.5 to 6
Adobe Photoshop 7+
47
49
Adobe Premiere 6+ (Note: Mac version requires Premiere 6.5)
Adobe Premiere Pro
52
Apple Final Cut Pro 3+
TABLE OF CONTENTS
Apple Shake 3.5+
55
57
Avid AVX 1.5 (excluding Avid DS)
Avid DS 6+
50
60
64
Autodesk Combustion 2+
67
Autodesk IFFFS 4+/7+
69
eyeon Digital Fusion 3+
72
media 100i 8+, sw 10+, Producer
73
4
Introduction
INTRODUCTION
AdvantEdge is the culmination of over 25 years of bluescreen imaging experience by Ultimatte Corporation.
AdvantEdge enables the user to quickly create and edit blue screen composites by simply scrubbing the
cursor within different areas of the foreground, background, and matte. The entire image is then analyzed
and AdvantEdge automatically calculates optimum settings for several different parameters simultaneously.
This powerful analysis allows AdvantEdge to have a very simple user interface without sacrificing flexibility
and image control. The final result is a composite that preserves the fine details like hair, smoke, and motionblurred edges with a minimum of compromises. The clean and modern UI design is filled with many new and
innovative features including;
•
Video Chroma Correction of artifacts created through 4:2:2, 4:2:0, or 4:1:1 compression
•
Separate Shadow Matte Tools and Output
•
Smart Matte Sizing
•
Roto-Screen Correction
•
Color Conformance
•
Load/Save AdvantEdge Settings file to allow set-up and saving from any supported host application
on any supported operating system to be loaded into any other AdvantEdge supported host/operating
system resulting in the exact same results
•
HoldOut Matte: A “HoldOut” matte is used when foreground objects are the same color or very close to
the backing color, but do not exist along the transition edges from the subject onto the backing area. The
HoldOut matte is used to notify AdvantEdge that the object relating to the corresponding HoldOut matte
is to be 100% opaque.
These powerful new features will appeal to individuals who have never used blue screen tools before, as well as
artists who want to advance their capabilities beyond the limited scope of industry standard chroma keyers.
This manual assumes that you are familiar with the host application in which AdvantEdge is running.
The supported host applications are very flexible systems that often provide a variety of ways to perform
5
a particular operation. In this guide, we show one way to load and use the AdvantEdge plug-in within a
particular environment, but other ways to perform various operations are also available. Please refer to the
documentation provided with the host application for general operational information
MINIMUM SYSTEM REQUIREMENTS
Minimum system requirements
OS:
CPU:
RAM:
AdvantEdge Minimum System Requirements
Windows
Macintosh
Linux
Windows NT/2000/XP Pro
Mac OS 9 (v9.2.2)
Red Hat v6.1 or higher
(Win 98, ME are not supported) Mac OS X (v10.1)
G4 system 500Mhz or
Pentium III 900Mhz or
Pentium III 900Mhz or higher
higher
higher
512MB RAM
512MB RAM
512MB RAM
SGI
IRIX v6.5.x or higher
R12K 250 MHz
512MB RAM
Note: Multi-processor support has been built into AdvantEdge. The use of multi-processing will significantly improve
render times on Windows, Mac, Linux, or SGI multi-processor based system.
Installation: Windows & Macintosh
The plug-ins are installed by running the AdvantEdge setup program. Install AdvantEdge by double-clicking on
the A/E Installer icon and follow the directions which appear onscreen.
Security Key
Ultimatte AdvantEdge is protected by a USB security key. The key must be connected to a USB port while the
plug-in is running to operate properly. The security key drivers are automatically installed when the AdvantEdge
setup program is used.
6
Customer Support and Feedback
We think we’ve created quite a wonderful tool, but we were only able to do so because we’ve been working
closely with artists throughout the Ultimatte AdvantEdge development process. We invite you to help
us redefine and improve it in the future. We’d appreciate your feedback and suggestions, problems and
observations. As the product matures, we’ll incorporate your requests to make Ultimatte AdvantEdge an even
more exciting and useful product.
You can visit our website at www.ultimatte.com for a wealth of information about Ultimatte AdvantEdge,
including product updates, hints and tips, etc. Please send your comments and inquiries to us via email at
[email protected]
Technical Support
Technical Support is available via email at [email protected], or via the telephone from 8:00am to 5:00pm
Pacific Time at +1.818.993.8007
Product Registration
SUPPORT
Please register your copy of Ultimatte AdvantEdge. By doing so, you’ll be kept up-to-date with new
versions of the product and enhancements. You can register the product by going to our support page at
www.ultimatte.com and completing the online registration form.
7
Ultimatte Corporation Software License Agreement
This License Agreement is your proof of license.
Please treat it as valuable property.
ULTIMATTE LICENSE AGREEMENT
This is a legal agreement between you (either an individual or an entity), the end user, and Ultimatte Corporation. If you do not agree
to t�
other containers) to the place you obtained them for a full refund.
ULTIMATTE SOFTWARE LICENSE
LICENSE AGREEMENT
1. GRANT OF LICENSE. Upon your acceptance of the terms of this license and payment of amounts due, Ultimatte hereby grants
to you, according with the terms of this License, the non-exclusive, non-transferable license to use the SOFTWARE solely with the
supported software identified on the addendum to this License. The rights granted herein are limited to “object code” versions of the
SOFTWARE and specifically exclude all rights to modify any portion of the SOFTWARE.
This (“License”) permits you to use one copy of the specified version of the Ultimatte software product identified above
(“SOFTWARE”) on any single computer, provided the SOFTWARE is in use on only one computer at any time. If you have multiple
Licenses for the SOFTWARE, then at any time you may have as many copies of the SOFTWARE in use as you have Licenses. The
SOFTWARE is “in use” on a computer when it is loaded into the temporary memory (i.e. RAM) or installed into the permanent
memory (e.g. hard disk, CD-ROM, or other storage device) of that computer, except that a copy installed on a network server for the
sole purpose of distribution to other computers is not “in use”. If the anticipated number of users of the SOFTWARE will exceed the
nu�
using the SOFTWARE concurrently does not exceed the number of Licenses. If the SOFTWARE is permanently installed on the hard
�
time it is in use, then that person may also use the SOFTWARE on a portable or home computer.
2. COPYRIGHT. The SOFTWARE is owned by Ultimatte or its suppliers and is protected by United States copyright laws and
international treaty provisions. Therefore, you must treat the SOFTWARE like any other copyrighted material (e.g., a book or musical
recording) except that you may either
(a) make one copy of the SOFTWARE solely for backup or archival purposes, or
(b) transfer the SOFTWARE to a single hard disk provided you keep the original solely for backup or archival purposes. You may not
copy the written materials accompanying the SOFTWARE.
3.�
be retained by you. You may not rent or lease the SOFTWARE, but you may transfer your rights under this Ultimatte License
agreement on a permanent basis provided you transfer this License Agreement, the SOFTWARE, and all accompanying written
materials and retain no copies, and the recipient agrees to the terms of this Agreement. You may not reverse engineer, decompile, or
disassemble the SOFTWARE. Any transfer of the SOFTWARE must include the most recent update and all prior versions.
8
4. LICENSEE’S SOFTWARE COVENANTS. You acknowledge and agree that SOFTWARE (whether delivered by tape, disk, electronic
means or other reproductive media or device such as ROM, RAM or PROM) together with the ideas and concepts contained therein
are, a�
licensed such software, if any) and are proprietary to Ultimatte (or such third party). You further agree and acknowledge that neither
you, n�
right, to the SOFTWARE other than as expressly granted herein. You agree not to reverse assemble, reverse compile or reverse
engineer the SOFTWARE.
5. LIMITATION OF LIABILITY. IN NO EVENT SHALL ULTIMATTE BE LIABLE TO YOU FOR ANY INCIDENTAL, CONSEQUENTIAL,
SPECIAL OR INDIRECT DAMAGES (INCLUDING WITHOUT LIMITATION, DAMAGES ARISING FORM LOST BUSINESS, DATA, PROFITS
OR GOODWILL) INCURRED OR SUFFERED BY YOU WITH RESPECT TO THE SOFTWARE OR FOR ANY OTHER REASON, EVEN IF
ULTIMATTE HAS BEEN APPRISED OF THE LIKELIHOOD OF THE SAME. ULTIMATTE’S SOLE LIABILITY FOR ANY DAMAGES OR
OBLIGATIONS RELATING THERETO SHALL BE LIMITED TO THAT SET FORTH HEREIN, REGARDLESS OF WHETHER ANY LIABILITY IS
BASED UPON CONTRACT, TORT OR OTHER THEORY. ANY ACTION FOR A BREACH OF ULTIMATTE’S OBLIGATIONS HEREIN MUST
BE COMMENCED WITHIN ONE (1) YEAR AFTER THE CAUSE OF ACTION HAS ACCRUED.
LICENSE AGREEMENT
LIMITED WARRANTY
LIMITED WARRANTY. Ultimatte warrants that:
(a) the SOFTWARE will perform substantially in accordance with the accompanying written materials for a period of ninety (90) days
from the date of receipt; and
(b) any hardware accompanying the SOFTWARE will be free from defects in materials and workmanship under normal use and service
for a period of one (1) year from the date of receipt. Any implied warranties on the SOFTWARE and hardware are limited to ninety (90)
days and one (1) year, respectively. Some states do not allow limitations on duration of an implied warranty, so the above limitation
may not apply to you.
CUSTOMER REMEDIES. Ultimatte’s entire liability and your exclusive remedy shall be, at Ultimatte’s option, either
(a) return of the price paid or
(b) repair or replacement of the SOFTWARE or hardware that does not meet Ultimatte’s Warranty and that is returned to Ultimatte
with a copy of your receipt.
This Limited Warranty is void if failure of the SOFTWARE or hardware has resulted from accident, abuse, or misapplication. Any
replacement SOFTWARE will be warranted for the remainder of the original warranty period or thirty (30) days, whichever is longer.
NO OTHER WARRANTIES. Ultimatte disclaims all other warranties, either express or implied, including but not limited to implied
warranties of merchantability and fitness for a particular purpose, with respect to the SOFTWARE, the accompanying written
materials, and any accompanying hardware. This limited warranty gives you specific legal rights. You may have others, which vary
from state to state.
NO LIABILITY FOR CONSEQUENTIAL DAMAGES. In no event shall Ultimatte or its suppliers be liable for any damages whatsoever
(including, without limitation, damages for loss of business profits, business interruption, loss of business information, or other
pecuniary lo�
of su�
the above limitation may not apply to you.
9
LICENSE AGREEMENT
U. S. GOVERNMENT RESTRICTED RIGHTS
The SOFTWARE and documentation are provided with RESTRICTED RIGHTS. Use, duplication, or disclosure by the Government is
subject to restrictions as set forth in subparagraph (c)(1)(ii) of the Rights in Technical Data and Computer Software clause at DFARS
252.227-7013 or subparagraphs (c)(1) and (2) of the Commercial Computer Software--Restricted Rights at 48 CFR 52.227-19, as
applicable Contractor/manufacturer is:
Ultimatte Corporation,
20945 Plummer Street, Chatsworth, CA 91311-5109.
The Agreement is governed by the laws of the State of California.
For more information, please call Ultimatte Customer Service at (818) 993-8007, or write Ultimatte Customer Sales,
20945 Plummer Street, Chatsworth, CA 91311-5109.
Ultimatte Corporation
20945 Plummer Street
Chatsworth, CA
91311-5109
USA
10
Interface Overview
Diagram
The “Less” Interface
OVERVIEW
THEINTERFACE
“LESS” CONTROLS
The “Less” Interface
Q
W
E
Q
W
E
R
T
Y
U
I
O
P
{
}
q
w
Settings Pop-up Menu
Undo Button
Redo Button
Reset Pop-up Menu
Automation Pop-up Menu
Foreground Options Pop-up Menu
Overlay Options Pop-up Menu
Matte Options Pop-up Menu
Composite Button
Proxy Mode Pop-up Menu
More Button
OK Button
Cancel Button
Help Button
e
r
t
y
u
i
o
p
[
]
A
Single Panel Display
Dual Panel Display
Side by Side Split Screen
Top/Bottom Split Screen
Pan Tool
Zoom Tool
Backing Color Sample Pixel
Show/Hide Guides
Invert Matte View
Invert Screen Overlay View
Hide/Show Time Controls
R
T
e t u o [ A D G
J
S
D
F
G
Hide/Show Color Palette
Hide/Show Inputs Palette
Hide/Show Outputs Palette
Frame, Odd Lines, Even Lines Toggle
Button
H Pointer
J Automation Sample Tools includes:
Screen Sample Tools
Matte Sample Tools
Spill Sample Tools
Color Sample Tools
K
L
:
a
s
d
Foreground Thumbnail
Overlay Thumbnail
Matte Thumbnail
Composite Thumbnail
Select Background for Composite View
Enable/Disable Processes
f
g
h
j
k
l
;
z
Help Text
Take Snapshot
Progress Bar
Pixel Color Swatch
RGB Color Info
X/Y Position Info
Zoom Scale
Proxy Resolution
Y
U
I
O
P
K
L
:
a
s
{
}
q
w
d
r y i p ] SF H
f
g
h
j
k
l
;
z
11
History Button
History List
History Bookmark Entry Field
Controls Pop-up Menu
Control Palette
Advanced Control Palette
U
I
O
P
{
Inputs Palette Button
Outputs Palette Button
Color Palette Button
Frame Jogger Palette Button
Color Palette
Q
R
W
U
I
O
P
T
{
Diagram
The “More” Interface
Q
W
E
R
T
Y
Y
E
Common Features
–––––Saving Views –––––––––––––––––––––––––––––––––––––––––––––––––––––––––––––––––––––––––––
To make any changes to the AdvantEdge interface persistent, choose Settings -> Set Workspace. To return to
the original interface settings choose Settings -> Restore Workspace.
View Tools
Common Features
INTERFACE OVERVIEW
The “More” Interface
–––––View Selectors––––––––––––––––––––––––––––––––––––––––––––––––––––––––––––––––––––––––––
When the AdvantEdge plug-in is launched, the foreground image will be displayed in a single-panel display
mode. The format of the display window can be changed by choosing the desired layout on the left side of the
control panel.
12
–––––View Pop-up –––––––––––––––––––––––––––––––––––––––––––––––––––––––––––––––––––––––––––
View Tools
Common Features
INTERFACE OVERVIEW
Clicking in the image display area will open the View palette allowing the user
to choose which view to place in the image display area. This can also be used
to switch between views on either side of the image display when in splitscreen mode or dual panel view.
13
–––––Snapshot ––––––––––––––––––––––––––––––––––––––––––––––––––––––––––––––––––––––––––––––
Snapshot
Use the camera to take a picture or snapshot of what is being displayed
in the image display area. This will be recorded in the history palette and
can be used to compare an image with one saved in the snapshot buffer.
Short Cut Keys:
Short Cut Keys
Common Features
INTERFACE OVERVIEW
The content of the display window can be changed by using the short cut keys as listed below. (Additional ways
to change the content of the display window will be covered later.)
f
b
m
c
p
G
H
d
s
h
q
l
I
t
w
a
z
display foreground
display background
display matte
display composite
display processed foreground
display garbage matte
display holdout matte
display clean plate
display overlay image
display shadow matte
display corrrected foreground
display snapshot
invert matte polarity
zoom image in 2x
zoom image out 2x
fit image display on screen
display image actual size
g
R
i
F
2
Y
>
<
ctrl + z
space
↑
↓
→
←
show/hide guides and sample target
full re-render
cancel/suspend render
allow re-sizing of interface
dual-panel mode
singe-panel mode
next frame
previous frame
undo
play/pause video
pan up
pan down
pan right
pan left
ctrl+Zoom tool zoom out (x + Zoom on the Mac)
ctrl+Overlay tool toggles between Add and Remove
Overlay (x + Overlay on the Mac).
Some controls and/or features may not be available until other functions have been performed from within the
AdvantEdge plug-in.
14
Sample Backing
Quick Start
Sample the Backing Area
(FOREGROUND VIEW)
When the AdvantEdge filter is launched, the foreground image will be
displayed. With Screen selected from the Automation pop-up menu, use the
Sample Backing eyedropper to select the backing color. Choose an area on the
blue (green) screen near important subject detail that is not obscured in any
way. The image will be rendered and a composite will be displayed. If further
adjustments are needed, follow the steps below.
Matte
Correction
With the Matte Correction process enabled, all kernel-based processes
become available. These include Roto-Screen Correction, Film
Correction, Video (DV) Correction, Shadow Processing, and some of
the Matte Density and Clean-Up controls. With the Matte Correction
process disabled, available functions will be pixel-based only (with the exception of Matte Shrink and Blur).
Enable Video Correction
QUICK START
Matte Correction (default ENABLED)
Enable Video Correction (if applicable)
Most video recording devices use some form of compression to store
the data, including 4:2:2, 4:2:0 and 4:1:1 imagery. If you suspect that
the imagery has been altered using some type of compression, enable
the process by clicking on the DV LED in the right hand section of the
AdvantEdge control panel. AdvantEdge will be capable of auto-detecting which type of compression artifacts
have been applied to the image as long as there have not been effects or transformations applied to the image
prior to entering AdvantEdge. If auto-detection is not possible, click on MORE and select Video Correction from
the controls pop-up menu. Select the suspected video format.
The results of the Video Correction algorithms can best be seen after a matte has been generated. To see the
effects of this process, enable and disable the Video Correction process by clicking on the DV LED in the right
hand section of the AdvantEdge control panel while viewing the matte or composite.
15
Video Correction
Alternatively, by clicking on the Foreground pop-up menu above the
Foreground thumbnail icon, the view can be toggled between Video Corrected
Foreground and Foreground. You may need to zoom into an area to see the
difference.
Set Roto-Screen Correction
QUICK START
Set Roto-Screen Correction Controls (if necessary) (suggested: Screen Overlay view)
Ultimatte Corp introduced a feature in 1990 called Screen Correction. Screen Correction compensates for
anomalies in the backing area such as uneven lighting, smudges, seams, variation in the backing color, blue
(green) set pieces, and unwanted shadows cast by set pieces, boom arms, etc. This technique assumes that
an exact copy of the problematic blue (green) screen element with the subject matter omitted, usually called a
"Clean Plate", is supplied.
Although this technique gives great results by differentiating between foreground elements and backing
flaws, we have found that most users have not been supplied with the necessary reference materials.
Therefore, we have devised a technique in which we will attempt to build a synthetic Clean Plate. By using the
Roto-Screen Correction process, a user will now be able to use Screen Correction technology as well as have
separate shadow controls allowing the density of the shadow to be altered without affecting the foreground
subject.
To achieve the best results, a reference Clean Plate should be used as an input to AdvantEdge as well as
allowing the software to generate a synthetic plate. In this way, the reference plate that is used as an input
will allow for the best shadow separation, while the synthetic plate will be used to reduce such artifacts as film
grain or video noise (which will rarely be accurately reproduced when the clean plate is shot during the time of
principal photography).
Switch the view to Overlay by clicking on the Overlay thumbnail icon.
16
With Screen selected from the Automation pop-up menu, use the Add Overlay
tool to scrub on areas that represent the blue (green) screen, including
shadows. The overlay will be used in the final process to fully eliminate these
areas from the final composite. Continue in this manner until the foreground
subject and its shadows are surrounded with an overlay.
Make sure the overlay does not cover any foreground detail that is to be
retained. If the overlay does cover foreground subject matter, then use the
Remove Overlay tool to scrub on those areas that should not be covered by the overlay.
Repeat these two processes until the overlay covers the blue (green) screen areas and no subject matter.
Set Roto-Screen Correction
QUICK START
View the composite by clicking on the Composite thumbnail icon or by pressing C on the
keyboard to see the screen corrected composite with anomalies in the backing area removed.
To learn which controls were automatically set by AdvantEdge, click on More and select the
Roto-Screen Correction control panel from the Controls pop-up menu and note the position of
the controls.
To learn which controls
were automatically set by
AdvantEdge, click on More
and select the Roto-Screen
Correction control panel from
the Controls pop-up menu
and note the position of the
controls.
Note: When scrubbing on the Screen Area using "Add Overlay", the RGB
value of the points chosen are accumulated in a "Keep" list and "Remove
Overlay" points are accumulated in a "Drop" list. If both lists have equivalent
values, a conflict may occur, resulting in no visible change in the overlay. If a
conflict occurs, try using Undo which will flush the last set of points added to
the appropriate list or resetting the Roto-Screen Correction controls by clicking
on the Reset pop-up menu and selecting Roto-Screen Correction. All points in
both lists will be flushed and the controls will be returned to their default values.
17
Set Roto-Screen Correction
QUICK START
Under some circumstances, it may be difficult to completely cover the screen area with the overlay. This
does not mean that the screen will not be removed in that area, but that other controls may need to be adjusted
to help reduce anomalies in those areas that were not covered by the overlay. It may be advantageous to resample the screen using the Sample Backing tool found under the Screen Automation pop-up menu in the area
where covering the screen with the overlay is unsuccessful, but be careful about selecting in shadow areas if
the final composite requires the retention of shadows.
Additionally, it may be difficult in some circumstances to remove the overlay from very dark areas of
foreground detail that may be close to values in dark or shadow areas of the screen. If the overlay does include
some dark foreground areas, these areas may be recovered by enabling the Shadow controls.
Note: Since the AdvantEdge software is producing a synthetic clean plate using an interpolation process, it is
important to exclude non-video areas of the image, such as the black blanking lines that may appear in video or
the black areas in "letterbox" images. The guides should be used to exclude these areas from the overlay and
final composites. Otherwise the synthetic clean plate may contain black (or other colors) which can result in an
inaccurate clean plate being generated.
Guides have been moved
in from the frame edges to
exclude unwanted portions.
18
Set Matte Density Controls (if necessary)
(suggested: matte & composite views)
Set Shadow + Clean Up
QUICK START
Set Matte Density Controls
These controls are used to adjust the density or opacity of the foreground objects. The density of a foreground
object is determined by its matte (alpha) value. A completely opaque object's matte will be white, a completely
transparent object's matte will be black, and a partially transparent object's matte will be gray.
View the Matte by clicking on the Matte thumbnail icon. With Matte selected
from the Automation pop-up menu, use the Add Matte dropper to scrub on
areas in the matte that appear gray, but should be white (fully opaque) in the
matte. These areas are described as "print-through", meaning that the opacity
of the subject is too low in this area and the background will be visible through
the foreground in this area. Be careful not to select those objects that should
have a gray matte value such as fine hair, smoke or partially transparent objects, as they will become opaque.
To learn which controls were automatically set by AdvantEdge, click on More and select the Matte control
panel and note the position of the controls.
Note: When viewing the Matte, if there are sections of the matte which
should be opaque but are exhibiting gray values that do not "look" like typical
transparency, then there is a chance that there is a remainder of overlay in this
area. Look at the overlay by selecting the Overlay thumbnail icon. If overlay
exists on subject matter, return the Automation pop-up menu to Screen and
use the Remove Overlay tool to scrub on that area. Switch to Invert Overlay
to aid in determining the extent of the overlay.
Set Shadow and Clean Up Controls (if necessary)
(suggested: foreground, matte, & composite views)
With Matte selected from the Automation pop-up menu, use the Hold Shadow
dropper (only available when Roto Screen Correction
is enabled) to
scrub on those shadows that are to be preserved. Hint: these shadows may
best be seen in the foreground image.
If unwanted shadows are retained, then use the Remove Noise dropper to
reduce or eliminate those shadows.
If the area which is scrubbed does not reside under the overlay, then erasing will adjust the appropriate Clean
Up controls to reduce anomalies in the screen area. This will result in the loss of some fine detail.
Repeat these two processes until wanted shadows are retained and unwanted shadows or noise are removed.
19
The density, sharpness, and tint of the shadow may be altered by manually adjusting the shadow controls in
the More - Shadow controls panel in the Control Sliders pop-up menu.
To learn which controls were automatically set by AdvantEdge, click on More and select the Shadow and/or
Clean Up control panel and note the position of the controls.
Set Spill
Set Spill Controls (if necessary)
Change the Automation pop-up menu to Spill. Select the Remove Spill tool to
scrub on those areas exhibiting excessive spill not removed by the default spill
suppression algorithms.
If too much spill was removed or needs to be added to other parts of the
image, select the Restore Spill dropper, and scrub on those areas needing
more spill.
To learn which controls were automatically set by AdvantEdge, click on More and select the Spill controls from
the Controls pop-up menu and note the position of the controls.
Set Color Conformance
QUICK START
Set Color Conformance Controls (if necessary)
(suggested: composite view)
A flawless composite requires matched blacks, whites, and gammas between the foreground and background
elements. Color Conformance with Ultimatte Intelligence allows for the selection of blacks, whites, and
gammas and will automatically match the foreground to the background (or vice versa if composite is chosen
as output selection).
Choose Color Conformance from the Automation pop-up menu. Use the
Match Color dropper to scrub on similar colors that are to be matched in both
the background and processed foreground elements. Select at least one point
from both the foreground and background.
Since multiple data points may be chosen, the user must notify the software
that data gathering has been completed by clicking on the Composite
thumbnail icon, selecting r on the keyboard to render the effect or double-clicking the final selected point.
Notes: To obtain the most accurate results, it is best to choose colors that exhibit similar ranges in hues and
levels. For example, if changes need to be made in both dark and light colors, choose the dark colors first,
render the results, and then choose the lighter colors and re-render the results.
20
Set Color Conformance
QUICK START
If the desired background color does not appear in the image, then a color may be
chosen from the Ultimatte color palette by clicking on the color tool button
to
launch the Ultimatte color picker. The foreground color that was selected will be
represented down the center of the color tool, with the other colors representing the
range to which the foreground color may be changed.
Hint: if the desired background color is obscured by the foreground element,
switch to the background view and sample the desired color directly from the
background image. It is not advisable to sample colors from the original foreground
image as these will have "spill" from the blue (green) screen affecting the colors.
The colorimetry of the foreground image will be altered to closely match the chosen foreground colors to the
chosen background colors.
Repeat this process until the desired color effect has been achieved.
To alter the tint of foreground shadows, choose the Match Shadows dropper and click on a color anywhere in
the image (or the color picker) to choose the tint of the shadows.
To learn which controls were automatically set by AdvantEdge, click on More and select the Color controls
panel and note the position of the controls.
Finish: Click OK to render the result back to the host application.
21
THE “MORE” CONTROLS
Individual slider controls can be found by clicking on
and selecting the respective menu from the Slider Controls pop-up
menu.
Parameter values may be adjusted in any of the following ways:
THE “MORE” CONTROLS
• Clicking on a text field
• Click on left or right arrows
and entering a numeric value
to decrease or increase the value
in specific increments
• Click on left/right arrow button, hold and drag mouse in either
direction
• Click on the Default, Automation, User
buttons to toggle the value between default, automation,
and user settings, respectively.
A control marked with
indicates that this control can be set using automation.
Slider Controls Menus are only active when the respective process has been enabled.
22
Matte Density Controls for Print-Through, Dark & Glowing Edges
These controls are used to adjust the density or opacity of the foreground objects. The density of a foreground
object is determined by its matte (alpha) value. A completely opaque object's matte will be white, a completely
transparent object's matte will be black, and a partially transparent object's matte will be gray.
With the Matte Correction process enabled (click the Matte button to
enable), all kernel-based processes become available. These include
Roto-Screen Correction, Film Correction, Video (DV) Correction,
Shadow Processing, and some of the Matte Density and Clean-Up
controls. With the Matte Correction process disabled, available functions will be pixel-based only (with the
exception of Matte Shrink and Blur).
Choose Matte Density from the Slider Controls pop-up menu.
• Brights: Use this control to adjust density in bright foreground objects.
Matte Density Controls
THE “MORE” CONTROLS
Set these controls while viewing the matte or composite:
Warning: Advancing this control too far can cause hard, dark edges around foreground subjects.
• Darks: Use this control to adjust density in black glossy or dark foreground objects.
Warning: Advancing this control too far can cause hard, dark edges around foreground subjects.
• Shrink/Bias: (Only available when Matte Correction is DISABLED.)
Use the Shrink control to shrink the matte to possibly reduce hard edges. A value set to
10 is the equivalent of a 1-pixel shrink. Use the Bias control to influence the matte shrink
process from one or more of the following directions: left, right, top, bottom.
23
• Blur: (Only available when Matte Correction is DISABLED.)
Use this control to blur the matte.
• Edge Kernel: (Only available when Matte Correction is ENABLED.)
Warning: Advancing this control too far, may cause too much print-through at the edges.
Advanced Controls
• Warm: Use this control to adjust density in warm colors (flesh tones).
Warning: Reducing this control too much can cause print-through in reddish foreground objects.
Advanced
Matte Density Controls
Spill Controls
THE “MORE” CONTROLS
Use this control to adjust number of pixels to use as a kernel to reduce dark edges that
may exist in transition areas due to an over-dense matte.
• Cool: Use this control to adjust density in cool colors.
Warning: Reducing this control too much can cause print-through in bluish foreground objects.
Spill Controls for excessive spill & miscolored subject matter
The Ultimatte algorithms will automatically suppress spill caused from the backing onto foreground subject
matter. These controls are used to suppress excessive spill. View the Composite when adjusting these controls.
Set these controls while viewing the composite:
24
Choose Spill Suppression from the Slider Controls pop-up menu.
• Cool: Use this control to adjust the amount of spill in cool colored foreground objects. Used to
• Warm: Use this control to adjust the amount of spill in warm colored foreground objects. Used to
reproduce pink, purple and magenta colors for bluescreen, or yellow and orange colors for
greenscreen that changed through the spill suppression algorithms.
• Mid-tones: Use this control to adjust the amount of spill in midrange foreground objects.
Advanced
Spill Controls
THE “MORE” CONTROLS
reproduce blue, green or cyan colors that changed through the spill suppression algorithms.
Advanced Controls
• Brights: Use this control to adjust the amount of spill on bright foreground objects.
25
• Darks: Use this control to adjust the amount of spill on dark foreground objects.
• Ambience: Use this control to choose a color to subtly influence the foreground objects in areas that
• Strength: (Only available when Matte Correction is ENABLED.)
Use this control to adjust the intensity of the chosen Ambient color.
• Veiling: These controls are used to override the automatic suppression of the backing color. The
Advanced Controls
Ultimatte process uses the selected backing color to suppress the backing to black. An indication that the
automatic settings did not suppress enough backing is "veiling" or a colorized haze in some background
areas. An indication that the automatic settings suppressed too much backing is darkened or mis-colored
foreground edges and transparencies. In most cases these controls will be left at their default settings.
Spill Controls
THE “MORE” CONTROLS
may have contained spill.
• Red: Use this control to override the automatic suppression of the red channel. Increasing this control
will increase the amount of veiling (residue) left in the backing area. Decreasing this control will
26
Advanced Controls
Spill Controls
increase suppression of red content in the blue (green) screen and can cause foreground edges
and transparencies to turn cyan.
• Green: Use this control to override the automatic suppression of the green channel. Increasing this
control will increase the amount of veiling (residue) left in the backing area. Decreasing this
control will increase suppression of green content in the blue (green) screen and can cause
foreground edges and transparencies to turn magenta.
• Blue: Use this control to override the automatic suppression of the blue channel. Increasing this
control will increase the amount of veiling (residue) left in the backing area. Decreasing this
control will increase suppression of blue content in the blue (green) screen and can cause
foreground edges and transparencies to turn yellow.
Shadow Controls for independent control over shadows • only available when Matte Correction and Roto-Screen
Set these controls while viewing the matte or composite.
These controls are used only if Roto-Screen Correction is enabled, and will allow for the adjustment of the
opacity, sharpness, and color of shadows with minimal effect on the foreground subject.
Choose Shadows from the Slider Controls pop-up menu
Shadow Controls
THE “MORE” CONTROLS
Correction are ENABLED
Choose Shadows from the
Slider Controls pop-up menu to
modify shadows independently.
• High: Decrease this control to reduce or eliminate unwanted shadows (which must be lighter than
those shadows that are to be retained).
27
Warning: All preserved shadows will be lightened.
• Low: Increase this control to restore the density of the darkest part of the shadows that are to be
retained
• Density: Use this control to change the density of the shadows that are retained to better match
Shadow Controls
Clean Up
THE “MORE” CONTROLS
shadows in the background scene.
• Blur: Use this control to blur the shadows
• Tint: Use these controls to tint the shadows
Clean Up Controls for unwanted anomalies retained as foreground detail
Set these controls while viewing the matte or composite.
The following controls are used to adjust the black and gray areas of the matte channel. This will dramatically
affect the nature of foreground objects' edges, the opacity of transparent objects, and the noise in the
foreground image. Use these controls sparingly as they WILL result in the loss of foreground detail. The proper
technique for dealing with imperfections in the screen is the use of Screen Correction not Clean Up.
28
Choose Clean Up from the Slider Controls pop-up menu
Choose Clean Up from the
Slider Controls pop-up menu to
reduce noise in the backing.
Warning: Advancing this control too far will result in a "cut and paste" look with a hard, unnatural edge.
Background noise (as well as some foreground detail) will be reduced. A better method for dealing
with blue (green) screen imperfections is the use of Screen Correction.
• Shrink: (Only available when Matte Correction is ENABLED.)
Use this control to "choke" or reduce the size of the cleaned-up matte.
Clean Up Controls
THE “MORE” CONTROLS
• Clean Up: Use this control to reduce imperfections or small amounts of noise in the backing.
• Blur: (Only available when Matte Correction is ENABLED.)
Use this control to "soften" the cleaned-up matte.
• Recover: Use this control to set a threshold below which the Clean Up control will not have influence.
29
Color Conformance Controls for matching foreground colors to background colors
Set these controls while viewing the composite.
A flawless composite requires matched blacks, whites, and gammas between the foreground and background
elements. Color Conformance with Ultimatte Intelligence allows for the selection of blacks, whites, and
gammas and will automatically match the foreground to the background (or vice versa if composite is chosen
as output selection).
Color Conformance Contorls
THE “MORE” CONTROLS
Choose Color Conformance from the Slider Controls pop-up menu.
Choose Color Conformance
from the Slider Controls pop-up
menu to match foreground to
background colors.
• Brights: These controls are used to mostly influence the brightest parts of the image. These are global
controls which will affect the entire image, but the greatest effect will be seen in the brightest
areas.
> Red: Use this control to increase or decrease the red influence in the bright areas of the
image.
> Green: Use this control to increase or decrease the green influence in the bright areas of
the image.
30
> Blue: Use this control to increase or decrease the blue influence in the bright areas of
the image.
• Mid-tones: These controls are used to mostly influence the mid-range parts of the image. These are
global controls which will affect the entire image, but the greatest effect will be seen in the
mid-range areas.
> Red: Use this control to increase or decrease the red influence in the mid-range areas of
> Green: Use this control to increase or decrease the green influence in the mid-range
Color Conformance Contorls
THE “MORE” CONTROLS
the image.
areas of the image.
> Blue: Use this control to increase or decrease the blue influence in the mid-range areas
of the image.
• Darks: These controls are used to mostly influence the darkest parts of the image. These are global
controls which will affect the entire image, but the greatest effect will be seen in the darkest
areas.
> Red: Use this control to increase or decrease the red influence in the dark areas of the
image.
31
> Green: Use this control to increase or decrease the green influence in the dark areas of
the image.
> Blue: Use this control to increase or decrease the blue influence in the dark areas of the
image.
• Hue: This control will change the color contents of the image without changing its brightness or color
Advanced Controls
Color Conformance Controls
Video Corr.
THE “MORE” CONTROLS
Advanced Controls
intensity (purity) values. At default setting (0), the image hue is not altered. The range of the
control extends from -300 to +300.
• Saturation: This control will change the color intensity or purity values of the image without altering
its color contents or brightness values. At default setting (0), the image saturation is not
altered. At minimum setting (-200), the color intensity is reduced to zero and the image is
monochrome, or shades of gray.
• Brightness : This control will change the overall intensity of the image. At the default setting, the
image brightness is not altered.
Video Correction Controls
for reducing the artifacts caused by color compression • only available when Matte
Correction is ENABLED
Most video recording devices use some form of compression to store the data, including 4:2:2, 4:2:0 and 4:1:1
imagery. If you suspect that the imagery has been altered using some type of compression, enable the process
by clicking on the DV LED in the right hand section of the AdvantEdge control panel. AdvantEdge will be
32
capable of auto-detecting which type of compression artifacts have been applied to the image as long as there
have not been effects or transformations applied to the image prior to entering AdvantEdge.
The results of the Video Correction algorithms can best be seen after a matte has been generated. To see the
effects of this process, enable and disable the Video Correction process by clicking on the DV LED in the right
hand section of the AdvantEdge control panel while viewing the matte or composite.
Choose Video Correction from
the Slider Controls pop-up
menu to refine the compression
correction settings.
Video Correction Controls
THE “MORE” CONTROLS
Choose Video Correction from the Slider Controls pop-up menu.
Set these controls while viewing the Video Corrected Foreground, Matte, or Composite.
Video Correction Controls
• Compression Type: Use this pop-up menu to choose the type of color compression that was applied to
the imagery:
4:2:2
for color compression on NTSC or PAL images.
4:1:1
for color compression on DV-NTSC images.
4:2:0
for color compression on DV-PAL images.
• Sample Pixel: Use this pop-up menu to choose the suspected pixel that most accurately represents the
pixel if no color compression had been applied.
33
Video Correction
Left:
use the leftmost pixel from a 4-pixel array to restore the
correct color information.
Right:
use the rightmost pixel from a 4-pixel array to restore the
correct color information (may be common when an image
format "flips" the image).
Average:
use an average of the 4 pixels to restore the correct color
information.
• Low Luminance Noise: Use this control to adjust the amount of correction that will mostly affect the
dark areas of the screen.
Warning: Advancing this control too far can have an adverse effect on the Roto-Screen Correction process, if
enabled. It may be necessary to further refine the Roto-Screen Correction Controls.
Roto-Screen Correction Controls for uneven blue (green) screens and to allow shadow separation • only
Roto-Screen Correction Controls
THE “MORE” CONTROLS
available when Matte Correction is ENABLED
Ultimatte Corp introduced a feature in 1990 called Screen Correction. Screen Correction compensates for
anomalies in the backing area such as uneven lighting, smudges, seams, variation in the backing color, blue
(green) set pieces, and unwanted shadows cast by set pieces, boom arms, etc. This technique assumes that
an exact copy of the problematic blue (green) screen element with the subject matter omitted is supplied as a
reference (clean plate).
Although this technique gives excellent results, by differentiating between foreground elements and backing
flaws, we have found that most users have not been supplied with the necessary reference materials often
known as "clean plate".
Therefore, we have devised a technique in which we will attempt to build a synthetic Clean Plate. By using the
Roto-Screen Correction process, a user will now be able to use Screen Correction technology as well as have
separate shadow controls allowing the density of the shadow to be altered without affecting the foreground
subject.
To achieve the best results, a reference Clean Plate should be used as an input to AdvantEdge as well as
allowing the software to generate a synthetic plate. In this way, the reference plate that is used as an input will
allow for the best shadow separation, while the synthetic plate will be used to reduce such artifacts as film grain
or video noise (which will rarely be accurately reproduced when a reference plate is shot during the time of
principal photography).
Choose Roto-Screen Correction from the Slider Controls pop-up menu.
34
Choose Roto-Screen Correction
from the Slider Controls pop-up
menu to refine the settings.
Roto-Screen Correction Controls
THE “MORE” CONTROLS
Set these controls while viewing the Screen Overlay.
• Screen Tolerance: These controls are used to adjust the color range or tolerance to be included or
excluded from the screen overlay.
> Red: Use this control to adjust the red channel tolerance
> Green: Use this control to adjust the green channel tolerance
> Blue: Use this control to adjust the blue channel tolerance
35
• Darks (G>R) {for bluescreen}: Use this control to include or exclude dark areas from the screen overlay
in those areas where the Green Value is greater than the Red Value in the
original foreground image.
• Darks (B>R) {for greenscreen}: Use this control to include or exclude dark areas from the screen
overlay in those areas where the Blue Value is greater than the Red
Value in the original foreground image.
• Darks (R>G) {for bluescreen}: Use this control to include or exclude dark areas from the screen overlay
in those areas where the Red Value is greater than the Green Value in the
original foreground image.
overlay in those areas where the Red Value is greater than the Blue
Value in the original foreground image.
• Shrink: Use this control to shrink the screen overlay.
• Orphans: Use this pop-up menu to include or exclude neighboring "rogue" pixels from the screen
overlay.
Advanced Controls
Advanced Controls
Roto-Screen Correction Controls
THE “MORE” CONTROLS
• Darks (R>B) {for greenscreen}: Use this control to include or exclude dark areas from the screen
• Brights (G>R) {for bluescreen}: Use this control to include or exclude bright areas from the screen
36
overlay in those areas where the Green Value is greater than the Red
Value in the original foreground image.
• Brights (R>G) {for bluescreen}: Use this control to include or exclude bright areas from the screen
Advanced Controls
Roto-Screen Correction
overlay in those areas where the Blue Value is greater than the Red
Value in the original foreground image.
overlay in those areas where the Red Value is greater than the Green
Value in the original foreground image.
• Brights (R>B) {for greenscreen}: Use this control to include or exclude bright areas from the screen
overlay in those areas where the Red Value is greater than the Blue
Value in the original foreground image.
• Overlay Color: Use this control to change the color of the overlay.
• Overlay Opacity: Use this control to adjust the opacity of the overlay.
Film Correction Controls
Film Correction
THE “MORE” CONTROLS
• Brights (B>R) {for greenscreen}: Use this control to include or exclude bright areas from the screen
to reduce the effects of cyan undercutting • only available when Matte Correction is ENABLED
Due to the nature of film’s emulsion layers, a phenomenon know as "cyan undercutting" exists that reveals
itself as a smeared red edge in areas of sharp transitions, which can best be seen by viewing the individual RGB
channels of a film image. Normally, this phenomenon is not a problem until bluescreen compositing techniques
are applied. Since the red emulsion layer tracks at a slower rate than the blue and green emulsion layers, the
artificial red edge it produces will be retained as foreground detail resulting in an unacceptable composite.
AdvantEdge attempts to reduce the effects of cyan undercutting in the following manner:
Enable the process by clicking on the Film LED in the right hand
section of the AdvantEdge control panel to enable the Film Correction
Process.
The goal is to create an overlay over the foreground subject that
does not intrude on any transitional edges or screen area.
The results of these controls can best be seen while viewing the composite. Alternatively by clicking on
37
the Foreground pop-up menu above the foreground thumbnail icon, the view can be toggled between Film
Corrected Foreground and Foreground. You may need to zoom into an area to see the difference.
Choose Film Corrected from
the Foreground pop-up menu
to compare the corrected and
uncorrected foregrounds.
Film Correction Controls
THE “MORE” CONTROLS
Set these controls while viewing the Composite.
• Transparency: Use this control to adjust the amount of Film Correction in partially transparent
foreground objects (such as hair detail.)
• Correction: Use this control to adjust the amount of correction in the individual RGB channels of the
foreground image
• Strength: Use this control to adjust the overall amount of Film Correction that is applied to the
foreground image
38
Advanced Controls
Film Correction Controls
Set the following advanced controls while viewing the Subject Overlay.
• Shrink: Use this control to shrink the subject overlay.
• Brights: Use this control to include or eliminate bright areas from the subject overlay.
• Darks: Use this control to include or eliminate dark areas from the subject overlay.
Choose Your Output Mode (if necessary)
Click on Output to choose the desired output from the AdvantEdge plug-in by clicking on the appropriate eye to
enable:
Output Module
THE “MORE” CONTROLS
Advanced Controls
39
image.
• PFG+Alpha (4-channel): This will output the foreground subject against a black background
Output Module
THE “MORE” CONTROLS
• PFG (3-channel): This will output the foreground subject against a black background as a 3-channel
(transparency) with its corresponding alpha (embedded) in the fourth channel.
This is used to composite with the background using the host application’s
layering tools.
• Composite
• Matte
(3-channel): This will output a “merged” layer or image without transparency.
(3-channel): This will output the matte or alpha channel only of the foreground subject
• Shadow
generated by AdvantEdge as a single layer with no transparency.
(3-channel): This will output the matte or alpha channel of the shadow only as a single layer
with no transparency.
40
Black and White Logic
In some cases, it may be desirable to shoot the foreground imagery in front of a black or white screen. These
are typically used for product shots that do not contain the color of the backing. Black or white logic is not
recommended for shots that contain people.
Many people will choose to shoot fire against a black screen. However, if there is dark smoke or dark sections
of flames, then shooting against a green screen would be a better choice. (Bluescreen is not typically chosen
because flames often have a high blue component in them.)
When shooting objects in front of a white screen, it is very easy to over-expose the screen area. Avoid overexposure of either the backdrop or the subject, particularly near transition areas. When over-exposure occurs,
the result is typically seen as color tints in the edge transitions during the compositing process.
Since black or white screens will not create flare onto the foreground subject matter, the Spill Suppression
controls have been disabled in AdvantEdge when black or white logic is detected.
When using black or white screens, the basic AdvantEdge operation is the same as when using blue or green
screens with some minor changes in slider parameters that are better suited for black or white logic.
Matte Density Controls for Black or White Logic:
Matte Density for BW
BLACK AND WHITE LOGIC
Thoughts when shooting:
41
Matte Density
Choose Matte Density from the Slider Controls pop-up menu.
• Subject: Use these RGB controls to adjust the opacity of foreground subjects
• Screen: Use these RGB controls to adjust the transparency in the screen area.
• Edge Kernel: Use this control to adjust number of pixels to use as a kernel to reduce dark edges that
may exist in transition areas due to an over-dense matte.
Roto-Screen Correction for BW Logic
BLACK AND WHITE LOGIC
Roto-Screen Correction Controls for Black or White Logic
Choose Roto-Screen Correction from the Slider Controls pop-up menu.
• Shrink: Use this control to shrink the screen overlay
• Subject: Use these RGB controls to exclude subject areas (or possibly include screen areas) from the
screen overlay
42
screen overlay
Advanced Controls
Advanced
Roto-Screen Correction for Black and White Logic
BLACK AND WHITE LOGIC
• Screen: Use these RGB controls to include screen areas (or possibly exclude subject areas) from the
• Overlay Color: Use this control to change the color of the overlay.
• Overlay Opacity: Use this control to adjust the opacity of the overlay.
43
Setup
Adobe After Effects 5+ (Windows)
Adobe After Effects 5+
SETUP
1
• 5.5+ (Mac):
Place the foreground, background, clean plate (if available) and holdout matte (if available) footage in
the Timeline window. Make sure the foreground footage is above the background footage.
In order to use a HoldOut Matte within After Effects, the HoldOut Matte must exist in the fourth channel of its own layer
within the composition timeline window.
2
Switch the view (eye) to "off" on the clean plate and holdout matte layers.
3
With the foreground layer selected, apply the AdvantEdge plug-in. (Effect -> Ultimatte -> AdvantEdge)
44
Adobe After Effects 5+
SETUP
4
In the Effect Controls window, set the Clean Plate pull-down menu to the corresponding layer in the
Timeline which is the clean plate. Set the Holdout Matte pull-down menu to the corresponding layer in
the Timeline which is the holdout matte.
5
Use the BG Preview pull-down to select the background layer from the Timeline if you want to see
the background within the AdvantEdge interface. If you do not select BG preview before entering
the AdvantEdge interface, you will be able to select a solid color or transparency from within the
AdvantEdge interface for previewing only. (This will not be output).
• Since After Effects has a hierarchy to which we do not have access, you must pre-render
or pre-compose compositions if you apply any transformations, masks, or filters to either
your foreground or background layers and you want to see the entire effect when you
are in the AdvantEdge interface. (If you do not follow this process, your final After Effects
render will be unchanged. However, you will not be able to see the effects of other filters or
transformations in the AdvantEdge interface which may be critical in helping you to make
decisions about control parameters).
• If the "background" consists of multiple layers in your After Effects Timeline window, prerender or use pre-comps to see the entire background in the AdvantEdge interface.
45
• The BG Preview, Clean Plate and Holdout Matte images, footage or compositions must be
the same size as the foreground layer.
6
Click on the AdvantEdge logo in the Effect Control window to launch the AdvantEdge interface.
• Within the AdvantEdge interface, you will be able to preview the frame at which your time
marker is set within the After Effects Timeline window. To view other frames, launch the
time controls by clicking on
in the AdvantEdge control window or by clicking on the
Jogger button in the AdvantEdge More interface.
The default output is PFG + Alpha. Open the Output Palette
tab, if an output other than the default is desired.
or click More and then the Outputs
Toggle the eye to select an
alternate output.
SETUP
Adobe After Effects 5+
7
46
Adobe Photoshop 5.5 to 6
1
AdvantEdge functions on Layers, so the first step is to convert the "Background" into a "Layer":
Double click on the "Background" layer, and a "New Layer" dialog box opens, with "Layer 0" highlighted.
If you like this name, simply click "OK" to accept. You can change the name of the layer at any time in
Photoshop. Notice that you now have "Layer 0" in the Layer List.
2
From the Filters menu choose: Filters->Ultimatte->AdvantEdge The AdvantEdge interface will be
launched.
3
Since Photoshop 6 and earlier only allow a filter to act on one layer, you must import the background,
clean plate (if available), garbage matte and holdout matte from within the AdvantEdge interface. Do
Adobe Photoshop 5.5 to 6
SETUP
this by clicking on
or click on More and then the Inputs tab. The Inputs palette will appear:
In this example, the Clean Plate
is being used.
47
4
Click the folder icon next to Background, Clean Plate, Garbage Matte and Holdout Matte to import and
enable the appropriate files. Note: The Background, Clean Plate, Garbage Matte and Holdout Matte
must be the same size as the foreground.
5
The default output for Photoshop is PFG + Alpha.
SETUP
Photoshop 5.5 to 6
Toggle the eye to select an
alternate output.
48
Adobe Photoshop 7+
Since Photoshop 7.0 allows a plug-in to have access to multiple layers, the layered document may contain
additional inputs to AdvantEdge. Previous Photoshop versions required the additional inputs to be imported
from within the AdvantEdge interface.
Adobe Photoshop 7+
SETUP
The Photoshop 7 document must be created as follows:
1
The foreground must be the the top-most layer
2
The background should be immediately below the foreground.
3
The clean plate should be immediately below the background.
4
The holdout matte should be immediately below the clean plate.
After entering the AdvantEdge interface, the corresponding inputs must be enabled by clicking on
or click
on More and then the Inputs tab. The Inputs palette will appear. Click the eye to the on position for each input.
If the document is “missing” an input that is between 2 existing inputs, then a layer must be used in the place
of the input. This layer may be fully transparent or a duplicate of any other layer that exists in the document.
Inputs Palette: the Background
and Clean Plate have been
turned on.
49
Adobe Premiere 6+
SETUP
Adobe Premiere 6+ (Note: Mac version requires Premiere 6.5)
1
Place the foreground image or sequence on Track 1A in the Adobe Premiere timeline. Place the
background image or sequence on Track 1B in the Adobe Premiere timeline.
2
From the Transitions menu within Premiere, select and drag the Ultimatte>AdvantEdge plug-in to the
Transition track (between the foreground and background images). Ensure the Transition direction
indicator arrow is pointing up towards the foreground track.
3
Double click on the AdvantEdge transition to launch the Premiere transitions dialog box. Click on
Show Actual Sources. The foreground image should be shown in the image windows. Click on Custom
to launch the AdvantEdge plug-in. Note, when you first enter the AdvantEdge interface, you will see
the first frame of the current clip. To see other frames, use the Frame Jogger
Jogger tab.
4
or More, then the
Since Premiere only allows a transition to contain two inputs, additional inputs (clean plate, garbage
matte and holdout matte {if any of these are available}) must be imported from within the AdvantEdge
interface. Do this by clicking on
or click on More and then the Inputs tab. The Inputs palette will
appear. Select the folder icon next to Clean Plate, Garbage Matte or Holdout Matte. An Open File
dialog box will be launched, and the additional input can be imported from the file system. Note: The
50
additional inputs must be the same size as the foreground and must be single frames (not sequences or
movie files.) Enable/disable the use of the addtional inputs by clicking their respective eye icons in the
Inputs palette. The following screenshot shows the Input palette with all inputs loaded and active.
Adobe Premiere 6+
SETUP
In this example, all inputs are
being used.
Toggle the eye to select an
alternate output.
5
The default output is Composite.
51
Adobe Premiere Pro
SETUP
Adobe Premiere Pro
1
Place the foreground footage and the background footage on the same track. Make sure there is no gap
between them on the timeline.
2
Drag the Ultimatte AdvantEdge transition out of the Transitions folder in the Effects window and onto
the tail end of the foreground as shown above.
3
Drag the left edge of the AdvantEdge transition all the way to the left edge of the foreground as shown
in the following screenshot.
52
Adobe Premiere Pro
SETUP
4
Leaving the AdvantEdge transition selected, go to the Effects Control Window and click the Custom
button in the AdvantEdge entry. This will open the AdvantEdge full-screen interface. Note, when you
first enter the AdvantEdge interface, you will see the first frame of the current clip. To see other frames,
use the Frame Jogger
5
or More, then the Jogger tab.
Since Premiere only allows a transition to contain two inputs, additional inputs (clean plate, garbage
matte and holdout matte {if any of these are available}) must be imported from within the AdvantEdge
interface. Do this by clicking on
or click on More and then the Inputs tab. The Inputs palette
will appear. Select the folder icon next to Clean Plate, Garbage Matte or Holdout Matte. An Open File
dialog box will be launched, and the additional input can be imported from the file system. Note: The
additional inputs must be the same size as the foreground and must be single frames (not sequences or
movie files.). Enable/disable the use of the addtional inputs by clicking their respective eye icons in the
Inputs palette. The following screenshot shows the Input palette with all inputs loaded and active.
53
Adobe Premiere Pro
SETUP
In this example, all inputs are
being used.
Toggle the eye to select an
alternate output.
6
Set the output to Composite.
54
Apple Final Cut Pro 3+
SETUP
Apple Final Cut Pro 3+
1
Add an additional track to the timeline by performing a right-click above video track 1 (V1) and selecting
Add Track. This will add video track 2 (V2) to the timeline.
2
Place the foreground image or sequence on V2 in the timeline. Place the background image or
sequence on V1 in the timeline. Your sequence should now look similar to this:
55
Apple Final Cut Pro 3+
SETUP
3
Select the Foreground layer (V2).
4
Choose Effects -> Video Filters -> Ultimatte -> AdvantEdge.
5
Doube click the Foreground layer to load it into the Final Cut Pro Viewer window.
6
Select the Filters tab in the Viewer window.
7
Drag the background footage or image from the bin
to the BG Preview icon in the Viewer window. Drag
the clean plate footage or image (if available) from the
bin to the Clean Plate icon in the Viewer window. Drag
the holdout matte footage or image (if being used)
from the bin to the Holdout Matte icon in the Viewer
window.
8
8
Click on the AdvantEdge logo button to launch the
AdvantEdge interface.
7
56
Apple Shake 3.5+
SETUP
Apple Shake 3.5+
1
Before launching the Ultimatte AdvantEdge interface, be sure to enable autoAlpha by clicking on the
LED in the node view of the foreground footage.
57
Apple Shake 3.5+
SETUP
2
Click the AdvantEdge tab and then the AdvantEdge logo to create an AdvantEdge node. Connect the
foreground, background, clean plate (if available), and garbage matte (if available) footage into their
corresponding inputs on the AdvantEdge node. Use Shake’s Over node to composite the AdvantEdge
processed foreground (using its alpha channel) over the background.
58
Apple Shake 3.5+
SETUP
3
In the AdvantEdge node interface, click on setup to launch the Ultimatte AdvantEdge interface.
4
The default output is PFG + Alpha.
59
Avid AVX 1.5 (excluding Avid DS)
The AdvantEdge AVX plug-in can accept up to 4 inputs. To use all 4 inputs with AdvantEdge, the following
images or sequences are needed: foreground, background, clean plate and garbage matte.
The images must be placed on the timeline in a specific order for AdvantEdge to have the proper inputs:
•
Foreground
•
Background
•
Clean Plate
•
Garbage Matte
Avid AVX 1.5
SETUP
If the footage is not placed in the above order, AdvantEdge will not receive the proper inputs. If no footage is
placed in one of these tracks, Avid will pass the footage from the track directly beneath it to the AdvantEdge
input. The appropriate timeline setups are shown below for each combination of inputs:
60
Avid AVX 1.5
SETUP
1
Locate the Effect Palette, choose Ultimatte AdvantEdge and drag it onto the foreground footage in the
timeline.
61
Avid AVX 1.5
SETUP
2
The AVX Optional Inputs dialog box will appear. Choose the number of tracks appropriate for your
AdvantEdge inputs. Note: if you have left a track blank but are using the track below it for AdvantEdge,
be sure to include the blank track in total number of inputs.
3
Launch the AdvantEdge interface by clicking on the Other Options button next to the effect in Avid’s
Effect Editor palette.
4
Open the Inputs palette by clicking on
or click on More and then the Inputs tab. Enable the input
images/footage by clicking the eye icon next to the appropriate images to be used by AdvantEdge.
In this example, the Clean Plate
is not being used.
62
5
The default output is Composite.
SETUP
Avid AVX 1.5
Toggle the eye to select an
alternate output.
63
Avid DS 6+
SETUP
Avid DS 6+ (Note:
there are many ways to setup this type of compostie in Avid DS. This is just one example.)
1
Switch to Compositing mode.
2
Activate the Avid Explorer subpanel.
3
Drag the Foreground to C1 in the timeline portion of the composite view.
4
Drag the Background, Clean Plate and Garbage Matte into the Effects Tree panel. (Note: Four inputs
must be present. Even if a Clean Plate or Garbage Matte is not being used, place a dummy input in the
effects tree or duplicate one of the existing inputs.)
5
Switch the upper panel from Avid Explorer view to Effects view.
6
Under Image Effects, select and drag an AVX Host into the Effects Tree panel.
7
Select the AVX Host in the Effects Tree to activate the Property Editor subpanel.
8
On the Generic tab, select the Ultimatte Group/Category, then choose AdvantEdgeDS from the Effects
pulldown menu.
9
Wire the AdvantEdgeDS node as shown below. (Note in the example shown, one of the inputs is used
twice. This is because the plugin requires 4 inputs. In this example, we simply reuse one input but leave
it turned off in the AdvantEdge interface.)
64
Click Open Effect UI to enter the AdvantEdge interface.
{
Open the Inputs palette by clicking on
or click on More and then the Inputs tab. Enable the input
images/footage by clicking the eye icon next to the appropriate images to be used by AdvantEdge.
Note: Avid DS does not allow for a Holdout Matte input.
Avid DS 6+
SETUP
0
65
Avid DS 6+
SETUP
In this example, the extra input
is turned off.
Toggle the eye to select an
alternate output.
}
The default output is Composite. Open the Output Palette
tab if an output other than the default is desired.
or click More and then the Outputs
66
Autodesk Combustions 2+
SETUP
Autodesk Combustion 2+
1
Create a combusiton composite workspace that contains the foreground and background footage.
2
Select the Foreground layer and then click the Operators pane tab. Choose Ultimatte -> AdvantEdge.
3
Click the twirl-down triangle next to the Foreground layer. This will reveal the AdvantEdge operator.
4
Select the AdvantEdge operator. This will activate the combustion tabbed pane for AdvantEdge.
5
Click the Clean Plate button, BG Preview button and Holdout Matte button to designate an image or
footage from the combustion footage library for each (if available/applicable).
6
Click Setup to launch the AdvantEdge interface.
67
7
The default output is PFG + Alpha. Open the Output Palette
tab if an output other than the default is desired.
or click More and then the Outputs
SETUP
Autodesk Combustions 2+
Toggle the eye to select an
alternate output.
68
Autodesk IFFFS 4+/7+
SETUP
Autodesk IFFFS 4+/7+
1
Once all necessary footage is loaded and visible in the Desktop, click the Effects button in the
Main Menu.
2
Click the AdvantEdge button.
3
At this point the cursor will change into the arrow cursor. 5 inputs must be selected in the following order:
• Foreground
• Background
• Clean Plate
• Garbage Matte
• Holdout Matte
If any input is not being used (i.e. no Garbage Matte will be used) then click on the previous input twice.
69
Autodesk IFFFS 4+/7+
SETUP
4
When 5 inputs have been chosen, the arrow cursor will turn white. Click anywhere in the grey area of
the Discreet Desktop to confirm the operation.
5
The AdvantEdge module appears.
6
Click the AdvantEdge Setup button to enter the AdvantEdge interface.
Open the Inputs palette by clicking on
or click on More and then the Inputs tab. Enable the input
images/footage by clicking the eye icon next to the appropriate input to be used by AdvantEdge.
7
70
In this example, the Clean Plate
is not being used.
Autodesk IFFFS 4+/7+
SETUP
8
Open the Output Palette
or click More and then the Outputs tab if an output other than the default
is desired. The default output is Composite.
Toggle the eye to select an
alternate output.
9
Click OK to accept the current settings and return to the flame interface.
71
eyeon Digital Fusion 3+
SETUP
eyeon Digital Fusion 3+
1
Connect the foreground, background, clean plate (if
available), and garbage matte (if available) loaders into
their corresponding inputs of the AdvantEdge node.
2
In the AdvantEdge node parameters box, click on Setup
to launch the AdvantEdge interface.
3
The default output is PFG + Alpha.
4
Use Digital Fusion’s Merge tool (set to additive) to
composite the AdvantEdge processed foreground (using
its alpha channel) over the background.
72
media 100i 8+, sw 10+, Producer
SETUP
media 100i 8+, sw 10+, Producer
1
Place the Background material in Track B. Place the Foreground material in Track A.
2
Extend the OUT point of Track B past the end of Track A.
3
Goto the Transition Tab of the Edit Suite Window and select AdvantEdge from the pulldown menu.
4
Move the Green Triangle that marks the transition IN point, all the way to the left. (NOTE: The green
triangle may be hidden behind the red initially.)
5
Select the Right-Aligned Transition or Left-Aligned Transition icon.
6
Click the Transition Settings twirl-down button and click on Custom Settings to open the AdvantEdge
interface.
73
media 100i 8+, sw 10+, Producer
SETUP
media100’s Edit Suite window.
Transition Settings shown.
7
Open the Inputs palette by clicking on
or click on More and then the Inputs tab. Import auxiliary
inputs by clicking on a folder icon and then browse to the file. Enable the input images/footage by
clicking the eye icon next to the appropriate input to be used by AdvantEdge.
74
media 100i 8+, sw 10+, Producer
SETUP
In this example, a Clean Plate is
being used.
8
Open the Output Palette
or click More and then the Outputs tab if an output other than the default
is desired. The default output is Composite.
Toggle the eye to select an
alternate output.
9
When finished, click OK to return to the media100 interface.
0
Click Apply in the Transition panel to use the AdvantEdge settings just created. At this point, only the
background will be visible in the Record window until the effect is rendered.
75