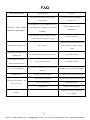
1
IP Media Phone VP-2009
User Manual
VoIPon www.voipon.co.uk [email protected] Tel: +44 (0)1245 808195 Fax: +44 (0)1245 808299
VoIPon www.voipon.co.uk [email protected] Tel: +44 (0)1245 808195 Fax: +44 (0)1245 808299
Tables of Contents
Tables of Contents ............................................................................................................................ 3
1.
Notices......................................................................................................................................... 7
2.
Package List.............................................................................................................................. 11
3.
Production Instruction ............................................................................................................ 12
4.
5.
3.1
Product Appearance ......................................................................................................... 12
3.2
Function Description........................................................................................................ 13
3.3
Specification .................................................................................................................... 14
Installation................................................................................................................................ 15
4.1
Interface ........................................................................................................................... 15
4.2
Hardware Connection....................................................................................................... 15
Basic Operation........................................................................................................................ 16
5.1
Keypad ............................................................................................................................. 16
5.2
LCD Icon Instruction ....................................................................................................... 17
5.3
Contact ............................................................................................................................. 18
5.3.1
Quickly Find ......................................................................................................... 18
5.3.2
Exact Search.......................................................................................................... 19
5.3.3
Add Contact .......................................................................................................... 19
5.3.4
Edit Contact XXX ................................................................................................. 19
5.3.5
Delete Contact-XXX .......................................................................................... 20
5.3.6
Empty Phonebook ................................................................................................. 20
5.3.7
Add Group............................................................................................................. 20
5.3.8
Edit Group-XXX ................................................................................................ 20
3
VoIPon www.voipon.co.uk [email protected] Tel: +44 (0)1245 808195 Fax: +44 (0)1245 808299
5.4
5.5
5.3.9
Delete Group-XXX............................................................................................. 21
5.3.10
Group Ring.......................................................................................................... 21
Call Settings ..................................................................................................................... 21
5.4.1
Call Methods ......................................................................................................... 21
5.4.2
Phone Call ............................................................................................................. 22
5.4.3
Answer a call......................................................................................................... 24
5.4.4
Refuse a call .......................................................................................................... 24
Operation during the call.................................................................................................. 24
5.5.1
Audio/Video Operation ......................................................................................... 24
5.5.2
Mute ...................................................................................................................... 25
5.5.3 Call Hold ............................................................................................................... 25
5.6
Call List............................................................................................................................ 25
5.6.1
Enter the Call List page......................................................................................... 25
5.6.2
Check the details ................................................................................................... 25
5.6.3 Call Back............................................................................................................... 25
5.7
5.6.4
Save to Contact ..................................................................................................... 25
5.6.5
Delete the Record.................................................................................................. 26
E-Photo ............................................................................................................................ 26
5.7.1 Play ....................................................................................................................... 26
5.7.2
5.8
Manage.................................................................................................................. 26
Web Browser ................................................................................................................... 27
5.9 Media Player .................................................................................................................... 27
5.10
Message.......................................................................................................................... 27
4
VoIPon www.voipon.co.uk [email protected] Tel: +44 (0)1245 808195 Fax: +44 (0)1245 808299
6.
Phone Operation ...................................................................................................................... 29
6.1
Configuration ................................................................................................................... 29
6.1.1
System Status ........................................................................................................ 29
6.1.2
Desktop Settings.................................................................................................... 30
6.1.3
Phone Settings....................................................................................................... 30
6.1.4
Tones and Volume ................................................................................................ 31
6.1.5
Date and Time ....................................................................................................... 31
6.1.6
Alarm .................................................................................................................... 32
6.1.7
Security ................................................................................................................. 32
6.1.8 Call Setting............................................................................................................ 34
6.2
Advanced Settings............................................................................................................ 36
6.2.1
Account Setting..................................................................................................... 37
6.2.2
WAN(Internet Port) ......................................................................................... 37
6.2.3
LAN(PC Port) .................................................................................................. 38
6.2.4
Servers................................................................................................................... 38
6.2.5
Browser ................................................................................................................. 39
6.2.6 Call Settings .......................................................................................................... 39
6.2.7
Update Application ............................................................................................... 40
6.2.8 Style Setting .......................................................................................................... 41
7.
6.2.9
Reset to Factory..................................................................................................... 41
6.2.10
Update Configuration Files ................................................................................. 41
Configuration ........................................................................................................................... 42
7.1
Log in the Webpage ......................................................................................................... 42
7.2
Network Configuration .................................................................................................... 43
5
VoIPon www.voipon.co.uk [email protected] Tel: +44 (0)1245 808195 Fax: +44 (0)1245 808299
7.3
7.2.1
WAN Configuration.............................................................................................. 43
7.2.2
LAN Configuration ............................................................................................... 44
Account............................................................................................................................ 45
7.3.1
Account Configuration.......................................................................................... 45
7.3.2
Voice Configuration.............................................................................................. 46
7.3.3
Advanced .............................................................................................................. 47
7.4
Status................................................................................................................................ 48
7.5
Phone Configuration ........................................................................................................ 48
7.6
Contact Configuration...................................................................................................... 49
7.7
Upgrade Configuration..................................................................................................... 49
7.8
Security Configuration ..................................................................................................... 50
FAQ.................................................................................................................................................. 51
6
VoIPon www.voipon.co.uk [email protected] Tel: +44 (0)1245 808195 Fax: +44 (0)1245 808299
1.
Notices
Basic Notices:
Read the user manual carefully before the installation and usage of the device.
During the storage, shipment and usage, please strictly avoid the water and fierce collision.
Do not dismantle the device without any reference, please contact the after-sale services for
maintenance when it doesn’t work normally.
Nobody is allowed to change the structural and safety design without any permission.
Otherwise all the consequences arising therefore is at his own risk
This product is on environmental protection and personal safety of the design requirements,
storage, usage and disposal of the device should comply with the product manuals, the relevant
contracts or related laws and regulations as required.
7
VoIPon www.voipon.co.uk [email protected] Tel: +44 (0)1245 808195 Fax: +44 (0)1245 808299
Safety Notices:
Before usage, make sure the input voltage power supply meets the demand.
Do not let children use the facilities to prevent dangerous.
Device can only be used indoors to prevent rain, lightning and sunlight. When liquid flows
into the device by accident, users should immediately power it off to prevent fire or electric
shock.
Do not share the same power supply line with the other high-power equipment and electrical
appliances (such as air conditioners, microwave ovens, etc.). Do not connect the equipments to
the same AC power socket board.
please stop using the equipment and make sure the power is switched off before plug on/off
cable equipment, and keep hands dry when plug in/out the cable equipments.
Do not use damaged or aging power lines, do not dismantle or repair the power lines.
Please keep the power line away from the local heat source.
Please do not put any weight on device.
If there is any abnormal phenomena, such as smoke, smell etc, please stop using the device
immediately, power off and contact professional maintenance staff.
When the equipment is not be used for a long time, plug out the power plug.
8
VoIPon www.voipon.co.uk [email protected] Tel: +44 (0)1245 808195 Fax: +44 (0)1245 808299
Maintenance Notices:
The device should be placed in airy, dry, non-glare environment, keep the equipment away
from rain and humidity, do not place vases, cups or other water containers on the device.
Please Place the equipment on the smooth station where children can not reach. Do not put any
heavy things on the device.
Please keep cooling space wider than 10cm.
Please keep the device away from the strong magnetic field or a strong electric field of
electrical appliances (such as microwave ovens, refrigerators, etc).
Please do not put the device in the sealed place to prevent high temperature damage.
Please keep device clean and avoid dust pollution.
9
VoIPon www.voipon.co.uk [email protected] Tel: +44 (0)1245 808195 Fax: +44 (0)1245 808299
Clean Notices:
Please stop using the device and disconnect the power plug before clean.
Use soft, dry cloth to wipe device shell when cleaning.
No liquid to the equipment when cleaning to avoid damage.
Keep power plug clean and dry to avoid electric shock or other dangerous.
10
VoIPon www.voipon.co.uk [email protected] Tel: +44 (0)1245 808195 Fax: +44 (0)1245 808299
2.
Package List
Please check the items in the box in accordance with the packing list, if parts are missing or
damaged, promptly contact your dealer.
Item
Number
VP-2009
1
Handset
1
Telephone Cable
1
Internet Cable
1
Power Adapter
1
User Manual
1
11
VoIPon www.voipon.co.uk [email protected] Tel: +44 (0)1245 808195 Fax: +44 (0)1245 808299
3.
Production Instruction
3.1
Product Appearance
IP Media Phone VP-2009,showed as Picture 3-1.
Picture 3-1
12
VoIPon www.voipon.co.uk [email protected] Tel: +44 (0)1245 808195 Fax: +44 (0)1245 808299
3.2
Function Description
VP-2009 is an innovative IP media phone equipped with the most advanced video compression
technology. The H.264 based IP media phone offers unrivalled superb voice and picture quality,
innovative functional richness, friendly user interface, stylish and elegant design, enhancing the
instant, face-to-face communication experience even at low bandwidth.
Meanwhile it supports IPTV, VoD, media player, browser, Message, Digital Photo Frame, IM
which make it not only a video phone but also a media phone for entertainment. It is definitely ideal
for multimedia communication, virtual office and all IP video conversation for business or home
users.
13
VoIPon www.voipon.co.uk [email protected] Tel: +44 (0)1245 808195 Fax: +44 (0)1245 808299
3.3
Specification
VP-2009’s specification showed as Table 3-1.
Item
Instruction
LCD: 7 inch large TFT color screen, 480*234 pixels;
Camera: adjustable 300K pixels CMOS sensor;
Video Features
Video Codecs: H.264, H.263;
Support H.264、H.263 video conversation.
Support SIP 2.0,NAT transverse: STUN mode;
Internet Features
IP address assignment:Static IP /DHCP/PPPoE;
In-band DTMF and out-of-band DTMF.
Voice Codecs:PCMA、PCMU、G.723、G.729 etc;
Call hold, Speak phone, Speed Dial, Mute, etc;
Telephone Features
Touch screen;
Caller ID.
Browser;
Digital Photo Frame;
Value-added Features
Media Player;
Message.
Voltage:5 V DC;
Maximum Power Consumption: 15 W;
Hardware Features
Input voltage (AC adapter):100~240V, 650mA;
Dimension:284×190×43 mm;
Weight:2.5 kg.
Table 3-1
14
VoIPon www.voipon.co.uk [email protected] Tel: +44 (0)1245 808195 Fax: +44 (0)1245 808299
4.
Installation
4.1
Interface
VP-2009’s interface instruction showed as Table 4-1.
Interface
Instruction
USB port
2,connect to USB Mouse, flash memory, etc.
WAN Port
10/100 Mbps RJ-45 Ethernet Connector
LAN Port
10/100 Mbps RJ-45 PC Connector
A/V Out Port
Connect to external device such as TV screen
Mic Port
2.5 mm Headset Port
Power Adapter Port
5V DC
Table 4-1
4.2
Hardware Connection
VP-2009’s back view, showed as Picture 4-1.
Picture 4-1
15
VoIPon www.voipon.co.uk [email protected] Tel: +44 (0)1245 808195 Fax: +44 (0)1245 808299
5.
Basic Operation
5.1
Keypad
VP-2009’s keypad, showed as Picture 5-1.
Picture 5-1
16
VoIPon www.voipon.co.uk [email protected] Tel: +44 (0)1245 808195 Fax: +44 (0)1245 808299
5.2
LCD Icon Instruction
VP-2009’s Icons instruction showed as Table 5-1.
Icon
Instruction
Registration Status: Successful
Registration Status: Failed
Network Status: Available
Network Status: Unavailable
Network Status: Limited
PSTN
Out-coming Calls
In-coming Calls
Flash when there is missing calls
In Handset Status
In Speaker Status
Alarm set
USB flash device detected
Table 5-1
17
VoIPon www.voipon.co.uk [email protected] Tel: +44 (0)1245 808195 Fax: +44 (0)1245 808299
5.3
Contact
In the desktop status,Press<Phone book> to enter “Contact” page, press <F3
> to pop up the “More” frame, showed as Picture 5-2.
Picture 5-2
5.3.1
Quickly Find
Quickly find the contact by the following steps:
1.
In the “More” frame, press up/down button to choose “Quickly Find” option,
press OK, then the “Quickly Find” dialog will showed in the bottom of the LCD.
2. Enter the contact name, for example “David”, then the screen will show all
the contacts whose name begins with “David”.
3. Press<F4> button to get back to Contact page.
Note:
Users can click the digital key to switch the input methods. For example, according to the number 2
button, click this button once, you can enter the number 2. Click it again, it will change to a,
followed by b, c and @ in order; Press <F3> key, you can delete the input letters or numbers.
18
VoIPon www.voipon.co.uk [email protected] Tel: +44 (0)1245 808195 Fax: +44 (0)1245 808299
5.3.2
Exact Search
Do the exact search by the following steps:
1.In the “More” frame, press Up/Down buttons to choose “Exact Search” option,
press <OK>,then “Accurate Find” Dialog will pop up.
2. Enter the find name information into the “Accurate Find” dialog, for example
“David Lee”, press <OK>, then the screen will show the details of the first
contact whose name match with “David Lee”.
5.3.3 Add Contact
Users can add a contact and edit the name and the phone numbers. After adding
the contact, users can call this contact directly through “Contact List”.
Add the contact by the following steps:
1. Enter the Contact page.
In the Desktop status, press <Phone book> to enter the Contact page.
In the “Contact” page, press <F3> to pop up the “More” Frame, Press Up/Down Button to
choose the “Add Contact” option, Then press <OK> to enter.
Note:
Every contact can have up to 4 phone numbers and 1 Email address.
2. Press Up/Down Button to choose different options, in the “Ring” and “Group”
options, press <OK> to pop up the “Select List” Frame, press Up/Down
buttons to choose different options, press <OK> to confirm.
3. After edition, press <F1>to save the changes and get back to the previous
page.
5.3.4
Edit Contact XXX
XXX is the current cursor location of the contact's name.
In ”More” Frame, press Up/Down buttons to choose the “Edit Contact-XXX” option,
19
VoIPon www.voipon.co.uk [email protected] Tel: +44 (0)1245 808195 Fax: +44 (0)1245 808299
press <OK> to get into the Edit Page, users can do the configuration as “ 5.3.3
Add Contact”.
5.3.5
Delete Contact-XXX
After deleting the contact, its phone numbers and email will be deleted at the
same time.
Delete the contact by the following steps:
1. In ”More” Frame, press Up/Down buttons to choose the “Delete Contact-XXX”
option, press <OK> to pop up the dialog reminds ”Delete the contact?” .
2. Click <Yes> to confirm the operation, click <No> to cancel the operation.
5.3.6
Empty Phonebook
1. In ”More” Frame, press Up/Down buttons to choose the “Empty Phonebook”
option, press <OK> to pop up the dialog reminds ”Delete all contacts?”.
2. Click<Yes>to confirm the operation, click <No> to cancel the operation.
5.3.7
Add Group
Add group by the following steps:
1. In ”More” Frame, press Up/Down buttons to choose the “Add Group” option,
press <OK> to pop up the “New Group” dialog.
2. Enter the new group’s name. Press <OK> to save the changes and exit.
3. Press Left/Right button to check the new group in the Contact page.
5.3.8
Edit Group-XXX
XXX is the current cursor location of the group's name.
Attention:
Can not modify key groups: the "blacklist" and "not specified".
20
VoIPon www.voipon.co.uk [email protected] Tel: +44 (0)1245 808195 Fax: +44 (0)1245 808299
Edit the group by the following steps:
1. In ”More” Frame, press Up/Down buttons to choose the “Rename Group-XXX”
option, press <OK> to pop up the “Edit Group” dialog.
2. After the edition, press <OK> to save the changes and exit.
5.3.9
Delete Group-XXX
Attention:
Can not modify key groups: the "blacklist" and "not specified".
Delete the group by the following steps:
1. In ”More” Frame, press Up/Down buttons to choose the “Delete Group-XXX”
option, press <OK> to pop up the relating dialog ”Delete the group?”.
2. Click <Yes> to confirm the operation, click <No> to cancel the operation.
5.3.10
Group Ring
Edit the group ring by the following steps:
1. In ”More” Frame, press Up/Down buttons to choose the “Group Ring” option,
press <OK> to pop up the “Select List” dialog.
2. Press Up/Down buttons to choose the preferred ring tone, press <OK> to
save the changes.
5.4
Call Settings
5.4.1 Call Methods
VP-2009 has three types of call:
IP Video Call: During the conversation, users can see the video of both side and hear the voice.
IP Voice Call: During the conversation, users can only hear the voice.
PSTN Call: Users can make PSTN calls even when it is power off or the network is unavailable
21
VoIPon www.voipon.co.uk [email protected] Tel: +44 (0)1245 808195 Fax: +44 (0)1245 808299
5.4.2 Phone Call
5.4.2.1 Direct Call
Make a phone call directly when the account is registered by the following steps:
1. Pick up the handset or press the <Speaker> button;
2. Enter the phone number you want to dial;
3. Start the call;
Press <F1> to make a SIP video call;
Press <F2> to make a SIP voice call ;
Press <F3> to make a PSTN call.
If the account is registered, when <F2> is pressed, the call will be made according to the
settings of “6.13 Phone Settings”, if the Default Call Method is set as Video (IP) and Audio
(IP), it will be IP call; If the Default Call Method is PSTN, it will be PSTN call;
Press <OK> to call out in the default call method. For more details, please refer to “6.1.3 Phone
Settings”.
Make a phone call when it is power off or PSTN mode without internet connection
by the following steps:
1. Pick up the handset;
2. Enter the phone number you want to dial;
3. Start the call;
Attention:
All the applications below are handled in the power off status.
5.4.2.2 Redial Call
Redial from the “Dialed List” by the following steps:
1. Press the Up button to enter the “Dialed List” page.
22
VoIPon www.voipon.co.uk [email protected] Tel: +44 (0)1245 808195 Fax: +44 (0)1245 808299
2. Press Up/Down Button to choose the phone number;
3. Start the call;
Press <F1> to make a video call;
Press <F2> to start a voice call or a PSTN call;
Press <OK> to make a call in the default call method. Please refer to “6.1.3 Phone Settings” for
more details.
Redial the last phone number that called out by the following steps:
1. Pick up the handset or press the <Speaker> button.
2. Press the <呼叫> button to call out.
5.4.2.3
Speed Dial
Use the speed dial by the following steps:
1. Configure the speed dial number first, please refer to “6.1.8” for more details;
2. Pick up the handset or press the <Speaker> button, press the speed dial
number to make a call out directly.
5.4.2.4
Make a call through Call List
Make a call through Call List by the following steps:
1. Press <F1> to enter the Call List page;
2. Press Left/Right to choose the groups;
3. Press Up/Down to choose the phone number;
4. Start the call;
Press <F1> to make a video call;
Press <F2> to start a voice call or a PSTN call;
Press <OK> button to call out in the default call method. For more details, please refer to
“6.1.3 Phone Settings”.
23
VoIPon www.voipon.co.uk [email protected] Tel: +44 (0)1245 808195 Fax: +44 (0)1245 808299
5.4.2.5
Make a call through Contact List
Make a call through Contact List by the following steps:
1. Press <Phone Book> to enter the “Contact” page;
2. Press Left/Right to choose the group;
3. Press Up/Down to choose the phone number;
4. Start the call;
Press <F1> to make a video call;
Press <F2> to start a voice call or a PSTN call;
Press <OK> to call out in the default call method. For more details, please refer to “6.1.3 Phone
Settings”.
Note:
When the contact has more than one phone number, a “Phone Number Select” frame will pop up in
the screen, press Up/Down button to choose the phone number, press the relating soft function keys
to choose the call method or just press “OK” to call out with the default method.
5.4.3 Answer a call
When there is a call comes in, pick up the handset or press the <Speaker> button
to answer it.
5.4.4 Refuse a call
When there is a call comes in, press <Refuse> to refuse the call.
5.5
Operation during the call
5.5.1 Audio/Video Operation
There are several ways to operate the audio/video conversation:
Shift between audio and video: During a call, press <F1> to shift between video call and audio
call;
24
VoIPon www.voipon.co.uk [email protected] Tel: +44 (0)1245 808195 Fax: +44 (0)1245 808299
Close local video: press <F4> to close the local video, press this button again to reopen the
local video;
5.5.2 Mute
During a conversation, press <
>, users can hear the voice from the other side,
but the other side can not. Press <
> again to resume the conversation.
5.5.3 Call Hold
During a conversation, press <OK> button, the call will be put on hold; press it
again to resume the conversation.
5.6
Call List
Call List is grouped by All Call, Dialed, Missed and Received calls. The All Call
group can store up to 300 records, while the others can store up to 100 records.
5.6.1
Enter the Call List page
In Desktop status, press <F1> to enter the Call List page.
Note:
The Call List is ordered by time.
5.6.2 Check the details
1. In Call List page, press Left/Right button to choose the group;
2. Press Up/Down button to check the details.
5.6.3 Call Back
Please refer to “5.4.2.4” for more details.
5.6.4 Save to Contact
Save the phone numbers in the Call List to Contact by the following steps:
25
VoIPon www.voipon.co.uk [email protected] Tel: +44 (0)1245 808195 Fax: +44 (0)1245 808299
1. In the Call List page, press Up/Down to choose the number;
2. Press <Ok> to enter the edit page, please refer to “5.3.3 Add Contact” for
more details.
5.6.5 Delete the Record
Delete the record from the Call List by the following steps:
1. In the Call List page, press Up/Down button to choose a record;
2. Press <F3> to delete the record;
3. “Delete Records” Dialog will pop up, by the Up/Down button, users can
choose to “Delete the record of ××” or “Delete all records”. Press <OK> to
confirm the changes, press <ESC> to cancel.
5.7
E-Photo
In the Desktop status, press <F2> to enter the E-Photo frame, press <Exit>to
exit.
Note:
If there is USB flash device plugged into the USB Port, when <OK> button is pressed users review
the pictures stored in the USB flash device; Or users will review pictures stored in the device.
5.7.1
Play
In the “E-Photo” page, press Left/Right to choose the “Play” option, press <OK>,
the screen will auto-play the photos until you click any key to exit.
5.7.2
Manage
1.
Press Left/Right to choose <Manage>, press <OK> to get into the page;
2.
Press <Up>/ <Down> to review the pictures.
<Preview>:To preview the selected picture.
<Delete>:To delete the selected picture. Click this button, it will pop up a warning frame,
26
VoIPon www.voipon.co.uk [email protected] Tel: +44 (0)1245 808195 Fax: +44 (0)1245 808299
asking whether to delete it. Click <OK> to delete, click <Esc> to cancel and return to the
e-Photo Manage frame.
<USB >:To import pictures from USB storage equipment.
<Exit>:Exit from e-Photo Manager frame,return to E-Photo frame. If there is USB flash
device plugged into the USB Port, the pictures stored in the USB flash device will be listed
when <F3> button is pressed; Press <F1> to review, <F2> to import, <F3> to delete.
5.8
Web Browser
Operate the Web Browser by the following steps:
1. In Desktop status, press <F4>to enter the “Information” page;
2. Press Left/Right button to choose the websites;
3. Press <OK> to enter the operate page.
5.9 Media Player
The device supports encoder is H.264, MPEG-4, and the media files in MP3, MP4
or AVI format, please follow the steps:
1. Save the media files in the root of the USB flash device, and then plug the
USB device into the USB port, after being detected, a small icon
will
showed in the upper right corner;
2. Press<F3> to enter the “Menu” page;
3. Press Left/Right to choose the “Player” option, press <OK>, and Up/Down to
choose the media file to play;
4
Press <F1> to play, <F2> to stop, Left/Right to adjust the volume. During
the play, press <F1> to shift between Pause and Play.
5.10 Message
View the messages by the following steps:
1. In Desktop status, press <F3>to enter the Menu page.
2.
Press Left/Right to choose the “Message” option, press <OK> to enter the
Inbox page.
27
VoIPon www.voipon.co.uk [email protected] Tel: +44 (0)1245 808195 Fax: +44 (0)1245 808299
3.
Press Up/Down to view the messages in the inbox.
Click <Details> to view the detail of the selected message.
Click <Delete> to delete the selected message.
Click < Delete All>to delete all the messages in the inbox.
Click <Exit> to return to “Menu” page.
28
VoIPon www.voipon.co.uk [email protected] Tel: +44 (0)1245 808195 Fax: +44 (0)1245 808299
6.
Phone Operation
6.1
Configuration
In Desktop status, click <Menu> and <Setting>to enter “Setting” page, showed
as Table 6-1.
Table 6-1
6.1.1 System Status
1. In “Setting” page, press Up/Down keys to select “System Status” option;
2. Press <OK> to enter the page where users can check the information about
Software Version, Hardware Version, MAC Address, Link Status, WAN Port
Type and IP Address.
●
Press <F1> to view the version detail.
●
Press <F2> to review the update log.
●
Press <Exit> to return to the “Setting” page.
29
VoIPon www.voipon.co.uk [email protected] Tel: +44 (0)1245 808195 Fax: +44 (0)1245 808299
6.1.2 Desktop Settings
Configure Desktop Settings by the following steps:
1. In the “Setting” page, press Up/Down button to choose “Desktop Settings”
option, press <OK> button to enter the configuration page;
2. The details of configuration:
(1) Press Up/Down button to choose the “Screen Saver” option;
(2) press <OK> button to pop up the pull-down menu;
(3) press Up/Down button to choose the time;
(4) Press <OK> to save the changes.
Note:
The setting of option “Sleep” and “Wallpaper” is the same as “Screen Saver”.
3. Press <F1> to save the changes, and get back to “Settings” page.
4. Press <F2> to get into “Wallpaper Manage” page, users can preview, delete,
and import the pictures. Please check 5.7.2 for more details.
6.1.3 Phone Settings
Phone Settings includes the following parameters:
Display Name: Device Name;
Language: English, Simplified Chinese, Turkish, Korean and Russian;
Output Mode: LCD and TV;
Output Style: NTSC and PAL. When the Output Mode is TV, this option is available;
Call Option: PSTN, Audio (IP) and Video (IP).
Local Video: Open or Close.
Configure the Phone Settings by the following steps:
30
VoIPon www.voipon.co.uk [email protected] Tel: +44 (0)1245 808195 Fax: +44 (0)1245 808299
1. In “Setting” page, press Up/Down button to choose “Phone Settings”; press
<OK> to enter;
Display Name: Press Up/Down button to choose and input “Display Name”.
Language: Press Up/Down button to choose “Language” option, press <OK> to pop up the
pull-down menu, press Up/Down to choose the language; press <OK> to confirm the change;
Call Option: Press Up/Down button to choose “Call Option”, press <OK> to pop up the
pull-down menu, choose audio or video call as default call mode;
2. Press <F1> button to save the changes and get back to the “Settings” page.
Note:
When the information of an incoming call is not recoded in the Contact List, its phone name and
number will show in the LCD.
6.1.4 Tones and Volume
Configure Tones and Volume parameters by the following steps:
1. In “Settings” page, press Up/Down button to choose “Tones and Volume”
option, press <OK> to enter;
2. The details of configuration:
Ring Tone: Press Up/Down button to choose the “Tone” option, press <OK> button to pop up
the pull-down menu, press Up/Down button to choose the ring tone; press <OK> to confirm the
selection;
Volume: press Up/Down button to choose “Volume” option, press Left/Right button to adjust
the volume;
3. Press <F2>to pre-listen the ring tone.
4. Press <F1>to save the changes, and get back to “Settings” page.
6.1.5
Date and Time
Configure Date and Time by the following steps: 、
31
VoIPon www.voipon.co.uk [email protected] Tel: +44 (0)1245 808195 Fax: +44 (0)1245 808299
1. In “Settings” page, press Up/Down button to choose “Date and Time” option,
press <OK> button to enter the configuration page.
2. Configurations:
(1) Press Up/Down button to choose the “Date and Time” option;
(2) Press <OK> button to pop up the pull-down menu, press Up/Down to
choose the Time Zone; Press <OK> button to save the changes; users
can press Left/Right button choose the option directly;
3. Press <F1> to save the changes, and get back to “Settings” page.
Note:
You can follow the above steps to set Date Format and Time Format. Time Server?
6.1.6
Alarm
1. In “Setting” page, press Up/Down button to choose “Alarm” option, press
<OK> to enter configuration page;
2. Press <OK> to enable alarm;
3. Press Up/Down button to choose and set the time;
4. Press Up/Down button to choose the “Tone” option, press <OK> button to
pop up the pull-down menu, press Up/Down to choose the prefer ring tone;
Press <OK> button to save the changes; Users can press Left/Right button
choose the option directly;
5. Press Up/Down button to choose “Volume” option, press Left/Right button to
adjust the volume.
6. Press <F1> to save the changes, and get back to “Settings” page.
6.1.7
Security
Configure Security by the following steps:
32
VoIPon www.voipon.co.uk [email protected] Tel: +44 (0)1245 808195 Fax: +44 (0)1245 808299
1. In “Setting” page, press Up/Down button to choose “Security” option;
2. Press <OK> to enter configuration page;
6.1.7.1 Change Web Password
Attention:
This page is only able to change the password of “User”, the default password is user.
Change the Web Password by the following steps:
1. In “Security” page, press Up/Down button to choose “Web Password” option,
press <OK> to enter configuration page;
2. Press Up/Down button, choose and fill in the “Old Password”, “New Password”
and “Re-enter” blacks.
3. Press <F1> to save the changes, and get back to “Security” page.
6.1.7.2 Change Telnet Password
Change the Telnet Password by the following steps:
1. In “Security” page, press Up/Down button to choose “Telnet Password”
option, press <OK> to enter configuration page;
2. Press Up/Down button, choose and fill in the “New Password” and “Re-enter”
blacks.
3. Press <F1>to save the changes, and get back to “Security” page.
6.1.7.3 Change Admin Password
Attention:
The default password of Advanced is 123.
33
VoIPon www.voipon.co.uk [email protected] Tel: +44 (0)1245 808195 Fax: +44 (0)1245 808299
Change the Advanced Password by the following steps:
1. In “Security” page, press Up/Down button to choose “Advanced Password”
option, press <OK> to enter configuration page;
2. Press Up/Down button, choose and fill in the “Old Password”, “New Password”
and “Re-enter” blacks.
3. Press <F1> to save the change, and get back to “Security” page.
6.1.8 Call Setting
Configure Call setting by the following steps:
1. In “Setting” page, press Up/Down button to choose “Call Setting” option;
2. Press <OK> to enter configuration page;
6.1.8.1 Speed Dial
Instruction about Speed Dial:
1. Set speed dial for the phone numbers which are called out in frequency, when
the speed dial number dialed meets the rule of entry, the corresponding
phone number will be sent out.
2. For example, set “1”as the speed dial number of “114”, when “1”is dialed,
“114”will be sent out.
Configure Speed Dial by the following steps:
1. In “Setting” page, press Up/Down button to choose “Call Setting” option,
press <OK> to enter configuration page;
2.
Press Up/Down button to choose “Speed Dial” option, press <OK> to enter;
3. Press <F1> to add speed dial number, it will pop up the “Add Dial” frame,
enter “Prefix” and “Replace” parameters, and press <F1> or click <OK> to
save the changes;
4. In the speed dial list, press Up/Down button to choose the Speed Dial record,
press <F2> to edit the record, <F3> to delete the record, <F4> to return to
the call setting page.
34
VoIPon www.voipon.co.uk [email protected] Tel: +44 (0)1245 808195 Fax: +44 (0)1245 808299
6.1.8.2
Dial Plan
Instruction about Dial Plan:
1. Set the Dial Plan in the same way of making a long-distance call; if the
number dialed matches the entry rules, it will add the configured
corresponding numbers in front and dial out automatically.
2. For example, set the “Prefix” as 010, “Replace” as 65, all the number which
starts with 65 will be added the prefix 010.
Configure Speed Dial by the following steps:
1. In “Setting” page, press Up/Down button to choose “Call Setting” option,
press <OK> to enter configuration page;
2.
Press Up/Down button to choose “Dial Plan” option, press <OK> to enter;
3. Press <F1> to add speed dial number, it will pop up the “Add Dial” frame,
enter “Prefix” and “Replace” parameters, and press <F1> or click <OK> to
save the changes;
4. In the dial plan list, press Up/Down button to choose the dial plan record,
press <F2> to edit the record, press <F3> to delete the record, and press
<F4> to return to the call setting page.
6.1.8.3 Auto Answer
Configure Auto Answer by the following steps:
1.In “Call Setting” page, press Up/Down button to choose “Auto Answer” option,
press <OK> to enter configuration page;
2. Press <OK> to enable/disable auto answer; if auto answer is enabled, users
can choose different type. Press <OK> to pop up the pull-down menu, choose
the type by pressing Up/Down button, press <OK> to confirm the change.
3. Press <F1> to save and get to the “Setting” page.
35
VoIPon www.voipon.co.uk [email protected] Tel: +44 (0)1245 808195 Fax: +44 (0)1245 808299
Attention:
If the Auto Answer is enabled by the called party, when a new call is coming, the device will auto
answer the call after the specific period which is set in the type.
6.1.8.4 Call Waiting
Configure Call Waiting by the following steps:
1. In “Call Setting” page, press Up/Down button to choose “Call Waiting” option,
press <OK> to enter configuration page;
2. Press <OK> to enable/disable Call Waiting function;
3. Press <F1> to save and get back to the “Call Setting” page.
Attention:
If the Call Waiting is enabled by the called party, when a new call is coming in, the device will
sound a “Du…”, then the LCD indicates the new coming call, the caller will hear the ring back tone.
6.1.8.5 Forward Setting
Configure call forward by the following steps:
1. In “Call Setting” page, press Up/Down button to choose “Forward Setting”
option, press <OK> to enter configuration page;
2. Press Up/Down button to choose a forward type: Disable, Always Forward,
Busy Forward or No Answer Forward.
3.
If you choose “No Answer Forward”, you should also set the no answer times.
4. Press <F1> to save and get back to the “Setting” page.
6.2
Advanced Settings
In the Desktop status, press <F3> to get into the “Menu” page,
<OK> to get into “Setting” page. Press
then press
<OK> to pop up the “Admin Password”
36
VoIPon www.voipon.co.uk [email protected] Tel: +44 (0)1245 808195 Fax: +44 (0)1245 808299
frame, enter the password and press <OK> to get into the “Advanced” page,
shown as Picture 6.2.
Table 6-2
6.2.1 Account Setting
Configure Account Setting by the following steps:
1. In “Advanced” page, press Up/Down button to choose “Account Setting”
option, press <OK> to enter configuration page;
2. Press <OK> to enable line;
3. Press Up/Down to choose and fill in different options.
Attention:
Please contact your ISP for exact information.
6.2.2
WAN(Internet Port)
Configure WAN by the following steps:
1. In “Advanced” page, press Up/Down button to choose “WAN” option, press
37
VoIPon www.voipon.co.uk [email protected] Tel: +44 (0)1245 808195 Fax: +44 (0)1245 808299
<OK> to enter configuration page;
2. Press <OK> to pop up the pull-down menu, press Up/Down button to choose
the proper IP assignment type, press <OK> to save the changes.
3. Configure the corresponding parameters according to the different IP
assignment methods.
Choose “DHCP”. Press <F1> to save the changes;
Choose “PPPoE”, press Up/Down button to configure the corresponding “User
Name” and “Password”. Press <F1> to save the changes.
Choose “Static IP”, press Up/Down button to choose and configure “IP
Address”~“DNS2”, press <F1> to save the changes.
6.2.3 LAN(PC Port)
There are two methods: Bridge and Router.
Configure LAN by the following steps:
1. In “Advanced” page, press Up/Down button to choose “LAN” option, press
<OK> to enter configuration page;
2. Press Up/Down button to choose and configure the relating information,
press <OK> to save the changes.
3. Press <F1> to save the changes and get back to the previous page.
6.2.4 Servers
Configure Servers by the following steps:
1. In “Advanced” page, press Up/Down button to choose “Servers” option, press
<OK> to enter configuration page;
2. Configure the “Info Server”, “Business Server”, “File Server” and “IPTV
Server” options. Please contact your ISP for exact information.
3. Press <F1> to save the changes and get back to the previous page.
38
VoIPon www.voipon.co.uk [email protected] Tel: +44 (0)1245 808195 Fax: +44 (0)1245 808299
6.2.5 Browser
Configure Browser by the following steps:
1. In “Advanced” page, press Up/Down button to choose “Brower” option, press
<OK> to enter configuration page;
2. Enter the website address as “Homepage”;
3. Press <F1> to save the changes and get back to the previous page.
4.
In the “Menu” page choose “Browser”, press <OK> to get into the homepage
set before.
6.2.6 Call Settings
6.2.6.1 Bandwidth and Frame Rate
Configure Bandwidth by the following steps:
1. In “Call Settings” page, press Up/Down button to choose “Bandwidth and
Frame Rate” option, press <OK> to enter configuration page;
2. Press Up/Down button to choose “Bandwidth” option , press <OK> to pop up
the pull-down menu, choose the proper bandwidth, press <OK> to confirm
the change.
3.
Follow the above steps to set the “Frame Rate” option.
4. Press <F1> to save the changes and get back to the previous page.
6.2.6.2 Audio Codes Priority
The device supports 7 kinds of voice codecs, when there are more than one codec
chosen, the priorities will be ordered by descending order.
Configure Audio by the following steps:
1. In “Call Settings” page, press Up/Down button to choose “Audio Codecs
Priority” option, press <OK> to enter configuration page;
2. In the Disable/Enable Codecs List, choose the codecs by Left/Right button,
press <OK> to disable/enable the chosen codec.
39
VoIPon www.voipon.co.uk [email protected] Tel: +44 (0)1245 808195 Fax: +44 (0)1245 808299
3.
In the Enable Codecs List, press Up/Down button to choose the codec, and
then press <F2>and <F3> to make the priority higher or lower respectively.
4. Press <F1> to save the changes and get back to the previous page.
6.2.6.3 Video Codes Priority
VP-2009 supports 3 kinds of video codecs, when there are more than one codec
chosen, the priorities will be ordered by descending order.
Configure Video by the following steps:
1. In “Call Settings” page, press Up/Down button to choose “Video Codecs
Priority” option, press <OK> to enter configuration page;
2. In the Disable/Enable Codecs List, choose the codecs by Left/Right button,
press <OK> to disable/enable the chosen codec.
3.
In the Enable Codecs List, press Up/Down button to choose the codec, and
then press <F2> and <F3> to make the priority higher or lower respectively.
4. Press <F1> to save the changes and get back to the previous page.
6.2.7 Update Application
VP-2009 supports 3 update methods: manual update, Boot Update and Time
update.
Configure Update by the following steps:
1. In “Advanced” page, press Up/Down button to choose “Update Application”
option, press <OK> to enter configuration page;
2. Press Up/Down button to choose the proper option, press <OK> to confirm
the change.
3. Press Up/Down button to choose and fill in “Update Server”.
4. Press <F1> to save the changes, press <F2> to update immediately.
40
VoIPon www.voipon.co.uk [email protected] Tel: +44 (0)1245 808195 Fax: +44 (0)1245 808299
6.2.8 Style Setting
Users can change the color of background and label in the Desktop, Configure the
Style Setting by the following steps:
1. In “Advanced” page, press Up/Down button to choose “Style Setting” option,
press <OK> to enter configuration page;
2. Configure the RGB parameters, and then press <OK> to confirm the changes,
press <ESC> to cancel.
3.
Get back to the Desktop to check the changes.
6.2.9 Reset to Factory
Configure Reset to Factory by the following steps:
1. In “Advanced” page, press Up/Down button to choose “Reset to Factory”
option, press <OK> to enter configuration page.
2. It will pop up a warning frame asking you whether to reset to factory settings.
Click <OK> to confirm the changes, click <ESC> to cancel.
6.2.10 Update Configuration Files
Please check the “6.2.7 Update Application”.
41
VoIPon www.voipon.co.uk [email protected] Tel: +44 (0)1245 808195 Fax: +44 (0)1245 808299
7.
Configuration
7.1
Log in the Webpage
Configure Reset to Factory by the following steps:
1. Please connect VP-2009 and PC to the same router/switch, or connect PC to
VP-2009’s PC port. In the VP-2009’s Advanced Setting-> LAN, configure LAN
port as Bridge mode.
2. Configure PC’s IP address assignment method as “DHCP”, and restart PC.
3. Open the browser in PC, enter VP-2009’s IP address, for example
http://192.168.5.92, press Enter button, the log in dialog will showed as
Picture 7-1.
Picture 7-1
4. Enter user name and password, and press <OK> button.
The account can be admin or user.
The user name and password of admin are both admin by default.
The user name and password of user are both user by default.
42
VoIPon www.voipon.co.uk [email protected] Tel: +44 (0)1245 808195 Fax: +44 (0)1245 808299
7.2
7.2.1
Network Configuration
WAN Configuration
In the webpage, select Network->WAN Port, showed as Picture 7-2.
Picture 7-2
Please check Table 7-1 for more information about WAN configuration instruction.
Parameters
Instruction
Obtain an IP Address Automatically
The phone will get the IP address from DHCP Server
Static
The users need to configure the IP address, gateway,
IP
Address
(Use the Following IP Address)
submask, DNS, etc.
xDSL(PPPoE)
the users need to configure the user name and password.
Table 7-1
WAN Parameters Instruction
43
VoIPon www.voipon.co.uk [email protected] Tel: +44 (0)1245 808195 Fax: +44 (0)1245 808299
7.2.2
LAN Configuration
In the webpage, select Network->PC port LAN, showed as Picture 7-3
Picture 7-3
Please check Table 7-2 for more information about LAN configuration instruction.
Parameters
Instruction
Bridge
VP-2009 will be used as a switch
Router
VP-2009 will be used as a router
LAN IP Address
Users need to configure the LAN IP address
the device connect to LAN Port will automatically get
DHCP Server
the IP address, and the range is between Start IP
Address and End IP Address
Table 7-2
44
VoIPon www.voipon.co.uk [email protected] Tel: +44 (0)1245 808195 Fax: +44 (0)1245 808299
7.3
7.3.1
Account
Account Configuration
In the webpage, select Account->Account, showed as Picture 7-4.
Picture 7-4
Please check Table 7-3 for more information about Account configuration.
Parameters
Instruction
Display Name
Showed as Caller ID
User Name
Provided by users’ SP
Register Name
ID verify when registering
Password
The password for the account
SIP Server
SIP server’s IP address or real domain name, provided by ISP.
Port
the port of SIP Server, 5060 by default
Enable Outbound Proxy Server
Please consult SP whether the Outbound Server is enable or not
Outbound Proxy Server
Outbound server’s IP address or real domain name, provided by ISP.
Port
the port of Outbound Server, 5060 by default
NAT Traversal
Please consult SP whether the NAT Server is enable or not
Table 7-3
45
VoIPon www.voipon.co.uk [email protected] Tel: +44 (0)1245 808195 Fax: +44 (0)1245 808299
7.3.2
Voice Configuration
In the webpage, select Account->Voice, showed as Picture 7-5.
Picture 7-5
Please check Table 7-4 for more information about Voice configuration.
Parameters
Instruction
there are 7 voice codecs, press the Up/Down button to
Audio Codecs
choose the right priority.
there are 3 video codecs, press the Up/Down button to
Video Codecs
choose the right priority.
DTMF Type
there are 3 types, and Info DTMF has 3 types.
DTMF Payload
RTP payload of DTMF
Table 7-4
46
VoIPon www.voipon.co.uk [email protected] Tel: +44 (0)1245 808195 Fax: +44 (0)1245 808299
7.3.3
Advanced
In the webpage, select Account->Advanced, showed as Picture 7-6.
\
Picture 7-6
Please check Table 7-5 for more information about Advanced configuration
instruction.
Parameters
UDP Keep-alive Message
UDP Keep-alive Interval
Instruction
The default mode is Enable
the time intervals for sending the package to SIP Server,
30 seconds by default
Login Expire
the time intervals of registration , 2000 seconds by default
Local SIP Port
9060 seconds by default
Local RTP Port
RPort
11780 seconds by default
when it is enable, the proxy server is allowed to send
back an address and port
STUN Server
Please consult the SP for STUN Server and Port.
Voice QoS
There are 5 options
SIP QoS
There are 5 options
Table 7-5
47
VoIPon www.voipon.co.uk [email protected] Tel: +44 (0)1245 808195 Fax: +44 (0)1245 808299
7.4
Status
Users can enter “Status” page to check the corresponding network and account
information. In the webpage, select Status, shown as Picture 7-7.
Picture 7-7
7.5
Phone Configuration
In the webpage, select Phone, showed as Picture 7-8.User can configure the Time
parameters in this page.
Picture 7-8
48
VoIPon www.voipon.co.uk [email protected] Tel: +44 (0)1245 808195 Fax: +44 (0)1245 808299
7.6
Contact Configuration
In the webpage, select Contact, showed as Picture 7-9. Users can import and
export the contact information in Card format.
Picture 7-9
7.7
Upgrade Configuration
In the webpage, select Upgrade, showed as Picture 7-10. Users can upgrade the
firmware directly from PC.
Picture 7-10
49
VoIPon www.voipon.co.uk [email protected] Tel: +44 (0)1245 808195 Fax: +44 (0)1245 808299
7.8
Security Configuration
In the webpage, select Security, showed as Picture 7-11.
Note:
When users login the webpage by Admin account, they can change the password
of Admin account.
when users login the webpage by User account, they can only change the
password of User account.
Picture 7-11
50
VoIPon www.voipon.co.uk [email protected] Tel: +44 (0)1245 808195 Fax: +44 (0)1245 808299
FAQ
Abnormal phenomena
Potential Reason
Solution
the internet cable doesn’t plug into the
Connect the cable according to
Internet port
Picture 4.2.1
if the WAN port’s type is DHCP, the server
Network Link Status
showed as unavailable
Contact with the network
has been shut down, or there is no available
administrator
IP address.
if the WAN port’s type is PPPoE, the user
Contact with the SP
name and password may be wrong
Confirm the user name and password
Can not make a phone call
fail to register
of the account provided by SP are
right
no ringtone when there is an
the volume is turned off or to the lowest.
Turn up the volume
The volume is too low
Turn up the volume
incoming call
The volume is very low
during the conversation
Handset isn’t connected to the device in the
no voice from handset
Connect again by following the menu
right way
blank screen
the device is in Sleep status
Press any keys to active the screen
The voltage is not stable
Replace with a stable power adapter
Loose of Power plug
Re-plug the power
Wrong port
Connect to the right port
when the AV out mode is TV,
there is no video
Restart the device or contact the
Others
service hotline
51
VoIPon www.voipon.co.uk [email protected] Tel: +44 (0)1245 808195 Fax: +44 (0)1245 808299