1
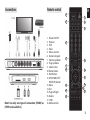
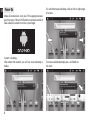
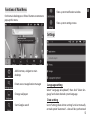
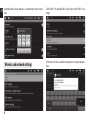
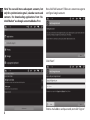
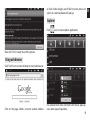
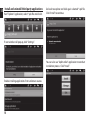
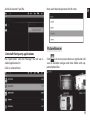
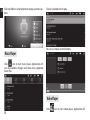
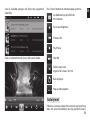
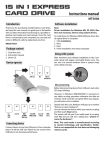
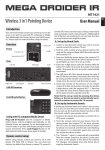
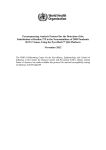
ENGAGE HQ PRO
Multimedia Fun Center
MT7001
User manual
EN
Introduction .................................................................................2
Connections .................................................................................3
Remote control ...........................................................................3
Power On .......................................................................................4
Functions of Main Menu ..........................................................5
Settings ..........................................................................................5
Language setting .......................................................................5
Date setting ..................................................................................5
Wireless and network settings...............................................6
Ethernet settings ........................................................................7
Accounts and sync .....................................................................7
Using web browser ....................................................................9
Explorer ..........................................................................................9
Install and uninstall third-party applications .............. 10
Uninstall third-party applications ..................................... 11
Picture Browser ........................................................................ 11
Music Player............................................................................... 12
Video Player ............................................................................... 12
Factory reset .............................................................................. 13
Power Off .................................................................................... 14
Compatible accessories ........................................................ 14
USB mouse/keyboard. ........................................................... 14
USB DVB-T tuner ...................................................................... 15
2
Introduction
Thank you for buying a new multimedia fun center
device. MT7001 will expand capabilities of every TV
set: internet access, playing movies, viewing pictures,
listening music, playing games. Device is based on
Android operating system, it can be controlled via remote control or USB keyboard or mouse – please visit
www.media-tech.eu to check latest accessories designed for this device.
Connections
Remote control
EN
3
1
2
4
5
Note! Use only one type of connection: [HDMI] or
[YPbPr and audio R/L].
1. Power ON/OFF
2. Browser
3. Shift
4. Mute
5. Mouse control
6. Numeric keypad
7. Volume up/down
8. Page up/down
9. Zoom in/out
10. Home button
11. Notification
12. UP/DOWN/LEFT/
RIGHT/OK button
13. Menu
14. Exit
15. Page left/right
16. Delete
17. CVBS
18. Media control
6
7
8
9
10
11
12
14
13
16
15
17
18
3
EN Power On
Make all connections, turn your TV to appropriate output, then press “Power ON” button on remote control. It
takes about 8 seconds to show system logo:
System is loading…
After about 50 seconds you will see main desktop as
below:
4
To switch between desktops click at left or right edge
of screen:
To show available desktops press and hold on
this icon:
Functions of Main Menu
Show system notification window
On the main desktop press “Menu” button on remote to
pop-up this menu:
Show system settings menu
Settings
Add shortcuts, widgets to main
desktop
Direct access to application manager
Change wallpaper
Language setting
Select “Language & keyboard”, then click “Select language” and select desired system language.
Date setting
Start Google search
Go to “Settings/Date & time settings” and set manually
or mark option “Automatic” – date will be synchronized
5
EN
EN
automatically when device is connected to the internet.
Wireless and network settings
6
Click “Wi-Fi” to enable Wi-Fi card, next click “Wi-Fi settings”.
Click one of the available networks to make connection.
Enter password provided by your ISP operator.
Click “Connect”.
Ethernet settings
Click “Ethernet” if you want to use this interface (automatic configuration is enabled by default).
If you want to enter IP address manually click “Static IP
Settings” and enter parameters provided by your ISP
operator.
Accounts and sync
When connection is established you will see info under
Wi-Fi option “Connected to...”.
Click “Accounts&sync” to configure Google account. It
is required in order to use e-mail or download applications from “Android Market”.
7
EN
EN
Note! You can add more subsequent accounts, but
only for synchronization gmail, calendar events and
contacts. For downloading applications from “Android Market” use Google account added as first.
Now click “Add account”. Follow on-screen messages to
configure Google account.
Click “Next”.
Enter e-mail address and password, next click “Sign in”.
8
or click inside Google search field to enter phrase to
search. A screen keyboard will pop-up.
Explorer
Click
icon to start explorer application.
Now click “Finish setup” to end this process.
Using web browser
Click “Earth” icon on main desktop to start web browser.
Click on the page address to enter website address
On selected item click and hold until menu pop-up,
now select type of operation.
9
EN
EN
Install and uninstall third-party applications
Run “Explorer” application, select *.apk file and click it.
Go back to explorer and click again selected *.apk file.
Click “Install” to continue.
If next window will pop-up, click “Settings”.
You can also use “ApkInstaller” application to conduct
installation process. Click “Install”.
Enable installing applications from unknown sources.
10
And click selected *.apk file.
Next select desired operation for this item.
EN
Picture Browser
Uninstall third-party applications
Run “ApkInstaller” and click “Manage”. You will see installed application list.
Click on selected item.
Click
icon to run picture browser. Application will
scan all available storages and show folder with supported photo files:
11
EN
Click and hold on selected picture to pop-up menu options.
Click on selected item to play.
You can use media control buttons.
Music Player
Click
icon to start music player. Application will
scan all available storages and show only supported
music files.
Video Player
Click
12
icon to start video player. Application will
scan all available storages and show only supported
video files.
Press “menu” button on remote to pop-up menu:
Set bookmark to play file from
this moment
Set screen brightness
Previous file
Play/Pause
Click on selected item to view in full screen mode.
Next file
Select screen size:
original, full screen, 16:9, 4:3
Back to player
Pop-up more options
Factory reset
If device is running slower than normal and restarting
does not solve the problem you may perform factory
13
EN
EN
reset. It is recommended to back up all user documents
before this procedure. If you want to automatically
restore application data, Wi-Fi passwords and Google
account settings enable “Back up my data” option and
“Automatic restore”.
Click “Factory data reset”.
Now click “Erase everything”. Device will power off.
Now power on manually, device will be restored to factory settings, wait until initial desktop will be displayed.
Power Off
Press “Power OFF” button on remote, a pop-up window
will appear. Select “Standby” if you want to hibernate
device or “Power OFF” to switch off.
Compatible accessories
USB mouse/keyboard.
Now click “Reset device”.
14
You can use compatible mouse and keyboard to operate comfortably. You only need to plug it to USB port.
You can find recommended device list at www.mediatech.eu.
USB DVB-T tuner
EN
Plug aerial to DVB-T tuner and plug to USB port. Start
“Hi TV” application to watch TV.
* Functions and technical specification of device are subject to
change without prior notice. For technical support please visit
www.media-tech.eu
15
EN
16