1
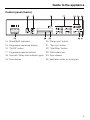
Operating instructions
for dishwashers
It is essential to read the operating and
installation instructions before
installing or using the machine,
to avoid the risk of accident or
damage to the machine.
Q
M.-Nr. 05 184 510
Contents
Contents
Contents . . . . . . . . . . . . . . . . . . . . . . . . . . . . . . . . . . . . . . . . . . . . . . . . . . . . . . . . . 2
Guide to the appliance. . . . . . . . . . . . . . . . . . . . . . . . . . . . . . . . . . . . . . . . . . . . . . 4
View of the machine . . . . . . . . . . . . . . . . . . . . . . . . . . . . . . . . . . . . . . . . . . . . . . . . . 4
Control panel (fascia). . . . . . . . . . . . . . . . . . . . . . . . . . . . . . . . . . . . . . . . . . . . . . . . 5
Warning and safety instructions. . . . . . . . . . . . . . . . . . . . . . . . . . . . . . . . . . . . . . 6
Caring for the environment . . . . . . . . . . . . . . . . . . . . . . . . . . . . . . . . . . . . . . . . . 10
Disposal of the packing material . . . . . . . . . . . . . . . . . . . . . . . . . . . . . . . . . . . . . . 10
Disposal of your old appliance . . . . . . . . . . . . . . . . . . . . . . . . . . . . . . . . . . . . . . . 10
Energy saving washing . . . . . . . . . . . . . . . . . . . . . . . . . . . . . . . . . . . . . . . . . . . . . 10
Before using for the first time . . . . . . . . . . . . . . . . . . . . . . . . . . . . . . . . . . . . . . 11
Before using the machine for the first time you require . . . . . . . . . . . . . . . . . . . . . 11
To open the door . . . . . . . . . . . . . . . . . . . . . . . . . . . . . . . . . . . . . . . . . . . . . . . . . . 12
To close the door . . . . . . . . . . . . . . . . . . . . . . . . . . . . . . . . . . . . . . . . . . . . . . . . . . 12
Child safety lock. . . . . . . . . . . . . . . . . . . . . . . . . . . . . . . . . . . . . . . . . . . . . . . . . . . 12
Water softener . . . . . . . . . . . . . . . . . . . . . . . . . . . . . . . . . . . . . . . . . . . . . . . . . . . . 13
Programming and setting the water hardness level . . . . . . . . . . . . . . . . . . . . . . . 14
Programming and changing the water hardness level . . . . . . . . . . . . . . . . . . . 14
Setting the water hardness level selector in the wash cabinet . . . . . . . . . . . . . 15
Filling the salt reservoir . . . . . . . . . . . . . . . . . . . . . . . . . . . . . . . . . . . . . . . . . . . . . 16
Salt indicator . . . . . . . . . . . . . . . . . . . . . . . . . . . . . . . . . . . . . . . . . . . . . . . . . . . . . 17
Rinse aid . . . . . . . . . . . . . . . . . . . . . . . . . . . . . . . . . . . . . . . . . . . . . . . . . . . . . . . . 18
Adding rinse aid. . . . . . . . . . . . . . . . . . . . . . . . . . . . . . . . . . . . . . . . . . . . . . . . . . . 18
Rinse aid indicator . . . . . . . . . . . . . . . . . . . . . . . . . . . . . . . . . . . . . . . . . . . . . . . . . 19
Setting the rinse aid dosage . . . . . . . . . . . . . . . . . . . . . . . . . . . . . . . . . . . . . . . . . 20
Loading the dishwasher . . . . . . . . . . . . . . . . . . . . . . . . . . . . . . . . . . . . . . . . . . . 21
Loading examples . . . . . . . . . . . . . . . . . . . . . . . . . . . . . . . . . . . . . . . . . . . . . . . . . 22
Upper basket . . . . . . . . . . . . . . . . . . . . . . . . . . . . . . . . . . . . . . . . . . . . . . . . . . 22
Flap up rack . . . . . . . . . . . . . . . . . . . . . . . . . . . . . . . . . . . . . . . . . . . . . . . . . . . 23
Positioning rail. . . . . . . . . . . . . . . . . . . . . . . . . . . . . . . . . . . . . . . . . . . . . . . . . . 23
Adjusting the upper basket . . . . . . . . . . . . . . . . . . . . . . . . . . . . . . . . . . . . . . . 24
Lower basket . . . . . . . . . . . . . . . . . . . . . . . . . . . . . . . . . . . . . . . . . . . . . . . . . . 25
Bottle holder . . . . . . . . . . . . . . . . . . . . . . . . . . . . . . . . . . . . . . . . . . . . . . . . . . . 26
Cutlery. . . . . . . . . . . . . . . . . . . . . . . . . . . . . . . . . . . . . . . . . . . . . . . . . . . . . . . . 26
Items not suitable for dishwashers. . . . . . . . . . . . . . . . . . . . . . . . . . . . . . . . . . . . . 29
2
Contents
Operating the dishwasher . . . . . . . . . . . . . . . . . . . . . . . . . . . . . . . . . . . . . . . . .
Adding detergent . . . . . . . . . . . . . . . . . . . . . . . . . . . . . . . . . . . . . . . . . . . . . . . . .
Programme selection . . . . . . . . . . . . . . . . . . . . . . . . . . . . . . . . . . . . . . . . . . . . . .
Switching on . . . . . . . . . . . . . . . . . . . . . . . . . . . . . . . . . . . . . . . . . . . . . . . . . . . . .
Starting a programme . . . . . . . . . . . . . . . . . . . . . . . . . . . . . . . . . . . . . . . . . . . . . .
Programme sequence indicator lights . . . . . . . . . . . . . . . . . . . . . . . . . . . . . . . . . .
Time display . . . . . . . . . . . . . . . . . . . . . . . . . . . . . . . . . . . . . . . . . . . . . . . . . . . . . .
At the end of a programme . . . . . . . . . . . . . . . . . . . . . . . . . . . . . . . . . . . . . . . . . .
Switching off. . . . . . . . . . . . . . . . . . . . . . . . . . . . . . . . . . . . . . . . . . . . . . . . . . . . . .
Interrupting a programme . . . . . . . . . . . . . . . . . . . . . . . . . . . . . . . . . . . . . . . . . . .
Changing a programme. . . . . . . . . . . . . . . . . . . . . . . . . . . . . . . . . . . . . . . . . . . . .
Additional functions . . . . . . . . . . . . . . . . . . . . . . . . . . . . . . . . . . . . . . . . . . . . . . . .
“Top Solo” . . . . . . . . . . . . . . . . . . . . . . . . . . . . . . . . . . . . . . . . . . . . . . . . . . . . .
Delay start . . . . . . . . . . . . . . . . . . . . . . . . . . . . . . . . . . . . . . . . . . . . . . . . . . . . .
Unloading the dishwasher . . . . . . . . . . . . . . . . . . . . . . . . . . . . . . . . . . . . . . . . . .
Cleaning and care . . . . . . . . . . . . . . . . . . . . . . . . . . . . . . . . . . . . . . . . . . . . . . . .
“Check Filter” indicator light. . . . . . . . . . . . . . . . . . . . . . . . . . . . . . . . . . . . . . . . . .
Cleaning the filters in the wash cabinet . . . . . . . . . . . . . . . . . . . . . . . . . . . . . . . .
Cleaning the spray arms . . . . . . . . . . . . . . . . . . . . . . . . . . . . . . . . . . . . . . . . . . . .
Cleaning the wash cabinet . . . . . . . . . . . . . . . . . . . . . . . . . . . . . . . . . . . . . . . . . .
Cleaning the door and the door seal . . . . . . . . . . . . . . . . . . . . . . . . . . . . . . . . . .
Cleaning the control panel (fascia) . . . . . . . . . . . . . . . . . . . . . . . . . . . . . . . . . . . .
Cleaning the door panel. . . . . . . . . . . . . . . . . . . . . . . . . . . . . . . . . . . . . . . . . . . . .
Problem solving guide . . . . . . . . . . . . . . . . . . . . . . . . . . . . . . . . . . . . . . . . . . . .
Solving problems . . . . . . . . . . . . . . . . . . . . . . . . . . . . . . . . . . . . . . . . . . . . . . . . .
Cleaning the water inlet filter . . . . . . . . . . . . . . . . . . . . . . . . . . . . . . . . . . . . . . . . .
Cleaning the drain pump and non-return valve . . . . . . . . . . . . . . . . . . . . . . . . . .
After sales service . . . . . . . . . . . . . . . . . . . . . . . . . . . . . . . . . . . . . . . . . . . . . . .
Special accessories . . . . . . . . . . . . . . . . . . . . . . . . . . . . . . . . . . . . . . . . . . . . . .
Comparison tests . . . . . . . . . . . . . . . . . . . . . . . . . . . . . . . . . . . . . . . . . . . . . . . .
Transport. . . . . . . . . . . . . . . . . . . . . . . . . . . . . . . . . . . . . . . . . . . . . . . . . . . . . . . .
Programme chart . . . . . . . . . . . . . . . . . . . . . . . . . . . . . . . . . . . . . . . . . . . . . . . .
Technical data . . . . . . . . . . . . . . . . . . . . . . . . . . . . . . . . . . . . . . . . . . . . . . . . . . .
30
30
33
34
34
34
35
35
36
36
36
37
37
39
41
42
42
42
44
45
45
45
45
46
54
54
55
57
58
59
63
64
66
3
Guide to the appliance
Guide to the appliance
View of the machine
1 Upper spray arm (not visible)
8 Four height adjustable screw feet
2 Cutlery tray
(depending on model)
9 Filter combination
3 Upper basket
4 Water feed for middle
spray arm
11 Dual compartment detergent
dispenser
5 Middle spray arm
12 Rinse aid reservoir
(with dosage selector)
6 Water hardness selector
13 Data plate
7 Lower spray arm
4
10 Salt reservoir
Guide to the appliance
Control panel (fascia)
14 Check/Refill indicators
20 “Delay start” button
15 Programme sequence display
21 “Top solo” button
16 “On/Off” button
22 “Start/Stop” button
17 Programme selector buttons
23 Child safety lock
18 Time left / Delay start indicator lights
24 Door release
19 Time display
25 Ventilation outlet for drying fan
5
Warning and safety instructions
Warning and safety instructions
This appliance conforms to current
safety requirements. Inappropriate
use can however lead to personal
injury and damage to property.
Read the operating instructions
carefully before starting to use this
machine.This way you will avoid the
risk of accidents, and damage to
the machine.
Keep these instructions in a safe
place for reference, and pass them
on to any future user.
Appropriate usage
This dishwasher is intended exclusively for cleaning domestic crockery and cutlery in a domestic household. Do not use for purposes other
than those for which it was designed.
Any other applications may be dangerous.
The manufacturer cannot be held responsible for any damage caused by
improper use or for uses other than
those for which the appliance is intended.
Delivery
A damaged appliance is dangerous. It is therefore essential to
check packaging immediately and
examine the dishwasher for transport
damage. Under no circumstances
should you use a damaged machine.
Please ensure that the packaging
material is offered for recycling.
6
Installation
The dishwasher must be installed
and connected in compliance with
the installation instructions.
In order to ensure stability, builtunder and integrated dishwashers
must only be installed under a continuous worktop which is secured to adjacent cabinetry.
The dishwasher must not be installed under a hob unit. The high
temperatures sometimes dissipated by
radiant heat could damage the dishwasher.
Do not connect the dishwasher to
the mains supply until it has been
installed.
Check that the voltage, frequency
and fuse rating shown on the data
plate match the household mains supply.
The electrical safety of this appliance can only be guaranteed
when continuity is complete between
the appliance and an effective earthing
system. It is imperative that this basic
safety requirement is tested and where
there is any doubt the electrical system
in the house is checked out by a qualified electrician.
The manufacturer cannot be held responsible for damage caused by the
lack or inadequacy of an effective earthing system (electric shock, for
example).
Warning and safety instructions
A damaged appliance is dangerous. Switch off at the mains and
call your Miele supplier or the Miele Service Department.
With the “Waterproof system” the
plastic housing of the water inlet
connection contains an electrical component. The housing must therefore not
be dipped in water.
Never cut the water inlet hose,
even if it is too long. There are live
wires in this hose.
For safety reasons do not operate
this appliance on an extension
cable. (Danger of overheating).
Daily use
Do not use solvents in the dishwasher. Danger of explosion.
Water in the dishwasher must not
be used as drinking water.
Avoid inhalation of powder detergents. Dishwasher detergents contain irritant or corrosive ingredients. They
can cause burning in the mouth and
throat if swallowed, or inhibit breathing.
Consult a doctor immediately if detergent
has been swallowed or inhaled.
In an appliance with a cutlery basket (depending on model) cutlery
is cleaned and dried more efficiently if
placed in the basket with the handles
downwards. However, to avoid the risk
of injury place cutlery with sharp points
with the handles upwards.
Only use detergents formulated for
domestic dishwashers. Do not use
washing-up liquid.
Only use rinse aid formulated for
domestic dishwashers.
Only use special coarse grained
dishwasher salt for reactivation, as
other salts may contain insoluble additives which can impair the functioning
of the softener.
Plastic items which cannot withstand being washed in hot water,
such as disposable plastic containers,
or plastic cutlery and crockery should
not be cleaned in the dishwasher. The
high temperatures in the dishwasher
may cause them to melt or lose shape.
Do not sit or lean on the opened
door. This could cause the dishwasher to tip and be damaged and you
could get injured.
7
Warning and safety instructions
Take care on dishwashers with a
visible heater element
Do not touch the heating element
during or directly after the end of a
programme, you could burn yourself.
Some plastic items could melt or
catch fire if they were to come into
contact with the heating element. Therefore always place plastic items or any
other items which may not be completely heat resistant in the upper basket and ensure they cannot drop down
onto the heater element. Any items
which are too small to be lodged securely in the upper basket should not
be cleaned in the dishwasher.
Safety with children
Do not let small children play with
the dishwasher and its controls or
operate it. There is a danger that children playing might shut themselves in
the dishwasher.
Keep children away from detergents. Dishwasher detergents contain irritant or corrosive ingredients.
They can cause burning in the mouth
and throat if swallowed, or inhibit breathing. Consult a doctor immediately if
your child has swallowed or inhaled
detergent.
To avoid the danger of children
coming into contact with the dishwasher detergent:
Only add detergent just before starting
the programme and close the door, activating the child safety lock (depending
on model).
Keep children away from the dishwasher when the door is open. There
could be detergent residues in the appliance.
To ensure children do not come
into contact with detergent:
For models with the “Delay start” option
make sure the dispenser is dry before
adding detergent. Wipe dry if necessary. Detergent will clog if poured into a
damp dispenser and may not be thoroughly dispersed. If the door is open at
the end of a programme, children may
come into contact with this residue.
To avoid machine and material
damage
Do not fill the rinse aid reservoir
with powder or liquid detergent.
This will cause serious damage to the
reservoir.
Inadvertently filling the salt reservoir with powder or liquid dishwasher detergent always leads to
serious damage to the water softener.
Do not use commercial or industrial detergents as these may damage material and there is a risk of
severe chemical reaction.
8
Warning and safety instructions
The Miele Waterproof System offers protection from water damage,
provided the following conditions are
met:
– The dishwasher is correctly installed
and plumbed in.
– The dishwasher is properly maintained and parts are replaced where
it can be seen that this is necessary.
– The stopcock has been turned off
when the machine is not used for a
longer period of time (e.g. during
holidays).
Disposal of your old machine
When disposing of an old dishwasher first make it unusable. Disconnect, cut off the cable and the plug
from the cable.
Make the door lock inoperative (2 crossslotted screws), so that children cannot
accidentally shut themselves in. Make
appropriate arrangements for the safe
disposal of the appliance.
The manufacturer cannot be held responsible for any damage caused
by non-observance of the warning
and safety instructions.
In countries where there are areas
which may be subject to infestation
by cockroaches or other vermin,
pay particular attention to keeping
the appliance and its surroundings
in a clean condition at all times. Any
damage which may be caused by
cockroaches or other vermin will not
be covered by the appliance guarantee.
Repairs and maintenance
Repairs may only be carried out by
suitably qualified and competent
engineers in accordance with local and
national safety regulations. Repairs by
unqualified persons could be dangerous.
Always disconnect the appliance
from the electrical supply for maintenance work (switch off at wall socket
and remove the plug, or remove the
screw out fuse in countries where this
is applicable).
9
Caring for the environment
Caring for the environment
Disposal of the packing
material
The transport and protective packing
has been selected from materials
which are environmentally friendly for
disposal and can normally be recycled.
Rather than just throwing these materials away, please ensure they are offered for recycling.
Disposal of your old appliance
Old appliances contain materials which
can be recycled. Please contact your
local authorities or scrap merchant
about potential recycling schemes, before disposing of the appliance.
Ensure that the appliance presents no
danger to children while being stored
for disposal. See the appropriate section in the Warning and Safety instructions.
Energy saving washing
This dishwasher is exceptionally economical in its use of water and electricity.
You can make the most of your appliance by following these tips:
If your household water system is
suitable, this dishwasher can be connected to a hot water supply, for further economies.
Although all stages of the wash then
take place with hot water, savings are
made in:
– the use of primary energy
– costs
– programme running time.
If, however, your water is heated by
electricity we would still recommend
connection to cold water.
For most economical dishwashing
make full use of the baskets without
overloading the dishwasher.
Choose the programme to suit the
type of crockery being washed and
the degree of soiling.
The “Top Solo” function should only be
selected for washing very small loads
of crockery (see “Additional options”).
Select the Economy 45ºC programme for energy-saving dishwashing.
Use the correct amounts of detergent.
Use only 2/3 of the given dosage if
baskets are only half full.
10
Before using for the first time
Before using for the first time
Before using the machine for
the first time you require:
– approx. 2 litres of water,
– approx. 2 kg dishwasher reactivation
salt,
– domestic dishwasher detergent,
– rinse aid formulated for domestic
dishwashers.
Every dishwasher is tested at the
factory.
There will be residual water in the
machine from this test. It is not an
indication that the machine has
been previously used.
11
Before using for the first time
To open the door
Child safety lock
The yellow key for the child safety
lock is on one of the spikes at the
front of the upper basket.
Remove the key before switching
on the dishwasher and keep it in a
safe place away from the dishwasher.
Press the release catch inside the
door grip and pull forward.
If the door is opened during operation
all functions are automatically interrupted.
To close the door
Push the baskets right in. Lift the
door and push until it clicks into position.
If you wish to prevent children opening
the dishwasher door during operation
use the key provided to turn the lock to
the required setting.
Horizontal setting:
The door is locked.
Vertical setting:
The door can be opened.
12
Before using for the first time
Water softener
In order to achieve good cleaning results, the dishwasher needs to operate
with soft water. Hard water results in
the build-up of calcium deposits on
crockery and in the dishwasher. Hence
if mains water hardness is above 4 °d
(0.7 mmol/l), the water should be softened. This takes place automatically in
the integrated water softener.
– The water softener must be filled
with dishwasher salt for reactivation.
– The dishwasher must be programmed to correspond to the water
hardness in your area.
– Your local water authority will advise
you on the highest level of water
hardness in your area.
If the hardness of your local supply is
constantly lower than 4 °d ( 0.7 mmol/l),
you do not need to add dishwasher
salt. The dishwasher must, however,
still be programmed to correspond to
the water hardness level in your area.
Where the water hardness fluctuates
e.g. between 8 - 17 °d (1.4 - 3.1 mmol/l),
always programme the machine to the
higher value (17 °d / 3.1 mmol/l in this
example).
In the case of a fault, it will help the service technician if you know the hardness of your local water supply.
Settings
°d
1
2
3
4
5
6
7
8
9
10
11
12
13
14
15
16
17
18
19
20
21
22
23
24
25
26
27
28
29
30
31
32
33
34
35
36-70
mmol/l
0.2
0.4
0.5
0.7
0.9
1.1
1.3
1.4
1.6
1.8
2.0
2.2
2.3
2.5
2.7
2.9
3.1
3.2
3.4
3.6
3.8
4.0
4.1
4.3
4.5
4.7
4.9
5.0
5.2
5.4
5.6
5.8
5.9
6.1
6.3
6.5-12.6
°f
2
4
5
7
9
11
13
14
16
18
20
22
23
25
27
29
31
32
34
36
38
40
41
43
45
47
49
50
52
54
56
58
59
61
63
65-126
Value shown in
the time display
1
2
3
4
5
6
7
8
9
10
11
12
13
14
15
16
17
18
19
20
21
22
23
24
25
26
27
28
29
30
31
32
33
34
35
36
The dishwasher is programmed at the
factory for a water hardness level of
22 °d (4.0 mmol/l).
Enter the water hardness below:
°d
13
Before using for the first time
Programming and setting the
water hardness level
The water hardness level of your water
supply must be programmed into the
machine using the buttons on the control panel. The water hardness level selector in the wash cabinet is then also
set to the water hardness level in your
area.
Programming and changing the
water hardness level
The water hardness level which has
been programmed into the machine
can be checked and altered by using
the buttons on the control panel.
Switch the appliance off with
“On/Off” button.
Press > and “Start/ Stop” in and
whilst doing so at the same time
switch the dishwasher on using the
“On/Off” button.
A “P” and 2 figures will appear in the
time display, and the indicator light
next to the “Universal Plus 55°” programme button will light up.
Press the ”Universal Plus 55 °” programme button.
The value corresponding to the programmed water hardness level e.g. “22”
will appear in the time display. The water
hardness level is 22 °d (4.0 mmol/l).
If the water hardness level in memory is
the correct one:
Switch the appliance off with the
“On/Off” button.
14
If you wish to programme in a different
water hardness level:
Press the “Top Solo” button repeatedly until the value corresponding to your water hardness level appears in the display. This figure will
be in °d. For instance if your water
hardness level is 30 °d (5.4 mmol/l)
then the figure “30” will show in the
display.
Note:
Once the figure “36” is reached the
counter returns to “1”.
Press the “Start/Stop” button.
“SP” appears in the time display.
Press the “Start/Stop” button again.
The water hardness level change is
stored in memory.
All indicator lights next to the programme buttons and the decimal point
in the time display light up.
Switch the dishwasher off with the
“On/Off” button.
Before using for the first time
Setting the water hardness level selector in the wash cabinet
Switch the dishwasher off with the
“On/Off” button.
The water hardness level selector in the
wash cabinet must be set according to
the table below.
Setting the selector to the correct setting will help minimise the effects of the
wash process on glass surfaces. Too
high a setting will lead to poor cleaning
results and an increase in water spots
left on crockery and cutlery.
Use a screwdriver to take the cover
off the water hardness level selector
in the wash cabinet.
Use a coin or screwdriver to adjust
the water hardness level selector in
the wash cabinet. There is a click as
each setting is reached.
°d
mmol/l
°f
Selector
setting (level)
1- 7
8-10
0.2- 1.3
1.4- 1.8
2- 13
14- 18
3
2
11-14
2.0- 2.5
20- 25
1
15-70
2.7-12.6
27-126
0
The water hardness selector is set at the
factory to setting “1”.
Example:
For a water hardness level of 6 °d.
Turn the water hardness level selector to setting 3 (1 - 7 °d).
Replace the cover on the water hardness level selector.
15
Before using for the first time
Filling the salt reservoir
Important. Before filling the salt
reservoir with dishwasher salt for
the first time, you must fill it with approx. 2 litres of water to enable the
salt to dissolve. Once the dishwasher has been used, there is always sufficient water in the reservoir.
Inadvertently filling the salt reservoir
with powder or liquid dishwasher
detergent always causes serious
damage to the water softener. Make
sure that you have picked up the
right packet of dishwasher salt before filling the salt reservoir.
Please only use special coarse
grained dishwasher salt for reactivation, as other salts may contain insoluble additives which can impair the
functioning of the softener.
Remove the lower basket and unscrew the salt reservoir cap.
Fill the reservoir with approx. 2 litres
of water (first use).
Place the funnel provided over the
salt reservoir and carefully fill with
salt. The salt reservoir holds approx.
2 kg of salt.
As the salt reservoir is filled, displaced
water will overflow.
Clean any excess salt from around
the reservoir opening and then
screw the cap on again firmly.
Run the Pre-wash programme immediately to remove any traces of salt
water from the cabinet.
16
Before using for the first time
Salt indicator
Note
The salt indicator light comes on to notify you that the reservoir is empty.
The salt indicator light will also come
on if the water used is very soft (below
4 °d / 0.7 mmol). In this case the reservoir should not be filled with salt. The indicator light will remain lit and should
be ignored.
(See “After sales service” for definition
of “PC”).
The reservoir should then be refilled
with dishwasher salt for reactivation.
( See: Filling the salt reservoir)
After the reservoir has been filled, the
water softener is automatically reactivated the next time the dishwasher is
run. The salt indicator light may still be
illuminated during this process. It will
go out once the salt concentration has
reached the correct level.
17
Before using for the first time
Rinse aid
Adding rinse aid
Rinse aid is necessary to ensure water
does not cling and leave marks on crockery during the drying phase.
Rinse aid is poured into the storage
reservoir and the amount set is dispensed automatically.
Make sure you have added rinse aid
before using the dishwasher for the first
time.
Inadvertently filling the rinse aid
reservoir with powder or liquid dishwasher detergent always causes
serious damage to the reservoir.
Only pour rinse aid formulated for
domestic dishwashers into the reservoir.
Alternatively it is possible to use
– Household vinegar with a max. 5%
acid content
Do not use vinegar with a higher
acid content (e.g. vinegar essence
25% acid). This must not be used
as its use would damage the dishwasher.
or
– Liquid citric acid up to 50% acid content. The resulting rinsing and drying
quality will not, however, be as good
as when rinse aid is used.
18
Press the button in the direction of
the arrow until the flap springs open.
Before using for the first time
Rinse aid indicator
The Rinse aid indicator light on the fascia comes on when the rinse aid reservoir needs to be replenished.
Add rinse aid only until it is visible on
the surface of the filter in the opening.
The rinse aid reservoir holds approx. 130 ml.
Close the flap firmly so that it clicks
into place. Otherwise water would
enter the rinse aid reservoir during a
programme.
When the light comes on the reservoir
still contains sufficient rinse aid for 2 - 3
programmes.
Add rinse aid in plenty of time.
Wipe up any spilled rinse aid. This
prevents over-foaming occuring during the next programme.
19
Before using for the first time
Setting the rinse aid dosage
The dosage selector has settings from
1-6. It is set to 3 at the factory (see
arrow). Approx. 3 ml of rinse aid are
then used per programme. This is a recommended setting.
If spots appear on crockery and glassware:
Use a higher setting.
If clouding or smearing appears on
crockery and glassware:
Use a lower setting.
20
Loading the dishwasher
Loading the dishwasher
Note
Remove coarse food residues from
crockery.
There is no need to rinse items
under running water.
Do not wash items soiled with ash,
sand, wax, lubricating grease or
paint in the dishwasher.
Ash does not dissolve and is distributed in the wash cabinet. Wax,
sand, lubricating grease and paint
cause damage to the dishwasher.
Crockery can be loaded anywhere in
the baskets, but the following notes
should be observed:
Do not place crockery and cutlery inside other pieces where they may be
concealed.
Load the crockery so that water can
access all surfaces. This ensures
that it is properly cleaned.
Make sure that all items are securely
positioned.
Hollow items such as cups, glasses,
pans, etc. must be inverted in the
basket.
Tall, narrow, hollow items, e.g. champagne glasses, should be placed in
the centre of the basket to ensure
better water coverage.
Deep-based items should be placed
at an angle so that water can run off
them freely.
The spray arms must not be blocked
by items which are too tall or hang
through the baskets.
If in doubt, test for free movement by
manually rotating the spray arms.
Make sure that small items do not fall
through the holders in the baskets.
Small items, e.g. lids, should therefore be placed in the cutlery tray or
cutlery basket.
Some foodstuffs may contain natural dyes, e.g. carrots, tomatoes or
ketchup. Plastic items in the dishwasher may discolour if large quantities of these foodstuffs find their
way into the appliance on the crockery. The stability of plastic items is
not affected by this discolouration.
When the dishwasher is being
loaded food and drink residue may
drip onto the sides of the dishwasher door. These surfaces do not
belong to the wash cabinet and are
not accessed by water from the
spray arms. Food residue should
therefore be wiped away before the
dishwasher door is closed.
21
Loading the dishwasher
Loading examples
Upper basket
Note for “Top Solo”
If a wash programme has been selected with the additional function “Top
Solo”, all crockery must be loaded in
the upper basket and cutlery tray (if
fitted).
If your dishwasher has a cutlery basket
then cutlery should be placed in the
cutlery basket with plenty of space between items.
For small, lightweight, delicate items
such as cups, saucers, glasses, dessert bowls, etc.
Flat saucepans or casserole dishes
can also be placed in the upper basket.
Long items such as soup ladles, mixing
spoons and long knives should be
placed lying down across the front of
the upper basket.
22
As the middle spray arms also directs
water downwards, it is possible to wash
lightly soiled plates (with a large
diameter) and serving platters in the
lower basket, however plenty of space
must be left in between items. Do not
wash dishes, bowls or other hollow containers when using this function.
Loading the dishwasher
Flap up rack
Positioning rail (depending on model)
To make room for tall items raise the
rack upwards.
The positioning rail can be flipped over
to the middle of the basket for easy
sorting and removing of crockery.
23
Loading the dishwasher
Adjusting the upper basket
In order to gain more space for taller
pieces of crockery in the bottom or
upper basket, the upper basket can be
adjusted on three levels with 2 cm between each level.
The upper basket can also be set at an
angle with one side high, and the other
side low. Ensure however, that the basket can be inserted smoothly into the
cabinet.
Depending on the setting of the upper
basket, the following plate dimensions
can be accommodated.
Dishwashers with cutlery tray
Upper
basket
level
Top
Middle
Bottom
Plate Ø in cm
Upper
Lower
basket
basket
15.5
30
17.5
28
19.5
26
Pull out the upper basket.
Dishwashers with cutlery basket
Upper
basket
level
Top
Middle
Bottom
Pull upwards on the levers at either
side of the upper basket.
Adjust the basket to the desired
height.
Then push the levers securely back
down into position.
24
Plate Ø in cm
Upper
Lower
basket
basket
21
30
23
28
25
26
Loading the dishwasher
Lower basket
Height limitation
For larger and heavier items such as
plates, serving platters, saucepans,
bowls, etc.
Small items such as saucers can also
be placed in the lower basket.
Do not place thin, delicate glassware in
the lower basket unless a special glassware insert is installed.
The stay at the front of the upper basket determines the max. height permissible for items placed in the lower
basket to ensure they do not impede
the movement of the middle spray arm.
Glassware insert (depends on model)
Dishwashers with a cutlery tray
Dishwashers with a cutlery basket
The insert for glasses can be fitted in
the left or right of the bottom basket in
place of a removable insert. Very tall
glasses, e. g. tall beer glasses, can be
held more securely by the vertical supports.
25
Loading the dishwasher
Bottle holder
The bottle holder e.g. for milk and baby
bottles, can be inserted into the bottom
basket in more than one place. Position
in any area marked white in the illustration. Do not position in areas marked
“X”, as water cannot properly access
bottles in these areas, hence cleaning
results are impaired.
Cutlery
Dishwashers with a cutlery basket
Unsorted cutlery should be placed
in the cutlery basket with the handles
facing downwards to ensure optimum spray water access.
However, to avoid the risk of injury
cutlery with sharp points should be
placed with the handles upwards.
Place small spoons in the individual
slots to either side of the cutlery basket.
26
Loading the dishwasher
Spoon inserts for the cutlery basket
Use the inserts supplied when washing
heavily soiled spoons, e.g. tablespoons
and serving spoons.
The inserts separate the spoons to
allow a space between them so that
they can be more easily accessed by
water.
Insert the spoons with the handles
facing downwards, using only every
other slot.
If required, place an insert onto the
front and rear of the cutlery basket.
To remove the inserts:
Press the engaged hooks inwards
(use a spoon handle if necessary)
and remove the insert by pulling it
upwards.
27
Loading the dishwasher
Dishwashers with a cutlery tray (SC)
For best results cutlery should be
grouped in zones, one for knives, one
for forks, one for spoons, etc.
This makes unloading much easier.
Longer items such as soup ladles,
cake slices, mixing spoons and long
knives should be placed lengthwise in
the indentation in the middle of the cutlery tray.
Place the handles between the holders.
Spoon heads should be placed in contact with at least one of the serrated retainers on the base of the cutlery tray to
ensure that water runs off them freely.
The upper spray arm must not be
blocked by items which are too big
(e. g. cake slices)
The cutlery tray insert is removable.
Spoons with round or oval handles
should be placed with the heads in the
holders as this prevents them slipping.
28
Loading the dishwasher
Items not suitable for dishwashers:
– Wooden cutlery and crockery or
items with wooden parts: these may
discolour and fade. The glue used in
these items is not dishwasher-proof
and wooden handles may come
loose after being washed in a dishwasher.
We recommend:
– When purchasing new crockery and
cutlery, make sure they are dishwasher-proof.
– There are no standard guidelines for
washing glassware. When in doubt,
wash by hand.
– Craft items, antiques, valuable
vases and decorative glassware are
also not suitable for dishwashers.
– If delicate glassware is washed in
the dishwasher ensure that only very
low temperatures are used (see programme chart). This will reduce the
risk of clouding.
– Plastic items which are not heat resistant may lose shape.
Please note
– Copper, brass, tin and aluminium
items may discolour or become matt.
– Items with colours painted over a
glaze may fade after many washes.
– Clouding may occur on glasses after
frequent washing. Do not wash glassware containing lead crystal in a
dishwasher.
Silverware previously cleaned with a silver polish may still be damp or spotted
at the end of a programme, where
water has not run off smoothly. It may
need rubbing dry with a soft cloth. Silver treated in a silver immersion dip is
usually dry at the end of a programme
but may discolour.
Aluminium components (e. g. a
grease filter) must not be cleaned
with caustic alkaline commercial or
industrial cleaning agents. These
may damage material, or in extreme
cases, cause severe chemical reaction.
See section “Adding detergent” for
information on suitable detergents.
29
Operating the dishwasher
Operating the dishwasher
Adding detergent
Only use detergents formulated for
domestic dishwashers. Do not use
washing up liquid.
You can use conventional powder
detergent, tablets or liquid dishwasher detergent.
1. Detergents containing phosphates
and chlorine.
2. Detergents containing phosphates
but chlorine-free.
3. Phosphate-free and chlorine-free
detergents.
Put powder or liquid detergent into
the dispenser compartment.
Type 3 detergents are more environmentally friendly, however:
Detergent tablets should only be put
into compartment II if this is recommended by the manufacturer.
If the manufacturer recommends inserting tablets in the cutlery basket
do not do so. Instead place them on
the inside of the door or directly into
the wash cabinet. The tablets will
then dissolve completely.
Phosphate-free detergent reacts more
sensitively to water hardness than
detergent containing phosphates. This
may influence cleaning results.
The following problems may occur:
– Increased etching in the form of a
bluish sheen on the surface of glassware
– Discolouration of silverware
– Colours painted over a glaze may
fade.
Appearances of this nature are generally caused by the detergent used and
are not attributable to any malfunctioning of the dishwasher itself.
Detergent manufacturers give the required amount of detergent for a particular programme on their packaging.
Use at least 30 ml of detergent for a
full load in the following programmes:
– Normal programme,
– Universal programme,
– Universal plus programme,
– Economy 45º C programme.
If the manufacturer recommends a
larger amount of detergent, use the
amount recommended.
Please note
Failure to dispense the recommended
amount of detergent may impair cleaning results.
30
There are currently three types of
detergent on the market:
Preventative measures:
– Try out a phosphate-free detergent
from another manufacturer.
– Change to a detergent containing
phosphates (type 2), or, if available,
to a detergent containing both phosphates and chlorine (type 1).
– Programme the water hardness selector one setting higher than recommended for your supply hardness
(see chart in “Before using for the
first time”). Softer water is then provided.
Operating the dishwasher
The bleaching effect of chlorine-free
detergents is lower than that of detergents containing chlorine. This may result in increased tea stains or discolouration on plastic items. Appearances of
this nature are generally caused by the
detergent used and are not attributable
to any malfunctioning of the dishwasher itself.
Preventative measures:
– Increase the amount of detergent
used for a greater bleaching effect.
– If available, change to a detergent
containing chlorine (type 1).
Should you experience difficulties when
using these types of products, please
contact the detergent manufacturer’s
advisory service.
Warning:
Avoid inhalation of powder detergents. Dishwasher detergents contain irritant or corrosive ingredients.
They can cause burning in the
mouth and throat if swallowed, or inhibit breathing. Consult a doctor immediately if detergent has been
swallowed or inhaled.
Keep children away from detergents and from the dishwasher
when the door is open. There could
still be detergent residues in the
cabinet.
To avoid the danger of children coming into contact with the dishwasher
detergent only add detergent just
before starting the programme and
close the door, activating the child
safety lock.
To achieve optimum results distribute
the required amount of detergent, depending on the type of detergent and
the programme selected, proportionally
between compartments I and II of the
dispenser.
It is essential to follow the instructions
given in the programme chart at the
end of the operating instructions.
31
Operating the dishwasher
For information
Compartment I holds max. 25 ml.
Compartment II holds max. 80 ml.
There are markings in compartment II
to assist with dispensing. The marks indicate a level of approx. 20, 25, 30 ml
when the door is open in a horizontal
position.
Press the opening catch on the
detergent dispenser. The flap will
spring open.
The flap is always open at the end of a
programme.
Add the required amount of detergent and close the flap.
Ensure that the detergent package is
properly sealed after use. Otherwise
the detergent can lose its effectiveness.
32
Operating the dishwasher
Operating the dishwasher
Programme selection
Choose your programme according to
the type of load and how dirty it is.
In most cases this will be a Normal Programme, a Universal Programme or a
Universal Plus Programme.
These programmes are ideally suited to
everyday mixed loads with varying degrees of soiling.
For particular needs there are
special programmes.
The different programmes and their
uses are described in the programme
chart at the end of this booklet.
The additional function “Top Solo” can
be selected with each programme.
For further information see “Additional
functions/Top Solo”.
“Energy Save” programme
Use this programme for lightly to normally soiled dishes.
A hot water intake (temperature of the
incoming water) of at least 45 °C and
max. 60 °C is necessary for this programme.
Water is not heated in this programme.
Only approx. 0.10 kWh of electricity is
used during this cycle.
As water is not heated, the drying results may not match those of other programmes.
The higher the temperature of the intake water, the better the cleaning and
drying results.
Open the door of the dishwasher at the
end of the programme to speed up the
drying process.
33
Operating the dishwasher
Switching on
Make sure the spray arms are not obstructed.
Close the door.
Open the stopcock, if it is closed.
Press the “On/Off” button (16).
All indicator lights (17) next to the programme buttons and the decimal point
in the time display (19) light up.
Starting a programme
When selecting a programme, refer
to the programme chart at the end of
the operating instructions.
Press button (17) for the required programme.
All indicator lights next to the programme buttons, except the one for the
programme selected, go out.
The indicator light next the the “Start/
Stop” button comes on.
The running time of the programme selected appears in the time display (19)
in hours and minutes.
The “Time Left” indicator light comes
on.
Note:
If selecting “Delay start” or “Top Solo”
this must be done before the programme is started (see “Additional
functions” ).
Press the “Start/Stop” button (22).
The indicator light next to the
“Start/Stop” button goes out. The programme cycle commences.
Do not finish a programme prematurely.
Important programme stages (e. g.
reactivating the water softener)
could be omitted.
Programme sequence indicator lights (15)
After a programme has been started
the current stage of the programme is
indicated by the programme sequence
indicator lights (15).
34
Operating the dishwasher
Time display (19)
At the end of a programme
The running time of the programme selected shows in hours and minutes in
the time display before a programme is
started. During a programme the time
left until the end of the programme is
displayed. The “Time left” indicator
light next to the time display lights up.
A programme has finished when the
“End” indicator light is on in the programme sequence display (15) and a
“0” shows in the time display (19).
The indicator lights for the selected programme just finished and any additional functions which were chosen are
still lit up.
These will go out when the dishwasher
door is opened.
The time displayed in the time display
may vary with the same programme.
This is partly because of the water inlet
temperature at each intake and partly
because of the amount of crockery.
When the dishwasher is first switched
on the display shows an average time
value for a cold water intake.
Values shown in the programme chart
refer to normal loads and average temperatures.
Each time a programme is run the electronic unit takes into account the new
conditions and calculates the time required. This new figure is then displayed when the programme is next selected.
The dishwasher can now be opened
and unloaded (see “Unloading the dishwasher”).
If the dishwasher is left closed, the fan
will continue for a few more minutes to
diminish any remaining moisture. This
process is not part of the programme.
We recommend only opening the door
immediately a programme has ended if
you urgently need crockery or cutlery
from it.
For safety’s sake it is advisable to always switch the dishwasher off if you
do not wish to start another programme immediately.
35
Operating the dishwasher
Switching off
Changing a programme
At the end of a programme:
If you have not yet started the selected
programme by pressing the
“Start/Stop” button:
Press and release the “On/Off” button (16).
The dishwasher continues to use
electricity until switched off using
the “On/Off” button.
If the dishwasher is not to be used for a
longer period of time, e. g. whilst on
holiday, the stopcock should be turned
off.
Interrupting a programme
A programme is interrupted as soon as
the door is opened.
If the door is closed again, the programme will continue from the point it
was at before the door was opened.
Warning:
Water in the dishwasher may be
hot. Danger of scalding! Only open
the door if absolutely necessary
and exercise extreme caution when
doing so. Before closing the door
again, leave it ajar for approx. 20
secs. This will enable the temperature in the wash cabinet to settle.
Close the door firmly making sure
that it clicks into place.
Press button (17) for the programme
you want.
Select additional function “Delay
Start” or “Top Solo” again if wished
(see “Additional functions”).
Press the “Start/Stop” button (22).
The indicator light next to the
“Start/Stop” button goes out. The programme cycle commences.
If the selected programme is already
running, or if the selected delay start
period has started counting down:
Press the “Start/Stop” button (22) for
at least one second. Whilst it is
pressed in the indicator light next to
it will light up.
All indicator lights next to the programme buttons will then come on
and the decimal point in the time display will light up.
Press button (17) for the programme
you want.
Select additional function “Delay
Start” or “Top Solo” again if wished
(see “Additional functions”).
Press the “Start/Stop” button (22).
The indicator light next to the
“Start/Stop” button goes out. The programme cycle commences.
36
Operating the dishwasher
Additional functions
“Top Solo” (21)
The “Top Solo” additional function is recommended when there is only a small
amount of crockery and cutlery to clean.
With this function the majority of the
water is directed only to the top and
middle spray arms in the dishwasher.
This means that the water jets are aimed
at items in the upper basket and the cutlery tray if the dishwasher has one.
As the middle spray arm also directs
water downwards, lightly soiled plates
or platters can be placed in the bottom
basket, and cutlery may be placed in
the cutlery basket if there are large
spaces between items.
Do not place dishes, bowls or other hollow containers in the bottom basket.
Because smaller amounts of crockery
are being washed the amount of detergent recommended by the manufacturer can be reduced to approx. 2/3 of
the total amount for a full load.
Make sure, however, when reducing
the amount dispensed that the cleaning result is not affected.
Using “Top Solo” will also save water
and energy.
For example, using this function with
the “Economy 45°” programme uses
only 11 litres of water and approx. 0.8 kWh of electricity.
The “Top Solo” function can be selected
with all programmes.
37
Operating the dishwasher
Switch the dishwasher on using the
“On/Off” button (16).
All indicator lights next to the programme buttons and the decimal point
in the time display will come on.
Press the programme button (17) for
the programme you want to run.
The indicator lights next to the selected
programme button and the “Start/Stop”
button light up.
The running time of the selected programme appears in the time display
(19) in hours and minutes, and the
“Time left” indicator light comes on.
Press the “Top Solo” button (21).
The “Top Solo” indicator light comes on.
The running time shown in the time display (19) for the programme selected
will change because the electronic unit
has taken the “Top Solo” function into
account
Note:
The “Delay Start” function can now be
selected (see next page).
Press the “Start/Stop” button (22).
The programme begins. The
“Start/Stop” indicator light goes out and
the programme sequence indicator
lights (15) and the “Top Solo” (21) indicator light come on.
The additional function is deleted from
memory at the end of the programme
cycle.
38
Operating the dishwasher
Delay start (20)
The starting time of a programme can
be delayed between 30 mintues and
24 hours, e.g. to benefit from economy
rates of electricity.
With a delay start time of between 30
minutes and 9 hours 30 minutes the
delay is set in 30 minute stages. For 10
hours or more it is set in one hour
stages.
Switch the dishwasher on with the
“On/Off” button (16).
All indicator lights next to the programme buttons and the decimal point
in the “Time display” come on.
Press the programme button (17) for
the programme you wish to run.
Press “>“- or “$” (20).
The last delay start time used will show
in the time display (19). The “Time left”
indicator light goes out and the “Delay
start” indicator light comes on.
Press button “>”- or “$” (20), to reduce or increase the delay start time.
Note:
The “Top Solo” function can now be selected (see previous page).
Press the “Start/Stop” button (22).
The delay time counts down in 1 hour
steps until the delay start period has
elapsed for delay start periods of over
10 hours, and in minutes for delay start
periods of under 10 hours.
The indicator light next to the selected
programme button and next to the
“Start/Stop” button light up.
The running time of the programme selected appears in the time display (19)
in hours and minutes, and the “Time
left” indicator light comes on.
39
Operating the dishwasher
Once the “Delay start” period has
elapsed, the selected programme
begins automatically. The time left for a
programme to run then shows in the
display, the “Delay Start” indicator light
goes out and the “Time left” indicator
light come on.
How the delay start time is shown in
the time display:
up to 59 minutes:
example - 30 minutes = 30
between 1 hour and 9 hours 30
minutes:
example - 5 hours = 5.00
10 hours and over:
example - 15 hours = 15h
To avoid the danger of children coming into contact with dishwasher
detergent:
Only fill the detergent dispenser immediately before starting the programme, i.e. before pressing the
“Start/Stop” button, and activate the
child safety lock.
When using the delay start function,
make sure that the compartment is
dry before adding detergent. Wipe
dry with a cloth if necessary.
40
To start a programme before the
delay start period has elapsed:
Proceed as follows:
Press the “Start/Stop” button (22) for
at least one second. Whilst it is
pressed in the indicator light next to
it will light up.
All indicator lights next to the programme buttons will then come on
and the decimal point in the time display will light up.
Press the programme button (17) of
the programme you wish to run.
Select additional function “Top Solo”
again if required.
Press the “Start/Stop” button (22).
The indicator light next to the “Start/
Stop” button goes out. The programme
starts.
Operating the dishwasher
Unloading the dishwasher
Dishes tend to break and chip more
easily when they are hot.
Allow the dishes to cool until they are
comfortable enough to handle before unloading them.
If you open the door fully after switching off, the dishes will cool much faster.
First unload the lower basket, then
the upper basket and cutlery tray
(depending on model).
This will prevent water drops from
the upper basket and cutlery tray
from falling onto the dishes in the
lower basket.
41
Cleaning and care
Cleaning and care
Check your dishwasher regularly
(approx. every 4 - 6 months). This
way faults and problems can be
avoided.
Cleaning the filters in the
wash cabinet
Switch the dishwasher off beforehand.
The dishwasher must not be used
without all the filters in place.
“Check Filter” indicator light
The filter combination in the base of the
wash cabinet retains coarse soil from
the suds solution, thus preventing it accessing the circulation system and reentering the cabinet through the spray
arms.
Collection of coarse soil may cause the
filters to clog.
Turn the handle anti-clockwise to release the filter combination.
The “Check Filter” indicator light comes
on after every 40 programme cycles. It
serves as a reminder to check the filters in the wash cabinet.
Check the filter combination whenever
the “Check Filter” indicator light comes
on, and clean if necessary.
Press the “Start/Stop” button for at
least one second, the “Check Filter”
indicator light will then go out.
The “Check Filter” indicator light will
also go out when the dishwasher is
switched off.
42
Lift the filter combination out of the
machine. Remove any coarse particles and rinse the filter under running water. Use a nylon brush if
necessary.
Cleaning and care
To clean the underside of the filter, the
flap must be opened:
Pull back the yellow clip to do this.
Rinse all parts under running water,
using a nylon brush if necessary.
Replace the filter combination so
that it lies flat in the base of the
wash cabinet.
Secure the filter by turning the
handle in a clockwise direction.
Then close the flap so that the clip
engages.
Important:
After cleaning make sure that the
clip has properly engaged.
43
Cleaning and care
Cleaning the spray arms
Remove the lower basket.
Particles of food can get stuck in the
spray arm jets. The spray arms should
therefore be inspected and cleaned
regularly (approx. every 4 - 6 months).
Switch the dishwasher off beforehand.
Remove the spray arms as follows:
Take out the cutlery tray (if your dishwasher is fitted with one).
Press the top spray arm upwards to
engage the inner ratchet. Then unscrew the spray arm.
Lift up the middle spray arm b to engage the ratchet. Then unscrew the
spray arm c.
Pull the lower spray arm firmly upwards to remove it.
Use a pointed object to push food particles into the spray arm jets.
Rinse thoroughly under running
water.
Replace the spray arms and check
that they rotate freely.
44
Cleaning and care
Cleaning the wash cabinet
The wash cabinet is largely self-cleaning, provided that the correct amount of
detergent is always used.
If however there are lime scale or
grease deposits in the cabinet these
can be removed with a proprietary dishwasher cleaner.
Cleaning the door and the
door seal
Wipe the door seals regularly with a
damp cloth to remove food deposits.
Wipe food and drink residue from the
sides of the dishwasher door.
These areas are not part of the wash
cabinet and are therefore not accessed by water from the spray
arms.
Cleaning the control panel
(fascia)
This should only be wiped with a
damp cloth or suitable cleaning
agent designed for use on plastic.
Do not use abrasive cleaning
agents, glass cleaning agents or allpurpose cleaners. Because of their
chemical composition they could
cause serious damage to plastic
surfaces.
Cleaning the door panel
Clean using a suitable cleaning
agent.
Panels made from wood should only
be cleaned using a damp chamois
leather and then dried with a soft
cloth.
Do not use any cleaning agents containing ammonia or thinners.
They could damage surfaces.
45
Problem solving guide
Problem solving guide
With the aid of the following guide, minor problems can be easily corrected without calling in a Miele service technician, thus saving you both time and money.
You should, however, note the following:
Repairs should only be carried out by a suitably qualified and trained person in
accordance with local and national safety regulations. Unauthorised or incorrect repairs could cause personal injury or damage the machine.
Problem
Possible cause
Remedy
The programme does
not start
The door is not properly
closed.
The machine is not
plugged in.
The fuse is defective or
has tripped.
Close the door firmly.
The dishwasher stops
during a programme
The fuse has tripped.
The “Spray arm” indica- Tall items are blocking
the path of the middle
tor light is flashing
spray arm.
The middle spray arm
jets are blocked.
46
Insert the plug.
Replace the fuse
(U.K.fuse rating =
13 A).
Replace the fuse
(U.K. fuse rating =13 A).
Open the door and
rearrange items which are
blocking the spray arm.
Before rectifying the
problem you must:
– Switch the dishwasher
off with the “On/Off”
button,
then:
– Clean the spray arm.
Problem solving guide
Problem
Possible cause
The “Water inlet” indica- The stopcock is closed.
tor light flashes shortly
after the start of a programme
Remedy
Open the stopcock fully.
If a programme will not
continue:
– Press “Start/Stop” button
for at least 1 second.
All indicator lights next to
the programme buttons
light up.
– Switch the dishwasher
off using the “On/Off”
button,
– Start the programme
again.
Seek professional advice.
The flow pressure at the
water inlet is lower than
0.3 bar.
The filter in the water inlet Before rectifying the
is blocked.
problem you must:
– Press the “Start/Stop”
button for at least 1
second.
All indicator lights next to
the programme buttons
light up.
– Switch the dishwasher
off using the “On/Off”
button,
then:
– Clean the filter in the
water inlet.
–
Start the programme
The
intake
water
has
not
The “Water inlet” indicaagain.
reached
the
required
tor light comes on durtemperature of 45 °C, the – If the indicator light
ing the “Energy Save”
hot water system may be
comes on again, select
programme
overloaded (see
a different programme.
“Programme selection”).
47
Problem solving guide
Problem
Possible cause
The “Water outlet” light
flashes, the programme
stops
Knocking noise
in the wash cabinet
Rattling noise
A whistling noise is
heard during the programme
Knocking noise in the
water pipes
48
The filter combination in
the wash cabinet is
clogged.
The drain pump or the
non-return valve may be
blocked.
The drain hose is kinked.
The spray arm is
knocking against an item
in the basket.
Items of crockery are
insecure in the wash
cabinet.
The axial face seal of the
circulation pump
sometimes makes a
whistling noise. This may
be caused by detergent.
This may be caused by
the on-site installation or
the cross-section of the
piping.
Remedy
Before rectifying the
problem you must:
– Press the “Start/Stop”
button for at least 1
second.
All indicator lights next to
the programme buttons
light up.
– Switch the dishwasher
off using the “On/Off”
button
Clean the filter
combination, see
“Cleaning and Care”
Clean the drain pump
and the non-return valve,
see appropriate section.
Remove the kink.
Interrupt the programme,
rearrange items which
are obstructing the spray
arms.
Interrupt the programme,
rearrange the items of
crockery.
This is not a problem. Try
out other detergents.
Consult the Miele Service
Department if the noise is
permanent.
This has no influence on
dishwasher function. If in
doubt contact a suitably
qualified plumber.
Problem solving guide
Problem
Possible cause
Remedy
Three horizontal bars
– – – appear in the time
display at the end of a
programme
There may be a technical
fault.
– Press the “Start/Stop”
button for at least 1
second.
All indicator lights next to
the programme buttons
light up.
– Switch the dishwasher
off using the “On/Off”
button,
a few seconds later:
– Switch the dishwasher
on using the “On/Off”
button,
– Select the programme
again.
– Press the “Start/Stop”
button to start the
programme.
If the horizontal bars
appear again at the end of
the programme, there is a
technical problem.
– Call the Miele Service
Department.
Despite the problem the
dishwasher can be used
in all programmes.
However the water will
not heat up. The “Energy
Save” programme only
works if the dishwasher is
connected to a hot water
supply. .
49
Problem solving guide
Problem
Possible cause
Remedy
Dishes and glasses are The rinse-aid amount set Increase the dosage or
may be insufficient, or the replenish the reservoir,
not dry or are flecked
rinse-aid reservoir empty. see “Before using for the
first time”.
The water hardness level Set the selector to a
lower setting, See
selector in the wash
“Programming and
cabinet is set too high.
setting the water
hardness level”.
Crockery was taken out
Leave it in for longer, see
of the cabinet too soon.
“Operating the
dishwasher”
See notes in “Loading the
The dishes are not clean The dishes were not
loaded correctly. Dishes
dishwasher”.
were placed inside other
pieces, water could not
access all surfaces.
Make sure that dishes
The outlet of the water
intake pipe for the middle inserted in the rear
section of the upper
spray arm was covered.
An insufficient amount of basket do not cover the
pipe outlet.
water flowed into the
middle spray arm.
The programme was not Select a more intensive
powerful enough.
programme see
“Programme chart” at the
end of these operating
instructions.
Not enough detergent
Use more detergent, see
was dispensed.
“Operating the
dishwasher”.
Rearrange items so that
Tall items are blocking
the spray arms can rotate
the path of the spray
freely.
arms.
The spray arm jets are
Clean the spray arm jets,
blocked.
see “Cleaning and care”.
50
Problem solving guide
Problem
Possible cause
The dishes are not clean The filter combination in
the base of the wash
cabinet is not clean or is
not correctly fitted.
The drain pump or nonreturn valve may be
blocked.
The wash temperature of
Tea or lipstick stains
the selected programme
have not been comwas too low.
pletely removed
The bleaching effect of
the detergent used is too
low.
White residue is visible Not enough rinse aid was
on cutlery and crockery, used.
clouding occurs on
There is no salt in the salt
glassware; film can be
reservoir.
wiped off
Smearing appears on
glassware and cutlery,
there is a bluish sheen
on the surface of glassware; film can be wiped
off
The salt reservoir cap
was not correctly
screwed on.
The water softener is
programmed to a setting
which is too low.
Phosphate-free detergent
was used.
The rinse aid dosage is
set too high.
Remedy
Clean and/or replace the
filter combination
correctly, see “Cleaning
and care”.
Clean the drain pump
and the non-return valve,
see section on this.
Select a programme with a
higher wash temperature.
Use detergent containing
chlorine.
Increase the dosage,
see “Before using for the
first time”.
Add reactivation salt,
see “Before using for the
first time”.
Replace it making sure it
screws back on correctly.
Programme a higher
setting, see “Before using
for the first time”.
Try detergent containing
phosphate.
Reduce the dosage, see
“Before using for the first
time”.
51
Problem solving guide
Problem
Possible cause
Remedy
Glassware is dull and
discoloured; film cannot be wiped off
The water hardness
selector in the wash
cabinet is incorrectly set.
Set it to the correct
setting, see “Before using
for the first time”.
There is no remedy for
already damaged
glassware.
There is no remedy.
Purchase glassware
which is dishwasherproof.
Use detergent containing
chlorine. Use more
detergent, see “Operating
the dishwasher”.
Discolouration is
irreversible .
Glassware is not
dishwasherproof. The
surfaces are affected.
Plastic items are discol- Natural dyes e. g. from
carrots, tomatoes or
oured
ketchup may be the
cause. The amount of
detergent used or its
bleaching effect was not
sufficient to deal with
natural dyes.
There are rust stains on The salt reservoir cap
has not been screwed on
cutlery
properly.
The affected items are
not corrosion resistant.
Detergent residue is left The dispenser was still
damp when detergent
in the dispenser at the
was added.
end of a programme
Clogged detergent
The detergent dispenser lid cannot be closed residue is blocking the
catch.
properly
52
Screw the cap on firmly.
There is no remedy.
Purchase cutlery which is
dishwasher-proof.
Make sure the dispenser
is dry before adding
detergent.
Remove the residue.
Problem solving guide
Problem
Possible cause
Remedy
The filter combination in
the wash cabinet is
clogged.
The drain pump or the
non-return valve may be
blocked.
The drain hose is kinked.
Before rectifying the
problem:
– Press the “Start/Stop”
button for at least 1
second.
– Switch the dishwasher
off using the “On/Off”
button.
Clean the filter
combination, see
“Cleaning and Care”
Clean the drain pump
and the non-return valve,
see section on this.
Remove the kink.
Water remains in the
wash cabinet
at the end of a programme
53
Solving problems
Solving problems
Cleaning the water inlet filter
A filter is incorporated in the screw connection of the valve on the water inlet
hose. The filter must be cleaned when
dirty, otherwise insufficient water flows
into the wash cabinet (see “Checking
the water level”).
The plastic housing of the water
connection contains an electrical
component. It must not be dipped
in water.
Recommendation
Carefully remove the rubber seal.
If the mains water contains a large number of insoluble substances, we recommend fitting a large-area filter in the
connection between the stopcock
and the water inlet hose threaded
union.
This filter is available from the Miele
Spares Dept.
Withdraw the filter using pointed pliers
and rinse clean under running water.
Cleaning the filter:
Disconnect the dishwasher from the
mains supply (switch off at the mains
socket, pull out the plug , switch off
the appropriate circuit at the fuse box
or withdraw the mains fuse).
Turn off the stopcock.
Unscrew the inlet hose.
54
Replace the filter and seal, making
sure they are sitting correctly.
Screw back into place on the water
inlet, taking care that it is not crossthreaded.
Turn on the stopcock gradually to
test for leaks. If there is a leak, screw
the connections on more tightly, making sure the threads do not cross.
Solving problems
Cleaning the drain pump and
non-return valve
If the water has not been pumped
away at the end of a programme the
drain pump or the non-return valve
might be blocked. They are, however,
easy to clean. Watch out for glass or
bone splinters which could cause injury.
Take the filter combination out of the
wash cabinet (see “Cleaning and
care”, “Cleaning the filters in the
wash cabinet”).
Scoop the water out of the cabinet
using a suitable container.
Raise the locking clamp for the nonreturn valve.
55
Solving problems
Lift up the non-return valve and rinse
well under running water.
Remove all extraneous objects from
the non-return valve.
The drain pump is situated under the
non-return valve (see arrow).
Remove all extraneous objects from
the drain pump (watch out for glass
or bone splinters which are particularly difficult to detect and could
cause injury). Turn the drain pump
impeller by hand to check that there
are no more obstructions.
Carefully replace the non-return
valve and secure it with the locking
clamp.
56
After sales service
After sales service
Should you still have any difficulties,
please contact:
– Your Miele Dealer
or
Programme update function - PC
The programme update function enables new developments in programme
technology to be programmed into your
machine by a service technician.
– The Miele Service Department
See back cover for addresses.
Please quote the model type and
number of your appliance.
This information can be found on the
data plate at the top of the door.
Please note that telephone calls
may be monitored and recorded to
improve our service.
When, for example, technological developments offer advanced modifications to your existing programme
cycles a service technician will be able
to input these into your machine controls via the indicator light marked PC
(Programme Correction).
Miele will provide information on programme updates when such developments become available.
57
Special accessories
Special accessories
To make the most of your dishwasher
If you would like...
then you need...
...to wash bottles,
e. g. milk or baby bottles
... a bottle holder
...to wash lots of glasses
...a glassware insert for the bottom
basket
... to wash long-stemmed glassware
... a glassware insert for the upper
basket
58
Comparison tests
Comparison tests
Test standard:
Programme tested:
IEC 436 / DIN 44990 / IEC 704 / prEN 50242
Universal Plus 55 °
Programme with best cleaning and drying
results and for noise emissions
Standard programme
for Energy label:
Economy 45 °
Amount washed:
12 place settings
Amount of detergent:
If using a detergent containing chlorine:
5 g in compartment I and 25 g in compartment II.
If using a chlorine-free detergent:
30 g only in compartment II.
Rinse aid dispensing:
Setting 3 (approx. 3 ml)
Water hardness level
selector:
Setting 0
Noise measurements:
The dishwasher door must first be opened completey
and then shut again, Doing this will automatically close
the ventilation outlet for the Turbothermic.
Dishwashers with cutlery basket
Spoon inserts:
Upper basket
Fit the two inserts on top of the cutlery basket
(see section on loading the dishwasher, spoon inserts)
Place six spoons at intervals in each insert
Lower basket
59
Comparison tests
Dishwashers with cutlery tray
Upper basket
Cutlery tray
60
Lower basket
Comparison tests
Test standard:
IEC 436 / DIN 44990 / IEC 704 / prEN 50242
Programme tested:
Universal Plus 55 °
with additional function “Top Solo”
Programme with best cleaning and drying
results and for noise emissions
Standard programme
for energy label:
Economy 45 ° with additional function “Top Solo”
Amount washed:
6 place settings
Amount of detergent:
20 g only in compartment II.
Rinse aid dispensing:
Setting 3 (approx. 3 ml)
Water hardness level
selector:
Setting 0
Noise measurements:
The dishwasher door must first be opened completey
and then shut again, Doing this will automatically close
the ventilation outlet for the Turbothermic process as in
daily use.
Dishwashers with cutlery basket
Spoon inserts:
Upper basket
Fit the two inserts on top of the cutlery basket
(see section on loading the dishwasher, spoon inserts)
Place six spoons at intervals in each insert.
Lower basket
61
Comparison tests
Dishwashers with cutlery tray
Upper basket
Cutlery tray
Insert cutlery at double spacing in the
cutlery tray.
62
Lower basket
Transport
Transport
Should you ever need to move the dishwasher, e.g. when moving house, note
the following:
– Empty the dishwasher,
– Secure any loose parts, e. g. hoses,
cables, cutlery baskets,
– Transport the dishwasher in the upright position.
If unavoidable it may be transported
on its back.
Do not transport it on its side or on
the door as residual water still in the
machine will leak out of it.
This residual water could get into the
electronic unit and cause a fault.
63
Programme chart
Programme chart
Programme
When to use
chlorine
free 1)
Compartment II
( Wash
cycle)
Universal 55 °
Detergent
containing
chlorine 2)
Compart- Compartment I
ment II
( Pre-wash) (Wash
cycle)
for normal everyday loads
100 %
20 %
80 %
as UNIVERSAL 55 °,
but with longer wash time for heavily soiled
loads, also suitable for chlorine-free detergents
Universal 65 °
as UNIVERSAL 55 °,
but at a higher temperature for stubborn
dried on particles
Normal 55 °
for normal everyday loads,
also suitable for chlorine-free detergents
Economy 45 ° 4) for normal everyday loads,
energy saving programme
Special programmes
Intensive 75 °
for pots, pans and food preparation
crockery with dried on particles of food and
very heavy soiling
Gentle 45 °
Gentle programme for lightly soiled and
heat sensitive crockery
Short 45 °
Quick programme for lightly soiled crockery,
e.g. party crockery
Pre-wash
for rinsing crockery to avoid smells if a
complete cycle is not yet needed
Energy Save
for light to normally soiled loads,
select only if the dishwasher is connected to a
hot water intake (min. temperature 45 °C) see
“Programme selection”
100 %
20 %
80 %
100 %
20 %
80 %
Universal
Plus 55 ° 3)
100 %
100 %
100 %
100 %
150 %
150 %
50 %
50 %
50 %
50 %
100 %
20 %
The dispensing method will depend on the type of detergent being used.
1) Use this ratio for:
– detergent which is chlorine and phosphate free
– detergent which is chlorine free but contains phosphates
– liquid dishwasher detergent
In this instance the whole amount is placed in compartment II.
2) Use this ratio for:
– powder detergent which contains chlorine and phosphates (but not liquid detergent)
Divide the total amount, as shown, between compartment I and compartment II.
64
80 %
Programme chart
Programme cycle
1.
Preliminary
prewash
Main
wash
Interim
rinse
Final
rinse
Drying
X
X
55 °
X
55 °
X
X
65 °
X
65 °
X
1.20
0.6
17
85
72
X
1.25
0.7
17
108
95
X
65 °
X
X
65 °
X
1.30
0.7
17
88
74
X
55 °
X
45 °
X
X
65 °
X
55 °
X
1.20
0.6
13
80
67
X
1.05
0.6
13
115
102
X
X
75 °
X
X
75 °
X
1.80
1.2
22
115
93
X
X
45 °
X
45 °
X
X
55 °
X
55 °
X
1.10
0.5
17
68
55
0.90
0.5
13
33
18
0.06
0.06
5
11
11
–
0.1
22
–
61
X
X
X
X
X
X
X
X
X
X
X
Cold
Hot
water
water Litres
connec- connection
tion
(15 °C) (55 °C)
Duration
Minutes
(approx.)5)
Cold
Hot
water
water
(15 °C) (55 °C)
2.
Prewash
X
X
Consumption
Energy kWh
Water
When washing a full load in the Normal Programme, the Universal Programme, the Universal Plus Programme or the Economy Programme at least 30 ml of detergent are required. If the detergent manufacturer recommends using more than this you should dispense the amount they suggest.
If the “Top Solo” function is selected, the appropriate amount of detergent according to the level of soiling should be added to compartment II only (approx. 2/3 of the total amount required for a full load).
3) Standard programme for comparison tests (see section “Comparison tests”)
4) Standard programme for Energy label
5) see “Operating the dishwasher (Time display)”
N.B. Data obtained from a machine tested in Germany.
65
Technical data
Technical data
Height freestanding
Height built-in
Width
Width of building in recess
Depth
Depth with door open
Weight:
Freestanding model
Freestanding SC model #
Built-under model
Built-under model SC #
Integrated model
Integrated SCmodel #
Voltage
Rated load
Fuse rating
Test marks
Water pressure (flow rate)
Hot water connection
Delivery head
Drainage length
Connection cable
Capacity
# SC = Dishwasher with cutlery tray
66
85 cm
(adjustable + 1.0 cm)
82 cm
(adjustable + 5.0 cm)
59.8 cm
60 cm
60 cm (Freestanding model)
57 cm (Built-in model)
118.5 cm (Freestanding model)
115.5 cm (Built-in model)
approx. 63 kg
approx. 64 kg
—
approx. 60 kg
approx. 54 kg
approx. 56 kg
}
see data plate at the top of the door
VDE, Radio and television suppressed
0.3 - 10 bar pressure
max. 60 °C
max. 1 m
max. 4 m
approx. 1.7 m
12 place settings
67
Alteration rights reserved / (G691) / 000
This paper consists of cellulose which has been bleached without the use of chlorine
.
0398