1
-I 9-,
(II
9-,
m
=
C,
C)
>
z
C,
—I
0
rnO
Cl)
___________________
________
POLARiZED PLUGS CAUTION
This pro uct is
equipped with a polayized alternating
current line plug (a plug having one blade wider than
the other). This plug will fit into the power outlet only
one way. This is a safety feature. If you are unable to
insert the plug fully into the outlet, try re’ersing the plug.
If the plug should still fail to fit, contact an electrician
to replace the obsolete outlet. Do not defeat the safety
purpose of the polarized plug.
WHITE SEWING MACHINE COMPANY
Record in space provided below the Serial No. and
Model No. of this appliance.
The Serial No. is located on Bed Plate.
The Model No. is located on Rating Plate.
Serial No.
Model No.
Retain these numbers for future reference.
IMPORTANT SAFETY INSTRUcTIONS
When using an electrical aoptiance, basic safety precautions should always be
followed, including the followirg:
Read all instructions before using
(this sewing machine)
DANGER
To reduce the risk of electric shock:
An appliance should never he left unattended when plugged in. Always unplug this
appilance from the electric outlet immediately after using and before cleaning.
Always unplug before relamping, Replace bulb with same type rated 15 watts.
WARNING
To reduce the risk of burns, fire,
electric shock, or injury to persons:
1 Do not allow to be used as a toy. Close at1enton s recessary when this apIiance
is used by or near children.
2. Use this appliance only for its (ntendod use as described in this manual. i.,se only
attachments recommended by the manufacturer as contained in this manual.
3. Never operate this appliance if t has a damaged cord or plug, if it is not working
properly, if it has been dropped or damaged, or dropped into water Return te
appliance to the nearest authorized dealer or service center for examination, repdir,
electrical or mechanical adjustment.
4. Never operate the appliance with any air openings blocked, Keep ventilation open
ings of the sewing machine and foot controller free from the accumulation of lInt,
dust, and loose cloth.
5. Never drop or insert any object into any opening.
6 Do not use outdoors.
7. Do not operate where aerosol (spray) products are being used or where oxygen is
being administered.
8. To disconnect, turn all controls to the off (‘0”) position, then remove plug from
outlet.
9. Do not unplug by pulling on cord. To unplug, grasp the plug, not the cord.
10. Keep fingers away from all moving parts. Special care is required around the sewing
machIne needle.
11. Always use the proper needle plate. The wrong plate can cause the needle to break.
12. 00 not use bent needles.
13. Do not pull or push fabric while stitching. II may deflect the needle causing it to
break
14. Unplug the sewing machine when making any adjustments in the needle area,
such as threading needle, changing needle, threading bobbin, or changing
presser foot, etc.
15. Always unplug sewing machine from the electrical outlet when removing covers,
lubricating, or when making any other user servicing adjustments mentioned in the
instruction manual.
SAVE THESE INSTRUCTIONS
CONTENTS
I & 2
Names of Parts
3
Accessories
4
Before sewing (Power supply and Sewing Lamp)
5
Take out extension table, free arm sewing
6
Winding the bobbin
7
Removing bobbin case and bobbin
7
case
bobbin
into
bobbin
Inserting
8
Inserting bobbin case into shuttle race
threachng
needle
9
&
Twin
Threading upper thread
TO
Drawing up bobbin thread
10
Changing sewing directions
ii
Levelling machine
12
Adjusting thread tension
13
Regulating the presser foot pressure
13
Drop feed
14
Changing needle
15
Fabric, Thread. Needle table
16
To start sewing
17
Tofiriishseam
18
Straight stitch
18
Zigzag sewing
19
Button sewing
20
Zipper sewing
21
Hemming
22
Twin Needle
22
Embroidery
23
Quilter & Seam guide
24
Buttonhole sewing
25
Maintenance (Cleaning and oiling)
26
Checking Performance Problems WHAT TO 00
:3.
0
I-.
:3
m
:3.
‘V
-4
D
C,
:3.
0
I-.
:3.
0
C,
3
C,
m
Cm
-
-40
-a
:3.
p.
C,,
‘V
:3.
-4
0
8
0
m
z
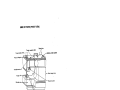
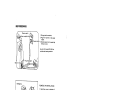
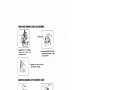
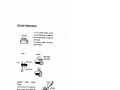
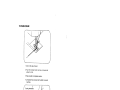
(REAR VIEW)
Upper thread guide
Stop clamp motion
• Face cover
Hand wheel
Thumb screw
plate
—2—
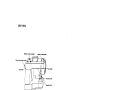
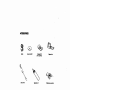
ACcESSORIES
Bobbin
Screw driver
Spoo’
— fr*
Zpzag tcc*
(On machine)
Machine o
Buttonhole cutter
oot
Button sew on foot
#11
#14
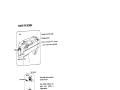
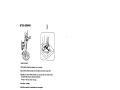
BEFORE SEWING
1. Fit plug into the machine.
2. Plug the machine to The power
supply.
3. Sewing speed can be vaned by
the toot control.
Use only VGK model ELI 68A foot
controller with sewing machine.
Sewing lamp
REMOVE OR INSTALL BULB
1. Open face cover in direction of
arrow.
2. Remove bulb by unscrew
ing it counter-clockwise.
3. Install a new bulb by screwing it
in clockwise.
4. Use a screw type bulb with
1 20V /1 5W(Max).
I
IMPORTANT When leaving the sowing machine unattended, the
plug must be removed from the socket outlet.
When servicing the sewing machine, or when removing covers or
chang?ng lamps, the machine must be disconnected from the supply
by removing the plug from the socket outlet.
—4—
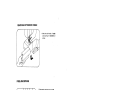
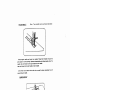
REMOVING EXTENSION TABLE
I .Hold the left end o table
and pull out in direction or
arrow.
FREE-ARM SEWING
1. This sewing machine can be used
as a fiat bed machine but easily
converts to free arm machine by
removing the extension table.
2. Especially useful for sewing
sleeves, pant legs, tubular fabrics
etc., more easily.
3. To sew tubular just sLip the sleeve
or leg of pants on to the free arm
as shown at side.
—5—
WINDING THE BOBBIN
1 ,Release stop motion knob.
2.Thread as shown.
3. When the bobbin is full, the stop
motion knob must be tightened.
5cm thread
Push bobbin winder spindle in
ciLtectiot’ ct aow.
Winder
When bobbin winding is com
pleted return spindle to
original position.
1
When bobbin winding is in
correct, release the screw of
upper thread guide and ad
just up or down until bobbin
winding is balanced.
—6—
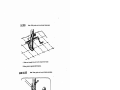
REMOVING BOBBIN CASE AND BOBBIN
Hinged latch
LZ
1.Ralse needle to Its highest
position and open the
shuttle race cover.
2.Open hinged latch of bobbin
case and pull bobbin case
out of machine.
3,Reiease the latch and bob
bin will fall out easily.
INSERTiNG BOBBIN INTO BOBBIN CASE
SLOT
I .Pull off 5cm of thread from
bobbin and insert it into
bobbin case as shown.
2.Guide the end of thread into
slot.
Tension spring
3.Pull into slot and under
tension spring and draw
out about 10cm of thread.
—7—
iNSERTiNG BOBBIN CASE INTO SHUTTLE RACE
Hinged latch
1 .Raise needle to its highest position,
pulling thread to the front, open the
latch of bobbin case and hold it.
Insert
-I
2Holding latch open, place bobbin case
onto centre pin in shuttle and release
latch
—8—
THREADING UPPER THREAD
Twin need’e threading
—9—
____________________
DRAWING UP BOBBIN THREAD
L Hold upper thread with left
hand, turn the hand wheel
slowly towards you untft the
needle qoes down and
comes up, Then stop the
hand wheel when the
takeup lever is at its highest
position. Lightly draw up
the upper t)read and the
lower thread will be brought
up in a loop.
2. Pun out both threads and
place them together under
presser foot to the rear of
machine.
1
3. Place fabric under presser
foot from the front, lower
presser foot.
4.Sah to
(see page16
CHANGING SEWING DIRECTIONS
I .Lower needle down into
fabric and raise presser foot,
pivot the fabric around the
needle to change direction
as desired.
2 Lower presser foot and start
to sew.
—10
—
—
H
—
dfl%
NMOC
3NIHOVW oNrn3,’31
ADJUSTING THREAD TENSION
It is only normally necessary to adjust
the upper thread tension to achieve the
correct balance between the upper and
lower threads.
The higher the number on the dial the
greater the tension.
Correct
Incorrect
Inside of fabric
Upper thread
Fabric
Upper thread
Bobbin thread
ADJUSTING
LOWER
THREAD
TENSION
Lower thread tension can be adjusted by
turning the screw on the bobbin case
slightly to the right {clockwise) to
increase tension, (Anticlockwise) to the
left todecrease tension.
As a general guide only, the user can achieve the correct
tension for normal sewing, by carefully suspending the
wound bobbin in its case by the thread. If the bobbin
and case immediately fall to the ground, the tension is too
loose and should be increased. The correct tension is
obtained when a slight jerk of the thread causes the bobbin
to drop a short distance only. If this action does not move
the bobbin the tension is too tight and should be loosened
until the desired effect is achieved.
—12—
Increase
REGULATING THE PRESSER FOOT PRESSURE
-
-
1. Ph down lever for desired pressure, for light fabrics set lever at 1, set at
2 for medium fabrics and 3 for heavy fabrics.
2. Insufficient pressure may cause poor feeding, skipped stitches, or difficulty
in guiding the fabric.
3. When darning or sewing freehand embroidery release the pressure by setting
the lever on 0.
DROP FEED
A
B.
Push feed lever down to drop feed below needle plate for darning,
embroidery, and button sewing.
Push feed lever up to raise feed above needle plate for normal
sewing.
—
13—
CHANGING NEEDLE
1. Raise needle bar to its highest position,
2.Loosen needle clamp screw and remove old needle.
will go.
3. With the flat side of the needle facing away from you insert needle as far up as it
4.Tighten the needle clamp screw securely.
—14—
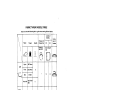
FABRIC ThREAD NEEDLE TABLE
Please note that the following list is a guide when sewing different fabrics.
Length of
stitches
\
\
\
\
Fabric
Thread
Needle
Pressure of
Presser foot
Pressu!o
regulation
\4>s
ST.
ZZ.
lndaca
lion of
tension
Stitch length
dial
‘
FD
Nylon
80 Cotton
Tricot
0 S.Fibre
Silk
50 silk
Light
ç_\\
Wool silk
Medium
Gingham
9
50S.Fibre
60-80
Cotton
1
1-3
1-4
2
0.5-3
0.5-4
0,5-3
0.5-4
11
11-14
j
Thin Jerse 60 S.Flbre
11
—
Gaberdine 50 Silk
Heavy
Denim
50 cotton
14-16
Jersey
50 S.Fibre
11-14
Tweed
5OSllk
11-14
—
15—
TO START SEWING
ints
1. Raise the take-up lever to rts highest position betore slartrng tid
after stopping sewing.
2. Hold both Threads about 10 cms to the rear of machine for the first
two or three stitches.
3. Sufficient fabric should be placed under needle before lowenng
presser foot
4.Depress foot and start to sew.
5. Test the machine stitches on a scrap of fabric you plan to use.
adjusting the machine for the length of stitch and tension suitable
to your fabric.
Attention
1. When turning the balance wheel manually,
toward you.
always turn it
2. Guide the cloth gently with your hand.
3. To prevent breaking needle always raise the needle out of the
fabric when you stop sewing.
—
16
—
TO FINISH SEAM
1 .Sew to the edge of seam.
2.Push the reverse button and sew in reverse for
about 34 cms.
3.Raise need’e to its highest position.
4.Litt presser foot and puW out the fabric 10 rear of
machine.
5Cut threads as shown on the thread cutter.
—17—
STRAiGHT STiTCH
1 This type of stitching is the one used most frequently.
2.The zig-zag presser foot can be used for both straight and zigzag
sewing.
3.For sewing light fabric, use smaller stitch size. (Refer to page 15 for dial
setting).
ZIGZAG SEWING
zigzag width position
Satin stitching can be used for sewing initials, patterns, applique, etc.
—
18
—
BUTTON SEWING
1 .Lower drop teed.
2. Place button attaching presser toot in position.
3. Place button between presser loot and fabric and lower presser foot.
4.Manua(Iy turn hand wheel towards you ensuring that the needle enters
into both holes of button without obstruction.
(Increase or decrease width setting).
5.Sew about 7 stitches.
6.PuU both threads to the underside and tie together.
—
19—
ZIPPER SEWING
Select straight stitch.
1. ZIpper foot is designed to
sew close to a raised edge
preventing sewing on zipper
2. Place zipper toot In position
and attach firmly
3. Fold the fabric about 2 cm
and place fabric under foot
[
1. To sew the left side of zipper
set the zipper foot on the right
side of the needle.
2. To sew the right side of zipper
set the zipper foot on the left side
of the needle.
J
sew as illustrated.
—
20
—
HEMMING
Note Hemmer foot can be purchased separately.
1. Raise the foot and the needle to its highest position. Replace the foot with the
hemmer foot.
2. Fold over the fabric edge by about 3mm and place it under the foot. Secure the
Take out the workpiece and draw the hem
folded edge with a few stitches.
into the hemmer foot by pulling the threads.
3. Lower the foot and sew the hem.
4. Durning sewing, fold the fabric to the left a little and allow it to run into the
hemmer foot.
5. Make sure that the fabric does not move under the right half of the foot. The
fabric must be fed into the scroll of the hemmer sufficiently so that the workpiece edge runs freely through the groove under the foot.
Only suitable materials can be used and some practice may be necessary to acheive
best results.
—21
—
TWIN NEEDLE
Note: Twin needle can be purchased separately.
\
the
Remove regular needle and insert twin needle. Thread both threads through
the
above
guide
thread
last
before
threads
Separate
sewing.
same path as for normal
needle. Insert one thread into the right needle of twin needle.
lnsert other thread into the left needle of twin needle.
this Will
CAIJTION:Do not set stitch width wider than number 2 setting. Exceeding
cause breaking of needle.
EMBROIDERY
Lower feed dog and move hooped fabric slowly to form the desired effect.
See Page 13 drop feed,
—22—
QUILTER
Note: Quilt guide can be purchased separately.
1 Slide arm through hole on top of presser foot holder.
2.Move guide to reguired stitch distance.
SEAM GUIDE
Note: Seam guide can be purchased separately.
1. Use seam guide when sewing a tong seam of regular
distance from edge of material.
2. Set guide in hole on bed, at right of needle plate,
and adjust distance.
3. Run machine with edge of material touching
guide. Position cloth guide at an angle to sew a
curved seam.
—
23
—
BUtTONHOLE SEWING
To prepare:
1
2.
3.
4.
Mark the location of buttonhole on your garment
Attach the all purpose foot.
Set the stitch length dial haitwaybetween O” and i’.
See illustrations for proper width settings.
To sew the buttonhole:
—
j
çJ
.
Set the width dial to sew the right side of the
buttonhole.. Stop with the needle down in the right
side of the zigzag stitch. (A)
‘-
A
2,
•
f j,’\
I (
\
I
-
a
Ø
Raise the
degrees.
lower the
stitch will
‘artack.)
presser foot and pivot tne fabric 180
Set the width dial to the smallest setting,
presser foot and sew one stitch. (This
movethe zigzag into position to sew the
With the needle down and the presser foot up, set
j\
4.
jji
5.
I
B
((
the width dial to the largest setting. Lower the
presser foot and sew the bartack 7 stitches. Stop
with the needle down in the right side. (B)
Raise the presser foot and set the width dial to sew
the second side of the buttonhole. Lower the presser
foot and sew the second leg of the buttonhole till the
length is the same as the first Leg. Stop with the
needle down in the right sida (C)
Raise the presser foot and turn the width dial to the
widest setting. Lower the presser foot and sew 7
stitches to sew the final bartack. (0)
0
—24—
MAINTENANCE (CLEANING AND OILING)
1.
2.
3.
4.
5.
6,
Raise needle to its highest position.
Take out bobbin case.
Turn latch knob A as illustrated.
Take off shuttle race cover.
Take out shuttle hook.
Clean and oil shuttle race and hook,
then replace in the reverse order.
C
Cleaning shuttle race
(A) Latch knob
(B) Shuttle race cover
(C) Shuttle hook
Open face cover and oil points
indicated.
Cleaning feed dog
—
25
—
Pucker ing
Machine Jamming
Knocking Noise
Breaking Bobbin
Thread
Breaking Upper
Thread
Breaking Needle
Fabric not
moving
PROBLEM
-
—
—
—
—
—
—
—
—
—
—
—
—
—
—
—
—
—
—
—
—
Tension too tight
Sewing foot pressure too strong.
Incorrect using fabric, needle and thread
No oil
Dust and thread in shuttle
Tight bobbin thread tension
Incorrect setting of needle
Improper threading.
Dust and thread in shuttle.
PROBABLE CAUSE
Feed dog down.
Machine not moving
t;tch length dial in 0 position
ight pressure on presser foot
ncorrect letting of needle.
leedle bent
ulling fabric.
ricorreci using needle thread and fabric
Incorrect position of zigzag width dial
Improper threading
Tight upper thread tension
Needle bent.
Nicks or burrs on shuttle
*
—
—
—
—
—
—
—
—
—
—
—
—
—
—
—
—
—
—
—
—
Reset
Regulating sewing fqot pressure.
Correct using fabric needle and thread
Need oil
Clean shuttle
Loosen bobbin thread tension
Reset needle
Rethread machine.
Clean shuttle.
CORRECTION
taise feed dog,
oving stop motion
‘oving dial to 1 4
ncrease pressure on presser foot
teset needle,
laplace new needle
)o riot pull fabric.
Correct using needle thread, and fabric
Moving to correct position
Rethread machine
Loosen upper thread tension
Replace new needle.
Replace shuttle or polish off burrs
completely
cHECK]NG PERFRMANc PRonLMs WHAT To Do