1
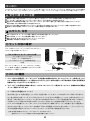
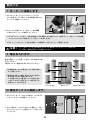
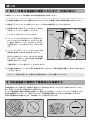
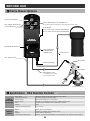
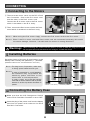
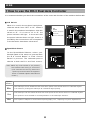
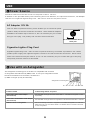
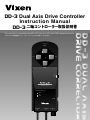
DD-3 Dual Axis Drive Controller
Instruction Manual
DD-3 二軸コントローラー取扱説明書
The controller is compatible with MT-1WT motors for GP2 and GPD2 equatorial mounts.
GP2・GPD2赤道儀用モーター
“ M T- 1WT ”とともにお使いいだだけます。
Decl.
R.A.
R.A.
Decl.
N
OFF
S
DUAL AXIS DRIVE CORRECTOR
MADE IN JAPAN
SPEED MODE SELECTOR
32x
2x
1.5x
▼
A.G.
R.A.Motor
▼
Decl.Motor
▼
DC Power
▼
はじめに
このたびは、ビクセン「DD-3二軸コントローラー」をお買い求めいただき、ありがとうございます。本製品は、GP2、GPD2赤道儀用
モーター“MT-1WT”とともにお使いください。なお、正しくお使いいただくため、お使いになる前に必ず本書をお読みください。
安全に関するご注意
製品を不安定な場所に置かないでください。倒れたり、落ちたりしてけがや故障の原因となる場合があります。
コードを持って振り回さないでください。他人にあたり、けがの原因となる危険があります。
電池を入れる際は極性を間違えないようにしてください。また、新しい電池と古い電池を混ぜて使用しないでください。
電池の破裂、火災や故障の原因となる危険があります。
水などのかかる場所では使用しないでください。
また濡れた手で製品をさわらないでください。感電する危険があります。
結露した状態で電源を入れないでください。故障の原因となる場合があります。
お手入れ、保管
炎天下の車の中や、ヒーターなど高温の発熱体の前に製品を放置しないでください。
清掃する場合、シンナーなど有機溶剤を使用しないでください。
製品に雨、水滴、泥、砂などがかからないようにしてください。
長期保管する場合は必ず電池を外してください。
◎ セット内容の確認
「 D D - 3 二軸コントローラー」
には以下のものが入って
います。
内容をお確かめください。
電池ボックス
「DD-3二軸コントローラー」のセット内容
DD -3二軸コントローラー本体
電池ボックス( ※電池は別売です。)
DD-3二軸コントローラー取扱説明書(本書)
保証書
なお、
「 D D - 3 二軸コントローラー」
以外のセット内容に
ついて
(鏡筒・赤道儀など各種機器)
はそれぞれに付属
の説明書にてご確認ください。
「 DD- 3二軸コントローラー」
取扱説明書(本書)
D D- 3二軸コントローラー本体
◎ DD-3の機能
1 . GP 2 、GP D2赤道儀用モーター
“ M T - 1W T ”
を赤道儀の赤経軸に取付け、
D D-3 コントローラーで操作することに
より、赤経軸方向の調整をモーター駆動でおこなえるとともに、
地球の自転による天体の動き(天体の日周運動)
を
自動的にキャンセルすることができます。※1
2 . “ M T-1 W T”を赤道儀の赤緯軸に取付け、このD D - 3 コントローラーで操作することにより、赤緯軸方向の調整を
モーター駆動でおこなえます。
※1
「天体の日周運動」
のキャンセル
夜空に輝く星々は、
時間の経過とともに見える位置が動いていきます。
これは地球が1日に1回転する自転のた
めに星が相対的に動いているように見えるものです。
これを
「星の日周運動」
といいます。
肉眼で星を見ている
場合は、
天体の動きはたいへんゆっくりと見えるので問題はありません。
しかし天体望遠鏡で数10倍∼100倍以上
の倍率でのぞいた場合は天体の動きが感じられ、
見ている星はすぐに望遠鏡の視野から外れてしまいます。
G P 2 、G P D 2 赤道儀にモーター
(M T - 1 W T )
とDD-3を取付けて駆動させることで、
赤道儀は
「星の日周運動」
に
合わせた速さで動くようになります。
赤道儀が
「天体の日周運動」
に合わせた速さで動くことにより、
見ている
天体が望遠鏡の視野から外れることがなくなります。
これを
《天体の自動追尾》
と言います。
(注意)
赤道儀の極軸合わせが正しくおこなわれている必要があります。
極軸合わせについては、
赤道儀に付属の取扱説明書をお読みください。
2
ご使用の前に
◎ 各部の名称
仕様は改良のため、予告なく変更する場合がございます。
Decl.
電源確認パイロットランプ
R.A.
R.A.
Decl
(赤緯)
ガイドボタン
※一軸
(赤経軸)
のみ駆動させる場合は使用しません。
R.A.
(赤経)
ガイドボタン
N - S 切替スイッチ
Decl.
N:北半球で使用する場合
S:南半球で使用する場合
N
OFF
S
DD-3コントローラー本体
DUAL AXIS DRIVE CORRECTOR
MADE IN JAPAN
SPEED MODE SELECTOR
速度切替スイッチ
32x
2x
1.5x
▼
A.G.
← A . G . オートガイダー端子
6極 6芯モジュラージャック
電源コード
R.A.Motor
▼
Decl.Motor
▼
DC Power
▼
電池ボックス
R.A.
(赤経)
モーター用コード
赤緯モーター
電源ソケット
赤経モーター
Decl
(赤緯)
モーター用コード
※一軸
(赤経軸)
のみ駆動させる
場合は使用しません。
G P 2・G P D 2 赤道儀
◎ D D -3コントローラーの仕様
仕様は改良のため、予告なく
変更する場合がございます。
DD-3ニ軸
コントローラー
機器名称
形式
回転精度
電源
大きさ
重さ
使用温度範囲
DD-3二軸コントローラー
マイクロコンピュータ制 御 4 相 パ ル ス モ ー タ ー
±0.002%(対恒星時)
動作電圧:DC8∼12V、恒星時4 3 0 m A・最大約9 5 0 m A
高さ190×幅65×厚さ26mm
270g
0∼50℃
電池ボックス
電池
大きさ
重さ
連続駆動時間
単一乾電池8本使用
高さ140×幅80×厚さ80mm
1 6 0 g( 電 池 含 ま ず )
ア ル カ リ 単 一 乾 電 池 で 約 2 0 時 間( 常 温 2 0 ℃ : 恒星時追尾)
3
取付け方
Ⅰ モーターに接続します。
① DD-3コントローラーの2つのコードのうち、
R.A.(赤経)モーター用コードを赤経軸に取付けた
モーターに接続してください。
赤緯モーター
赤経モーター
R .A.(赤経)
モーター用
コード
② 次に、Decl(赤緯)モーター用コードを赤緯軸
に取付けたモーターに接続してください。
Decl(赤緯)
モーター用
コード
※GP2ガイドパックSなど、一軸(赤経軸)のみを駆動させる場合は、R.A.(赤経)モーター用コードのみ接続
してください。Decl(赤緯)モーター用コードは使いません。
※R.A.コードとDeclコードを逆に接続しても故障はしませんが、正しく駆動しません。
注意!
コードをモーターから外す際は、必ずプラグ部を持ってください。コード部のみを
引っぱると、故障の原因となる場合があります。
Ⅱ 電池を入れます。
電池の極性(+−)に注意して、新しい単一電池を8本
入れてください。
(電池はアルカリ乾電池をおすすめいたします。)
※長時間お使いになる場合は、必ず予備の電池
をご用意ください。
※寒冷地でお使いの場合、寒さのために本来の
電力が得られない場合があります。
この場合、布などで電池ボックスを覆うある
いはカイロなどで温めることで電力低下を
改善することができます。
アルカリ単一電池
電池ボックス
反対側にも取付けます。
Ⅲ 電池ボックスに接続します。
① D D -3コントローラーの
「N - S切替スイッチ」
がOFF
になっていることを確認してください。
←電源ソケット
← N - S 切替
スイッチ
をOFF
② 次に、電池ボックスから出ている電源コードを、
DD-3コントローラーの電 源ソケットに差し込ん
でください。
4
←電源コード
使い方
Ⅰ D D - 3 コントローラーの使い方。
夜の天体観測でお使いになる前、明るい日中にうちにコード類の接続やスイッチの動きなどの動作確認しておく
ことをおすすめします。
① N-S切替スイッチを合わせます。
日本など北半球でお使いの場合は、
「 N - S 切替スイッ
De cl.(赤緯)
ガイドボタン
チ」を“OFF”の位置からスライドさせて“ N ”に合わ
N-S切替スイッチ
せます。
電源確認
パイロット
ランプ
北半球
南半球でお使いの場合は、
“ S ”にしてください。
電源OFF
“ N ”または“ S ”
に合わせますと、
「 電源確認パイロ
南半球
ットランプ」が点灯します。点灯しない場合、取付け
が不完全であったり、電池が消耗している可能性が
あります。
② 速度切替スイッチで速度を選びます。
R.A(赤経)
.
ガイドボタン
「R.A.(赤経)ガイドボタン」および「 D ec(赤緯)
l
ガイドボタン」を押した時に動くモーターの
速度を選びます。赤経、赤緯両方のモーター
速度切替スイッチ
速度が同時に切替となります。
(ヒント1)
※ガイドボタンを押さない状態で恒星時駆動
を続けます。
(ヒント1)「天体の日周運動」に合わせた速さのことです。
速 度
32×
「天体の日周運動」の32倍の速さで赤道儀を動かすことができます。天体をすばやくとらえたい
場合にお使いください。
2×
「天体の日周運動」の2倍の速さで赤道儀を動かすことができます。位置を微調整する際、最も使
いやすい速さです。
1.5×
天体写真撮影時など、非常に細かい操作が必要な場合に使用します。
5
使い方
Ⅱ 見たい天体を望遠鏡の視野に入れます。
(天体の導入)
天体導入については、必ず赤道儀に付属の取扱説明書もお読みください。
① 赤道儀の極軸を合わせます。極軸の合わせ方については、赤道儀に付属の取扱説明書をお読みください。
※ 極軸が正しく合っていない場合、D D - 3によって天体を自動追尾することはできません。
② 赤道儀の赤経・赤緯クランプをゆるめて、目的の
天体をファインダーの視野にとらえます。
赤緯クランプ
とらえたら、両方のクランプをしめます。
天の北極
赤経クランプ
③ ファインダーをのぞきながら「R.A.(赤経)ガイド
ボタン」および「Decl(赤緯)ガイドボタン」を押し
て、目的の天体をファインダーの中央にとらえます。
「速度切替スイッチ」の速さは“32×”がおすすめ
です。
④ ファインダーが正しくセットさせていれば、天体
望遠鏡の視野にも目的の天体があるはずです。
極軸
再び「R.A.(赤経)ガイドボタン」および「Decl(赤緯)
ガイドボタン」を押して、目的の天体を天体望遠鏡
の視野の中央にとらえます。
「速度切替スイッチ」の速さは“2×”がおすすめです。
⑤ 赤道儀の極軸が合っていれば天体の自動追尾がおこなわれて、天体望遠鏡の視野から目的の天体が外れる
ことはありません。
※モーターの動きが悪くなった場合は、乾電池を新しいものに交換してください。
Ⅲ 天体望遠鏡の視野内で東西南北を確認する
天体望遠鏡でのぞいた際に見える視野は、通常は上下左右が逆さまになっているので、方向がつかみにくいです。
また、天頂プリズムを使った場合は見え方が異なります。
そこで、天体望遠鏡の視野の東西南北を確認したい場合は、
「N-S切替スイッチ」をいったん“OFF”の位置にします。
天体を自動追尾していたモーターが停止しますから、天体望遠鏡の視野の中で、徐々に天体が動いていきます。
天体は日周運動で西に動きますから、天体が動いていく方向が西となります。
北天の星の動き
東
望遠鏡の視野
南天の星の動き
南 望遠鏡の視野
北
西
南
東
西
北
6
使い方
◎ DD-2の電 源 に つ い て
DD -3コントローラーには直流8∼12Vまでをお使いいただけます。付属の電池ボックスによる単一乾電池の他、
100Vの A C電源や車のカーバッテリ(シガーソケット)を電源とすることが可能です。
●100VのAC電源をお使いの場合
弊社でご用意していますオプションパーツ「 AC アダプター1 2 V・3 A」をお買
い求めください。市販のものもお使いいただける場合もございますが、必ず
スペックと差込みプラグの形状をご確認ください。
※図のような構造(極性およびサイズ)のものでない場合、接続できないか故障の原因
端子の極性仕様
となります。
DC12V EIAJ RC5320A Class4
センタープラス
●カーバッテリ(シガーソケット)をお使いの場合
弊社でご用意していますオプションパーツ「シガーソケット用電源コード(S X用)」をお買い求めください。
市販のものをお使いの場合は、100VのAC電源と同様に差込みプラグの形状を必ず確認してください。
◎ オートガイダー併用につ い て
本製品は外部オートガイダーに対応する端子を装備しています。
接続するには別途"AG Sコード"または" AG SコードT y pe S"が
必要になります。
A.G.端子
Ra− Dec− Dec+ Ra+ GND NC
製 品 名
対 応
弊社旧製品AG A-1
AGSコードType S(別売)
弊社旧製品AG A-1 L im it ed
付属のAGSコードType Sをご使用ください。
SBIG社製STシリーズ
オートガイダー付属のコードまたはAGSコードをご使用ください。
詳しくはオートガイダーに付属の説明書にてご確認ください。
7
トラブルシューティング
トラブル
原因
対策
電源スイッチを入れてありますか?
コントローラーが
作動しない 。
「 N - S 切替スイッチ」
を
“ N ”または
“ S ”にして
ください。
電源、
コネクター等が外れていませんか?
コード類の接続を確認してください。
電池が古くなっていませんか?
新しい電池を入れてください。
電源の極性
( + − )は合っていますか?
電池の極性を確認してください。
寒さで電力が大きく低下する場合があります。
電池を冷やさないようにしてください。
モーターが動かない。
星を見ても動いている様子が分からない様に
モーターもこれに合わせて極めてゆっくり回転
しています。
このため動いてない様に見えたも
のと思われます。
目的の天体が視野に
入らない。
異常ではございません。
R . A(赤経)
.
とD e c(
l 赤緯)
のモーター用コード
の接続が逆ではありませんか?
コードの接続を確認してください。
極軸は正しく合っていますか?
極軸が合っていないと天体追尾が正しくおこ
なわれません。
極軸を合わせてください。
望遠鏡の重量バランスはとれていますか?
赤道儀に付属の取扱説明書等にしたがって、
重量バランスをとってください。
ギアはきちんと噛みあっていますか?
モーター部のギアの噛みあわせを確認して
ください。
正確に天体の追尾を
しない。
ボタンを押してもコン
トローラーが作動しな
い、
モーターが動かない
星の動きに対して数倍で動作しています。
このためボタンを押してもモーターは高速回転
せず、
見掛け上は極めてゆっくり回転します。
速度によってはモーターが全く動いてないよう
に見えることもあります。
異常ではございません。
ボタンを押すとモーター
が止まります。
2倍速で追尾と反対向きのボタンを押すと
モーターが止まります。
(仕様)
1.5倍速の場合は止まってしまうほどゆっく
りと動きます。
異常ではございません。
お客様または第三者が本製品を誤って使用したために生じた故障、その他不具合よって受けられた損害については、当社は
一切その責任を負いませんのであらかじめご了承ください。
本製品をお使いの際、万一ご不審な点、ご不明な点、お気づきのことなどございましたら、弊社カスタマーサポートセンター
へお問い合わせください。
本製品は改良のため予告なく変更することがありますので、あらかじめご了承ください。
8
PREFACE
Thank you for you purchase the Vixen DD-3 Dual-Axis Drive Controller.Use this controller with the MT-1WT motors
for GP2 and GPD2 equatorial mounts. Carefully read the instructions before use.
Caution
Do not put this product in an unstable place. It loses the balance and falls on the ground, and it can cause injuries.
Do not whirl this product with the cord grasped. It will possibly hit someone and cause injury.
When setting batteries in a battery box, check their polarities. Do not use old batteries and new batteries mixed together.
Doing so may cause blowout of the batteries, fire or trouble of the product.
Do not use this product in a wet environment. Do not touch it with a wet hand. There is a possibility of getting an electric shock.
When the product is wetted with dew, do not turn on the power. it may have a breakdown.
Maintenance and Storage
Do not leave the product in a sun-heated car or near a heater.
Do not use any organic solvent like thinner for cleaning the product.
Keep the product away from the rain, dew, mud, or sand.
When storing the product for a long period, make sure to remove the batteries.
Contents
The DD-3 Dual Axis Drive Controller contains the
following items.
Battery Case
DD-3 Dual Axis Controller
Battery Case (Batteries are sold separately.)
Instruction Manual (this booklet)
Ins tr uc ti on M anual
( thi s book l et)
DD-3 Dual Axis Drive Controller
Functions
1. In the GP2/GPD2 equatorial mounts equipped with a MT-1WT motor on the R.A. axis, the DD-3 Dual Axis
Drive Controller enables fine and smooth adjustments in the R.A. direction to keep following the celestial
motion caused by the Earth’s rotation (diurnal motion). *1
2. If the MT-1WT is installed on the Decl. Axis of the above equatorial mounts, fine and smooth adjustments
in the Decl. direction can be done as well.
*1. Tracking of the diurnal motion of celestial objects
The stars in the night sky appear to move across the sky as time goes on. This motion is caused by the
Earth’s rotation, and is called “diurnal motion of celestial objects”. Seeing the stars with the naked eye, we
realize that they move very slowly. However, when we look at stars through a telescope of high power, they
deviate from the field of view quickly. To settle this problem, DD-3 Dual Axis Drive Controller and MT-1WT
motors are used on the GP2/GPD2 equatorial mounts. If you operate the motor drive system, motion of the
telescope will be synchronized with the diurnal motion of stars and the stars looked at through the
telescope will not deviate from the field of view. This is called “automatic tracking of celestial objects”.
[Warning]
The polar axis of the equatorial mount must be aligned accurately. For the procedure of aligning the polaraxis, refer to the instruction manual provided with the equatorial mount.
9
BEFORE USE
Parts Descriptions
Decl.
Power-On Indicator
R.A. (Right Ascension)
Control Buttons
R.A.
R.A.
Decl. (Declination) Control Buttons
N.B.: Not used for operation in the single-axis (R.A. axis)
N-S Switch
N: for use in the northern hemisphere
S: for use in the southern hemisphere
Decl.
N
OFF
S
DUAL AXIS DRIVE CORRECTOR
MADE IN JAPAN
SPEED MODE SELECTOR
Speed Mode Selector
32x
2x
1.5x
▼
A.G.
R.A.Motor
▼
Decl.Motor
▼
Auto guider Port
6-pole 6-wired
modular jack
Power Cord
DC Power
▼
Battery Case
R.A. Motor Cord
R.A. Motor
Power Cord Plug
Decl. Motor
Decl. Motor Cord
Not used if your mount
has not Decl, motor.
GP2/GPD2
Equatorial Mount
Specifications ‐ DD-3 Dual Axis Controller
( The s pe c i fi c a t i ons ma y c ha nge w i t hou t not i c e. )
DD-3
Dual Axis
Controller
Motor Type
Operation Accuracy
Power Source
Current Drain
Size
Weight
Operational Temperature
Microprocessor controlled 4-Phase Pulse Motor
±0.002% (against sidereal rate)
DC8~12V (required for operation)
430mA (for sidereal-rate driving) / 950mA (maximum)
Height 19cm x Width 6.5cm x Thickness 2.6cm
270g
0 C to 50 C
Battery
Case
Battery
Size
Weight
Continuous Driving Time
Eight (8) D-size batteries
Height 14 X Width 8 X Thickness 8cm
160g (without batteries)
Approx. 20 hours with alkaline D-size batteries (at ambient temperature.)
10
CONNECTING
Connecting to the Motors
① There are two motor cords on the DD-3 Dual
Axis Controller. One is the R.A. motor cord
and the other is the Decl. motor cord.
Connect the R.A. motor cord to the R.A. motor
which is attached to the R.A. body.
Decl. Motor
R.A. Motor
② Then, connect the Decl. motor cord to the Decl.
motor which is attached to the Decl. body.
R.A.
Motor
Cord
Decl. Motor Cord
Noto 1: When using the R.A. motor singly, connect the R.A. motor cord to the R.A. motor .
Noto 2: Even if the R.A. motor cord and Decl. motor cord are connected reversely, this could
not cause damage, However, it would work the motors in wrang directions.
Warning!
When removing the cords from the motors, be sure to hold the plug part to pull.
Do not pull the cords themselves as doing so could break them.
Installing Batteries
Set eight pieces of the new D-size battery in the
battery case correctly with polarities (+ -) checked.
(Alkaline batteries are recommended to be used.)
Noto 1: For long hours of operation, make sure
to bring spare batteries with you.
Noto 2: In case of operation in a cold weather,
t h e bat t er ies m a y n o t p r o d u c e th e
e l e c t r i c t y p o w e r s u ff i c i e n t t o t h e
m o t or s due t o l o w t e m p e r a t u r e .
In such a case, try to lag the battery
case with a cloth or warm it with a pocket
warmer in order to prevent decrease in
power.
Al k al i ne D - s i z e Batter y
Batter y C as e
Set four pi ec e s o n
the other s i de.
Connecting the Battery Case
Make sure that the N-S Changeover Switch
on the DD-3 Dual Axis Controller is set to OFF.
Insert the plug of the power cord from the battery
case into the power cord socket on the DD-3
Dual Axis Controller.
Set the N-S
Changeover
Switch to OFF.
11
Power
Cord
Socket
Power
Cord
Plug
USE
How to use the DD-3 Dual Axis Controller
It is recommended that you check the connections of the cords and functions of the switches before dark.
N- S S w i t ch
When it is used in the northern hemisphere,
slide the switch from “OFF” to “N”. When it
N-S
Swit ch
is used in the southern hemisphere, slide the
Decl. Control
Button
Northern Hemisphere
switch to “S”. If it is set to “N” or “S”, the
Power
Indicator
Power OFF
power indicator will light. In the event that
Southern Hemisphere
the power indicator does not light, there is a
possibility that connections are incompletion
or the batteries have been e x h a u s te d .
Speed Mode Selector
R.A. Control Button
On the S peed Mod e S e l e c to r, s e l e c t yo u r
desired speed of the motors to operate when
the “R.A. Control Button” or “Decl. Control
Button” is pressed. The selected speed is
relative to both the R.A. and Decl. motors.
Noto: When any control button is not pressed,
th e sidereal-rat e dr iv ing is c ont inued.
( T h e s i d e r e a l - r a t e d r i v i n g means the
speed synchronized with the apparent
motion of celestial objects called diurnal
motion.)
Speed
Mode
32x
2 x
1.5x
The telescope can be slewed around at 32 times speed of the diurnal motion of celestial objects.
It is useful for pointing the telescope at a celestial object quickly.
The telescope can be slewed around at 2 times speed of the diurnal motion of celestial objects.
This speed is most suitable for fine adjustments of the telescope direction.
This s peed is helpf ul f or as t r on om i c al ph o t o g r a p h y, e t c . , r e q u i r i n g v e r y f i n e a d j u s t m e n t s .
12
U SE
Ⅱ How to bring a celestial object into the field of view of the telescope
For bringing a celestial object into the field of view, refer to the instruction manual provided with
the equatorial mount, too.
Align the polar axis of the equatorial mount. As for how to align the polar axis, refer to the instruction
manual provided with the equatorial mount. (If the polar axis is not aligned correctly, the equatorial
mount cannot follow the celestial objects accurately with the DD-3 Dual Axis Controller.)
Loosen the R.A. and Decl. clamps and bring
a celestial object into the field of view of the
finderscope. Once the celestial object is seen
in the field of view of the finderscope, tighten
both of the clamps.
Decl. clamps
R.A. clamps
Polar axis
While look ing thro u g h th e fi n d e rs c o p e , b ri n g
the celestial object into the center of the field
of view with the R.A control buttons and Decl.
control buttons. When doing this, the speed mode,
32x, is recommendable.
Supposing the finderscope is correctly installed
on the telescope, the same celestial object will
be seen in the field of view of the telescope.
While looking through the telescope, bring the
celestial object into the center of the field of view
with the R.A. control buttons and Decl. control buttons. The speed mode, 2x, is recommendable.
If the polar axis of the equatorial mount is correctly aligned, the celestial object will be tracked
automatically without deviating from the field of view.
Noto: If the motors come not to work properly, replace the batteries with new ones.
Ⅲ How to know north, south, east and west in the field of view
As the field of view of the telescope is generally upside-down and mirror-reversed, it is not easy to
know the right direction. In case of using a diagonal prism additionally on the telescope, the field of
view will be seen differently. If you want to check north, south, east and west in the field of view, set
the N-S Switch to OFF in order to stop the motors tracking the celestial objects. Whereat, the celestial
objects begin to move gradually in the field of view. Since the celestial objects move to the west from
the east, the direction to which they are moving is the west.
Celestial Motion in the Northern Sky
East
Celestial Motion in the Southern Sky
South
North
West
South
East
West
North
13
USE
Power Source
The DD-3 Dual Axis Controller works on the power of 8V to 12V D.C.
In addition to the provided battery case containing the D-size batteries, the optional accessories, “AC Adapter
12V 3A” and “Cigarette-Lighter Plug Cord – SX” can be used for the power source.
AC Adapter 12V 3A
This is a Vixen’s optional accessory, which enables you to use the AC power
(100V to 240V) for the DD-3 Dual Axis Controller. Other brand AC adapters
available in the market may be used for it, but it is necessary for you to check
the type of the plug. The polarity and size must be as illustrated.
DC12V EIAJ RC5320A Class4
center plus
Cigarette-Lighter Plug Cord
Cigarette-Lighter Plug Cord – SX is a Vixen’s optional accessory, and makes it possible to use a Vixen
potable power supply with cigarette-lighter sockets for the DD-3 Dual Axis Controller. Other brand
items of the same kind may be used for it, but it is also necessary for you to check the type of the plug.
The polarity and size must be as illustrated.
Use with an Autoguider
The autoguider connecting port on the DD-3 is compatible with ST series
of autoguiders manufactured by SBIG, USA. To use your autoguider unit with
the DD-3 Dual-Axis Drive Controller, an AGS cord
(or AGS cord type S) may be necessary.
Autoguider Connecting Port
Ra− Dec− Dec+ Ra+ GND NC
Product name
Connecting cables required
Vixen AGA-1 Auto Guide Adapter
(Discontinued)
Use the AGS cord type S for the Vixen AGA-1. The AGS cord type S is sold
separately.
Vixen AGA-1 Limited Auto Guide Adapter
(Discontinued)
Use the AGS cord type S that is supplied as standard with the AGA-1 Limited.
SBIG ST series of autoguiders
Use a connecting cord that is supplied for the SBIG autoguiders or order the
AGS cord from your local Vixen dealer. For details refer to instruction manuals
for the autoguiders.
14
TROUBLESHOOTING
Tr o u b l e
The DD-3 does not
work or the motors
stop moving.
Cause
Solution
Is the power switch on?
Set the “N-S Switch” to “N” or “S.”
Is the power cord or connector disconnected?
Check the connections of the cords.
Are the batteries too old?
Replace the batteries with new ones.
Are the batteries’ polarities (±) correct?
Check the polarities of the batteries.
Is the voltage level(electricity) normal?
The voltage(electricity)can drop to a too
low value in a cold night. Try not to let
the batteries cool.
The motors look as if they are not moving
since they move slowly.
Celestial objects cannot
be brought into the field
of view.
Are the R.A. motor cord and Decl. motor
cord reversed?
Check the connections of the cords.
Is the polar axis correctly aligned?
Celestial objects cannot be tracked accurately
unless the polar axis is properly aligned.
Align the polar axis accurately.
Is the telescope balanced well?
Referring to the instruction manual provided
with the equatorial mount, balance the
telescope properly.
Are the gear wheels engaged each other
properly on the motors?
Set the gear wheels to engage each other
properly.
or
Celestial objects cannot
be tracked accurately.
The motor speed for tracking the celestial
objects is very slow. You may continue to
use it.
CAUTION: With the speed mode selector, you can set the search speed at 1.5x, 2x or 32x sidereal rate freely.
However, it is advisable not to hold the search speed of 32x for a long time. As the current consumption is rather
large at the 32x, batteries will be exhausted in a short time.
When using a car battery, etc., make sure that an output does not exceed
the voltage limit. of 12V, in a stabilized direct current.
The company will not be responsible for any damage caused by the owner’s or a third person’s incorrect use or
incorrect storage.
The specifications are subject to change without notice.
15
製品についてのお問い合わせについて
弊社ホームページのお問い合わせメールフォームにて受け付けております。
http://www.vixen.co.jp/
またお電話によるお問い合わせも受け付けております。
カスタマーサポートセンター
電話番号 :
0 4 - 2 9 6 9 - 0 2 2 2(カスタマーサポートセンター専用番号)
受付時間 : 9:00∼12:00、13:00∼17:30
(土・日・祝日、弊社夏季休業・年末年始休業など弊社休業日を除く)
※上記電話は都合によりビクセン代表電話に転送されることもあります。
※お電話によるお問い合わせは、時間帯によってつながりにくい場合もございます。
お客様のご質問にスムースに回答させていただくためにも、上記のお問い合わせ
フォームのご利用をお薦めいたします。
5-17-3 H i gash itokorozawa,Tokorozawa, Sai tama 359-0021, Japan
P h o n e +81-4-2944-4141(International)
h t t p : / / w w w. v i x e n . c o . j p F a x +81-4-2944-9722(International)
〒359-0021 埼玉県 所沢市 東所沢 5 - 1 7 - 3
[代 表]T E L : 04-2944-4000 FAX : 04-2944-4045
[ホームページ] h t t p : / / w w w . v i x e n . c o . j p
60キ-4-(80000083)-2S-87-(Miz)
( M)