1
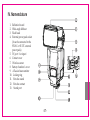
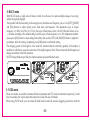
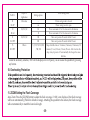
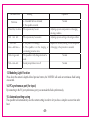
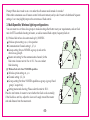
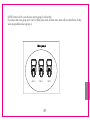
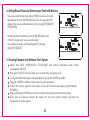
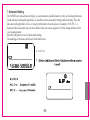
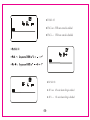
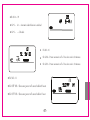
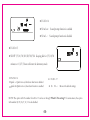
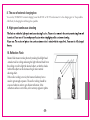
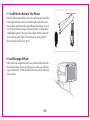
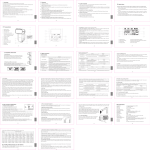
I. Warning
To avoid fire or electrical shock, do not expose this product to rain or moisture.
To avoid short circuit, be sure the batteries contacts are securely packed and in accordance with local provision
when handling the batteries.
Please place the batteries and the parts which can be swallowed mistakenly away from children. Contact a
doctor immediately when it occurs.
To avoid possible injury to eyes, do not use the flash light in a short distance from the eyes.
To avoid possible safety accident, do not use the flash light on the people who need a high degree of attention.
Please take out the batteries and stop using immediately in case of below.
● This product is dropped or shocked seriously and the inner part of the product is bared.
● If the battery leaks corrosive liquids, please take out the battery with gloves.
● The product gives off strange smell, smokes or heats.
Do not disassemble or maintain this product. Touching the internal high voltage circuit will cause electric
shock.
Remove batteries during long periods of non-use.
-33-
II.Features
AWL SUPPORTED FOR N’s & C’s SYSTEM
The YN565EX can be triggered by 580EX II, SB-900/800/700, 7D/60D/600D, Nikon c-command and ST-E2,
and flashes as TTL mode as well as M/Multi mode.
TTL FLASH WITH LARGE GUIDE NUMBER
GN58@ ISO100, 105mm; which reaches the level of the mainstream hot shoe flashes, supports TTL/M/Multi mode.
MULTIPLE TRIGGER MODE SUPPORTED
The YN565EX can be triggered by hot-shoe, flash command slave mode, optical S1, and S2 (pre-flash-canceled
mode).
SUPPORTS AUTO/MANUAL ZOOMING
The YN565EX covers a focal length range of auto, and 24 to 105mm, supports full-frame/half-frame camera.
COMPREHENSIVELY SUPPORTS TTL FUNCTIONS
FEC, FEB, Rear-curtain sync, FE lock, Modeling Light, Canon camera menu accessable
SUPER SPEED OF CHARGING RECYCLE
It only takes 3 seconds to finish a charging cycle after a full level output, you can use external power pack to
accelerate the charging speed once more.
PROVIDES CHARGING SOCKET FOR EXTERNAL POWER PACK
YN565EX provides charging socket for external power pack, to meet your higher demand for charging recycle.
-34-
PC PORT PROVIDED
YN565EX provides PC port,you can make the flash synchronously by connecting to the PC port.
SOUND PROMPT SYSTEM
Turn on the sound prompt function, different sounds indicate working situations help you focus on shooting.
MODELING LIGHT FUNCTION
Press down the camera’s depth-of-fired preview button, the YN565EX will send out continuous flash lasting
one second.
ADVANCED SETTINGS ON FLASH
The YN565EX supports advanced settings; you can customize the unit according to your shooting preferences.
AUTOMATIC SETTINGS SAVING
YN565EX can save the current settings automatically.
LCD PANEL USER INTERFACE WITH SUPER GELIVABLE METAL HOT-SHOE STAND
-35-
III.Quick Start
If you don’t have much time to read the whole user manual, we advise you to read this section.
1. Please avoid the excessive use of the output with maximum power. It can effectively extend the service life
of this product.
2. You can understand the function of each button by pressing them and observing the displayed content.
3. Keeping [ZOOM] button under pressed can enter off mode SL(cn or c, n separately)/S1/S2.
4. Long press on [Fn] button to set the function of advanced option of speedlite. See the section of “advanced
setting” for the content.
5. Operate the YN565EX through function setting of external speedlite on the menu of Canon camera.
6. Press the [UP], [DOWN], [LEFT] and [RIGHT] buttons to adjust the parameters of speedlite quickly at the
current mode. For some parameters, the [OK] button in the center is needed to be pressed for setting.
7. This product provides ETTL/M/MULTI mode. It can be switched through [MODE] button.
-36-
IV. Nomenclature
1.Reflection board
2.Wide-angle diffuser
3.Flash head
4.External power pack socket
(It can be connected to the
SF-18C or SF-17C external
power pack)
5.PC port(for input)
6.Contact cover
7. Wireless sensor
8.Battery chamber’s cover
9. AF-assist beam emitter
10.Locking ring
11.Hot shoe stand
12.Hot shoe contact
13. Sound port
-37-
-38-
14. LCD panel: It will display the status of function settings.
15. Rear-curtain sync hotkey: The speedlite will be switched between rear-curtain sync and front-curtain
sync in circle for each press.
16. ZOOM button: It is applied to set focal length coverage of speedlite and relevant parameters of slave unit.
Use the [ZOOM] and [LEFT], [RIGHT], [UP], [DOWN] and [OK] button for operation.
17. Power switch: The power of the speedlite can be turned on or turned off by holding this button for 2
seconds.
18. Select/Setting button group: Buttons of multi functions include LEFT, RIGHT, UP , DOWN and OK
buttons; you can adjust output, FEC, FEB, Stroboscopic flash count, Stroboscopic flash frequency, zooming
setting, slave units, channel and slave groups.
19. Mode switch button: Under the normal flash, the mode of the speelite will be switched among the
ETTL/M/MULTI in circle for each press; and under the wireless flash, long press on this button locks the
speedlite in M and MULTI mode.
20. Illumination/Advanced options button: A short press will turn on or turn off the LCD panel illumination
light, a long press on the button conducts advanced option setting of speedlite.
21. Charging indicator / Test button: The lighting of red light shows that charging process is finished and
flash can be used; the lighting of green light shows that it is in charging or a shortage of power; the alternate
flashing of the red and green lights shows overheat protection, please wait for about 3 minutes to cancel the
protection before continuing use. If you press this test button (PILOT), the speedlite will give a test flash.
22. Flash exposure confirmation indicator: If a standard exposure was obtained, the flash exposure
confirmation indicator will light for 3 seconds.
-39-
-40-
V. Installation Instruction
1. Install Batteries
Slide the batteries chamber’s cover in the direction of the arrow.
Insert the batteries according to the label inside battery chamber.
Make sure the direction of the batteries’ polarity is correct.
Close the battery chamber cover in the direction of the arrow.
2. Attaching to the Camera
Loosen the locking ring by turning it in the direction of the arrow.
Slip the speedlite hot shoe stand into the camera hot shoe stand until it stops.
Turn the locking ring in the direction of the arrow tighten.
To detach the speedlite, loosen the locking ring by turning it in the opposite direction.
-41-
VI. Basic Functions
1. Basic Operations
Component
Operation
Power switch of the flash light. The power of the flash light can be turned on or turned off by holding this button
[Power Switch]
for 2 seconds.
It is suggested that the battery shall be taken out after the power of the flash light is closed through this button.
A short press on this button makes the speedlite enter electric zoom setting state. Press
[ZOOM] button
[LEFT] [RIGHT] or [UP]
[DOWN] buttons to adjust different focal length (auto,24,28,35,50,70,80,105mm). .
A long press on this button makes the speedlite enter slave unit setting state, you can set it at SL(cn or c, n
separately)and S1/S2. Then press [OK] button to confirm the setting.
[Rear-curtain sync]
The speedlite will be switched between rear-curtain sync and front-curtain sync in circle for each press.
hotkey
[MODE] button
Under the normal flash, the mode of the speelite will be switched among the ETTL/M/MULTI in circle for each
press; and under the wireless flash, long press on this button locks the speedlite in M and MULTI mode.
[Illumination/advanced
A short press will turn on or turn off the LCD panel illumination, hold the button to go into the status of advanced
option] button
options.
[LEFT] [RIGHT] and
Used as the button to adjust slave unit, zoom range, flash brightness, Exposure Compensation, stroboscopic flash
[OK] button
times, stroboscopic flash frequency. See the subsequent chapter for relevant operation.
You can set exposure bracketing and zoom range. Under the TTL mode, you can operate [up] and [down] button to
[UP] [DOWN] button
[PILOT] button
set the exposure bracketing of speedlite. It should be used with [ZOOM] button to set range zoom.
Press this test button and the speedlite will test flashing in current output level; under the dormancy state, you can
press [PILOT] to awake the speeslite to continue operation.
-42-
2. Power-on and Power-off
The power of the flash light can be opened or closed by holding this button for 2 seconds. It is suggested that
the battery shall be taken out after the power of the flash light is closed through this button.
After opening the power switch of the flash, the flash will fetch the setting state saved in the closedown last
time, the charging indicator is red, which indicates the flash is available.
If the charging is not completed within 20 seconds, the power is low, and <P.L> will be displayed on LCD panel,
the speedlite will automatically shutdown. The you need to replace with new batteries.
You may press the testing button PILOT to test whether the flash works normally.
After use, hold the power switch for 2S to power off.
3. ETTL MODE
Just set the camera’s shooting mode to [AV] (aperture-priority AE), [TV] (shutter-priority-AE), or [M](manual),
and you can use ETTL autoflash. Under the ETTL mode, YN565EX supports FEC, FEB, Rear-sync, FEV,
Modeling, Canon camera menu accessable.
4. M mode
You can set the flash output from 1/128 to 1/1 full power in 1/3-stop
increments. Press the [LEFT] [RIGHT] button to adjust the output directly.
Press [MODE] button and the <M> will display on LCD panel.
Press [LEFT] and [RIGHT] button to adjust output level, you
can fine tune the power output of the flash by [UP] and [DOWN],
the step size is 1/3ev.
Press the shutter button halfway, and check that the
subject is within the effective range displayed on the LCD panel.
-43-
5. MULTI mode
With MULTI mode, a rapid series of flashes is fired. It can be used to capture multiple images of a moving
subject in single photograph.
The speedlite will flash according to the output power, flash times and frequency you set. Use [LEFT], [RIGHT]
and [OK] buttons to adjust output power, flash times and frequency. The adjustment scope of output
frequency is 1/128-1/64-1/32-1/16-1/8-1/4, the scope of flash times is from 1 to 100 (if the flash time is set as
--, it flashes according to the default setting.) and the scope of flash frequency is 1 to 100. Adjustment method:
please press [OK] button to select setting items (flash) and use the [LEFT] and [RIGHT] buttons to adjust the
parameters. After the setting is completed, press [OK] button to confirm the setting.
The charging speed of flash light is slow under the situation that the electricity quantity of the battery is
insufficient, which may cause the occurrence of the high-frequency flash. Please reduce the flash frequency or
change new battery under this situation.
NOTE: During Stroboscopic flash, the shutter remains open until the flash stops.
6. S1/S2 mode
These two modes are suitable for manual flash environment and TTL flash environment respectively. Under
these two modes, the way to adjust the output level is like the way in M mode.
When using S1/S2 mode, you can rotate the flash head to make the wireless triggering sensor face with the
-44-
master flash. Setting method: Hold press the [ZOOM] button, and then press [LEFT] [RIHGT] button to select
S1 or S2.
S1 mode: It will work with the first trigger of master flash synchronously; the master flash should be set at
manual flash.
S2 mode: It is also called “pre-flash cancel mode”, it can neglect the pre-flash given by TTL flash, and therefore,
it can support the main flash working in TTL mode.
The following situation shall be avoided when the S1 and S2 modes are used: the red eye reduction function of
the main light is used; the order mode (nikon) or wireless mode (canon) of the main light is used; the ST-E2 is
used as the flash controller. Otherwise, please set the speedlite as SL (see “wireless flash system” for detail).
7. Menu Access of Camera (only for the more recent Canon models)
You can control the speedlite by accessing to camera menu on the recent canon models which support ETTL.
On the Flash Control Menu, you can set some parameters through “External flash func. setting” and “External
flash C. Fn setting”, for example, Flash mode, Shutter sync, FEB, Flash exp. comp, Zoom, Wireless set, and
advanced setting etc.
8. Test Flash
Whether in any mode, you can press PILOT button to test if the speedlite flash normally. When testing the
flash, the speedlite will give flash at relevant output level in accordance with the chosen output power setting.
9. Power Saving Mode
YN565EX provides shrinkable power-saving mode; this power-saving mode can set through long press on
[Advanced option] button. Long press the [Advanced option] to enter the setting state and select the option
with number 01 through [up] and [down] buttons. When pressing the [right] button to set the state as SL EP - -,
this means to disable the function of “automatic power off”. When it is set as SL EP on, this means that the
function of “automatic power off” is enabled, the following table lists the power-saving mode that is set
through advanced option.
-45-
Fn NO.
Scope of
Application
All modes
Power saving mode
Setting options
Power saving mode is closed
Power saving mode is open
SL/S1/S2
Power automatic off of the slave unit is 60 minutes
Power automatic off of the slave unit is 10 minutes
SL/S1/S2
Slave auto power off cancel within 1 hours
Slave auto power off cancel within 8 hours
Others
Sleep after idle time of 3 minutes/5 minutes/10 minutes/30
minutes/1 hour/2 hours/3 hours/5hours. After it enters the
sleep state, it powers off automatically after keeps the same
idle time.
Under the dormancy situation, <SE> will be displayed on LCD panel, you can awake the speedlite by pressing
any button.
01
SL EP
10
SL Sd
11
SL OFF
15
SE OFF
-on
60
10
1H
8H
3/5/10/30/1H/2H
/3H/5H
10. Overheating Protection
11. ZOOM Setting the Flash Coverage
Auto Zoom: Press the [ZOOM] button to adjust the flash coverage, if <M> is not displayed, the flash coverage
will be set automatically (35mm for default coverage). Attaching the speedlite to the camera, the flash coverage
will set automatically to match the lens focal length.
-46-
Manually set the zooming position: Press the [ZOOM] button
to adjust the flash coverage, if <M> is displayed, pressing the
[LEFT] [RIGHT] or [UP] [DOWN] buttons, the coverage
focal length of the flash will switch in circle of (24, 28, 35, 50,
70, 80, 105mm).
NOTE: Using wide-angle-diffuser, the flash coverage will then
be extended for 14mm.
-47-
The sound form
Meaning
Operation
Three ticks, two times
a. A standard flash was obtained;
b. The speedlite is started;
The exposure may be over
Tick
The exposure may be excessive
Tick twice
tick
tick
Tick—tick
twice—tick twice—
Tick a long sound
Tick—tick—tick
a. The power is not enough;
b. The speedlite is in the charging or
overheating protection state;
The speedlite is fully charged and can be
used.
Sound prompt before turn off
Normal
Adjusting exposure compensation or changing
shooting condition
Adjusting exposure setting or shooting condition
Replace the batteries, waiting for the completion
of charging or the protection is canceled
Normal
Normal
13. Modeling Light Function
Press down the camera’s depth-of-fired preview button, the YN565EX will send out continuous flash lasting
one second.
14. PC synchronous port (for input)
By connecting to the PC port synchronous port, you can make the flash synchronously.
15. Automatic setting saving
The speedlite will automatically save the current setting in order to let you have a simpler use next time after
boot.
-48-
VII. Wireless Flash System
YN565EX has wireless remote flash systems as slave unit, the YN565EX can be triggered by 580EX II,
SB-900/800/700, 7D/60D/600D, Nikon c-command and ST-E2, wireless TTL or manual lighting can be
achieved.
cn: Indicating that it can receive wireless signal from Canon system as well as Nikon system at the same time.
c: Indicating that it can only receive wireless signal from Canon system, avoiding Nikon system.
n: Indicating that it can only receive wireless signal from Nikon system, avoiding Canon system.
Any flash exposure compensation, FEB, FE lock, manual flash, and stroboscopic flash settings set with the
master unit will be automatically transmitted to the YN565EX.
Even with multiple YN565EXs, all of them will be controlled in the same way via wireless signal.
1. Master unit setting
To use 580EX II, SB-900/800/700, 7D/60D/600D with built-in commander mode, Nikon c-commander and ST-E2.
For the setting method, please refer to your master instructions.
2. Slave unit setting
As the slave unit, when YN565EX is used, the wireless option of speedlite is set as SLAVE.
Setting method: long press on ZOOM for 2 seconds to make the OFF flash on the LCD screen, this means that it is
in the setting state. Use [LEFT] and [RIGHT] buttons to select SL. The LCD screen display cn when [OK] button is
pressed at this moment. This means that it receives the wireless signal from Canon and Nikon at the same time.
Press ZOOM button again and <c n>,< CH > or < A > will flash. This means that it enters setting state of Canon
or Nikon wireless option, communication channel or slave unit. At this moment, use [LEFT] and [RIGHT] buttons
to set slave unit c/n separately, number of communication channel (1,2,3,4)or slave group (A,B,C),
then press [OK] button to confirm setting.
-49-
Prompt: When does it need to set c or n under the off camera mode instead of cn mode?
When other cameraman uses off camera control in the environment, and you don’t want to be bothered. Separate
setting of c or n may slightly improve the correctness of flash control.
3. Multi-Speedlite, Wireless lighting configurations
You can create two or three slave groups to make shooting effect better meet your requirements, and set flash
ratio for ETTL autoflash shooting of master, as well as manual flash output, frequency flash etc.
(1). Wireless flash of two slave units made up by YN565EX.
� Wireless option setting: cn, c, n for operation
� Communication Channel setting: 1, 2, 3, 4
� Groups setting: Set one YN565EX as group A, and set the
other one as group B.
� Master unit setting: Set the communication channel, Set the
�
flash ratio of master unit A:B or A:B C. You can conduct
flash shooting.
(2). Wireless flash with three YN565EX speedlites
Wireless option setting: cn, c, n
Channel setting: 1, 2, 3, 4
Groups setting: Set three YN565EX speedlites as group A, group B and
group C respectively.
Setting master and shooting: Please select the ratio<A: B C>.
Press the test button of master to test whether the flash works normally;
if the flash does not fire, adjust the slave unit’s angle toward the master
unit and distance from the master unit.
-50-
NOTE: If ratio <A: B> is set, the slave unit in group C will not fire.
If you have the slave group set to <A> for three slave units, all three slave units will be controlled as if they
were one speedlite in slave group A.
GRP=A
GRP=A
GRP=A
-51-
4. Setting Manual Flash and Stroboscopic Flash with Wireless
You can also lock the flash mode when YN565EX is used as slave unit.
Manual flash: Press the [MODE] button for 2 sec. or longer until <M>
display, then you can set the output level by pressing [LEFT] [RIGHT]
[UP] [DOWN]
Stroboscopic flash: Continue to press the [MODE] button until
<MULTI> display, then you can set the output
level, number of flashes, and firing frequency by pressing
[OK] [LEFT] [RIGHT].
5. Shooting Examples with Wireless Flash System
Master unit: 580-II, SB-900/800/700, 7D/60D/600D with built-in commander mode, Nikon
c-commander and ST-E2.
Slave unit: YONGNUO EX series flash, you can create three slave groups at all.
Use the mini flash stand (tripod socket provided) to prop up the YN565EX speedlite.
Swing the YN565EX so that its wireless sensor faces the master unit.
Indoors, the wireless signal can also bounce off the wall so there is more leeway in positioning the
YN565EX(s).
After positioning the YN565EX(s), be sure to test the wireless flash operation before shooting
Don’t place any obstacles between the master unit and slave unit(s). Obstacles can block the
transmission of wireless signals.
-52-
VIII. The Advanced Application
1.Ultra-long-range Wireless Flash
YN565EX can receive remote wireless signal. The longest distance used indoors is 25 meters and the longest
distance used outdoors is 15 meters.
Please note that the YN565EX’s wireless sensor should be faced to master unit, and make sure it is within the
effective range of transmission.
2. Flash Exposure Compensation
You can use the exposure compensation function of the camera to compensate flash output so as to make
shooting effect better meet your requirements. You can also make compensation of flash brightness with the
[LEFT] [RIGHT] button within the range of ±5ev, with the precision of 1/3ev. Every press the button, the
compensation setting will be displayed on LCD panel.
NOTE: For Canon version, please note that this compensation setting will override the exposure compensation
setting on the camera.
3. Rear- curtain Sync
You can use slow-speed shutter to produce trailing smear for the object and the flash light will flash at the
moment when the shutter is going to be shut, which means the rear-curtain sync function .(For the rear-curtain
sync setting, refer to your camera manual for setting). You can turn on or turn off the rear-curtain sync by
pressing the [rear-curtain sync] hotkey on panel of YN565EX.
NOTE: When YN565EX is used as slave unit, the rear-curtain sync function cannot be set on the speedlite.
-53-
4. Exposure Bracketing (FEB)
The FEB function is set on the camera or speedlite. For the specific setting method, refer to your Camera
Instructions. After the FEB is set, after 3 photos are taken, exposure compensation will be made automatically
in the sequence of, for example, “normal
under
over”. This function helps you improve the success rate
of photo taking.
The setting method on the YN565EX speedlite: Press the [UP] [DOWN] button to adjust the exposure
bracketing amount.
NOTE: For FEB, set the camera’s drive mode to single shooting. Be sure the flash is ready before shooting.
5. FE Lock (Canon)
To use this function, cover the subject for which flash exposure will be locked at the center of the viewfinder of
camera, press the button <*> of the flash exposure lock, and the flash light will pre-flash and the camera will
calculate the appropriate flash output data. Now you have some time for decomposition, after which, you can
take photo. (The function can be used only when it is supported by your camera. For the setting method, refer
to your Camera Instructions.)
6. FV Lock (Nikon)
Set the AE-L/AF-L function as FV Lock on the camera before using this function. At this time, you can aim at your
desired object in the viewfinder and then press the AE-L key or AF-L key, in such case, the flash light will pre-flash
to get the reading of flash exposure for the object; after you have confirmed the scene frame, press the shutter.
(This function can only be available when your camera supports it; for the setting of AE-L and AF-L, refer to your
camera manual).
-54-
7. Advanced Setting
The YN565EX provides advanced settings, you can customize speedlite feature to suit your shooting preferences.
Set the advanced settings through hotkey of speedlite or menu accessable. Setting method of hotkey: Press the
[advanced setting] button for 2 sec. or longer until the item to be set displays; for example, <01 SL EP --> is
displayed. Menu accessable can only be available when your camera supports it; for the setting method, refer to
your camera manual
Hold the [OK] button to recover the default settings.
The meanings of the items can be found in the table below:
● Fn NO.: 00
●
-55-
● Fn NO.: 03
● Fb CL on:FEB auto cancel is enabled
● Fb CL --: FEB auto cancel is disabled
● Fn NO.: 08
● AF L on:AF-assist beam firing is enabled
● AF L --: AF-assist beam firing is disabled
-56-
● Fn NO.::09
● AP S – A1:Automatic identification is enabled
● AP S – --:Disable
● Fn NO.: 10
● SL Sd 60:Power automatic off of the slave unit is 60 minutes
● SL Sd 10:Power automatic off of the slave unit is 10 minutes
● Fn NO.: 11
● SL OFF 8H:Slave auto power off cancel within 8 hours
● SL OFF 1H:Slave auto power off cancel within 1 hour
-57-
● Fn NO.: 14
● SO nd on: Sound prompt function is enabled
● SO nd --: Sound prompt function is disabled
● Fn NO.: 15
● SEOFF 3/5/10/30/1H/2H/3H/5H:Keeping idle for 3/5/10/30
minutes or 1/2/3/5 hours will enter the dormancy mode
● Fn NO.: 16
● qu ic --: Quick turn on/shut down function is disabled
● qu ic on: Quick turn on/shut down function is enabled
● Fn NO.: 17
● CL EA --: Recover the default settings
NOTE: The option with Fn number from 00 to 13 can be set through “Flash C. Fn settings” of camera menu; the option
with number 02, 05, 06, 07, 12, 13 are be disabled.
-58-
8. The use of external charging box
You can buy YONGNUO external charging boxes like SF-18C or SF-17C and connect it to the charging port of the speedlite.
After flash, the charging box will charge the speedlite.
9. High-speed continuous shooting
10. Reflection Flash
Bounce flash means to take photos by making flash light head
aimed at wall or ceiling and using the light reflected back from
the ceiling or wall to light the desired object, so that the shade
behind the object can be decreased to get more natural
shooting effect.
If the wall or ceiling is too far, the bounce flash may be too
weak to get enough exposure. The wall or ceiling should be
even and white in order to get efficient reflection; if the
reflection surface is not white, color cast may appear in photo.
-59-
11. Use Reflection Board to Take Photos
With the reflection board flash, draw the reflection board and the
wide-angle diffusion board out from the light head at the same
time and then push the wide-angle diffusion board back. In such
case, if this product is being used to take photos, it will produce
a highlighted point on the eyes of the subject and thus make the
eyes charming (catch light). This function can reach optimal
effect when the flash head is up 90°.
9. Use Wide-angle Diffuser
Pull out the wide-angle diffusion board, push back the reflection
board and arrange them as per the figure; in such case, the flash
scopes will extent to 18 mm and the flash effect will be softer and
more natural.
-60-
IX. Specifications
Circuit design
Guide No.
Flash mode
Wireless trigger
Wireless triggering distance
Slave groups
Channels
Zoom range
Vertical rotation angle
Horizontal rotation angle
Power supply
Lighting times
Recycle time
Color temperature
Flash time
Flash control
External interface
External power
Additional features
Dimensions
Net weight
Accessories
Insulated Gate Bipolar Transistor (IGBT)
58 (ISO 100, 105mm)
TTL、M、MULTI
N’s & C’s wireless system/S1/S2 pre-flash-canceled mode
20~25m indoor, 10~15m outdoor
3(A, B, and C)
4
auto, 24, 28, 35, 50, 70, 80, 105mm
-7~90 degrees
0~270 degrees
4×AAsize batteries (Alkaline or Ni-MH are usable)
100~1500 times (AA alkaline cell used)
approx 3s (AA alkaline cell used)
5600k
1/200s~1/20000s
8 levels of output control (1/128~1/1), 22 levels of fine tuning
hot shoe, PC port and eternal charging port
YONGNUO external charging boxes like SF-18C, SF-17C
Rear-curtain sync, FEC, FEB, FEV, modeling flash, manual zoom, auto zoom, sound
prompt, advanced setting, automatically saving setting, PC port, power saving mode
and over heat protection
60×190×78mm (Extended state)
380g
Flash light (1), protecting bag (1), mini stand (1) and manual (1)
-61-
Guide Number of different focal length range (at ISO 100, in meters / feet)
Flash Coverage (mm)
Flash
Output
14
24
28
35
50
15/49.2
28/91.9
30/98.4
39/127.9
42/137.8
1/1
10.6/34.8
19.8/65
21.2/69.6
27.6/90.7
29.7/97.4
1/2
7.5/24.6
14/45.9
15/49.2
19.5/64
21/68.9
1/4
5.3/17.4
9.9/32.5
10.6/34.8
13.7/45.2
14.8/48.6
1/8
3.8/12.5
7/23
7.5/24.6
9.7/32
10.5/34.4
1/16
2.7/8.9
4.9/16.1
5.3/17.4
6.9/22.7
7.4/24.3
1/32
1.9/6.2
3.5/11.5
3.8/12.5
4.9/16
5.3/17.4
1/64
1.3/4.3
2.5/8.2
2.7/8.9
3.5/11.4
3.7/12.1
1/128
70
50/164
35.4/116.1
25/82
17.7/58.1
12.5/41
8.8/28.9
6.3/20.7
4.4/14.4
80
53/173.9
37.5/123
26.5/86.9
18.7/61.4
13.3/43.6
9.4/30.8
6.6/21.7
4.7/15.4
105
58/190.3
41/134.5
29/95.1
20.5/67.3
14.5/47.6
10.3/33.8
7.3/24
5.1/16.7
X. Possible problems during use and solutions
1. The YN565EX can’t flash
Check whether the batteries are installed in the correct orientation: Please install the batteries in the correct orientation.
Check whether the speedlite is attached to the camera: Slip the speedlite hot shoe stand into the camera hot shoe stand
hard.
Check the hot shoe contact: Clean the contacts.
Check whether the batteries are exhausted: If the charging is not completed within 20 seconds, the flash will
automatically shutdown. Then you need to replace with new batteries.
-62-
2. YN565EX can’t work as slave unit
Check the slave unit setting: The YN565EX must be set to SLAVE.
Check the slave unit’s situation: Please position the YN565EX(s) within the master’s wireless transmission range. Adjust
the slave unit’s angle toward the master unit and distance from the master unit.
Note: Setting the slave unit as separate c or n can slightly improve the success rate of flash.
3. Underexposure or overexposure of photo
Check whether the shutter, aperture and sensitivity (ISO) of camera are set too close to the limit of flashing, or whether
the exposure compensation, exposure bracketing and other settings relative with flashing are correct.
Because of the differences among different types of cameras and the personal preference, you may meet the whole
overexposure or underexposure when using this product, and so try to adjust it through the flashing compensation or
exposure compensation.
4. Is the FEB exposure range set anew every time?
You can access FEB setting through camera menu or lock FEB setting through Fn advanced option setting to avoid that FEB
will cancel automatically when completing three shooting tasks. The number of setting option is 03. It is ok to set the “FEB
auto cancel” disabled.
5. Underexposure of photo
Please check whether your speedlite is set with exposure bracketing and the exposure order is “-→0→+” You can access Fn
advanced option through camera menu to set the order of exposure bracketing as “0→-→+” or enables “ FEB to cancel”.
6. Vignetting appears in photos or only part of the subject is illuminated?
This product has a designed light head zoom range of 24-85 mm, and is currently not compatible with full frame camera
system. You may pull out the wide-angle diffuser to widen the flash range.
-63-
7. The state of YN565EX is abnormal.
Please try to turn off the power supply YN565EX and camera. After YN565EX is installed on the hot shoe of camera, turn
on the power supply again. If it is still unusual, please replace the batteries.
Updated version of this manual can be got from http://www.yongnuo.com.cn/usermanual/downloadIndex.htm
The functions of this manual are based on test conditions of our company. Further notice will not be given if the design and
specifications change.
The YONGNUO logo in this manual includes the registered trademark or trademark of SHENZHEN YONGNUO
PHOTOGRAPHY EQUIPMENT Co., Ltd in China or/and other countries (regions). All other trademarks are the property
of their respective owners.
-64-