1
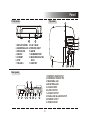
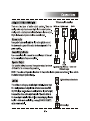
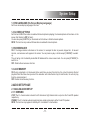
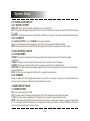
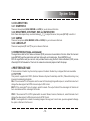
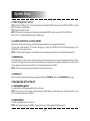
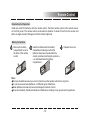
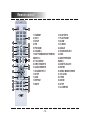
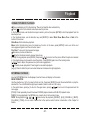
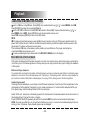
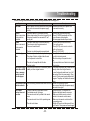
DVD-468
2-Channel DVD Microsystem for iPod
Instruction Manual
Contents
Features ........................................................................................................................................... 2
For Your Attention .........................................................................................................................3-5
Accessories ...................................................................................................................................... 6
Panel ................................................................................................................................................. 7
Connections ..................................................................................................................................8-9
System Setup ............................................................................................................................10-14
Remote Control .........................................................................................................................15-16
Playback ....................................................................................................................................17-22
Troubleshooting ............................................................................................................................. 23
Specifications ................................................................................................................................. 24
-1-
Features
Thank you for purchasing our product. Please read through this manual before connecting and operating this
product. Retain this manual for future reference.
The Coby DVD-468 provides a quality video and audio experience. Its high-performance digital technology
delivers a crisp picture and brilliant sound for long-lasting and enjoyable entertainment!
●
●
●
●
●
●
●
●
●
●
●
●
Progressive scan DVD player
DVD, DVD R/RW, CD, CD-R/RW, JPEG, and MP3 compatible
Universal dock for iPod charges and plays your favorite iPod music, videos, and photo slideshows
Plays digital media files directly from USB, SD, and MS memory cards
Official DivX® Certified product
Plays all versions of DivX® video (including DivX® 6) with standard playback of DivX® media files
Plays digital MPEG-4 video files (XviD)
Dolby Digital decoder
NTSC/PAL compatible
Parental lock controls
Digital AM/FM tuner with preset station memory
Full function remote control
-2-
For Your Attention
IMPORTANT SAFETY INSTRUCTIONS
1.
2.
3.
4.
5.
6.
7.
8.
9.
10.
11.
12.
13.
14.
15.
Read these instructions.
Keep these instructions.
Heed all warnings.
Follow all instructions.
Do not use this apparatus near water.
Clean only with a dry cloth.
Do not block any ventilation openings. Install in accordance with the manufacturer's instructions.
Do not install near any heat sources such as radiators, heat registers, stoves, or other apparatus
(including amplifiers) that produce heat.
Do not defeat the safety purpose of the polarized or grounding-type plug. A polarized plug has two
blades with one wider than the other. A grounding type plug has two blades and a third grounding prong.
The wider blade or the third prong is provided for your safety. If the provided plug does not fit into your
outlet, consult an electrician for replacement of the obsolete outlet.
Protect the power cord from being walked on or pinched particularly at plugs, convenience receptacles,
and the point where they exit from the apparatus.
Only use attachments/accessories specified by the manufacturer.
Use only with the cart, stand, tripod, bracket, or table specified by the manufacturer, or
sold with the apparatus. When a cart is used, use caution when moving the
cart/apparatus combination to avoid injury from tip-over.
Unplug this apparatus during lightning storms or when unused for long periods of time.
Refer all servicing to qualified service personnel. Servicing is required when the apparatus has been damaged in any way, such as power-supply cord or plug is damaged, liquid has been
spilled or objects have fallen into the apparatus, the apparatus has been exposed to rain or moisture,
does not operate normally, or has been dropped.
Where the mains plug or an appliance coupler is used as the disconnect device, the disconnect device
shall remain readily operable.
-3-
For Your Attention
IMPORTANT INFORMATION
To reduce risk of fire or electric shock, do not expose this apparatus to rain or moisture.
WARNING
The apparatus must not be exposed to dripping or splashing. Objects filled with liquids, such as
vases or drinking glasses, must never be placed on the apparatus.
This symbol indicates "dangerous voltage" inside the product that presents a
risk of electric shock or personal injury.
This symbol indicates important instructions accompanying the product.
Caution: To reduce the risk of electric shock, do not remove cover (or back). No user
serviceable parts inside, Refer servicing to qualified service personnel.
This symbol indicates that this product incorporates double insulation between hazardous mains voltage and user accessible parts. When servicing use only identical
replacement parts.
-4-
For Your Attention
FCC Statement:
This device complies with Part 15 of the FCC Rules. Operation is subject to the following two conditions:
(1) This device may not cause harmful interference, and
(2) This device must accept any interference received, including interference that may cause undesired
operation.
Note:
This equipment has been tested and found to comply with the limits for Class B digital devices, pursuant to
Part 15 of the FCC rules. These limits are designed to provide reasonable protection against harmful
interference in a residential installation. This equipment generates, uses and can radiate radio frequency
energy and, if not installed and used in accordance with the instructions, may cause harmful interference
to radio communications. However, there is no guarantee that interference will not occur in a particular
installation. If this equipment does cause harmful interference to radio or television reception, which can
be determined by turning the equipment off and on, the user is encouraged to try to correct the interference
by one or more of the following measures:
- Reorient or relocate the receiving antenna.
- Increase the separation between the equipment and receiver.
- Connect the equipment into an outlet on a circuit different from that to which the receiver is connected.
- Consult the dealer or an experienced radio/TV technician for help
Use of shielded cable is required to comply with Class B limits in Subpart B of Part 15 of the FCC rules.
Do not make any changes or modifications to the equipment unless otherwise specified in the manual. If
such changes or modifications should be made, you could be required to stop operation of the equipment.
-5-
Accessories
Accessories
Accessories
ZOOM
STEP
A-B
USB
REPEAT
RADIO
SUBTITLE
MENU
TONE
A/V Cable
Multimedia Player Adapters
ENTER
AUTO
MO/ST
CH-LEVEL
AM/FM
MEMORY
AUDIO
TITLE
SEARCH
FM Antenna
S.EFFECT
9
6
SOURCE SELECT
VOL
OSD
PROG
3
10+
SLOW
V-MODE
5
2
8
ANGLE
1
7
4
STANDBY
0/10
Remote Control
l
PBC
U s e r ma nua
SETUP
User Manual
AM Antenna
Speaker Cable
Playable Disc and Media Types
Disc types
Symbol
Contents
DVD
Audio + Video
MP3
Audio
Video-CD
(VCD)
Audio + Video
CD-DA
Audio
Picture CD
MPEG-4
JPEG Photo CD
V
I
D E
Audio + Video
O
DivX
Audio + Video
-6-
Panel
Front panel
Top panel
1
1. DISPLAY SCREEN
2. HEADPHONE JACK
3. OPEN/CLOSE
4. SOURCE
5. STANDBY
6. STOP
7. VOLUME +/-
12
2
8. PLAY / PAUSE
9. PREVIOUS / NEXT
10. AM/FM
11. SD/MS/MMC PORT
12. MULTIMEDIA PLAYER
DOCK
13. USB PORT
USB
SOURCE
1
Cr/Pr
3
L
LINE IN
S-VIDEO
4
5 6
L
R
7
COAXIAL
8
9
4
5 6
1. COMPOSITE VIDEO OUTPUT
2. COMPONENT VIDEO OUTPUT
3. FM ANTENNA JACK
4. AM ANTENNA JACK
5. L/R AUDIO INPUT
6. S-VIDEO OUTPUT
7. L/R AUDIO OUTPUT
8. COAXIAL DIGITAL AUDIO OUTPUT
9. SPEAKER OUTPUT
10. POWER SOCKET
SPEAKER OUT 4ohm
R
ANTENNA
3
Cb/Pb
AM/FM
STANDBY
2
Y
11
10
9
SD/MS/MMC
OPEN/CLOSE
Rear panel
VIDEO
13
10
-7-
7
8
System Setup
MENU OPERATION
1. In DVD mode, press [SETUP] on the remote control to display the setup menu.
2. Press [ ]/[ ] to select an item. The submenu of the selected item will be displayed below instantly.
3. Press [ ]/[ ] to select an item you desire to set in the submenu, then press [ENTER] /[ ]to enter. Use [ ]/[ ] to
select an option, then press [ENTER] to confirm it, or press [ ] to cancel.
4. Then you can press [ ]/[ ] to continue to set other items in the submenu.
5. Press [ ] to go back to the previous menu.
6. Press [SETUP] again to exit the setup menu. Alternatively, move the highlight to ' ', then press [ENTER] to exit
the setup menu.
1 GENERAL SETUP PAGE
1.1 TV DISPLAY
If the unit is connected to a conventional TV set, select 4:3 PANSCAN or 4:3 LETTERBOX. The 4:3 image will be
displayed in full screen in its native aspect ratio.
4:3 PANSCAN: The wide-screen image will be displayed on the screen in its native aspect ratio with some part on
the left and right cut off.
4:3 LETTERBOX: The wide-screen image will be displayed in its native aspect ratio with black bands on the upper
and lower sections of the screen.
If the unit is connected to a wide-screen TV set, select 16:9 or WIDE SQUEEZE.
16: 9: The wide-screen image will be displayed in full screen in its native aspect ratio while the 4:3 image will be
stretched out horizontally to fit in the screen.
WIDE SQUEEZE: The wide-screen image will be displayed in full screen in its native aspect ratio and so does the
4:3 image but with black borders on the left and the right side.
1.2 ANGLE MARK
Set this item to ON. When a disc encoded with multiple camera angles is playing, the angle mark will display on the
screen. Then you can view the video in different camera angles by pressing [ANGLE] on the remote control.
Set this item to OFF to disable this function.
NOTE: This function only works with discs encoded with multiple camera angles.
-10-
System Setup
1.3 OSD LANGUAGE (On-Screen Display Language)
Set the on-screen display language in this item.
1.4 CLOSED CAPTIONS
Set this item to ON. When a disc encoded with closed captions is playing, the closed captions will be shown on the
screen. Set this item to OFF to hide it.
You can also press [SUBTITLE] on the remote control to show or hide the closed captions.
NOTE: This function only works with those discs encoded with closed captions.
1.5 SCREEN SAVER
ON: If the image remains motionless on the screen, for example the disc is paused, stopped etc, for several
minutes, a screen saver will appear on the screen. You can press any key or button except [STANDBY] to wake it
up.
The unit will go into the standby mode after 20 minutes in the screen saver mode. You can press [STANDBY] to
switch it on.
OFF: Disable the screen saver function.
1.6 LAST MEMORY
ON: During a playback or in the paused status, each time you open the disc tray, the unit will memorize the last
playback time. Next time when you insert the same disc and close the disc tray to load the disc, the unit will play
from the memorized point.
OFF: Disable the last memory function.
2 AUDIO SETUP PAGE
2.1 ANALOG AUDIO SETUP
2.1.1 DOWNMIX
LT/RT: The 5.1-channel audio is mixed into left channel and right channel and is output via the FL and FR speaker
respectively.
STEREO: The 5.1-channel audio is mixed into stereo signal and is output via the FL and FR speaker.
NOTE: This function only applies to the Dolby AC -3 encoded 5.1-channel discs.
-11-
System Setup
2.2. DIGITAL AUDIO SETUP
2.2.1 DIGITAL OUTPUT
SPDIF OFF: There will be no digital audio signal output. (Coaxial Off)
ALL: The digital audio signal output will be in its raw format. Normally, this m ode is used for DTS & Dolby Digital
5.1 signals.
PCM ONLY: The digital audio signal output will be in PCM format. Normally, this mode is used for audio CD signals.
2.2.2 LPCM OUT
When DIGITAL OUTPUT is set to PCM ONLY, this item is available.
Select a sample rating for the analog audio output. There are two options, 48KHz and 96KHz.
NOTE: Some amplifiers don't support 96KHz sampling which will affect the optical and coaxial output.
2.3 DOLBY DIGITAL SETUP
2.3.1 DUAL MONO
STEREO: The player outputs the left-channel audio and right-channel audio via the FL and FR speaker
respectively.
L-MONO: The player outputs the left-channel audio only via both the FL and FR speaker.
R- MONO: The player outputs the right-channel audio only via both the FL and FR speaker.
MIX- MONO: The player outputs the average signal of the left-channel and right-channel audio via the FL speaker
and the FR speaker.
NOTE: This function only applies to the Dolby AC -3 encoded 2-channel discs.
2.3.2 DYNAMIC
When you watch films with large dynamic scope in low volume, for example at night, you can adjust the dynamic
value up to avoid losing sound details resulting from the low volume.
3 VIDEO SETUP PAGE
3.1 VIDEO OUTPUT
OFF: Set video output to the CVBS.
YUV: Set video output in analog component video format if the component video outputs are used.
P_YUV: Set video output as progressive YUV signals if the component video outputs are used.
NOTE: If the video setting differs from the actual video connection, you may get no image or very poor image on the
TV. In such cases reset this setting item for an appropriate video output mode or press [V-MODE] on the remote
control until the output image becomes normal.
-12-
System Setup
3.2 COLOR SETTING
3.2.1 SHARPNESS
There are three options (HIGH, MEDIUM and LOW) for you to choose in this item.
3.2.2 BRIGHTNESS, CONTRAST, HUE and SATURATION
Enter these items respectively, use direction keys [
3.2.3 GAMMA
]/[
] to adjust the value, then press [ENTER] to confirm it.
There are four options (HIGH, MEDIUM, LOW and NONE) for you to choose in this item.
3.2.4 LUMA DELAY
There are two options (0T and 1T) for you to choose in this item.
3.3 DIVX VOD (DivX Video-on-Demand)
The registration code for DivX Video-on-Demand (VOD) service can be available in this item. Enter this item and
press [ENTER] to get the registration code from the brought up information box. Press [ENTER] to quit.
With the registration code you can rent and purchase movies using the DivX Video-on-Demand (VOD) service
offered by DIVX official website. Then burn the video onto a disc and playback it with this player.
4 PREFERENCE PAGE
If there's no disc in the disc tray, the disc tray is open or the disc in the disc tray is stopped, this item is available.
4.1 TV TYPE
This product supports both NTSC (National Television System Committee) and PAL (Phase Alternating Line)
television broadcasting standards.
PAL: If the connected TV is PAL system which is used in China, Hong Kong and Europe, etc, select this mode. It will
change the video signal of an NTSC disc and output in PAL format.
MULTI: If the connected TV is multi system, select this mode. The output format of the video signal of the disc will
be in accordance with the video signal of the disc.
NTSC: If the connected TV is NTSC system which is used in Taiwan, America, Canada, etc, select this mode. It will
change the video signal of a PAL disc and output in NTSC format.
NOTE: If a wrong selection is made, the viewing image will be very poor. In such case, you are supposed to change
the option in this item to fix the error.
-13-
System Setup
4.2 PBC (Play Back Control)
ON: Activate the PBC function. When playing a disc encoded with PBC function such as VCD 2.0, SVCD etc, press
[PBC] to return to the PBC menu.
OFF: Disable the PBC function.
NOTE: This function only works with those discs encoded with PBC function such as VCD 2.0, SVCD, etc.
DVD, VCD1.1, CD-DA and M P3 disc have no PBC menu.
4.3 AUDIO, SUBTITLE and DISC MENU
Select a preferred audio language, subtitle language and disc menu language in these items.
You can also make selection of the audio language by using the [AUDIO] and the subtitle language by the
[SUBTITLE] on the remote control.
NOTE: If the selected language is not available for the currently playing disc, the disc's default setting works.
4.4 PARENTAL
This item allows the user to set a maximum rating of the movies that can be viewed. Movies rated higher than the
level set for the parental lock can not be viewed without inputting the correct password. What's more, to key in the
correct password is needed to reset the level. The default password is 136900.
NOTE: This function only works with those discs with parental function.
4.5 DEFAULT
Enter to restore all the default settings except the settings in PARENTAL item and PASSWORD setup page.
5 PASSWORD SETUP PAGE
5.1 PASSWORD MODE
You can switch on/off the password function in this item.
NOTE: You must key in the correct password and press [ENTER] to confirm before you change the option in this
item. The default password is 136900.
5.2 PASSWORD
You can reset the password in this item.
NOTE: The default password (136900) is always active even if the password has been reset.
-14-
Remote Control
Remote Control Operation
Install two AAA/1.5V batteries into the remote control. Point the remote control at the remote sensor
on the front panel. The remote control works within a distance of about 20 feet from the sensor and
within an angle of about 30 degrees from the left and right side.
Battery Installation
Remove the battery
compartment cover on
the back of the remote
control.
Load the batteries into the battery
compartment making sure that the
batteries have been inserted with the
correct polarities matching the symbols +,
- as indicated inside the battery
compartment.
Replace the cover.
Not e:
Remove the batteries when you do not intend to use the remote control for a long time.
Do not mix new and used batteries, or different types of batteries.
Weak batteries can leak and severely damage the remote control.
Be environmentally friendly and dispose of batteries according to your government regulations.
-15-
Remote control
STANDBY
1
15
1
2
3
4
5
6
16
7
2
8
9
0/10
10+
SETUP
17
SLOW
18
3
PBC
ANGLE
V-MODE
PROG
OSD
SOURCE SELECT
4
5
6
7
22
VOL
SEARCH
RADIO
AM/FM
8
AUTO
TITLE
MENU
AUDIO
26
MO/ST
MEMORY
S.EFFECT
CH-LEVEL
TONE
12
USB
STEP
ZOOM
13
REPEAT
A-B
14
25
ENTER
10
11
23
24
SUBTITLE
9
19
20
21
27
28
29
1. STANDBY
2. GOTO
3. SETUP
4. PBC
5. PROGRAM
6. VOLUME+/7. FAST FORWARD/FAST REWIND
SEARCH +/8. TITLE/ AM/FM
9. DIRECTION KEYS
10. AUDIO/ MEMORY
11. SOUND EFFECT
12. STEP
13. USB
14. REPEAT
15. MUTE
30
31
-16-
16. DIGIT KEYS
17. PLAY/PAUSE
18. SLOW
19. V-MODE
20. ANGLE
21. SOURCE SELECT
22. OSD
23. NEXT/PREVIOUS
RADIO+/24. SUBTITLE/ AUTO
25. ENTER
26. MENU/ MONO/STEREO
27. CH-LEVEL
28. TONE
29. ZOOM
30. STOP
31. A-B REPEAT
Playback
STANDBY
SOURCE
SELECT
USB
1
4
7
Switch on the unit. /Put the unit in standby mode.
Note: Being in the standby mode uses a minimal amount of electricity, but ensures that the components
of the unit operate at maximum efficiency from the moment you start.
Press repeatedly to select a signal source among DVD, TUNER, LINE 1 and LINE2.
Press this button, use the direction key [ ]/[ ] to select a signal source, DVD, USB or CARD, then
press [ENTER] to access the corresponding mode.
2
5
8
3
6
9
0/10
10+
ENTER
The digit keys can be used to input the corresponding numbers or make selection of a track or a
chapter of a disc, etc.
Press to enter an item in the menu or to confirm your operation etc.
The direction keys can be used to move the highlight or adjust the value of an item in the menu .
SETUP
Press to enter/exit the setup menu.
GOTO
During playback, press to enter the GOTO menu. In the menu, use the direction key [ ]/[ ] to select
a setting item and press [ENTER] to enter the editing state, then with the digit keys input a specific
track, disc time, track time, chapter, title, chapter time or title time to go to directly. Press it again to exit
the GOTO menu.
PROGRAM
Press this button to enter/exit the program menu with which you can playback the contents of a disc
in your desired order.
In the program menu, use the direction keys, digits keys and [ENTER] to make a program list, then
move the highlight to START and press [ENTER] to start program playback.
During program playback, press [PROG] to enter the program menu and the STOP is highlighted,
press [ENTER] to cancel program playback.
-17-
Playback
Press to temporarily pause a playback. Press it again to resume the playback.
Or, press to resume the normal playback from the fast forward, fast reverse playback, etc.
Press once to pause the playing disc, then press [ ] to continue the playback;
Press this button twice to stop the disc and the disc will be reset to the start point.
STEP
Press repeatedly to advance the video frame by frame. Press [
(Note: Applies to DVD, VCD, MPEG4 discs etc)
SLOW
Press repeatedly for slow-motion playback in different speeds or return to the normal speed. The
available slow-motion speeds are 1/2, 1/4, 1/8, 1/16 of the normal speed. (Note: Applies to DVD, VCD,
,etc)
] to resume the normal playback.
Press for fast forward playback. The available speeds are 2X, 4X, 8X, 16X and 32X.
Press for fast reverse playback. The available speeds are 2X, 4X, 8X, 16X and 32X.
Press to skip to the previous chapter/track.
Press to skip to the next chapter/track.
Press to temporarily switch off the sound . Press it again to switch it on.
VOLUME+/REPEAT
Press [VOLUME +/-] to adjust the volume.
Press repeatedly to switch the repeat modes.
(Note: For VCD2.0, SVCD, etc, this function is invalid when PBC function is activated.)
A-B
You can repeat a specific section of a disc with this button.
During playback, press this button to mark down the starting point (A) and press it again to mark down
the ending point (B). Then, the unit will playback this section over and over again. Press it for the third
time to cancel A-B repeat and resume to the normal playback.
Note: Points A and B must be in the same title/ track.
CH-LEVEL
Press to select a channel or the overall volume, then use [VOLUME+]/[VOLUME-] to adjust the
volume of the selected channel or the overall volume.
-18-
Playback
S.EFFECT
TONE
TITLE
MENU
Press repeatedly to switch the sound effects or switch off the sound effect.
Note: You are recommended to switch off the sound effect when playing a Dolby 5.1 channel disc to
obtain the real 5.1 effect.
Press to select BASS or TREBLE, then use [VOLUME+/-] to adjust the value of bass or treble.
When a DVD is currently playing, press to return to the title menu.
When a DVD is currently playing, press this button to return to the root menu.
PBC
Press to activate/ disable the PBC (Play Back Control) function.
(Note: This function only works with those discs encoded with PBC function such as VCD 2.0, SVCD,
etc. DVD, VCD1.1, CD-DA and MP3 discs have no PBC function.)
SUBTITLE
Press repeatedly to switch the subtitles or switch off the subtitle if the playing disc has multiple
subtitles recorded onto it.
OSD
AUDIO
ANGLE
V-MODE
ZOOM
Press repeatedly to switch or hide the relative information of the playing disc.
Press repeatedly to select the available audio languages provided by the disc (for DVD).
Press repeatedly to switch the available audio channels (LEFT MONO, RIGHT MONO, MIX-MONO
and STEREO) provided by the disc (for VCD).
Press to switch the viewing angles if the playing disc has multiple camera angles recorded onto it.
Press repeatedly to switch the video output modes.
Press to zoom in/out the scene. The available zoom ratios are 2X, 3X, 4X, 1/2, 1/3 and 1/4. In
zoomed-in mode, the direction keys can be used to move the zooming center. (Note: Applies to DVD,
VCD, etc.)
-19-
Playback
Tuner Operation
The following buttons are used in Tuner Mode. Press [SOURCE SELECT] to select Tuner Mode.
AM/FM
Press to switch between the AM mode and the FM mode.
MO/ST
Press to switch between Mono and Stereo reception of the broadcast signal in FM mode.
MEMORY
AUTO
After tuning in to a new frequency, press [MEMORY], then select a preferred station by inputting the
corresponding numbers to save it as a preset station.
Press to search broadcasting stations automatically.
LEFT/RIGHT
Press the direction key [LEFT]/[RIGHT] to tune manually to lower or higher broadcast station
frequencies.
During auto scanning, press to stop the process.
1
4
7
2
5
8
3
6
9
0/10
10+
SEARCH+/-
RADIO+/-
In tuner mode, the digit keys can be used to select a preset station.
For example, press [0] and [2] to select the 2nd station; press [1] and [5] to select the 15th station.
Press to tune (increase/decrease) the frequency.
Press to skip to the next/previous preset station.
NOTE: In Tuner mode, [VOLUME+/-], [CH-LEVEL], [MUTE], [TONE] and [S.EFFECT] buttons are available. For
details, please refer to the remote control function of the DVD part in this chapter.
-20-
Playback
KODAK PICTURE CD PLAYBACK
Place a kodak picture CD in the disc tray. The unit will load the disc automatically.
Press [ ] to enter the thumbnail mode to preview the pictures.
In the thumbnail mode, use the direction keys to select a picture, then press [ENTER] to start the playback from the
selected picture.
In the thumbnail mode, use the direction keys and [ENTER] to select Slide Show, Menu, Prev or Next at the
bottom of the screen.
Slide Show: Start slide show playback.
Menu: Enter the instruction menu for remote key function. In the menu, press [ENTER] to turn over to the next
menu page and again to exit the instruction menu.
Prev/Next: Turn over to the previous/next page.
Remote key function introduction:
[ ]: Enter the thumbnail mode to preview the pictures.
[ZOOM]: During playback, press [ZOOM], then press [ ]/[ ] to zoom in/out the picture. When the picture is zoomed
in, the direction keys can be used to move the picture. Press [ZOOM] again to exit the zooming mode.
[ ]/[ ]: Press to skip to the previous/ next picture during playback.
[ ]: Press to pause a playback. Press it again to resume the playback.
[ ]/[ ]: Press to rotate the picture counterclockwise/ clockwise during the playback.
MP3/MPEG4 PLAYBACK
Insert an MP3/MPEG4 disc into the player. A content menu will display on the screen.
MENU OPERATION:
Use the direction key [ ]/[ ] to select a folder or a file, then press [ENTER] to enter the selected folder or play the
selected file. You can also use the digit keys to select a folder to enter or a file to play.
In the content menu, press [ ] to return to the upper menu; press [
]/[
] to turn over to the previous/next the
menu page.
[PROG]: Press repeatedly to switch between FOLDER playback mode and FILELIST playback mode.
[MENU]: During a playback of an MPEG4 disc, press to return to the content menu.
NOTE: During playback, [ ], [ ], [ ], [ ](press to stop the playback), [REPEAT], [A-B], [VOLUME+/-], [MUTE],
[CH-LEVEL], [TONE], etc. are valid. Please refer to the remote control function introduction in this chapter for
details.
-21-
Playback
USB DRIVE & SD/MS/MMC CARD PLAYBACK
Insert a USB drive in the USB slot. Press [USB], then use the direction key [ ]/[ ] to select MEDIA, then USB.
Press [ENTER] to access the connected USB drive.
Insert a SD, MMC or MS card in the SD/MMC/MS card slot. Press [USB], then use the direction key [ ]/[ ] to
select MEDIA, then CARD. Press [ENTER] to enter the connected memory card.
Select DVD and press [ENTER] to return to the DVD mode.
NOTE:
If the player should freeze when you load a USB drive or a memory card, turn off the player and disconnect the
power cord from the AC outlet. Remove the USB drive and/or memory card from the player and then power on the
player again. The player will resume normal status.
The connected USB drive or the memory card is probably not a certified one. The player cannot play any
uncertified USB drive and memory card.
For menu playback operation, please refer to the MP3 DISC PLAYBACK part in this chapter.
i Pod PLAYBACK
MULTIMEDIA
PLAYER PLAYBACK
This system is designed with the same connector found in all multimedia player docks. By simply connecting the
multimedia player to the docking station on the top panel you can play the multimedia player through the speakers
of this system.
Multimedia Player Adapters
To accommodate all models of dockable multimedia players we have included several different multimedia player
adapters to ensure that the multimedia player will fit properly in the docking station. Select a proper adapter for
your particular model of dockable multimedia player, then plug it to the docking area of the docking station.
Adapter Replacement
To change iPod dock adapters, you will need a small flat-head screwdriver. Insert the tip of the screwdriver into the
rectangular slot of the adapter; then gently pry up to loosen and remove it. To install another adapter that fits your
iPod, press it down into the docking station until it locks into place.
Switch off the unit. Insert your multimedia player with its dock connector faced downward to the dock connector of
the docking station. Then switch on the unit again.
Press [SOURCE SELECT] repeatedly to switch to the option LINE 2 to play the connected multimedia player.
NOTE: Do make sure that this unit is switched off before you plug in or remove the multimedia player from the
docking station. Otherwise, the multimedia player may be damaged.
-22-
Troubleshooting
Before resorting to maintenance service, please kindly check with the following chart.
Symptom
Cause(s)
Remedy
The AC power cord is not connected to the power Please check that the AC power cord
is connected securely.
supply or is not connected to a power supply
securely.
Picture
Connect the video cable securely.
The video cable isn't connected securely.
There is no picture
Press [V-MODE] repeatedly until the
Video output mode of the unit isn't correctly set.
or the picture is
picture becomes normal again.
Video input mode of the connected TV isn't
distorted.
Set an appropriate video input mode.
correctly set.
The audio cables aren't connected securely.
Connect the audio cables securely.
Sound
The volume is set to the minimum level.
Turn up the volume.
There is no sound
The sound is switched off.
Press [MUTE] on the remote control to
or the sound is
switch on the sound.
distorted.
The disc is in fast forward/reverse playback.
Press [PLAY/PAUSE].
Unable to play a
This disc is placed in the disc tray in a wrong way. Check that the disc is placed in the disc
disc
The rating of the disc is higher than the rate
tray with its label side upwards.
set in the parental control item.
Reset the settings in the parental control
item.
The unit isn't compatible with the disc.
Only compatible discs will be able to be played.
The disc is dirty.
Clean the disc.
The player breaks
The player cannot play any USB drive and
The connected USB drive or the memory card is
down when a USB probably not of an original version.
memory card of non-original version.
drive or memory
In case the player breaks down, turn it off
card is inserted
and unplug it from the power supply. Then,
into the player.
connect it to the power supply and switch it
on again. The player will resume the normal
status.
The buttons on the The unit is being interfered with static electricity
Switch off and unplug the unit.
unit do not work.
etc.
Then connect the plug to the power supply
and switch it on again.
The remote
Install two AAA/1.5V batteries in it.
There is no battery in the remote control.
control does not
Replace the batteries with new ones.
The batteries are out of charge.
function.
Make sure that the remote control is
The remote control isn't pointed to the remote
pointed to the remote control sensor.
sensor.
Make sure the remote control is within
The remote control is out of its operating area.
the operating area.
Switch off the unit and disconnect it from
The unit is shut down.
the AC outlet. Then power on the unit again.
No Power
-23-
Specifications
Power supply
Power consumption
Working
environment
Disc output
Temperature
-10~+40
Relative humidity
5%~90%
TV System
PAL/NTSC
Frequency Range
S/N(A weight)
20Hz~20KHz
80dB( 1KHz )
Dynamic Range
THD+NOISE
Tuner
AC ~100-240V 50/60Hz
75W
WOW FLUTTER
AM frequency Range
FM band Range
Power output (Max)
Frequency response
70dB( 1KHz )
-60dB(1KHz)
Below the limit of apparatus measure
530KHz~1710KHz
87.5MHz~108MHz
15WX2
1.5dB(20Hz~20KHz)
-24-